Using Keys and Constraints to Maintain Database Integrity
Understanding the Importance of Database Keys
A key is a column or combination of columns whose values uniquely identify a row in a table. Because a table is an unordered collection of rows, there is no first row, fifth row, or last row. As such, when you want to access a particular row in a table, you must do so based on data values in the row's columns.
There are two types of database keys-a PRIMARY KEY and a FOREIGN KEY. A table can have only one PRIMARY KEY, and the combination of the values in the column or columns that make up a table's PRIMARY KEY must be unique in every row of the table. You will learn more about the restrictions on and the uses for a PRIMARY KEY in Tip 171, "Understanding Primary Keys." For now, the important thing to know is that since the PRIMARY KEY must be unique for every row in a table, you can use a PRIMARY KEY value in an SQL statement to target a specific row in a table.
Unlike a PRIMARY KEY, which has a unique value in each row of a table, the column or combination of columns that make up a FOREIGN KEY need not be unique within the table in which the FOREIGN KEY is defined. Allowing duplicate key values for a FOREIGN KEY seems to contradict the first statement in this tip-a key uniquely identifies a specific row in a table. However, the FOREIGN KEY definition does uniquely identify a row in a table-just not a row in the table in which the FOREIGN KEY is defined. Instead, a FOREIGN key "points to" the PRIMARY KEY (or other unique key) in another table. As such, the FOREIGN KEY uniquely identifies a row in that table.
| Note |
Do not confuse a database key (PRIMARY KEY or FOREIGN KEY) with the key value in an index entry. A database key is actually one or more columns in a table that you have identified as being a key by applying either a PRIMARY KEY or a FOREIGN KEY constraint. The key value in an index, on the other hand, is a value computed from the column or columns being indexed and is stored in a separate database object-an index. While the DBMS will delete an index if you execute a DROP INDEX statement, the data values in the column (or columns) that make up a PRIMARY or FOREIGN KEY will remain unchanged if you DROP either of the two types of database key constraints. Thus, a key in an index is a separate data value in its own database object, while a database key (primary and foreign) is a label you put on the values in certain columns in a database table. |
Understanding Single Column and Composite Keys
As you learned in Tip 167, "Understanding the Importance of Database Keys," a key is a column with a unique value in each row of the table. Therefore, if you know the key value and use it as the equality criterion in a SELECT statement in the form
SELECT * FROM WHERE =
the DBMS will display the contents of a single row in the table. If the DBMS returns more than one row, the column you chose is not the single-column key for the table named in the SELECT statement's FROM clause.
Suppose, for example, that you have an EMPLOYEE table created with:
 CREATE TABLE employee
 (emp_num SMALLINT,
 name VARCHAR(30),
 address VARCHAR(50),
 payrate MONEY)
Although any of the columns in the EMPLOYEE table is theoretically eligible for use as a key, using the NAME column, for example, would require that the company have only one employee named, John Smith. If the company hired a second John Smith, the DBMS could no longer use the single-column key based on the NAME column, because the DBMS would not be able to identify the first John Smith row from the second one in the EMPLOYEE table:
 emp_num name address payrate
 ------- ----------- -------------------- -------
 1 Konrad King 765 E. Eldorado Lane 10.25
 2 Karen King 765 E. Eldorado Lane 25.75
 3 John Smith 2234 State Street 12.35
 4 Harry Smith 2258 Hilly Way 10.25
 5 John Smith 589 Hillcrest Drive 32.58
Similarly, neither ADDRESS nor PAYRATE is a good key candidate because both have duplicate values in different rows of the table. If you used the ADDRESS column as the key, the DBMS cannot distinguish the first row in the table from the second; and if you used PAYRATE as the key, the DBMS cannot distinguish the first row from the fourth. Thus, EMP_NUM is the only suitable single column key for the EMPLOYEE table in the example because EMP_NUM has a unique value in each row of the table.
Whether you identify the EMP_NUM column as a PRIMARY_KEY or not, the SELECT statement
SELECT * FROM EMPLOYEE WHERE emp_num = 3
will display the contents of a single row in the EMPLOYEE table. Applying the PRIMARY KEY constraint to a column whose value is unique in every row of a table lets database users know which column they can use to find a particular row in a table, and also prevents anyone from adding a row with either a NULL or a duplicate value in the column.
Sometimes no single column in a table in a table has a unique value in each row. Suppose, for example, that your company has offices in more than one location-each with its own unique set of employee numbers. The EMP_NUM column in the EMPLOYEE table
emp_num Office name address payrate
------- ------ ----------- -------------------- -------
1 LV Konrad King 765 E. Eldorado Lane 10.25
2 TX Karen King 765 E. Eldorado Lane 25.75
3 LV John Smith 2234 State Street 12.35
4 LV Harry Smith 2258 Hilly Way 10.25
5 TX John Smith 589 Hillcrest Drive 32.58
2 LV Sally Field 215 State Street 25.75
4 TX Wally Wells 7810 Greenwood Ave 17.58
3 TX Harry Smith 258 Hilly Way 22.58
would not be a good key because there is more than one EMP_NUM 2, 3, and 4 in the table. Since no single column has a unique value in every row of the table, you must use a multiple-column or composite key.
In the current example, the composite key for the EMPLOYEE table would be EMP_NUM and OFFICE. If you know the values of the columns in a composite key, you can use them as the equality criteria in a SELECT statement in the form
SELECT * FROM
WHERE = AND =
to display one particular row in a table. (If the composite key has more than two columns, you would additional AND keywords to add equality criteria for the third and subsequent columns in the composite key.)
As was the case with a single-column key, the SELECT statement
SELECT * FROM EMPLOYEE WHERE emp_num = 3 AND office = 'TX'
will display the contents of a single row in the EMPLOYEE table-whether you've applied the PRIMARY KEY constraint to the columns or not. However, if you apply the PRIMARY KEY constraint, database users will know which combination of columns to use in order to find a specific row in a table. Moreover, the PRIMARY KEY constraint will prevent someone from adding a row with a NULL in either the EMP_NUM or the OFFICE column and adding a new employee row (record) with the same EMP_NUM and OFFICE as that of an existing employee.
Understanding MS SQL Server Rules
A rule is an MS-SQL Server object that controls the data values that can be stored in a table column. Rules are similar to CHECK constraints (which you will learn about in Tip 193, "Using the CHECK Constraint to Validate a Column's Value"), in that the DBMS uses a rule (like a CHECK constraint) to determine if a data value is valid for a particular column. If the data value satisfies the rule's conditional expression, the DBMS will put the value in the target column. On the other hand, if the data value violates the rule (makes its conditional expression evaluate to FALSE), the DBMS aborts execution of the INSERT or UPDATE statement and returns an error message.
Applying a rule involves two steps. First, you must create the rule itself by using either the Transact-SQL CREATE RULE statement or the MS-SQL Server Enterprise Manager's Action menu New Rule option. Second, you must bind the rule to a table column or a user-defined data type either by using the MS-SQL Server Rules Properties, Bind Rules to Columns dialog box or by executing the stored procedure sp_bindrule. Once a rule is bound to a column or data type, the DBMS will apply the rule to every data value a user or application program tries to put into the column governed by the rule.
For example, to create a rule that the DBMS can use to validate grades to be placed in a COURSE_GRADE column, you could use the CREATE RULE statement
 CREATE RULE validate_grades
 AS @grade in ('A+', 'A', 'A-', 'B+', 'B', 'B-', 'C+', 'C',
 'C-', 'D+', 'D', 'D-', 'F', 'I', 'WD')
and then bind the rule to the COURSE GRADE column of the STUDENT_GRADES table created with
CREATE TABLE student_grades
 (student_id SMALLINT,
 course_id VARCHAR(20),
 course_grade CHAR(2))
by executing the sp_bindrule stored procedure:
 EXEC sp_bindrule
 'validate_grades', 'student_grades.course_grade'
After a rule is bound to the table column, the DBMS will check future UPDATE and INSERT statements to make sure the data value given for the COURSE_GRADE is one of the values listed in the VALIDATE_GRADES rule. As such the DBMS will successfully execute the INSERT statement
INSERT INTO student_grades VALUES (1001, 'HIST-101', 'A+')
but will abort the INSERT statement
INSERT INTO student_grades VALUES (1001, 'HIST-101', 'NA')
with an error message similar to
 Server: MSG 513, Level 16, State 1, Line 1
 A column insert or update conflicts with a rule imposed by
 a previous CREATE RULE statement.
 The statement was terminated.

 The conflict occurred in database 'SQLTips', table
 'student_grades', column 'course_grade'.
 The statement has been terminated.
because it violates the VALIDATE_GRADES rule on the column.
You will learn more about creating rules in Tip 195, "Using the Transact-SQL CREATE RULE Statement to Create an MS-SQL Server Rule." For now, the important thing to know is that MS-SQL Server lets you use rules to make sure a data value being placed in a table column either falls within a range of values, is one of a discrete set of values, or matches a specified character string pattern.
Using the CREATE DOMAIN Statement to Create Domains
A domain is a set of legal data values that a column can hold. When you define a column as being one of the standard SQL or SQL server-specific data types (INTEGER, NUMERIC, CHARACTER, DATETIME, and so on), you specify the set of legal values (the domain) for the column. MS-SQL Server, for example, has three INTEGER data types: INTEGER (or INT), SMALLINT, and TINYINT. When you define a column of type INTEGER, you set its domain as the set of whole numbers in the range -2,147,483,468 through 2,147,483,647. Columns of type SMALLINT have a domain of the whole numbers in the range -32,768 through 32,767. Meanwhile, TINYINT columns have a domain of whole numbers in the range 0 through 255.
Sometimes, however, you need to restrict a column's domain to a subset of all legal values for a particular data type—that is the purpose of CREATE DOMAIN. The SQL-92 CREATE DOMAIN statement lets you create a new data type by applying a CHECK constraint on a standard DBMS data type to limit its domain.
The syntax of the CREATE DOMAIN statement is
CREATE DOMAIN  AS
[DEFAULT ]
[
 ...]
where:
 ::=
 [CONSTRAINT ]
 CHECK (VALUE )
Suppose, for example, that a company's employee numbers are four-digit numbers starting with the digit 1. The CREATE statement
CREATE TABLE employees
 (employee_num INTEGER,
 name CHAR(30),
 address CHAR(50))
would allow the insertion of invalid employee numbers—those outside the range 1000 through 1999. To limit the domain of the EMPLOYEE_NUM column to the range 1000 to 1999, you could create a domain using
CREATE DOMAIN valid_empnums
CHECK (VALUE BETWEEN 1000 AND 1999)
and then use the domain in place of the INTEGER type in the table definition:
CREATE TABLE employees
 (employee_num valid_empnums,
 name CHAR(30),
 address CHAR(50))
| Note |
Not all DBMS products support the CREATE DOMAIN statement. If yours does not, check your system manual on CHECK constraints and user-defined data types. Many times you can create a named domain by creating a new data type and applying a CHECK constraint to it. MS-SQL Server, for example, does not have a CREATE DOMAIN statement. However, you can still limit the domain of the EMPLOYEE_NUM column in the current example on MS-SQL Server by executing the Transact-SQL statements: EXEC sp_addtype valid_empnums, 'SMALLINT' CREATE RULE validate_empnum AS @employee_number BETWEEN 1000 AND 1999 EXEC sp_bindrule 'validate_empnum', 'valid_empnums' The net result of executing the three statements is the same as executing the CREATE DOMAIN statement—you end up with a VALID_EMPNUMS data type whose domain is whole numbers in the range 1000 through 1999. |
Understanding Primary Keys
As you learned from the discussion of database keys in Tip 167, "Understanding the Importance of Database Keys," and Tip 168, "Understanding Single-Column and Composite Keys," a database key is nothing more than one or more columns in a table to which either the PRIMARY KEY or a FOREIGN KEY constraint has been applied. When you apply the PRIMARY KEY constraint or drop it, nothing happens to the data stored in the table's columns. Identifying one or more columns as PRIMARY KEY columns merely tells the DBMS to prevent users from entering NULL values into any of the key's columns and from inserting a row whose PRIMARY KEY column value (or the composite value of its columns if it is a multi-column key) already exists in the table.
If a table has a single-column PRIMARY KEY, you can choose whether you want to use the PRIMARY KEY constraint or simply apply the UNIQUE and NOT NULL constraints to the key column. Suppose, for example, that you create an EMPLOYEES table in which the value in the employee number (EMP_NUM) column is unique and not NULL for all rows in the table. The table definition
 CREATE TABLE employees
 (emp_num SMALLINT UNIQUE NOT NULL,
 office CHAR(2),
 name VARCHAR(50),
 address VARCHAR(50),
 payrate MONEY)
is functionally equivalent to:
 CREATE TABLE employees
 (emp_num SMALLINT,
 office CHAR(2),
 name VARCHAR(50),
 address VARCHAR(50),
 payrate MONEY,
 PRIMARY KEY (emp_num))
The one difference between the two ways of defining a key in the current example is that on most DBMS products (including MS-SQL Server), the DBMS automatically creates an index on the columns explicitly identified as being part of the table's PRIMARY KEY. Thus, the DBMS will automatically create an EMP_NUM index on an EMPLOYEES table created by the second CREATE TABLE statement while leaving index creation to the database object owner (DBOO) when the same single column key is created by constraining a column's values as UNIQUE and NOT NULL.
When you have a composite (or multi-column) key in which the table's PRIMARY KEY constraint is applied to more than one column, you can no longer create an equivalent index using UNIQUE and NOT NULL constraints. Continuing with the current example,
 CREATE TABLE employees
 (emp_num SMALLINT UNIQUE NOT NULL,
 office CHAR(2) UNIQUE NOT NULL,
 name VARCHAR(50),
 address VARCHAR(50),
 payrate MONEY)
is not equivalent to:
 CREATE TABLE employees
 (emp_num SMALLINT,
 office CHAR(2),
 name VARCHAR(30),
 address VARCHAR(50),
 payrate MONEY,
 PRIMARY KEY (emp_num, office))
A table created with UNIQUE and NOT NULL constraints on both key columns requires that both EMP_NUM and OFFICE must be unique (and not NULL) in all rows in of the EMPLOYEES table. As a result, an EMPLOYEES table with the values
emp_num Office name address payrate
------- ------ ----------- -------------------- -------
1 LV Konrad King 765 E. Eldorado Lane 10.25
2 TX Karen King 765 E. Eldorado Lane 25.75
3 LV John Smith 2234 State Street 12.35
4 LV Harry Smith 2258 Hilly Way 10.25
5 TX John Smith 589 Hillcrest Drive 32.58
2 LV Sally Field 215 State Street 25.75
4 TX Wally Wells 7810 Greenwood Ave 17.58
3 TX Harry Smith 258 Hilly Way 22.58
would not be allowed because the EMP_NUM column has duplicate values, as does the OFFICE column. However, the combination of the EMP_NUM and OFFICE columns when taken together as a composite (or multi-column) PRIMARY KEY is unique in every row of the table. Thus, while neither EMP_NUM nor OFFICE alone is unique in each row of the table, the two taken together (as a composite key value) are and can therefore be the PRIMARY KEY for the table in the current example.
The important thing to understand from this discussion of primary keys is that a PRIMARY KEY is not a separate database object. Instead, a PRIMARY KEY is merely a constraint (or limit) on the values that can be placed in the column (or columns) defined as part of the key. In the case of a single-column PRIMARY KEY, the value in the key column must be unique and not NULL in every row of the table. Similarly, if the PRIMARY KEY consists of multiple columns, none of the columns that make up the key can have a NULL value, and the combination of the values in the key's columns must be unique for each row of the table.
Using the PRIMARY KEY Column Constraint to Uniquely Identify Rows in a Table
After reading about database keys in Tip 167, "Understanding the Importance of Database Keys"; Tip 168, "Understanding Single-Column and Composite Keys"; and Tip 171, "Understanding Primary Keys," you know that each row in a table is unique if the table has a PRIMARY KEY or has at least one column constrained as UNIQUE and not NULL. As such, it is possible to update columns in, display, or delete one particular row in a table by specifying the row's PRIMARY KEY value as an equality in an SQL statement's WHERE clause.
Suppose, for example, that you had a single column PRIMARY KEY in an EMPLOYEES table created by:
CREATE TABLE employees
 (emp_num SMALLINT,
 office CHAR(2),
 name VARCHAR(50),
 address VARCHAR(50),
 payrate MONEY,
 PRIMARY KEY (emp_num))
The PRIMARY KEY constraint on the EMP_NUM column means that each and every row in the table has a different, non-NULL value for EMP_NUM. As such, executing the SELECT statement
SELECT * FROM employees WHERE emp_num = 1001
will display either 0 or 1 row. If there is no employee 1001, then the DBMS will display zero rows; if there is an employee 1001, the DBMS will display a single row because 1001 can appear in the EMP_NUM column of only one row in the table.
Similarly, if you have a two-column PRIMARY KEY such as the one defined in
 CREATE TABLE employees
 (emp_num SMALLINT,
 office CHAR(2),
 name VARCHAR(30),
 address VARCHAR(50),
 payrate MONEY,
 PRIMARY KEY (emp_num, office))
an SQL statement can target one particular row in the table by performing an equality test on each of the columns in the PRIMARY KEY and combining the two equalities using the Boolean operator AND. For example, the UPDATE statement
 UPDATE employees SET payrate = payrate * 1.2
 WHERE emp_num = 2 AND office = 'LV'
will give either zero or one employee a 20 percent pay rate increase. The PRIMARY KEY constraint on the two columns EMP_NUM and OFFICE guarantees that there will be at most one EMP_NUM/OFFICE pair. As you saw in Tip 171, there may be more than one row with a 2 in the EMP_NUM column and more than one row with an LV in the OFFICE column. However, the PRIMARY KEY constraint on the composite (multi-column)-in this case, two-column-key guarantees that the EMPLOYEES table will have no more than one row where the value in the EMP_NUM column is 2 and the value in the OFFICE column is LV.
As a third example, suppose you have a four-column PRIMARY KEY such as that defined in:
 CREATE TABLE call_history
 (phone_number CHAR(7),
 called_by CHAR(3),
 date_called DATETIME,
 call_time SMALLINT,
 hangup_time SMALLINT,
 disposition CHAR(4),
 PRIMARY KEY (phone_number, called_by, date_called,
 hangup_time))
An SQL statement that performs four equality tests-one on each column of the PRIMARY KEY-joined by AND Boolean operators will uniquely target a single row in the CALL_HISTORY table. For example, the DELETE statement
DELETE FROM call_history
WHERE phone_number = '3610141' AND called_by = 'KLK' AND
 date_called = '07/24/2000' AND hangup_time = 2100
will remove either zero or one row from the CALL_HISTORY table. As was the case with the single- and two-column PRIMARY KEY constraints, the PRIMARY KEY constraint in the CALL_HISTORY table guarantees that, in this case, there is at most one row with a particular combination of PHONE_NUMBER and CALLED_BY and DATE_CALLED and HANGUP_TIME.
The specific values, columns, and tables used in this tip are not important. What you want to remember is that you can use a PRIMARY KEY to display or work with one particular row in a table by joining a WHERE clause equality test on each of the PRIMARY KEY's columns with Boolean AND operators.
Understanding Foreign Keys
Although its name may imply as much, a FOREIGN KEY is not a key with values written in a language other than your own. Instead, a FOREIGN KEY is a constraint in which the value of one column or the composite value of several columns in one table is equal to the PRIMARY KEY in another table. The word foreign in FOREIGN KEY constraint alludes to the fact that the FOREIGN KEY is not actually a key (or unique value) for the table in which it is defined. Rather, a FOREIGN KEY is a column in one table whose value matches the PRIMARY KEY in another table-hence, its moniker as a key that is foreign to the table it is stored.
As you learned from the discussion of the hierarchical, network, and relational database models (in Tip 3, "Understanding the Hierarchical Database Model"; Tip 4, "Understanding the Network Database Model"; and Tip 5, "Understanding the Relational Database Model), the relational model, unlike the other two, has no pointers to use in linking database records. Given the central role of pointers in establishing parent/child relationships in the hierarchical model, you might think that the relational model cannot represent them, since it has no pointers to link records (rows) in one table with those in another. However, parent/child relationships do exist in the relational model. Instead of using pointers, the DBMS represents relationships between tables through common data values stored in each of the two tables' columns.
Suppose, for example, that you have the CUSTOMERS, ORDERS, and ORDERS_ITEMS_DETAIL tables shown in Figure 173.1.
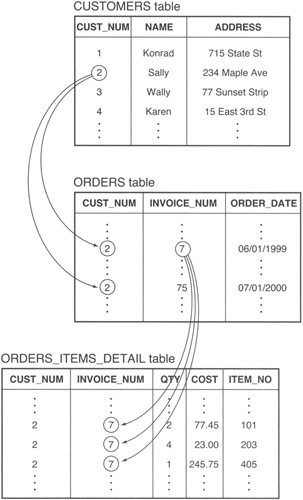
Figure 173.1: CUSTOMERS parent with ORDERS child, and ORDERS parent with ORDERS_ITEMS_DETAIL child relationships
Given the CUSTOMERS table definition
CREATE TABLE customers
 (cust_no INTEGER,
 name VARCHAR(30),
 address VARCHAR(50),
PRIMARY KEY (cust_no))
you can use the following FOREIGN KEY constraint in the ORDERS table to establish the parent/child relationship between an ORDERS row (the child record) and its parent row in the CUSTOMERS table:
CREATE TABLE orders
 (customer_number INTEGER,
 invoice_num INTEGER,
 order_date DATETIME,
 delivery_date DATETIME,
PRIMARY KEY (customer_number, invoice_num)
CONSTRAINT fk_customers_orders
 FOREIGN KEY (customer_number)
 REFERENCES CUSTOMERS (cust_no))
A FOREIGN KEY constraint tells the DBMS that a user ID can INSERT a row in the table only if the composite value in the column (or columns) making up a FOREIGN KEY in the child table exists as a PRIMARY KEY value in the parent table.
In the current example, the DBMS will allow the insertion of a row into the ORDERS table only if the value the row's CUSTOMER_NUMBER column already exists in the CUST_NO column of one of the rows in the CUSTOMERS table. In effect, the FOREIGN KEY prevents the insertion of orphan (or parentless) child records (rows) into a database table. In the current example, every order inserted into the ORDERS table, must have a parent-a row that represents the customer that placed the order-in the CUSTOMERS table.
Similarly, a FOREIGN KEY in the ORDERS_ITEM_DETAIL table links the individual items on an order (the child rows) with the order "header" row (parent) in the ORDERS table:
CREATE TABLE orders_item_detail
 (cust_no INTEGER,
 invoice_num INTEGER,
 qty TINYINT,
 cost MONEY,
 item_no INTEGER
CONSTRAINT fk_orders_orders_item_detail
 FOREIGN KEY (cust_no, invoice_num)
 REFERENCES orders (customer_number, invoice_num))
Thus, the DBMS will allow an order item detail row to be added to the ORDERS_ITEM_DETAIL table only if the composite value of the FOREIGN KEY columns (CUST_NO + INVOICE_NUM) exists as a PRIMARY KEY value in one of the rows in the ORDERS (parent) table.
| Note |
The names of the FOREIGN KEY column or columns need not match those in the PRIMARY KEY. The system uses the composite value in the column(s), not the column name(s), to match the child record (row) with its parent. Because the composite value of the FOREIGN KEY must match a PRIMARY KEY value in the table named in the FOREIGN KEY's REFERENCES clause, the column (or columns) making up the FOREIGN KEY (in the child table) must match column(s) that make up the PRIMARY KEY (in the parent table) both in number and in data type. |
Understanding Referential Integrity Checks and Foreign Keys
As you learned in Tip 173, "Understanding Foreign Keys," a FOREIGN KEY lets you set up a parent/child relationship between two tables. Instead of using a pointers to link a (parent) row in one table with one or more (child) rows in another table, the relational DBMS stores the PRIMARY KEY value of the parent row in the FOREIGN KEY column(s) of the child row. The relational database rule that dictates that every FOREIGN KEY value in the child table must exist as a PRIMARY KEY value in its parent table is known as the referential integrity constraint.
For example, if you have two tables, EMPLOYEES and TIMECARDS, created with
 CREATE TABLE employees
 (employee_number SMALLINT,
 name VARCHAR(30),
 payrate MONEY,
 PRIMARY KEY (employee_number))

 CREATE TABLE timecard
 (emp_no SMALLINT,
 card_date DATETIME,
 time_in SMALLINT,
 time_out SMALLINT,
 CONSTRAINT fk_employees_timecard FOREIGN KEY (emp_no)
 REFERENCES employees (employee_number)
the FOREIGN KEY constraint on the EMP_NO column in the TIMECARD table tells the DBMS to make sure that the value in the EMP_NO column in each row of the TIMECARD table has a matching value in the EMPLOYEE_NUMBER column (the PRIMARY KEY column) of one row in the EMPLOYEES table.
Maintaining the referential integrity of the FOREIGN KEY column(s) in one table with the PRIMARY KEY column(s) in another involves the performance of referential integrity checks on each of four types of table updates that could break parent/child relationships:
- Inserting a row into the child table. The DBMS must make sure that every new row inserted into the child table has a FOREIGN KEY that matches the PRIMARY KEY values in the parent table. If the FOREIGN KEY value in a new row does not match the value of one of the PRIMARY KEY values in the parent table, the DBMS aborts the INSERT statement. Inserting a nonmatching FOREIGN KEY value into the child table would corrupt referential integrity by creating an "orphan"-a child record (row) without a parent-and is therefore not allowed.
- Deleting a row from the parent table. The DBMS will abort any DELETE statement that attempts to remove a row from the parent table if the row's PRIMARY KEY value appears as the FOREIGN KEY value in a child table row. Removing the one matching PRIMARY KEY from the parent table would corrupt referential integrity by creating an "orphan"-a FOREIGN KEY value in a child record (row) without a matching value in the PRIMARY KEY of the parent table-and is therefore not allowed. (In Tip 183, "Understanding How Applying the CASCADE Rule to Updates and Deletes Helps Maintain Referential Integrity," you will learn how some DBMS products apply the CASCADE rule to the DELETE statement and remove both the parent row and all child rows to allow the DELETE statement to remove a parent table row that has children in other tables.)
- Updating a FOREIGN KEY value in the child table. Whether it is in a new row or an existing one, the FOREIGN KEY value in the row must match one of the PRIMARY KEY values in the parent table referenced by the FOREIGN KEY constraint. As such, the DBMS will abort any UPDATE statement that attempts to change the value of a FOREIGN KEY in a child row such that it no longer matches one of the PRIMARY KEY values in the parent table.
- Updating a PRIMARY KEY value in the parent table. Changing the PRIMARY KEY value in the parent table has the same effect as removing a row with the original PRIMARY KEY value and inserting another row with the new PRIMARY KEY. As such, the DBMS will abort any UPDATE statement that attempts to change a row's PRIMARY KEY if the current PRIMARY KEY value appears as the FOREIGN KEY value in a child table row. Changing the one matching PRIMARY KEY in the parent table to a new value would corrupt referential integrity by creating an "orphan"-a FOREIGN KEY value in a child record (row) without a matching value in the PRIMARY KEY column(s) of the parent table-and is therefore not allowed. (In Tip 183, you will learn how some DBMS products apply the CASCADE rule to the UPDATE statement and change both the PRIMARY KEY value in the parent row and the FOREIGN KEY value in each of the child rows to allow an UPDATE statement to change the PRIMARY KEY value in a parent table row that has children in other tables.)
The important thing about referential integrity checks is that the DBMS checks its system tables for FOREIGN KEY references to the PRIMARY KEY any time an UPDATE statement attempts to change a value in one or more columns in a table's PRIMARY KEY, or any time a DELETE statement attempts to REMOVE a row from a table that has a PRIMARY KEY constraint. Conversely, the DBMS checks the PRIMARY KEY index to make sure the value in the FOREIGN KEY column(s) exists in the PRIMARY KEY index before it executes an UPDATE to one or more column values in a FOREIGN KEY or executes an INSERT to add a new row to a table with a FOREIGN KEY constraint.
If executing an UPDATE, INSERT, or DELETE statement would create an "orphan"-a FOREIGN KEY value (in a child table) without a corresponding PRIMARY KEY value (in the parent table)-the DBMS will abort the statement in order to maintain referential data integrity.
Understanding How Referential Data Integrity Checks Can Jeopardize Security
In Tip 149, "Using the GRANT SELECT (and REVOKE SELECT) Statement to Control Access to a Database Object," you learned how to let some user IDs see information in a table by granting them SELECT access on the table. You also learned how to hide a table's contents from other user IDs either by never granting them SELECT access on the table or by revoking the SELECT access you previously granted. Unfortunately, a user ID without SELECT privileges on a table can exploit the referential data integrity checks you learned about in Tip 174, "Understanding Referential Integrity Checks and Foreign Keys," to deduce the values in a table's PRIMARY KEY column(s).
Suppose, for example, that you are a casino executive in charge of player relations, and you keep a list of your top players in a table created by:
CREATE TABLE high_rollers
 (player_ID INTEGER, name VARCHAR(30),
 credit_limit MONEY,
 average_action MONEY,
 YTD_winnings MONEY,
 YTD_losses MONEY,
 PRIMARY KEY (player_ID))
Given the hotel tracks all players in a table created by:
 CREATE TABLE big_gamblers
 (player_number INTEGER,
 name VARCHAR(30),
 address VARCHAR(50),
 phone_number VARCHAR(20),
 PRIMARY KEY (player_number))
An employee with only REFERENCES access to the HIGH_ROLLERS table and SELECT access to the PLAYER_CARDS table could make a list of high rollers by creating a table that references the PRIMARY KEY in the HIGH_ROLLERS table, such as
CREATE TABLE big_gamblers
 (player_number INTEGER,
 name VARCHAR(30),
 address VARCHAR(50),
 phone_number VARCHAR(20),
CONSTRAINT fk_high_roller_id FOREIGN KEY (player_number)
 REFERENCES high_rollers (player_ID))
and then attempt an INSERT statement such as
INSERT INTO big_gamblers
VALUES (, NULL, NULL,
 NULL)
for each of the CUSTOMER_IDs listed by the SELECT statement:
SELECT customer_ID FROM players_cards
Since the FOREIGN KEY constraint will allow the DBMS to INSERT a row into the BIG_GAMBLERS table only if the value in the row's PLAYER_NUMBER column exists in the PLAYER_ID column of one of the rows in the HIGH_ROLLERS table, the BIG_PLAYERS table will contain a list of all CUSTOMER_IDs from the PLAYERS_CARDS table that are also PLAYER_IDs in the HIGH_ROLLERS table.
Filling out the remaining information in the BIG_GAMBLERS table can be accomplished with the INSERT statement
INSERT INTO big_gamblers
 SELECT player_cards.customer_ID, player_cards.name,
 player_cards.address, player_cards.phone_number
 FROM big_gamblers, player_cards
 WHERE player_cards.customer_ID = big_gamblers.player_ID
and then by removing rows with only customer IDs using the DELETE statement:
DELETE FROM big_gamblers WHERE name IS NULL
The important thing to understanding from this example, is that a user can use the REFERENCES privilege and the referential integrity check on the INSERT statement to deduce the values in the table's PRIMARY KEY column(s) (and the values of any column with a UNIQUE constraint, on MS-SQL Server). Therefore, be sure to secure your table data from inadvertent disclosure by granting REFERENCES privilege only to those user IDs that are allowed to display the values in PRIMARY KEY and UNIQUE constrained columns.
Understanding How Referential Integrity Checks Can Limit the Ability to Delete Rows and Drop Tables
As you learned in Tip 174, "Understanding Referential Integrity Checks and Foreign Keys," referential integrity checks are actions taken by the SQL server to maintain the (parent/child) relationships between tables. A FOREIGN KEY, consisting of either the value in a single column or the composite value in multiple columns, matches the PRIMARY KEY VALUE in another table. In other words, you establish a link between two tables by adding one or more columns to one table and storing the PRIMARY KEY value of the "linked" row of another table in them. After you apply the FOREIGN KEY constraint to the columns you add, the DBMS makes sure that value in the columns always has a matching value in the PRIMARY KEY columns of the other table.
| Note |
On MS-SQL Server, you can establish a FOREIGN KEY reference to table columns that have a UNIQUE constraint as well those with a PRIMARY KEY constraint. |
In order to maintain referential integrity, the DBMS checks each INSERT, UPDATE, DELETE, and DROP statement involving a table that has a PRIMARY KEY or one more FOREIGN KEY constraints. The DBMS aborts any statement that would result in the storage of a FOREIGN KEY value that references a nonexistent PRIMARY KEY value. For example, given the tables created by
 CREATE TABLE item_master
 (product_code INTEGER,
 description VARCHAR(30),
 bin_level SMALLINT,
 PRIMARY KEY (product_code))

 CREATE TABLE inventory
 (item_number INTEGER,
 supplier_code INTEGER,
 cost MONEY,
 qty_on_hand SMALLINT,
 CONSTRAINT fk_item_master_inv FOREIGN KEY (item_number)
 REFERENCES item_master (product_code))
the DBMS will abort the execution of a DELETE statement that tries to remove an ITEM_MASTER row whose PRODUCT_CODE (PRIMARY KEY) value matches a value in the ITEM_NUMBER (FOREIGN_KEY) value in the INVENTORY table. As such, if the INVENTORY table has a row with 1001 in its ITEM_NUMBER column, the DBMS will abort the DELETE statement
DELETE item_master WHERE PRODUCT_CODE = 1001
and display an error message similar to:
 Server: Msg 547, Level 16, State 1, Line 1
 DELETE statement conflicted with COLUMN REFERENCE
 constraint 'fk_item_master_inv'. The conflict occurred in
 database 'SQLTips', tab 'inventory', column
 'item_number'.
 The statement has been terminated.
To successfully execute the DELETE statement in the current example, you must first either DELETE all rows in the INVENTORY table with an ITEM_NUMBER of 1001 or use the ALTER TABLE statement to DROP the INVENTORY table's FK_ITEM_MASTER_INV FOREIGN KEY constraint.
Similarly, the DBMS will abort any DROP TABLE statement that attempts to remove a table referenced by a FOREIGN KEY constraint—even if the table making the FOREIGN KEY reference is empty. For example, given the tables in the current example, the DBMS will abort DROP TABLE statement
DROP TABLE item_master
with an error message similar to:
Server: Msg 3726, Level 16, State 1, Line 1
Could not drop object 'item_master' because it is
 referenced by a FOREIGN KEY constraint.
If you want to DROP the ITEM_MASTER table, you must first remove all FOREIGN KEY constraints that reference the table. Unfortunately, the error message generated when you try to DROP a table referenced by a FOREIGN KEY constraint may not be specific as to which tables contain the FOREIGN KEY references. (You need to know the table [or tables] with a FOREIGN KEY reference to the table you want to DROP so you can execute an ALTER TABLE statement to drop the FOREIGN KEY in those tables.) Check your data dictionary—it should document all table dependencies. Or, use one of your system tools to have the DBMS list the table references for you. On MS-SQL Server, for example, you can execute the stored procedure sp_help with
EXEC SP_HELP item_master
and then look in the "Table Is Referenced By" section of the output to see the names of all database objects and FOREIGN KEY constraints that reference the ITEM_MASTER table.
Understanding Referential Integrity Check INSERT Deadlock and How to Resolve It
Referential integrity checks ensure that each FOREIGN KEY value in one table has a matching PRIMARY KEY value in another table. Unfortunately, maintaining referential integrity can lead to INSERT statement deadlocks when the FOREIGN KEY in one table refers to the PRIMARY KEY of another table that has a FOREIGN KEY that references the PRIMARY KEY in the first table—such as that shown in Figure 177.1.
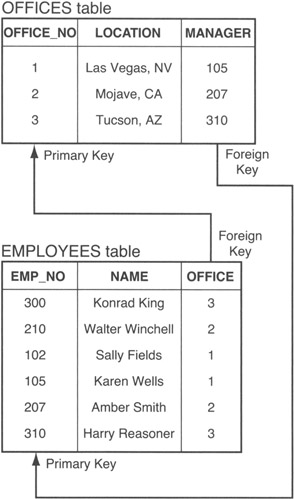
Figure 177.1: Circular FOREIGN KEY reference between two tables
Suppose, for example, that the company hires a new employee to open a new office, office 4, in Honolulu, Hawaii. An attempt to add the new employee with the INSERT statement
INSERT INTO employees VALUES (400, 'Debbie Jamsa', 4)
will fail because there is no office 4 in the OFFICE_NO column of the OFFICES table. Therefore, the INSERT statement fails the referential integrity check. However, if you try to add information on office 4 with the INSERT statement
INSERT INTO offices VALUES (4, 'Honolulu, HI', 400)
the DBMS will abort the INSERT statement because it violates the referential integrity check on the MANAGER column—there is no employee with EMP_NUM 400 in the EMPLOYEES table.
Thus, there appears to be no way to add a new office or manager for a new office to the database!
To prevent the INSERTION deadlock, make sure that at least one of the FOREIGN KEY constrained columns in tables the reference each other allows NULL values.
Thus, if the tables in the current example were created with
CREATE TABLE offices
 (office_no SMALLINT,
 location VARCHAR(30),
 manager SMALLINT,
PRIMARY KEY (office_no))

CREATE TABLE employees
 (emp_no SMALLINT,
 name VARCHAR(30),
 office SMALLINT NOT NULL,
PRIMARY KEY (emp_no),
CONSTRAINT fk_offices_emp
 FOREIGN KEY (office) REFERENCES offices (office_no))

ALTER TABLE offices ADD CONSTRAINT fk_employees_ofce
 FOREIGN KEY (manager) REFERENCES employees (emp_no)
you still could not INSERT the employee information first, but you could execute the statement sequence
 INSERT INTO offices VALUES (4, 'Honolulu, HI', NULL)
 INSERT INTO employees VALUES (400, 'Debbie Jamsa', 4)
 UPDATE offices SET manager = 400 WHERE office = 4
to create a new office, add the new employee record, and then designate the new employee as the office manager.
| Note |
Unlike PRIMARY KEY columns, the DBMS allows FOREIGN KEY columns to contain NULL values. This may, at first, seem to violate referential integrity. After all, if a FOREIGN KEY is NULL and none of the PRIMARY KEY columns can have a NULL value, then a NULL FOREIGN KEY value can never have a matching value in the corresponding PRIMARY KEY, right? Well, the answer to the question depends on the "real" value of the NULL. Remember, NULL means missing or unknown. As such, the DBMS gives the NULL in FOREIGN KEY columns the benefit of the doubt by assuming that once the NULL's value is resolved, the non-NULL FOREIGN KEY will turn out to be one of the values in the PRIMARY KEY column(s). |
If all of the FOREIGN KEY columns in the tables involved in a circular referential reference are constrained as NOT NULL, you can still avoid the INSERT deadlock if your DBMS product allows you to suspend the referential integrity check temporarily. On MS-SQL Server, for example, you could execute the statement sequence:
ALTER TABLE employees NOCHECK CONSTRAINT fk_offices_emp
INSERT INTO employees VALUES (400, 'Debbie Jamsa', 4)
INSERT INTO offices VALUES (4, 'Honolulu, HI', NULL)
ALTER TABLE employees CHECK CONSTRAINT fk_offices_emp
The first ALTER TABLE statement suspends the referential integrity check on the FOREIGN KEY constraint (FK_OFFICES_EMP) on the OFFICES table. This allows the insertion of an employee with an OFFICE column value that does not yet exist in the PRIMARY KEY (OFFICE_NO) column of the OFFICES table. After you finish inserting the rows you want, be sure to reactivate the referential integrity, as is shown by the final ALTER TABLE statement in the current example.
Understanding and Maintaining Entity Integrity
In a relational database, a table has entity integrity if each of its rows is uniquely identifiable from every other row. Or, said another way, a table has entity integrity if it has no rows that are exact duplicates.
Each row in a table represents an entity (either a concept or a physical object or being) in the "real" world. If two (or more) rows in a table have the same value in every one of their columns, the table loses its integrity as a model of the outside world because no two "things" in the "real" world are absolutely identical to the last detail. (Even if two things are the same down to the subatomic level, two physical objects cannot occupy the same space at the same time-meaning their physical location makes for at least one difference in otherwise identical things.)
Because the PRIMARY KEY constraint requires that every row in the table has a unique, non-NULL value in the column or set of columns to which the constraint is applied, it follows that any table with a PRIMARY KEY has entity integrity. A table without a PRIMARY KEY may have entity integrity, but there is no guarantee that it does-unless at least one of the table's columns has UNIQUE and NOT NULL constraints.
Thus, the table created by
CREATE TABLE employees
 (emp_num SMALLINT UNIQUE NOT NULL,
 office CHAR(2),
 name VARCHAR(50),
 address VARCHAR(50),
 payrate MONEY)
has entity integrity because the UNIQUE and NOT NULL constraints on the EMP_NUM column tell the DBMS to make sure that every row in the EMPLOYEES table has a different (unique) and non-NULL value in its EMP_NUM column. Similarly, the table created by
CREATE TABLE employees
 (emp_num SMALLINT,
 office CHAR(2),
 name VARCHAR(30),
 address VARCHAR(50),
 payrate MONEY,
 PRIMARY KEY (emp_num, office))
has entity integrity because the PRIMARY KEY constraint tells the DBMS to make sure no row in the table has a NULL value in either the EMP_NUM or the OFFICE column, and that the combination of EMP_NUM and OFFICE values is unique (different) in every row of the table.
Understanding the Interaction of NULL Values and Uniqueness
Allowing NULL values to occur in PRIMARY KEY columns or in columns with a UNIQUE constraint poses a problem for the integrity-checking mechanisms in the DBMS. If one of the rows in a table has a NULL value in its PRIMARY KEY column, are the values in the PRIMARY KEY column truly unique for every row in the table? The answer depends on the "real" value of the missing (NULL) data.
As you learned in Tip 177, "Understanding Referential Integrity Check INSERT Deadlock and How to Resolve It," the DBMS will allows NULL values in FOREIGN KEY columns and satisfies the referential integrity requirement by assuming that the "real" value of the missing (NULL) data matches one of the values in the PRIMARY KEY referenced by the FOREIGN KEY. Applying this same reasoning to NULL values in a PRIMARY KEY means that a NULL value will be a duplicate of one of the other values in the key, thereby destroying the table's entity integrity (which you learned about in Tip 178, "Understanding and Maintaining Entity Integrity").
No DBMS product that supports primary keys allows any column named in the PRIMARY KEY constraint to hold a NULL value.
Some DBMS products do, however, allow you to insert a single NULL value into a column with a UNIQUE constraint or into an INDEX defined as UNIQUE. MS-SQL Server, for example, treats a NULL as a unique value when you add it to a UNIQUE column or index. As such, if you create a table with
CREATE TABLE test_null
 (row_id INTEGER UNIQUE,
 row_name VARCHAR(30))
MS-SQL Server will let you store a single row with a NULL in the ROW_ID column of the TEST_NULL table. If you try to INSERT a second NULL value into the ROW_ID column, the INSERT statement will fail to execute with an error message similar to:
 Server: Msg 2627, Level 14, State 2, Line1
 Violation of UNIQUE KEY constraint
 'UQ__test_null__7720AD13'. Cannot insert duplicate key in
 object 'test_null'.
 The statement has been terminated.
Understanding and Maintaining Domain Integrity
While the DBMS cannot determine whether or not a particular column value in a database is correct, it can make sure that the data item is valid by making sure its value falls within its defined domain. As you learned in Tip 170, "Using the CREATE DOMAIN Statement to Create Domains," a column's domain is the set of all valid values the column can hold. Preventing INSERT and UPDATE statements from storing a value in a column that falls outside of the column's domain (range of all legal values) is known as maintaining domain integrity.
Every DBMS automatically maintains the domain integrity of the columns in every table. For example, if you define a column as type INTEGER, the DBMS will automatically abort any UPDATE or INSERT statement that attempts to put non-numeric data or a nonwhole number into the column. In real life, however, the true domain of a column is often a subset of the values allowed for its data type.
For example, although the EMPLOYEE_ID column in the EMPLOYEES table created by
 CREATE TABLE employees
 (employee_ID INTEGER,
 name VARCHAR(30))
is of type INTEGER, your company might specify that all employee numbers be in the range 1000-9999. Therefore, an EMPLOYEE_ID of 123456, while well within the INTEGER domain, would not be a valid value for the EMPLOYEE_ID column of your EMPLOYEES table.
Some DBMS products let you use the CREATE DOMAIN statement to define data types that limit the range of data values a user can put into a column. For example, the statement
 CREATE DOMAIN employee_id_type INTEGER
 CHECK (VALUE BETWEEN 1000 AND 9999)
will create a domain object you can use as a data type in a CREATE TABLE statement such as:
 CREATE TABLE employees
 (employee_ID employee_id_type,
 name VARCHAR(30))
After you create the EMPLOYEES table and declare the EMPLOYEE_ID column's data type as EMPLOYEE_ID_TYPE, the DBMS will execute only INSERT and UPDATE statements that have either a NULL or a non-NULL value that falls within the range specified in the CREATE DOMAIN statement (1000-1999, in the current example).
Not all DBMS products support the CREATE DOMAIN statement. MS-SQL Server, for example, does not. Instead of domains, MS-SQL Server lets you define "rules" (as you learned in Tip 169, "Understanding MS-SQL Server Rules"), which you can "bind" to columns and user-defined data types to limit the range of values users can put into those columns.
Either in addition to or in place of user-defined domains and rules, most DBMS products let you specify a column's domain using a CHECK constraint in a CREATE TABLE statement. For example, the CREATE TABLE statement
 CREATE TABLE employees
 (employee_ID INTEGER
 CHECK (employee_ID BETWEEN 1000 AND 1999),
 name VARCHAR(30))
will tell the DBMS to maintain the EMPLOYEE_ID's domain integrity by allowing INSERT and UPDATE statements to store only values ranging from 1000 to 1999 in the column.
Understanding and Maintaining Referential Integrity
As its name implies, a relational database consists of related data items and objects. Columns within a table are related in that column values are the attributes that describe a physical entity or concept. Moreover, the database tables themselves are interrelated in that rows representing purchases in an ORDERS table "belong to" to the customers (represented by rows in the CUSTOMERS table) that placed the orders. Similarly, rows representing hours worked in a TIMECARDS table "belong to" employees (represented by rows in an EMPLOYEES table) that worked those hours. The process of ensuring that the "links" between related rows in different tables remain intact is called maintaining referential integrity.
Every relational DBMS product uses one or more columns of matching data values to link rows in one table with those in another. Suppose, for example, that the database has two tables created with:
 CREATE TABLE timecards
 (emp_num SMALLINT,
 card_date DATETIME,
 time_in SMALLINT,
 time_out SMALLINT,
 PRIMARY KEY (emp_num, card_date, time_in),
 CONSTRAINT fk_employees_timecards FOREIGN KEY (emp_num)
 REFERENCES employees (emp_ID))

 CREATE TABLE employees
 (emp_ID SMALLINT,
 name VARCHAR(30),
 address VARCHAR(50),
 payrate MONEY,
 PRIMARY KEY (emp_ID))
To maintain the relationship between each timecard and the employee who worked the hours, each row in a TIMECARDS table will have an employee number column (EMP_NUM) whose value matches the value in the employee number column (EMP_ID) of one (and only one) of the rows of the EMPLOYEES table. The database, then, has referential integrity so long as every employee number in the EMP_NUM column of the TIME-CARDS table matches the value in the EMP_ID column of exactly one row in the EMPLOYEES table.
A individual column value (or composite column value, for multi-column keys) that uniquely identifies a single row in a table (such as the EMP_ID column of the EMPLOYEES table) is called a PRIMARY KEY. A column or set of columns in a table used solely to store the PRIMARY KEY value of the corresponding row in another table (such as the EMP_NUM column in the TIMECARDS table) is called a FOREIGN KEY. As such, referential integrity dictates that every FOREIGN KEY value in one table has a matching PRIMARY KEY value in its related table. (The definition of the FOREIGN KEY constraint names the related table in its REFERENCES clause.)
As you learned in Tip 174, "Understanding Referential Integrity Checks and Foreign Keys," the DBMS maintains referential integrity by checking each INSERT, DELETE, and UPDATE statement on a table that has either a PRIMARY KEY or a FOREIGN KEY to make sure the link between a row in a child table and its parent row in another table remains intact. Whenever you INSERT a row in a table with a FOREIGN KEY (a child table), the key value in the FOREIGN KEY column(s) must exist as a PRIMARY KEY value in the corresponding (parent) table. If it does not, the DBMS will abort the INSERT statement. Conversely, if a table has a PRIMARY KEY, the DBMS will execute a DELETE statement on a row only if the row's PRIMARY KEY value is not a FOREIGN KEY value in a related (child) table.
The important thing to remember is that the DBMS represents the relationship between tables by storing matching key values in the FOREIGN KEY column(s) of one or more rows of a (child) table and in the PRIMARY KEY column(s) of one row in the related (parent) table. Maintaining referential integrity means preventing the execution of any statement that breaks the relationship between tables by leaving a child table with one or more FOREIGN KEY values that do not have a matching PRIMARY KEY in the parent table.
Understanding How Applying the RESTRICT Rule to Updates and Deletes Helps Maintain Referential Integrity
As you know, maintaining referential integrity means making sure that there is a matching PRIMARY KEY value in the parent table for every FOREIGN KEY value in a child table.
Since each row in a table with a PRIMARY KEY has a unique PRIMARY KEY value, removing a row with PRIMARY KEY value that matches one or more values in a FOREIGN KEY that references the PRIMARY KEY results in the loss of referential integrity. Removing the single matching PRIMARY KEY value causes the FOREIGN KEY value in one or more rows in the child table to refer to a nonexistent row (PRIMARY KEY) in the parent table. Similarly, changing a PRIMARY KEY value that matches one or more key values in a corresponding FOREIGN KEY—without changing those values to match the PRIMARY KEY's new value—also results in the loss of referential integrity in the database.
The RESTRICT rule applied to a FOREIGN KEY constraint tells the DBMS abort the execution of any DELETE statement that would remove a parent row (a row from a table with a PRIMARY KEY) if the row has any children. Thus, the RESTRICT rule tells the DBMS to preserve referential integrity when executing a DELETE statement by aborting statement execution (and to roll back any work performed within the current transaction) if the DELETE statement tries to remove a row with a PRIMARY KEY value that matches one or more values in a corresponding FOREIGN KEY.
Moreover, the RESTRICT rule also tells the DBMS to abort the execution of any UPDATE statement that changes the PRIMARY KEY value of a parent row that has child rows. Thus, the RESTRICT rule also tells the DBMS to preserve referential integrity when executing an UPDATE statement by aborting statement execution (and to roll back any work performed within the current transaction) if the UPDATE statement tries to change a PRIMARY KEY value that matches one or more values in a corresponding FOREIGN KEY.
Most DBMS products default to using the RESTRICT rule in determining what actions to take in processing an UPDATE or DELETE statement that tries to violate the referential integrity between tables. In fact, some DBMS products, including MS-SQL Server, not only default to the RESTRICT rule, but also prohibit the selection any one of the other possible rules—CASCADE, SET NULL, and SET DEFAULT.
Refer to the system manual for your DBMS to see which rule is the default for your system, to determine if the DBMS supports any of the other rules. Check the manual's index for "UPDATE_RULE" or "DELETE_RULE." Also look up the syntax for creating FOREIGN KEY constraints. If the DBMS lets you select the rule (the actions) the system will take when an UPDATE or DELETE statement attempts to violate referential integrity constraints, the FOREIGN KEY creation syntax will include optional ON UPDATE and ON DELETE clauses such as:
 [ [ON UPDATE
 NO ACTION|CASCADE|RESTRICT|SET NULL|SET DEFAULT]
 [ON DELETE
 NO ACTION|CASCADE|RESTRICT|SET NULL|SET DEFAULT] ]
| Note |
SQL-92 and MS-SQL Server refer to the rule for the actions described in this tip as NO ACTION vs. RESTRICT. MS-SQL Server's "Books Online" documentation states, "NO ACTION means that no action is performed and the Transact-SQL statement to perform changes does not execute." However, in addition to not executing the statement, the DBMS does raise an error condition and displays an error message. So, "RESTRICT" seems to more accurately describe what happens than does "NO ACTION." If your DBMS (like DB2) supports both rules, the only difference is in the timing of the application of each rule. The DBMS enforces the RESTRICT rule before any other column constraints and enforces the NO ACTION rule after enforcing other column constraints. In almost all cases, the two rules operate identically. |
Understanding How Applying the CASCADE Rule to Updates and Deletes Helps Maintain Referential Integrity
A database has referential integrity when every non-NULL key in the FOREIGN KEY column(s) of one table has one and only one matching entry its corresponding PRIMARY KEY.
By definition, the value of every key in a PRIMARY KEY is unique for each row in a table. As a result, if a DELETE statement removes a row with a PRIMARY KEY value that matches one or more key values in a corresponding FOREIGN KEY, the database loses its referential integrity. By removing the FOREIGN KEY's single matching PRIMARY KEY value, the DBMS creates an "orphan"-a child row whose FOREIGN KEY value refers to a nonexistent row (PRIMARY KEY) in the parent table. Similarly, referential integrity is destroyed if an UPDATE statement changes the PRIMARY KEY value in a parent row without also changing the matching FOREIGN KEY value in the child row.
The CASCADE rule applied to a FOREIGN KEY constraint tells the DBMS to automatically remove all of the row's children and then the parent row when executing a DELETE statement on a row in a parent table. By following the CASCADE rule, the DBMS ensures there are never any orphans because the system automatically removes child rows right along with the parent row.
Similarly, when executing an UPDATE statement that changes a PRIMARY KEY value, the CASCADE rule tells the DBMS to update the FOREIGN KEY value in all child rows to match the new PRIMARY KEY value. Thus, the CASCADE rule tells the DBMS to preserve referential integrity when executing an UPDATE statement by automatically changing the FOREIGN KEY values that matched the PRIMARY KEY's original value to the PRIMARY KEY's new value.
Many DBMS products apply only the RESTRICT rule (which you learned about in Tip 182, "Understanding How Applying the RESTRICT Rule to Updates and Deletes Helps Maintain Referential Integrity") when determining what actions to take in processing an UPDATE or DELETE statement that tries to violate the referential integrity between tables. Both DB2 and INFORMIX, however, support cascading DELETE statements.
Refer to the system manual for your DBMS to see which rule is the default for your DBMS product and to determine if your DBMS supports the CASCADE rule. Check the manual's index for "UPDATE_RULE" or "DELETE_RULE." Also review the syntax for creating FOREIGN KEY constraints. If the DBMS lets you select the rule (the actions) the system will take when an UPDATE or DELETE statement attempts to violate referential integrity constraints, the FOREIGN KEY creation syntax will include optional ON UPDATE and ON DELETE clauses such as:
 [ [ON UPDATE
 NO ACTION|CASCADE|RESTRICT|SET NULL|SET DEFAULT]
 [ON DELETE
 NO ACTION|CASCADE|RESTRICT|SET NULL|SET DEFAULT] ]
Understanding How Applying the SET NULL Rule to Updates and Deletes Helps Maintain Referential Integrity
By definition, a database has referential integrity if each key in a FOREIGN KEY either is NULL or matches the value of one and only of the key values in its corresponding PRIMARY KEY.
The SET NULL rule applied to a FOREIGN KEY constraint tells the DBMS to set the FOREIGN KEY column(s) in all child rows to NULL when a DELETE statement removes the parent row or when an UPDATE statement changes the value(s) in the parent row's PRIMARY KEY column(s). Thus, the SET NULL rule tells the DBMS to maintain referential integrity when executing a DELETE statement that removes a row with children by changing the FOREIGN KEY value in each of the parent's child rows to NULL.
| Note |
In Tip 177, "Understanding Referential Integrity Check INSERT Deadlock and How to Resolve It," you learned that a NULL FOREIGN KEY value does not violate referential integrity. The DBMS "assumes" that the FOREIGN KEY's NULL (missing or unknown) value will turn out to be one of the values in the parent table's PRIMARY KEY when a user or application program supplies the FOREIGN KEY's "real" value. |
While most DBMS products follow only the RESTRICT rule in determining what actions to take in processing an UPDATE or DELETE statement that tries to violate the referential integrity between tables, DB2 does support the SET NULL rule for DELETE statements.
Refer to the system manual for your DBMS to determine its default rule and to find out if your system supports the SET NULL rule. Check the manual's index for "UPDATE_RULE" or "DELETE_RULE." Also review the syntax for creating FOREIGN KEY constraints. If the DBMS lets you select the rule (the actions) the system will take when an UPDATE or DELETE statement attempts to violate referential integrity constraints, the FOREIGN KEY creation syntax will include optional ON UPDATE and ON DELETE clauses such as:
[ [ON UPDATE
 NO ACTION|CASCADE|RESTRICT|SET NULL|SET DEFAULT]
 [ON DELETE
 NO ACTION|CASCADE|RESTRICT|SET NULL|SET DEFAULT] ]
Understanding How Applying the SET DEFAULT Rule to Updates and Deletes Helps Maintain Referential Integrity
Referential integrity means that every non-NULL FOREIGN KEY value in a child row has a single matching value in the parent table's PRIMARY KEY.
The SET DEFAULT rule applied to a FOREIGN KEY constraint tells the DBMS to set the FOREIGN KEY column value in all of a parent row's child rows to the column's default value when executing a DELETE statement that removes a parent row and when an UPDATE statement changes the value in the parent row's PRIMARY KEY column. (For composite [multi-column] PRIMARY/FOREIGN KEY pairs, the DBMS sets each column in the FOREIGN KEY its default value.) Thus, the SET DEFAULT rule tells the DBMS to maintain referential integrity when executing a DELETE or UPDATE statement that affects the PRIMARY KEY value in a parent row by changing the FOREIGN KEY value in each of the parent's child rows to the default value for the column(s) in the FOREIGN KEY.
| Note |
It is up to the person that creates the table with the child rows to make sure that the default values for the column(s) in the FOREIGN KEY will generate a key value that is guaranteed to be present in the PRIMARY KEY of the parent table. Suppose, for example, that one of the rows in a SALESPERSON table's PRIMARY KEY column (EMP_ID) has a value of 999, meaning "House Lead." You could then set the default value for the related (SALESPERSON_ID) column in the CUSTOMERS table to 999 (either in the CREATE TABLE or the ALTER TABLE statement). Then, whenever you DELETE the row for a salesman that leaves the company from the SALESPERSONS table, the DBMS will automatically change the salesperson's customers to house accounts-SALESPERSON_ID 999. |
If the default value for the FOREIGN KEY column(s) produces a key value that does not match one of the values in the PRIMARY KEY, the DELETE or UPDATE statement will behave as if the RESTRICT rule applies-the statement will abort and the DBMS will roll back any work performed during the current transaction.
Although a part of the SQL-92 specification, no commercial DBMS product currently supports the SET DEFAULT rule for either an UPDATE or a DELETE statement that attempts to violate the referential integrity between tables.
Refer to the system manual for your DBMS to see which rule is the default for your system and to determine if your DBMS supports the SET DEFAULT rule. Check the manual's index for "UPDATE_RULE" or "DELETE_RULE." Also review the syntax for creating FOREIGN KEY constraints. If the DBMS supports the selection of the rule to apply when an UPDATE or a DELETE statement tries to violate referential integrity constraints, the FOREIGN KEY creation syntax will include optional ON UPDATE and ON DELETE clauses such as:
 [ [ON UPDATE
 NO ACTION|CASCADE|RESTRICT|SET NULL|SET DEFAULT]
 [ON DELETE
 NO ACTION|CASCADE|RESTRICT|SET NULL|SET DEFAULT] ]
Understanding the Dangerous Nature of the Cascading Deletes Rule
In Tips 182–185, you learned about the eight rules a DBMS can follow when asked to execute an UPDATE or DELETE statement that violates referential integrity constraints. Of the eight rules, only the ON DELETE CASCADE rule can result in the loss of existing data beyond the values stored FOREIGN KEY columns. As such, be sure to review all FOREIGN KEY constraints that include an UPON DELETE CASCADE clause to make sure you really want to remove rows from the table when a row in the parent table is removed.
Suppose, for example, that your database includes the tables and data shown in Figure 186.1.
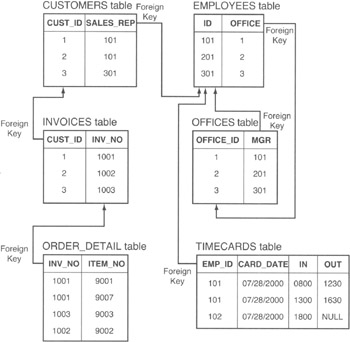
Figure 186.1: Multiple tables affected by a single DELETE due to the CASCADE DELETE rule
If your company closes office 1 (OFFICE_ID 1) and you remove its row from the OFFICES table with the DELETE statement
DELETE FROM offices WHERE office_ID = 1
you might think that the DELETE statement affects only a single row in the OFFICES table. After all, the statement's WHERE clause is based on an equality, and only one row in the target table, OFFICES, can have a value of 1 in its single-column PRIMARY KEY, OFFICE_ID. However, if the definition for each of the FOREIGN KEY constraints shown in Figure 186.1 specifies that the DBMS use the ON DELETE CASCADE rule for handling referential integrity violations, removing the row with OFFICE_ID 1 from the OFFICES table will result in the deletion of rows in each of the five other tables as well!
By virtue of its PRIMARY KEY/FOREIGN KEY relationship, each row in the OFFICE table is the parent of the child rows in the EMPLOYEES table in which the OFFICE_ID in the OFFICES table matches the value of the OFFICE column in the EMPLOYEES table. Each employee (row) in the EMPLOYEES table "owns" the rows in the TIMECARD table where the value in EMP_ID column in the TIMECARD table matches the ID column in the EMPLOYEES table.
In the current example, deleting OFFICE_ID 1 from the OFFICES table violates referential integrity by causing the value in the FOREIGN KEY (the OFFICE column) in the EMPLOYEES table to refer to a nonexistent row (1) in the OFFICES table. As a result, the DBMS will apply the ON DELETE CASCADE rule and remove the row with ID 101 from the EMPLOYEES table. However, removing the row with EMP_ID 101 violates referential integrity by causing the rows with the FOREIGN KEY (EMP_ID) value of 101 in the TIME-CARDS table to refer to a (now) nonexistent row in the EMPLOYEES table. Therefore, the DBMS must again apply the UPON DELETE CASCADE rule and remove the rows with EMP_ID 101 from the TIMECARDS table.
Thus, executing the DELETE statement, which removes a single row from the OFFICES table, causes the deletion of rows in the EMPLOYEES and TIMECARDS tables as well. Moreover, the removal of rows to execute the DELETE statement in the current example does not end here because each row in the CUSTOMERS table is also related by the FOREIGN KEY (SALES_REP) to the salesperson with a matching ID in the EMPLOYEES table.
When the DBMS removes the row ID 101 from the EMPLOYEES table, the system violates referential integrity by leaving the rows of the CUSTOMERS table with a FOREIGN KEY value (SALES_REP 101) that refers to a nonexistent PRIMARY KEY (ID 101) in the EMPLOYEES table. As a result, the DBMS will apply the UPON DELETE CASCADE rule and delete CUSTOMERS table rows that have a 101 in the SALES_REP column. However, removing SALES_REP 101 rows from the CUSTOMERS column also violates referential integrity by leaving FOREIGN KEY (CUST_ID) values in INVOICES table that refer to nonexistent PRIMARY KEY (CUST_ID) values rows in the CUSTOMERS table. Thus, the DBMS must again follow the guidelines of the UPON DELETE CASCADE rule, and remove rows with CUST_ID 1 and rows with CUST_ID 2 from the INVOICES table. Unfortunately, removing these INVOICES table rows violates referential integrity by leaving rows with FOREIGN KEY (INV_NO) columns in the ORDER_DETAIL table that refer to nonexistent PRIMARY KEY values (1001 and 1002) in the INV_NO column of the INVOICES table. Therefore, the DBMS, following the UPON DELETE CASCADE rule, will remove those rows from the ORDER_DETAIL table.
The current example illustrates that applying the UPON DELETE CASCADE rule to all FOREIGN KEY constraints can cause a DELETE statement intended to remove a single row from one table to remove multiple rows from several related tables. As such, be very careful when specifying that the DBMS follow the ON DELETE CASCADE rule when a DELETE statement violates a particular FOREIGN KEY (referential integrity) constraint.
In the current example, you can limit the DELETE statement's row removal to a single row in the OFFICES table by specifying the ON DELETE SET NULL rule for the OFFICE column FOREIGN KEY constraint in the EMPLOYEES table.
The important thing to understand now is that the indiscriminate application of the ON DELETE CASCADE rule for FOREIGN KEY constraint violations can lead to an unintended loss of data. As such, be sure to analyze each FOREIGN KEY relationship and decide which of the eight rules (discussed in Tips 182–185) specify the actions most appropriate to the situation when the execution of an UPDATE or DELETE statement violates a FOREIGN KEY (referential integrity) constraint.
Using the Enterprise Manager to Add FOREIGN KEY Relationships Between Existing Tables
Tip 62, "Using the CREATE TABLE Statement to Assign Foreign Key Constraints," showed you how to define foreign key constraints when creating a new table using the CREATE TABLE statement; Tip 60, "Using the ALTER TABLE Statement to Change Primary and Foreign Keys," showed you how to use the ALTER TABLE statement to add a FOREIGN KEY constraint to an existing table. In addition to the two command-based tools, MS-SQL Server also provides a graphical method for creating FOREIGN KEY constraints through the MS-SQL Server Enterprise Manager.
To create FOREIGN KEY constraints using the MS-SQL Server Enterprise Manager, perform the following steps:
- Start the Enterprise Manager by clicking your mouse pointer on the Start button. When Windows displays the Start menu, move your mouse pointer to Programs, select Microsoft SQL Server 7.0, and then click your mouse pointer on Enterprise Manager.
- To display the list of SQL servers, click your mouse pointer on the plus (+) to the left of SQL Server Group.
- Find the SQL server that manages the database with the tables in which you wish to setup one or more FOREIGN KEY constraints, and click you mouse pointer on the plus (+) to the left of SQL server's icon. Enterprise Manager will display the list of databases managed by the server. For example, if you want to work with a database managed by a server named NVBIZNET2, click your mouse pointer on the plus (+) to the left of the icon for NVBIZNET2.
- Click your mouse pointer on the icon for the database with the tables you want to relate using a FOREIGN KEY constraint. For the current project, click your mouse pointer on the icon for the SQLTips database. Enterprise Manager will display the default database diagram. If you have not yet created a default database diagram, click your mouse pointer on the Yes button when the Enterprise Manager asks if you want to create a database diagram. Enterprise Manager will start the Create Database Diagram Wizard.
- If the database you selected in Step 4 already has a default database diagram (and Enterprise Manager did not prompt you to start the Create Database Diagram Wizard in Step 4), select the Action menu New option, and click your mouse pointer on Database Diagram. Enterprise Manager will start the Create Database Diagram Wizard.
- On the Create Database Diagram Wizard welcome screen, click your mouse pointer on the Next button. The wizard will display a Select Tables to Be Added dialog box, similar to that shown in Figure 187.1.
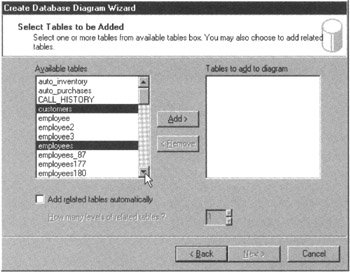
Figure 187.1: The Create Database Diagram Wizard's Select Tables to Be Added dialog box - From the list of tables in the Available Tables scroll window, select the tables in which you wish to set up FOREIGN KEY relationships. For the current project, hold down your Ctrl key and click your mouse pointer on CUSTOMERS, EMPLOYEES, and ORDERS. (The list of tables is alphabetized, and you may need to use the scroll bar to the right of the Available Tables scroll window do display additional table names.)
- Release the Ctrl key and then click your mouse pointer on the Add button to move the tables you selected in Step 7 to the Tables to Add to Diagram scroll window.
- Click your mouse pointer on the Next button. The Create Database Diagram Wizard will display the Completing the Create Database Diagram Wizard dialog box.
- To create a database diagram based on the tables you selected in Step 7, click your mouse pointer on the Finish button.
- After the wizard creates the database diagram, it will display a Tables Have Been Added and Arranged message box—click your mouse pointer on its OK button. Enterprise Manager will display the tables in your database diagram in a window similar to that shown in Figure 187.2.
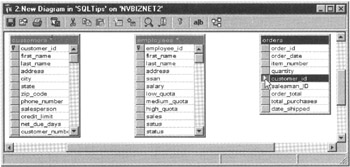
Figure 187.2: The Create Database Diagram Wizard New Diagram window - Move your mouse pointer over the column selection button to the left of the column you wish to use as a FOREIGN KEY, and then hold down the left mouse button. (If you want to create a multi-column FOREIGN KEY [to link with a multi-column PRIMARY KEY], hold down the Ctrl key on your keyboard as you click your mouse pointer on the column selection buttons to the left of the columns you want to include in the FOREIGN KEY. After you move your mouse pointer over select button for the final column in the FOREIGN KEY, hold down the left mouse button and then release the Ctrl key.) For the current project, move your mouse pointer over the select button to the left of the CUSTOMER_ID column in the ORDERS table, and then press and hold down your left mouse button.
- While holding down your left mouse button, drag your mouse pointer until it is over the first column in the PRIMARY KEY of the table to which you wish to relate the FOREIGN KEY. For the current project, relate the ORDERS table to the CUSTOMERS table by holding down your left mouse button as you drag the mouse pointer until it points to the CUSTOMER_ID column in the CUSTOMERS table.
- Release the left mouse button. Enterprise Manager will display a Create Relationship dialog box similar to that shown in Figure 187.3.
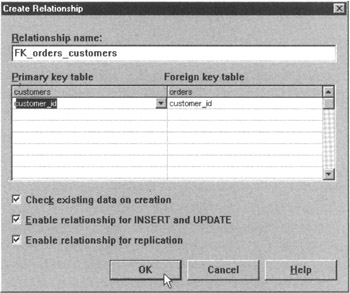
Figure 187.3: The Create Database Diagram Wizard Create Relationship dialog box - Click your mouse pointer on the OK button, and Enterprise Manager will create the FOREIGN KEY and display the link between the two tables graphically in the database diagram.
- Repeat Steps 12–15 for each FOREIGN KEY relationship you want to create. For the current project, establish a second relationship by selecting the SALESMAN_ID column in the ORDERS table for Step 12 and dragging your mouse pointer over the EMPLOYEE_ID column of the EMPLOYEES table in Step 13.
- If the graphical representations of the FOREIGN KEY links overlap, click on the Arrange Tables button (the button at the right end) on the New Diagram window's Standard toolbar. Enterprise Manager will do its best to arrange the database diagram's tables without overlapping links, similar to that shown in Figure 187.4.
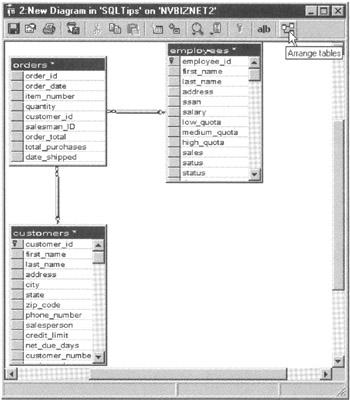
Figure 187.4: The Create Database Diagram Wizard New Diagram window, graphically depicting the FOREIGN KEY links between tables
After you are finished creating new FOREIGN KEY relationships, exit the Database Diagram window by clicking your mouse pointer on the X in the window's upper-right corner. Enterprise Manager will ask you if you want to save your updated diagram as a disk file. Whether you save the diagram or not, the FOREIGN KEY relationships you created will remain in place. For the current project, click your mouse pointer on the No button to discard the new database diagram and return to the Enterprise Manager window.
| Note |
If you answered Yes to create the default database diagram in Step 4, you do not have to exit the Database Diagram window. Instead, Enterprise Manager will continue to display the default database diagram in its right pane until you click your mouse pointer on another database object. When you choose to work with another database object or wizard, or exit Enterprise Manager, the Enterprise Manager will ask if you want to save the default database diagram. |
Using the MATCH FULL Clause to Maintain Referential Integrity
In Tip 179 you learned a row with the value NULL in a FOREIGN KEY column does not violate referential integrity-the DBMS assumes that the "real" value of the missing data will turn out to be one of the PRIMARY KEY values in the related table. This "benefit of the doubt" rule seems clear enough in cases where a FOREIGN KEY consists of single column. However, when a table has a multi-column FOREIGN KEY, a NULL in any one of the columns that make up the key will cause the DBMS (by default) to skip the referential integrity check on the FOREIGN KEY and allow any NULL or valid (for the data type) non-NULL value in any of the key's remaining columns.
Suppose, for example, that you have two tables created with:
CREATE TABLE invoice
 (cust_ID INTEGER,
 invoice_num INTEGER)

CREATE TABLE order_detail
 (cust_id INTEGER,
 invoice_num INTEGER,
 order_date DATETIME,
 item_number INTEGER,
CONSTRAINT fk_invoice_order_detail
 FOREIGN KEY (cust_ID, invoice_num)
 REFERENCES invoice (cust_ID, invoice_num))
If the invoice table contains a single row with CUST_ID 1 and INVOICE_NUM 1, the INSERT statement
INSERT INTO order_detail VALUES (1,1,07/30/2000,1000)
is obviously valid because both of the composite FOREIGN KEY values (1,1) in the new row exists as a PRIMARY KEY value in the related table. However, INSERT statements:
 INSERT INTO order_detail VALUES (NULL,23,07/30/2000,1001)
 INSERT INTO order_detail VALUES (77,NULL,07/30/2000,1002)
are also valid. Although the INVOICE table has no rows with a 23 in the INVOICE_NUM column or a 77 in the CUST_ID column, the NULL value in each INSERT statement's FOREIGN KEY (NULL, 23) and (27, NULL) tells the DBMS to suspend judgment on the referential integrity of the entire FOREIGN KEY—not just the column or columns with a NULL value.
To prevent the DBMS from allowing a non-NULL value in a FOREIGN KEY column that does not match any value in the corresponding column of the PRIMARY KEY, include the MATCH FULL clause in the definition of the FOREIGN KEY constraint. For example, if you create the ORDER_DETAIL table in the current example with
CREATE TABLE order_detail
 (cust_id INTEGER,
 invoice_num INTEGER,
 order_date DATETIME,
 item_number INTEGER,
CONSTRAINT fk_invoice_order_detail
 FOREIGN KEY (cust_ID, invoice_num)
 REFERENCES invoice (cust_ID, invoice_num) MATCH FULL)
the MATCH FULL option on a FOREIGN KEY constraint tells the DBMS that all of the columns in a multi-column FOREIGN KEY either must be NULL or must all be non-NULL. Thus, the DBMS will accept only a FOREIGN KEY that is completely NULL or whose non-NULL composite key value matches the composite value of a key in the PRIMARY KEY of the related table. (If the definition of the FOREIGN KEY constraint includes a MATCH FULL clause, the DBMS will not allow the insertion of a row with a partially NULL FOREIGN KEY.)
| Note |
Not all DBMS products, including MS-SQL Server, support a MATCH FULL clause in the definition of a FOREIGN KEY constraint. If your DBMS does not support the MATCH FULL option, you must place the NOT NULL constraint on each of the columns in a FOREIGN KEY in order to guarantee that all non-NULL values in the FOREIGN KEY columns match values in the corresponding columns of the related table's PRIMARY KEY. |
Understanding MATCH FULL, MATCH PARTIAL, and MATCH SIMPLE Clauses
As you learned from our discussion of referential integrity and FOREIGN KEY constraints in Tip 173, "Understanding Foreign Keys," and Tip 174, "Understanding Referential Integrity Checks and Foreign Keys," referential integrity requires that the FOREIGN KEY value in one table matches one and only one PRIMARY KEY value of the table referenced in the definition of the FOREIGN KEY. A referential integrity check, therefore, is relatively straightforward—check the PRIMARY KEY to make sure it has a value that matches the value of the FOREIGN KEY—except when dealing with a partially NULL FOREIGN KEY. As you learned in Tip 188, "Using the MATCH FULL Clause to Maintain Referential Integrity," the DBMS does not perform a referential integrity check on a FOREIGN KEY with a NULL in any one of its columns.
SQL-92 provides three MATCH clauses you can add to the definition of a FOREIGN KEY constraint to control the behavior of the DBMS when dealing with NULL values in a FOREIGN KEY:
- MATCH FULL. Tells the DBMS to require that all columns in a FOREIGN KEY be either NULL or not-NULL. For example, the definition of a two-column FOREIGN KEY constraint that includes a MATCH FULL clause tells the DBMS that the key value (NULL, NULL) is acceptable. However, key values such as (100, NULL) and (NULL, 100) always violate referential integrity because part of the key is NULL and part is non-NULL.
- MATCH PARTIAL. Tells the DBMS to allow partially NULL FOREIGN KEY values, so long as the value in each of the non-NULL columns in the FOREIGN KEY matches the value in the corresponding column of the PRIMARY KEY. Thus, the definition of a two-column FOREIGN KEY constraint that includes a MATCH PARTIAL clause tells the DBMS that the key value (NULL, NULL) is acceptable. However, key values such as (100, NULL) and (NULL, 100) pass the referential integrity check only if the corresponding column of the PRIMARY KEY has a value of 100 in one more of the rows in the table.
- MATCH SIMPLE. Tells the DBMS to skip the relational integrity check on partially NULL FOREIGN KEY values. Therefore, if the definition of a two-column FOREIGN KEY includes a MATCH SIMPLE clause (or has no MATCH clause at all), the DBMS will accept a FOREIGN KEY with the value (NULL, NULL), (NULL, 100), and (100, NULL)—whether or not the PRIMARY KEY has a value of 100 in the corresponding column of the rows in the table.
Not all DBMS products support a MATCH clause in the definition of a FOREIGN KEY constraint. As such, check your system manual to see if the syntax for defining a FOREIGN KEY constraint on your system includes:
[MATCH {FULL | PARTIAL | SIMPLE}]
If your DBMS, like MS-SQL Server, does not support the MATCH clause, the default (and only) handling of partially NULL FOREIGN KEY values will be as described by MATCH SIMPLE.
| Note |
Some DBMS products may refer to MATCH SIMPLE as MATCH UNIQUE. While the names are different, the action of MATCH UNIQUE is the same as that described for MATCH SIMPLE. |
Understanding the Interaction of the SET NULL Rule and a MATCH Clause
In Tip 184, "Understanding How Applying the SET NULL Rule to Updates and Deletes Helps Maintain Referential Integrity," you learned that the ON DELETE SET NULL rule tells the DBMS to put a NULL in the FOREIGN KEY column(s) of child rows when it removes the PARENT row from the related table. Similarly, the ON UPDATE SET NULL rule tells the DBMS to change the value of the FOREIGN KEY columns in child rows to NULL when a user ID changes the PRIMARY KEY value in the parent row. If one or more of the columns in the FOREIGN KEY has a NOT NULL constraint, the DBMS does not report an error. Rather, it puts a NULL into only those FOREIGN KEY columns that will accept a NULL value.
For example, if you have two tables created with
 CREATE TABLE customers
 (cust_ID INTEGER,
 office INTEGER,
 customer_name VARCHAR(30)
 CONSTRAINT PK_customers PRIMARY KEY (cust_ID, office))
 CREATE TABLE invoices
 (cust_ID INTEGER NOT NULL,
 office INTEGER,
 invoice_num INTEGER,
 order_date DATETIME,
 item_number INTEGER,
 CONSTRAINT fk_customers_invoices
 FOREIGN KEY (cust_ID, office)
 REFERENCES customers (cust_ID, office)
 ON DELETE SET NULL ON UPDATE SET NULL)
and execute the DELETE statement
DELETE FROM customers WHERE cust_ID = 1 AND office = 5
the DBMS will set the OFFICE column to NULL and leave a 1 in the CUST_ID column for all rows with CUST_ID 1 and OFFICE 5 in the INVOICES table. As such, removing a parent row will cause the DBMS to create a partially NULL FOREIGN KEY value in each of its child rows where all the FOREIGN KEY columns do not have a NOT NULL constraint.
As you learned in Tip 188, creating partially NULL foreign keys is undesirable because the DBMS skips referential integrity checks on partially NULL key values and a column in the child row's FOREIGN KEY may hold a value that does not exist in the corresponding column of any row in the parent table.
For example, after executing the DELETE statement in the current example, all child rows in the INVOICES table (rows with CUST_ID 1 and OFFICE 5) will still show that customer 1 has invoices on the system (although the customer's OFFICE will be NULL). However, the CUSTOMERS table, which is supposed to have a row for every customer, will have no information on customer 1—if only OFFICE 5 had a customer with CUST_ID 1. Moreover, if other offices do have a customer with CUST_ID 1, each of these customers is now the parent row for the child rows with CUST_ID 1 and a NULL value in the OFFICE column.
You can add a MATCH clause to a FOREIGN KEY to tell the DBMS how to react to the creation of partially NULL FOREIGN KEY values when applying the ON DELETE NULL or ON UPDATE NULL rule for DELETE and UPDATE statements that violate referential integrity. If you do not include an explicit MATCH clause in the definition of a FOREIGN KEY constraint, the DBMS defaults the MATCH clause to MATCH SIMPLE. As a result, the DBMS is allowed to create a partially NULL FOREIGN KEY when following the ON DELETE or ON UPDATE SET NULL rule.
However, if you change the FOREIGN KEY constraint in the INVOICES table to
CONSTRAINT fk_customers_invoices
 FOREIGN KEY (cust_ID, office)
 REFERENCES customers (cust_ID, office)
 MATCH FULL ON DELETE SET NULL ON UPDATE SET NULL)
the MATCH FULL clause tells the DBMS it is not allowed to create partially NULL FOREIGN KEY values. Therefore, the DBMS will abort the DELETE statement
DELETE FROM customers WHERE cust_ID = 1 AND office = 5
because it violates a referential integrity constraint. The ON DELETE SET NULL rule would normally allow the DBMS to execute the DELETE statement successfully by setting the OFFICE column in the child rows to NULL and skipping the referential integrity check on the partially NULL FOREIGN KEY values created. However, the MATCH FULL clause tells the DBMS it cannot create partially NULL FOREIGN KEY values.
If you want to allow the DBMS to create partially NULL FOREIGN KEY values only if the non-NULL value(s) in each FOREIGN KEY column matches a value in the corresponding column of one of the rows in the parent table, include the MATCH PARTIAL clause in the FOREIGN KEY definition. For example, if you change the definition of the FOREIGN KEY in the INVOICES table to
 CONSTRAINT fk_customers_invoices
 FOREIGN KEY (cust_ID, office)
 REFERENCES customers (cust_ID, office)
 MATCH PARTIAL ON DELETE SET NULL ON UPDATE SET NULL)
the MATCH PARTIAL clause tells the DBMS that it can successfully execute the DELETE statement
DELETE FROM customers WHERE cust_ID = 1 AND office = 5
by following the ON DELETE SET NULL rule to set the OFFICE column of the FOREIGN KEY in the INVOICES table to NULL while leaving the NOT NULL constrained CUST_ID column with a value of 1, so long as at least one row in the CUSTOMERS table has a value of 1 in its CUST_ID column.
Using the NOT NULL Column Constraint to Prevent NULL Values in a Column
As you know, a NULL value in a column indicates that the actual value of the column is either unknown or missing. Rule 3 of Codd's 12-rule relational database definition requires that NULL is included in the domain (range of valid values) for every data type. However, there are occasions when you want to prevent users from entering a NULL into certain columns in a table. By adding the NULL constraint to a column's definition, you can tell the DBMS to abort any INSERT or UPDATE statement that attempts to put NULL into the column. (A NULL constraint in a FOREIGN KEY column also prevents the DBMS from changing the column's value to NULL if it must apply the ON DELETE SET NULL rule or ON UPDATE SET NULL rule when executing a DELETE or UPDATE statement that violates referential integrity).
To place a NOT NULL constraint on a column when creating a new table, simply add the constraint after the column's data type. For example, the CREATE TABLE statement
CREATE TABLE customer
 (cust_ID INTEGER NOT NULL,
 first_name VARCHAR(30),
 last_name VARCHAR(30) NOT NULL,
 address VARCHAR(50) NOT NULL)
creates a CUSTOMER table in which the DBMS will not allow a user to put a NULL into the CUST_ID, LAST_NAME, or ADDRESS columns. As such, the INSERT statement
INSERT INTO customer VALUES (0,'','','')
will execute successfully—remember that neither the value 0 nor a zero-length string is NULL. However, the INSERT statement
 INSERT INTO customer
 VALUES (1,'Konrad',NULL,'765 E. Eldorado Lane')
will fail with an error message similar to
Server: Msg 515, Level 16, State 2, Line 1
Cannot insert the value NULL into column 'last_name', table
 'SQLTips.dbo.customer'; column does not allow nulls.
 INSERT fails.
The statement has been terminated.
because the INSERT statement attempts to add a row with a NULL in the LAST_NAME column—which is constrained and has a NOT NULL in the table definition. Similarly, the DBMS will abort an UPDATE statement such as
UPDATE customer SET address = NULL WHERE cust_ID = 0
because it attempts to put a NULL into a NOT NULL constrained column of an existing row in the table.
Some DBMS products allow you to specify the NOT NULL constraint for a column only when you first create a table. MS-SQL Server, however, lets you use the ALTER TABLE statement to add the NOT NULL constraint to a column in an existing table—even if the table has data. For example, the ALTER TABLE statement
ALTER TABLE customer
ALTER COLUMN first_name VARCHAR(30) NOT NULL
will add the NOT NULL constraint to the FIRST_NAME column of the CUSTOMER table. If any of the existing rows in the CUSTOMER table have a NULL in the FIRST_NAME column, the ALTER TABLE statement will abort with an error message similar to the one the DBMS displayed when the INSERT statement tried to add a row with a NULL value for a column constrained as NOT NULL. To get around this problem, change the NULL values in the column to a non-NULL value with an UPDATE statement such as
UPDATE customer SET first_name = ''
WHERE first_name IS NULL
and then execute the ALTER TABLE statement again.
Using the UNIQUE Column Constraint to Prevent Duplicate Values in a Column
As you learned in Tip 172, "Using the PRIMARY KEY Column Constraint to Uniquely Identify Rows in a Table," you can use a PRIMARY KEY constraint to tell the DBMS to force the value in a column to be different (unique) for every row in a table. Unfortunately, a table can have only one PRIMARY KEY, and you may want more than one column to contain a unique value in every row.
Suppose, for example, that every employee must have a unique ID (for identification purposes) and that your security officer requires each employee to have a unique password as well. You can create a table with multiple UNIQUE column constraints using a CREATE TABLE statement similar to:
CREATE TABLE employees
 (ID INTEGER PRIMARY KEY,
 name VARCHAR(30),
 SSAN INTEGER UNIQUE,
 password VARCHAR(15) UNIQUE)
In the current example, the PRIMARY KEY constraint specifies that the ID column must contain unique, non-NULL values. Moreover, the UNIQUE constraints on the SSAN and password columns tell the DBMS to prevent the entry of duplicate values in to these columns as well.
 INSERT into employees
 VALUES (1, 'Konrad King', 123456789, 'SECRET')
will succeed as long as no existing row in the EMPLOYEES table has an ID of 1 or an SSAN with the value 123456789 or a PASSWORD of SECRET. If an INSERT statement attempts to add a duplicate value to any one or more of the table's UNIQUE columns, the DBMS will abort the error message with:
 Server: Msg 2627, Level 14, State 2, Line 1
 Violation of UNIQUE KEY constraint 'UQ_employees_1D4655FB'.
 cannot insert duplicate key in object 'employees'.
 The statement has been terminated.
The DBMS also enforces the UNIQUE constraint when executing an UPDATE statement. For example, the UPDATE statement
UPDATE employees SET password = 'NEW PASSWORD' WHERE ID = 1
will execute successfully only if no rows in the EMPLOYEES table have the value NEW PASSWORD in the PASSWORD column. Otherwise, the DBMS will abort the UPDATE statement with an error message similar to that shown when attempting to INSERT a row with a duplicate value in a UNIQUE column.
| Note |
There is an important difference between a column defined with the PRIMARY KEY constraint and a column constrained as UNIQUE. The DBMS will allow the insertion of a single NULL value into a UNIQUE column. Conversely, no NULL values are allowed in a PRIMARY KEY column. |
Using the CHECK Constraint to Validate a Column s Value
A CHECK constraint is a tool you can use to limit the domain (or valid range of values), for one or more columns in a table, to a subset of the full range of values allowed for the data type. Each CHECK constraint consists of the word CHECK followed by a search condition that the DBMS evaluates each time a DELETE, INSERT, or UPDATE statement changes the contents of the table. If the search condition evaluates to TRUE after the modification, the DBMS allows the change; if the search condition evaluates to FALSE, the system undoes the work performed and returns an error.
The syntax of a CHECK constraint is:
[CONSTRAINT ] CHECK ()
Therefore, you can use the CHECK constraint in the CREATE TABLE statement
CREATE TABLE employees
 (ID INTEGER PRIMARY KEY,
 name VARCHAR(30) NOT NULL,
 SSAN INTEGER UNIQUE NOT NULL,
 department VARCHAR(15) CONSTRAINT valid_department
 CHECK (department IN ('MARKETING','SALES','ADMIN',
 'EXECUTIVE','SERVICE',
 'COLLECTIONS', 'WAREHOUSE')),
 hourly_rate MONEY,
 monthly_salary MONEY,
 commission MONEY)
to create an EMPLOYEES for which the DBMS will check the DEPARTMENT value supplied by an INSERT or UPDATE statement to make sure that it is one of those listed in the CHECK constraint's search condition. In the current example, the DBMS will add the row inserted with the INSERT statement
 INSERT INTO employees VALUES
 (1,'Konrad King',123456789,'Executive',NULL,3000.00,NULL)
to the table but will reject the change attempted by the UPDATE statement
UPDATE employees SET department = 'MIS' WHERE ID = 1
and will display an error message similar to:
 Server: Msg 547, Level 16, State 1, Line 1
 UPDATE statement conflicted with COLUMN CHECK constraint
 'valid_department'. The conflict occurred in database
 'SQLTips', table 'employees'.
 The statement has been terminated
In addition to checking to make sure the data in a single column falls within a range or is one of a discrete set of values, you can use a CHECK constraint to check the validity of data in multiple columns and even use the value in one column to define the domain for another column. For example, the CREATE TABLE statement
 CREATE TABLE employees
 (ID INTEGER PRIMARY KEY,
 name VARCHAR(30) NOT NULL,
 SSAN INTEGER UNIQUE NOT NULL,
 department VARCHAR(15) CONSTRAINT valid_department
 CHECK (department IN ('MARKETING','SALES','ADMIN',
 'EXECUTIVE','SERVICE',
 'COLLECTIONS', 'WAREHOUSE')),
 hourly_rate MONEY,
 monthly_salary MONEY,
 commission MONEY,
 CONSTRAINT valid_pay CHECK(
 (department IN ('MARKETING','SALES') AND
 (hourly_rate IS NULL) AND (monthly_salary IS NULL) AND
 (commission BETWEEN 100.00 and 500,00)) OR
 (department IN ('ADMIN','EXECUTIVE') AND
 (hourly_rate IS NULL) AND (monthly_salary BETWEEN
 1000.00 AND 10000.00) AND (commission IS NULL)) OR
 (department IN ('SERVICE','COLLECTIONS','WAREHOUSE') AND
 (hourly_rate BETWEEN 10.00 AND 45.00) AND
 (monthly_salary IS NULL) AND (COMMISSION IS NULL)))
tells the DBMS to make sure that EMPLOYEES table rows for:
- Employees in MARKETING and SALES are assigned a commission (per sale) between $100.00 and $500.00, and no monthly salary or hourly pay
- Employees in ADMIN and EXECUTIVE are assigned a monthly salary between $1,000.00 and $10,000.00, and no hourly pay or commissions
- Employees in SERVICE, COLLECTIONS, and WAREHOUSE receive an hourly rate between $10.00 and $45.00 and no monthly salary or commission
Using the MS SQL Server Enterprise Manager to Bind a Rule to a Data Type or Column
As you learned in Tip 169, "Understanding MS-SQL Server Rules," a rule is an MS-SQL Server object you can use to specify the domain (or valid range of values) for a column or data type. MS-SQL Server uses rules as it does CHECK constraints. Each time an SQL statement puts a value in a column governed by a rule, the DBMS evaluates the rule's conditional expression. If the expression evaluates to TRUE, the DBMS allows the update; if the rule's conditional expression evaluates to FALSE, the MS-SQL Server undoes the work performed and reports an error.
Unlike a CHECK constraint, a rule is a database object and not a part of a table or column definition. As such, before the DBMS can apply the rule to check the validity of data being placed in a column, you must first bind the rule to the column or user-defined data type used to define the column. To bind a rule to a column or user-defined data type, you can either execute the stored procedure sp_bindrule (which you will learn about in Tip 593) or use the MS-SQL Server Enterprise Manager by performing the following steps:
- Start the Enterprise Manager by clicking your mouse pointer on the Start button. When Windows displays the Start menu, move your mouse pointer to Programs, select Microsoft SQL Server 7.0, and then click your mouse pointer on Enterprise Manager.
- To display the list of SQL servers, click your mouse pointer on the plus (+) to the left of SQL Server Group.
- Find the SQL server that manages the database with the rule(s) you want to bind to table columns or data types, and click your mouse pointer on the plus (+) to the left of SQL server's icon. For example, if you want to work with a database managed by a server named NVBIZNET2, click your mouse pointer on the plus (+) to the left of the icon for NVBIZNET2. Enterprise Manager will display the list of databases managed by the server.
- Click your mouse pointer on the plus (+) to the left of the icon of the database in which the rules are defined. For the current project, click your mouse pointer on the plus (+) to the left of the icon for the SQLTips database. The Enterprise Manager will display an icon for each class of objects in the database.
- Click your mouse pointer on Rules in the expanded list of database objects. Enterprise Manager will use its right pane to display the list of rules defined in the database.
- Double-click your mouse pointer on the rule you wish to bind. For the current project, double-click your mouse pointer on the VALIDATE_EMPNUM rule. Enterprise Manager will display a Rule Properties dialog box similar to that shown in Figure 194.1.
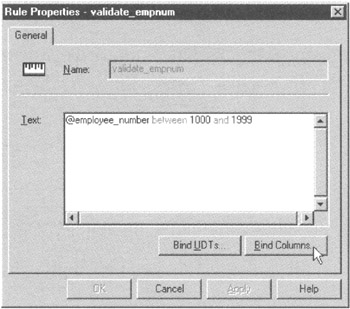
Figure 194.1: The Enterprise Manager Rule Properties dialog box - If you want to bind the rule you selected in Step 6 to a user-defined data type, continue at Step 11; otherwise, to bind the rule to a column, click your mouse pointer on the Bind Columns button. The Enterprise Manager will display a Bind Rule to Columns dialog box similar to that shown in Figure 194.2.
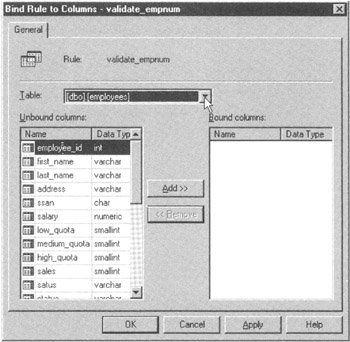
Figure 194.2: The Enterprise Manager Bind Rule to Columns dialog box - To select the table with the column(s) to which you wish to bind the rule, click your mouse pointer on the drop-down button to the right of the Table field in the dialog box. Then select the table you want from the drop-down list of database tables. For the current project, click your mouse pointer on [dbo].[employees] in the database list to select the EMPLOYEES table. Enterprise Manager will display the table columns not yet bound by a rule in the Unbound Columns box and the columns bound to a rule in the Bound Columns box.
- To bind the rule to a column, look in the Unbound Columns box and click your mouse pointer on the name of the column you want to bind. Next, click your mouse pointer on the Add button. For the current project, click your mouse pointer on EMPLOYEE_ID in the Unbound columns box, and then click your mouse pointer on the Add button. Enterprise Manager will transfer the name of the column you selected from the Unbound Columns list to the Bound Columns list.
- If you wish to bind the rule to additional columns, repeat Steps 8 and 9. When you are finished binding rules to table columns, click your mouse pointer on the OK button. The Enterprise Manager, in turn, will display the Rule Properties dialog box.
- If you want to bind the rule to a user-defined data type, click your mouse pointer on the Bind UDTs button. The Enterprise Manager will display a Bind Rule to User-Defined Data Types dialog box similar to that shown in Figure 194.3. If you do not want to bind the rule to a user-defined data type, continue at Step 15.
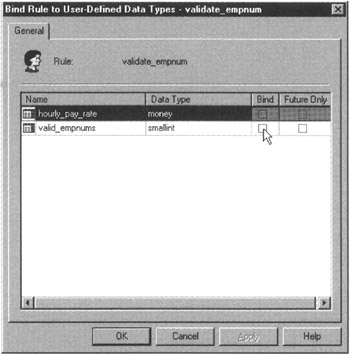
Figure 194.3: The Enterprise Manager Bind Rule to User-Defined Data Types dialog box - To bind the rule to the data type, click your mouse pointer in the Bind check box of the row that lists the data type you want to bind. For the current project, bind the rule to the VALID_EMPNUMS data type by clicking your mouse pointer on the Bind check box to the right of the VALID_EMPNUMS data type until a check mark appears. If you want the rule to apply only to columns defined using the data type from this point on, click your mouse pointer on the Future Only check box; otherwise, clear the Future Only check box, and the DBMS will apply the rule to all columns created using the data type. For the current project, clear the Future Only check box.
- If you want to bind the rule to additional user-defined data types, repeat Step 12 until you are done.
- To exit the dialog box, click your mouse pointer on the OK button. Enterprise Manager will return to the Rule Properties dialog box.
- To exit the Rule Properties dialog box and return to the Enterprise Manager window, click on the OK button.
MS-SQL Server lets you bind only a single rule to each column in a database table. You can, however, bind a rule and one or more CHECK constraints to the same column. Also, the DBMS will apply the rule only when making changes to the value in bound column (or to the columns defined using the data type to which the rule is bound). The DBMS does not check the existing values in a rule-bound column to make sure none of them violates the rule.
Using the Transact SQL CREATE RULE Statement to Create an MS SQL Server Rule
In Tip 169, "Understanding MS-SQL Server Rules," you learned that an MS-SQL Server rule lets you define the domain (the valid range of values) for a column or user-defined data type, and in Tip 194, "Using the MS-SQL Server Enterprise Manager to Bind a Rule to a Data Type or Column," you learned how to bind the rule to a column or user-defined data type. To create the rule itself, you can use either the Enterprise Manager or the Transact-SQL CREATE RULE statement.
The syntax of the CREATE RULE statement is:
 CREATE RULE

 AS @
Therefore, to create a rule that the value placed in a column is in the range 1000.00–10000.00, execute a CREATE RULE statement such as:
 CREATE RULE validate_salary

 AS @salary BETWEEN 1000.00 AND 10000.00
Or, to create a rule that tells the DBMS to make sure the value placed in a column is one of the values in a list of values, execute a CREATE RULE statement such as:
 CREATE RULE validate_freshman_classes

 AS @class IN ('English','History','Math','Science')
As you learned in Tip 169, the CREATE RULE statement creates a rule object only in the database. Before the DBMS will use the rule to check column values being changed or added, you must bind the rule to the column or its user-defined data type by using the Enterprise Manager (as you learned in Tip 194) or by executing the stored procedure sp_bindrule.
The syntax for executing sp_bindrule is:
 EXEC '',
 '.',['FUTUREONLY']
Thus, to bind the VALIDATE_SALARY rule to the MONTHLY_SALARY column of an EMPLOYEES table, you would enter the Transact-SQL statement:
 EXEC sp_bindrule
 'validate_salary','employees.monthly_salary'
Using the MS SQL Server Enterprise Manager Rule Properties Screen to Change a Rule
As you learned in Tip 169, "Understanding MS-SQL Server Rules," and Tips 193–195, MS-SQL Server rules and SQL CHECK constraints let the DBMS perform validity tests on values a user or application tries to place into a column in a table row. While a CHECK constraint exists as only one of the elements in the definition of a table, each MS-SQL Server rule is a separate database object and not part of a column or user-defined data type definition. Consequently, clauses in CREATE TABLE and ALTER TABLE statements manage CHECK constraints, and MS-SQL Server provides a set of stored procedures and the Enterprise Manager to manage rules, as it does other database objects.
To use the MS-SQL Server Enterprise Manager to work with a rule's properties, perform the following steps:
- Start the Enterprise Manager by clicking your mouse pointer on the Windows Start button. After Windows displays the Start menu, move your mouse pointer to Programs, select Microsoft SQL Server 7.0, and then click your mouse pointer on Enterprise Manager.
- To display the list of SQL servers, click your mouse pointer on the plus (+) to the left of SQL Server Group.
- Find the SQL Server that manages the database with the rule(s) you want to change, and click your mouse pointer on the plus (+) to the left of the SQL server's icon. For example, if you want to work with a database managed by a server named NVBIZNET2, click your mouse pointer on the plus (+) to the left of the icon for NVBIZNET2. Enterprise Manager will display the list of databases managed by the server.
- Click your mouse pointer on the plus (+) to the left of the icon of the database in which the rules you want to change are defined. For the current project, click your mouse pointer on the plus (+) to the left of the icon for the SQLTips database. The Enterprise Manager will display an icon for each class of objects in the database.
- Click your mouse pointer on Rules in the expanded list of database objects. Enterprise Manager will use its right pane to display the list of rules defined in the database.
- To work with a rule's properties, right-click your mouse pointer on the name of the rule (or its icon). For the current project, right-click your mouse pointer on the rule VALIDATE_FRESHMAN_CLASSES. Enterprise Manager will display a Rule properties dialog box similar to that shown in Figure 196.1.
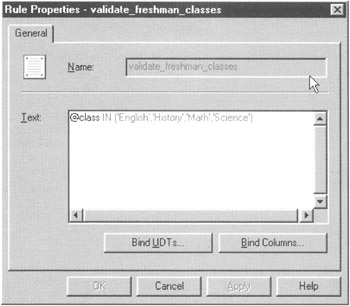
Figure 196.1: The Enterprise Manager Rule Properties dialog box - To change the range of values a rule allows the DBMS to put into a column, modify the rule's search condition in the Text field of the Rule Properties dialog box. For the current project, assume that freshman class titles now include a -101 suffix and that an engineering course has been added to the curriculum. As such, replace the contents of the Text box with: @class(English-101, 'History-101', 'Math-101', 'Science-101', 'Engineering-101').
- Click your mouse pointer on the OK button. Enterprise manager will store the new rule definition and close the Rule Properties dialog box.
One of the main advantages of using a rule over using a CHECK constraint is that while a CHECK constraint can validate updates to only a single column, each rule can validate data being put into multiple columns in one or more tables. As such, if the same CHECK constraint is used in several tables, you must execute an ALTER TABLE statement on each of them to reflect a domain change (such as the one in Step 7 of the preceding procedure). Conversely, if you bind a single rule to multiple columns (either directly or indirectly by binding the rule to the user-defined data type used to define a column), a single change to the rule's search condition (as you performed in Step 7) will alter the validity test for updates to all of the columns bound by the rule.
Using the Transact SQL DROP RULE Statement to Permanently Remove a Rule from a Database
While they perform the same basic function, MS-SQL Server rules, unlike SQL CHECK constraints, exist as separate database objects. Because each CHECK constraint is part of a table's definition, you use the ALTER TABLE statement with a DROP clause statement to remove a CHECK constraint. Conversely, because a rule is a database object in its own right, you use a DROP statement to delete a rule—just as you would to remove any other object form the database.
The syntax of the DROP RULE statement is:
DROP RULE [,...]
As such, you can use a single DROP RULE statement to remove one or more rules from the database. For example, to remove the VALIDATE_GRADES and VALIDATE_SALARY rules from a database, execute the DROP RULE statement:
DROP RULE validate_grades, validate_salary
Before you can delete a database rule, you must unbind the rule from the column(s) or user-defined data type(s) to which the rule is bound. If you attempt to DROP a rule that is still bound to a column or user-defined data type, MS-SQL Server will abort the DROP RULE statement with an error. Unfortunately, the error message the DBMS will display as a result of the error condition will not tell you the columns or user-defined data types to which the rule is bound. As such, you must refer to your data dictionary, which, among other things, should list all database objects and dependencies (including rule bindings).
| Note |
If the data dictionary is not available or is out-of-date, you can also use the Enterprise Manager's Bind Rule to Columns and Bind Rule to User-Defined Data types screens (which you learned about in Tip 194, "Using the MS-SQL Enterprise Manager to Bind a Rule to a Data Type or Column") to display (and remove) a rule's bindings. |
In Step 8 of the procedure in Tip 194, you learned how to select the table with the column to which you were binding the rule. If you select each table in turn, the Enterprise Manager will display the columns to which the rule is bound in the Bound Columns field of the Bind Rule to Columns dialog box each time you select a table where the rule is bound to one or more of the columns. To unbind the rule from the column(s), click your mouse pointer on the column name in the Bound Columns field and then on the Remove button. If you unbind the rule from a column, be sure to click your mouse button on the Apply button before moving on to the next table.
Similarly, when you perform Step 11 of the procedure in Tip 194, Enterprise Manager will use the Bind Rule to User-Defined Data Types screen to list all user-defined data types. Each user-defined data type to which the rule is bound will have a check mark in its Bind check box. To unbind the rule from the data type, simply clear the check box by clicking your mouse pointer on the check box until the check mark disappears. Be sure to click your mouse pointer on the OK button (vs. the Cancel button) to exit the screen if you clear any Bind check boxes.
Using the MS SQL Server Enterprise Manager to List and Edit Views
A view is a virtual table. Although it has the look and feel of a "real" table and can be used in most SQL statements wherever a table reference is allowed, a view has no rows and columns of data of its own. Instead, a view consists of a SELECT statement that extracts and displays data from columns and rows in other tables (or views). Although not a "real" table, a view is, however, a "real" database object that exists apart from the tables on which the view is based.
To use MS-SQL Server Enterprise Manager to list and edit views, perform the following steps:
- Start the Enterprise Manager by clicking your mouse pointer on the Windows Start button. After Windows displays the Start menu, move your mouse pointer to Programs, select Microsoft SQL Server 7.0, and then click your mouse pointer on Enterprise Manager.
- To display the list of SQL Servers, click your mouse pointer on the plus (+) to the left of SQL Server Group.
- Find the SQL Server that manages the database with the views on which you wish to work, and click your mouse pointer on the plus (+) to the left of the SQL Server's icon. For example, if you want to work with a database managed by a server named NVBIZNET2, click your mouse pointer on the plus (+) to the left of the icon for NVBIZNET2. Enterprise Manager will display the list of databases managed by the server.
- Click your mouse pointer on the plus (+) to the left of the icon of the database that contains the views you want. For the current project, click your mouse pointer on the plus (+) to the left of the icon for the SQLTips database. The Enterprise Manager will display an icon for each class of objects in the database.
- Click your mouse pointer on Views in the expanded list of database objects. Enterprise Manager will display a list of the database's views in its right pane.
- To work with a view, double-click your mouse pointer on the view's name (in the Enterprise Manager's right pane). For the current project double-click your mouse pointer on the view: name: CONSTRAINT_COLUMN_USAGE. Enterprise Manager will display the View Properties dialog box shown in Figure 198.1.
Figure 198.1: The Enterprise Manager View Properties dialog box - To change the data displayed by the view you selected in Step 6, edit the contents of the Text field in the lower half of the View Properties dialog box. Be sure to click your mouse pointer on the Check Syntax button to have Enterprise Manager check the syntax of the views before you save the view's new definition to disk by clicking your mouse pointer on the View Properties dialog box OK button.
- To specify the access privileges user IDs and roles have on the view, click your mouse pointer on the PERMISSIONS button near the top right-hand corner of the dialog box. Enterprise Manager will list the database user IDs and roles along with check boxes showing the privileges each one has on the view, similar to that shown in Figure 198.2.
Figure 198.2: The Enterprise Manager Object Properties screen - To give a user ID or role the privileges, click your mouse pointer on the check box for the privilege in the row of the user ID or role to which you wish to GRANT the privilege. For example, to GRANT SELECT privilege to user ID FRANK, you click your mouse pointer on the check box in the SELECT column of the FRANK row until the check mark appears.
- Similarly, to REVOKE a privilege on the view, clear the contents of the check box of the privilege you want to REVOKE in the row of the user ID or role that is no longer to have the privilege.
- After you finish granting and revoking privileges on the view, click your mouse pointer on the OK button. Enterprise Manager will update the system privilege tables and return to the View Properties dialog box.
- To save changes you made to the view and return to the Enterprise Manger application window, click your mouse pointer on the OK button near the bottom left corner of the View Properties dialog box.
In addition to the Enterprise Manager, you can also use SQL statements to change a view and the permissions user IDs and roles have on it. While the GRANT and REVOKE statements are as convenient to use as Enterprise Manager for assigning privileges on the view, the ALTER VIEW statement requires that you retype the entire definition of the view—even if you want to modify only a portion of the view. Enterprise Manager, on the other hand, lets you edit just the parts of the view's definition that you want to change. As such, Enterprise Manager is clearly the best choice when you want to make a small change to a long view definition.
Using the CREATE ASSERTION Statement to Create Multi table Constraints
CHECK constraints and MS-SQL Server rules limit the values an SQL statement can place into a column in a table. An assertion, meanwhile, places a limit (a restriction) on the values the DBMS can store in the database as a whole.
CHECK constraints, when present, are included in table definitions. Rules, though separate from database objects, must be bound to specific table columns or user-defined data types before the DBMS will use them to validate the actions of UPDATE and INSERT statements.
An assertion, like a rule, is a separate database object. However, unlike a rule, it is not bound to a specific data type or column. Instead, the DBMS is required to evaluate the search condition in an assertion any time there is an attempt to change the contents of any one of the tables used in the assertion's CHECK clause.
For example, given the syntax of the CREATE ASSERTION statement
 CREATE ASSERTION
 CHECK ()
you would create an assertion to make sure the sum of all outstanding orders for a product does not exceed the quantity of the item in inventory by executing the CREATE ASSERT statement:
 CREATE ASSERTION item_in_stock
 CHECK((orders.item_number = inventory.item_number) AND
 (SUM (orders.qty) <= inventory.qty_on_hand))
After you add the ITEM_IN_STOCK assertion to the database definition (by executing the CREATE ASSERTION statement in the current example), the DBMS is required to evaluate the search condition in the assertion whenever an SQL statement attempts to change either the ORDERS or the INVENTORY table. If the update causes the assertion to evaluate to FALSE, the DBMS undoes the work performed, raises an error, and displays an error message indicating that the statement could not be executed due to the violation of the assertion.
| Note |
Although included in the SQL-92 specification, most database products do not support assertions. Therefore, be sure to check your system manual for the CREATE ASSERTION statement before you include assertions in your database design. |
Understanding Database Normalization
In general, database normalization involves splitting tables with columns that have different types of data (and perhaps even unrelated data) into multiple tables, each with fewer columns that describe the attributes of a single concept or physical object or being. The goal of normalization is to prevent the problems (called modification anomalies) that plague a poorly designed relation (table). Suppose, for example, that you have a table with resort guest ID numbers, activities the guests have signed up to do, and the cost of each activity—all together in the following GUEST_ACTIVITY_COST table:
 guest_ID activity cost
 -------- ---------------- ------
 2587 Scuba Diving 250.00
 2564 Deep Sea Fishing 750.00
 4589 Massage Therapy 150.00
 1247 Golf 225.00
 1269 Aromatherapy 75.00
Each row in the table represents a guest that has signed up for the named activity and paid the specified cost. Assuming that the cost depends only on the activity—that is, a specific activity costs the same for all guests—if you delete the row for GUEST_ID 2587, you lose not only the fact that guest 2587 signed up for scuba diving, but also the fact that scuba diving costs $250.00 per outing. This is called a deletion anomaly—when you delete a row, you lose more information than you intended to remove. In the current example, a single deletion resulted in the loss of information on two entities—what activity a guest signed up to do and how much a particular activity costs.
Now, suppose the resort adds a new activity such as horseback riding. You cannot enter the activity name (horseback riding) or cost ($190.00) into the table until a guest decides to sign up for it. The unnecessary restriction of having to wait until someone signs up for an activity before you can record its name and cost is called an insertion anomaly.
In the current example, each insertion adds facts about two entities. Therefore, you cannot INSERT a fact about one entity until you have an additional fact about the other entity. Conversely, each deletion removes facts about two entities. Thus, you cannot DELETE the information about one entity while leaving the information about the other in the table.
You can eliminate modification anomalies through normalization—that is, splitting the single table with rows that have attributes about two entities into two tables, each of which has rows with attributes that describe a single entity. For example, by splitting the GUEST_ACTIVITY_COST table in the current example into a GUEST_ACTIVITY table
 guest_ID activity
 -------- ----------------
 2587 Scuba Diving
 2564 Deep Sea Fishing
 4589 Massage Therapy
 1247 Golf
 1269 Aromatherapy
and an ACTIVITY_COST table
 activity cost
 ---------------- ------
 Scuba Diving 250.00
 Deep Sea Fishing 750.00
 Massages Therapy 150.00
 Golf 225.00
 Aromatherapy 75.00
you will be able to remove the aromatherapy appointment for guest 1269 without losing the fact that an aromatherapy session costs $75.00. Similarly, you can now add the fact that horseback riding costs $190.00 per day to the ACTIVITY_COST table without having to wait for a guest to sign up for the activity.
During the development of relational database systems in the 1970s, relational theorists kept discovering new modification anomalies. Someone would find an anomaly, classify it, and then figure out a way to prevent it by adding additional design criteria to the definition of a "well-formed" relation. These design criteria are known as normal forms. Not surprisingly E. F. Codd (of the 12-rule database definition fame), defined the first, second, and third normal forms (1NF, 2NF, and 3NF). (Tips 201–203 discuss 1NF, 2NF, and 3NF.)
After Codd postulated 3NF, relational theorists formulated Boyce-Codd normal form (BCNF) and then fourth normal form (4NF) and fifth normal form (5NF). However, all normal forms had a serious flaw—no theory (or theorist) could guarantee that any of the normal forms could eliminate all modification anomalies. The nagging feeling that there would be seventh, eighth, and ninth (and so on) normal forms as people discovered and figured out criteria to prevent new anomalies lasted until 1981, when Ronald Fagin defined domain/key normal form (DK/NF) and proved it to be free of all modification anomalies.
Since a relation (a relational table) in DK/NF is guaranteed to exhibit no modification anomalies, finding ways to put all database relations in DK/NF is the design goal. Unfortunately, unlike 1NF, 2NF, and 3NF, there are no software design tools that will (or can) split a relational table into relations that are in domain/key normal form. Moreover, there is no guarantee that every relation can even be put into DK/NF. As a result, while a database with all tables (relations) in DK/NF is theoretically possible, most designers strive for 3NF, which removes most anomalies and thus provides a high degree of integrity.
Understanding First Normal Form (1NF)
In Tip 200, "Understanding Database Normalization," you learned that normalization is a processes by which database designers attempt to eliminate modification anomalies such as the:
- Deletion anomaly. The inability to remove a single fact from a table without removing other (unrelated) facts you want to keep.
- Insertion anomaly. The inability to insert one fact without inserting another (and sometimes, unrelated) fact.
- Update anomaly. Changing a fact in one column creates a false fact in another set of columns.
Modification anomalies are a result of functional dependencies among the columns in a row (or tuple, to use the precise relational database term). A functional dependency means that if you know the value in one column or set of columns, you can always determine the value of another. For example, given the data in the table
CLASS SECTION TEACHER DEPARTMENT STUDENTS
----- ------- -------- ---------- --------------
H100 1 Smith HISTORY 1005,2110,3115
CS100 1 Bowls COMP-SCI 4001,4515,8978
M200 3 Rawlins MATH 2002,4587,2358
if you know the CLASS and SECTION, you know the TEACHER. Similarly, if you know the TEACHER, you know the DEPARTMENT. Thus, the value in the TEACHER column is functionally dependant on the combination of the values in the CLASS and SECTION columns. Also, the value in the DEPARTMENT column is functionally dependent on the value in the TEACHER column.
In addition to the single-value functional dependencies where A determines B or A + B determines C, the preceding table also exhibits a multi-valued dependency in which the value of one attribute (column) determines the values in a set of another attribute (column). In the current example, the value of TEACHER determines the list of students (in the STUDENTS column).
First normal form (1NF), the most basic form for relational tables, requires that the table has no duplicate rows and that none of the rows has repeating groups. This means that every row must have a unique value in at least one of its columns, and each column of a row must have an atomic (scalar) value. As such, the table in the current example is not in 1NF because the value in the STUDENTS column is a repeating group—it consists of a list of values and not a single valued (atomic) value.
To put the table in first normal form (1NF), you could break up the student number list in the STUDENTS column of each row such that each row had only one of the student IDs in the STUDENTS column. Doing so would change the table's structure and rows to:
 CLASS SECTION TEACHER DEPARTMENT STUDENT
 ----- ------- -------- ---------- -------
 H100 1 Smith HISTORY 1005
 H100 1 Smith HISTORY 2110
 H100 1 Smith HISTORY 3115
 CS100 1 Bowls COMP-SCI 4001
 CS100 1 Bowls COMP-SCI 4515
 CS100 1 Bowls COMP-SCI 8978
 M200 3 Rawlins MATH 2002
 M200 3 Rawlins MATH 4587
 M200 3 Rawlins MATH 2358
The value given by the combination (CLASS,SECTION,STUDENT) is the composite key for the table because it makes each row unique and all columns atomic. Now that each the table in the current example is in 1NF; each column has a single, scalar value. Unfortunately, the table still exhibits modification anomalies:
- Deletion anomaly. If professor SMITH goes to another school and you remove his rows from the table, you also lose the fact that STUDENTs 1005, 2110, and 3115 are enrolled in a history class.
- Insertion anomaly. If the school wants to add an English class (E100), it cannot do so until a student signs up for the course. (Remember, no part of a primary key can have a NULL value.)
- Update anomaly. If STUDENT 4587 decides to sign up for the SECTION 1, CS100 CLASS instead of his math class, updating the CLASS and SECTION columns in the row for STUDENT 4587 to reflect the change will cause the table to show TEACHER RAWLINS as being in both the MATH and the COMP-SCI departments.
Thus, "flattening" a table's columns to put it into first normal form (1NF) does not solve any of the modification anomalies. All it does is guarantee that the table satisfies the requirements for a table defined as "relational" and that there are no multi-valued dependencies between the columns in each row.
Understanding Second Normal Form (2NF)
As you learned in Tip 200, "Understanding Database Normalization," and 201, "Understanding First Normal Form (1NF)," the process of normalization involves removing functional dependencies between columns in order to eliminate the modification anomalies caused by these dependencies. In Tip 201, you learned that putting a table in first normal form (1NF) requires removing all multi-valued dependencies. When a table is in second normal form, it must be in first normal form (no multi-valued dependencies) and have no partial key dependencies.
A partial key dependency is a situation in which the value in part of a key can be used to determine the value of another attribute (column). Thus, a table is in 2NF when the value in all nonkey columns depends on the entire key. Or, said another way, you cannot determine the value of any of the columns by using part of the key.
Suppose, for example, that you have the data in the table
 CLASS SECTION TEACHER DEPARTMENT STUDENT MAJOR
 ----- ------- ------- ----------- ------- -----------
 H100 1 Smith HISTORY 1005 ENGLISH
 H100 2 Riley HISTORY 2110 ENGLISH
 H100 1 Smith HISTORY 2358 MATH
 CS100 1 Bowls COMP-SCI 4001 COMP-SCI
 CS100 1 Bowls COMP-SCI 2110 ENGLISH
 CS100 1 Bowls COMP-SCI 8978 ENGINEERING
 M200 3 Rawlins MATH 4001 COMP-SCI
 M200 2 Brown MATH 2110 ENGLISH
 M200 4 Riley MATH 2358 MATH
 E100 1 Jones ENGINEERING 8978 ENGINEERING
with (CLASS,SECTION,STUDENT) as its primary key. If the university has two rules about taking classes—no student can sign up for more than one section of the same class, and a student can have only one major—then the table, while in 1NF, is not in 2NF.
Given the value of (STUDENT,COURSE) you can determine the value of the SECTION, since no student can sign up for two sections of the same course. Similarly, since students can sign up for only one major, knowing STUDENT determines the value of MAJOR. In both instances, the value of a third column can be deduced (or is determined) by the value in a portion of the key (CLASS,SECTION,STUDENT) that makes each row unique.
To put the table in the current example in 2NF will require that it be split into three tables described by:
 courses (class, section, teacher, department)
 PRIMARY KEY (class,section)

 enrollment (student, class, section)
 PRIMARY KEY (student, class)

 students (student, major)
 PRIMARY KEY (student)
Unfortunately, putting a table in 2NF does not eliminate modification anomalies. Suppose, for example, that professor Jones leaves the university. Removing his row from the COURSES table would eliminate the entire ENGINEERING department, since he is currently the only professor in the department. Similarly, if the university wants to add a music department, it cannot do so until it hires a professor to teach in the department.
Understanding Third Normal Form (3NF)
To be in third normal form (3NF) a table must satisfy the requirements for 1NF (no multivalued dependencies) and 2NF (all nonkey attributes must depend on the entire key). In addition, a table in 3NF has no transitive dependencies between nonkey columns.
Given a table with columns (A, B, C), a transitive dependency is one in which A determines B, and B determines C, therefore, A determines C. Or, expressed using relational theory notation: If A→B and B→C then A→C.
When a table is in 3NF, the value in every nonkey column of the table can be determined by using the entire key and only the entire key. Therefore, given a table in 3NF with columns (A, B, C), if A is the PRIMARY KEY, you could not use the value of B (a nonkey column) to determine the value of C (another nonkey column). As such, A determines B (A→B), and A determines C (→C). However, knowing the value of column B does not tell you the value in column C—that is, it is not the case that B→C.
Suppose, for example, that you have a COURSES table with columns and PRIMARY KEY described by
 courses (class, section, teacher, department, dept_head)
 PRIMARY KEY (class,section)
that contains the data:
 (<---- A ---->) (B) (C) (D)
 CLASS SECTION TEACHER DEPARTMENT DEPT_HEAD
 ----- ------- ------- ----------- ---------
 H100 1 Smith HISTORY SMITH
 H100 2 Riley HISTORY SMITH
 CS100 1 Bowls COMP-SCI PEROIT
 M200 3 Rawlins MATH HASTINGS
 M200 2 Brown MATH HASTINGS
 M200 4 Riley MATH HASTINGS
 E100 1 Jones ENGINEERING JONES
Given that a TEACHER can be assigned to only one DEPARTMENT and that a DEPARTMENT can have only one department head, the table has multiple transitive dependencies.
For example, the value of TEACHER is dependant on the PRIMARY KEY (CLASS,SECTION), since a particular SECTION of a particular CLASS can have only one teacher—that is, A→B. Moreover, since a TEACHER can be in only one DEPARTMENT, the value in DEPARTMENT is dependant on the value in TEACHER—that is, B→C. However, since the PRIMARY KEY (CLASS,SECTION) determines the value of TEACHER, it also determines the value of DEPARTMENT—that is, A→C. Thus, the table exhibits the transitive dependency in which A→B and B→C, therefore A→C.
The problem with a transitive dependency is that it makes the table subject to the deletion anomaly. When Smith retires and we remove his row from the table, we lose not only the fact that Smith taught SECTION 1 of H100, but also the fact that SECTION 1 of H100 was a class that belonged to the HISTORY department.
To put a table with transitive dependencies between nonkey columns into 3NF requires that the table be split into multiple tables. To do so for the table in the current example, we would need split it into tables described by:
 courses (class, section, teacher)
 PRIMARY KEY (class,section)
 teachers (teacher, department)

 PRIMARY KEY (teacher)
 departments (department, dept_head)
 PRIMARY KEY (department)
Denormalizing a Database to Improve Performance
From Tips 201–203 you learned that the process of normalization involves changing the structure of a table (sometimes by splitting it into more than one table) in order to eliminate functional dependencies between pairs of its nonkey columns. You also learned that the goal of normalization is to eliminate modification anomalies.
Unfortunately, splitting a table into two or more tables has a downside—if you need a "complete" picture in answer to a query, the DBMS must perform a multi-table join, which is very expensive in terms of time and memory resources. As such, if you have several normalized tables with related historical information, you should considering combining them into one denormalized table. After all, if it is purely historical information, it is not subject to change and therefore is not subject to modification anomalies—even in its denormalized state.
Suppose, for example, that you have historical data in tables created by:
CREATE TABLE customers
 (cust_id INTEGER,
 name VARCHAR(30),
 address VARCHAR(50),
 salesrep_ID INTEGER)

CREATE TABLE invoices
 (invoice_no INTEGER,
 invoice_date DATETIME,
 data_shipped DATETIME)

CREATE TABLE invoice_detail
 (invoice_no INTEGER,
 item_number INTEGER,
 price MONEY)

CREATE TABLE item_master
 (item_number INTEGER,
 description VARCHAR(30),
 cost MONEY)

CREATE TABLE employees
 (salesrep_ID INTEGER,
 name VARCHAR(30),
 SSAN CHAR(11),
 OFFICE SMALLINT)
Each time you want a list of customer orders complete with customer name, address, salesperson name, and invoice detail including a one-line description of each item on each invoice, the DBMS must perform a multi-table join of all of the data in five tables. If the tables are large (have many rows) and you often produce individual customer reports, you will end up wasting a significant amount of processor time by performing the same joins over and over again.
Denormalizing the database into a single table created by
 CREATE TABLE customer_histories
 (cust_id INTEGER,
 name VARCHAR(30),
 address VARCHAR(50),
 salesrep_name VARCHAR(30),
 salesrep_office SMALLINT,
 invoice_number INTEGER,
 invoice_date DATETIME,
 date_shipped DATETIME,
 item_number INTEGER,
 item_description VARCHAR(30),
 item_cost MONEY,
 item_price MONEY)
will let the DBMS perform a single table search whether printing a complete list of a customer's orders including the salesman, a description of the product, the price paid and the actual item cost, or printing the detail of orders by salesperson and office number.
SQL Tips and Techniques
- Understanding SQL Basics and Creating Database Files
- Using SQL Data Definition Language (DDL) to Create Data Tables and Other Database Objects
- Using SQL Data Manipulation Language (DML) to Insert and Manipulate Data Within SQL Tables
- Working with Queries, Expressions, and Aggregate Functions
- Understanding SQL Transactions and Transaction Logs
- Using Data Control Language (DCL) to Setup Database Security
- Creating Indexes for Fast Data Retrieval
- Using Keys and Constraints to Maintain Database Integrity
- Performing Multiple-table Queries and Creating SQL Data Views
- Working with Functions, Parameters, and Data Types
- Working with Comparison Predicates and Grouped Queries
- Working with SQL JOIN Statements and Other Multiple-table Queries
- Understanding SQL Subqueries
- Understanding Transaction Isolation Levels and Concurrent Processing
- Writing External Applications to Query and Manipulate Database Data
- Retrieving and Manipulating Data Through Cursors
- Understanding Triggers
- Working with Data BLOBs and Text
- Working with Ms-sql Server Information Schema View
- Monitoring and Enhancing MS-SQL Server Performance
- Working with Stored Procedures
- Repairing and Maintaining MS-SQL Server Database Files
- Writing Advanced Queries and Subqueries
- Exploiting MS-SQL Server Built-in Stored Procedures
- Working with SQL Database Data Across the Internet
EAN: 2147483647
Pages: 632
