Understanding Triggers
Understanding When to Use a CHECK Constraint Instead of a Trigger
As you will learn in Tip 448, "Understanding Triggers," a trigger is a set of one or more SQL statements the DBMS is to execute when a user attempts to INSERT, DELETE, or UPDATE one or more rows in a table. If you are trying to use the DBMS to enforce a business rule such as "Do not accept any orders of more than $100,000," you could use a trigger similar to
 CREATE trigger order_total_over_100000
 ON orders
 FOR INSERT, UPDATE
 AS IF ((SELECT order_total FROM inserted) > 100000)
 BEGIN
 PRINT 'Order rejected. Total order > 100000.'
 ROLLBACK
 END
which will display an error message and undo (ROLLBACK) any INSERT or UPDATE of the ORDERS table row in which the ORDER_TOTAL column is greater than $100,000.
One of the problems with triggers is that they exist as separate database objects, and someone looking at the definition if the ORDERS table has no idea that the system will reject any order that exceeds $100,000. Therefore, you may find it more straightforward and convenient (from a documentation standpoint) to enforce simple business rules using a CHECK constraint instead of a trigger.
For example, to implement the business rule in the current example as a CHECK constraint, add the constraint to the CREATE TABLE statement as:
 CREATE TABLE orders
 (cust_ID INTEGER,
 order_date DATETIME,
 shipped_date DATETIME,
 salesperson_ID INTEGER,
 order_total MONEY,
 total_paid MONEY,
 CONSTRAINT order_total_over_100000
 CHECK (order_total <= 100000))
You will learn all about triggers in Tips 448–461. For now, the important thing to understand is that if the trigger's only purpose is to prevent the insertion of a row with a column value that violates a business rule, you should consider replacing the trigger with a CHECK constraint in the CREATE TABLE statement used to define the table.
Understanding Nested Cursors
A connection can have multiple cursors open simultaneously. Moreover, you can nest one cursor within another. However, as you work your way through the outer cursor, you will incur the additional overhead of declaring, opening, and deallocating each inner cursor multiple times. Therefore, you should nest one cursor declaration within another only if you need to use one or more column values from the current row in the outer cursor in the inner (nested) cursor's SELECT statement.
Suppose, for example, that you want to create a stored procedure that will list your sales offices in order from the lowest to highest amount of total sales and will show the manager and top salesperson for each office. The following code creates a stored procedure using nested cursors to produce output similar to that shown in Figure 445.1.
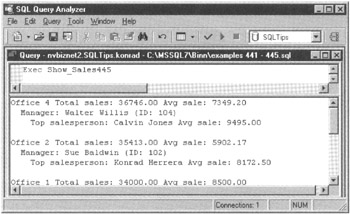
Figure 445.1: Composite office report produced using embedded and multiple open cursors
CREATE PROCEDURE Show_Sales AS
DECLARE @avg_sale MONEY, @emp_fname VARCHAR(20),
 @emp_lname VARCHAR(20), @manager INT,
 @max_sale MONEY @manager_name VARCHAR(50),
 @office_ID INT, @total_sales MONEY

/* cursor used to display the office cursor information,
 arranged in ascending order by total sales */
DECLARE cur_office_sales CURSOR
FOR SELECT office, SUM(order_total) total_sales,
 AVG(order_total) avg_sale
 FROM orders GROUP BY office ORDER BY total_sales DESC
OPEN cur_office_sales

/* work through the office cursor fetching rows until there
 are no more rows to display (@@FETCH_STATUS <> 0) */

FETCH cur_office_sales INTO @office_ID, @total_sales,
 @avg_sale
WHILE @@FETCH_STATUS = 0
BEGIN
 PRINT 'Office ' + CAST(@office_ID AS CHAR(1)) +
 ' Total sales: ' + CAST(@total_sales AS VARCHAR(11)) +
 ' Avg sale: ' + CAST(@avg_sale AS VARCHAR(11))

/* the cursor used to list managers for each office is
 nested, because it uses the value of @office_ID from the
 outer cursor in its SELECT statement */

 DECLARE cur_office_manager CURSOR
 FOR SELECT emp_ID,office, f_name+' 'l_name office_manager
 FROM employees, offices
 WHERE emp_ID = manager AND office = @office_ID
 OPEN cur_office_manager

/* the cursor used to list the top employee for each office
 is also nested, because it too uses the @office_ID value
 from the outer cursor */
 DECLARE cur_office_employees CURSOR
 FOR SELECT f_name, 1 _name, MAX(order_total) max_order,
 AVG(order_total) avg_order
 FROM orders, employees
 WHERE orders.office = @office_ID AND
 salesperson = emp_ID
 GROUP BY f_name, l_name ORDER BY max_order DESC
 OPEN cur_office_employees

/*work through the (embedded) office manager cursor,
 displaying the name and ID of the managers for the
 office in the current row in the (outer) office cursor*/
 FETCH cur_office_manager INTO @manager, @office_ID,
 @manager_name
 WHILE @@FETCH_STATUS = 0
 BEGIN
 PRINT ' Manager: ' + @manager_name +
 ' (ID: ' + CAST(@manager AS VARCHAR (4)) +')'

/* retrieve and display the "top" employee from the
 (embedded) office employees cursor for the office in the
 current (outer) row of the offices cursor */

 FETCH cur_office_employees INTO @emp_fname, @emp_lname,
 @max_sale, @avg_sale
 PRINT ' Top Salesperson: ' @emp_fname + ' ' +
 @emp_lname + ' Avg sale: ' +
 CAST(@avg_sale AS VARCHAR (11))
 PRINT ' '
 FETCH cur_office_manager INTO @manager, @office_ID,
 @manager_name
 END

 DEALLOCATE cur_office_manager
 DEALLOCATE cur_office_employees

 FETCH cur_office_sales INTO @office_ID, @total_sales,
 @avg_sales
END

DEALLOCATE cur_office_sales
RETURN 0
| Note |
The reason you have to DEALLOCATE the embedded (managers and employees) cursors while working through the offices cursor is because the value of the @OFFICE_ID variable is set for the cursor's SELECT statement when the cursor is declared. As such, to change the value of @OFFICE_ID in each cursor's WHERE clause to match the value of the office ID in the current row of the outer (offices) cursor, you must DEALLOCATE and re-create the embedded cursors. |
Using the @@ERROR Function to Determine the Error Status of the Last Transact SQL Statement Executed
When an MS-SQL Server successfully executes a Transact-SQL statement, the @@ERROR function returns zero (0). If an error occurs during statement execution, the DBMS returns a text error message, and @ERROR returns the error code (number) associated it. You can display all of the server's error codes and messages by querying the SYSMESSAGES system table with a query such as:
SELECT * FROM master.dbo.sysmessages
Or, to display the error message generated by the last Transact-SQL statement executed, submit the query:
SELECT * FROM master.dbo.sysmessages
WHERE error = @@ERROR
| Note |
The system clears and resets the last statement execution status each time it executes a statement—including the query to display the text of the error message in the previous example. As such, either check and use the value returned by @@ERROR to decide on an action immediately after the statement in question, or save the value returned by @@ERROR to a local variable for use later. |
Common uses for the @@ERROR function are to display customized error messages and to return an error code from a stored procedure. For example, the following procedure attempts to INSERT a new title into the TITLES table and uses @@ERROR to select and display an error message to the screen, if necessary. The stored procedure also returns a result code to the calling program, which if 0 = success and if <>0 indicates failure.
CREATE PROCEDURE add_title @ISBN CHAR(13), @auth_ID TNT,
 @title VARCHAR(40) AS
DECLARE @result_code TNT
INSERT INTO titles VALUES (@ISBN, @auth_ID, @title)

SET @result_code = @@ERROR
IF @result_code <> 0
 BEGIN
 IF @result_code = 515
 PRINT 'ERROR! ISBN, author ID, or title is NULL.'
 ELSE IF @result_code = 547
 PRINT 'ERROR! Author ID is not in AUTHORS table.'
 ELSE IF @result_code = 2627
 PRINT 'ERROR! Duplicate ISBN is not allowed.'
 ELSE PRINT 'ERROR! Unable to add new title.'
 END

RETURN @result_code
Understanding That the Value of the Current Date and Time Is Set at the Start of Statement Execution
The GETDATE() function returns the current system date and time (down to the millisecond, if stored into a table column of data type DATETIME). If you use GETDATE() in an SQL statement, the DBMS calls the function only once, regardless of the amount of time it takes the system to finish executing the statement.
Suppose, for example, that you submit the UPDATE statement
 UPDATE orders
 SET late_fee = (late_fee +
 ((order_total - amount_paid) * 0.10)),
 date_fee_assessed = GETDATE()
 WHERE CONVERT(CHAR(9),date_due,6) =
 CONVERT(CHAR(9), GETDATE() - 1,6) AND
 (order_total - amount_paid) > 0
at 1 minute before midnight on 01/12/2001, and due to the large number or rows in the ORDERS table, the system does not finish executing the UPDATE until 10 minutes after midnight. The DBMS will assess a late fee only on orders with a DUE_DATE of 01/11/2001—even though the "current date" changed from 01/12/2001 to 01/13/2001 while the server was in the process of executing the UPDATE statement. Moreover, the DATE_FEE_ASSESSED column in each of the updated rows will have the same date and time value (down to the millisecond)—even though each successive update occurred at a later time during the 11 minutes it took the DBMS to work its way through the ORDERS table.
A trigger is a special type of stored procedure that the DBMS executes in response to an INSERT, UPDATE, or DELETE operation against a specific table or column. Triggers are most often used to enforce business rules such as:
- Notify the branch manager if any account is given a credit line of $75,000 or more.
- No customer is allowed to make charges that would exceed the customer's credit limit by 10 percent.
- Place a 14-day hold on the funds available from any check for $2,500.00 or more deposited into an account.
In addition, many triggers are used to maintain the integrity of totals, counts, and other amounts such as:
- When an office hires a new salesperson, increase the office sales quota by the amount of the new hire's sales quota.
- After adding a new order to the system, increase the customer's total purchases, and the salesperson and sales office's total sales by the amount of the order.
- When a customer makes a credit card charge, increase the account's rewards credit by 1 percent of the amount charged.
The DBMS takes responsibility for maintaining entity integrity with PRIMARY KEY and UNIQUE constraints, domain integrity through CHECK constraints, and referential integrity with FOREIGN KEY constraints. However, with the exception of FOREIGN KEY constraints, each of these integrity checks is confined to a single table. Even each FOREIGN KEY constraint can validate data only by looking for an exact match in a column or combination of columns in one other table. Thus, enforcing business rules and maintaining totals across multiple tables go beyond the scope of standard SQL constraints and have therefore been the responsibility of the application programs that access the database. Triggers are an attempt to give the DBMS the capability to check all necessary constraints so that the application programmer need worry about only designing the best interface that allows users to enter data and displays information in the most efficient manner possible.
While all of the major database products (MS-SQL Server, Sybase, Informix, Oracle, DB2, and so on) support triggers, neither the SQL-86 nor the SQL-92 specification mentions them. As a result, each DBMS product has a different syntax for creating a trigger and places its own limitations on the statements a trigger can execute. Tips 449–461 will detail the MS-SQL Server trigger syntax and capabilities.
While the specific syntax for creating a trigger and its capabilities will differ from one DBMS product to another, the basic concept of triggers and their general purpose is the same for all SQL servers that support them. A trigger is a set of statements the DBMS is to execute when a user attempts the triggering action—an UPDATE, INSERT, or DELETE (as defined by the trigger). You can associate a trigger with a table, in which case any DELETE, INSERT, or UPDATE on the table will cause the DBMS to execute its code. Or, you can attach a trigger to a specific column or group of columns within a table, in which case the DBMS will activate the trigger only when an INSERT or UPDATE supplies a NULL or non-NULL value for the column to which the trigger is attached.
Using the CREATE TRIGGER Statement to Create a Trigger
Only a table's owner (the DBOO) or the database owner (the DBO) can create a trigger on a table (or on one or more of its columns). Creating a trigger is very similar to creating a stored procedure in that a trigger, like a stored procedure, has a name and a set of statements the DBMS is to execute when the trigger (or stored procedure) is called. The syntax for the CREATE TRIGGER statement is
 CREATE TRIGGER
 ON {|}
 [WITH ENCRYPTION]
 {{FOR | AFTER I INSTEAD OF}{[INSERT], [UPDATE], [INSERT]}
 [NOT FOR REPLICATION]
 AS [{IF UPDATE ()
 [{AND | OR} UPDATE (...)]
 |IF (COLUMNS_UPDATED()
 {})
 {...
 }
 }]

 }
where:
- trigger name is the name of the trigger. Since triggers are global to the database, each trigger must have a unique name within the database, not just among the trigger owner's database objects.
- table name | view name is the name of the table or view to which the trigger is attached.
- WITH ENCRYPTION is the DBMS that stores the text of each trigger in the SYSCOMMENTS table. If the CREATE TRIGGER statement includes the WITH ENCRYPTION clause, the DBMS will encrypt the text of the trigger, which prevents users from displaying the trigger's code by querying the SYSCOMMENTS table. However, encrypting the trigger also prevents the DBMS from publishing the trigger to other MS-SQL Servers during MS-SQL Server replication.
- FOR or AFTER specifies that the DBMS is to execute the trigger after the DBMS executes the triggering INSERT, UPDATE, or DELETE statement on the table listed in the ON clause.
AFTER is the default if FOR is the only keyword specified.
You cannot define an AFTER trigger on a view.
- INSTEAD OF. Tells the DBMS to execute the trigger instead of (in place of) the INSERT, UPDATE, or DELETE on the table or view name in the CREATE TRIGGER statement's ON clause.
Each table and view can have at most one INSTEAD OF (INSERT, UPDATE, and DELETE) trigger. However, you can create multiple views of the same table and a different INSTEAD OF (INSERT, UPDATE, or DELETE) for each view.
You cannot create an INSTEAD OF trigger on a view whose definition includes a WITH CHECK OPTION.
- DELETE, INSERT, UPDATE. The SQL statement that, when attempted against the table or view listed in the ON clause, activates the trigger. Each CREATE TRIGGER statement must include at least one of the three statement types and may include any combination of the three. If you want more than one of the three actions to activate the trigger, list the desired triggering actions separated by commas.
You cannot create an INSTEAD OF DELETE trigger on a table with an ON DELETE CASCADE option defined. Similarly, you cannot create an INSTEAD OF UPDATE trigger on a table with an ON UPDATE CASCADE option.
- NOT FOR REPLICATION. Tells the DBMS not to activate the trigger when the table is modified during a replication process.
- IF UPDATE (). Tells the DBMS to activate the trigger only if an INSERT or UPDATE action modifies the value in the column named by . To test for an INSERT or UPDATE action on more than one column, use an AND or an OR logical connective to add the desired additional column name(s) to the IF UPDATE clause.
- IF COLUMNS_UPDATED(). The COLUMNS_UPDATED() function returns a VAR-BINARY bit pattern indicating which of the columns have been updated due to an INSERT or UPDATE action on the table. The leftmost bit is the least significant bit and represents the first column in the table or view, second from the left represents the second column, third from the left represents the third column, and so on. To check if column 2, 4, or 6 was updated, for example, write the IF COLUMNS_UPDATED() clause as:
IF (COLUMNS)_UPDATED() & 42) > 0
Or, to test if all three of the columns (2, 4, and 6) were updated, write the AS IF COLUMNS_UPDATED() clause as:
IF (COLUMNS)_UPDATED() & 42) = 42
- AS . Details the actions that the trigger is to perform when activated.
Whenever the DBMS activates a trigger (that is, executes the SQL statements in a trigger's AS clause) in response to an INSERT, UPDATE, or DELETE action on the trigger's table or view, the DBMS creates two virtual tables: INSERTED and DELETED. Both tables are structurally identical to the table or view on which the trigger is defined and hold the original and new value for all of the rows the DBMS will change in response to the trigger action.
For an INSERT trigger, the INSERTED table holds all of the new values to be inserted into the table to which the trigger is attached. For an UPDATE trigger, the INSERTED table holds the new (updated) values to be placed in the trigger's table, while the DELETED table holds the column values prior to the UPDATE. Finally, for a DELETE trigger, the DELETED table holds the values (rows) to be removed from the table on which the trigger is created.
Tip 450, "Understanding INSERT Triggers"; Tip 451, "Understanding DELETE Triggers"; and Tip 453, "Understanding UPDATE Triggers," will show you how to use the CREATE TRIGGER statement to create INSERT, DELETE, and UPDATE triggers.
Understanding INSERT Triggers
An INSERT trigger is a stored procedure you want the DBMS to execute either AFTER or INSTEAD OF executing an INSERT statement on a particular table or view. Suppose, for example, that you want to UPDATE the TOTAL_SALES column in the OFFICES table and the TOTAL_SALES column in the EMPLOYEES table whenever a salesperson inserts a new order into the ORDERS table. The CREATE TRIGGER statement
 CREATE TRIGGER tri_ins_order ON orders
 AFTER INSERT AS
 SET NOCOUNT ON
 UPDATE offices SET total_sales = total_sales +
 (SELECT order_total FROM INSERTED)
 WHERE offices.office_ID =
 (SELECT office_ID FROM INSERTED)
 UPDATE employees SET total_sales = total_sales +
 (SELECT order_total FROM INSERTED)
 WHERE employees.emp_ID =
 (SELECT salesperson FROM INSERTED)
tells the DBMS to UPDATE the totals in each of the two tables after it successfully executes the INSERT statement that adds the new order to the ORDERS table.
As mentioned in Tip 449, "Using the CREATE TRIGGER Statement to Create a Trigger," the DBMS automatically creates a virtual table named INSERTED when it activates an INSERT trigger. The INSERTED table has all of the columns from the table in the trigger's ON clause and contains a copy of every row the DBMS will INSERT into the trigger table if the system is allowed to complete the current INSERT statement. Notice that you can use any of the column values in the INSERTED table in statements within the trigger. For example, the trigger in the current example uses the ORDER_TOTAL column from the row to be inserted to increase the value in the TOTAL_SALES column in the EMPLOYEES and OFFICES tables. Moreover, the trigger uses the OFFICE_ID and SALESPERSON values from the inserted row in each UPDATE statement's WHERE clause to specify which rows in the two tables are to be updated.
In addition to updating totals in multiple tables, you might use an INSERT trigger to enforce a business rule such as "All orders must be entered into the system at least three days prior to the EXPECTED_DEL_DATE." The trigger created with
CREATE TRIGGER tri_check_delivery_date ON orders
FOR INSERT AS
SET NOCOUNT ON
IF (SELECT expected_del_date FROM INSERTED) <
 (GETDATE() + 3)
BEGIN
 ROLLBACK TRAN
 RAISERROR('You cannot take an order to be delivered less
than three days from now.',16,1)
END
will enforce the "delivery in three or more days" business rule.
As shown by the examples in this tip, you can create more than one INSERT trigger on the same table. The DBMS considers the INSERT statement and all of the triggers it activates to be part of the same transaction. Therefore, the end result is the same whether or not the DBMS executes the TRI_INS_ORDER trigger before the TRI_CHECK_DELIVERY_DATE trigger. Any work performed by the current open transaction (including actions taken within any activated triggers) will be undone (rolled back) by the ROLLBACK TRAN statement in the TRI_CHECK_DELIVERY_DATE trigger if the EXPECTED_DEL_DATE on the new order is less than three days in the future.
| Note |
When an activated trigger executes a ROLLBACK, the DBMS undoes any work performed. Therefore, any additional triggers on the table will not be activated, since the DBMS will return the table to the condition it was in prior to the execution of any triggering (INSERT, UPDATE, or DELETE) statement. |
Understanding DELETE Triggers
A DELETE trigger is a stored procedure that the DBMS executes either after or instead of executing a DELETE statement on a specific table or view. For example, if you create the INSERT trigger you learned about in Tip 450, "Understanding INSERT Triggers," on an ORDERS table to maintain the TOTAL_SALES value in the EMPLOYEES and OFFICES tables, you also need to create a DELETE trigger such as:
CREATE TRIGGER tri_del_order ON orders AFTER DELETE AS
IF @@ROWCOUNT > 1
 BEGIN
 ROLLBACK TRAN
 RAISERROR('Each DELETE statement must remove only a single
order.',16,2)
 END
ELSE BEGIN
 SET NOCOUNT ON
 UPDATE offices SET total_sales = total_sales -
 (SELECT order_total FROM DELETED)
 WHERE offices.office_ID =
 (SELECT office_ID FROM INSERTED)
 UPDATE employees SET total_sales = total_sales -
 (SELECT order_total FROM DELETED)
 WHERE employees.emp_ID =
 (SELECT salesperson FROM DELETED)
END
Each time a user (or application) executes a DELETE statement that removes a row from the ORDERS table, the DBMS activates the DELETE trigger, which reduces the TOTAL_SALES in the OFFICES and EMPLOYEES tables by the ORDER_TOTAL value of the order removed.
Notice that unlike the INSERT trigger in Tip 450, the DELETE trigger must take into consideration that a single DELETE statement can remove more than one row from the trigger table. The DELETE trigger in the current example uses the @@ROWCOUNT variable to determine the number of rows affected by the triggering (DELETE) statement. If the DELETE statement attempts to remove more than one row from the ORDERS table, the DELETE trigger undoes the deletion by executing a ROLLBACK.
Although the current example does not allow it, you could modify the DELETE trigger to allow for multiple-row deletions. Remember, the DBMS creates a virtual DELETED table and fills it with a copy of each of the rows removed by the DELETE statement that activated the trigger. Therefore, the trigger could create a cursor, populate it with the rows from the DELETED table, and then work through the cursor one row at a time-reducing the TOTAL_SALES from the EMPLOYEES and OFFICES tables by the value in the ORDER_TOTAL column in each row of the cursor.
| Note |
Executing a Transact-SQL TRUNCATE TABLE statement will delete all rows from a table without activating a DELETE trigger created on the table being truncated. As such, be careful when executing a TRUNCATE TABLE statement in a production environment. After truncating a table that has a DELETE trigger designed to summarize the table's data in another table, you must execute an UPDATE statement that zeroes out the totals maintained by the trigger. |
Understanding Cascading Triggers
Because a trigger can execute INSERT, UPDATE, and DELETE statements, work performed by one trigger can cause the DBMS to activate another trigger, which may execute a statement that activates a third trigger, and so on. In short, a single triggering (INSERT, UPDATE, or DELETE) statement can cause the DBMS to activate a cascade of triggers, each trigger executing statements that activate other triggers.
Suppose, for example, that you wanted to remove a customer (from the CUSTOMERS table) and all of the customer's orders (from the ORDERS table), while still maintaining accurate TOTAL_SALES figures in the EMPLOYEES and OFFICES tables for the remaining orders (for other customers) in the ORDERS table. If you create a trigger such as
 CREATE TRIGGER tri_del_customer ON customers
 INSTEAD OF DELETE AS
 IF @@ROWCOUNT > 1
 BEGIN
 ROLLBACK TRAN
 RAISERROR('You can DELETE only one customer at a time.',16,3)
 END
 ELSE BEGIN
 SET NOCOUNT ON
 DECLARE @timestamp AS TIMESTAMP

 /* Create a cursor and populate it with all of the
 customer's orders */

 DECLARE cur_del_orders CURSOR
 FOR SELECT order_timestamp FROM orders
 WHERE cust_ID = (SELECT cust_ID FROM DELETED)
 OPEN cur_del_orders

 /* Go through the cursor one row at a time, deleting each
 of the customer's orders in turn */

 FETCH NEXT FROM cur_del_orders INTO @timestamp
 WHILE @@FETCH_STATUS = 0
 BEGIN
 DELETE FROM orders WHERE order_timestamp = @timestamp
 FETCH NEXT FROM cur_del_orders
 END

 DEALLOCATE cur_del_orders

 /* Remove the customer record from the CUSTOMERS table */
 DELETE FROM customers
 WHERE cust_ID = (SELECT cust_ID FROM DELETED)
 END
and then DELETE a customer from the CUSTOMERS table, the DBMS will create a cursor, populate it with the customer's orders, and then delete one order at a time from the ORDERS table. Given that the database owner (DBO) or the owner of the ORDERS table created the DELETE trigger in Tip 451, "Understanding DELETE Triggers," each DELETE statement in the TRI_DEL_CUSTOMERS trigger that removes a row from the ORDERS table will activate that TRI_DEL_ORDER trigger.
| Note |
In the current example, the CUST_ID column of the CUSTOMERS table is a FOREIGN KEY for the ORDERS table. As a result the DBMS will abort any DELETE statement that tries to remove a customer (from the CUSTOMERS table) who still has orders (in the ORDERS table). To get around this problem, the DELETE trigger includes an INSTEAD OF clause that tells the DBMS to substitute the actions of the trigger in place of the DELETE statement that activated it. After the trigger in the current example removes all of the customer's orders from the ORDERS table, the DBMS allows it to DELETE the customer row from the CUSTOMERS table because doing so no longer violates the ORDERS table's FOREIGN KEY (referential integrity) constraint. Notice that deleting a row from the table on which the DELETE trigger is declared does not itself activate the DELETE trigger recursively-unless you use the system stored procedure SP_DBOPTION to enable RECURSIVE TRIGGERS. |
Understanding UPDATE Triggers
An UPDATE trigger is a stored procedure that the DBMS executes either after or instead of executing an UPDATE statement on a specific table or view. Continuing with the TOTAL_SALES summary example from Tip 450, "Understanding INSERT Triggers," and Tip 451, "Understanding DELETE Triggers," you might add an UPDATE trigger such as
CREATE TRIGGER tri_update_order ON orders AFTER UPDATE AS
DECLARE @rowcount INT
SET @rowcount = @@rowcount

IF UPDATE (order_total) OR UPDATE (office_ID) OR
 UPDATE(salesperson) BEGIN
 IF @@ROWCOUNT > 1
 BEGIN
 ROLLBACK TRAN
 RAISERROR('Each UPDATE must change only one order at a time.',16,2)
 END
 ELSE BEGIN
 SET NOCOUNT ON
 UPDATE offices SET total_sales = total_sales -
 (SELECT order_total FROM DELETED)
 WHERE offices.office_ID =
 (SELECT office_ID FROM DELETED)
 UPDATE offices SET total_sales = total_sales +
 (SELECT order_total FROM INSERTED)
 WHERE offices.office_ID =
 (SELECT office_ID FROM INSERTED)

 UPDATE employees SET total_sales = total_sales -
 (SELECT order_total FROM DELETED)
 WHERE employees.emp_ID =
 (SELECT salesperson FROM DELETED)
 UPDATE employees SET total_sales = total_sales +
 (SELECT order_total FROM INSERTED)
 WHERE employees.emp_ID =
 (SELECT salesperson FROM INSERTED)
 END
END
to maintain the correct value for TOTAL_SALES in the OFFICES and EMPLOYEES tables when a user (or application) changes the amount of an order, its salesperson, or the office from which it was purchased.
The first IF statement in the UPDATE trigger in the current example determines if the updated row's ORDER_TOTAL, OFFICE_ID, or SALESPERSON column value was included in the UPDATE statement's SET clause. If the UPDATE statement did not set the value in any one of the three columns, then the change made to the row in the ORDERS table has no effect on the TOTAL_SALES values maintained by the trigger. Therefore, the trigger will execute its UPDATE statements only if the value in one or more of the three columns (ORDER_TOTAL, OFFICE_ID, or SALESPERSON) was set by the UPDATE statement that activated the trigger.
Notice that an UPDATE trigger can take advantage of both the INSERTED and the DELETED virtual tables that the DBMS creates when it activates the trigger. For an UPDATE trigger, the DELETED table contains a copy of the original column values from each row that satisfied the search criteria in the UPDATE statement's WHERE clause. The INSERTED table, meanwhile, contains a copy of the same rows, but the column values in each row of the INSERTED table reflect the changes made by in the UPDATE statement's SET clause.
| Note |
If the UPDATE trigger's IF UPDATE (column) clause appears in the UPDATE statement's SET clause, the IF UPDATE clause returns TRUE-whether the UPDATE statement changed the value in the column or not. For example, the DBMS will execute the UPDATE trigger in the current example if you execute the UPDATE statement UPDATE orders Set salesperson = salesperson WHERE customer_ID = 1001 AND order_date = '01/06/2001' so long as the column values in at least one row in the ORDERS table satisfy search criteria in the UPDATE statement's WHERE clause. (Bear in mind that some application programs submit an UPDATE with a SET clause that contains all updateable fields when the user clicks the mouse pointer on the OK button, whether any changes were made or not.) If the trigger performs a significant amount of work when column values change, you can improve its performance by checking the original column values in the DELETED table against the updated column values in the INSERTED table to see if the user (or application) actually made any changes. The trigger needs to perform its work only if the column values actually changed, and not just because the trigger columns appeared in the UPDATE statement's SET clause. |
Like the DELETE trigger in Tip 451, an UPDATE trigger must allow for the possibility that a single UPDATE statement will set column values in more than one row in the trigger table. The UPDATE trigger in the current example uses the @@ROWCOUNT variable to determine the number of rows affected by the triggering (UPDATE) statement. If the UPDATE statement sets values in more than one row within the ORDERS table, the UPDATE trigger undoes the work performed by executing a ROLLBACK and returns an error message and status codes.
Although the current example does not allow it, you could modify the UPDATE trigger to allow for multiple-row updates. Remember, the DELETED table contains a copy of each of the original column values from every ORDERS table row that satisfies the search criteria in the UPDATE statement's WHERE clause. Similarly, the INSERTED table contains the same rows with the column values as they would be if the UPDATE statement is allowed to complete its work. Therefore, the trigger could create two cursors, populate one with the rows from the INSERTED table and the other with the rows from the DELETED table, and then work its way through each cursor, one row at a time, reducing the TOTAL_SALES figure by the ORDER_TOTAL column value from each row in the DELETED cursor and increasing the TOTAL_SALES figure by the value of the ORDER_TOTAL column value from each row in the INSERTED cursor.
Using an UPDATE Trigger to Change the Value of a PRIMARY KEY FOREIGN KEY Pair
In Tip 173, "Understanding Foreign Keys," you learned how to use FOREIGN KEY constraints to maintain referential integrity. By matching the FOREIGN KEY value in a child table with the PRIMARY KEY value in a parent table, the DBMS maintains referential integrity by preventing users (and applications) from deleting a row in the parent table if doing so will create an orphan row in the child table. However, the FOREIGN KEY constraint prevents you not only from deleting a row that has a PRIMARY KEY that matches the FOREIGN KEY in one or more rows in the child table, but also from updating the PRIMARY KEY.
Suppose, for example, that you are using the customer's phone number (in the PHONE_NUMBER column) as the PRIMARY KEY in the CUSTOMERS table. The DBMS will ensure that no orders or payments for nonexistent customers are inserted in the ORDERS and PAYMENTS tables by requiring that the FOREIGN KEY in each new row has a matching value in the PRIMARY KEY column of one (and only one) of the rows in the CUSTOMERS table.
Now, suppose you need to change the customer's phone number. The DBMS will not allow you to change the phone number in either the ORDERS or the PAYMENTS table because the new phone number does not exist in the CUSTOMERS table. Similarly, the system will not let you change the phone number in the CUSTOMERS table because doing so will create FOREIGN KEY values (with the old phone number) in the ORDERS and PAYMENTS tables that have no matching phone number in the PRIMARY KEY column of the CUSTOMERS table.
Fortunately, you can use an UPDATE trigger (with an INSTEAD OF clause) to let the user execute a single UPDATE statement that changes both PRIMARY KEY and FOREIGN KEY values in a single transaction. For example, the UPDATE trigger
 CREATE TRIGGER tri_change_phone_number ON customers
 INSTEAD OF UPDATE AS
 IF @@ROWCOUNT > 1
 BEGIN
 ROLLBACK
 RAISERROR('You must UPDATE customer columns one row at a time.',16,4)
 END
 ELSE BEGIN
 SET NOCOUNT ON
 DECLARE @new_phone_num CHAR(7), @old_phone_num CHAR(7)
 SET @new_phone_num = (SELECT phone_number FROM INSERTED)
 SET @old_phone_num = (SELECT phone_number FROM DELETED)

 IF @new_phone_num <> @old_phone_num
 BEGIN

 /*INSERT duplicate customer record with new phone number*/

 INSERT INTO customers SELECT * FROM INSERTED

 /*Change phone number in child rows*/

 UPDATE payments SET phone_number = @new_phone_num
 WHERE phone_number = @old_phone_num

 UPDATE orders SET phone_number = @new_phone_num
 WHERE phone_number = @old_phone_num
 /*DELETE original customer record*/

 DELETE FROM customers
 WHERE phone_number = @old_phone_num
 END

 /*If not changing the primary key then update the remaining
 columns in the customers table as normal*/

 ELSE BEGIN
 UPDATE customers SET
 f_name = (SELECT f_name FROM INSERTED),
 l_name = (SELECT l_name FROM INSERTED)
 WHERE customers.phone_number = @old_phone_num
 END
 END
first inserts a duplicate customer row with the new phone number into the CUSTOMERS table. Then the trigger changes the FOREIGN KEY value in each of the child rows in the ORDERS and PAYMENTS tables from the old phone number to the new phone number. Finally, the UPDATE trigger deletes the original (now childless) customer row with the old phone number from the CUSTOMERS table.
Using Triggers to Enhance Referential Integrity
In Tip 454, "Using an UPDATE Trigger to Change the Value of a PRIMARY KEY/FOREIGN KEY Pair," you learned that you can use an UPDATE trigger to work around FOREIGN KEY referential integrity constraints that prevent you from changing the PRIMARY KEY value in parent table rows that have children (related rows) in one more related tables. Meanwhile, Tip 452, "Understanding Cascading Triggers," showed you how to use a DELETE trigger to remove related (child) rows prior to deleting a parent row in response to a user's request to DELETE a row from the parent table that has related (child) rows in one or more child tables. In addition to letting you work around referential integrity constraints (while still maintaining database referential integrity), triggers provide an alternative means to implement the referential integrity constraints normally provided by the DBMS through PRIMARY KEY/FOREIGN KEY pairs.
The main reason to implement referential integrity using triggers instead of primary and foreign keys is that triggers can display customized, descriptive messages as to why a statement failed to execute. For example, if you attempt to DELETE a parent row with child rows in one ore more related tables, the DBMS will display an error message similar to:
 Server: Msg 547, Level 16, State 1, Line 1
 DELETE statement conflicted with COLUMN REFERENCE
 constraint fk_pay_cust. The conflict occurred in database
 'SQLTips', table 'payments', column 'cust_ID'.
 The statement has been terminated
Moreover, the DBMS will display a nearly identical error message (substituting only the word INSERT for DELETE) if you attempt to INSERT a child row with a FOREIGN KEY value that has no matching PRIMARY KEY in the parent table.
To maintain referential integrity using triggers that provide more descriptive error messages when aborting statements that attempt to create orphans (one or more rows in a child table that have no related row in the parent table), create an INSERT/UPDATE trigger such as the following for each FOREIGN KEY in each of the child tables
 CREATE TRIGGER tri_order_ins_updt ON payments
 FOR INSERT, UPDATE AS
 IF ((SELECT COUNT(*) FROM customers, INSERTED
 WHERE customers.cust_ID = INSERTED.cust_ID) = 0)
 BEGIN
 ROLLBACK

 PRINT 'The customer ID (CUST_ID) is invalid.'
 PRINT 'The CUST_ID in a payment record must match one
 of the CUST_ID values in the CUSTOMERS table.'

 RAISERROR('The statement has been terminated.',16,547).
 END
Then create a DELETE trigger such as that shown here in conjunction with an UPDATE (like the one shown in Tip 454) on the parent table
 CREATE TRIGGER tri_cust_del ON customers FOR DELETE AS
 DECLARE @child_count INT
 SET @child_count = 0
 IF ((SELECT COUNT(*) FROM payments, DELETED
 WHERE payments.cust_ID = DELETED.cust_ID) > 0)
 BEGIN
 PRINT 'You must DELETE the customer''s payments from
 the PAYMENTS table before deleting the customer.'

 SET @child_count = 1
 END

 IF ((SELECT COUNT(*) FROM orders, DELETED
 WHERE orders.cust_ID = DELETED.cust_ID) > 0)
 BEGIN
 PRINT 'You must DELETE the customer''s orders from the
 ORDERS table before deleting the customer.'
 SET @child_count = 1
 END

 IF @child_count > 0
 BEGIN
 ROLLBACK

 RAISERROR('The DELETE statement has been terminated
 without deleting any rows.',16,547)
 END
Using a Trigger to Send an E mail Message
Each MS-SQL Server installation includes a set of extended procedures which enable the DBMS to execute command strings in external operating system shells and to send and receive e-mail messages. Moreover, the system stored procedure SP_ADDEXTENDEDPROC lets you make additional extended procedures (function calls in Dynamic Link Library [DLL] files) available to the server as well. A trigger can call any of the extended procedures available on the MS-SQL Server.
For example, to send an e-mail message to the SALESMANAGER e-mail box and to the members of the SALESPEOPLE e-mail group when a new item is inserted into the PRODUCTS table, create an INSERT trigger similar to:
 CREATE TRIGGER tri_email_re_new_item ON products
 FOR INSERT AS
 DECLARE @product_code VARCHAR(10),
 @description VARCHAR(30),
 @email_message VARCHAR(75)
 SET NOCOUNT ON

 /* Get the product code and description of the new product
 from the row being inserted into the PRODUCTS table */

 SELECT @product_code = INSERTED.product_code,
 @description = INSERTED.description
 FROM INSERTED

 /* Form the e-mail message to send */

 SELECT @email_message = 'PRODUCT CODE: (' + @product_code +
 ') DESCRIPTION: ' + @description

 /* Formulate and send the e-mail message */
 EXEC master.dbo.xp_sendmail
 @recipients = 'SalesManager, Salespeople',
 @message = @email_message,
 @subject = 'NEW PRODUCT Availability Alert'
You will learn more about the syntax (and capabilities) of the extended procedure XP_SENDMAIL, how to use other extended procedures to start and stop MS-SQL Server e-mail processes, and how to read and delete e-mail message in Tips 588-590. For now, the important thing to understand is that you can use triggers to call an extended procedure that lets you send e-mail messages.
Understanding Nested Triggers
A nested (or cascading) trigger is a trigger that executes a statement that activates another trigger (which may execute a statement that activates a third trigger, and so on.) You learned how to use nested DELETE triggers in Tip 452, "Understanding Cascading Triggers," and how to use nested UPDATE triggers in Tip 454, "Using an UPDATE Trigger to Change the Value of a PRIMARY KEY/FOREIGN KEY Pair." In addition to giving the DBMS the ability to execute cascading deletes and updates, nested triggers are also useful for such housekeeping functions as making a backup copy of rows being deleted or updated by another trigger.
For example, if you implement the DELETE trigger in Tip 452
CREATE TRIGGER tri_del_customer ON customers
INSTEAD OF DELETE AS
IF @@ROWCOUNT > 1 BEGIN
 ROLLBACK TRAN
 RAISERROR('You can DELETE only one customer at a time.',16,3)
 END
ELSE BEGIN

/* .
 Statements which remove PAYMENTS and ORDERS table
 rows go here- see Tip 454 for details --
 .
/* Remove the customer record from the CUSTOMERS table */

 DELETE FROM customers
 WHERE cust_ID = (SELECT cust_ID FROM DELETED)
END
and you want to make a backup copy of the row being deleted from the CUSTOMERS table, create a nested DELETE trigger such as:
 CREATE TRIGGER tri_archive_del_cust ON customers FOR DELETE
 AS INSERT archive customers SELECT * FROM DELETED
As a result of the INSTEAD OF DELETE trigger and the nested DELETE trigger on the CUSTOMERS table, if a user executes a DELETE statement on the CUSTOMERS table, the DBMS will activate the INSTEAD OF DELETE trigger. When the INSTEAD OF DELETE executes the DELETE statement that attempts to DELETE a row from the CUSTOMERS table, the DBMS will activate the nested DELETE trigger, which will INSERT a copy of the deleted row from the CUSTOMERS table into the ARCHIVE_CUSTOMERS table.
When nesting triggers, keep in mind that the MS-SQL Server cannot determine whether the nesting you set up will start an infinite loop of cascading triggers until it activates the triggers at run time. For example, the DBMS will let you create an UPDATE trigger on table A that updates table B, and also let you create an UPDATE trigger on table B that updates table A. (Of course, when you later execute an UPDATE statement on either table, the triggers will execute and activate each other until the trigger execution nesting exceeds the maximum of 32 levels and the DBMS terminates the trigger. Note that the maximum level of nesting varies among DBMS products.)
| Note |
Nested triggers execute within a single transaction. Therefore, if the DBMS terminates a trigger because it exceeds the maximum nesting level, or if a trigger terminates due to some other error, the DBMS will execute a ROLLBACK to undo all work performed by all nested triggers and the UPDATE, DELETE, or INSERT statement that activated the first trigger in the chain. |
Using the MS SQL Server Enterprise Manager to Display or Modify a Trigger
The MS-SQL Server system stored procedure SP_HELPTEXT lets you use the syntax
SP_HELPTEXT
to display the text contents of a rule, default, unencrypted stored procedure, trigger, user-defined function, or view. Therefore, to display the code the governs the behavior of the TRI_DEL_CUSTOMER trigger created in Tip 457, "Understanding Nested Triggers," call the SP_HELPTEXT stored procedure as:
SP_HELPTEXT TRI_DEL_CUSTOMER
If you want to modify (as well as view) the contents of a trigger, use the MS-SQL Server Enterprise manager to display the trigger by performing the following steps:
- Click your mouse pointer on the Start button. Windows will display the Start menu.
- Move your mouse pointer to Programs on the Start menu, select the Microsoft SQL Server 2000 option, and click your mouse pointer on Enterprise Manager. Windows will start the Enterprise Manager in a new application window.
- Click your mouse pointer on the plus (+) to the left of SQL Server Group to display the list of MS-SQL Servers available on your network.
- Click your mouse pointer on the plus (+) to the left of the SQL server that has the table with the trigger you want to display (and perhaps modify). Enterprise Manager will display the Databases, Data Transformation, Management, Security, and Support Services folders for the SQL Server you selected.
- Click your mouse pointer on the plus (+) to the left of the Databases folder to display the list of databases currently on the SQL server, and then on the plus (+) to the left of the database that has the table with trigger you want to display. For the current project, click on the plus (+) to the left of the SQLTips folder.
- To display the list of tables in the database you selected in Step 5, click your mouse pointer on the Tables icon. The Enterprise Manager will use its right pane to display the list of the tables in the database you selected.
- Right-click your mouse pointer on the table whose trigger you want to view. For the current project, right-click your mouse pointer on the icon to the left of CUSTOMER457. The Enterprise Manager will display a context-sensitive pop-up menu.
- Move your mouse pointer to All Tasks on the pop-up menu, and then select Manage Triggers. The Enterprise Manager will display the Trigger Properties dialog box.
- Click your mouse pointer on the drop-down list button to the right of the Name field, and select the name of the trigger you want to display from the drop-down list of trigger names. For the current project, click your mouse pointer on TRI_DEL_CUSTOMER457. The Enterprise Manager will display the trigger's code in the Text field of the Trigger Properties dialog box, as shown in Figure 458.1.
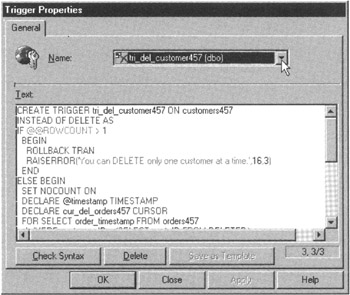
Figure 458.1: The MS-SQL Server Enterprise Manager Trigger Properties dialog box - If you want to modify the trigger's behavior, make the desired changes, deletions, and additions in the Text window of the Trigger Properties dialog box, and then click your mouse pointer on the Check Syntax button.
- Repeat Step 10 as necessary to correct any errors reported by the Enterprise Manager's syntax check of the trigger in the Text window.
- To save your changes and make the updated trigger available to the DBMS, click your mouse pointer on the OK button.
After you complete Step 12, the Enterprise Manager will save the trigger as a database object, INSERT the trigger's text into the server's system tables, and exit the Trigger Properties dialog box.
| Note |
If you included the WITH ENCRYPTION clause when you used the CREATE TRIGGER statement to create a trigger, neither SP_HELPTEXT nor the Enterprise Manager will be able to display the trigger's source code. Moreover, you will not be able to use the Enterprise Manager to change the trigger's behavior by editing its text on the Trigger Properties dialog box. |
Using the DROP TRIGGER Statement to Delete a Trigger
When you no longer want a trigger to perform a set of actions in response to an INSERT, DELETE, or UPDATE on a particular table, execute a DROP TRIGGER statement using the syntax
DROP TRIGGER [...,]
to delete the trigger. For example, to delete the TRI_ARCHIVE_DEL_CUST and TRI_ARCHIVE_DEL_ORDER triggers created in Tip 457, "Understanding Nested Triggers," execute the DROP TRIGGER statement:
DROP TRIGGER tri_archive_del_cust, tri_archive_del_order
The MS-SQL Server will delete the triggers from the database and remove each trigger's text from the SYSOBJECTS and SYSCOMMENTS system tables.
Only the table owner, the database owner (DBO), or a member of the system administrator (SA) role can DROP a trigger on a particular table. To list a table's triggers and the username of the owner, execute the SP_HELPTRIGGER system stored procedure (which you will learn about in Tip 572, "Using the MS-SQL Server Stored Procedure sp_helptrigger to Display Information about Triggers on Tables") as:
SP_HELPTRIGGER
For example, to display the list of triggers on CUSTOMERS table, execute the statement:
SP_HELPTRIGGER customers
The MS-SQL Server will display the names, types, and owner of the triggers on the CUSTOMERS table. If you do not have the rights to DROP the trigger you want to remove from the table, either log in to the account that owns the trigger or ask the SA, the DBO, or the table's owner to execute the DROP TRIGGER statement for you.
| Note |
If you execute a DROP TABLE statement to remove a table from the database or a DROP VIEW statement to delete a view, the DBMS will automatically DROP (delete) all triggers on the table or view. Therefore, you do not have to DROP triggers on a table or view before or after you delete the table or view-the DBMS automatically drops the triggers on a database object when it removes the object from the database. |
Using the ALTER VIEW Statement to Modify a View
Unlike the ALTER TABLE statement (which you will learn about in Tip 461, "Using the ALTER TABLE Statement to Change the Data Type of a Column"), you cannot write an ALTER VIEW statement that adds, removes, or changes the type of one or more individual columns in an existing view. As a result, other than substituting the word ALTER for CREATE, the syntax of an ALTER VIEW statement
 ALTER VIEW [.][.]
 [([...,])]
 [WITH ENCRYPTION | SCHEMABINDING | VIEW_METADATA)
 AS
 [WITH CHECK OPTION]


is identical to the CREATE VIEW statements you learned about in Tips 206-215. Therefore, if you execute the CREATE VIEW statement


 CREATE VIEW vw_student_name_list
 (student_ID, first_name, last_name)
 AS SELECT SID, first_name, last_name FROM students


and later want to add the MAJOR column in the STUDENTS table to the view, you would use and ALTER VIEW statement such as


 ALTER VIEW vw_student_name_list
 (student_ID, first_name, last_name, major)
 AS SELECT SID, first_name, last_name, major FROM students


which includes all of the elements from the original view definition, plus the new column you want to add to the view.
At first glance, the ALTER VIEW statement seems to add no functionality to the DBMS data definition language. After all, an ALTER VIEW statement does not provide a shortcut way to change the definition of a view. As mentioned at the beginning of the current tip, the ALTER VIEW statement used to define a view must be identical in all but its name (ALTER vs. CREATE) to the CREATE VIEW statement used to create the same view. Therefore, it seems to be the case that when you want to change a view, you may as well use a DROP VIEW statement to remove the existing view and then execute a CREATE VIEW statement to re-create the view with its new structure.
However, the ALTER VIEW statement does provide one major advantage (over the DROP VIEW/CREATE VIEW sequence) in that it lets you change a view while leaving all access privileges and triggers created on the view in place. When you DROP a view, the DBMS automatically drops any triggers created on the view. Then, when you re-create the view, the system not only does not reinstate the triggers on the view, but it also does not GRANT any access privileges to the usernames (and roles) that had privileges on the original view.
As such, if you modify a view by executing a DROP VIEW statement followed by executing a CREATE VIEW statement to re-create the view (in its new form), you must also re-enter the code for all TRIGGERS on the original view, and GRANT access privileges on the view to users, roles, and accounts that were allowed to use the original view. Conversely, if you execute an ALTER VIEW statement to make the same change to the view's definition, you need not execute a DROP VIEW statement, and all triggers and access privileges granted on the original view remain in place on the new (modified) view.


461 Using the ALTER TABLE Statement to Change the Data Type of a Column
The ALTER TABLE statement's ALTER COLUMN clause lets you change a column's data type by using the syntax


ALTER TABLE
 ALTER COLUMN [(precision[,scale])]


where:


table name. Is the name of the table with the column whose type you want to change.


new data type. Is a valid data type (INTEGER, NUMERIC, VARCHAR, CHAR, and so on). If the column whose data type you are changing has non-NULL data values, the existing data type must be implicitly convertible to the new data type. For example, you can convert a column of data type CHAR to NUMERIC, so long as all of the data values in the column (of data CHAR) are numbers.


precision. Is the total number of digits in a number.


scale. Is the number of digits to the right of the decimal point in a number.


Suppose, for example, that you created a CUSTOMERS table with a PHONE_NUMBER column that you defined as data type CHAR(14). As long as all phone numbers were inserted as numbers (that is, without dashes [-] and parentheses [()]), you can change the data type of the PHONE_NUMBER column to NUMERIC by executing the ALTER TABLE statement:


 ALTER TABLE customers ALTER COLUMN phone_number NUMERIC


Before using the ALTER TABLE statement to change a column's data type, check your system manual to see if your DBMS imposes any limitations on the old or new data type of the target column. On an MS-SQL Server, for example, some of the limitations on the target column are that it cannot be:


Of data type TEXT, IMAGE, or TIMESTAMP


A computed column, or used in a computed column


A replicated column


Used in an INDEX-unless the column's data type is VARCHAR, NVARCHAR, or VARBINARY and the new data type increases the columns' current maximum length


Used in a PRIMARY KEY or referenced by a FOREIGN KEY


Used in a CHECK or UNIQUE constraint, or have a DEFAULT value-unless the new data type changes only a column's length, precision, or scale


Chapter 18 Working with Data BLOBs and Text
SQL Tips and Techniques
- Understanding SQL Basics and Creating Database Files
- Using SQL Data Definition Language (DDL) to Create Data Tables and Other Database Objects
- Using SQL Data Manipulation Language (DML) to Insert and Manipulate Data Within SQL Tables
- Working with Queries, Expressions, and Aggregate Functions
- Understanding SQL Transactions and Transaction Logs
- Using Data Control Language (DCL) to Setup Database Security
- Creating Indexes for Fast Data Retrieval
- Using Keys and Constraints to Maintain Database Integrity
- Performing Multiple-table Queries and Creating SQL Data Views
- Working with Functions, Parameters, and Data Types
- Working with Comparison Predicates and Grouped Queries
- Working with SQL JOIN Statements and Other Multiple-table Queries
- Understanding SQL Subqueries
- Understanding Transaction Isolation Levels and Concurrent Processing
- Writing External Applications to Query and Manipulate Database Data
- Retrieving and Manipulating Data Through Cursors
- Understanding Triggers
- Working with Data BLOBs and Text
- Working with Ms-sql Server Information Schema View
- Monitoring and Enhancing MS-SQL Server Performance
- Working with Stored Procedures
- Repairing and Maintaining MS-SQL Server Database Files
- Writing Advanced Queries and Subqueries
- Exploiting MS-SQL Server Built-in Stored Procedures
- Working with SQL Database Data Across the Internet
EAN: 2147483647
Pages: 632
