Performing Multiple-table Queries and Creating SQL Data Views
Using a SELECT Statement with a FROM Clause for Multi table Selections
In Tip 85, "Understanding What to Expect from a SELECT Statement," you learned that a SELECT statement tells the DBMS to display the values stored in the rows and columns of a table. For example, to display the values in all columns of all rows in a table, you would use a SELECT statement in the form:
SELECT * FROM
To display only the data from certain columns and rows within a table, you would execute a SELECT statement with a column list and a WHERE clause in the form:
SELECT FROM
WHERE
In addition to displaying information from a single table, you can use a SELECT statement to combine and display information from multiple tables. A multi-table SELECT statement, like a single-table SELECT statement, lets you list the columns you want to see in the SELECT clause and requires that you list the table(s) from which the DBMS is to extract the column values in the statement's FROM clause. However, while a single-table SELECT statement without a WHERE clause will display the selected column values for all rows in a table, a multi-table SELECT clause requires a WHERE clause to produce the same results.
When the DBMS is to extract data from two (or more) tables, you must include a WHERE clause with an equality conditional expression that tells the DBMS which rows in one table to match up with which rows in another table for each pair of tables listed in the SELECT statement's FROM clause. For example, given the tables created by
 CREATE customers
 (cust_ID INTEGER,
 name VARCHAR(30),
 address VARCHAR(50),
 salesrep INTEGER)

 CREATE employees
 (salesrep_ID INTEGER,
 name VARCHAR(30))
you must execute a SELECT statement such as
 SELECT * FROM customers, employees
 WHERE salesrep = salesrep_ID
to produce a results table with the name and ID of the customer's salesperson listed next to the information on each customer in the CUSTOMERS table.
After you tell the DBMS which rows from one table to combine with which rows from the other, you can include additional conditional expressions to specify exactly which rows you want to display. For example, to display information from both the CUSTOMERS and the EMPLOYEES tables only for specific customers, you could use a SELECT statement such as
 SELECT cust_ID AS 'ID', customers.name, address,
 employees.name AS 'salesperson'
 FROM customers, employees
 WHERE salesrep = salesrep_ID AND customers.name = 'Jones'
which includes CUSTOMERS table selection criteria in addition to the multi-table row match (equality) conditional expression. Similarly, if you want to limit the rows in the results table based on the "other" table in the SELECT statement's FROM clause, you can execute a SELECT statement such as
 SELECT cust_ID AS 'ID', customers.name, address,
 employees.name AS 'salesperson'
 FROM customers, employees
 WHERE salesrep = salesrep_ID AND employees.name = 'Smith'
that decides which rows to display based on the name of the salesperson vs. the name of the customer.
The important things to remember about executing a multi-table SELECT statement are that the FROM clause must list the names of all tables from which column values are to be displayed. And, unless you want to produce a Cartesian product (or CROSS JOIN), which you will learn about in Tip 298, "Using the CROSS JOIN to Create a Cartesian Product," the multi-table SELECT statement must include a WHERE clause with an equality conditional expression for each pair of tables listed in the FROM clause. (The equality conditional expression tells the DBMS which column's value[s] to use in matching a row in one table with its corresponding row in the another table.)
Using a View to DisPlay Columns in One or More Tables or Views
As you learned in Tip 11, "Understanding Views," views are virtual tables. Although you can use a view almost anywhere a table reference is allowed, a view is not a physical table that resides on the hard drive along with the other tables and indexes in a database. Instead, a view consists of a SELECT statement that extracts rows and columns from one or more base tables (or other views). The results table for the SELECT statement the DBMS executes when an SQL statement references a view is an in-memory table that can be used as the target of other SQL statements.
The syntax for creating a view is:
 CREATE VIEW
 [([,...])]
 AS


Thus, to create a view of student information based on a table created by


 CREATE TABLE students
 (SID INTEGER,
 first_name VARCHAR(15),
 last_name VARCHAR(20),
 SSAN CHAR(11),
 home_address VARCHAR(50),
 home_city VARCHAR(20),
 home_state CHAR(2),
 home_phone_number CHAR(14),
 major VARCHAR(20))


you could execute a CREATE VIEW statement similar to


 CREATE VIEW vw_student_list AS SELECT * FROM students


and the view could then be used to display student information in a SELECT statement such as:


 SELECT SID AS 'student ID', first_name, last_name
 FROM vw_student_list


Given the additional overhead required in having the DBMS query an underlying table to create an in-memory virtual table, you will find few (if any) single table views define solely as SELECT * without a WHERE clause. After all, if why create a view to display all of the columns and rows of a single table? If a user is to have access to all of the data in a table, avoid the overhead of making the DBMS generate the view, and let the user execute SQL statements against the table (STUDENTS in the current example) instead.
One of the real advantages of using a view is its ability to hide portions of a table you do not want a user to see. Suppose, for example, that you wanted users to be able to work with values only in the SID, FIRST_NAME, and LAST_NAME columns of the STUDENTS table. By creating a view with a CREATE VIEW statement similar to


CREATE VIEW vw_student_name_list
 (student_ID, first_name, last_name)
AS SELECT SID, first_name, last_name FROM students


the SELECT statement


SELECT * FROM vw_student_name_list


will display only those columns you wanted the user to see, not all of the columns in the underlying table. By granting the user access to the view and not the base table(s), you limit the user to working in and displaying only some of the columns in a table.


207 Using a View to Display Columns from Specific Rows in One or More Tables
In Tip 206, "Using a View to Display Columns in One or More Tables or Views," you learned how to hide columns in a table by creating a view with only the columns you want the user to see. By granting the user access to the view and not its underlying table(s), you limit what the user sees after executing a SELECT * statement to data in only those columns included in the view.
A view that displays only some of the columns in an underlying table is called a vertical view. The term vertical is used in the name because when you view data in a table column, you proceed vertically (up or down) from one row to the next. Since a table consists of both vertical columns and horizontal rows, you might correctly surmise that if there is a vertical view, there should also be a horizontal view.
A horizontal view is a view that lets the user display and work with only specific rows in a table. For example, the view created by


 CREATE VIEW vw_LVNV_student_list
 AS SELECT * FROM students
 WHERE home_city = 'Las Vegas' AND home_state = 'NV'


is a horizontal view because it lets the user work with only some of the rows in the STUDENTS table—those for students from Las Vegas, Nevada. The current example shows that you can create a horizontal view by including a WHERE clause in the view's SELECT statement.
Moreover, you can combine vertical and horizontal limits on a view to allow a user to see only certain columns in current rows of one or more tables. For example, to limit a user to working only with student ID and name information for students from Las Vegas, Nevada, you could execute a CREATE VIEW statement similar to:


 CREATE VIEW vw_LVNV_student_name_list
 (student_ID, first_name, last_name)
 AS SELECT SID, first_name, last_name FROM students
 WHERE home_city = 'Las Vegas' AND home_state = 'NV'


In addition to limiting a user to displaying (and perhaps updating) only specific columns or rows, a view can also be used to simplify the SELECT statement a user must execute to display information from a combination of several tables. Suppose, for example, that in addition to the STUDENTS table in Tip 206, you have tables created by:


 CREATE TABLE grades
 (class VARCHAR(15),
 section SMALLINT,
 grade VARCHAR(4),
 student_ID INTEGER,
 professor_ID INTEGER)

 CREATE TABLE teachers
 (PID INTEGER,
 professor VARCHAR(30),
 department VARCHAR(20))


You can then create a view that combines data from all three tables using:


CREATE VIEW vw_students_grades_teachers AS
SELECT * FROM students, grades, teachers
WHERE (grades.student_id = students.SID) AND
 (grades.professor_ID = teachers.PID)


After you GRANT SELECT access to the view, a user can execute single-table SELECT statements to answer multi-table queries, such as:
"How many of professor Rawlins' students received an A in his M200 (math) class?"


SELECT COUNT (*) FROM vw_students_grades_teachers
WHERE professor = 'Rawlins' AND class = 'M200' AND
 grade = 'A'


"What grades did student 2110 receive in her classes, and who were the instructors?"


 SELECT first_name,last_name,class,section,grade,professor
 FROM vw_students_grades_teachers WHERE SID = 2110


"What students took classes from the history department, and what were their grades?"


SELECT first_name,last_name,class,section,grade,professor
FROM vw_students_grades_teachers
WHERE department = 'History'


Notice that in each query, the view takes care of joining (matching) parent/child rows in related tables. As such, a multi-table view lets a user execute simple (single table) SELECT statements to extract information that is really available only through queries based on multi-table joins.


208 Understanding How the DBMS Handles Views

When a DBMS parses an SQL statement and encounters a reference to a view, the DBMS retrieves the definition of the view from its system tables. It then uses the definition of the view to translate the action making the view reference into the equivalent action on the view's underlying table(s). By performing SELECT, UPDATE, and DELETE statement actions on the base table(s) (from which the view's SELECT statement extracts its data), the DBMS maintains database integrity while allowing the user to act on the view as if it were "real" physical table.
For example, if you execute the UPDATE statement


 UPDATE vw_students_grades_teachers SET grade='B+'
 WHERE SID = 1005 AND class = 'H100'


on the view created in Tip 207, "Using a View to Display Columns from Specific Rows in One or More Tables," the DBMS translates the UPDATE statement to


 UPDATE grades SET grade='B+'
 WHERE student_ID = 1005 AND class = 'H100'


and updates the GRADES table, which is the source (or base) table for the letter grade "stored" in the view's GRADE column.
For views created with a simple SELECT statement, the DBMS will construct each row of the view "on the fly" by retrieving columns of data from a row in the underlying table(s) as it displays the data to the user. For views consisting of complex multi-table joins and subqueries, the DBMS will actually materialize the view—that is to say, the DBMS will execute the SELECT statement that defines the view and will create a temporary data with the view's data. The DBMS will then satisfy query requests against the view by retrieving data from the temporary table. (When the DBMS no longer needs it to satisfy SQL queries on the view, it automatically discards the temporary table.)
Whether the DBMS materializes a view or creates the view's rows "on the fly" is transparent to the user. In either case, the view behaves is if it is a "real" table. Moreover, whether the view exists only in memory or as a temporary table, any updates performed on the view are reflected as changes in its base table(s).


209 Using a View to Display the Results of an Expression

Views can display not only values stored in tables, but also the results of expressions and functions. For example, given a table created by


 CREATE TABLE invoice_detail
 (invoice_number INTEGER,
 item_number INTEGER,
 sales_price MONEY,
 qty INTEGER)


the view created by


 CREATE VIEW vw_item_sales
 (item, order_ct, sold_ct, avg_sales_price) AS
 SELECT item_number, COUNT(*), SUM(qty), AVG(sales_price)
 FROM invoice_detail
 GROUP BY item_number


will display the results of SQL aggregate functions on a base table called INVOICE_DETAIL.
| Note |
The view definition for views that display function or expression results must include a column name list, while the column name list is optional in the definition of views that display only data from columns in one or more underlying tables. |
In order for the DBMS to be able to treat a view as if it were a physical table, all of the view's columns (like those in a physical table) must have names. When a view displays only data from underlying tables, the DBMS can use the name of the base table column for name of the view column that displays its data. However, when a column in a view displays the result of a function or expression, the DBMS cannot determine the column's name because the view column is not simply displaying data on one of a base table's columns. As a result, you must supply a column name when defining views with (otherwise nameless) columns that display function or expression results.
To display expression (vs. SQL aggregate function) results, simply include the expressions in the SELECT clause in the view's definition, as with any other column from a base table. For example, given the a table created by
 CREATE TABLE item_master
 (item_number INTEGER,
 description VARCHAR(30),
 item_cost MONEY)
and the preceding INVOICE_DETAIL table and VW_ITEM_SALES view, the view created by
CREATE VIEW vw_item_sales_profits
 (item_number, description, order_ct, sold_ct,
 avg_sales_price, total_cost, total_sales, profit,
 pct_profit) AS

SELECT vw_item_sales_profits.item_number, description,
 order_ct, sold_ct, avg_sales_price, sold_ct * item_cost,
 sold_ct * avg_sales_price,
 (avg_sales_price * sold_ct) - (sold_ct * item_cost),
 (((avg_sales_price * sold_ct) - (sold_ct * item_cost)) /
 (sold_ct * item_cost)) * 100
FROM item_master, vw_item_sales_profits
WHERE item_master.item_number = vw_item_sales.item_number
will display not only the results of aggregate functions, but also the computed values of total cost, net profit, and percent profit based on those values.
Using an UPDATE Statement to Change Data in Multiple Tables Through a View
As you learned in Tip 73, "Using the UPDATE Statement to Change Column Values," an UPDATE statement lets you change the value of one or more columns in one and only one target table. However, the syntax of the UPDATE statement
 UPDATE  SET  =
 [,... = ]
 WHERE
seems to indicate that one could update columns in multiple tables by specifying a view based on multiple tables as the target "table" for the UPDATE statement. Using the view as the one and only target table, you could reference view columns derived from different tables in set clauses following the target table name in the UPDATE statement.
Unfortunately, the DBMS will allow you to include columns from only a single underlying (base) table in the SET clause(s) following the target table name in an UPDATE statement. As such, if you have a view created by
 CREATE VIEW vw_customer_invoices AS
 SELECT * FROM customers, invoices
 WHERE cust_ID = purchased_by
based on tables created with
 CREATE TABLE customers
 (cust_ID INTEGER,
 name VARCHAR(30),
 address VARCHAR(50))

 CREATE TABLE invoices
 (invoice_number INTEGER,
 invoice_date DATETIME,
 purchased_by INTEGER,
 ship_to VARCHAR(50)
then the statement statements
 UPDATE vw_customer_invoices SET address = 'New Address'
 WHERE CUST_ID = 1
 UPDATE VW_customer_invoices SET ship_to = 'New Address'
 WHERE CUST_ID = 1
are acceptable to the DBMS because each statement updates a column in only one table-even though the view itself consists of data from more than one table. However, the DBMS will not accept the UPDATE statement
 UPDATE vw_customer_invoices SET address = 'New Address',
 ship_to = 'New Address'
 WHERE CUST_ID = 1
because it attempts to update columns in more than on table.
Remember, the DBMS handles an SQL statement that references a view by generating the equivalent statement on the column(s) of the base table(s) involved. Therefore, in order for the DBMS to execute the UPDATE statement that references both ADDRESS (from the CUSTOMERS table) and SHIP_TO (from the INVOICES table), the DBMS would have to construct an invalid UPDATE statement-one that lists two tables and not one as its target.
| Note |
MS-SQL Server provides a special type of stored procedure called a "trigger" that you can use to cause an update of a column in one table to result in updates to columns in other tables. You will learn all about triggers in Tip 448 and how to use them to perform multi-table updates using a single UPDATE statement in Tip 453. |
Using the CHECK OPTION Clause in a CREATE VIEW Statement to Apply View Constraints to INSERT and UPDATE Statements
As you learned in Tip 207, "Using a View to Display Columns from Specific Rows in One or More Tables," a horizontal view is a virtual table that displays only some of the rows from one or more underlying tables or views. Because a vertical view does not display all of the rows in its base table(s), a user with INSERT privilege on a vertical view could use the view to INSERT rows into the base table that are not visible in the view itself. Similarly, a user with UPDATE could change column values in such as way as to make rows "disappear" from the view.
Suppose, for example, that you have the vertical view created by
 CREATE VIEW vw_nv_employees AS
 SELECT * FROM employees WHERE office = 'NV'
which has rows from an (underlying) EMPLOYEES table with the data
id name ssan office
-- ------ ----------- ------
1 Konrad 555-55-5555 TX
10 Sally 222-22-2222 NV
15 Wally 111-11-1111 NV
28 Walter 333-33-3333 CA
and you execute the SELECT statement:
SELECT * PROM vw_nv_employees
The DBMS will display data in the rows for employee ID 10 and 15, since these are the only two EMPLOYEES table rows whose OFFICE column has the value NV.
If you execute the INSERT statement
 INSERT INTO vw_nv_employees
 VAL0ES (2, 'Kris', '777-77-7777','TX')
the DBMS will add the new row to the EMPLOYEES table. However, if you then execute
SELECT * FROM vw_nv_employees
again, the DBMS will still display information on only employees 10 and 15 because the new row you inserted into the EMPLOYEES table does not satisfy the view's search condition (OFFICE = 'NV').
Similarly, if you execute the UPDATE statement
UPDATE vw_nv_employees SET office = 'LA' WHERE id = 10
employee ID 10 will "disappear" from the view. Although the UPDATE statement did not DELETE the row from the underlying EMPLOYEES table, the row no longer satisfies the view's search criteria and is therefore no longer included in the view.
To prevent a user from using a view to INSERT rows the view will not display and from changing data in a view's columns so that rows are dropped from the view, add the WITH CHECK OPTION clause to the view definition. In the current example, if you create the VW_NV_EMPLOYEES view with
 CREATE VIEW vw_nv_employees AS
 SELECT * FROM employees WHERE office = 'NV'
 WITH CHECK OPTION
the DBMS will allow a user to INSERT only rows that have a value of NV in the OFFICE column. Moreover, the DBMS will not allow the user to execute an UPDATE statement that attempts to change the value in the OFFICE column in an existing row to something other than NV.
For example, while the UPDATE statement
UPDATE vw_nv_employees SET office = 'LA' WHERE id = 10
was perfectly acceptable when the definition of the VW_NV_EMPLOYEES view lacked a WITH CHECK OPTION clause, the DBMS will now abort execution of the UPDATE statement and return an error message similar to:
 Server: Msg 550, Level 16, State 1, Line 1
 The attempted insert or update failed because the target
 view either specifies WITH CHECK OPTION or spans a view
 that specifies WITH CHECK OPTION and one or more row
 resulting from the operation did not qualify under the
 CHECK OPTION constraint.
 The statement has been terminated.
Using a View to Allow a User to See Only Certain Rows in a Table
When you have a source table that contains data for various organizations or groups of users, you can use a horizontal view to give each department or set of users its own virtual table with only the rows of data it needs or to which it should have access. Suppose, for example, that a salesperson, BOB (employee ID 101), is allowed to view information on only his own customers, while the sales manager, SUE (employee ID 302), is allowed to generate reports on all customers belonging to salespeople she manages. You could create a VW_BOB_CUSTOMERS view for user ID BOB that displays only his customers with:
 CREATE VIEW vw_bob_customers AS
 SELECT * FROM customers WHERE salesperson_ID = 101
Similarly, you can execute the CREATE VIEW statement
 CREATE VIEW vw_sue_subordinate_customers AS
 SELECT * FROM customers
 WHERE cust_ID IN (SELECT cust_ID FROM customers, employees
 WHERE
 customers.salesperson_ID = employees.ID
 AND employees.manager = 'SUE')
to create a virtual table that SUE can use to review information on her salespersons' customer accounts.
The SELECT * in the view's definition tells the DBMS to include all of the source table's columns in the view. Meanwhile, the WHERE limits the view to displaying only some (and not all) of the underlying table's rows.
By granting SELECT, UPDATE, or DELETE privilege on a horizontal view and not on the base table, you can limit a user's ability to SELECT (display), DELETE, and UPDATE data to only certain rows within the view's underlying table. However, as you learned in Tip 211, you must include the WITH CHECK OPTION clause in a horizontal view's definition if you want to prevent the user with INSERT and/or UPDATE privilege from using the view to add data not visible in the view to the base table.
Using a View to Allow a User to See Only Certain Columns in a Table
In addition to limiting a user's access to only specific rows in a table (as you learned to do in Tip 212, "Using a View to Allow a User to See Only Certain Rows in a Table"), you can also use a view to limit a user to working with only specific columns within a row. As you already know, a view is a virtual table with no data of its own. The view displays data from one or more underlying tables, and any work done on its rows or column values is actually performed on the view's source table(s). While a view's WHERE clause (if any) limits the underlying table rows that a user can access through the view, the view's column list determines the column values a user can display and (perhaps) change.
For example, if you have a table created with
 CREATE TABLE students
 (SID INTEGER,
 first_name VARCHAR(15),
 last_name VARCHAR(20),
 SSAN CHAR(11),
 home_address VARCHAR(50),
 home_city VARCHAR(20),
 home_state CHAR(2),
 home_phone_number CHAR(14),
 major VARCHAR(20))
you can limit students to seeing only name and major information by granting them SELECT access to a VW_STUDENT_NAME_MAJOR view created by:
 CREATE VIEW vw_student_name_major AS
 SELECT first_name, last_name, major FROM students
| Note |
Since its CREATE VIEW statement has no WHERE clause, the view in the current example (VW_STUDENT_NAME_MAJOR) will display all of the rows from the STUDENTS table. To limit a view's access to specific columns and specific rows, include both a column list and a WHERE clause in the definition of the view. For example, to limit the VW_STUDENT_NAME_MAJOR view to displaying only name and major information for Nevada students, change the view definition to: CREATE VIEW vw_student_name_rnajor AS SELECT first_name, last_name, major FROM students WHERE home_state = 'NV' |
Using a GROUP BY Clause in a CREATE VIEW Statement to Create a View That Displays Summary Data
If you create a view using a SELECT statement that has no GROUP BY clause, there is a one-to-one correspondence between the rows in the view and the rows in the underlying table(s) whose data the view displays. Thus, an (ungrouped) SELECT statement in a view makes the view act as a filter on the data in the source table, screening out certain rows and columns and letting others pass through unchanged. Conversely, when you use a grouped SELECT (a SELECT statement with a GROUP BY clause) to define a view, the DBMS groups related rows of data, and the view will display one row of results for each group or rows from the base table. As such, there is no one-to-one relationship between the rows in a grouped view (a view created with a grouped SELECT statement) and the rows in its underlying table(s).
The syntax used to create a grouped view is:
 CREATE VIEW
 AS SELECT
 FROM  []
 GROUP BY
Thus, to create a grouped view summarizing a customer's orders, you would use a CREATE VIEW statement similar to:
 CREATE VIEW vw_customer_orders
 (customer_number, orders_placed_ct, orders_shipped_ct,
 total_amt_purchased, total_amt_paid, total_amt_due,
 high_order_amt, avg_order_amt, low_order_amt)
 AS SELECT
 cust_ID, COUNT(*), COUNT(date_shipped),
 SUM(invoice_total), SUM(amt_paid), SUM(invoice_total) -
 SUM(amt_paid), MAX(invoice_total), AVG(invoice_total),
 MIN(invoice_total)
 FROM invoices
 GROUP BY cust_ID
The main disadvantage of using a grouped view is that it is read-only. Since there is not a one-to-one correspondence between the rows in a view and its source table(s), the DBMS cannot translated UPDATE or DELETE statements into equivalent statements that perform work on specific rows in the view's underlying table(s).
On the other hand, the main advantage of using a grouped view is that it simplifies queries on summarized data. For example, you can execute a simple select statement such as
 SELECT TOP 10 customer_number, name, total_amt_due
 FROM customers, vw_customer_orders
 WHERE cust_ID = customer_number
 ORDERED BY total_amt_due DESC
on a grouped view to get a list of the 10 customers with the highest outstanding balances due.
Using the CREATE VIEW Statement to Display the Results of Joining Two or More Tables
In addition to providing security by limiting a user's access to data in specific rows and columns, a view provides a way to consolidate related data from the many tables in a normalized database into a single, comprehensive virtual table. As you learned from the discussion of database normalization in Tips 200-203, designers normalize a database (to at least 3NF) in order to prevent modification anomalies that can destroy database integrity as users make changes to database contents over time.
However, even simple queries such as "List each salesperson's customers" normally require joining at least two tables when executed on a normalized database because customer data will be in one table while employee (salesperson) data will be in another. If you further complicate the query by adding "... and list the total and average amount of each customer's orders," the person writing the SQL statement must know how to write a SELECT statement that will properly join three tables and perform a grouped query.
Fortunately, views provide a way to continue storing data in multiple tables-to maintain database integrity through normalization-while at the same time letting users access database information by executing simple, single-table SELECT statements. In other words, the DBA and programming staff can write complex SELECT statements that join rows from multiple related tables and store them in view definitions. The user can then use the views to execute a complex query involving the joining of several tables by referencing the columns in a view as if all of the related data were in a single table with a lot of columns.
For example, with views similar to those created by
 CREATE VIEW vw_cust_invoices
 (cust_id, total_purchased, avg_purchase)
 AS SELECT
 customers.cust_id, SUM(invoice_total), AVG(invoice_total)
 FROM customers, invoices
 WHERE customers.cust_id = invoices.cust_ID

 CREATE VIEW vw_salesperson_customers
 (salesperson_ID, salesperson_name, customer_ID,
 customer_name, total_purchased, avg_purchase)
 AS SELECT
 employees.ID, employees.name, customers.cust_ID,
 customers.name, total_purchased, avg_purchase
 FROM customers, employees, vw_cust_invoices
 WHERE customers.salesperson_ID = employees.ID AND
 vw_cust_invoices.cust_ID = customers.cust_id
a user can execute the simple SELECT statement
 SELECT * FROM vw_salesperson_customers
 ORDER BY salesperson_ID, customer_ID
to perform the complex query: "List each salesperson's customers and the total and average amount sold to each customer."
The important thing to learn from the current example is that referencing a view that consolidates data from multiple tables lets a user execute a single-table SELECT statement to pose a query that requires the joining of data in rows from several tables.
Using the UNION Operator to Select All Rows That Appear in Any or All of Two or More Tables
The UNION operator provides a convenient way to combine the results of two or more queries. Each time the DBMS performs a UNION operation, the final results table contains all of the rows produced by each query in the UNION, with duplicate rows eliminated. In order to be union-compatible, queries must exhibit the following characteristics:
- All queries must have the same number of columns.
- The data type of corresponding columns in each query results table must be the same data type. (That is, if the first column in one results table is of type CHAR, then the data type of the first column in all results tables must be CHAR; if the data type of the second column of one results table is INTEGER, then the data type of the second column in all results tables must be INTEGER, and so on.)
- None of the SELECT statements can have an ORDER BY clause. (In Tip 220, "Using the ORDER BY Clause to Sort the Results of a Union Operation," you will learn how to sort the final results table produced by the UNION operator by placing an ORDER BY clause after the final SELECT statement.)
To use the UNION operator, place it between SELECT statements whose results tables you want to join. Suppose, for example, that your company resells products for three vendors, each with its own products table, such as:
 ABC_Products table
 item_no item_desc price count_on_hand
 ------- --------- ------ -------------
 1 Widget 254.00 5
 2 Gidget 123.00 7
 3 Gadget 249.00 10

 DEF_Products table
 item_number description cost qty_on_hand
 ----------- ----------- ------ -----------
 1 Sprocket 243.00 15
 2 Gadget 100.00 7

 GHI_Products table
 item_number description cost qty_on_hand
 ----------- ----------- ------ -----------
 7 Laser 575.00 12
 10 Phaser 625.00 5
 15 Taser 75.00 7
You can produce a complete product list of everything available for sale by using UNION operators in a query similar to:
 SELECT 'ABC' as 'vendor', item_no, item_desc, price,
 count_on_hand FROM abc_products
 UNION
 SELECT 'DEF' as 'vendor', item_number, description, cost,
 qty_on_hand FROM def_products
 UNION
 SELECT 'GHI' as 'vendor', item_number, description, cost,
 qty_on_hand FROM ghi_products
After executing the query in the current example, the DBMS will display a single results table (similar to that shown in Figure 216.1), which contains all of the rows returned by the each of the SELECT statements joined by the UNION operator.
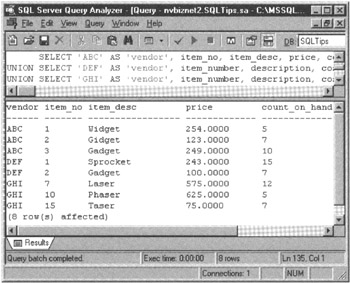
Figure 216.1: MS-SQL Server Query Analyzer showing the results table produced by a UNION of three queries
| Note |
As shown in the current example, the UNION operator requires only that the SELECT statements it is combining have matching corresponding column types-the names of corresponding columns may differ. Unfortunately, some DBMS products will produce a results table with unnamed columns for each corresponding pair of SELECT statement columns with different names (such as ITEM_NO vs. ITEM_NUMBER, ITEM_DESC vs. DESCRIPTION, PRICE vs. COST, and COUNT_ON_HAND vs. QTY_ON_HAND, in the current example). Other DBMS products, such as MS-SQL Server, will use the column names from the first SELECT statement in the UNION as the headings for the columns in the final results table. |
Using the UNION ALL Operator to Select All Rows That Appear in Any or All of Two or More Tables, Including Duplicate Rows
As mentioned in Tip 216, "Using the UNION Operator to Select All Rows That Appear in Any or All of Two or More Tables," one of the features of the UNION operator is that it eliminates duplicate rows from the final results table. The default behavior of the UNION operator contrasts with that of the SELECT statement, which (by default) displays any duplicate rows it finds. As such, to prevent a query from returning duplicate rows, you must add the keyword DISTINCT to the SELECT clause (as in SELECT DISTINCT * FROM
). Conversely, since the UNION operator returns only unique (distinct) rows in its results table, you must use the UNION ALL operator to combine queries for which you want the DBMS to display all rows (including duplicates).
For example, suppose you have a house inventory table created by
 CREATE table house_inventory
 (address VARCHAR(50),
 sales_price MONEY,
 pool CHAR(l),
 gated_community CHAR(1),
 acreage NUMERIC,
 bedrooms SMALLINT,
 square_footage INTEGER,
 realtor_ID SMALLINT)
and you want to get a list of houses that satisfy a buyer's criteria for an ideal home. You could execute a SELECT statement such as
 SELECT * FROM house_inventory
 WHERE acreage > 2 OR bedrooms >= 4 OR gated_community = 'Y'
to get a list of properties that fulfill at list one of the buyer's expectations. However, given that some properties might satisfy only one of the criteria, some two, and others perhaps all three, it would be handy to put the houses in the list such that those that satisfy the most criteria are at the top, and those that satisfy the least are at the bottom.
To create a list of houses sorted in order by the number of buyer criteria satisfied, first create a temporary table (such as HOUSE_PROSPECTS) with the same structure as HOUSE_INVENTORY. Next, use an INSERT statement such as
 INSERT INTO house_prospects
 SELECT * FROM house_inventory WHERE acreage > 2
 UNION ALL
 SELECT * FROM house_inventory WHERE bedrooms >= 4
 UNION ALL
 SELECT * FROM house_inventory WHERE gated_community = 'Y'
to populate the table with the rows from the HOUSE_INVENTORY table that meet at least one of the buyer's expectations.
The UNION ALL operators create a final results table by combining all of the rows from each SELECT statement's (interim) results table-without filtering out duplicate rows. As such, if a house sits on 3 acres and has four bedrooms, the UNION ALL operator will put property into the final results table twice (once from the first SELECT statement's results table and once again from the second SELECT statement's results table). The INSERT statement retrieves the rows from the final results table and inserts them into the HOUSE_PROSPECTS (temporary) table.
Finally, execute a SELECT statement similar to
 SELECT COUNT(*) AS 'Score', address, sales_price, acreage,
 bedrooms, gated_community FROM house_prospects
 GROUP BY address, acreage, bedrooms, gated_community
 sales_price
 ORDER BY score DESC, sales_price ASC
and the DBMS will display a report, sorted in descending order by the "score," that represents the number of times each property appears in the HOUSE_PROSPECTS table. (In effect, the score (or duplicate row count) tells you how many search conditions a property satisfied because the UNION ALL operator added the same row each time one of the SELECT statements in the UNION included the row in its interim results table.
Using the UNION CORRESPONDING Operator to Combine Rows in Two or More Tables That Are Not Union Compatible
Two tables are union-compatible if both have the same number of columns and if the data type of each column in one table is the same as the data type of its corresponding column (by ordinal position) in the other table. For example, the tables created by
 CREATE TABLE table_a CREATE TABLE table_b
 (ID SMALLINT, (emp_ID SMALLINT,
 office INTEGER, office INTEGER,
 address VARCHAR(30), home_address VARCHAR(30),
 department CHAR(5)) emp_department CHAR(5))
are union-compatible because both have the same number of columns and because the first column in TABLE_A is the same data type as the first column in TABLE_B, the second column in TABLE A is the same data type as the second column in TABLE_B, and so on.
When two tables are union-compatible, you use the UNION operator with SELECT statements such as
 SELECT * FROM table_a
 UNION
 SELECT * FROM table_b
to display a results table that has a combination of all columns from all rows in TABLE_A and all columns from all rows in TABLE_B-with duplicate rows removed. If two (or more) tables are not union-compatible (either because corresponding columns are not in the same ordinal positions or because one table has columns not found in the other table), you can use the UNION CORRESPONDING operator to tell the DBMS to create a results table by merging data in columns with matching names in both tables, regardless of their ordinal position in each table.
For example, if you have the (non-union-compatible) tables created by
 CREATE TABLE table_c CREATE TABLE table_d
 (ID SMALLINT, (office INTEGER,
 office INTEGER, ID SMALLINT,
 address VARCHAR(30), address VARCHAR(30),
 department CHAR(5), emp_department CHAR(5))
 pay_rate MONEY)
you can use the UNION CORRESPONDING operator with SELECT statements such as
 SELECT * FROM table_c
 UNION CORRESPONDING
 SELECT * FROM table_b
to display a results table with the data in columns that the two tables have in common (namely, ID, OFFICE, and ADDRESS, in the current example).
| Note |
Not all DBMS products, including MS-SQL Server, support the UNION CORRESPONDING operator. Do not despair. As you will learn in Tip 219, "Using the UNION Operator to Combine the Results of Two Queries," if your DBMS does not support the UNION CORRESPONDING operator, you can still display the union of tables that are not union-compatible by explicitly listing the columns (vs. using SELECT *) that the DBMS is to merge into the final results table. |
Using the UNION Operator to Combine the Results of Two Queries
In Tip 216, "Using the UNION Operator to Select All Rows That Appear in Any or All of Two or More Tables," you learned how to use the UNION operator to combine the results of two or more queries into a single results table. If the tables are union-compatible (that is, all of the tables to be combined have the same number of columns in the same order), you can use the UNION operator to merge results from "select all columns" queries such as
 SELECT * FROM innvoices_99 WHERE invoices_99.cust_ID =
 (SELECT cust_ID FROM CUSTOMERS WHERE name = 'XYZ Corp')
 UNION
 SELECT * FROM innvoices_00 WHERE invoices_00.cust_ID =
 (SELECT cust_ID FROM CUSTOMERS WHERE name = 'XYZ Corp')
which lists all orders placed by XYZ CORP during the past two years.
On the other hand, if you are working with tables that are not union-compatible, you can still use the UNION operator to combine query results if you explicitly list the columns the operator is to merge. Suppose, for example, that the Ford Motor Company announces an enhancement for the Ford Explorer (all model years), and you want a complete list of both Explorers waiting to be sold and those you already sold.
Given that the AUTO_INVENTORY and AUTO_SALES tables have different structures, you could use the UNION operator to combine queries that list the columns to merge into the final results table, such as:
 SELECT store_name AS 'sold_to', address, phone, make,
 model, vehicle_ID, 'Inventory' AS 'location',
 date_received
 FROM auto_inventory, dealerships
 WHERE dealerships.store_ID = auto_inventory.dealership_ID
 AND make = 'Ford' AND model = 'Explorer'
 UNION
 SELECT first_name + ' ' + last_name AS 'sold_to',
 address, home_phone, make, model, vehicle_ID,
 'Customer' AS 'location', date_sold
 FROM customers, auto_sales
 WHERE customers.customer_ID = auto_sales.cust_ID
 AND make = 'FORD' AND model = 'Explorer'
Although each SELECT statement's tables have a different structure, you can use the UNION operator (vs. having to use the UNION CORRESPONDING operator) to merge their (interim) results tables, as long as the columns returned by each SELECT statement match the columns returned by the every other SELECT statement both in number and in type (by ordinal position).
| Note |
Some DBMS products only allow either a column name list or the asterisk (*) (meaning all columns) in the SELECT clause of queries to be combined by UNION operators. Other products, such as MS-SQL Server, allow both aggregate functions, simple expressions (such as concatenation (FIRST_NAME + ' ' + LAST_NAME), and the use of literal strings ('Inventory', 'Customer'), as shown in the current example. Be sure to check your system manual for the specific restrictions your DBMS product imposes on SELECT statements joined by a UNION operator. |
Using the ORDER BY Clause to Sort the Results of a Union Operation
None of the SELECT statements combined by a UNION operator can have an ORDER BY clause. (Sorting the interim results tables the UNION operator merges into the final results table would be inefficient anyway. After all, the user never sees the interim results tables.) You can, however, place an ORDER BY clause after the final SELECT statement in the UNION to sort the final (merged) results table.
For example, to sort the final results table for a query similar to that in Tip 216, "Using the UNION Operator to Select All Rows That Appear in Any or All of Two or More Tables," you would add an ORDER BY clause after the final SELECT statement, as follows:
 SELECT 'ABC', item_no, item_desc, price, count_on_hand
 FROM abc_products
 UNION
 SELECT 'DEF '' item_number, description, cost, qty_on_hand
 FROM def_products
 UNION
 SELECT 'GHI', item_number, description, cost, qty_on_hand
 FROM ghi_products
 ORDER BY item_no
The ORDER BY clause can specify a sort by any column name from the final results table.
In the current example, the DBMS will sort the final results table in ascending order by the values in its ITEM_NO column because MS-SQL Server (conveniently) named the third column in the final results table ITEM_DESC. Unfortunately, some DBMS products will not name columns that combine queries on tables that use different names for corresponding columns. If you are using one of these DBMS products, your system will leave all of the columns in the final results table for the current example unnamed because the first column is a literal string and has no column name to start with and because the remaining columns have different names in one of the three tables used in the query.
To use an ORDER BY clause to sort the contents of a final results table by an unnamed column, refer to the column's ordinal position in the results table. For example, to sort the final results table in the current example by ITEM_NO, you would write the ORDER BY clause as
ORDER BY 2
since ITEM_NO is the second column in the final results table. Similarly, to sort the final results table in the current example by the literal string (which happens to be the vendor ID) and item description, you can use the ORDER BY clause
ORDER BY 1, 3
since the literal string (vendor ID) is the first column and the item description is the third column in the results table.
Using the UNION Operator to Combine Three or More Tables
As you learned in Tips 216-219, UNION operators are used to combine the results from multiple SELECT statements into a single composite results table. Whether you use a single UNION operator to combine the output of 2 SELECT statements or use 10 UNION operators to combine results from 11 SELECT statements, the unions of queries are always executed 2 results tables at a time.
Suppose, for example, that you were to EXECUTE the statements:
 SELECT * FROM table_a UNION
 SELECT * FROM table_b UNION
 SELECT * FROM table c
The DBMS will execute the unions according to the workflow shown in Figure 221.1.
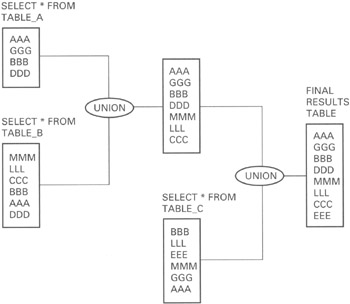
Figure 221.1: The UNION of three query results tables
You can uses parenthesis ( () ) to tell the DBMS the order in which to combine SELECT statement results. However, the final results table will be the same regardless of the order in which the unions take place if all SELECT statements are combined using UNION operators or if all SELECT statements are combined using all UNION ALL operators.
When you have a mix of UNION and UNION ALL operators, the order of execution becomes important. For example, given the table data shown in Figure 221,
 table_a UNION (table_b UNION table_c)
 (table_a UNION table_b) UNION table_c
 (table_a UNION table_c) UNION table_b
will all produce the same final results table with eight nonduplicate rows. Similarly, executing the UNION ALL statements grouped as
 table_a UNION ALL (table_b UNION ALL table_c)
 (table_a UNION ALL table_b) UNION ALL table_c
 (table_a UNION ALL table_c) UNION ALL table_b
will all produce the same final results table with 16 rows. (Remember, the UNION ALL operator does not eliminate duplicate rows.) However, if you want the DBMS to execute
table_a UNION ALL table_b UNION table_c
the results are different if the system orders the execution as
table_a UNION ALL (table_b UNION table_c)
which will produce 13 rows (9 nonduplicate rows from the inner UNION of table_b and table_c, plus the outer UNION ALL of all 4 rows in table_a) vs.
(table_a UNION ALL table_b) UNION table_c
which will produce only 8 rows (after the inner UNION ALL of table_a and table_b produces 10 rows, the outer UNION adds its UNIQUE row EEE and eliminates the duplicate rows-AAA and DDD, in the current example).
The important thing to understand is that if you combine query results using only UNION or using only UNION ALL operators, you do not have to tell the DBMS the order in which to perform the unions. However, if you use a mix of UNION and UNION ALL operators to combine query results, you should always use parenthesis to specify the order of execution so that the system will discard only those duplicate rows you want to eliminate.
Understanding Where to Place the MS SQL Server Transaction Log to Improve Performance
In Tip 133, "Understanding Transaction Logs," you learned that the DBMS uses the transaction log to
- Undo uncommitted work performed when the user executes a ROLLBACK statement
- Redo (roll forward) work performed by completed transactions if you restore a backup version of the database and apply a more recent transaction log
- Redo (roll forward) work committed but not yet written to the database files when the DBMS is restarted after a system failure
- Roll back (undo) an uncommitted transaction when the DBMS is restarted after a system failure
In order to use the transaction log for these purposes, the DBMS must use it to maintain a serial list of all work performed on the database, along with a copy of each value in the database both before and after it is modified. In fact, most DBMS products write the original and updated data values to the transaction log before changing the database tables themselves. As such, the physical location of the transaction log has a significant impact on overall database performance.
When possible, locate the transaction log on a fast, physically separate disk drive or RAID array. Since the DBMS maintains the transaction log by appending new information to the end of the log file, placing the log on a dedicated drive will allow the disk heads to stay in place for the next write operation. As a result, the DBMS will not have to wait for the system hardware to reseek the end of the log prior to updating it. Although a few milliseconds does not seem like a lot of time, it does add up when you consider that every command and two copies of every modified data value must be written to the transaction log before the DBMS can update the database and process another SQL statement.
Tip 41, "Using the CREATE DATABASE Statement to Create an MS-SQL Server Database and Transaction Log," shows you how to specify the location (file name and physical disk storage device) for the transaction log as part of the CREATE DATABASE statement, and Tip 42, "Using the MS-SQL Server Enterprise Manager to Create a Database and Transaction Log," explains how to do the same thing using the MS-SQL Server Enterprise Manager instead. Please refer to these tips for the specific steps involved in creating a transaction log.
For now, the important thing to understand is that you should create a large transaction log on a separate (dedicated) drive. Doing so will improve DBMS performance because the system will not have to extend the size of the log or wait for the hardware to find the end of the file before it records commands and data values in the log prior to updating the database and continuing statement execution.
Understanding Multicolumn UNIQUE Constraints
In Tip 192, "Using the UNIQUE Column Constraint to Prevent Duplicate Values in a Column," you learned how to apply the UNIQUE constraint to a column definition to ensure that the DBMS will prevent duplicate data values from being stored in the column. A single column UNIQUE constraint is appropriate when creating a table such as
 CREATE TABLE employees
 (employee_ID SMALLINT,
 office SMALLINT,
 emp_name VARCHAR(30),
 SSAN CHAR(11) UNIQUE)
where the value in the SSAN (Social Security account number) column must be unique for every row in the table, since no two employees can have the same Social Security number. However, suppose that the company has multiple offices and each office has its own employee number sequence. As such, although OFFICE 1 can have only one EMPLOYEE_ID 101, OFFICE 2 can also have one and only one EMPLOYEE_ID 101; likewise the same goes for OFFICE 3, and so on.
When the combination of values in two or more columns must be unique, you cannot use multiple, single-column UNIQUE constraints such as:
 CREATE TABLE employees
 (employee_ID SMALLINT UNIQUE,
 office SMALLINT UNIQUE,
 emp_name VARCHAR(30),
 SSAN CHAR(11) UNIQUE)
If you add the UNIQUE constraint to each column definition, as shown in the current example, the DBMS will allow the insertion of only one employee row for each office, since an office number, such as "1", can appear in the OFFICE column of only one row in the table. Conversely, if you apply the UNIQUE constraint only to the EMPLOYEE_ID column, the DBMS will not allow duplicate EMPLOYEE_ID's for different offices.
To apply a multicolumn UNIQUE constraint (in which each set of values from two or columns must be unique throughout the table), define the constraint apart from the column definitions. For example, to constrain the EMPLOYEES table in the current example such that employee numbers must be unique within each office, but can be repeated from one office to the next, use a CREATE TABLE statement such as:
 CREATE TABLE employees
 (employee_ID SMALLINT,
 office SMALLINT,
 emp_name VARCHAR(30),
 SSAN CHAR(11) UNIQUE,
 CONSTRAINT unique_by_office UNIQUE (employee_ID, office))
The UNIQUE_BY_OFFICE constraint will allow the insertion of rows with (EMPLOYEE_ID,OFFICE) pairs of (101,1), (101,2), (102,2), (102,3), and so on, but will prevent the insertion of more than one row where the OFFICE is 1 and the EMPLOYEE_ID is 101 (101,1).
SQL Tips and Techniques
- Understanding SQL Basics and Creating Database Files
- Using SQL Data Definition Language (DDL) to Create Data Tables and Other Database Objects
- Using SQL Data Manipulation Language (DML) to Insert and Manipulate Data Within SQL Tables
- Working with Queries, Expressions, and Aggregate Functions
- Understanding SQL Transactions and Transaction Logs
- Using Data Control Language (DCL) to Setup Database Security
- Creating Indexes for Fast Data Retrieval
- Using Keys and Constraints to Maintain Database Integrity
- Performing Multiple-table Queries and Creating SQL Data Views
- Working with Functions, Parameters, and Data Types
- Working with Comparison Predicates and Grouped Queries
- Working with SQL JOIN Statements and Other Multiple-table Queries
- Understanding SQL Subqueries
- Understanding Transaction Isolation Levels and Concurrent Processing
- Writing External Applications to Query and Manipulate Database Data
- Retrieving and Manipulating Data Through Cursors
- Understanding Triggers
- Working with Data BLOBs and Text
- Working with Ms-sql Server Information Schema View
- Monitoring and Enhancing MS-SQL Server Performance
- Working with Stored Procedures
- Repairing and Maintaining MS-SQL Server Database Files
- Writing Advanced Queries and Subqueries
- Exploiting MS-SQL Server Built-in Stored Procedures
- Working with SQL Database Data Across the Internet
EAN: 2147483647
Pages: 632
- Chapter I e-Search: A Conceptual Framework of Online Consumer Behavior
- Chapter IV How Consumers Think About Interactive Aspects of Web Advertising
- Chapter V Consumer Complaint Behavior in the Online Environment
- Chapter IX Extrinsic Plus Intrinsic Human Factors Influencing the Web Usage
- Chapter XVII Internet Markets and E-Loyalty
