Exploiting MS-SQL Server Built-in Stored Procedures
Using sp_detach_db to Remove a Database From and sp_attach_db to Add a Database to an MS SQL Server
To remove a database from an MS-SQL Server-while leaving the database data (.mdf) and transaction log (.ldf) files intact on the hard drive-call the built-in stored procedure sp_detach_db. Although you cannot access the data within a database while it is not attached to an MS-SQL Server, you can copy or move the database .mdf file (which contains the database data and all its objects) onto another hard drive or onto another server altogether. Then, as we will discuss later within this tip, you can reattach the database data file (and optionally, its transaction log file) onto the same or a different MS-SQL Server. When that is completed, you can once again work with the data and objects within the database.
The built-in stored procedure sp_detach_db, which allows you to remove a database from the MS-SQL Server without deleting the database's files from the hard drive, has the following syntax
 sp_detach_db [@dbname=]''
 [, [@skipchecks=]{'TRUE'|'FALSE'}]
where:
- @dbname is the name of the database you want to remove from the MS-SQL Server.
- @skipchecks specifies whether the MS-SQL Server is to run the Transact-SQL UPDATE STATISTICS statement on each table and indexed view within the database before detaching the database from the DBMS. If FALSE or NULL, the DBMS runs UPDATE STATISTICS; if TRUE (which is the default if you don't specify a value for @SKIPCHECKS), the DBMS does not run UPDATE STATISTICS.
Note that the MS-SQL Server keeps statistics about the distribution of key values within an index and (sometimes) the same statistics about values stored within some of the table's non-indexed columns. The optimizer uses these statistics to determine which index or table column to use when executing a query. Whenever there is a significant change to the values stored within a table, or if someone added a large amount of data (with a bulk INSERT INTO) or removed a lot of data (with a TRUNCATE), you should set @SKIPCHECKS to FALSE so the DBMS will update table and index statistics. In addition, if you plan to move the DBMS to a read-only device, set @SKIPCHECKS to FALSE, so that permanent database has the most up-to-date indexes, which will allow queries to retrieve data as efficiently and quickly as possible. Otherwise, set @SKIPCHECKS TRUE or omit its value from the stored procedure call.
To remove the database SQLTips from an MS-SQL Server without updating statistics on INDEXES and table column values, submit the following EXEC statement to the DBMS:
EXEC sp_detach_db @dbname='SQLTips', @skipchecks='TRUE'
When you must reattach to an MS-SQL Server a database (.mdf) file that you previously detached with sp_detach_db, use the built-in stored procedure call sp_attach_db, whose syntax is shown here
 sp_attach_db [@dbname=]''
 ,[@filename<n>=]
 ''
 [...,@filename16]
where:
- @dbname is the name of the database you want to attach to an MS-SQL Server. You do not have to use the same name the database had when it was previously attached to an MS-SQL Server; any valid database name will do.
- @filename<n> is the full pathname of the database (.mdf) or transaction log (.ldf) file. Whereas an .ldf file holds the database transaction log, the .mdf file holds all database data, objects, user, and role information.
Suppose, for example, that you want to reattach the SQLTips database whose data is stored within the file C:MSSQLDataSQLTips_data.mdf and whose transaction log is stored within the file in D:MSSQLLogFilesSQLTips_log.ldf. To reattach SQLTips to an MS-SQL Server, you would execute the following EXEC statement:
 EXEC sp_attach_db @dbname='MySQLTips',
 @filenamel='C:MSSQLDataSqlTips_data.mdf',
 @filename2='D:MSSQLLogFilesSQLTips_log.ldf'
If you have only the database data (.mdf) file, you would call sp_attach_db as follows, instead:
 EXEC sp_attach_db @dbname='MySQLTips',
 @filename1='C:MSSQLDataSqlTips_data.mdf'
When you have only the database .mdf (data), the stored procedure will attach the data file to the MS-SQL Server and then create a new transaction log.
When you reattach a database to an MS-SQL Server, the database will again be accessible to DBMS users who were previously granted permission to use the database. All database objects and data, as well as user and role definitions are stored within a database .mdf file. As such, after executing the sp_attach_db procedure, the objects, data, logins, and security created within the original, previously detached database will be available within the database on the MS-SQL Server to which it was reattached.
Adding and Removing User Defined Data Types with the MS SQL Server Stored Procedures sp_addtype and sp_droptype
While creating a table, you must assign each column a data type that defines the type of data the column can hold. For example, if a column is of type INTEGER, users and applications can store only whole numbers within the column-characters and numbers with a decimal point are not allowed within the column. Similarly, when you define a column as being of type CHAR(10), the column can hold up to 10 characters, symbols, or numeric digits.
By creating a user-defined data, you can assign a descriptive name to one of the standard SQL data types. The name you assign should describe for the user the type of data and/or range of data values a user will find within a column. Suppose, for example, that you are working with the SALARY column in an EMPLOYEE table. You could define the column's data type as NUMERIC(10,2), or you could use a more descriptive user-defined data type such as EXECUTIVE_SALARY, MANAGER_SALARY, or SUPERVISOR_SALARY. Moreover, by creating a rule and binding it to the user-defined data type assigned to a column, you can ensure that numbers entered into the column (SALARY, in this example) fall within a certain range of values.
Tip 53 "Using the MS-SQL Server Enterprise Manager to Create a User-Defined Data Type," showed you how to create user-defined data types. In addition to creating data types within the Enterprise Manager, MS-SQL Server lets you create data types from the command line by calling the built-in stored procedure sp_addtype, which has the following syntax
 sp_addtype [@typename=]''
 ,[@phystype=]''
 [,[@nulltype=]'{NULL|NOT NULL|NONULL}'
 [,[@owner=]'']
where:
- @typename is the name that describes the type of data or range of values a table column can hold. For example, you might use names like HOURLY_PAYRATE, EXECUTIVE_SALARY, SSAN, and so on for your user-defined data types.
- @phystype is a valid built-in data type on your DBMS product. Most DBMS products support all the data types defined within the SQL specification and add a few of their own. Therefore, check your system documentation for a complete list of pre-defined data types you can assign to the @PHYSTYPE parameter.
- @nulltype specifies whether a column defined as being of the user-defined data type can hold NULL values. You can override this default nullability setting by providing a different setting when you use the user-defined type in a CREATE TABLE or ALTER TABLE statement.
- @owner specifies the username that owns the data type being created. If you do not pass a username to the stored procedure through the @OWNER parameter, the user executing the sp_addtype stored procedure will be the new data type's owner.
For example, to create the user-defined data type SALES_TAX, which defines a numeric value with a maximum of six digits, five of which might follow the decimal point, you would call sp_addtype as shown here:
 EXEC sp_addtype @typename='SALES_TAX',
 @phystype='NUMERIC(6,5),@owner='dbo'
Note that the sp_addtype stored procedure call in this example makes the DBO the user-defined data type's owner. Whenever you make the DBO a user-defined data type's owner, all users can refer to the new data type by name. If a user other than DBO owns a data type, the user must provide both the owner's username and user-defined data type's name when using the data type within a column definition.
When you no longer need a data type, you can drop it from the database using the sp_droptype stored procedure, with the following syntax
sp_droptype [@typename=]''
where:
- @typename is the name of the user-defined data type you want to delete.
Note You can only drop (that is, delete) user-defined types not currently in use. Thus, before you can drop a user-defined type, you must remove it from all table definitions in which it is applied to a column. In addition, you must unbind any rules or defaults (using sp_unbindrule or sp_unbindrule fault) you previously bound to the data type.
Thus, to drop the user-defined data type "SSAN" from the DBMS use:
EXEC sp_droptype @typename='SSAN'
Using sp_help to Display Database Object Properties
The built-in stored procedure sp_help lets you display the properties of objects within a database. Just as Windows displays an object's description after you right-click the object and select Properties from the pop-up menu, sp_help returns a description of the object whose name you pass as a parameter to the stored procedure.
The syntax of the sp_help stored procedure call is
sp_help [[@objname=]]
where:
- @objname is the name of the database object whose properties you want the DBMS to describe. @OBJNAME can be any database object including a user-defined data type, or the name of a table, index, constraint, view, stored procedure, and so on.
If you call sp_help without supplying the name of an object (within the @OBJNAME parameter) as shown in the following code line, the MS-SQL Server will return a results set that lists the name, owner, and data type of each object within the database:
EXEC sp_help
Therefore, calling sp_help without supplying an object's name is a convenient way to get a list of all database objects. You can then pass the names of objects, one at a time, to sp_help and get additional information on the objects you want.
The results set (that is, the specific properties information) that the DBMS returns when you call sp_help, depends on the type of object you pass to the stored procedure through its @OBJNAME parameter. For example, if you pass the name of a constraint, the DBMS will return a table listing:
- CONSTRAINT_TYPE-The constraint's type.
- CONSTRAINT_NAME-The constraint's name.
- DELETE_ACTION-Either Cascade or No Action for a FOREIGN KEY constraint. Not applicable for all other constraints. DELETE_ACTION is Cascade only when a FOREIGN KEY definition has an ON DELETE CASCADE option.
- UPDATE_ACTION-Either Cascade or No Action for a FOREIGN KEY constraint. Not applicable for all other constraints. UPDATE_ACTION is Cascade only when a FOREIGN KEY definition has an ON UPDATE CASCADE option.
- STATUS_ENABLED-Indicates whether a FOREIGN KEY or CHECK constraint is enabled. Not applicable for all other constraint types.
- STATUS_FOR_REPLICATION-Indicates whether a FOREIGN KEY or CHECK constraint is to be enforced during replication Not applicable for all other constraint types.
- CONSTRAINT_KEYS-The names of the columns that make up the constraint, or for defaults, rules, and check constraints, the text that defines the constraint.
Similarly, to display information about a stored procedure such as USP_PROCESS_CHECK, for example, you would call sp_help as follows:
EXEC sp_help 'USP_PROCESS_CHECK'
MS-SQL Server will display the name of the stored procedure, the username of its owner, and the date and time it was created. Next, the DBMS will return a results set with information about each of the stored procedure's parameters. The results set includes:
- PARAMETER_NAME-The parameter variable's name, such as @account_number, @check_number, @check_date, and so on.
- TYPE-The parameter's data type.
- LENGTH-The parameter's maximum physical storage size in bytes.
- PREC-The total number of digits (for numeric parameters) or number of characters (for non-numeric parameters).
- SCALE-For numeric parameters, the number of digits allowed to the right of the decimal point, otherwise NULL.
- PARAM_ORDER-The ordinal position of the parameter, that is 1 for the first parameter, 2 for the second, 3 for the third, and so on.
Using sp_helptext to Display the Text That Defines a Stored Procedure, User Defined Function, Trigger, Default, Rule, or View
MS-SQL Server stores the batch of statements you enter to define a stored procedure, user-defined function, trigger, default, rule, or view within the TEXT column of a row within the SYSCOMMENTS table. If you did not encrypt the stored procedure, function, or trigger when you created it, you can display its statements by calling the stored procedure sp_helptext using the following syntax
sp_helptext [[@objname=]]
where:
@objname is the name of the stored procedure, user-defined data type, function, trigger, default, rule or view.
You can only use sp_helptext to display the statement batch for objects within the current database. For example, the built-in stored procedure sp_helptext is defined within the MASTER database. As such, to display the definition of the stored procedure sp_helptext, you must first execute a "USE master" statement and then you call the stored procedure sp_helptext as shown here:
EXEC sp_helptext 'sp_helptext'
If you encrypt an object's definition by including the WITH ENCRYPTION clause with the CREATE statement that you executed to create the object, sp_helptext will not be able to display the object's text. Instead, sp_helptext will display the message "The object has been encrypted." Sp_helptext will, of course, display the object's name in place for .
Using sp_depends to Display the Tables and or Views That Define a View
Before altering tables or views, especially when changing the number or order of columns in either type of object, be sure to call sp_depends. As you learned in Tip 11 "Understanding Views," a view is a virtual table that derives its columns and its rows of data either from other views or from base tables within the database. Therefore, if you drop a table, views that reference column values within the table will no longer work. When a user queries a view whose underlying table (or view) has been deleted, the DBMS returns error messages such as the following:
Server: Msg 208, State 1, Procedure vw_show_high_rollers,
Line2

Invalid object name 'high_rollers'.

Server: Msg 4413, Level 16, State 1, Line 1

Could not use view or function 'vw_show_high_rollers'
because of binding errors
While the actual text of the error messages will vary, their point is the same: Views whose base tables (or base views) have been deleted stop displaying data. Moreover, views that stop working may cause a cascade of errors throughout the DBMS as stored procedures and user-defined functions may stop working because the views that feed data to them no longer work. To prevent such data outages, you must remove dependencies before dropping tables or views upon which other views are dependant.
When database object A references a column within database object B, object A is said to be dependent on object B. A view, for example, is dependant on a table when a column within the view references a column within the table. Similarly, a view is dependant upon another view when one of the columns within the first view references a column within the second.
MS-SQL Server makes a note of all dependencies between database objects within the SYSDEPENDS table. Unfortunately, SYSDEPENDS refers to all database objects by ID number rather than by name. As a result, checking which objects are dependant by querying SYSDEPENDS can be challenging. Fortunately, you can use the built-in stored procedure sp_depends to check the dependencies between and among objects by name.
The syntax for the sp_depends stored procedure call is
sp_depends [[@objname=]]
where:
@objname is the name of the view, table, or other database object whose dependencies you want to examine.
Sp_depends reports not only those objects that depend on the object whose name you pass to the stored procedure (through the @OBJNAME parameter), but also the database objects on which the object itself depends. Thus, before dropping or altering the view VW_HIGH_ROLLERS, for example, call sp_depends (as shown by the following code) to determine if there are any database views that reference columns within the VW_HIGH_ROLLERS view:
sp_depends 'vw_high_rollers'
If sp_depends reports there are database objects dependant on the view you want to delete, don't delete it. Or, if you delete the view anyway, either change the references within dependant objects, such that they refer to other database objects that have the same data, or delete the dependant objects views as well, because they will no longer work. Of course, before you delete any dependant objects, you should use sp_depends to see if other objects depend on them as well.
Using sp_helpconstraint to Display Information on Table Constraints
A constraint, as you learned in Tip 15 "Understanding Constraints," is a database object that restricts the range of values and type of data a user or application can place within a table column. There are seven types of constraints: assertions, domains, check constraints, foreign key constraints, primary key constraints, required data, and uniqueness constraints. Tip 15 explains the role that each type of constraint plays in maintaining database integrity. The bottom line is that the DBMS prevents users and applications from inserting rows with data that violates any constraints on the table's column or on the table as a whole.
If you are inserting rows manually (by executing INSERT statements through the SQL Query Analyzer, for example), the MS-SQL Server will report any constraint violations onscreen if it rejects the rows you are trying to insert. When you use an external application to insert data into a database table or when you call on a stored procedure to do so, the DBMS still rejects rows with illegal values. However, if the application or stored procedure does not handle errors properly, you might never see the system's error messages—data that you think was inserted into the database will simply go missing.
When writing batch routines that insert or update table data, it is critical that you understand the table's column constraints. Therefore, before you write stored procedures or external applications that update the database, call the built-in stored procedure sp_ helpconstraint to get a list of all constraints to which column values in new rows must adhere. Then, include within your programs and stored procedures code that ensures that data to be inserted does not violate these constraints.
The syntax of an sp_helpconstraint stored procedure call is
 sp_helpconstraint [@objname=]''
 [,[@ncmsg=}{'nomsg'}]
where:
- @objname is the name of the table for which you want the stored procedure to list constraint information.
- @nomsg specifies whether sp_helpconstraint is to display the name of the table whose list of constraints the stored procedure is reporting. Set @NOMSG to nomsg if you want to suppress the table name display, or omit the parameter to display the name of the table along with the table's list of constraints.
For each table constraint, sp_helpconstraint returns a results set that includes:
- CONSTRAINT_TYPE—The type of constraint (CHECK, DEFAULT, PRIMARY KEY, FOREIGN KEY, and so on) and the columns to which the constraint applies.
- CONSTRAINT_NAME—The constraint's unique user- or system-supplied name. User-supplied constraint names are often descriptive of the constraint's purpose. System-supplied names of the table name, followed by the names of the columns to which the constraint applies, and end with a randomly generated sequence of letters and numbers to guarantee the uniqueness of the constraint's name.
- DELETE_ACTION—Either Cascade or No Action for a FOREIGN KEY constraint and not applicable for all other constraints. DELETE_ACTION is Cascade only when a FOREIGN KEY definition has an ON DELETE CASCADE rule.
- UPDATE_ACTION—Either Cascade or No Action for a FOREIGN KEY constraint and not applicable for all other constraints. (UPDATE_ACTION is Cascade only when a FOREIGN KEY definition has an ON UPDATE CASCADE rule.)
- STATUS_ENABLED—Indicates whether a FOREIGN KEY or CHECK constraint is enabled and not applicable for all other constraint types.
- STATUS_FOR_REPLICATION—Indicates whether a FOREIGN KEY or CHECK constraint is to be enforced during replication and not applicable for all other types of constraints.
In addition to the preceding information about column constraints, sp_helpconstraint also lists any FOREIGN KEY constraints that reference the table—giving the name of each FOREIGN KEY and the name of the table in which the FOREIGN KEY is defined.
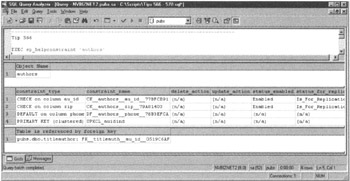
For example, to display the constraints on the AUTHORS table within the PUBS database you would execute the following statement batch:
 USE PUBS
 EXEC sp_helpconstraint 'authors'
| Note |
You must call sp_helpconstraint from within the database that has the table for which you want the stored procedure to report constraints. In this example, PUBS must be the current database for the sp_helpconstraint procedure to report the constraints on the AUTHORS table as shown in Figure 566.1.
|
To display the text of CHECK and DEFAULT constraints, use the built-in stored procedure sp_helptext (which you learned about in Tip 564 "Using the MS-SQL Server Stored Procedure sp_helptext to Display the Text that Defines a Stored Procedure, User-Defined Function, Trigger, Default, Rule, or View"). In this example, you would execute the following EXEC command to display the text of the CHECK constraint on the AU_ID column within the AUTHORS table:
EXEC sp_helptext 'CK__authors__au_id__77BFCB91
When passing a system-supplied constraint name to the sp_helptext stored procedure, be sure to note the two underscores that precede the table name (AUTHORS), the column name (AU_ID), and the random string ("77BFCB91") within the constraint.
Using sp_pkeys to Display Information on a Table s PRIMARY KEY
You can establish a parent/child relationship between any two tables by making a FOREIGN KEY reference within the child table to the PRIMARY KEY within the parent table. A PRIMARY KEY is nothing more than one or more columns within a table to which the PRIMARY KEY constraint has been applied. Similarly, a FOREIGN KEY is a column or set of columns that have a FOREIGN KEY constraint. The importance of the PRIMARY KEY is that each PRIMARY KEY value uniquely identifies a single row within the parent table. In other words, every row in the column (or set of columns) that is the table's PRIMARY KEY must have a unique, non-NULL value. The values within the rows of a FOREIGN KEY column, on the other hand, need not be, and, in fact, are ideally not unique to any row within the child table.
Suppose, for example you want to setup a parent/child relationship between a CUSTOMERS table and an ORDERS table. In this relationship, the rows within the CUSTOMERS table are "parents" and the "child" rows are within the ORDERS table. A customer can (and hopefully does) place more than one order. However, any particular order can only belong to one customer.
To setup the parent/child relationship between CUSTOMERS and ORDERS, you would use the built-in stored procedure sp_pkeys to identify the PRIMARY KEY columns that uniquely identifies each customer (that is, each row) within the CUSTOMERS table. Then you can define within the child table (ORDERS) a FOREIGN KEY constraint that references the PRIMARY KEY within the parent table (CUSTOMERS).
The syntax of an sp_pkeys stored procedure call is
sp_pkeys [@table_name=]''
 [,[@table_owner=]'
' [,[@table_qualifier=]''
where:
- @table_name is the name of the table for which you want the stored procedure to report information about the PRIMARY KEY.
- @table_owner is the username of the table owner. If you omit the @TABLE_OWNER from the procedure call, the DBMS will search for the table given by
among the tables you own, and then among the tables owned by the database owner (DBO).
- @table_qualifier the name of the database in which the table resides. If omitted, the DBMS assumes the table exists within the current database.
Thus, to display information about the PRIMARY KEY defined on the CUSTOMERS table within the NORTHWIND database, you might write the following EXEC statement:
 EXEC sp_pkeys @table_name='customers',
 @table_qualifier='Northwind'
When called, sp_pkeys will return a results set with the following information about the PRIMARY KEY:
- TABLE_QUALIFIER-The name of the database in which the table resides.
- TABLE_OWNER-The username of the table's owner.
- TABLE_NAME-The table's name.
- COLUMN_NAME-The name of a column within the PRIMARY KEY.
- KEY_SEQ-The ordinal position within the PRIMARY KEY of the column named within the COLUMN_NAME column.
- PK_NAME-The name of the primary key.
After calling the sp_pkeys stored procedure, look in the COLUMN_NAME column within the results table to determine the column your FOREIGN KEY (within the ORDERS table, in this example) must reference within the parent (CUSTOMERS) table. Then, apply a FOREIGN KEY constraint to the appropriate columns within the child (ORDERS) table. You learned how to apply FOREIGN KEY constraints while creating a new table within Tip 62, "Using the CREATE TABLE Statement to Assign Foreign Key Constraints." You also learned how to change the structure of an existing table within Tip 60, "Using the ALTER TABLE Statement to Change Primary and Foreign Keys."
If the PRIMARY KEY has multiple columns, the results set returned by the sp_pkeys stored procedure will have multiple rows-one for each column within the PRIMARY KEY. When working with multi-column PRIMARY KEYs, pay particular attention to the value in both the COLUMN_NAME and KEY_SEQ columns. Make sure you list each column within the FOREIGN KEY in the same ordinal position as its corresponding column within the PRIMARY KEY. In other words, the number of columns within the FOREIGN KEY must match the number of columns in the PRIMARY KEY, and corresponding columns must be in the same ordinal position within each key. The number in the KEY_SEQ column gives you the ordinal position within the PRIMARY KEY of the column named in the COLUMN_NAME column.
Using sp_fkeys to Display Information on the Foreign Keys That Reference a Table s PRIMARY KEY
When creating a relational database, be sure to exploit the ability of the DBMS to maintain referential integrity. Although you can set up multi-table SELECT statements that join parent and child rows without PRIMARY KEY and FOREIGN KEY constraints, resist the temptation to do so. While it takes some prior planning to set up PRIMARY KEY and FOREIGN KEY constraints properly, doing so frees you from having to worry about users being able to insert duplicate rows into the parent table or being able to create orphan rows within the child table.
Duplicate rows in a parent table and/or orphans within a child table are undesirable because they lead to errors in reporting and can cause real-life problems. Suppose, for example, that you have a CUSTOMERS parent table and an ORDERS child table. If you have duplicate rows within the CUSTOMERS (parent) table, a child row within the ORDERS table could have two (or more) parents within the CUSTOMERS table-which means a customer will likely be billed twice for the one order that shipped. Conversely, orphan rows within the child (ORDERS) table means there are orders with no customer information. Therefore, if the "Ship To" address is stored within the ORDERS table and the "Bill To" information is stored in the CUSTOMERS table, orders will ship without customers being billed.
After you set up PRIMARY KEY and FOREIGN KEY constraints that let the DBMS manage parent/child relationships between related tables (that is, to maintain referential integrity within the database), you will find it convenient to produce a list of FOREIGN KEY constraints that reference each parent table. This list will come in handy when you want to drop a parent table or change its structure. In addition, when executing a DELETE statement to remove parent rows or an UPDATE statement that changes values within PRIMARY KEY columns, you may have to drop or update columns in rows within the child table as well. The list of FOREIGN KEY references to the parent table's PRIMARY KEY will tell you which child tables require attention when you make changes within the parent table.
The built-in stored procedure sp_fkeys lets you get a list of FOREIGN_KEY references on any table within a database managed by an MS-SQL Server. To call sp_fkeys, use the following syntax
 sp_fkeys
 [@pktable_name=]''
 [,[@pktable_owner=]''
 [,[@fktable_name=]''
 [,[@fktable_owner=]''
 [,[@fktable_qualifier=]''
where:
- @pktable_name is the name of the parent table (with the PRIMARY KEY) for which you want the stored procedure to list the FOREIGN KEY references.
- @pktable_owner is the username of the parent table's owner. If you omit the @PKTABLE_OWNER parameter from the procedure call, the DBMS will search for the table name by @PKTABLE_NAME among the tables you own and then among the tables owned by the database owner (DBO).
- @fktable_name is the name of the child table (with the FOREIGN KEY). If you provide both the parent table (@PKTABLE_NAME) and child table (@FKTABLE_NAME) names, the stored procedure will list only the FOREIGN KEY reference on the parent (named in @PKTABLE_NAME parameter) within the one child table (named in the @FKTABLE_NAME parameter). Conversely, if you provide only the name of the child table (in the @FKTABLE_NAME parameter) and omit the parent table's name, the stored procedure will list all the parent tables referenced by foreign keys within the child table.
- @fktable_owner is the username of the child table's owner. If you omit the @FKTABLE_OWNER parameter, the DBMS will search for the child table named by @FKTABLE_NAME among the tables you own and then among the tables owned by the database owner (DBO).
- @fktable_qualifier is the name of the database in which the child table (with the FOREIGN KEY constraint) resides. If omitted, the DBMS assumes the child (FOREIGN KEY) table exists within the current database.
Thus, if you want a list of all FOREIGN KEY constraints that reference the PRIMARY KEY within the CUSTOMERS table in the NORTHWIND database, you would execute the following statement batch:
 USE Northwind
 EXEC sp_fkeys @pktable_name='Customers'
The stored procedure sp_fkeys, in turn, will return a results set with at least one row per FOREIGN KEY reference and the following columns within each row:
- PKTABLE_QUALIFIER-The name of the database in which the (parent) table with the PRIMARY KEY constraint reside.
- PKTABLE_OWNER-The username of the parent table's owner.
- PKTABLE_NAME-The name of the (parent) table with the PRIMARY KEY constraint.
- PKCOLUMN_NAME-The name of the column in the PRIMARY KEY. If the PRIMARY KEY has multiple columns, sp_fkeys will return multiple rows-one for each column within the PRIMARY KEY constraint.
- FKTABLE_QUALIFIER-The name of the database in which the (child) table with the FOREIGN KEY constraint reside.
- FKTABLE_OWNER-The username of the child table's owner.
- FKTABLE_NAME-The name of the (child) table with the FORIEGN KEY constraint.
- FKCOLUMN_NAME-The name of the column within the FOREIGN KEY that corresponds to the PRIMARY KEY column named in PKCOLUMN_name (within the current row of the results set).
- KEY_SEQ-The ordinal position within the PRIMARY KEY and FOREIGN KEY of the columns described by the current row within the results table.
- UPDATE_RULE-0, 1, or 2 indicate the action the DBMS takes on the value within the FOREIGN KEY column when the value in the corresponding column within the PRIMARY KEY is updated. 0 = Cascade; 1 = No Action, and 2 = Set Null.
- DELETE_RULE-0, 1, or 2 indicate the action the DBMS takes on the value within the FOREIGN KEY column when the value in the child's corresponding row in the parent table is deleted. 0 = Cascade; 1 = No Action, and 2 = Set Null.
- FK_NAME-The user- or system-supplied name of the FOREIGN KEY constraint.
- PK_NAME-The user- or system-supplied name of the PRIMARY KEY constraint.
To display the above listed information for all parent tables referenced by FOREIGN KEYS within a child table, you would call sp_fkey and supply to it only the information about the child table (which has the FOREIGN KEY constraints). For example, to list all tables referenced by FOREIGN KEY constraints within the ORDERS table in the NORTHWIND database, you would execute the following statement batch:
USE Northwind
EXEC sp_fkeys @fktable_name='Orders'
Using sp_procoption to Control Which Stored Procedures the MS SQL Server Will Run at Startup
In Tips 530-532 you learned what a stored procedure does, how to use the CREATE PROCEDURE statement to create a stored procedure, and how to call a stored procedure using the Transact-SQL EXEC command. In short, a stored procedure is a batch of SQL and/or Transact-SQL statements the DBMS executes whenever a user calls the stored procedure by name. Stored procedures are a powerful feature, because they let you write SQL Programs. That is, stored procedures let you combine SQL data management statements with procedural Transact-SQL programming statements so you can create statement batches that perform complex queries, database updates, or execute any sequence of SQL (and Transact-SQL statements) you like. Stored procedures make it possible for a database user to execute complex queries or a large batch of database management statements by submitting a single EXEC statement that calls the stored procedure, which then performs the work required.
In addition to letting users and external applications execute stored procedures, you can have the MS-SQL Server execute specific stored procedures automatically each time you start the DBMS. For example, if you have set of maintenance tasks such as creating and or clearing global temporary tables or cursors, creating executive summary tables, or some other cleanup/preparatory tasks that you want the DBMS to perform each time you start the MS-SQL Server, put the statements that perform the work into one or several stored procedures. Then, use the built-in stored procedure sp_procoption to mark the stored procedures you want to be called at startup.
To create stored procedures the DBMS will execute at startup, you must login to the MASTER database as the database owner (DBO). As DBO, and within the MASTER database, use the CREATE PROCEDURE statement to create a stored procedure you want the DBMS to execute at startup. Next, call the sp_procoption stored procedure with the the following syntax to mark the stored procedure you created for execution at startup
 sp_procoption [@procname=]''
 ,[@optionname=]'startup'
 [@optionvalue=]'{true|false}'
where:
- @procname is the name of the stored procedure you want to MS-SQL Server to run at startup. Or, if you set the @OPTIONVALUE to FALSE, @PROCNAME is the name of the stored procedure you no longer want the MS-SQL Server to run at startup.
- @optionname is always "startup."
- @optionvalue is either TRUE or FALSE. Set @OPTIONVALUE to TRUE if you want the DBMS to execute the procedure named in @PROCNAME at startup. Set @OPTIONVALUE to FALSE if you no longer want the DBMS to execute the procedure at startup.
Suppose for example, that you create the stored procedure su_sp_CreateExecSummary as the DBO within the MASTER database. To have the DBMS call su_sp_CreateExecSummary each time you restart the MS-SQL Server, execute the following statement batch:
USE master
EXEC sp_procoption @procname = 'su_sp_CreateExecSummary',
 @optionname = 'startup',
 @optionvalue = 'true'
SQL Tips and Techniques
- Understanding SQL Basics and Creating Database Files
- Using SQL Data Definition Language (DDL) to Create Data Tables and Other Database Objects
- Using SQL Data Manipulation Language (DML) to Insert and Manipulate Data Within SQL Tables
- Working with Queries, Expressions, and Aggregate Functions
- Understanding SQL Transactions and Transaction Logs
- Using Data Control Language (DCL) to Setup Database Security
- Creating Indexes for Fast Data Retrieval
- Using Keys and Constraints to Maintain Database Integrity
- Performing Multiple-table Queries and Creating SQL Data Views
- Working with Functions, Parameters, and Data Types
- Working with Comparison Predicates and Grouped Queries
- Working with SQL JOIN Statements and Other Multiple-table Queries
- Understanding SQL Subqueries
- Understanding Transaction Isolation Levels and Concurrent Processing
- Writing External Applications to Query and Manipulate Database Data
- Retrieving and Manipulating Data Through Cursors
- Understanding Triggers
- Working with Data BLOBs and Text
- Working with Ms-sql Server Information Schema View
- Monitoring and Enhancing MS-SQL Server Performance
- Working with Stored Procedures
- Repairing and Maintaining MS-SQL Server Database Files
- Writing Advanced Queries and Subqueries
- Exploiting MS-SQL Server Built-in Stored Procedures
- Working with SQL Database Data Across the Internet
EAN: 2147483647
Pages: 632
