Selection Portals
We've covered the basics of portals thus far, and discussed the idea that portals are used to display records from a related table and that the records themselves relate in a meaningful way. In other words, the related records shown in a portal correspond somehow to the active recordParents to their own Children, Class to its attending Students, Company to its own Employees, Neighborhoods to Houses, and so on.
These relationships are often thought of as primary. They're the relationships that you depend on to define and determine a database's core architecture. Your users, likewise, will intuitively understand the process of entering data for, say, a class and then fleshing out its roster of students. There's a direct correlation between a primary data structure and the information that users expect to view, enter, and report on.
|
For a more in-depth discussion of data modeling, see Chapter 5, "Relational Database Design," p. 129. |
We will now venture beyond the basic functions of data entry and display and explore other uses of portals. The other, advanced uses of portals mainly revolve around user interface choices in which you might opt for a more sophisticated approach in making selections. You may choose to relate to records in another table not for primary data purposes but for any number of others. We tend to refer to these cases as utility relationships. The following sections delve into some of the ways in which you can apply utility relationships.
Basic Selection Portals
The first advanced technique we discuss is what we refer to as a selection portal. Selection portals are used to present choices to the user in lieu of a value list or menu of some kind.
This approach is necessary when a simple value list contains too many values to display practically or perhaps needs to display multiple columns of information as opposed to the two that FileMaker allows. In these cases we often choose to create a portal that displays options and permits a user to click on a row to select from among the choices presented.
Selection portals offer an alternative to the standard approach of using value lists to choose foreign key values: The only way two records in an equijoin become related is if they share a like value in match key fields. If you want, for example, to relate a real estate agent to a listing record, you can either manually enter the key for an agent into an AgentID field for the listing record, or assist data entry by providing a pop-up list or menu of options.
|
For a refresher in related value lists, see Chapter 3, "Defining and Working with Fields," p. 67. |
Value lists, although a quick and easy means of giving users access to choose related records, can be limited: If you have hundreds of possible values, they can become cumbersome to scroll through. You're also able to utilize the contents of only two fields, the first of which needs to be the values for your match field (regardless of whether you choose to have it displayed). Figure 16.7 offers a pop-up window alternative to a value list that makes use of a portal.
Figure 16.7. This portal of options allows users to pick which related record they want to associate with their current record.
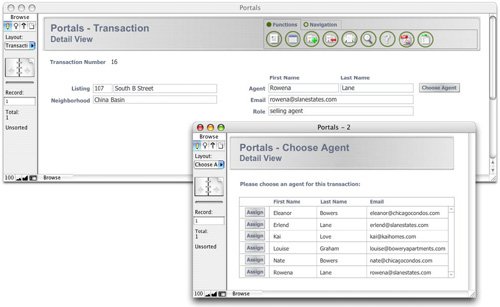
Selection portals address these issues, although they admittedly require more work to build. When a user wants to associate a record, as shown in Figure 16.7, he need only click, for example, the Rowena Lane row in the selection portal. Notice that the example shows the selection portal in a different pop-up window. This is a common way to display a selection portal for only as long as it is necessary. Clicking on a row above can also close the window in question.
The basic concept for selection portals is fairly straightforward. The goal here is to display all the possible relatable matches for a given record, and then through scripting capture and populate its match key into the appropriate foreign match key on the other side of the relationship. The work involves two elements: first, creating a portal that displays all the records from the other table and, second, writing a script that captures and populates the match field (foreign key) after a user has clicked on one of the portal rows available.
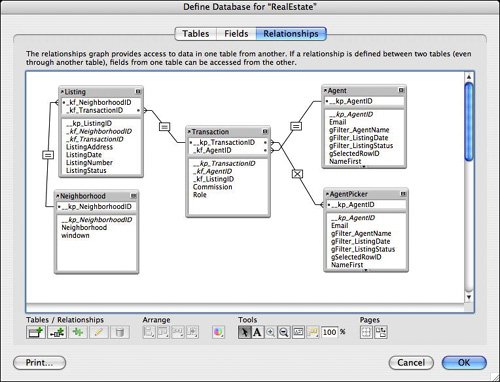
First define your data structure. In the example shown in Figure 16.7, agents can work with multiple listings, but a listing might have multiple agents as well: one representing the buyers and another representing the sellers. Notice that this now becomes a many-to-many relationship. At times there might be multiple agents on the buying or selling side as well. For the purposes of this example, use the Relationships Graph shown in Figure 16.8.
Figure 16.8. We've simplified the fields and relationships in this example to show just the primary data structure and a handful of fields necessary for the example.
Tip
To see this process work, first create an Agent layout and add a portal for all the listings associated with that agent. We recommend displaying your match key fields until you get comfortable with this technique.
Now you need a portal that shows all the listings in the table from which users can choose. For any portal, you always first need a relationship, so create a second table occurrence and second relationship. The example in Figure 16.8 related the _kp_agent to the _kp_listing via a Cartesian cross-product operator (x).
Note
Note that it doesn't matter what fields you choose as match fields for a cross-product join. The operator doesn't make any comparison and simply relates all records to all records.
A second portal can now be placed on your existing layout, or, in all likelihood, you would have these two portals displayed on a different layout expressly established for this picking process. You can even combine it with a pop-up window, as explained in Chapter 13, "Advanced Interface Techniques."
|
To review how to create a pop-up window, see "Rich Dialog Windows," p. 369. |
After your cross-product selection portal is in place, you need to write a script to associate the related record your user will choose. The script, which will be tied to a button that's placed in the selection portal, needs to navigate to another layout to create the association. So that information about the current record and the selected portal row can be accessible on that other layout, you need to define the button to pass the agent and listing IDs as a script parameter. Use the following:
Select_Listing
 # assumes the user has clicked on the "assign" button for agents
 # establish context
 Go to Layout [ "Transaction" (Transaction) ]
 #
 # create the new record
 New Record/Request
 #
 # set the two foreign IDs required.
 # This script assumes that the button that launches the script passes the
 # script parameter:
 # Agent::_kp_agent & " " & select_Listing::_kp_listing
 Set Field [ Transaction::_kf_agent; LeftWords ( Get(ScriptParameter); 1 )]
 Set Field [ Transaction::_kf_listing; RightWords ( Get (ScriptParameter); 1 ) ]
 #
 # commit and return to the original layout
 Commit Records/Requests [ No dialog ]
 Go to Layout [ original layout ]
|
To review script parameters and how to pass multiple parameters, see Chapter 15, "Advanced Scripting Techniques," p. 435. |
This basic technique allows you to create a more complete user experience for your users and to expressly control the creation of related records. The advantages of this over a value list are that you can offer more than two fields of information to users, you can leave obscured the key values in your database, and generally the user interface can come across as more polished (depending, of course, on your artistic abilities).
Portal Row Highlights
You are now exploring ways of working with portals that go beyond simply using them to display data that is related in a real-world sense. You're now establishing utility relationships that allow for other things beside basic structural relationships. In the example in the preceding section, you related your current record to all records in another table. In this example, we establish a condition by which a single portal row can be highlighted (see Figure 16.9). This is another technique to enhance usability and extend user interface.
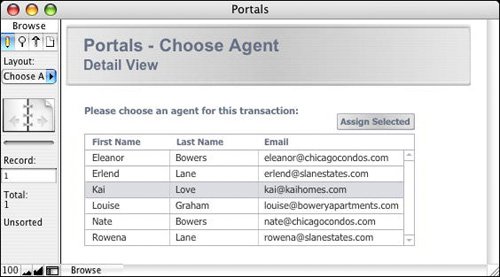
Figure 16.9. The highlighting gives solid feedback to users that they are acting on the row in question; it allows you to establish a "selected" row.
Note
Notice that the Assign Selected button has been moved to the top of the portal, rather than placed on every row of the portal.
This technique involves setting a global field to the value of the primary key of whichever row the user clicks. You need three fields in all for this technique. We generally add them to the related table or a separate utility table, but keep in mind that you can use globals from any context. The following is a list of the fields you'll need for this technique:
- gHighlightColorA global container field that holds a rectangle of the color you want to use as a highlight. You need only one such field in your database, regardless of how many portals you want to have use this technique.
- gSelectedRowIDA global number field that holds the primary key value of whichever row the user last clicked.
- HighlightRowA calculation field that returns a container as its result:
If ( gSelectedRowID = _kp_relatedTable; gHighlightColor; "")
To set the global field, you need only create a script like so:
SelectRow_SetHighlight
 Set Field [ Listing::gSelectedRowID; relatedTable::_kp_relatedTable ]
 Commit Records/Requests [ No dialog ]
This script presumes that the user has clicked on a portal row: The _kp_relatedTable is passed from that mouse click.
Notice that in cases in which gSelectedRowID equals the primary key of the related table, the calculation returns the value (in this case a colored rectangle) from gHighlightColor. Because you're using global fields, this solution works perfectly well in a multiuser environment. Whatever a given user has selected as her highlight row remains specific to her session.
The final element of implementing highlighted portal rows is to place the HighlightRow calculation field in the portal itself. Make the field exactly the size of the top row of the portal, and set its graphic format to Crop. (Make sure that your colored rectangle is larger than the portal rows you plan on having the highlight.) Attach the SelectRow_SetHighlight script to the field. In Browse mode a button does not need to be the topmost object on the screen to work. Move fields above it and your highlight color fills in nicely in the background. You would generally turn off access to the fields in your portal in Browse mode so that clicking on the portal row anywhere results in a highlight appearing, rather than a field being entered for data entry.
 |
If you're having difficulty getting the colored rectangle to display properly, refer to "Incomplete Highlighting Rectangle" in the "Troubleshooting" section at the end of this chapter. |
One additional option when storing a selected row ID and creating a highlighted portal row is that it is possible to then also create a relationship specifically for that selected record. By relating gSelectedRowID to _kp_listing, you now have a relationship that will change as a user clicks portal rows.
Consider the implications: You can display related record fields directly on your current layout, based on the selected row (see Figure 16.10).
Figure 16.10. Notice that the information on the right corresponds to the related record selected by the portal on the left.
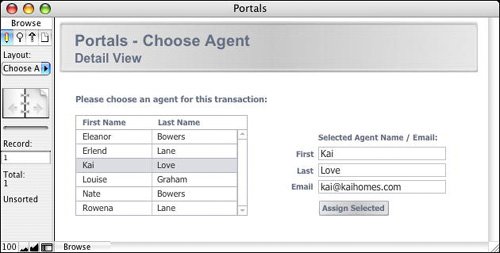
This is a great way to address a portal that is getting too crowded with fields. Instead of making each column smaller, or perhaps stacking fields in rows that might then get difficult to read, simply allow users to select a row in a portal and then display additional information about the selected, related record off to the side.
There's one flaw in the technique described. When users move from parent record to parent record, what happens to the row highlight? The gSelectedRowID would still remain associated to a record in the related table, even though a subsequent record may not include it in the selection portal. This could lead to confusion at best or, at worst, data integrity problems.
To ensure that a selected related record is visible only from its parent record, add a second predicate to the relationship so that it displays only related records from the current listing or transaction context. If the status area book icon is used to change records, the relationship will no longer be valid and no records will display.
|
To manage displaying related data in a safe, multiuser-conscious way, refer to "Multiuser Selected Data" in the "Troubleshooting" section at the end of this chapter. |
Multi-keys and Multi-row Selections
In addition to wanting to highlight a single row, as in the preceding example, you may encounter the need to have multiple rows selected at once. In the Agent Listings example, for instance, you may want to allow users to click multiple rows in the listing portal and assign them all at once to the agent in question.
This is a particularly handy way of allowing users to do multiple things at once: add a batch of listings to an agent, select multiple people for form letters, apply new dates to a series of records, and so on. There are dozens of possibilities.
The technique for this is nearly identical to that already presented. However, we rely on FileMaker Pro's capability to resolve multiple match values in a single field. These multiple match value keys are often called multi-keys.
Consider a company table related to an agent table, as shown in Table 16.1.
|
ID |
Name |
|---|---|
|
1 |
Eleanor Bowers |
|
2 |
Erlend Lane |
|
3 |
Kai Love |
|
4 |
Nate Bowers |
|
5 |
Rowena Lane |
If you establish a relationship to this table by using a fieldglobal or otherwiseFileMaker will recognize all return-delimited match key values as though they were individual values.
For example, if your company match field holds
1
3
then your valid, related records will be Eleanor and Kai's.
Likewise,
5
2
4
relates to Rowena, Erlend, and Nate. It doesn't matter to FileMaker in which order the values fall, simply that they are valid and delimited with a carriage return.
With a multi-key match, it is possible to show multiple rows as highlighted or selected in a given portal. You can use again the same three fields you'd use to set up a single row highlight:
- gHighlightColorA global container field that holds a rectangle of the color you want to use as a highlight.
- gSelectedRowIDA global text field that holds multiple primary key values, return delimited, of whichever rows the user last clicked. Note that a number field no longer works. You cannot insert line breaks in a number field. Happily, in this case, FileMaker Pro can relate a text field to a number field. Be wary of problems with field types, but in this case there will be no problem.
- HighlightRowA calculation field that returns a container as its result:
If ( FilterValues ( gSelectedMultiRows; _kp_listing ); gHighlightColor; "" )
If you are modifying the fields from the example given earlier in the chapter, notice that the test in the calculation is now using a FilterValues function that recognizes whether an ID is included in your global (as opposed to simply checking whether the two fields are equal).
When you're setting values in gSelectedRowID, a simple Set Field script step won't do the trick any longer. Doing so would replace the contents of the field and you'd be left with just one row selected. Your script needs to look like this:
SelectRow_SetHighlight
#
# if the ID already exists, remove it
If [ FilterValues ( Listing::gSelectedMultiRows; select_Listing::_kp_listing)]
Set Field [ Listing::gSelectedMultiRows;
 Let ( [
 selectedRowKey = select_Listing::_kp_listing & "¶"
 ] ;
 Substitute ( Listing::gSelectedMultiRows; selectedRowKey ; "")
 ) ]
 #
 # if the ID doesn't exist, append it to the end
 Else
Set Field [ Listing::gSelectedMultiRows;
 Let ( [
 selectedRowID = select_Listing::_kp_listing & "¶"
 ] ;
 Listing::gSelectedMultiRows & selectedRowID
 ) ]
End If
#
Commit Records/Requests [ No dialog ]
#
The mechanics of this script will result in your user adding and removing key values to your global match field as he or she clicks on multiple rows in your portal. Each row will highlight and in this manner you can have users choose multiple items from a given set of related records.
Part I: Getting Started with FileMaker 8
FileMaker Overview
- FileMaker Overview
- FileMaker and Its Marketplace
- Introduction to Database Software
- FileMaker Deployment Options
- Whats New in FileMaker Pro 8
Using FileMaker Pro
- Getting Started
- Working in FileMaker Pro
- Troubleshooting
- FileMaker Extra: Becoming a FileMaker Pro Power User
Defining and Working with Fields
- Defining and Working with Fields
- Working Under the Hood
- Working with Fields
- Working with Field Types
- Assigning Field Options
- Troubleshooting
- FileMaker Extra: Indexing in FileMaker
Working with Layouts
- Working with Layouts
- Whats a Layout?
- Creating and Managing Layouts
- Working with Parts
- Working with Objects on a Layout
- Working with the Tab Control Object
- Working with Fields
- Portals
- Troubleshooting
- FileMaker Extra: Designing Cross-PlatformFriendly Layouts
Part II: Developing Solutions with FileMaker
Relational Database Design
- Relational Database Design
- Understanding Database Design
- Database Analysis
- Working with Entities and Attributes
- Understanding Relationships
- Relationship Optionality
- Understanding the Role of Keys in Database Design
- Many-to-Many Relationships: Solving the Puzzle
- The Basics of Process Analysis
- FileMaker Extra: Complex Many-to-Many Relationships
Working with Multiple Tables
- Working with Multiple Tables
- Multitable Systems in FileMaker Pro
- Creating a One-to-Many Relationship in FileMaker
- Working with Keys and Match Fields
- Understanding Table Context
- Working with Related Data
- Creating a Many-to-Many Relationship
- Relational Integrity
- Rapid Multitable Development
- Troubleshooting
- FileMaker Extra: Building a Three-Way Join
Working with Relationships
- Working with Relationships
- Relationships Graphs and ERDs
- Relationships as Queries
- Creating Self-Relationships
- Creating Ranged Relationships
- Creating Cross-Product Relationships
- Working with Data from Distant Tables
- Working with Multiple Files
- How and When to Use Multiple Files
- Troubleshooting
- FileMaker Extra: Managing the Relationships Graph
Getting Started with Calculations
- Getting Started with Calculations
- Understanding How and Where Calculations Are Used
- Exploring the Calculation Dialog Box
- Essential Functions
- Using Conditional Functions
- Aggregate Functions
- Learning About the Environment
- Troubleshooting
- FileMaker Extra: Tips for Becoming a Calculation Master
Getting Started with Scripting
- Getting Started with Scripting
- Scripts in FileMaker Pro
- Creating Scripts
- Common Scripting Topics
- Triggering Scripts
- Working with Buttons on Layouts
- Troubleshooting
- FileMaker Extra: Creating a Script Library
Getting Started with Reporting
- Getting Started with Reporting
- Deriving Meaning from Data
- Working with Lists of Data
- Summarized Reports
- Delivering Reports
- Troubleshooting
- FileMaker Extra: Incorporating Reports into the Workflow
Part III: Developer Techniques
Developing for Multiuser Deployment
- Developing for Multiuser Deployment
- Developing for Multiple Users
- Sessions in FileMaker Pro
- Concurrency
- Audit Trails in FileMaker Pro
- Launch Files
- Troubleshooting
- FileMaker Extra: Development with a Team
Implementing Security
- Approaching Security
- User-Level Internal Security
- File-Level Access Security
- Troubleshooting
- FileMaker Extra: Working with Multiple Files
Advanced Interface Techniques
- Advanced Interface Techniques
- User Interfaces in FileMaker Pro
- Navigation
- Multiwindow Interfaces
- Working with Custom Menus
- Showing/Hiding Layout Elements
- Dedicated Find Layouts
- Data Presentation
- Working with Table View
- Troubleshooting
- FileMaker Extra: User Interface Heuristics
Advanced Calculation Techniques
- Advanced Calculation Techniques
- Whats an Advanced Calculation Technique?
- Logical Functions
- Text Formatting Functions
- Array Functions
- The Filter-ing Functions
- Custom Functions
- GetNthRecord
- Troubleshooting
- FileMaker Extra: Creating a Custom Function Library
Advanced Scripting Techniques
- Advanced Scripting Techniques
- What Is Advanced Scripting?
- Script Parameters and Script Results
- Script Variables
- Window Management Techniques
- Go to Related Record
- Troubleshooting
- FileMaker Extra: Recursive Scripts
Advanced Portal Techniques
- Advanced Portal Techniques
- Portals in FileMaker Pro
- Portal Basics
- New Record Only Relationships
- Horizontal Portals
- Using Portals to Create Calendars
- Selection Portals
- Filtered Portals
- Dynamic Portal Sorting
- Troubleshooting
- FileMaker Extra: Portals and Record Locking
Debugging and Troubleshooting
- Debugging and Troubleshooting
- What Is Troubleshooting?
- Staying Out of Trouble
- Planning for Trouble
- Troubleshooting Scripts and Calculations
- Troubleshooting in Specific Areas: Performance, Context, Connectivity, and Globals
- File Maintenance and Recovery
- FileMaker Extra: Other Tools of the Trade
Converting Systems from Previous Versions of FileMaker Pro
- Converting Systems from Previous Versions of FileMaker Pro
- Migration Choices
- Converting Files
- Pre-Conversion Tasks
- Post-Conversion Tasks
- Troubleshooting
- FileMaker Extra: Converting Web-Enabled Databases
Part IV: Data Integration and Publishing
Importing Data into FileMaker Pro
- Importing Data into FileMaker Pro
- Working with External Data
- Flat-File Data Sources
- Importing Multiple Files from a Folder
- Importing Photos from a Digital Camera
- Importing from an ODBC Data Source
- Importing from an XML Data Source
- Using a Script to Import Data
- Troubleshooting
- FileMaker Extra: Exploiting the FileMaker-to-FileMaker Import
Exporting Data from FileMaker
- Exporting Data from FileMaker
- Getting Out What You Put In
- The Basic Mechanics of Exporting
- Export File Formats
- Formatting Exported Data
- Exporting Related Fields
- Exporting Grouped Data
- Exporting to Fixed-Width Formats
- Working with Large Fields and Container Fields
- Scripted Exports
- Accessing FileMaker Data Using ODBC and JDBC
- Using FileMaker Pro as an ODBC Client
- Troubleshooting
- FileMaker Extra: Accessing FileMaker Data via JDBC
Instant Web Publishing
- Instant Web Publishing
- An Overview of Instant Web Publishing
- Enabling and Configuring IWP
- Designing for IWP Deployment
- Using an IWP Solution
- Troubleshooting
- FileMaker Extra: Building Your Own Next and Previous Page Buttons
FileMaker and Web Services
- FileMaker and Web Services
- About Web Services
- FileMaker and XML
- Transforming XML
- XML Import: Understanding Web Services
- Working with Web Services
- Troubleshooting
- FileMaker Extra: Write Your Own Web Services
Custom Web Publishing
- Custom Web Publishing
- About Custom Web Publishing
- Custom Web Publishing Versus Instant Web Publishing
- Custom Web Publishing Versus XML Export
- Getting Your Databases Ready for Custom Web Publishing
- Publishing FileMaker Data as XML
- Using XSLT with Custom Web Publishing
- Building Web Applications with XSLT-CWP
- Other Custom Web Publishing Commands and Parameters
- About the FileMaker XSLT Extensions
- Troubleshooting
- FileMaker Extra: About the Custom Web Publishing Tools
Part V: Deploying a FileMaker Solution
Deploying and Extending FileMaker
- Deploying and Extending FileMaker
- FileMaker Deployment Options
- Single User
- Peer-to-Peer Hosting
- FileMaker Server
- Web Publishing
- ODBC/JDBC
- Citrix/Terminal Services
- Runtime Solutions
- Deploying to Handheld Devices
- Customized Deployment Options
- Troubleshooting
- FileMaker Extra: The Limits of Customization
FileMaker Server and Server Advanced
- FileMaker Server and Server Advanced
- About FileMaker Server
- Installing FileMaker Server
- Running FileMaker Server
- Using the Server Administration Tool
- Configuring and Administering FileMaker Server Using the SAT
- Managing Clients
- Managing Databases
- Administration from the Command Line
- Working with External Services
- Automatically Updating Plug-ins
- Scheduled Tasks
- Monitoring FileMaker Server
- Troubleshooting
- FileMaker Extra: Best Practices Checklist
FileMaker Mobile
- FileMaker Mobile
- FileMaker Mobile 8 Overview
- Using FileMaker Mobile on Your Handheld Device
- Troubleshooting
- FileMaker Extra: Publishing Related Data
Documenting Your FileMaker Solutions
- Documenting Your FileMaker Solutions
- Why Is Documentation Important?
- Developing Naming Conventions
- Using Comments Effectively
- Documenting the Relationships Graph
- Using the Database Design Report
- Using Third-Party Documentation Tools
- Putting the Finishing Touches on Your Documentation
- Final Thoughts on Documentation
- FileMaker Extra: Soliant Development Standards
EAN: 2147483647
Pages: 296
