Working with the Tab Control Object
Working with Fields
The primary purpose of a layout is to allow users to interact with data. By interact, we mean everything from viewing, editing, and formatting to finding and sorting. Although a field is at some level just another type of layout object and can be manipulated using the same tools as other layout objects, a number of tools are designed specifically for working with fields. These provide you with a great deal of freedom and flexibility for creating the interfaces that work best for your users and your solution. We don't cover every option of every tool here, but rather try to give you a sense of what the tools are and some of the situations in which to use them.
Adding Fields to Layouts
There are essentially two ways you can add fields to a layout: by using the Field button in the Status Area and by duplicating an existing field.
The first of thesewhich is generally also the first method that people learninvolves clicking and dragging the Field button in the Status Area out to the section of the layout where you want to place the field. The attributes of a field added this way are governed by the current default format attributes. However, the field's width is always 79 pixels. Its height is determined by a combination of the default font, font size, pen width, and object effects (for example, embossing, engraving, drop shadow).
As with other layout objects, when you duplicate an existing field, the new field has all the attributes of the previously existing field (including its width). Remember, to duplicate any layout object, either you can select it and choose Edit, Duplicate or press ( D) [Ctrl+D], or you can select it and then (Option-drag) [Ctrl-drag] to a new location. In either case, if you have selected a single field, when you duplicate it, you see the Specify Field dialog and can select the new field. On the other hand, if you have selected multiple objects, when you duplicate them, you get just the duplicated objects.
Keep in mind that you will be duplicating all the attributes of a fieldincluding any button behaviors you've attached to it, tool tips you may have assigned, and so on.
 |
There are some issues to be aware of when copying and pasting fields from a layout in one file to a layout in another file. See "Copying and Pasting Fields Between Files" in the "Troubleshooting" section at the end of this chapter. |
Each field object on a layout is defined to display data from a particular field. Unless you have selected Sample Data in the View, Show menu, you see the field's name on the object when you're in Layout mode. If the field name begins with ::, that's an indication that the object is linked to a related field. To know which relationship is used, you need to go into the Field/Control Setup dialog. That's also where you can redefine a field object to display the contents of a different field. You can get to the Field/Control Setup dialog by double-clicking the object.
Tip
If a field has been defined as a button, double-clicking it takes you to the Button Definition dialog, not the Field/Control Setup dialog. Similarly, if multiple fields are grouped together, right-clicking will only give you the control elements of the dialog.
Field Control Style
 |
You can apply several field control options to the fields on a layout. To get to the Field/Control Setup dialog, which is shown in Figure 4.18, either double-click or right-click the object and choose Field/Control Setup from the contextual menu. |
Figure 4.18. The Field/Control Setup dialog enables you to format a field with a range of control choices, set auto-complete behaviors, or set repeating values to display.
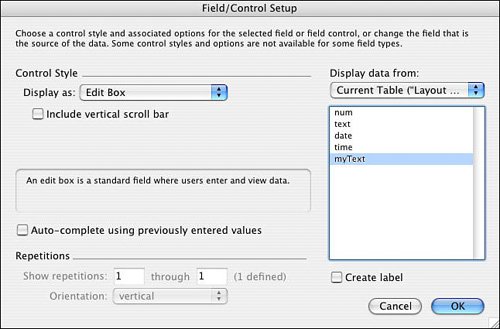
For standard fields where a user will be manually entering and editing data, the Edit Box format is appropriate. The option to include a vertical scrollbar is normally used only when a user is able and/or expected to type multiple lines of text.
|
For more information on creating value lists, see "Working with Fields," p. 41. |
The options to format a field as a Drop-Down List, Pop-Up Menu, Checkbox Set, or Radio Button Set require that you specify a value list that will provide the content for the selection values.
|
Note that in FileMaker 8 you can apply a Drop-Down Calendar to a field, to help with entering dates, and you can also toggle either a drop-down indicator icon or a calendar picker icon for the fields you're working with. The two iconsdrop-down indicator and calendar iconwill appear only if a field has its right border turned on. |
The lower left of the Field/Control Setup dialog is relevant only for fields that have been defined to allow multiple repetitions. You can hard-code the starting and ending repetitions and specify whether a vertical or horizontal orientation should be used.
On the right of the dialog you can opt to change the field associated with the selected object.
Field Behavior
The Field Behavior dialog contains controls for setting when a field is enterable and how a user can exit it. To access this dialog, select one or more fields on a layout, and then choose Format, Field Control, Behavior. You can also (Control-click) [right-click] a field and choose Field Control, Behavior from the contextual menu. The Field Behavior dialog is shown in Figure 4.19.
Figure 4.19. Using the Field Behavior dialog, you can specify which modes a field can be entered in, as well as the keystrokes that can be used to exit a field.
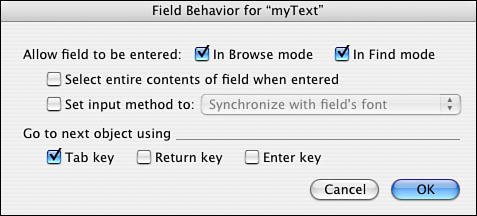
In this dialog, you can control whether a user is able to enter a particular field while in Browse or Find mode. Before version 7 of FileMaker, there was no distinction between modes; a field was either enterable or not. Typically, a user should be able to enter a field in both Browse and Find mode. Sometimes, though, you'll want a field to be enterable in only one of these modes. For instance, you might have a field that you don't want users to manually edit, but that they may need to use as part of a query. On the other hand, there may be unindexed fields on your layout that, for performance reasons, you don't want users to search on.
The other setting in this dialog is the Go to Next Object Using option. By default in FileMaker Pro, pressing the Tab key lets users move to the next field on the layout. Developers may also specify the option to allow the Return and/or Enter keys to perform this function. This is desirable in some cases to allow rapid data entry and to prevent data-entry mistakes. For instance, by setting a text field to use the Return key to go to the next field, you prevent users from accidentally adding stray returns at the ends of fields. Obviously, if a user needs to be able to enter carriage returns in a text fieldsay in a Comments fieldyou wouldn't set the Return key to go to the next field.
Caution
Normally, the Enter key serves to commit a record and exit all fields. If you change all your field behavior to have Enter go to the next field, be aware that users need to explicitly click on the background of a layout or perform some script or navigation routine to commit record changes.
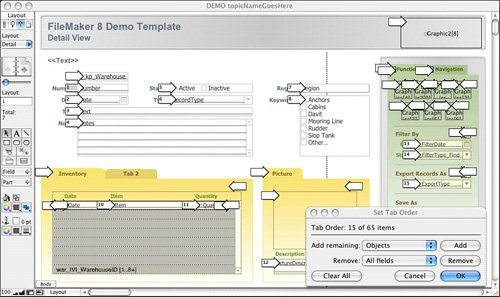
Setting the Tab Order
When moving from field to field on a layout with the Tab keyor (Return) and/or [Enter], as described in the previous sectionthe order in which the fields are activated is known as the tab order. The default tab order is the order in which the fields appear on the layout from top to bottom. Rearranging fields changes the tab order.
Tab order is stored with the layout, so there's no opportunity to customize the tab order for different users. The Set Tab Order dialog is shown in Figure 4.20. After the tab order has been edited manually, rearranging fields doesn't change the tab order. New fields are added to the end of the tab order automatically, regardless of position.
Figure 4.20. You can change the tab order of a layout to make data entry flow in a logical progression for end users.
|
Anyone with the ability to modify a layout can change its tab order; do so by selecting Layouts, Set Tab Order. The Set Tab Order dialog has changed in FileMaker 8. It is no longer modal and allows developers to click on both fields (the arrows to the left of objects) and objects themselves (the arrows to the right of objects) to manually edit the tab order for a given layout. You can also opt to remove items by pressing the Delete or Backspace key. |
The dialog operates on like objects. If you want to add all fields to the tab order or remove all objects, choose from the two menu options in the dialog and click the button for the appropriate command.
Note that it is entirely possible to attach a button behavior to a field and for that field to then appear twice in the tab order. One instance will tab into the field for editing, and another will select the field to perform the button action.
|
The Set Tab Order dialog allows developers to add and remove both fields and objects (including Tab Control object tabs) from the tab order of a given layout. Note that new in FileMaker 8 is the capability to tab from object to object on the screen and, with a press of either the spacebar or the Enter key, to perform whatever action is associated with an object, including scripted button actions. Any object that has been made active by tab order will display a highlight rectangle to the user (regardless of its actual shape). This is a great new feature for users who prefer to drive their computers from their keyboards. |
|
To further enable users to work from keyboard commands, and review adding keyboard shortcuts via Custom Menus, see "Working with Custom Menus," p. 373. |
Merge Fields
If you've ever done a mail merge, the concept of merge fields should be familiar to you. Merge fields give you a way of incorporating field data within text blocks on a layout. This is useful for creating form letters, labels, and reports.
Merge fields display field data, but they don't behave like or have all the properties of normal fields. A user can't click into a merge field to do data entry, for instance.
To add a merge field to a layout, choose Insert, Merge Field, or press (-Option-M) [Ctrl+Alt+M]. You are then prompted to specify a field. After you make your selection, the field name shows up on your layout surrounded by angle brackets, as shown in Figure 4.21. Note that you can add a merge field alone to a layout, or you can incorporate it (and potentially others) into a block of text within a text object.
Figure 4.21. Merge fields allow field data to be displayed inline with text and avoid the need for sliding fields.
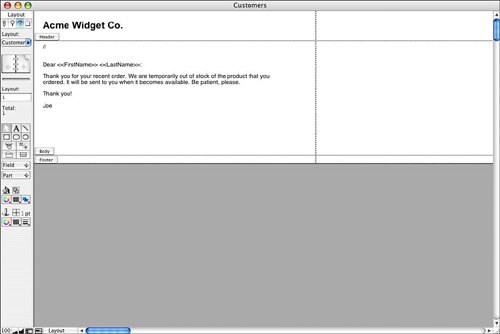
The primary benefit of merge fields is that field data can be flexibly placed within a text block; text before and after the merge field is repositioned to close up any extra space. Thus, within a text block, you could have "Hi, <>, how are you?" On one record, that would come out as "Hi, Joe, how are you?" whereas on another it might be "Hi, Frederick, how are you?"
Text, number, date, and time formatting applied to a text block are applied to any appropriate merge field within the text block. It is not possible to have a single text block that contains multiple merge fields that have different number formats applied to them.
Part I: Getting Started with FileMaker 8
FileMaker Overview
- FileMaker Overview
- FileMaker and Its Marketplace
- Introduction to Database Software
- FileMaker Deployment Options
- Whats New in FileMaker Pro 8
Using FileMaker Pro
- Getting Started
- Working in FileMaker Pro
- Troubleshooting
- FileMaker Extra: Becoming a FileMaker Pro Power User
Defining and Working with Fields
- Defining and Working with Fields
- Working Under the Hood
- Working with Fields
- Working with Field Types
- Assigning Field Options
- Troubleshooting
- FileMaker Extra: Indexing in FileMaker
Working with Layouts
- Working with Layouts
- Whats a Layout?
- Creating and Managing Layouts
- Working with Parts
- Working with Objects on a Layout
- Working with the Tab Control Object
- Working with Fields
- Portals
- Troubleshooting
- FileMaker Extra: Designing Cross-PlatformFriendly Layouts
Part II: Developing Solutions with FileMaker
Relational Database Design
- Relational Database Design
- Understanding Database Design
- Database Analysis
- Working with Entities and Attributes
- Understanding Relationships
- Relationship Optionality
- Understanding the Role of Keys in Database Design
- Many-to-Many Relationships: Solving the Puzzle
- The Basics of Process Analysis
- FileMaker Extra: Complex Many-to-Many Relationships
Working with Multiple Tables
- Working with Multiple Tables
- Multitable Systems in FileMaker Pro
- Creating a One-to-Many Relationship in FileMaker
- Working with Keys and Match Fields
- Understanding Table Context
- Working with Related Data
- Creating a Many-to-Many Relationship
- Relational Integrity
- Rapid Multitable Development
- Troubleshooting
- FileMaker Extra: Building a Three-Way Join
Working with Relationships
- Working with Relationships
- Relationships Graphs and ERDs
- Relationships as Queries
- Creating Self-Relationships
- Creating Ranged Relationships
- Creating Cross-Product Relationships
- Working with Data from Distant Tables
- Working with Multiple Files
- How and When to Use Multiple Files
- Troubleshooting
- FileMaker Extra: Managing the Relationships Graph
Getting Started with Calculations
- Getting Started with Calculations
- Understanding How and Where Calculations Are Used
- Exploring the Calculation Dialog Box
- Essential Functions
- Using Conditional Functions
- Aggregate Functions
- Learning About the Environment
- Troubleshooting
- FileMaker Extra: Tips for Becoming a Calculation Master
Getting Started with Scripting
- Getting Started with Scripting
- Scripts in FileMaker Pro
- Creating Scripts
- Common Scripting Topics
- Triggering Scripts
- Working with Buttons on Layouts
- Troubleshooting
- FileMaker Extra: Creating a Script Library
Getting Started with Reporting
- Getting Started with Reporting
- Deriving Meaning from Data
- Working with Lists of Data
- Summarized Reports
- Delivering Reports
- Troubleshooting
- FileMaker Extra: Incorporating Reports into the Workflow
Part III: Developer Techniques
Developing for Multiuser Deployment
- Developing for Multiuser Deployment
- Developing for Multiple Users
- Sessions in FileMaker Pro
- Concurrency
- Audit Trails in FileMaker Pro
- Launch Files
- Troubleshooting
- FileMaker Extra: Development with a Team
Implementing Security
- Approaching Security
- User-Level Internal Security
- File-Level Access Security
- Troubleshooting
- FileMaker Extra: Working with Multiple Files
Advanced Interface Techniques
- Advanced Interface Techniques
- User Interfaces in FileMaker Pro
- Navigation
- Multiwindow Interfaces
- Working with Custom Menus
- Showing/Hiding Layout Elements
- Dedicated Find Layouts
- Data Presentation
- Working with Table View
- Troubleshooting
- FileMaker Extra: User Interface Heuristics
Advanced Calculation Techniques
- Advanced Calculation Techniques
- Whats an Advanced Calculation Technique?
- Logical Functions
- Text Formatting Functions
- Array Functions
- The Filter-ing Functions
- Custom Functions
- GetNthRecord
- Troubleshooting
- FileMaker Extra: Creating a Custom Function Library
Advanced Scripting Techniques
- Advanced Scripting Techniques
- What Is Advanced Scripting?
- Script Parameters and Script Results
- Script Variables
- Window Management Techniques
- Go to Related Record
- Troubleshooting
- FileMaker Extra: Recursive Scripts
Advanced Portal Techniques
- Advanced Portal Techniques
- Portals in FileMaker Pro
- Portal Basics
- New Record Only Relationships
- Horizontal Portals
- Using Portals to Create Calendars
- Selection Portals
- Filtered Portals
- Dynamic Portal Sorting
- Troubleshooting
- FileMaker Extra: Portals and Record Locking
Debugging and Troubleshooting
- Debugging and Troubleshooting
- What Is Troubleshooting?
- Staying Out of Trouble
- Planning for Trouble
- Troubleshooting Scripts and Calculations
- Troubleshooting in Specific Areas: Performance, Context, Connectivity, and Globals
- File Maintenance and Recovery
- FileMaker Extra: Other Tools of the Trade
Converting Systems from Previous Versions of FileMaker Pro
- Converting Systems from Previous Versions of FileMaker Pro
- Migration Choices
- Converting Files
- Pre-Conversion Tasks
- Post-Conversion Tasks
- Troubleshooting
- FileMaker Extra: Converting Web-Enabled Databases
Part IV: Data Integration and Publishing
Importing Data into FileMaker Pro
- Importing Data into FileMaker Pro
- Working with External Data
- Flat-File Data Sources
- Importing Multiple Files from a Folder
- Importing Photos from a Digital Camera
- Importing from an ODBC Data Source
- Importing from an XML Data Source
- Using a Script to Import Data
- Troubleshooting
- FileMaker Extra: Exploiting the FileMaker-to-FileMaker Import
Exporting Data from FileMaker
- Exporting Data from FileMaker
- Getting Out What You Put In
- The Basic Mechanics of Exporting
- Export File Formats
- Formatting Exported Data
- Exporting Related Fields
- Exporting Grouped Data
- Exporting to Fixed-Width Formats
- Working with Large Fields and Container Fields
- Scripted Exports
- Accessing FileMaker Data Using ODBC and JDBC
- Using FileMaker Pro as an ODBC Client
- Troubleshooting
- FileMaker Extra: Accessing FileMaker Data via JDBC
Instant Web Publishing
- Instant Web Publishing
- An Overview of Instant Web Publishing
- Enabling and Configuring IWP
- Designing for IWP Deployment
- Using an IWP Solution
- Troubleshooting
- FileMaker Extra: Building Your Own Next and Previous Page Buttons
FileMaker and Web Services
- FileMaker and Web Services
- About Web Services
- FileMaker and XML
- Transforming XML
- XML Import: Understanding Web Services
- Working with Web Services
- Troubleshooting
- FileMaker Extra: Write Your Own Web Services
Custom Web Publishing
- Custom Web Publishing
- About Custom Web Publishing
- Custom Web Publishing Versus Instant Web Publishing
- Custom Web Publishing Versus XML Export
- Getting Your Databases Ready for Custom Web Publishing
- Publishing FileMaker Data as XML
- Using XSLT with Custom Web Publishing
- Building Web Applications with XSLT-CWP
- Other Custom Web Publishing Commands and Parameters
- About the FileMaker XSLT Extensions
- Troubleshooting
- FileMaker Extra: About the Custom Web Publishing Tools
Part V: Deploying a FileMaker Solution
Deploying and Extending FileMaker
- Deploying and Extending FileMaker
- FileMaker Deployment Options
- Single User
- Peer-to-Peer Hosting
- FileMaker Server
- Web Publishing
- ODBC/JDBC
- Citrix/Terminal Services
- Runtime Solutions
- Deploying to Handheld Devices
- Customized Deployment Options
- Troubleshooting
- FileMaker Extra: The Limits of Customization
FileMaker Server and Server Advanced
- FileMaker Server and Server Advanced
- About FileMaker Server
- Installing FileMaker Server
- Running FileMaker Server
- Using the Server Administration Tool
- Configuring and Administering FileMaker Server Using the SAT
- Managing Clients
- Managing Databases
- Administration from the Command Line
- Working with External Services
- Automatically Updating Plug-ins
- Scheduled Tasks
- Monitoring FileMaker Server
- Troubleshooting
- FileMaker Extra: Best Practices Checklist
FileMaker Mobile
- FileMaker Mobile
- FileMaker Mobile 8 Overview
- Using FileMaker Mobile on Your Handheld Device
- Troubleshooting
- FileMaker Extra: Publishing Related Data
Documenting Your FileMaker Solutions
- Documenting Your FileMaker Solutions
- Why Is Documentation Important?
- Developing Naming Conventions
- Using Comments Effectively
- Documenting the Relationships Graph
- Using the Database Design Report
- Using Third-Party Documentation Tools
- Putting the Finishing Touches on Your Documentation
- Final Thoughts on Documentation
- FileMaker Extra: Soliant Development Standards
EAN: 2147483647
Pages: 296
- Article 310 Conductors for General Wiring
- Article 388 Surface Nonmetallic Raceways
- Article 426: Fixed Outdoor Electric De-Icing and Snow-Melting Equipment
- Article 501 Class I Locations
- Example No. D2(b) Optional Calculation for One-Family Dwelling, Air Conditioning Larger than Heating [See 220.82(A) and 220.82(C)]
