User-Level Internal Security
The mechanics of implementing security begin with the database file (or files) within your solution itself. Generally, security is first a development task (first planning and then implementation), and is then followed by issues of deployment. This chapter follows that same approach by first discussing how to grant individual users access to your database.
User Accounts
If you select File, Define, Accounts & Privileges, you will be taken to the Define Accounts & Privileges dialog. This dialog has a good deal of depth, and it is through this dialog that you will implement much of your security architecture.
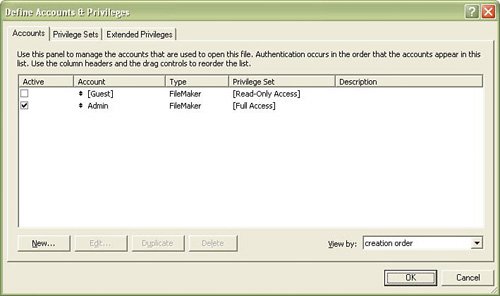
On the first tab of the dialog, Accounts, you create individual user accounts and assign a privilege set to each. It's important to grasp that various security settings in FileMaker are not controlled at the user account level but rather are assigned with privilege sets. Accounts are associated with a privilege set, and it is that association that determines the functionality a given user has access to, as shown in Figure 12.1. This allows you to define a privilege set for each role in your system and assign individual users to the corresponding set that matches their role for the database.
Figure 12.1. The Accounts tab of the Define Accounts & Privileges dialog allows you to see which accounts are active and what their respective privilege sets are.
Note
If you are used to working with FileMaker Pro 6 or prior, one of the first things you should notice is that accounts in FileMaker 8 (and FileMaker 7, the version in which the new security features were introduced) contain both a username and a password as opposed to the password-only approach of FileMaker 6 and before. We strongly recommend that you adopt single accounts for each user in your FileMaker 8 files and no longer share passwords among teams of individuals.
 |
If you've converted your files from FileMaker Pro 6 or prior and are having difficulty with your old passwords, refer to "Converted Passwords" in the "Troubleshooting" section at the end of this chapter. |
Default Accounts and Automatic Login
By default, any new FileMaker file will be created with an account named Admin with a blank password, and it will be set to log in to that account. The Admin account will be assigned to full access privileges, so in effect the file will be created with no restrictions whatsoever, but will have an account and privilege set in place. If you choose to lock down your database, either give the Admin account a password or delete it. You should also disable the File Options setting that first tries the Admin account and password on login.
In addition to the Admin account, FileMaker provides a [Guest] account with each new database. The [Guest] account cannot be deleted and is set to be inactive by default. You can choose to enable this [Guest] account in cases in which you want to restrict the development functions of a database but want to open the rest of the system to any user.
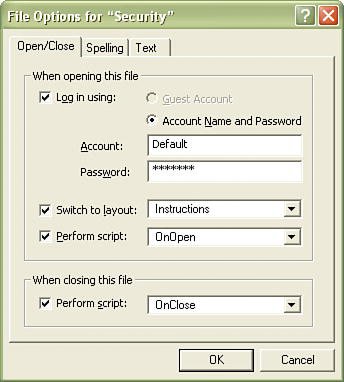
To set a file to a default state in which users are not prompted to log in, create an account with the appropriate access level you prefer, and then turn on the Log In Using option in the File Options dialog shown in Figure 12.2.
Figure 12.2. A system can automatically log users in with a default account via the File Options dialog.
Account Management
The settings in Figure 12.3 are more typical for a small workgroup application: The Admin account has been deleted and there are three individual users with full access. Note the full list of accounts (some of which are disabled) and the assignment of privilege sets.
Figure 12.3. Note that in the Accounts tab of the Define Accounts & Privileges dialog, you can review which accounts are active and to what privilege sets they belong.
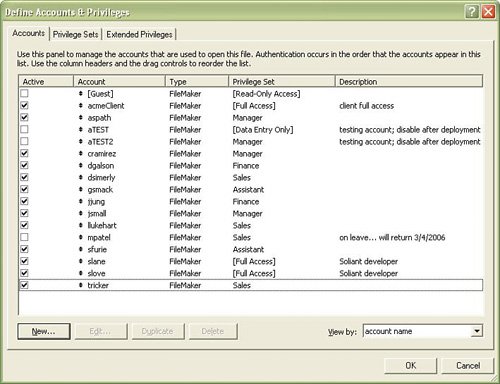
The Type column shows the means by which authentication is set to occur. It will show either FileMaker, in which case a user's password is stored within FileMaker (in a fully encrypted, reliably secure form), or External Server, in which case authentication is managed by a separate authentication server. (We will cover external authentication later in the chapter.)
When editing an individual account via the Edit Account dialog shown in Figure 12.4, you can control settings specific to that user. The setting to prompt users to change their password on their next login allows developers and database administrators to reset passwords without having to know the private passwords of their users. To administer a FileMaker database, we recommend creating temporary passwords for people and requiring them to change passwords on their next login. (Note that this practice is not recommended for Instant Web Publishing or for external authentication, both of which are covered later in this chapter.)
Figure 12.4. The Edit Account dialog allows you to control the authentication and active status for each user.
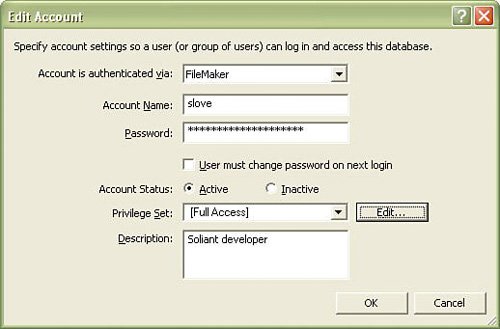
Note also that you can disable an account from the Edit Account dialog. This allows a database administrator to turn off an account without having to delete it. Having the ability to turn off an account is useful if some users are gone for extended periods or if you want to preserve the fact that an account exists with that specific name. You can also simply toggle the check box on the leftmost side of the Accounts tab (unchecking it to disable an account).
Last, you can assign a user's privilege set. An account can have only one privilege set assigned, and that privilege set determines the specific rights and privileges the user will have.
Privilege Sets
Privilege sets compose the bulk of security control in FileMaker. With a privilege set you can set various access levels, restrict functions and areas within a database, and control who can do development work within a given file. Privilege sets are associated (one to many) with accounts, and they can be thought of as analogous to groups. It is common to see privilege sets established for developers, managers, and so on.
|
If you need help with the testing process for privilege sets, see "Closing and Reopening File for Testing" in the "Troubleshooting" section at the end of this chapter. |
The Privilege Sets tab of the Define Accounts & Privileges, shown in Figure 12.5, allows you to see at a glance which accounts are assigned to which privilege set.
Figure 12.5. The three sets in brackets are defaults created for each new FileMaker file; those below are custom sets created for a specific database solution.
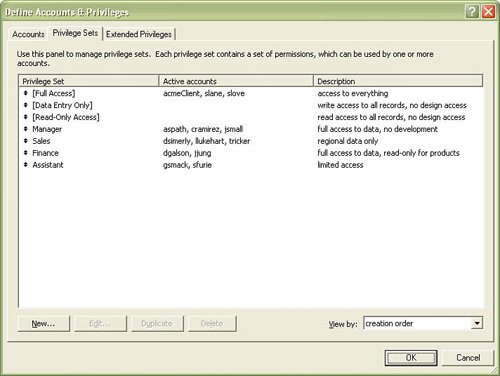
Notice the three sets at the top of the dialog: [Full Access], [Data Entry Only], and [Read-Only Access] are the default sets that FileMaker creates for a new FileMaker file. These cannot be deleted.
The [Full Access] privilege set is a unique set: It is the single set that has complete access to the file including all development functionality. It cannot be duplicated and your file must have at least one FileMaker-authenticated account associated with the [Full Access] privilege set. Without [Full Access] you wouldn't be able to get in and modify your database.
Note
Note that by using the Remove Admin Access feature of the Developer Utilities features in FileMaker Pro 8 Advanced, you can remove the administrative/full access accounts associated with a file and prevent any future development.
|
To learn more about Developer Utilities, see "Removing Admin Access," p. 768. |
If you select a privilege set from those listed and double-click (or click the Ed it button), you will be taken to the Edit Privilege Set dialog, shown in Figure 12.6. It enables you to control both the features within FileMaker that assigned users can access and to what degree members of a privilege set can do additional development work on your database file.
Figure 12.6. The Edit Privilege Set dialog allows you to define the security access for all accounts associated with a given privilege set.
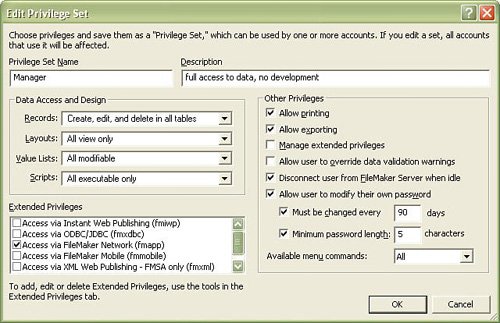
The Edit Privilege Set dialog is divided into three areas: Data Access and Design, Other Privileges, and Extended Privileges. We'll look more closely at each area in the sections that follow.
Controlling Data Access
The actual data of your file is protected by the Records drop-down list in the Edit Privilege Set dialog. It is important to remember that although there are various ways in which you can hide fields from users (for example, by not placing any field layout objects on layouts), the only way to fully protect your data is through the Records drop-down list.
The menu allows you to apply global permissions where a privilege set can have full access to all tables, no access at all, only the capability to create and edit records, or view-only access. View-only access means that users with this privilege set can see data but cannot make changes or create new records.
If you choose the fifth option, Custom Privileges, you will open the Custom Record Privileges dialog, shown in Figure 12.7. Within this dialog, you can control on a table-by-table basis, or even a field-by-field basis, what data a given set of users can view, edit, create, and delete. Each table in your file is listed. You can select multiple tables by Shift-clicking for contiguous selections or Control-clicking for noncontiguous selections. Any changes made to the settings below will then be applied to each table selected.
Figure 12.7. These settings show that access to this database has been restricted to a significant degree. The hyphen indicates no access.
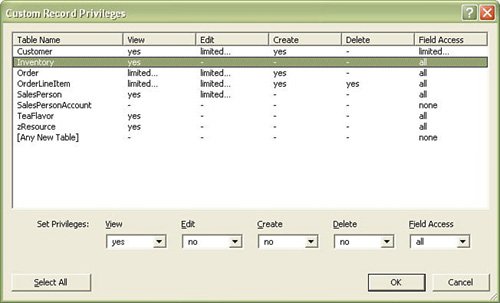
Notice that there are settings for [Any New Table] at the bottom of your table listings. This privilege controls tables added to the file after your security settings have been defined. In other words, if you were to add a TeaPackage table to the database shown, this privilege set would initially have no access to the records in that table.
The settings at the bottom of the dialog are listed here:
- View Controls whether or not a set of users can consume the information stored in a selected table. By "consume," we mean see in Browse mode, search for in Find mode, export, print, email, and so on. Users with View access can perform such actions as clicking into a given field and copying data to their clipboard.
- Edit Allows users to make changes to data within a given table. Note that if you set View to no, Edit will automatically show as no as well.
- Create Controls whether users can create new records in a selected table.
- Delete Determines whether users can delete records from a given table.
- Field Access Allows developers to apply view or edit privileges to individual fields rather than to an entire record. In cases in which you have applied settings to the View, Edit, and Field Access settings, the most restrictive setting will take precedence. In other words, if you set a table's View privileges to yes but Field Access to none, users will not be able to see or edit any of the fields within that table. Likewise, if you set Field Access to all and View privileges to no, users will not be able to view any records in the given table.
The first four privileges listed offer yes, no, and limited options (with the exception of Create, which offers only yes and no). We will cover limited privileges shortly. Field Access controls have more granularity than the other record privileges. The all and none options should be self-explanatory, but the limited option presents a list of all the fields in a given table, as shown in Figure 12.8.
Figure 12.8. Field-level access allows you to control individual fields for a given privilege set.
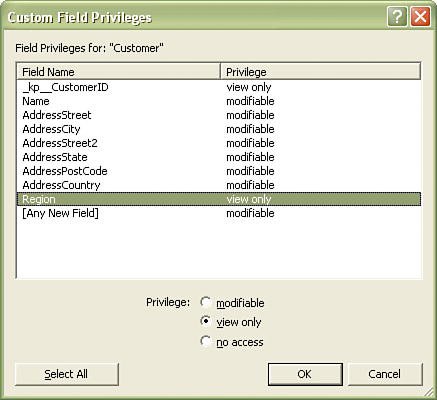
In the example shown, by setting a field to view only, you are ensuring that users logged in with this privilege set will be able to see (in this case) what region a customer belongs to, but not be able to make changes to the region field.
Conditional Privileges
For record privileges except Create, you also have the option to choose limited privileges. When doing so for View, Edit, and Delete, you will open a calculation dialog and can create conditional circumstances by which access can be controlled on a record-by-record basis.
|
For a review of the calculation dialog and working with formulas, see Chapter 8, "Getting Started with Calculations," p. 217. |
For example, you might have a business in which sales teams are divided by region and you want to prevent one region's team members from seeing the orders from another region. A simple way to enable this is to compare the name of a region assigned to a salesperson to the name of a region assigned to each order. Assume that your SalesPerson table contains a Region field and likewise your Order table contains a Region field. To control the capability to view Order records, take the following steps:
|
1. |
First create a startup script, set in the File Options to run when your file is opened, that finds a given person's SalesPerson record based on login account, and sets a global variable to the region to which that person is assigned. Your script might look like this: SetRegion # purpose: to set a global variable to the region # for the person who has just logged in # dependencies: access to the SalesPerson table and Region field Go to Layout [ "SalesPerson" (SalesPerson) ] Enter Find Mode [ ] Set Field [ SalesPerson::Account; Get (AccountName) ] Perform Find [ ] Set Variable [ $$userRegion; Value:SalesPerson::Region ] Go to Layout [ original layout ] Tip We recommend, if you implement this script, that you create some error-trapping conditions in cases in which no records are found during the find request, a user doesn't have access to the SalesPerson layout, and so on. For instructional purposes, we've kept it brief. |
|
2. |
Make sure that you have a Region field in both the Order table and the SalesPerson table and that they both have data populated. |
|
3. |
Change the View privileges for the Order table to limited and set the calculation to be this: $$userRegion = Order::Region |
You could modify this approach slightly to check for multiple values within the variable as well. This would allow you to assign multiple regions to a single person:
PatternCount ( $$userRegion; Order::Region & ¶ ) > 0
There is a wide array of functionality you can deliver via the capability to conditionally set access levels within record privilege sets. You could, for example, lock records from being edited by setting a flag field, or you could prevent records older than a day from being deleted.
Note that you will want to close any backdoor opportunities for users to get around your security settings. In the example given previously, make sure that users cannot change their own region, nor those of the Order records. Furthermore, make certain that they cannot write scripts or calculation functions (in which they might be able to change the value of the $$userRegion variable).
Controlling Layout Use and Development
In the Edit Privilege Set dialog, the next setting after Records is the Layouts drop-down list for controlling layout privileges. With it you can set the following:
- All No Access This setting ensures that people associated with the privilege set you're defining will have no access to any layouts within the current file.
- All View Only The term "view," again, really means "consume" or "use." Users assigned this privilege will not be able to make changes to a layout (in Layout mode), but they will be able to use the layout and (assuming that the developer hasn't omitted the layout from that menu) see it in the menu of layouts offered via the Status Area.
- All Modifiable This option enables the capability to change to Layout mode and to then edit all the layouts within a file.
- Custom Privileges Choosing this option takes you to the dialog shown in Figure 12.9
Figure 12.9. This dialog allows you to control who can modify which layouts.
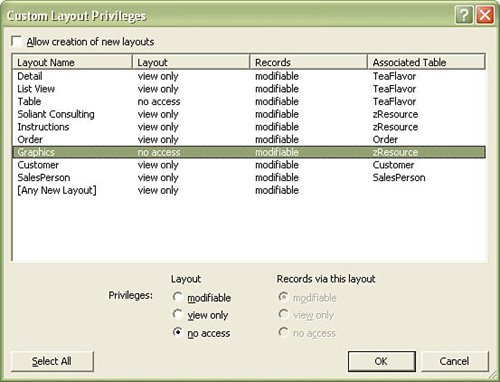
The Custom Layout Privileges dialog enables you to set only specific layouts as modifiable, or to turn off access to selected layouts. Furthermore, you can control how users interact with records via the layout in question. You can choose to lock down record access on a layout-by-layout basis. Be aware of the Allow Creation of New Layouts option. With it you can enable someone to add layouts to a file without giving them access to the layouts you as a developer created. Imagine the possibility of allowing users to, say, add columns to report layouts without having to give them unfettered access to the entire system.
One important note about layout access: Just because you lock down access to a certain layout does not mean that your users cannot get access to the data in your file. They may be able to pull information via export, might be able to create another FileMaker file and create their own layouts, and so on. The best way to control your data is to lock down both record access and layout access as appropriate.
Controlling Access to Value Lists
The drop-down list for controlling value list privileges in the Edit Privilege Set dialog is quite similar in function to that of layouts. You can enable all value lists to be modifiable, view (or use) only, and all no access. Likewise, you can choose Custom Privileges and will be presented with the Custom Value List Privileges dialog shown in Figure 12.10.
Figure 12.10. The Custom Value List Privileges dialog allows you to, among other things, enable others to edit value lists.

The dialog shown in Figure 12.10 can be used to prevent value lists from being edited or, indeed, from being used at all. In the case that a field has a value list associated but a given user doesn't have access to use it, that user will be presented with messages for radio buttons or check boxes. In the case of a pop-up menu, the user will be able to see an already selected value but will not be able to select a new one. And, last, for a drop-down list, the list will simply not appear (nor will the down arrow, if present, do anything), and the field will behave as though no value list were associated with it.
Note that, as with layouts, you can control the capability to create new value lists. If you've given some users limited abilities to create layouts, it's somewhat likely that they will need to create value lists as well. The two settings often go hand in hand.
Controlling the Capability to Run Scripts
Often developers can control access to scripts by controlling where in a database's interface scripts are executed (by button, via the Scripts menu, or as associated with a custom menu); however, in cases in which you simply do not want a class of users to run scripts, the fourth drop-down list in the Data Access and Design area of the Edit Privilege Set dialog controls the capability to execute scripts. As with the other menus, you can quickly set permissions so that all scripts are executable, all modifiable, or all disabled (no access) for a given privilege set. In addition to the global menu choices, you can choose Custom Privileges, which presents the dialog shown in Figure 12.11.
Figure 12.11. The Custom Script Privileges dialog allows script-by-script control over access.
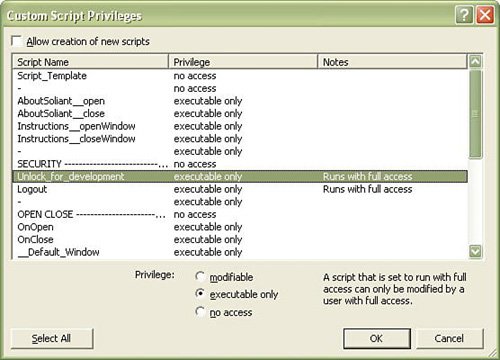
The dialog shown in Figure 12.11 lets you to set scripts to be modifiable, executable only, or to allow no access for the current privilege set.
Note that in the third column of the dialog, FileMaker displays the fact that a script has been set to run with full access. It also reminds you that only people logged in with the [Full Access] privilege set can modify scripts set to run in full access. This is also true for the capability to enable running scripts with full access: If someone is not logged in with [Full Access] privileges, she will not be presented with the Run Script with Full Access check box in ScriptMaker.
|
For more discussion of running scripts with full access, see "Full Access Privileges," p. 253. |
It is important to understand that a script set to run with full access will do exactly that: A user's security privileges will be overridden and the script will execute as though it were run by a user with [Full Access] privileges. This dialog, then, is useful in making sure that you can prevent users from executing a script, even if it is set to run with full access privileges.
Setting Other Feature Privileges
The area on the right of the Edit Privilege Set dialog controls access to a few of FileMaker's interface commands and offers some specific settings related to security.
The Allow Printing and Allow Exporting options should be somewhat obvious, but be sure to note that they also control the functions to Save as PDF (tied to the capability to print) and Save as Excel (tied to the capability to export). If you want to prevent your users from taking data elsewhere, you will need to turn off printing and exporting. Note too that the only way to prevent users from making use of the Email command is to use a custom menu to remove that menu item. There is no security setting that controls whether someone can use the Email command in the File menu.
Allowing users to override data validation warnings should be obvious as well. When a validation error occurs, users with this privilege will not be presented with the capability to accept an invalid entry into a validated field, regardless of whether Allow User to Override Data Validation Warnings is turned on for the field. This provides you with a means of taking away the capability to override validation warnings from some users.
|
For more detail on validation, see "Field Validation," p. 85. |
The option Disconnect User from FileMaker Server When Idle (the time interval is defined in FileMaker Server's settings) should almost always be enabled. When it's disabled, the server will never disconnect idle users who have this privilege set. One occasion to disable this setting is if for some reason you need a client computer set up to perform automated tasks.
We recommend using the Allow User to Modify Their Own Password feature and requiring that users change their password, but remember that Instant Web Publishing and external authentication do not support this. Recommended best practices suggest that passwords should be changed regularly and they should be of a certain minimum length. (There is no capacity in FileMaker to set rules about the content of a password, only its length.) Note, though, that these settings can get you in trouble: If you disallow someone from changing his own password, but then on the Edit Account dialog require that he do so on the next login, the user can get trapped and unable to log in to the database.
Caution
Note that the feature to change passwords is not supported by Instant Web Publishing. Do not enable it for users who will exclusively access your database via IWP.
The last setting, Available Menu Commands, allows you to disable FileMaker's menu items, leaving just those to open and close a file, run scripts, and so on, or additionally the clipboard and spelling items in the Edit menu. This option is often used to completely lock down a FileMaker solution. When you disable all menu items here, it's an all-or-nothing proposition that will then require that you re-create all the functionality you want users to be able to have. We often recommend instead using a custom menu set that doesn't contain the items you're trying to hide from users.
Note that if you do choose Minimum or Edit Only, those settings will disable custom menus just as they will standard FileMaker menu items.
|
To learn about custom menus, see "Working with Custom Menus," p. 373. |
Extended Privileges
The third area of security within FileMaker files comprises extended privileges. Think of extended privileges as nothing more than on/off switches. A privilege set has a specific extended privilege either enabled or disabled. There are no other settings or logic to extended privileges.
Default Extended Privileges
FileMaker Pro 8 and FileMaker Pro 8 Advanced ship with some extended privileges already in place, as shown in Figure 12.12. These are used to enable access into FileMaker by various means; the behaviors of these privileges are controlled by FileMaker itself.
Figure 12.12. FileMaker ships with a set of preexisting extended privileges.
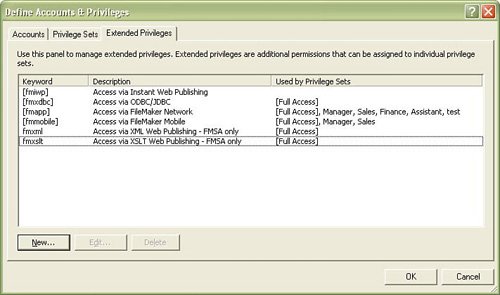
The default, precreated extended privileges are listed here:
- Access via Instant Web Publishing This privilege allows users to access the file via a web browser using Instant Web Publishing.
 To learn about Instant Web Publishing, see Chapter 21, "Instant Web Publishing," p. 633.
 - Access via ODBC/JDBC Access via ODBC/JDBC needs to be enabled if you want an ODBC or JDBC client to use SQL to converse with FileMaker.
To learn more about xDBC connectivity, see Chapter 19, "Importing Data into FileMaker Pro," p. 567, and Chapter 20, "Exporting Data from FileMaker," p. 595.
- Access via FileMaker Network This privilege allows users to access the file remotely, across a network, using FileMaker Pro (or Advanced) client connections. This is true for both peer-to-peer sharing and hosting files on FileMaker Server.
To learn about hosting FileMaker via FileMaker Server, see Chapter 25, "FileMaker Server and Server Advanced," p. 779.
- Access via FileMaker Mobile This privilege enables synchronization with FileMaker Mobile. In addition to enabling this extended privilege, you will also need to use FileMaker Mobile's configuration functions to prepare a file for synchronization.
To learn about FileMaker Mobile, see Chapter 26, "FileMaker Mobile," p. 821.
- Access via XML Web Publishing As noted in the dialog, this extended privilege works with files hosted by FileMaker Server Advanced. It allows users (or other systems) access to your data via XML.
- Access via XSLT Web Publishing As with XML, this extended privilege works with files hosted by FileMaker Server Advanced. It allows the file to serve as a data back end for XSLT Custom Web Publishing.
|
To learn about Custom Web Publishing and XML/XSLT, see Chapter 23, "Custom Web Publishing," p. 699. |
|
If you are having trouble getting your database files to appear on FileMaker Server and are sure that your authentication is correct, see "Database Doesn't Appear on FileMaker Server" in the "Troubleshooting" section at the end of this chapter. |
Custom Extended Privileges
Beyond the six extended privileges included with FileMaker, you can add your own. After the extended privileges are created, you can use the Get (ExtendedPrivileges) function to see what extended privileges have been granted to the current user. This then gives you the capability of modifying your solution's logic to take these extended privileges into account; script branching, calculation results, field validation, and even custom menu loading could all take the current extended privileges into account. The options are nearly endless.
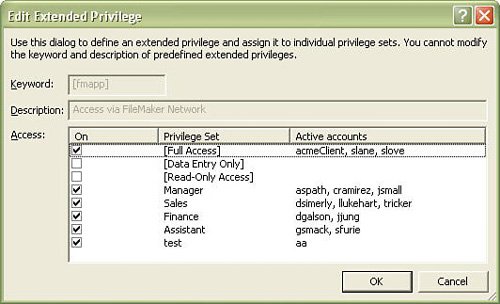
One of the advantages of extended privileges is that you can grant users the ability to manage them. On the right of the Edit Extended Privilege dialog, as shown in Figure 12.13, you can give users access to a security dialog devoted only to extended privileges. You might choose to do this if you want to expose some security control in your system without granting someone [Full Access].
Figure 12.13. Users can assign which privilege sets are associated with an extended privilege when the Manage Extended Privileges security setting is enabled.
Another advantage to extended privileges is that they are not session specific: If you enable an extended privilege for a privilege set, it is immediately available to all users logged in with that privilege set. If, for example, you want to disable access to a file via the Web while you complete some development, you can simply turn off the extended privilege for all the associated privilege sets.
As an example of putting extended privileges to use, consider a database with a series of reports that many, but not all, users will need to have access to. You could certainly control whether users could execute the individual scripts and navigate to the layouts in question, but creating an extended privilege for these reports will allow you to enable them across your various privilege sets in one central place. You can also disable them when perhaps it would be inappropriate to run them before some full set of data is input.
A portion of the script you might use to begin the reporting procedure could look like this:
[View full width]
If [PatternCount (Get (ExtendedPrivileges); "yearendReports")] Perform Script ["Goto Report Menu"] Else Show Custom Dialog ["Reports Offline"; "The Year End Reports have not yet been compiled  and are offline."] End If
Extended privileges are a useful way extend to FileMaker's security model into the logic of your solutions.
File Level Access Security |
Part I: Getting Started with FileMaker 8
FileMaker Overview
- FileMaker Overview
- FileMaker and Its Marketplace
- Introduction to Database Software
- FileMaker Deployment Options
- Whats New in FileMaker Pro 8
Using FileMaker Pro
- Getting Started
- Working in FileMaker Pro
- Troubleshooting
- FileMaker Extra: Becoming a FileMaker Pro Power User
Defining and Working with Fields
- Defining and Working with Fields
- Working Under the Hood
- Working with Fields
- Working with Field Types
- Assigning Field Options
- Troubleshooting
- FileMaker Extra: Indexing in FileMaker
Working with Layouts
- Working with Layouts
- Whats a Layout?
- Creating and Managing Layouts
- Working with Parts
- Working with Objects on a Layout
- Working with the Tab Control Object
- Working with Fields
- Portals
- Troubleshooting
- FileMaker Extra: Designing Cross-PlatformFriendly Layouts
Part II: Developing Solutions with FileMaker
Relational Database Design
- Relational Database Design
- Understanding Database Design
- Database Analysis
- Working with Entities and Attributes
- Understanding Relationships
- Relationship Optionality
- Understanding the Role of Keys in Database Design
- Many-to-Many Relationships: Solving the Puzzle
- The Basics of Process Analysis
- FileMaker Extra: Complex Many-to-Many Relationships
Working with Multiple Tables
- Working with Multiple Tables
- Multitable Systems in FileMaker Pro
- Creating a One-to-Many Relationship in FileMaker
- Working with Keys and Match Fields
- Understanding Table Context
- Working with Related Data
- Creating a Many-to-Many Relationship
- Relational Integrity
- Rapid Multitable Development
- Troubleshooting
- FileMaker Extra: Building a Three-Way Join
Working with Relationships
- Working with Relationships
- Relationships Graphs and ERDs
- Relationships as Queries
- Creating Self-Relationships
- Creating Ranged Relationships
- Creating Cross-Product Relationships
- Working with Data from Distant Tables
- Working with Multiple Files
- How and When to Use Multiple Files
- Troubleshooting
- FileMaker Extra: Managing the Relationships Graph
Getting Started with Calculations
- Getting Started with Calculations
- Understanding How and Where Calculations Are Used
- Exploring the Calculation Dialog Box
- Essential Functions
- Using Conditional Functions
- Aggregate Functions
- Learning About the Environment
- Troubleshooting
- FileMaker Extra: Tips for Becoming a Calculation Master
Getting Started with Scripting
- Getting Started with Scripting
- Scripts in FileMaker Pro
- Creating Scripts
- Common Scripting Topics
- Triggering Scripts
- Working with Buttons on Layouts
- Troubleshooting
- FileMaker Extra: Creating a Script Library
Getting Started with Reporting
- Getting Started with Reporting
- Deriving Meaning from Data
- Working with Lists of Data
- Summarized Reports
- Delivering Reports
- Troubleshooting
- FileMaker Extra: Incorporating Reports into the Workflow
Part III: Developer Techniques
Developing for Multiuser Deployment
- Developing for Multiuser Deployment
- Developing for Multiple Users
- Sessions in FileMaker Pro
- Concurrency
- Audit Trails in FileMaker Pro
- Launch Files
- Troubleshooting
- FileMaker Extra: Development with a Team
Implementing Security
- Approaching Security
- User-Level Internal Security
- File-Level Access Security
- Troubleshooting
- FileMaker Extra: Working with Multiple Files
Advanced Interface Techniques
- Advanced Interface Techniques
- User Interfaces in FileMaker Pro
- Navigation
- Multiwindow Interfaces
- Working with Custom Menus
- Showing/Hiding Layout Elements
- Dedicated Find Layouts
- Data Presentation
- Working with Table View
- Troubleshooting
- FileMaker Extra: User Interface Heuristics
Advanced Calculation Techniques
- Advanced Calculation Techniques
- Whats an Advanced Calculation Technique?
- Logical Functions
- Text Formatting Functions
- Array Functions
- The Filter-ing Functions
- Custom Functions
- GetNthRecord
- Troubleshooting
- FileMaker Extra: Creating a Custom Function Library
Advanced Scripting Techniques
- Advanced Scripting Techniques
- What Is Advanced Scripting?
- Script Parameters and Script Results
- Script Variables
- Window Management Techniques
- Go to Related Record
- Troubleshooting
- FileMaker Extra: Recursive Scripts
Advanced Portal Techniques
- Advanced Portal Techniques
- Portals in FileMaker Pro
- Portal Basics
- New Record Only Relationships
- Horizontal Portals
- Using Portals to Create Calendars
- Selection Portals
- Filtered Portals
- Dynamic Portal Sorting
- Troubleshooting
- FileMaker Extra: Portals and Record Locking
Debugging and Troubleshooting
- Debugging and Troubleshooting
- What Is Troubleshooting?
- Staying Out of Trouble
- Planning for Trouble
- Troubleshooting Scripts and Calculations
- Troubleshooting in Specific Areas: Performance, Context, Connectivity, and Globals
- File Maintenance and Recovery
- FileMaker Extra: Other Tools of the Trade
Converting Systems from Previous Versions of FileMaker Pro
- Converting Systems from Previous Versions of FileMaker Pro
- Migration Choices
- Converting Files
- Pre-Conversion Tasks
- Post-Conversion Tasks
- Troubleshooting
- FileMaker Extra: Converting Web-Enabled Databases
Part IV: Data Integration and Publishing
Importing Data into FileMaker Pro
- Importing Data into FileMaker Pro
- Working with External Data
- Flat-File Data Sources
- Importing Multiple Files from a Folder
- Importing Photos from a Digital Camera
- Importing from an ODBC Data Source
- Importing from an XML Data Source
- Using a Script to Import Data
- Troubleshooting
- FileMaker Extra: Exploiting the FileMaker-to-FileMaker Import
Exporting Data from FileMaker
- Exporting Data from FileMaker
- Getting Out What You Put In
- The Basic Mechanics of Exporting
- Export File Formats
- Formatting Exported Data
- Exporting Related Fields
- Exporting Grouped Data
- Exporting to Fixed-Width Formats
- Working with Large Fields and Container Fields
- Scripted Exports
- Accessing FileMaker Data Using ODBC and JDBC
- Using FileMaker Pro as an ODBC Client
- Troubleshooting
- FileMaker Extra: Accessing FileMaker Data via JDBC
Instant Web Publishing
- Instant Web Publishing
- An Overview of Instant Web Publishing
- Enabling and Configuring IWP
- Designing for IWP Deployment
- Using an IWP Solution
- Troubleshooting
- FileMaker Extra: Building Your Own Next and Previous Page Buttons
FileMaker and Web Services
- FileMaker and Web Services
- About Web Services
- FileMaker and XML
- Transforming XML
- XML Import: Understanding Web Services
- Working with Web Services
- Troubleshooting
- FileMaker Extra: Write Your Own Web Services
Custom Web Publishing
- Custom Web Publishing
- About Custom Web Publishing
- Custom Web Publishing Versus Instant Web Publishing
- Custom Web Publishing Versus XML Export
- Getting Your Databases Ready for Custom Web Publishing
- Publishing FileMaker Data as XML
- Using XSLT with Custom Web Publishing
- Building Web Applications with XSLT-CWP
- Other Custom Web Publishing Commands and Parameters
- About the FileMaker XSLT Extensions
- Troubleshooting
- FileMaker Extra: About the Custom Web Publishing Tools
Part V: Deploying a FileMaker Solution
Deploying and Extending FileMaker
- Deploying and Extending FileMaker
- FileMaker Deployment Options
- Single User
- Peer-to-Peer Hosting
- FileMaker Server
- Web Publishing
- ODBC/JDBC
- Citrix/Terminal Services
- Runtime Solutions
- Deploying to Handheld Devices
- Customized Deployment Options
- Troubleshooting
- FileMaker Extra: The Limits of Customization
FileMaker Server and Server Advanced
- FileMaker Server and Server Advanced
- About FileMaker Server
- Installing FileMaker Server
- Running FileMaker Server
- Using the Server Administration Tool
- Configuring and Administering FileMaker Server Using the SAT
- Managing Clients
- Managing Databases
- Administration from the Command Line
- Working with External Services
- Automatically Updating Plug-ins
- Scheduled Tasks
- Monitoring FileMaker Server
- Troubleshooting
- FileMaker Extra: Best Practices Checklist
FileMaker Mobile
- FileMaker Mobile
- FileMaker Mobile 8 Overview
- Using FileMaker Mobile on Your Handheld Device
- Troubleshooting
- FileMaker Extra: Publishing Related Data
Documenting Your FileMaker Solutions
- Documenting Your FileMaker Solutions
- Why Is Documentation Important?
- Developing Naming Conventions
- Using Comments Effectively
- Documenting the Relationships Graph
- Using the Database Design Report
- Using Third-Party Documentation Tools
- Putting the Finishing Touches on Your Documentation
- Final Thoughts on Documentation
- FileMaker Extra: Soliant Development Standards
EAN: 2147483647
Pages: 296
