Portal Basics
As previously mentioned, a portal is a view into a related table. In each row of your portal, you will see fields from records as they relate to the current record to which the portal is tied.
Another way to think of portals is that they offer a view into another table from a specific perspective. The match criteria you've established determine the perspective, and, depending on how you've set things up, it is possible to change that perspective to useful ends.
FileMaker Pro 7 introduced new relationship operators, beyond the single equijoin (=), and portals have become even more flexible than in the past. However, a portal's basic function of displaying one record per row from a related table remains essentially the same. A Cartesian cross-product operator (x), for instance, relates all the records in one table to all the records in another table, regardless of key values. A portal based on such a relationship would therefore display all the records of the related table. Similarly, a < operator compares the match fields on either side of your relationship, and the rows in your portal will be displayed accordingly. As a final example, a  operator enables you to exclude certain records from your portal.
|
To learn more about relationships and working with portals, see "Working with Related Data," p. 166. |
One of the most important details to keep in mind is that the match field in the table from which you want to view records must be indexed (with a value index) for the relationship to properly resolve and display records in a portal.
|
To understand indexing, see "Storage and Indexing," p. 86. |
Keep in mind that you can index calculations, as long as they do not reference related or unindexed fields themselves. It is entirely possible to relate to a calculation field in another table, rather than always relying on data input by users. You cannot create records through that relationship, however. Just as users cannot modify a calculation field, neither can FileMaker Pro itself. As you may recall, portals can be set to allow for the creation of related records. A user can click on the first empty row in a portal and enter data directly. FileMaker Pro then does the equivalent of a Set Field step and rightly places the match field valuekeyin the analogous field on the other side of the relationship.
Indexing is not required for the match field in your current table. You can use global fields or unstored calculation values to create the bridge between two tables. We get into those techniques later in the chapter. The important thing to remember is that the match field in the "distant" or related table must be indexed for the relationship to resolve properly.
Portals Versus List View/Table View
Knowing when to use portals is often a matter of personal preference, user interface requirements, and data architecture. Quite often developers go through phases of infatuation with using various ways to display multiple records in a single view. The three tools for doing this are List views, Table views, and portals. Each has its own pros and cons, and we'd argue that the three are best used for very different purposes.
We encourage laziness (it breeds a need for efficiency), so we tend to favor Table view when a developer or user needs to access raw data with no regard to interface. You get a good bit of functionality for free, such as column sorting, column headers, and the capability to resize and reorder columns. The main downside to Table view is that you cannot add buttons or other visual objects to your rows. You also cannot rename or modify the appearance of column headers. Table view therefore is generally used for layouts that are accessible only to developers. They're usually not suitable for end users.
For cases in which control over the user interface is of paramount importance, List view and portals come into play. The key difference between the two, from a user's perspective, is that a List view can dynamically represent whatever found set your table currently has, and portals always display a set of related records.
List view displays records in their creation order unless a user or script explicitly sorts the records. Unless you've controlled and turned off or altered menu access, users can omit records, show all records, and otherwise manipulate the found set in an ad hoc manner to suit their needs. List views display the number of rows that will fit on a screen, expanding as much as a user has monitor space. When you're printing a List view of records, all the records can be printed; page breaks are placed between records as necessary.
Portals are differently focused. They are always driven by a specific relationship and always display a fixed number of related rowsonly the content changes. They are always sorted (at a minimum in the order in which their related records were created, unless otherwise specified), so if you have a particularly large set of related data, your screen redraw speed may become an issue with hundreds of thousands of records. The obvious advantage of portals is that you can combine them on the same layout with data from other tablesboth with fields from a related record and with other portals. Unlike List views, portals are not particularly well suited to printing sets of records because the print output is limited to a specific number of related rows.
New Portal Setup
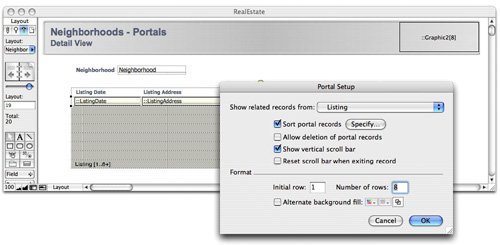
To add a portal to a layout, use the Portal tool from the Status Area in Layout mode, and draw a rectangle that approximates how large you want your portal to be. You are then presented with the Portal Setup dialog, from which, at least, you need to choose a table occurrence on which to base the portal (see Figure 16.1).
Figure 16.1. These options enable you to govern how a specific portal behaves.
Note
Setting new portal options in the Portal Setup dialog does not affect other portals in your solution, regardless of whether others are tied to the same table occurrence.
Tip
When choosing from the list of table occurrences, note that it is not possible to create a portal showing records from an unrelated table. By definition, portals show related records. If you need to display records in an unrelated manner, create a Cartesian cross-product relationship to the table occurrence in questionbut this is still a relationship. It will display all the records from that table.
As a helpful reminder, in Layout mode, the name of the table occurrence to which the portal is tied is displayed in the lower left, along with its row format options. We cover those options shortly.
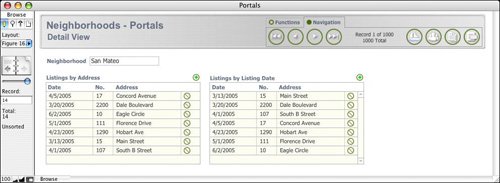
Specifying Portal Sorting
You can specify the order in which the related records are displayed by specifying sort criteria in the Portal Setup dialog (refer to Figure 16.1). It's thus possible to create two portals side by side, based on the same table occurrence, that offer two different sort views from the same related tables, as shown in Figure 16.2.
Figure 16.2. It is possible to establish different sort options for each portal in your database.
Note that the sort order is hard-coded to the portal. For users to change the sort order, they'd have to enter Layout mode and modify the Portal Setup dialog options. A technique for dynamic, user-based portal sorting is covered later in the chapter.
Note that the relationship from the current table occurrence to the destination table occurrence may also have a sort defined, but a portal sort, if defined, overrides the relationship sort. If the table occurrence is multiple hops away on the Relationships Graph, the last relationship is the one that determines the sort order.
Allowing Portal Row Deletion
By enabling the Allow Deletion of Portal Records option, you enable users to select a portal row and delete a record by pressing the Delete or Backspace key. They are then prompted by FileMaker as to whether they want to delete the one related record in question.
You may instead want to overlay buttons attached to scripts in portal rows to delete related records so that you can more fully control the behavior of portals. This enables you to perform your own functions before deleting a record or to create your own calculation-based container fields to offer a different user experience. Given that it's not possible to alter FileMaker's default selection mask color, you may opt to use a container field to create row shading that is more to your liking.
In the same vein as never attaching anything but scripts to buttons for the purposes of control and maintainability, we almost never use the capability to delete records in portals with FileMaker's default behavior. We opt instead to place buttons (complete with an explicit icon or text indicating that it performs a delete function), attached to scripts, to do so.
Nonetheless, FileMaker's default portal row deletion capability is a handy feature to enable if you're working with a database that uses FileMaker's native user interface behaviors.
Setup Options
FileMaker's Portal Setup options enable you to specify a starting row, how many rows (tall) a portal should be, whether to offer a vertical scrollbar, and whether to alternate row colors between that which you set for the portal itself and an alternative color.
The row choices are noteworthy. If you turn off your scrollbar, you can opt to display rows 18 in one portal, and rows 916 from the same relationship in another. Keep in mind that the end point is artificial; a child table can hold potentially millions of child records. With scrollbars turned on, a portal simply allows you to scroll from the initial row downward.
 |
To know what pitfalls to look for in starting a portal on a row besides the first one, refer to "Portal Rows Not Displaying" in the "Troubleshooting" section at the end of this chapter. |
Relationship Properties
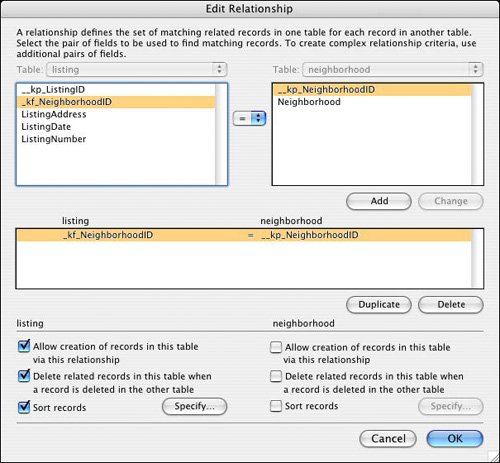
Relationship properties have a direct bearing on a portal's behavior. These properties were covered in some detail in Chapter 6, "Working with Multiple Tables"; however, we'd like to draw your attention to some particular aspects of the Edit Relationship dialog, shown in Figure 16.3 and in the sections that follow.
Figure 16.3. Portal behavior is affected by the options you choose in the lower portion of the Edit Relationship dialog.
Creating Related Records
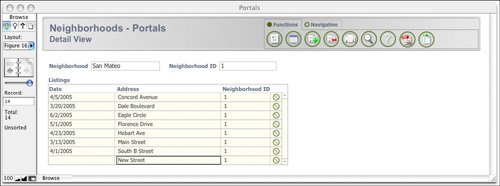
Notice in Figure 16.3 that one of the options you can specify for a relationship is Allow Creation of Records in This Table via This Relationship. When you check this option, a portal that's based on the relationship will contain a blank row under its related records (however many there are) that is readily available for data entry. When a user commits data in that blank row, FileMaker creates a record in the table into which the portal relates and pushes the value from the current parent record's match key into the related match field automatically.
This behavior is possible only with relationships that include the = operator (=,  , and
, and images/U2264.jpg border=0>) in which FileMaker can determine exactly the foreign value to populate in the newly created record. In the case of greater-than-or-equal and less-than-or-equal operators, FileMaker pushes data into newly created records based on the equal-to value. You also need to be able to modify the field in question. If the relationship is tied to a calculation field, FileMaker Pro cannot automatically populate it with a value from a related record (see Figure 16.4).
Figure 16.4. Note that the match field, shown here in the third column, is populated automatically.
|
For more depth on relationships and relationship properties, see Chapter 6, "Working with Multiple Tables," p. 157. |
Cascading Deletion of Related Records
The next option is Delete Related Records in This Table When a Record Is Deleted in the Other Table. Choosing this option ensures that when a user deletes a record in one related table, all its related records are deleted as well. This cascading effect ensures that your database doesn't orphan records by allowing a user to delete records without their respective related records. A good example might be a contact person's record and related phone-number records. It is unlikely that you'd want to retain just the phone-number records after deleting the contact record to which related phone records belong.
The downside, of course, is that users may not realize that along with deleting the current record they are also going to delete all the records they see displayed in a portal, or, worse yet, that they will be deleting records they may not see onscreen currently.
|
For more detail on referential integrity and cascading deletion, see Chapter 6, "Working with Multiple Tables," p. 157. |
Relationship-Based Sorting
The Sort Records option at the bottom of the Edit Relationship dialog enables you to define a sort order for that relationship. If set, it drives the order in which rows are displayed in portals based on this relationship. Portals themselves have their own sorting options and their options override whatever sort properties you set here; however, it's useful enough to consider this a default sort, if you want.
Sticky Portals
 |
Portals in FileMaker 8, by default, maintain their scroll position even after a record has been committed or exited. In the past, FileMaker would "pop" back to the top of a portal after a user had finished entering data, regardless of how far down in a given related recordset a user might have scrolled. In FileMaker Pro 7, you could opt to change that behavior by turning off field frames. Happily, in FileMaker 8 this is no longer an issue. If you prefer to have a portal reset to the top each time a user finishes working with it, turn on the new feature in the Portal Setup dialog called Reset Scroll Bar When Exiting Record. |
When this option is turned off, the scroll state of your portal is honored until you refresh the screen by changing modes, close the window in question, quit FileMaker Pro, perform a sort or script, or change records. All these actions result in a screen refresh. If you change from one record to another and return to the original, its portal position reverts to the top as well. Portals maintain their position when users actively edit fields in portal rows.
Scripted New Portal Records
It's quite common for developers to choose to disallow the creation of related records in portals. You might want to avoid the need for users to scroll to the bottom of a portal to create new related records. You may want to have your portal serve as a display-only tool, or you may simply have too many rows and don't want to force users through a bunch of unnecessary scrolling. Doing so means having to modify the relationship itself. You cannot simply turn on and off this behavior on a case-by-case basis at the portal level. (Consider that a feature request, FileMaker!)
If the option Allow Creation of Records in This Table via This Relationship setting is turned off, you've then got the task of figuring out howother than driving users to the related table in questionto create new related records.
One approach to manage the creation of new records is to use a Set Field script step in combination with passing the necessary key match value via script parameter:
Go to Layout [ "Contact" (Contact) ]
New Record/Request
Set Field [ Contact::_kf_company; Get (ScriptParameter)
 // _kp_company should be passed as the parameter]
Commit Records/Requests [ No dialog ]
Go to Layout [ original layout ]
Note that this script makes no assumptions about the originating context from which it is called. This is an example of a nicely flexible script that simply creates related contact records and returns the user to the layout from which he came after calling the script.
Part I: Getting Started with FileMaker 8
FileMaker Overview
- FileMaker Overview
- FileMaker and Its Marketplace
- Introduction to Database Software
- FileMaker Deployment Options
- Whats New in FileMaker Pro 8
Using FileMaker Pro
- Getting Started
- Working in FileMaker Pro
- Troubleshooting
- FileMaker Extra: Becoming a FileMaker Pro Power User
Defining and Working with Fields
- Defining and Working with Fields
- Working Under the Hood
- Working with Fields
- Working with Field Types
- Assigning Field Options
- Troubleshooting
- FileMaker Extra: Indexing in FileMaker
Working with Layouts
- Working with Layouts
- Whats a Layout?
- Creating and Managing Layouts
- Working with Parts
- Working with Objects on a Layout
- Working with the Tab Control Object
- Working with Fields
- Portals
- Troubleshooting
- FileMaker Extra: Designing Cross-PlatformFriendly Layouts
Part II: Developing Solutions with FileMaker
Relational Database Design
- Relational Database Design
- Understanding Database Design
- Database Analysis
- Working with Entities and Attributes
- Understanding Relationships
- Relationship Optionality
- Understanding the Role of Keys in Database Design
- Many-to-Many Relationships: Solving the Puzzle
- The Basics of Process Analysis
- FileMaker Extra: Complex Many-to-Many Relationships
Working with Multiple Tables
- Working with Multiple Tables
- Multitable Systems in FileMaker Pro
- Creating a One-to-Many Relationship in FileMaker
- Working with Keys and Match Fields
- Understanding Table Context
- Working with Related Data
- Creating a Many-to-Many Relationship
- Relational Integrity
- Rapid Multitable Development
- Troubleshooting
- FileMaker Extra: Building a Three-Way Join
Working with Relationships
- Working with Relationships
- Relationships Graphs and ERDs
- Relationships as Queries
- Creating Self-Relationships
- Creating Ranged Relationships
- Creating Cross-Product Relationships
- Working with Data from Distant Tables
- Working with Multiple Files
- How and When to Use Multiple Files
- Troubleshooting
- FileMaker Extra: Managing the Relationships Graph
Getting Started with Calculations
- Getting Started with Calculations
- Understanding How and Where Calculations Are Used
- Exploring the Calculation Dialog Box
- Essential Functions
- Using Conditional Functions
- Aggregate Functions
- Learning About the Environment
- Troubleshooting
- FileMaker Extra: Tips for Becoming a Calculation Master
Getting Started with Scripting
- Getting Started with Scripting
- Scripts in FileMaker Pro
- Creating Scripts
- Common Scripting Topics
- Triggering Scripts
- Working with Buttons on Layouts
- Troubleshooting
- FileMaker Extra: Creating a Script Library
Getting Started with Reporting
- Getting Started with Reporting
- Deriving Meaning from Data
- Working with Lists of Data
- Summarized Reports
- Delivering Reports
- Troubleshooting
- FileMaker Extra: Incorporating Reports into the Workflow
Part III: Developer Techniques
Developing for Multiuser Deployment
- Developing for Multiuser Deployment
- Developing for Multiple Users
- Sessions in FileMaker Pro
- Concurrency
- Audit Trails in FileMaker Pro
- Launch Files
- Troubleshooting
- FileMaker Extra: Development with a Team
Implementing Security
- Approaching Security
- User-Level Internal Security
- File-Level Access Security
- Troubleshooting
- FileMaker Extra: Working with Multiple Files
Advanced Interface Techniques
- Advanced Interface Techniques
- User Interfaces in FileMaker Pro
- Navigation
- Multiwindow Interfaces
- Working with Custom Menus
- Showing/Hiding Layout Elements
- Dedicated Find Layouts
- Data Presentation
- Working with Table View
- Troubleshooting
- FileMaker Extra: User Interface Heuristics
Advanced Calculation Techniques
- Advanced Calculation Techniques
- Whats an Advanced Calculation Technique?
- Logical Functions
- Text Formatting Functions
- Array Functions
- The Filter-ing Functions
- Custom Functions
- GetNthRecord
- Troubleshooting
- FileMaker Extra: Creating a Custom Function Library
Advanced Scripting Techniques
- Advanced Scripting Techniques
- What Is Advanced Scripting?
- Script Parameters and Script Results
- Script Variables
- Window Management Techniques
- Go to Related Record
- Troubleshooting
- FileMaker Extra: Recursive Scripts
Advanced Portal Techniques
- Advanced Portal Techniques
- Portals in FileMaker Pro
- Portal Basics
- New Record Only Relationships
- Horizontal Portals
- Using Portals to Create Calendars
- Selection Portals
- Filtered Portals
- Dynamic Portal Sorting
- Troubleshooting
- FileMaker Extra: Portals and Record Locking
Debugging and Troubleshooting
- Debugging and Troubleshooting
- What Is Troubleshooting?
- Staying Out of Trouble
- Planning for Trouble
- Troubleshooting Scripts and Calculations
- Troubleshooting in Specific Areas: Performance, Context, Connectivity, and Globals
- File Maintenance and Recovery
- FileMaker Extra: Other Tools of the Trade
Converting Systems from Previous Versions of FileMaker Pro
- Converting Systems from Previous Versions of FileMaker Pro
- Migration Choices
- Converting Files
- Pre-Conversion Tasks
- Post-Conversion Tasks
- Troubleshooting
- FileMaker Extra: Converting Web-Enabled Databases
Part IV: Data Integration and Publishing
Importing Data into FileMaker Pro
- Importing Data into FileMaker Pro
- Working with External Data
- Flat-File Data Sources
- Importing Multiple Files from a Folder
- Importing Photos from a Digital Camera
- Importing from an ODBC Data Source
- Importing from an XML Data Source
- Using a Script to Import Data
- Troubleshooting
- FileMaker Extra: Exploiting the FileMaker-to-FileMaker Import
Exporting Data from FileMaker
- Exporting Data from FileMaker
- Getting Out What You Put In
- The Basic Mechanics of Exporting
- Export File Formats
- Formatting Exported Data
- Exporting Related Fields
- Exporting Grouped Data
- Exporting to Fixed-Width Formats
- Working with Large Fields and Container Fields
- Scripted Exports
- Accessing FileMaker Data Using ODBC and JDBC
- Using FileMaker Pro as an ODBC Client
- Troubleshooting
- FileMaker Extra: Accessing FileMaker Data via JDBC
Instant Web Publishing
- Instant Web Publishing
- An Overview of Instant Web Publishing
- Enabling and Configuring IWP
- Designing for IWP Deployment
- Using an IWP Solution
- Troubleshooting
- FileMaker Extra: Building Your Own Next and Previous Page Buttons
FileMaker and Web Services
- FileMaker and Web Services
- About Web Services
- FileMaker and XML
- Transforming XML
- XML Import: Understanding Web Services
- Working with Web Services
- Troubleshooting
- FileMaker Extra: Write Your Own Web Services
Custom Web Publishing
- Custom Web Publishing
- About Custom Web Publishing
- Custom Web Publishing Versus Instant Web Publishing
- Custom Web Publishing Versus XML Export
- Getting Your Databases Ready for Custom Web Publishing
- Publishing FileMaker Data as XML
- Using XSLT with Custom Web Publishing
- Building Web Applications with XSLT-CWP
- Other Custom Web Publishing Commands and Parameters
- About the FileMaker XSLT Extensions
- Troubleshooting
- FileMaker Extra: About the Custom Web Publishing Tools
Part V: Deploying a FileMaker Solution
Deploying and Extending FileMaker
- Deploying and Extending FileMaker
- FileMaker Deployment Options
- Single User
- Peer-to-Peer Hosting
- FileMaker Server
- Web Publishing
- ODBC/JDBC
- Citrix/Terminal Services
- Runtime Solutions
- Deploying to Handheld Devices
- Customized Deployment Options
- Troubleshooting
- FileMaker Extra: The Limits of Customization
FileMaker Server and Server Advanced
- FileMaker Server and Server Advanced
- About FileMaker Server
- Installing FileMaker Server
- Running FileMaker Server
- Using the Server Administration Tool
- Configuring and Administering FileMaker Server Using the SAT
- Managing Clients
- Managing Databases
- Administration from the Command Line
- Working with External Services
- Automatically Updating Plug-ins
- Scheduled Tasks
- Monitoring FileMaker Server
- Troubleshooting
- FileMaker Extra: Best Practices Checklist
FileMaker Mobile
- FileMaker Mobile
- FileMaker Mobile 8 Overview
- Using FileMaker Mobile on Your Handheld Device
- Troubleshooting
- FileMaker Extra: Publishing Related Data
Documenting Your FileMaker Solutions
- Documenting Your FileMaker Solutions
- Why Is Documentation Important?
- Developing Naming Conventions
- Using Comments Effectively
- Documenting the Relationships Graph
- Using the Database Design Report
- Using Third-Party Documentation Tools
- Putting the Finishing Touches on Your Documentation
- Final Thoughts on Documentation
- FileMaker Extra: Soliant Development Standards
EAN: 2147483647
Pages: 296
