FileMaker Extra: Accessing FileMaker Data via JDBC
The discussion in this chapter has focused largely on ODBC. In our experience, JDBC connectivity is less commonly sought for FileMaker than ODBC connectivity. It is an important capability, though, so we cover it here in some detail.
JDBC is a technology used by Java-based applications to connect to various databases. Like ODBC, it depends on the existence of drivers, each specific to a particular database. Unlike ODBC, because Java is cross-platform, the drivers are generally not platform specific (a very small class of drivers may be platform specific but these are rarely encountered). In this section well cover how to install and test the driver and the JDBC connection, and well look at using a JDBC-based tool to inspect an xDBC-enabled FileMaker database.
Testing for Java and Installing the Driver
The first step, whether on Mac or PC, is to verify that you have Java installed. Java should be installed by default on the Mac OS, and is often found installed on Windows as well. On either platform, drop to the command line (Terminal on Mac OS X, cmd.exe on Windows) and run this command:
java -version
You should see a response like this:
java version "1.4.2_09"
Java(TM) 2 Runtime Environment, Standard Edition (build 1.4.2_09-232)
Java HotSpot(TM) Client VM (build 1.4.2-54, mixed mode)
Such a response indicates that your system has a Java Virtual Machine (JVM) installed and is capable of running Java programs.
If instead you get a response that tells you the java command can be found, your system does not have a JVM and youll need to download and install one. See http://java.sun.com for information pertaining to your specific operating system.
The next step is to install the FileMaker JDBC driver. The installer is included along with other additional files on the FileMaker install media. Look for a folder named JDBC Client Driver Installer. Inside the folder, double-click on sljcinstaller.jar. This will start the driver installer. You can choose any location for the driver. On the Mac OS, /Library/Java/Extensions is a good place. On Windows, you can create your own directory in a place of your choosing.
Configuring a Database for JDBC Access
Configuring databases for JDBC access is no different from configuring databases for ODBC access. The two types of access share a unified extended privilege (fmxdbc) that determines xDBC access to the file. For purposes of initial testing, you may want to practice JDBC access on a single machine, by using FileMaker Pro or FileMaker Pro Advanced to act as the JDBC host (as described earlier in this chapter for ODBC local hosting).
Testing JDBC Connectivity
When configuring ODBC for the first time, you tested ODBC connectivity by configuring a DSN, and then using the operating systems capability to test that DSN to verify that the FileMaker data source was running and accepting ODBC configurations.
JDBC works a bit differently (among other things, there are no DSNs with JDBC). The FileMaker JDBC install includes a JDBC testing application you can use to test your JDBC configuration.
The testforjdbc application is installed in whatever directory you chose for the JDBC client driver install. Inside that directory is a directory named testforjdbc containing, among other things, command scripts to start the testforjdbc application. On Windows, you can double-click one of the batch scripts testforjdbc.bat or testforjdbc14.bat. (The latter is only for systems that are running Java 1.4 or later, which is most current systems.) On the Mac OS, youll need to run your selected script from the command line. Assuming that you installed to /Library/Java/Extensions, you would open Terminal (usually found in Applications/Utilities) and type the following:
sh /Library/Java/Extensions/testforjdbc/testforjdbc14.sh
Regardless of how you launch it, your chosen script should start the Java-based testforjdbc application.
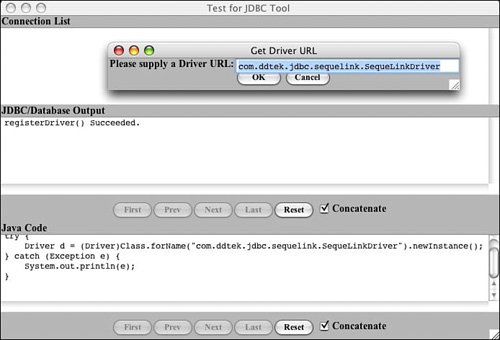
The interface is fairly bare-bones. Your first task is to make sure that the FileMaker JDBC driver is registered with the Java environment. To register the driver, choose Driver, Register Driver, and in the resulting dialog box type the following driver name:
com.ddtek.jdbc.sequelink.SequeLinkDriver
Then click OK. You should see a message in the JDBC/Database Output box in the middle of the window that says registerDriver() succeeded, as shown in Figure 20.31.
Figure 20.31. Each Java application needs to register the FileMaker JDBC driver before using it.
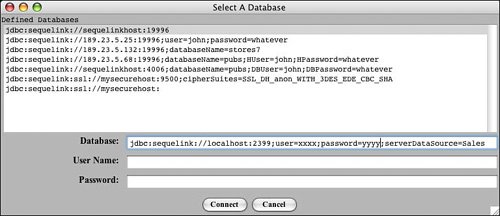
After the driver is registered, its time to try to connect to the FileMaker file as a JDBC data source. JDBC-based programs make a connection by issuing a call via a URL-like syntax. An example might be as follows:
jdbc:sequelink://localhost:2399;user=user;password=password;serverDataSource=Sales
This connection string (as its often known) tells a JDBC program to make a connection to a SequeLink data source (SequeLink is the name for both the ODBC and the JDBC drivers for FileMaker), running on the same machine on port 2399. The connection string further specifies that we try to connect to the data source called Sales, using a username of user and a password of pass. The serverDataSource in this case corresponds to a single FileMaker file.
You can make a connection in the testforjdbc program by choosing Connection, Connect to DB, and entering a connection string appropriate to your machine (your username, password, and database name are all you should have to change in the preceding string). The relevant dialog is shown in Figure 20.32.
Figure 20.32. JDBC connections are made via a URL-like connection string.
If you see a message in the JDBC/Database Output window stating that getConnection() succeeded, everything is fine. Youll see a new Connection window (mostly blank). This lets you know that your connection was successful.
Inspecting Your Database Using JDBC
If you wanted to, you could go on using the testforjdbc program to inspect and manipulate your FileMaker database via JDBC. As youll find, though, its not a very friendly tool. If you want to experiment a bit more with JDBC, you may want to grab a more intuitive tool. One such tool is DbVisualizer, from Minq Software. You can download a time-limited evaluation copy from http://www.minq.se/products/dbvis. DbVisualizer is written in Java, so it looks and works identically on Mac and Windows. Well walk quickly through the setup and configuration of a JDBC connection to FileMaker using DbVisualizer.
First, of course, you need a FileMaker database hosted somewhere and available for JDBC access. After the data source is ready, open DbVisualizer. Youll first need to register the driver (just as with testforjdbc), so choose Tools, Driver Manager. Next choose Driver, Create Driver (the menu will be within the window itself, not part of the application-level menus). The driver creation interface is shown in Figure 20.33.
Figure 20.33. In DbVisualizer, you need to first configure the FileMaker JDBC driver for use.

Fill in a name of your own choice for the driver. Its also helpful to fill in the URL format; DbVisualizer will display this format to you when you try to make a connection later. Each JDBC driver tends to have a slightly different URL syntax, so its helpful to have this here as a reminder.
Next you need to find the driver itself. To do so, click the Load File button. Navigate to the file driver/lib/sljc.jar within the location where you installed the FileMaker JDBC driver. After youve found and selected that file, click the Find Drivers in Listed Locations button. DbVisualizer should scan the file and find a driver called com.ddtek.jdbc.sequelink.SequeLinkDriver. As a last step, in the Driver Settings area of the screen, choose that driver from the Driver Class menu. The final configuration should look roughly like whats shown in Figure 20.33.
Next youll need to create a database connection using the new driver. Choose Database, Create Database Connection from the main application menu bar. You may be prompted as to whether you want to use the Connection Wizard; choose No (DbVisualizer has no installed wizard options for the FileMaker JDBC driver). Youll see the connection configuration screen, as shown in Figure 20.34.
Figure 20.34. The next step with DbVisualizer is to configure the connection to the data source.
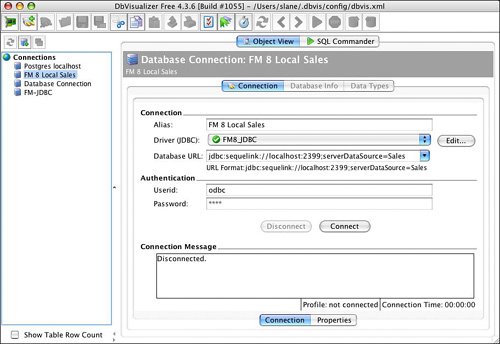
Choose a descriptive alias for the connection (probably something that mentions the name of the specific database being connected to). Select the driver you configured in the earlier steps (in this example its called FM8_JDBC). Next youll need to supply a correct connection string (database URL), just as with the testforjdbc program. Finally, youll need to enter the username and password, and click the Connect button.
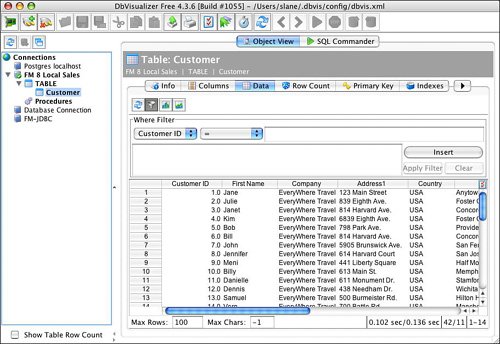
If the connection succeeded, you should see some additional information under the name of the database connection in the panel at the left of the window. Specifically, you might be interested in opening the Tables object and choosing a table occurrence from those present in the database. You could then choose the Info tab to see some general information about the table, or the Data tab to see the actual row data, as shown in Figure 20.35.
Figure 20.35. You can use DbVisualizer to inspect your data directly.
Note
Many of the options you can choose in DbVisualizer may give you scary-looking JDBC errors when you e working with FileMaker databases. This is not because anything has really gone wrong, but because the FileMaker JDBC driver doesn support certain JDBC operations, especially those intended to extract metadata from the database (that is, information about the database: stored procedures, column types, and the like). If you see such an error, don worry, just keep exploring until you get a sense for which DbVisualizer features are supported by the FileMaker JDBC driver.
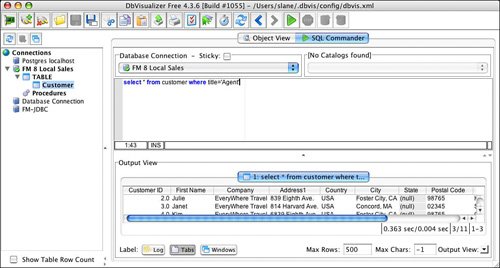
The intrepid may also experiment with using SQL directly against the database, via the SQL Commander tab, as shown in Figure 20.36. This is a great way to brush up on your SQL, and to learn which SQL features are and are not supported by the FileMaker JDBC driver.
Figure 20.36. You can also use DbVisualizer to experiment with running SQL queries against FileMaker.
Part I: Getting Started with FileMaker 8
FileMaker Overview
- FileMaker Overview
- FileMaker and Its Marketplace
- Introduction to Database Software
- FileMaker Deployment Options
- Whats New in FileMaker Pro 8
Using FileMaker Pro
- Getting Started
- Working in FileMaker Pro
- Troubleshooting
- FileMaker Extra: Becoming a FileMaker Pro Power User
Defining and Working with Fields
- Defining and Working with Fields
- Working Under the Hood
- Working with Fields
- Working with Field Types
- Assigning Field Options
- Troubleshooting
- FileMaker Extra: Indexing in FileMaker
Working with Layouts
- Working with Layouts
- Whats a Layout?
- Creating and Managing Layouts
- Working with Parts
- Working with Objects on a Layout
- Working with the Tab Control Object
- Working with Fields
- Portals
- Troubleshooting
- FileMaker Extra: Designing Cross-PlatformFriendly Layouts
Part II: Developing Solutions with FileMaker
Relational Database Design
- Relational Database Design
- Understanding Database Design
- Database Analysis
- Working with Entities and Attributes
- Understanding Relationships
- Relationship Optionality
- Understanding the Role of Keys in Database Design
- Many-to-Many Relationships: Solving the Puzzle
- The Basics of Process Analysis
- FileMaker Extra: Complex Many-to-Many Relationships
Working with Multiple Tables
- Working with Multiple Tables
- Multitable Systems in FileMaker Pro
- Creating a One-to-Many Relationship in FileMaker
- Working with Keys and Match Fields
- Understanding Table Context
- Working with Related Data
- Creating a Many-to-Many Relationship
- Relational Integrity
- Rapid Multitable Development
- Troubleshooting
- FileMaker Extra: Building a Three-Way Join
Working with Relationships
- Working with Relationships
- Relationships Graphs and ERDs
- Relationships as Queries
- Creating Self-Relationships
- Creating Ranged Relationships
- Creating Cross-Product Relationships
- Working with Data from Distant Tables
- Working with Multiple Files
- How and When to Use Multiple Files
- Troubleshooting
- FileMaker Extra: Managing the Relationships Graph
Getting Started with Calculations
- Getting Started with Calculations
- Understanding How and Where Calculations Are Used
- Exploring the Calculation Dialog Box
- Essential Functions
- Using Conditional Functions
- Aggregate Functions
- Learning About the Environment
- Troubleshooting
- FileMaker Extra: Tips for Becoming a Calculation Master
Getting Started with Scripting
- Getting Started with Scripting
- Scripts in FileMaker Pro
- Creating Scripts
- Common Scripting Topics
- Triggering Scripts
- Working with Buttons on Layouts
- Troubleshooting
- FileMaker Extra: Creating a Script Library
Getting Started with Reporting
- Getting Started with Reporting
- Deriving Meaning from Data
- Working with Lists of Data
- Summarized Reports
- Delivering Reports
- Troubleshooting
- FileMaker Extra: Incorporating Reports into the Workflow
Part III: Developer Techniques
Developing for Multiuser Deployment
- Developing for Multiuser Deployment
- Developing for Multiple Users
- Sessions in FileMaker Pro
- Concurrency
- Audit Trails in FileMaker Pro
- Launch Files
- Troubleshooting
- FileMaker Extra: Development with a Team
Implementing Security
- Approaching Security
- User-Level Internal Security
- File-Level Access Security
- Troubleshooting
- FileMaker Extra: Working with Multiple Files
Advanced Interface Techniques
- Advanced Interface Techniques
- User Interfaces in FileMaker Pro
- Navigation
- Multiwindow Interfaces
- Working with Custom Menus
- Showing/Hiding Layout Elements
- Dedicated Find Layouts
- Data Presentation
- Working with Table View
- Troubleshooting
- FileMaker Extra: User Interface Heuristics
Advanced Calculation Techniques
- Advanced Calculation Techniques
- Whats an Advanced Calculation Technique?
- Logical Functions
- Text Formatting Functions
- Array Functions
- The Filter-ing Functions
- Custom Functions
- GetNthRecord
- Troubleshooting
- FileMaker Extra: Creating a Custom Function Library
Advanced Scripting Techniques
- Advanced Scripting Techniques
- What Is Advanced Scripting?
- Script Parameters and Script Results
- Script Variables
- Window Management Techniques
- Go to Related Record
- Troubleshooting
- FileMaker Extra: Recursive Scripts
Advanced Portal Techniques
- Advanced Portal Techniques
- Portals in FileMaker Pro
- Portal Basics
- New Record Only Relationships
- Horizontal Portals
- Using Portals to Create Calendars
- Selection Portals
- Filtered Portals
- Dynamic Portal Sorting
- Troubleshooting
- FileMaker Extra: Portals and Record Locking
Debugging and Troubleshooting
- Debugging and Troubleshooting
- What Is Troubleshooting?
- Staying Out of Trouble
- Planning for Trouble
- Troubleshooting Scripts and Calculations
- Troubleshooting in Specific Areas: Performance, Context, Connectivity, and Globals
- File Maintenance and Recovery
- FileMaker Extra: Other Tools of the Trade
Converting Systems from Previous Versions of FileMaker Pro
- Converting Systems from Previous Versions of FileMaker Pro
- Migration Choices
- Converting Files
- Pre-Conversion Tasks
- Post-Conversion Tasks
- Troubleshooting
- FileMaker Extra: Converting Web-Enabled Databases
Part IV: Data Integration and Publishing
Importing Data into FileMaker Pro
- Importing Data into FileMaker Pro
- Working with External Data
- Flat-File Data Sources
- Importing Multiple Files from a Folder
- Importing Photos from a Digital Camera
- Importing from an ODBC Data Source
- Importing from an XML Data Source
- Using a Script to Import Data
- Troubleshooting
- FileMaker Extra: Exploiting the FileMaker-to-FileMaker Import
Exporting Data from FileMaker
- Exporting Data from FileMaker
- Getting Out What You Put In
- The Basic Mechanics of Exporting
- Export File Formats
- Formatting Exported Data
- Exporting Related Fields
- Exporting Grouped Data
- Exporting to Fixed-Width Formats
- Working with Large Fields and Container Fields
- Scripted Exports
- Accessing FileMaker Data Using ODBC and JDBC
- Using FileMaker Pro as an ODBC Client
- Troubleshooting
- FileMaker Extra: Accessing FileMaker Data via JDBC
Instant Web Publishing
- Instant Web Publishing
- An Overview of Instant Web Publishing
- Enabling and Configuring IWP
- Designing for IWP Deployment
- Using an IWP Solution
- Troubleshooting
- FileMaker Extra: Building Your Own Next and Previous Page Buttons
FileMaker and Web Services
- FileMaker and Web Services
- About Web Services
- FileMaker and XML
- Transforming XML
- XML Import: Understanding Web Services
- Working with Web Services
- Troubleshooting
- FileMaker Extra: Write Your Own Web Services
Custom Web Publishing
- Custom Web Publishing
- About Custom Web Publishing
- Custom Web Publishing Versus Instant Web Publishing
- Custom Web Publishing Versus XML Export
- Getting Your Databases Ready for Custom Web Publishing
- Publishing FileMaker Data as XML
- Using XSLT with Custom Web Publishing
- Building Web Applications with XSLT-CWP
- Other Custom Web Publishing Commands and Parameters
- About the FileMaker XSLT Extensions
- Troubleshooting
- FileMaker Extra: About the Custom Web Publishing Tools
Part V: Deploying a FileMaker Solution
Deploying and Extending FileMaker
- Deploying and Extending FileMaker
- FileMaker Deployment Options
- Single User
- Peer-to-Peer Hosting
- FileMaker Server
- Web Publishing
- ODBC/JDBC
- Citrix/Terminal Services
- Runtime Solutions
- Deploying to Handheld Devices
- Customized Deployment Options
- Troubleshooting
- FileMaker Extra: The Limits of Customization
FileMaker Server and Server Advanced
- FileMaker Server and Server Advanced
- About FileMaker Server
- Installing FileMaker Server
- Running FileMaker Server
- Using the Server Administration Tool
- Configuring and Administering FileMaker Server Using the SAT
- Managing Clients
- Managing Databases
- Administration from the Command Line
- Working with External Services
- Automatically Updating Plug-ins
- Scheduled Tasks
- Monitoring FileMaker Server
- Troubleshooting
- FileMaker Extra: Best Practices Checklist
FileMaker Mobile
- FileMaker Mobile
- FileMaker Mobile 8 Overview
- Using FileMaker Mobile on Your Handheld Device
- Troubleshooting
- FileMaker Extra: Publishing Related Data
Documenting Your FileMaker Solutions
- Documenting Your FileMaker Solutions
- Why Is Documentation Important?
- Developing Naming Conventions
- Using Comments Effectively
- Documenting the Relationships Graph
- Using the Database Design Report
- Using Third-Party Documentation Tools
- Putting the Finishing Touches on Your Documentation
- Final Thoughts on Documentation
- FileMaker Extra: Soliant Development Standards
EAN: 2147483647
Pages: 296
