Multiwindow Interfaces
Opening a new window for your navigation or other button elements is only the tip of the iceberg when it comes to working with multiple windows. It is possible in FileMaker 8 to strictly control multiple windowstheir positions, sizes, and titles.
The simple nuts and bolts of these features can be found in the New Window script step options. With them you can create new windows, close windows, select (bring to front) a specific window by name, adjust and resize windows, tile and cascade multiple windows at once, and control the availability of the Status Area as well.
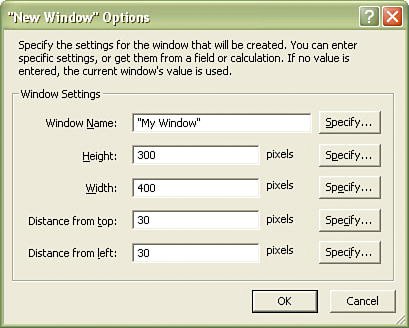
Figure 13.5 shows a simple example of the script options for the New Window script step.
Figure 13.5. This 400-pixel by 300-pixel window opens with a title of My Window and is positioned in the upper left of the screen.
The possible uses for multiple windows are quite varied:
- To view as many layouts at once as your screen real estate allows
- To create multiple List view windows of the same table, with different found sets, at once
- To use a form for editing a single record while still viewing multiple records via either List or Table view
- To create a pop-up window, similar to a dialog box
- To keep navigation, function, and other palettes off to the side of your workspace
- To view reports while not having to leave the windows/layouts in which you're working
The possible list is virtually endless. What we will present in the following sections are some common examples that should serve to demonstrate the mechanics of working with multiple windows.
Tool and Function Palettes
As discussed previously, it's possible to build a palette for navigation, functions, or any number of options for buttons in your solution. For example, you might want to present your users with a new window containing a portal of all the possible reports in their database solutionsthat also open in their own individual windows. Another idea might be to have a central control panel that allows you as a developer to unlock certain layouts, run test scripts, re-log in, view internal field data, and so on.
The only drawback to this approach is that users need to click twice to perform button actions: once to bring the window forward, into an active state, and a second time to click the chosen button.
From an implementation standpoint, this functionality is simple to deliver: Create a layout with all of your various button or control objects on it and write a script to open this window and tie it to your startup routine.
Rich Dialog Windows
Modal dialogswindows that stay open in the foreground while waiting for some action to be performed by the userare a common user interface standard that users will find familiar. Certainly the Show Custom Dialog script step will take care of some of your basic needs, but in cases in which you'd like to control the look and feel of a dialog or need more than three simple text-entry fields, you will need to turn to crafting your own window dialogs.
This technique is entirely driven by scripts. You are free to build whatever type of layout and window you'd like. The only stipulation here is that you give users a means of continuing with the process after you've brought them to a modal dialog (a Close button, for example). Your database will be in a paused state, waiting for user input. More often than not, resuming from this state is accomplished with a Continue button or, with a bit more scripting, Submit and Cancel buttons.
Cancel buttons imply that whatever action the user has taken in the modal dialog window can be undone. That can be problematic (especially if you've allowed the user to add and remove records from a portal), so be careful with the use of that term. One technique for managing the undo process is to use global fields for data entry and to populate true fields only when the user clicks Submit. Other techniques involve record-level rollbacks. (A rollback essentially undoes a transaction in a database, returning it to a previous state.)
|
To learn more about rollbacks and undo operations, see Chapter 11, "Developing for Multiuser Deployment," p. 307. |
To build a modal dialog, follow these steps:
|
1. |
Build a layout intended to act as your pop-up dialog, called Pop Up. Size it in such a way that it is smaller than a main layout that is to remain behind it. You can add whatever functions and layout objects to it that you want. The layout can be as simple as a single field, or it can be as complex as one that displays a subsummary report in preview mode. |
|
2. |
Add a Done button to your Pop Up layout. For now, attach it to its own placeholder script with just a comment. You will deal with writing the script itself later. |
|
3. |
Now place a button on your main layout. For now, create a label for it: Open. Attach it to the following script: Allow User Abort [ Off ] New Window [ Name: "Pop Up"; Height: 300; Width: 500; Top: 100; Left: 100 ] Go to Layout [ "Pop Up" (MyTable) ] Show/Hide Status Area [ Hide, Lock ] Pause/Resume Script [ Indefinitely ] |
It's important to disallow user abort; otherwise, users can close your window without performing the action you're attempting to require. It's also a good idea to lock the Status Area. Finally, you need to hold FileMaker in a paused state so that users can't perform any other action while attending to the dialog. Generally it's a bad idea to leave a script pausedusers can get stuck in limbobut in this case it is exactly the behavior you want. The script ends, leaving the user in a paused state. You need to remember that a pause state is active when performing any additional scripts or when providing other functions in your Pop Up window.
 |
For details on the caveats and pitfalls of using this technique, refer to "Modal Dialog Dangers," in the "Troubleshooting" section at the end of this chapter. |
Keep in mind that your users will still be able to run scripts that are visible in the Scripts menu or elsewhere. In solutions that use this technique, developers often opt to not set scripts to display in the Scripts menu (and to control or change any custom menu sets in use), or write their scripts such that all scripts that are visible in the Scripts menu take into account this paused state (by either refusing to run or ending gracefully so that the user's state in the modal dialog window is not disrupted).
Now return to ScriptMaker and create the Done script. You need to write whatever application logic your solution requires (for example, committing data to fields from globals, performing an evaluate function, or running a report) and end your script with this:
Close Window [ Name: "Pop Up" ]
One final element is critical. You'll notice we haven't yet dealt with the pause state. If you add a Pause/Resume script step to the Done script, FileMaker won't know that you want it to resume a currently paused script. The behavior it respects is to overlay a new pause state on top of the earlier pause state. This is entirely as it should be because this allows you to build routines with multitiered pause states.
The solution to dealing with your pause state lies with the button options attached to each button object. Select your Done button object and either right-click or navigate to the Format menu (in Layout mode) and choose the Button option. Another technique is to simply double-click the button object in Layout mode. Refer to the Current Script options shown in Figure 13.6.
Figure 13.6. Notice the rarely used Current Script option in the Button Setup dialog.
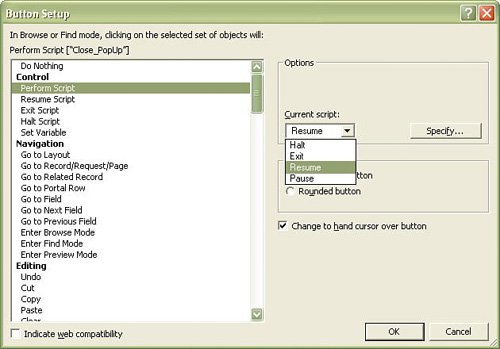
The Current Script option for the Perform Script button behavior is almost never changed. Most often its default state of pausing a currently running script while performing whatever new script is necessary will meet your needs. In this case, however, you need it to resume the current script (which will simply continue from the pause state, effectively ending it) before proceeding through the Done script and closing the pop-up window.
This then closes the pause state without creating a nested second one and allows the user back into the state of using the database solution normally. This, combined with the Close Window script step, gives the user the experience of clicking Done and seeing the window close. Clicking the Open button sends users back to the layout from which they began.
|
For another example of working with modal dialogs using script results, see "Script Results," p. 444. |
Special Effects
Other window techniques don't seem to add much more functionality to your solution, but they can certainly be fun to include for more polish (or to just show off). Calling these techniques "special effects" is probably a stretchwe hope those of you who are Flash developers will just let this section roll by for what it's worthbut many developers in the community have had some fun coming up with a few tricks you can pull off with window script steps.
Marquee Titles
Using a simple loop, you can rename the title of a window with progressively scrolling text. Use a Set Window Title script step inside a loop. Use a number increment (stored in a variable) and apply it to a Right or Left function with the text you want to display. The script looks like this:
New Window [ Height: 500; Width: 500; Top: 20; Left: 20 ]
Set Variable [ $loopCounter; 1 ]
Loop
 Exit Loop If [ $loopCounter = Length (myTable::windowTitleText) ]
 Set Window Title [ Of Window: Current Window; New Title: Middle
 ( myTable::windowTitleText; $loopCounter; $loopCounter) ]
 Set Variable [ $loopCounter; $loopCounter + 1 ]
 Commit Records/Requests [ No dialog ]
 Pause/Resume Script [ Duration (seconds): .1 ]
End Loop
Not the greatest use of computer technology ever made, but you can certainly draw attention to a warning message or alert of some kind by using it.
Expanding Windows
By using a similar looping technique, you can alter the horizontal and vertical dimensions of a window so that it appears to grow or expand onto the screen:
New Window [ Height: 500; Width: 500; Top: 20; Left: 20 ]
Set Variable [ $loopCounter; 1 ]
Loop
 Exit Loop If [ $loopCounter = 500 ]
 Move/Resize Window [ Current Window; Height: $loopCounter; Width: 500; Top: 40; Left: 40 ]
 Set Variable [$loopCounter; $loopCounter + 1 ]
 Commit Records/Requests [ No dialog ]
End Loop
This particular example is somewhat slow because it needs to loop 500 times to draw the window in question. Play with the increments in your Set Variable [$loopCounter; $loopCounter + 1 ] script step to make your window draw more quickly. You could just as easily set the width in a similar manner.
Hiding Windows
The Adjust Window script step includes an option to hide a window that does more than just minimize it: Users can access the window only from the Window menu within FileMaker. If you use a custom menu (discussed later in this chapter) to disable that menu item, you truly have the capability of hiding a window completely from a user.
Part I: Getting Started with FileMaker 8
FileMaker Overview
- FileMaker Overview
- FileMaker and Its Marketplace
- Introduction to Database Software
- FileMaker Deployment Options
- Whats New in FileMaker Pro 8
Using FileMaker Pro
- Getting Started
- Working in FileMaker Pro
- Troubleshooting
- FileMaker Extra: Becoming a FileMaker Pro Power User
Defining and Working with Fields
- Defining and Working with Fields
- Working Under the Hood
- Working with Fields
- Working with Field Types
- Assigning Field Options
- Troubleshooting
- FileMaker Extra: Indexing in FileMaker
Working with Layouts
- Working with Layouts
- Whats a Layout?
- Creating and Managing Layouts
- Working with Parts
- Working with Objects on a Layout
- Working with the Tab Control Object
- Working with Fields
- Portals
- Troubleshooting
- FileMaker Extra: Designing Cross-PlatformFriendly Layouts
Part II: Developing Solutions with FileMaker
Relational Database Design
- Relational Database Design
- Understanding Database Design
- Database Analysis
- Working with Entities and Attributes
- Understanding Relationships
- Relationship Optionality
- Understanding the Role of Keys in Database Design
- Many-to-Many Relationships: Solving the Puzzle
- The Basics of Process Analysis
- FileMaker Extra: Complex Many-to-Many Relationships
Working with Multiple Tables
- Working with Multiple Tables
- Multitable Systems in FileMaker Pro
- Creating a One-to-Many Relationship in FileMaker
- Working with Keys and Match Fields
- Understanding Table Context
- Working with Related Data
- Creating a Many-to-Many Relationship
- Relational Integrity
- Rapid Multitable Development
- Troubleshooting
- FileMaker Extra: Building a Three-Way Join
Working with Relationships
- Working with Relationships
- Relationships Graphs and ERDs
- Relationships as Queries
- Creating Self-Relationships
- Creating Ranged Relationships
- Creating Cross-Product Relationships
- Working with Data from Distant Tables
- Working with Multiple Files
- How and When to Use Multiple Files
- Troubleshooting
- FileMaker Extra: Managing the Relationships Graph
Getting Started with Calculations
- Getting Started with Calculations
- Understanding How and Where Calculations Are Used
- Exploring the Calculation Dialog Box
- Essential Functions
- Using Conditional Functions
- Aggregate Functions
- Learning About the Environment
- Troubleshooting
- FileMaker Extra: Tips for Becoming a Calculation Master
Getting Started with Scripting
- Getting Started with Scripting
- Scripts in FileMaker Pro
- Creating Scripts
- Common Scripting Topics
- Triggering Scripts
- Working with Buttons on Layouts
- Troubleshooting
- FileMaker Extra: Creating a Script Library
Getting Started with Reporting
- Getting Started with Reporting
- Deriving Meaning from Data
- Working with Lists of Data
- Summarized Reports
- Delivering Reports
- Troubleshooting
- FileMaker Extra: Incorporating Reports into the Workflow
Part III: Developer Techniques
Developing for Multiuser Deployment
- Developing for Multiuser Deployment
- Developing for Multiple Users
- Sessions in FileMaker Pro
- Concurrency
- Audit Trails in FileMaker Pro
- Launch Files
- Troubleshooting
- FileMaker Extra: Development with a Team
Implementing Security
- Approaching Security
- User-Level Internal Security
- File-Level Access Security
- Troubleshooting
- FileMaker Extra: Working with Multiple Files
Advanced Interface Techniques
- Advanced Interface Techniques
- User Interfaces in FileMaker Pro
- Navigation
- Multiwindow Interfaces
- Working with Custom Menus
- Showing/Hiding Layout Elements
- Dedicated Find Layouts
- Data Presentation
- Working with Table View
- Troubleshooting
- FileMaker Extra: User Interface Heuristics
Advanced Calculation Techniques
- Advanced Calculation Techniques
- Whats an Advanced Calculation Technique?
- Logical Functions
- Text Formatting Functions
- Array Functions
- The Filter-ing Functions
- Custom Functions
- GetNthRecord
- Troubleshooting
- FileMaker Extra: Creating a Custom Function Library
Advanced Scripting Techniques
- Advanced Scripting Techniques
- What Is Advanced Scripting?
- Script Parameters and Script Results
- Script Variables
- Window Management Techniques
- Go to Related Record
- Troubleshooting
- FileMaker Extra: Recursive Scripts
Advanced Portal Techniques
- Advanced Portal Techniques
- Portals in FileMaker Pro
- Portal Basics
- New Record Only Relationships
- Horizontal Portals
- Using Portals to Create Calendars
- Selection Portals
- Filtered Portals
- Dynamic Portal Sorting
- Troubleshooting
- FileMaker Extra: Portals and Record Locking
Debugging and Troubleshooting
- Debugging and Troubleshooting
- What Is Troubleshooting?
- Staying Out of Trouble
- Planning for Trouble
- Troubleshooting Scripts and Calculations
- Troubleshooting in Specific Areas: Performance, Context, Connectivity, and Globals
- File Maintenance and Recovery
- FileMaker Extra: Other Tools of the Trade
Converting Systems from Previous Versions of FileMaker Pro
- Converting Systems from Previous Versions of FileMaker Pro
- Migration Choices
- Converting Files
- Pre-Conversion Tasks
- Post-Conversion Tasks
- Troubleshooting
- FileMaker Extra: Converting Web-Enabled Databases
Part IV: Data Integration and Publishing
Importing Data into FileMaker Pro
- Importing Data into FileMaker Pro
- Working with External Data
- Flat-File Data Sources
- Importing Multiple Files from a Folder
- Importing Photos from a Digital Camera
- Importing from an ODBC Data Source
- Importing from an XML Data Source
- Using a Script to Import Data
- Troubleshooting
- FileMaker Extra: Exploiting the FileMaker-to-FileMaker Import
Exporting Data from FileMaker
- Exporting Data from FileMaker
- Getting Out What You Put In
- The Basic Mechanics of Exporting
- Export File Formats
- Formatting Exported Data
- Exporting Related Fields
- Exporting Grouped Data
- Exporting to Fixed-Width Formats
- Working with Large Fields and Container Fields
- Scripted Exports
- Accessing FileMaker Data Using ODBC and JDBC
- Using FileMaker Pro as an ODBC Client
- Troubleshooting
- FileMaker Extra: Accessing FileMaker Data via JDBC
Instant Web Publishing
- Instant Web Publishing
- An Overview of Instant Web Publishing
- Enabling and Configuring IWP
- Designing for IWP Deployment
- Using an IWP Solution
- Troubleshooting
- FileMaker Extra: Building Your Own Next and Previous Page Buttons
FileMaker and Web Services
- FileMaker and Web Services
- About Web Services
- FileMaker and XML
- Transforming XML
- XML Import: Understanding Web Services
- Working with Web Services
- Troubleshooting
- FileMaker Extra: Write Your Own Web Services
Custom Web Publishing
- Custom Web Publishing
- About Custom Web Publishing
- Custom Web Publishing Versus Instant Web Publishing
- Custom Web Publishing Versus XML Export
- Getting Your Databases Ready for Custom Web Publishing
- Publishing FileMaker Data as XML
- Using XSLT with Custom Web Publishing
- Building Web Applications with XSLT-CWP
- Other Custom Web Publishing Commands and Parameters
- About the FileMaker XSLT Extensions
- Troubleshooting
- FileMaker Extra: About the Custom Web Publishing Tools
Part V: Deploying a FileMaker Solution
Deploying and Extending FileMaker
- Deploying and Extending FileMaker
- FileMaker Deployment Options
- Single User
- Peer-to-Peer Hosting
- FileMaker Server
- Web Publishing
- ODBC/JDBC
- Citrix/Terminal Services
- Runtime Solutions
- Deploying to Handheld Devices
- Customized Deployment Options
- Troubleshooting
- FileMaker Extra: The Limits of Customization
FileMaker Server and Server Advanced
- FileMaker Server and Server Advanced
- About FileMaker Server
- Installing FileMaker Server
- Running FileMaker Server
- Using the Server Administration Tool
- Configuring and Administering FileMaker Server Using the SAT
- Managing Clients
- Managing Databases
- Administration from the Command Line
- Working with External Services
- Automatically Updating Plug-ins
- Scheduled Tasks
- Monitoring FileMaker Server
- Troubleshooting
- FileMaker Extra: Best Practices Checklist
FileMaker Mobile
- FileMaker Mobile
- FileMaker Mobile 8 Overview
- Using FileMaker Mobile on Your Handheld Device
- Troubleshooting
- FileMaker Extra: Publishing Related Data
Documenting Your FileMaker Solutions
- Documenting Your FileMaker Solutions
- Why Is Documentation Important?
- Developing Naming Conventions
- Using Comments Effectively
- Documenting the Relationships Graph
- Using the Database Design Report
- Using Third-Party Documentation Tools
- Putting the Finishing Touches on Your Documentation
- Final Thoughts on Documentation
- FileMaker Extra: Soliant Development Standards
EAN: 2147483647
Pages: 296
