|
FOREIGN KEY
|
Column whose value can be found as the PRIMARY KEY in table specified by REFERENCES
. (See Tip 174, "Understanding Referential Data Integrity Checks and Foreign Keys.")
For example, if you execute the CREATE TABLE statements
 CREATE TABLE item_master
 (item_number INTEGER,
 description VARCHAR(35) NOT NULL
 PRIMARY KEY (item_number))
 CREATE TABLE orders
 (order_number INTEGER UNIQUE NOT NULL,
 item_number INTEGER NOT NULL,
 quantity SMALLINT DEFAULT 1,
 item_cost DECIMAL (5, 2),
 customer_number INTEGER
 PRIMARY KEY (order_number, item_number)
 FOREIGN KEY (item_number) REFERENCES item_master)
the DBMS will create two tables, ITEM_MASTER and ORDERS. The ITEM_MASTER table has two columns, DESCRIPTION and ITEM_NUMBER. The ITEM_NUMBER is the PRIMARY KEY for the ITEM_MASTER table, meaning that each item (row) in the table will have a unique ITEM_NUMBER. Put another way, no two item descriptions will have the same item number.
The second table, ORDERS, has five columns. The PRIMARY KEY of the ORDERS table is a composite key, meaning that it is made up of two or more columns. In the current example, the PRIMARY KEY for ORDERS consists of the ORDER_NUMBER and ITEM_NUM-BER columns, meaning that the same ORDER_NUMBER (like 123, for example) may appear in several rows of the table, but each row for the same ORDER_NUMBER will have a unique ORDER_NUMBER-ITEM_NUMBER pair.
The FOREIGN KEY constraint in the ORDERS table tells the DBMS that the value in the ITEM_NUMBER column in the ORDERS table REFERENCES the PRIMARY KEY in the ITEM_MASTER table. Thus, the DBMS can take the value in the ITEM_NUMBER column and uniquely identify a single row in the ITEM_MASTER table. Moreover, the DBMS will not allow you to add a row to the ORDERS table if the ITEM_NUMBER value in the row to be inserted does not exist in the ITEM_MASTER table. Conversely, you will not be able to delete a row in the ITEM_MASTER file if its ITEM_NUMBER value exists as an ITEM_NUMBER in the ORDERS table. (You will learn more about the FOREIGN KEY constraint in Tip 174.)
From its syntax and the examples in this tip, you can see that the CREATE TABLE statement lets you define database tables. When creating a table, you give the names of the columns and the data type of each column, and specify any constraints as to the data values the columns can hold. Moreover, you can identify one of the columns or a set of columns as the PRIMARY KEY for the table, meaning that each row in the table has a unique value in the column (or set of columns) that make up the PRIMARY KEY. Finally, you can use the FOREIGN KEY constraint to identify parent/child relationships between tables. In the current example, ORDERS is the child of the ITEM_MASTER parent.
Using the MS SQL Server Enterprise Manager to Create Tables
In addition to typing CREATE TABLE statements into the MS-SQL Server Query Analyzer's Query pane or at the ISQL (or OSQL) Ready prompts, MS-SQL Server gives you a GUI tool you can use. To create a table using the Enterprise Manager, perform the following steps:
- To start the Enterprise Manager, click on the Start button, move your mouse pointer to Programs on the Start menu, select Microsoft SQL Server 7.0, and click your mouse on Enterprise Manager.
- To display the list of SQL servers, click on the plus (+) to the left of SQL Server Group.
- To display the list of resources on the SQL Server on which you wish to create a table, click on the plus (+) to the left of the SQL Server's name. For example, if you want to work with the SQL Server, NVBizNet2, click on the plus (+) to the left of NVBIZNET2. Enterprise Manager will display a list of folders that represent the resources managed by the SQL Server NVBizNet2 (in the current example).
- Click on the Database folders. The Enterprise Manager will display the databases on the SQL Server in its right pane.
- Right-click your mouse on the database in which you wish to create the table. For the current example, right-click your mouse on the SQLTips database. (If you did not create the SQLTips database, right-click your mouse on the TempDB database.) The Enterprise Manager will display a pop-up menu.
- Move your mouse pointer to New on the pop-up menu, and then select Table. Enterprise Manager will display the Choose Name dialog box.
- Enter the table name in the Enter a Name for the Table field of the Choose Name dialog box. For the current example, enter Item_Master and then click on the OK button. Enterprise Manager will display the SQL Server Enterprise Manager-New Table window shown in Figure 47.1.
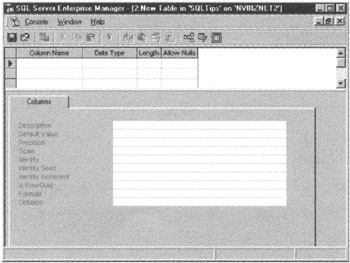
Figure 47.1: The MS-SQL Server Enterprise Manager New Table window
- Prepare to enter the first column name by clicking your mouse on the first cell in the Column Name column.
- Enter the name of the column. For the current example, enter item_number. Next, press the Enter key to move to the input cursors to the Datatype field.
- Select the field's data type. Either click on the drop-down arrow to the right of the Datatype field and select the data type, or enter the data type into the Data Type field. For the current example, enter INT. Next, press the Enter key to move to the insert cursor to the Length field.
- If you are working with a character, image, or text type, enter the length of the character. In the current example, you are working with an integer, so the Length field is not applicable. Press the Enter key to move the input cursor to the Precision field.
- If you are working with a decimal or floating-point (nonwhole) number, enter the total number of digits in the number into the Precision field. In the current example, you are working with an integer, so the precision is set to the default precision for your implementation (which you cannot change). Press the Enter key to move the input cursor to the Scale field.
- If you are working with a decimal or floating-point (nonwhole) number, enter the number of digits you want to carry to the right of the decimal point into the Scale field. In the current example, you are working with an integer, so the Scale field is not applicable. Press the Enter key to move to the Allow Nulls check box.
- To allow the field to hold a NULL value, click on the Allow Nulls check box until the check mark appears. For the current example, clear the Allow Nulls check box-every item in the ITEM_MASTER table must have an ITEM_NUMBER.
- If you want to set the column to a constant default value if you don't supply an explicit value for the column when inserting a row into the table, enter the value into the Default Value field. For the current example, leave the Default Value field blank.
- To have the DBMS supply an incrementing value for the column if you don't supply an explicit value for the column when inserting a row into the table, click on the Identity check box until the check mark appears. For the current example, click a check mark into the Identity check box-you want the system to supply the item numbers for new items you add to the ITEM_MASTER table. Then press the Enter key to move the input cursor to the Identity Seed field.
- Enter the first value the DBMS should supply for the column-applicable only if you've identified the column as having the IDENTITY property. For the current example, enter 1000. Then press the Enter key to move the input cursor to the Identity Increment field.
- Enter the value by which the DBMS is to increment the previous number it supplied for the column when inserting a new table row-applicable only if you've identified the column as having the IDENTITY property. For the current example, enter 100.
- Click on the next empty cell in the Column Name field to enter another column name.
- Repeat Steps 9-19 until you've defined all of the columns in your table. For the current example, add a second column named Description, with data type VARCHAR of length 35, which does not allow NULL values. Enterprise Manager will display your table definition similar to that shown in Figure 47.2.

Figure 47.2: The MS-SQL Server Enterprise Manager New Table window after defining two columns for the ITEM_MASTER table
- To identity a column as the PRIMARY KEY, right-click your mouse on any field in the column, and select Set Primary Key from the pop-up menu. For the current example, right-click your mouse on ITEM_NUMBER in the Column Name field, and then select Set Primary Key from the pop-up menu.
| |
Note |
If you want to use a multiple-column (composite) PRIMARY KEY, right-click your mouse on any cell in the table and select Properties from the pop-up menu. The Enterprise Manager will display the Properties dialog box. Click on the Indexes/Keys tab and select the columns you want to include in the PRIMARY KEY in the Column Name list field in the Type area of the Indexes/Keys tab. When you are finished selecting columns for the PRIMARY KEY, click on the Close button. (You will learn more about using Enterprise Manager to create indexes in Tip 162, "Understanding MS-SQL Server CREATE INDEX Statement Options.")
|
- To save your table definition, click on the Save button (first button on the left with the floppy disk icon) on the New Table standard toolbar.
- To close the MS-SQL Server Enterprise Manager New Table window, click on the close button (the X) in the upper-right corner of the application window.
You can use the CREATE TABLE statement (which you learned about in Tip 46, "Using the CREATE TABLE Statement to Create Tables") or the Enterprise Manager GUI New Table tool to create MS-SQL Server tables. Both SQL and GUI allow you to define columns, set constraints, and identify table keys. If you have MS-SQL Server Enterprise Manager installed on your computer, the method you select to create your tables is a matter of personal preference (command line vs. GUI).
Creating MS SQL Server Temporary Tables
MS-SQL Server lets you create two types of temporary tables: global and local. Local temporary tables are available only to the session in which they are created, and the DBMS automatically erases local temporary tables when the session ends. Global temporary tables are available to multiple database sessions. The DBMS drops a global temporary table after the last user using the table terminates his or her session.
Each login to the database starts a new session. As such, when you use Query Analyzer to attach to a database, you start a session. When you log off or terminate Query Analyzer, the DBMS ends your session. If you're logged in to the database, each time you execute a stored procedure or run an application program that logs in to the same or another database, the DBMS starts a new session. If you log in to the same database a second time, the DBMS keeps your original session open, but information in temporary tables created in the first session is not available to the second session.
Temporary tables are useful when you need to do several operations on the same set of data, such as creating summary reports on a subset of the data from multiple tables. By selecting and combining the raw data you need into a single table, you avoid having the DBMS extract and combine the data multiple times. In addition to eliminating multiple select operations, using a single temporary table increases execution speed because the MS-SQL Server can retrieve data faster from a single table than it can through references to multiple base tables.
To create a local temporary table, start the table name with a single pound (#) sign. As such, executing the statement
CREATE TABLE #customer_orders
 (customer_number INTEGER,
 customer_name VARCHAR (35),
 order_date DATETIME,
 amount MONEY)
will create a local temporary table. The #CUSTOMER_ORDERS table is accessible only to the person who created it. Moreover, the DBMS will automatically DROP the table when the user logs out.
If you want to create a global temporary table, start the table name with two pound (#) signs. Thus, if you want to create a temporary table that is accessible to multiple users (and sessions), use a double pound (#) sign with a CREATE TABLE statement similar to:
 CREATE TABLE ##customer_orders
 (customer_number INTEGER,
 customer_name VARCHAR (35),
 order_date DATE_TIME,
 amount MONEY)
The DBMS will not DROP the global temporary table until the last user that referenced the table during his or her session logs out.
Using the Transact SQL CREATE DEFAULT Statement to Set a Column Default
MS-SQL Server lets you create named, default values you can bind to columns and user-defined data types. Once you bind a default to a table column, the DBMS will supply the default value for the column (instead of NULL) if you insert a row that includes the column without specifying its value. The advantages of creating a default outside the CREATE TABLE statement are that you can use a descriptive name for the default, apply the same default to multiple columns in the same or different tables, and change or drop the default at any time.
The syntax of the Transact-SQL CREATE DEFAULT statement is:
 CREATE DEFAULT [.]
 AS
| |
Note |
Transact-SQL consists of Microsoft's additions to standard SQL. No commercial DBMS product fully supports everything in the SQL-92 standard. Conversely, every vendor adds its own SQL extensions (such as CREATE DEFAULT) and provides procedural language constructs. Microsoft calls its SQL and extensions and procedural language additions Transact-SQL. Oracle uses PL/SQL and SQL *Plus. While most standard SQL-92 code is transportable across DBMS products, specific product extensions (such as Transact-SQL statements) are not. If you need to use a Transact-SQL statement in an Oracle DBMS, check your system manual. You will probably find a PL/SQL statement that performs the same function but has a different name syntax.
|
Defaults you create must comply with the following rules:
- You do not have to supply the for the default. However, if you do not, the DBMS will supply your login name as the default for
- The name you use for the default () must be unique by owner.
- The must contain only constant values such as numbers, character strings, built-in functions, or mathematical expressions. The cannot include any columns or other database objects.
- After creating a default, you must use the stored procedure sp_bindefault to bind the default value to a column before the DBMS will supply the value for the column when inserting a row.
- The default must be compatible with the column to which you bind it. If you bind a character string to a numeric column, for example, the DBMS will generate an error message and not insert the row each time it has to supply the default value for the column.
- If you supply a character string default for a character column and the default is longer than the column length, the DBMS will truncate the default value to fit into the column.
- If a column has both a default and a constraint, the default value cannot violate the constraint. If a column's default value violates a column constraint, the DBMS will generate an error message and not insert the row each time it has to supply the default value for the column.
Suppose, for example, you had a table defined by
 CREATE TABLE employee
 (employee_ID INTEGER,
 first_name VARCHAR (20),
 last_name VARCHAR(30),
 social_security_number CHAR(11),
 street_address VARCHAR(35),
 health_card_number CHAR(15),
 sheriff_card_number CHAR(15)
 PRIMARY KEY (employee_ID))
and you want to supply "applied for" and "unknown" in place of NULL values if you don't know the Social Security number, health card number, or sheriff card number when adding a new employee to the EMPLOYEE table. You can create the defaults you need by executing the Transact-SQL statements:
 CREATE DEFAULT ud_value_unknown AS "Unknown"
 CREATE DEFAULT ud_applied_for AS "Applied for"
| |
Note |
You can only enter one CREATE DEFAULT statement at a time into the Query Analyzer's Query Pane, or into the ISOQL (or OSOQL) command buffer.
|
Before the DBMS will use a default, you must execute the sp_bindefault stored procedure to bind the default value to a user-defined data type or a table column. You will learn how to bind default values to a table column in Tip 50 and how to bind a default to a user-defined data type in Tip 594.
You can use the stored procedure sp_help to display a list of user and system-defined defaults. Since sp_help will display all defaults, not just the ones you create, you may want to group all of your defaults together in the list. To do so, use the same first one or two characters for the names of the defaults (such as UD_, short for USER DEFAULTS). Then, when you use sp_help to list the database defaults, the stored procedure will group all of the defaults you create together in its semi-alphabetized list of all defaults.
Using the MS SQL Server Stored Procedure sp_bindefault to Bind a User Created Default to a Table Column
As mentioned in Tip 49, "Using the Transact-SQL CREATE DEFAULT Statement to Set a Column Default," you must bind defaults to table columns so the DBMS knows which columns it is supposed to set to which default values. The syntax to use when executing the stored procedure sp_bindefault to bind a default value to a table column is
 EXEC sp_bindefault
 @DEFNAME=,
 @OBJNAME=.
where is the name you gave the default in the CREATE DEFAULT statement, and
. is the name column in the table for which you want the DBMS to supply the default value.
For example, if you executed the Transact-SQL CREATE DEFAULT statements
 CREATE DEFAULT ud_value_unknown AS "Unknown"
 CREATE DEFAULT ud_applied_for AS "Applied for"
the DBMS would store the default values UD_VALUE_UNKNOWN and UD_APPLIED_FOR in the database system tables. Once it's created, you can use the stored procedure sp_bindefault to bind the defaults to columns in tables (such as the EMPLOYEE table defined by example in Tip 49).
To bind the default ud_value_unknown ("Unknown") to the SOCIAL_SECURITY_NUMBER column in the EMPLOYEE table, execute the Transact-SQL statement:
 EXEC sp_bindefault
 @defname=ud_value_unknown,
 @objname='employee.[social_security_number]'
To bind the default ud_applied_for ("Applied For") to the SHERIFF_CARD_NUMBER column in the EMPLOYEE table, execute the Transact-SQL statement:
 EXEC sp_bindefault
 @defname=ud_applied_for,
 @objname='employee.[sheriff_card_number]'
To bind the default ud_applied_for ("Applied For") to the HEALTH_CARD_NUMBER column in the EMPLOYEE table, execute the Transact-SQL statement:
 EXEC sp_bindefault
 @defname=ud_applied_for,
 @objname='employee.[health_card_number]'
After you bind defaults to the EMPLOYEE table columns, the DBMS will supply the default value for the default-bound columns when you execute an INSERT statement on the EMPLOYEE table, such as:
 INSERT INTO employee (employee_ID, first_name, last_name)
 VALUES (1, 'Konrad', 'King')
In the current example, the DBMS will supply "Unknown" for SOCIAL_SECURITY_NUMBER, "Applied For" for SHERIFF_CARD_NUMBER and HEALTH_CARD_NUMBER, and NULL for STREET_ADDRESS.
Using the DEFAULT Clause in a CREATE TABLE Statement to Set Default Column Values
A default column value is the character string or number that you want the DBMS to enter into a column when you don't provide a value for the column. You learned how to create default column values in Tip 49, "Using the Transact-SQL CREATE DEFAULT Statement to Set a Column Default," and how to bind them to multiple columns in one or more tables in Tip 50, "Using the MS-SQL Server Stored Procedure sp_bindefault to Bind a User-Created Default to a Table Column." Unfortunately, the Transact-SQL CREATE DEFAULT statement and the sp_bindefault stored procedure are available to you only if you are working with MS-SQL Server.
The standard SQL-92 CREATE TABLE statement (available on all SQL relational DBMS products) gives you the ability to define default values for columns when you create a table. Not only is setting default column values standard across DBMS products, but it is also simpler than the Transact-SQL default value creation and binding process.
To define a column default value, simply add the keyword DEFAULT followed by the default value to the column definition in a CREATE TABLE statement. For example, the SQL CREATE TABLE statement
 CREATE TABLE employee
 (employee_ID INTEGER,
 first_name VARCHAR(20) NOT NULL,
 last_name VARCHAR(30) NOT NULL,
 social_security_number CHAR(11) DEFAULT 'Unknown',
 street_address VARCHAR(35) DEFAULT 'Unknown',
 health_card_number CHAR(15) DEFAULT 'Applied For',
 sheriff_card_number CHAR(15) DEFAULT 'Applied For',
 hourly_rate NUMERIC(5,2) DEFAULT 10.00,
 bonus_level INTEGER DEFAULT 1,
 job_rating_90days SMALLINT,
 job_rating_180days SMALLINT,
 job_rating_1year SMALLINT
 PRIMARY KEY (employee_ID))
defines default values for SOCIAL_SECURITY_NUMBER, STREET_ADDRESS, HEALTH_CARD_NUMBER, SHERIFF_CARD_NUMBER, HOURLY_RATE, and BONUS_LEVEL. As such, when you execute the SQL INSERT statement
 INSERT INTO employee
 (employee_ID, first_name, last_name,
 social_security_number, street_address)
 VALUES (1, 'Konrad', 'King', NULL, '77 Sunset Strip')
the DBMS will set the HEALTH_CARD_NUMBER and SHERIFF_CARD_NUMBER columns to "Applied For," the HOURLY_RATE column to 10.00, and the BONUS_LEVEL column to 1. Although the SOCIAL_SECURITY_NUMBER and STREET_ADDRESS columns have defaults, the default values were not used for the columns since the INSERT statement set the SOCIAL_SECURITY_NUMBER column to NULL and the STREET_ADDRESS column to "77 Sunset Strip." Finally, since the CREATE TABLE in the current example, did not define default values for the three job rating columns (JOB_RATING_90DAYS, JOB_RATING_180DAYS, and JOB_RATING_1YEAR), the DBMS will set these columns to NULL.
| |
Note |
Before you set column default values in the CREATE TABLE statement, check to see if your DBMS will allow you to change or stop using the defaults after you've created the table. MS-SQL Server will not let you use the ALTER TABLE statement to add, change, or drop (remove) any column defaults you define in a CREATE TABLE statement. (You can use the ALTER TABLE statement to add a new column and assign a default value to the column. However, once the column is part of a table, you cannot change its default value). If you are using MS-SQL Server, you can get around this shortcoming by using the Transact-SQL CREATE DEFAULT statement to create a named column default object outside the table definition. MS-SQL Server lets you bind a name column default to a column using the sp_bindefault stored procedure. You can change the value of a named column default at any time by unbinding the default from all columns, dropping it, re-creating the column default with a new value, and then rebinding it to the columns in one or more tables.
|
Using the MS SQL Server Enterprise Manager to Create a Default for a User Defined Data Type or Table Column
As usual, MS-SQL Server has both a command-line Transact-SQL statement way to create a default (which you learned about in Tip 49, "Using the Transact-SQL CREATE DEFAULT Statement to Set a Column Default") and a GUI method using the MS-SQL Server Enterprise Manager. The advantages of creating a default outside the CREATE TABLE statement are that you can give the default a meaningful name, use it for user-defined data types or multiple columns in one or more tables, change the default value at any time, or stop using it altogether.
To create a default using the MS-SQL Server Enterprise Manager, perform the following steps:
- To start the Enterprise Manager, click your mouse on the Start button, move your mouse pointer to Programs on the Start menu, select Microsoft SQL Server 7.0, and click your mouse on Enterprise Manager.
- To display the list of SQL servers, click your mouse on the plus (+) to the left of SQL Server Group.
- To display the list of resources on the SQL Server with the database in which you wish to create the default, click your mouse on the plus (+) to the left of the SQL Server's name. For example, if you want to work with the SQL Server NVBizNet2, click your mouse on the plus (+) to the left of NVBizNet2. Enterprise Manager will display a list of folders that represent the resources managed by the SQL Server, NVBizNet2 (in the current example).
- Click your mouse on the Databases folder. The Enterprise Manager will display the databases on the SQL Server in its right pane.
- Click your mouse on the icon for the database in which you wish to create the default. For the current example, click your mouse on SQLTips (if you created the database in Tip 41). (If you don't have an SQLTips database, click your mouse on Northwind, the example database.)
- Select the Action menu New option, and click your mouse on Default. The Enterprise Manager will display a Default Properties dialog box similar to that shown in Figure 52.1.
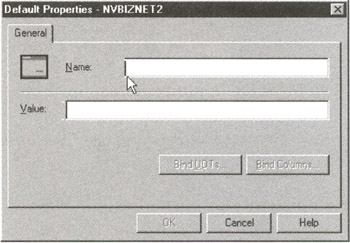
Figure 52.1: The Enterprise Manager Default Properties dialog box
- Enter the name of the default into the Name field. For the current example, enter ud_minimum_wage and then press the Tab key.
- Enter the default value into the Value field. You can enter either a number, a character string, a built-in function, or a mathematical expression. The value cannot include any columns or other database objects. For the current example, enter 7.35 into the Value field.
- Click your mouse on the OK button. The Enterprise Manager will add the UD_MINIMUM_WAGE default definition to the system tables and close the Default Properties dialog box.
As you learned in Tip 51, "Using the DEFAULT Clause in a CREATE TABLE Statement to Set Default Column Values," you must bind the default value to a column or user-defined data type in order for the DBMS to actually use the default you created. In Tip 51, you used the stored procedure sp_bindefault to bind a default to a table column. In Tip 54, "Using the MS-SQL Server Enterprise Manager to Bind a Default to a Data Type or Table Column," you will learn how to use the Enterprise Manager to bind a default to a user-defined data type and a table column.
Using the MS SQL Server Enterprise Manager to Create a User Defined Data Type
You learned about SQL data types in Tips 21–26, and you used them when you learned to create a table in Tip 46, "Using the CREATE TABLE Statement to Create Tables." As you now know, each table column must have a data type that defines the type of data you can put into the column. For example, if a column is of type INTEGER, you can store only whole numbers—characters and numbers with a decimal point are not allowed. Similarly, when you define a column as being of type CHAR(10), you know that it can hold up to 10 characters, symbols, or numeric digits.
A user-defined data type lets you use one of the standard SQL data types or domain you've created to define a descriptive name for the type of data a user will find in a column you define as being of that (user-defined) data type. Suppose, for example, that you were working with the REGULAR_PAY_RATE column in an EMPLOYEE table; you could define the column's data type as NUMERIC(5,2), or you could use a more descriptive user-defined data type such as HOURLY_PAY_RATE.
To use Enterprise Manager to create a user-defined data type, perform the following steps:
- To start the Enterprise Manager, click your mouse on the Start button, move your mouse pointer to Programs on the Start menu, select Microsoft SQL Server 7.0, and click your mouse on Enterprise Manager.
- To display the list of SQL servers, click your mouse on the plus (+) to the left of SQL Server Group.
- To display the list of resources on the SQL Server with the database in which you wish to create the data type, click your mouse on the plus (+) to the left of the SQL Server's name. For example, if you want to work with the SQL Server NVBizNet2, click your mouse on the plus (+) to the left of NVBIZNET2. Enterprise Manager will display a list of folders that represent the resources managed by the SQL Server NVBizNet2 (in the current example).
- Click your mouse on the plus (+) to the left of the Databases folder. The Enterprise Manager will expand the server list to show the list of databases on the SQL Server you selected in Step 3.
- Click your mouse on the plus (+) to the left of the database in which you wish to create the data type. For the current example, click your mouse on the plus (+) to the left of SQLTips (if you created the database in Tip 41, "Using the CREATE DATABASE Statement to Create an MS-SQL Server Database and Transaction Log"). (If you don't have an SQLTips database, click your mouse on the plus (+) to the left of Northwind, the example database.) Enterprise Manager will display a list of database object types.
- Click your mouse on User-Defined Data Types. Enterprise Manager will display the existing user-defined data types in the right pane of the application window.
- Select the Action menu New User-Defined Data Type option. The Enterprise Manager will display a User-Defined Data Type Properties dialog box similar to that shown in Figure 53.1.

Figure 53.1: The Enterprise Manager User-Defined Data Type Properties dialog box
- Enter the name of the data type into the Name field. For the current example, enter hourly_pay_rate.
- Click your mouse on the drop-down list button to the right of the Data Type field to list the available SQL data types and select one for your user-defined data type. (Your are not actually creating a new data type. Rather, you are simply applying a descriptive name to an existing SQL data type.) For the current example, select money.
- If you want to allow NULL values for columns of your user-defined data type, click your mouse on the All NULLS check box until the check mark appears. For the current example, click your mouse on the check box until the check mark appears—you want to allow a NULL value for the hourly pay rate if the employee is salaried or gets paid only on commission.
- If you want to use a database rule to apply a constraint to limit the values a user can enter into columns defined as being of the data type you are defining, use the drop-down list button to the right of the Rule field to display the list of database rules and select the one you want. (You will learn how to create Rules in Tip 195, "Using the Transact-SQL CREATE RULE Statement to Create an MS-SQL Server Rule.") For the current example, select (none).
- If you want the DBMS to supply a default value when a user does not provide a value when inserting rows that include columns defined as being of the data type you are defining, use the drop-down list button to the right of the Default Name field to display the list of defined defaults, and select the one you want. For the current example, select (none).
- Click your mouse on the OK button.
After you complete Step 13, the Enterprise Manager will store your data type definition in the DBMS system tables. You can then use the data type you defined in the database anywhere you can use a standard SQL data type. In the current example, the SQL statement
 CREATE TABLE employee
 (id INTEGER,
 name VARCHAR(35),
 regular_pay_rate hourly_pay_rate)
would be valid once you performed the steps to create the HOURLY_PAY_RATE data type.
| |
Note |
User-defined data type names in a database must be unique by owner and must be defined in the database in which you want to use them. For example, if you define HOURLY_PAY_RATE in the SQLTips database, you must also define it in the Northwind database if you want to use HOURLY_PAY_RATE as a data type for columns in both SQLTips database tables and Northwind database tables.
|
Using the MS SQL Server Enterprise Manager to Bind a Default to a Data Type or Table Column
Before MS-SQL Server will use a default value you've created, you must bind the default to a table column or a user-defined data type. In Tip 50, "Using the MS-SQL Server Stored Procedure sp_bindefault to Bind a User-Created Default to a Table Column," you learned how to use the stored procedure sp_bindefault to bind a default to a table column. In this tip, you will learn how to use the Enterprise Manager.
To use Enterprise Manager to bind a default to a table column, perform the following steps:
- To start the Enterprise Manager, click your mouse on the Start button, move your mouse pointer to Programs on the Start menu, select Microsoft SQL Server 7.0, and click your mouse on Enterprise Manager.
- To display the list of SQL Servers, click your mouse on the plus (+) to the left of SQL Server Group.
- To display the list of resources on the SQL Server with the database in which you wish to bind the default to a column, click your mouse on the plus (+) to the left of the SQL Server's name. For example, if you want to work with the SQL Server NVBizNet2, click your mouse on the plus (+) to the left of NVBizNet2. Enterprise Manager will display a list of folders that represent the resources managed by the SQL Server NVBizNet2 (in the current example).
- Click your mouse on the plus (+) to the left of the Databases folder. The Enterprise Manager will expand the database branch of the SQL Server list to show the list of databases on the SQL Server you selected in Step 3.
- Click your mouse on the plus (+) to the left of the database in which you wish to bind the default. For the current example, click your mouse on the plus (+) to the left of SQLTips (if you created the database in Tip 41, "Using the CREATE DATABASE Statement to Create an MS-SQL Server Database and Transaction Log"). (If you don't have an SQLTips database, click your mouse on the plus (+) to the left of Northwind, the example database.) Enterprise Manager will display a list of database object types.
- Click your mouse on the Defaults icon in the list of database object types. Enterprise Manager will use its right pane to display the list of user-defined defaults in the database you selected in Step 5, similar to that shown in Figure 54.1.
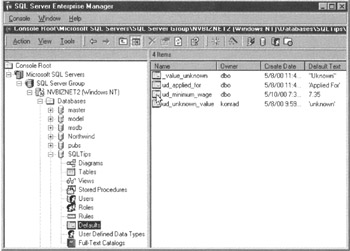
Figure 54.1: The Enterprise Manager application window displaying the user-defined defaults for a database
- Double-click your mouse on the name of the default you want to bind to a table column. For the current example, double-click your mouse on ud_minimum_wage (if you created the UD_MINIMUM_WAGE default in Tip 52, "Using the MS-SQL Server Enterprise Manager to Create a Default for a User-Defined Data Type or Table Column"). Enterprise Manager will display a Default Properties dialog box similar to that shown in Figure 54.2.
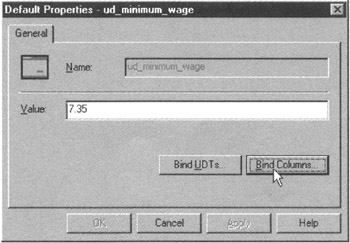
Figure 54.2: The Default Properties dialog box after selecting the UD_MINIMUM_WAGE default
- Click your mouse on the Bind Columns button. Enterprise Manager will display a Bind Default to Columns dialog box similar to that shown in Figure 54.3.
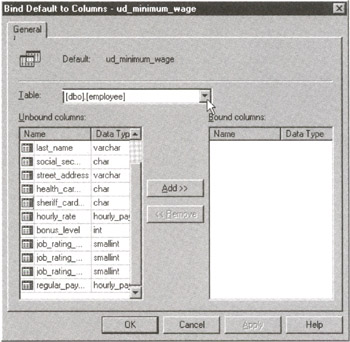
Figure 54.3: The Bind Default to Columns dialog box
- Click your mouse on the drop-down list button to the right of the Table field to display the list of tables in the database. Click your mouse on the table with the column to which you want to bind a default. For the current example, click your mouse on the EMPLOYEE table. Enterprise Manager will display a list of the table's columns in the Unbound columns list.
- Find the column to which you wish to bind the default in the Unbound defaults list along the lower-left side of the Bind Default to Columns dialog box, and click your mouse on it. For the current example, click your mouse on REGULAR_PAY_RATE.
- Click your mouse on the ADD button. Enterprise Manager will add the REGULAR_PAY_RATE column to the Bound columns list. (Since the left list shows only unbound columns, you will see that Enterprise Manager removed REGULAR_PAY_RATE from the Unbound columns list when it placed the column name in the Bound columns list.)
- Click your mouse on the OK button. Enterprise Manager will return to the Default Properties dialog box.
After you complete Step 12, Enterprise Manager will note your default bindings in the database system tables. The DBMS will then set the column to the default value whenever a user adds a row to the table without giving the value of the column to which you've bound a default.
If you later decide that you no longer want the DBMS to supply a default for a particular column execute the stored procedure sp_unbindefault, or perform Steps 1–9 of the procedure to bind a default to a column. Then, instead of selecting an unbound column in Step 10, select the column you want to unbind from the Bound columns list in the lower-right side of the Bind Default to Columns dialog box. Next, in Step 11, click your mouse on the Remove button. Finally, finish unbinding the default by clicking on the OK button in Step 12.
In addition to binding defaults to table columns, you can also bind a default to a user-defined data type. Once you do so, the DBMS will supply the default value instead of NULL whenever a user does not supply a value for a table column defined as being of the data type to which you've bound the default.
For example, to bind the UD_MINIMUM_WAGE default to the HOURLY_PAY_RATE data type you defined in Tip 53, "Using the MS-SQL Server Enterprise Manager to Create a User-Defined Data Type," perform the following steps:
| |
Note |
If you exited the Default Properties dialog box or did not perform the bind default procedure at the beginning of this tip, perform Steps 1–7 of the bind defaults procedure, as necessary, to display the Default Properties dialog box.
|
- Click your mouse on the Bind UDTs button on the Default Properties dialog box. Enterprise Manager will display defaults you've defined in a Bind Default to User-Defined Data Types dialog box similar to that shown in Figure 54.4.
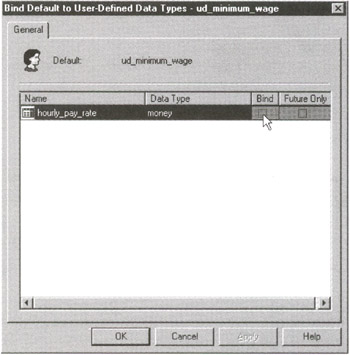
Figure 54.4: The Bind Default to User-Defined Data Types dialog box
- Find the data type to which you wish to bind the default, and click your mouse on the check box in the Bind column until the check mark appears. For the current example, click your mouse on the check box to the right of the HOURLY_PAY_RATE data type (if you created it in Tip 53).
- If you want a default value bound only to future columns defined as being of the data type to which you are binding the default, click your mouse on the Future Only check box until the check mark appears. For the current example, leave the Future Only check box clear—the DBMS will then use the default both for columns already declared as being of the HOURLY_PAY_RATE data type as well as those for you will define as being of the data type in the future.
- Click your mouse on the OK button. Enterprise Manager will note your default bindings in the DBMS system tables and return to the Default Properties dialog box.
If you later decide you that you no longer want the DBMS to supply a default for a particular columns defined as a specific user-defined data type to which you've bound a default, you can execute the stored procedure sp_unbindefault (which you will learn about in Tip 650), or return to the User-Defined Data Types dialog box and clear the Bind check box for the user-defined data type.
When you unbind a default from a data type, you must decide whether or not you want the default to remain bound to existing columns of the data type. If you click a check mark into the Future Only check box, the DBMS will continue supplying the default value for existing columns of the user-defined data type. If you clear the Future Only check box, the DBMS will supply NULL (stop supplying the default value) for both existing columns of the data type and any that you create in the future.
To return to the Enterprise Manager application window, click your mouse on the OK button on the Default Properties dialog box.
Using the Transact SQL DROP DEFAULT Statement to Remove a Default from a Database
When you no longer need a default you've created, you can use the Transact-SQL DROP DEFAULT statement to permanently remove the default from the database in which you created it. The syntax of the DROP DEFAULT statement is
DROP DEFAULT
 {, , ... ,]
where the is the name you gave the default when you defined it. As you can see from the syntax of the statement, you can drop multiple defaults with a single DROP DEFAULT.
In Tip 49, "Using the Transact-SQL CREATE DEFAULT Statement to Set a Column Default," you used the Transact-SQL statements
 CREATE DEFAULT ud_value_unknown AS "Unknown"
 CREATE DEFAULT ud_applied_for AS "Applied for"
to create two defaults: UD_VALUE_UNKNOWN and UD_APPLIED_FOR. If you no longer need these defaults, execute the Transact-SQL statement
DROP DEFAULT ud_value_unknown, ud_applied_for
to remove them from the database.
One important thing to know is that you cannot drop a default that is currently bound to either columns or user-defined data types. You must first use either the Enterprise Manager or the stored procedure sp_unbindefault to unbind the default from all columns and user-defined data types. Once you've completely unbound the default, you can remove it from the database.
If you create and use defaults, it is essential that you keep an accurate list of them and (perhaps more importantly) the columns and user-defined data types to which they are bound. Unfortunately, the error message the DBMS returns if you try to drop a column with a bound default states only the error and does not identify the bindings that caused it. For example, if you execute the statement
DROP DEFAULT ud_applied_for
and UD_APPLIED_FOR is bound to a column or data type, the statement will fail and the DBMS will display the error message:
 The default 'ud_applied_for' cannot be dropped because it
 is bound to one or more column.
To successfully execute the DROP DEFAULT statement, you will need to run the stored procedure sp_unbindefault. However, sp_unbindefault requires that you supply both the table and the column name in order to unbind a default. Moreover, MS-SQL Server does not have a stored procedure that will list the columns to which a default is bound, so you will need to refer to your documentation.
If you don't have a list of bindings for the default you want to remove, or if you prefer to use a GUI tool, you can use the MS-SQL Server Enterprise Manager to unbind and drop a default. First, perform the first eight steps of the bind default procedure in Tip 54, "Using the MS-SQL Server Enterprise Manager to Bind a Default to a Data Type or Table Column." After you complete Step 8, the DBMS will display the Bind Default to Columns dialog box (refer to Figure 54.3, in Tip 54).
Once you have the Bind Default to Columns dialog box on your screen, perform the following steps to unbind the default:
- To find a table with one or more bindings to the default you want to remove, click your mouse on the drop-down list box to the right of the Table field. Enterprise Manager will display the list of database tables in the drop-down list box.
- If you know the name of the table you want, select it from the drop-down list. (If you don't know the table you want, you will have to select each of the tables in the database, one at a time.) The Enterprise Manager will display the table columns bound to your default in the Bound Columns list,
- To unbind the default from a column, click your mouse on the column name in the Bound Columns list, and then click your mouse on the Remove button.
- Repeat Step 3 until you've removed all of the column names from the Bound Columns list.
- If your documentation lists other tables to which the default is bound (or if you don't have documentation and you have not made it through the list of database tables), click your mouse on the Apply button and then continue at Step 3 to select the next table with which you want to work.
- When you are finished unbinding the default from table columns, click your mouse on the OK button. Enterprise Manager will return to the Default Properties dialog box (similar to that shown in Figure 54.2, in Tip 54).
- Click your mouse on the OK button. Enterprise Manager will return to its application window with defaults displayed in the right pane, similar to that shown in Figure 54.1, in Tip 54.
Now that you've unbound the default, you can perform the following steps to delete (drop) the default:
- To select the default you want to delete (drop), click your mouse on the name of the default in the list of defaults in the right pane of the Enterprise Manager's application window.
- To delete the default, click your mouse on the Delete button (the red X) on the Standard Toolbar (or select the Action menu Delete option). Enterprise Manager will display the name, owner, and type of the default you selected in the Drop Objects dialog box.
- Click your mouse on the Drop All button.
To exit Enterprise Manager, click on the application window's close button (the X in the upper-right corner), or select the Console menu Exit option.
Understanding the ALTER TABLE Statement
No amount of prior planning completely eliminates the need for changing the structure of tables over the course of time. This is not to say that you should spend little time designing tables because they are going to change anyway. Quite the opposite—the more time you spend on design and deciding exactly what data goes in what tables, the less time you will spend later changing your tables and trying to input several months' worth of information that you initially omitted from the database.
That being said, changes to database tables, like changes in life, are inevitable. Perhaps you created your customer table before everyone had an e-mail address (yes, that was not too many years ago). So, now you need to add not only an e-mail address but also a Web (home page) address to the customer record. Or, maybe your company no longer accepts back orders. As such, your inventory table now needs a "minimum_stock_level" column so the DBMS can alert you to order parts from your supplier before you run out and can't take a customer's order. Finally, suppose that your company expands its product line and now makes purchases from multiple vendors. You may need to add a foreign key linking a new "vendor" column in the item master table to a newly created vendors table. None of these changes are necessitated by poor design. The database tables must change because the entities they represent (the business, business rules, and relationships) do not remain constant.
Fortunately, the SQL ALTER TABLE statement allows you to:
- Add a column to a table
- Drop a column from a table
- Change or drop a column's default value
- Add or drop individual column constraints
- Change the data type of a column
- Add or drop a table's primary key
- Add or drop foreign keys
- Add or drop table check constraints
The syntax of the ALTER TABLE statement is:
 ALTER TABLE
 {ADD }
 {[WITH CHECK | WITH NO CHECK] ADD
} {ALTER COLUMN [(precision,scale)][NULL | NOT NULL]} {DROP COLUMN [,...,} {CHECK | NO CHECK CONSTRAINT [ALL | [,...,]} {ENABLE | DISABLE TRIGGER [ALL | [,...,]} is defined as: [IDENTITY [(seed,increment)]|[NOT NULL] [DEFAULT ]][UNIQUE] [] is defined as: CHECK ()
is defined as: [CONSTRAINT ] | | DEFAULT FOR | CHECK () is defined as: PRIMARY KEY ( [, ]) is defined as: FOREIGN KEY () REFERENCES
| |
Note |
Do not include the ellipses ({}) in your ALTER TABLE statement. The ellipses delineate the different forms of the ALTER TABLE statement, and you must select one (and only one) of the forms per statement. Thus,
ALTER TABLE ADD
is one valid choice, as is this
 ALTER COLUMN
 [(precision,scale)][NULL | NOT NULL]
and so on.
Also, do not put the pipe ( I ) symbol in your ALTER TABLE statement. The pipe symbol indicates "or," meaning you must select one clause or another. As such, when specifying a table constraint, either define a primary key, a foreign key, a default, or a check constrain, but not all four.
SQL ALTER TABLE statement clauses tend to be very DBMS-specific. All products allow you to add columns. However, not all products let you drop columns. (Using the ALTER STATEMENT to drop a column is not part of the SQL-92 specification.) Some products allow you to add and drop individual column constraints on existing columns; others, including MS-SQL Server, do not.
In short, each DBMS vendor adds what it considers to be important features to the ALTER TABLE statement and removes those clauses more easily implemented with other vendor-specific constructs. MS-SQL Server, for example, does not let you use the ALTER TABLE statement to change defaults on or add defaults to existing columns, even though other DBMS vendors do. Instead, MS-SQL Server, through Transact-SQL and stored procedures, provides CREATE DEFAULT, sp_bindefault, sp_unbindefault, and DROP DEFAULT to manage column default apart from the ALTER TABLE statement.
We will discuss many of the ALTER TABLE clauses later in this book. The important thing to know is that every DBMS has an ALTER TABLE statement you can use to change a table's structure. Check your DBMS documentation for the specific clauses available to the ALTER TABLE statement in your DBMS product.
Using the ALTER TABLE Statement to Add a Column to a Table
Adding a column to a table is perhaps the most common use of the ALTER TABLE statement. The syntax of the ALTER TABLE statement to add a column is:
 ALTER TABLE
 ADD   [DEFAULT ]
 [NOT NULL] [IDENTITY][UNIQUE][CHECK ()]
For example, to add a BADGE_NUMBER column to an EMPLOYEE table defined by
 CREATE TABLE employee
 (employee_id INTEGER,
 first_name VARCHAR(20),
 last_name VARCHAR(30),
 social_security_number CHAR(11),
 street_address VARCHAR(35)
 PRIMARY KEY (employee_id))
you could use the ALTER TABLE statement:
ALTER TABLE employee ADD badge_number INTEGER IDENTITY
The DBMS will add a new column, BADGE NUMBER, to the EMPLOYEE table. In addition (MS-SQL Server only), IDENTITY characteristic in the current example will have MS-SQL Server set the value of the BADGE_NUMBER column in each row, starting with 1 and incrementing the value by 1 for each subsequent row.
When you use the ALTER TABLE statement to add a new column to a table, the DBMS adds the column to the end of the table's column definitions, and it will appear as the rightmost column in subsequent queries. Unless you specify a default value (or use the IDENTITY constraint on MS-SQL Server), the DBMS assumes NULL for the value of the new column in existing rows.
Since the DBMS assumes NULL for the new column in existing rows, you cannot simply add the NOT NULL constraint when you use the ALTER TABLE statement to add a column. If you add the NOT NULL constraint, you must also provide a default. After all, the DBMS assumes NULL for the new column in existing rows if you don't provide a default value, and thus would immediately violate the NOT NULL constraint.
When you add column to a table, the DBMS does not actually expand existing rows. Instead, it expands only the description of the table to include the new column(s) in the system tables. Each time you ask the DBMS to read an existing row, it adds one (or more) NULL values for the new column(s) before presenting query results. The DBMS will add the new column(s) to new rows and to any existing rows as the DBMS stores updates to them.
Using the MS SQL Server ALTER TABLE DROP COLUMN Clause to Remove a Table Column
The SQL-92 standard does not specify a DROP COLUMN clause as part of the ALTER TABLE statement. As a result, some DBMS products require that you unload data from the table, use the DROP TABLE statement to erase the table, execute the CREATE TABLE statement to re-create the table without the column you want to drop, and then reload the data you unloaded before dropping the table. (Given the steps involved, you might be tempted to just ignore the column you want to drop.)
Fortunately, MS-SQL Server provides a DROP COLUMN clause as part of its ALTER TABLE statement. The syntax for dropping a column is:
ALTER TABLE
DROP COLUMN [,...,
Thus, to drop columns from an EMPLOYEE table defined by
CREATE TABLE employee
 (employee_id INTEGER,
 first_name VARCHAR(20),
 last_name VARCHAR(30),
 social_security_number CHAR(11),
 street_address VARCHAR(35),
 health_card_number CHAR(15),
 sheriff_card_number CHAR(15),
 badge_number IDENTITY(100,100)
 PRIMARY KEY (employee_id))
you could use the ALTER TABLE statement
 ALTER TABLE employee
 DROP COLUMN health_card_number, sheriff_card_number
to drop the HEALTH_CARD_NUMBER and SHERIFF_CARD_NUMBER columns.
MS-SQL Server will prevent you from dropping a column to which a constraint or default value is assigned. Moreover, you cannot drop a column identified as a FOREIGN KEY in another table. For example, if you attempt to drop the EMPLOYEE_ID from the EMPLOYEE table, MS-SQL Server will respond with the error message
 Server: Msg 4922, Level 16, State 3, Line 1
 ALTER TABLE DROP COLUMN employee_id failed because PRIMARY
 KEY CONSTRAINT PK__employee__6E01572D access this column.
and the ALTER TABLE statement will fail.
In order to drop a column with a default value or constraint, you must first drop the constraint using an ALTER TABLE statement in the form:
ALTER TABLE
DROP CONSTRAINT
In the current example, the CREATE TABLE statement did not specify a name for the PRIMARY KEY constraint on the EMPLOYEE_ID column of the EMPLOYEE table. As a result, the DBMS created the unique constraint name PK_employee_6E01572D for the PRIMARY KEY constraint. Thus, in order to remove the PRIMARY KEY constraint from the EMPLOYEE table in the example, use the Transact-SQL statement:
| |
Note |
The name the DBMS assigns to an unnamed constraint will differ each time you create a constraint, even if you drop and respecify the same constraint. Also, when dropping a constraint with a DBMS-generated name, be sure to note and use double (vs. single) underscores (__) in the constraint name.
|
If you want to drop a column that is a FOREIGN KEY in another table, you must first use the ALTER TABLE statement to drop the FOREIGN KEY reference in the other table, and then you drop the column in the current table. (You will learn more about using the ALTER TABLE statement to work with FOREIGN KEY constraints in Tip 60.)
Using the ALTER TABLE Statement to Change to Width or Data Type of a Column
Unlike many DBMS products, MS-SQL Server allows you to change not only the width of a column but also its data type. There are, however, a few restrictions on data type changes. You cannot change the data type of a column if the column:
- Is of type TEXT, IMAGE, NTEXT, or TIMESTAMP
- Is part of an index, unless the original data type is VARCHAR or VARBINARY and you are not changing the original data type or making the column width shorter
- Is part of a PRIMARY KEY or FOREIGN KEY
- Is used in a CHECK constraint
- Is used in a UNIQUE constraint
- Has a default associate with it
- Is replicated
- Is computed or used in a computed column
When changing a column's data type, all of the existing data in the column must be compatible with the new data type. As such, you can always convert from INTEGER to character since a CHARACTER column can hold numeric digits, letters, and special symbols. However, when converting a CHARACTER column to INTEGER, you must ensure that every row of the table has numeric digits or NULL in the CHARACTER field you are converting.
Once you've identified the column as one whose type you can change, use the ALTER TABLE statement in the form
 ALTER TABLE
 ALTER COLUMN
to change the width or data type of a column. For example, if you have an EMPLOYEE table defined by
 CREATE TABLE employee
 (employee_id INTEGER,
 first_name VARCHAR(20),
 last_name VARCHAR(30),
 social_security_number CHAR(11),
 street_address CHAR(30),
 health_card_number CHAR(15),
 sheriff_card_number CHAR(15),
 PRIMARY KEY (employee_id))
you can use the ALTER TABLE statement
 ALTER TABLE employee
 ALTER COLUMN street_address CHAR(35)
to change the width of the STREET_ADDRESS column from CHAR(30) to CHAR(35).
You can also use the ALTER TABLE statement to change a column's data type. For example, to change the HEALTH_CARD_NUMBER from CHAR(15) to INTEGER, use the ALTER TABLE statement:
 ALTER TABLE employee
 ALTER COLUMN health_card_number INTEGER
When converting a column from one data type to another, remember that all of the existing data in the column must be compatible with the new data type. Thus, the conversion of HEALTH_CARD_NUMBER from character to integer will work only if all of the current health card numbers are NULL or if they are all composed of only digits. As such, if any health card number includes a non-numeric character, the ALTER TABLE statement converting the column's data type from CHARACTER to INTEGER will fail.
Using the ALTER TABLE Statement to Change Primary and Foreign Keys
In addition to changing the width and data type of a column, you can use the ALTER TABLE statement to add table constraints such as a PRIMARY KEY and FOREIGN KEY. Tip 61, "Using the CREATE TABLE Statement to Assign the Primary Key," and Tip 62, "Using the CREATE TABLE Statement to Assign Foreign Key Constraints," will show you how to define keys as part of the CREATE TABLE statement when creating a new database table. For existing tables, use the ALTER TABLE statement to add named and unnamed PRIMARY KEY and FOREIGN KEY constraints.
Both PRIMARY KEY and FOREIGN KEY constraints are database "keys," which means that each is a column or a combination of columns that uniquely identifies a row in a table. While a PRIMARY key uniquely identifies a row in the table in which it is defined, a FOREIGN KEY uniquely identifies a row in another table. (A FOREIGN KEY in one table always references the PRIMARY key in another table.)
A table can have only one PRIMARY KEY, but it can have several FOREIGN KEYS. While the value of the column or combination of columns that makes up a PRIMARY key must be unique for each row in the table, the value of the column or combination of columns that makes up a FOREIGN KEY need not be (and most likely are not) unique within the table in which the FOREIGN KEY is defined.
You will learn more about the PRIMARY KEY constraint in Tip 172, "Using the PRIMARY KEY Column Constraint to Uniquely Identify Rows in a Table," and the FOREIGN KEY constraints in Tip 173, "Understanding Foreign Keys."
The syntax for using the ALTER TABLE statement to add a PRIMARY KEY constraint to a table is:
ALTER TABLE
ADD CONSTRAINT PRIMARY KEY ( [,...,])
Therefore if you have a table created by
CREATE TABLE employee
 (employee_id INTEGER NOT NULL,
 badge_number SMALLINT NOT NULL,
 first_name VARCHAR(20),
 last_name VARCHAR(30))
you can add a single column PRIMARY KEY based on the EMPLOYEE_ID using the statement:
 ALTER TABLE employee
 ADD CONSTRAINT pk_employee PRIMARY KEY (employee_id)
If the values in a single column are not unique in each row of the table, but the values in a combination of columns are, you must use a composite, or multi-column PRIMARY KEY. Suppose, for example, that you had an EMPLOYEE table where two employees could have the same employee number, but no two employees with the same employee number would have the same badge number. To add the PRIMARY KEY to the table, use the ALTER TABLE statement
 ALTER TABLE employee
 ADD CONSTRAINT pk_employee
 PRIMARY KEY (employee_id,badge_number)
to combine EMPLOYEE_ID and BADGE_NUMBER into a single, unique key value for each row of the table.
| |
Note |
Since a table can have only one PRIMARY KEY, you just first use the ALTER TABLE statement
ALTER TABLE DROP CONSTRAINT
if you want to change a table's PRIMARY KEY. In other words, you must remove a table's existing PRIMARY KEY before you can use the ALTER TABLE statement to add a new PRIMARY KEY constraint to the table.
Adding FOREIGN KEY constraints to a table is similar to defining the PRIMARY KEY. However, when working with a FOREIGN KEY, you must identity not only the columns in the current table that make up the FOREIGN KEY but also the PRIMARY KEY columns in the table referenced by the FOREIGN KEY.
A FOREIGN KEY constraint is normally used to represent a parent/child relationship between two tables. When you place a FOREIGN KEY constraint on a column or combination of columns, you are saying that the value in the column (or combination of columns) in the child record (row in the child table) can be found in the column (or combination of columns) that makes up the PRIMARY KEY in the parent record (row in the parent table).
The syntax for using the ALTER TABLE statement to add a FOREIGN KEY constraint to a table is:
 ALTER TABLE
 [WITH NOCHECK]
 ADD [CONSTRAINT [,...,]
 REFERENCES
 (
 [,...,])
As such, to create a parent/child relationship between a (parent) CUSTOMER table created by
 CREATE TABLE customer
 (customer_number INTEGER PRIMARY KEY,
 first_name VARCHAR(20),
 last_name VARCHAR(30),
 address VARCHAR(35))
and a (child) ORDER table created by
 CREATE TABLE order
 (placed_by_customer_num INTEGER,
 order_date DATETIME,
 item_number INTEGER,
 quantity SMALLINT)
you might use the ALTER TABLE statement
 ALTER TABLE order ADD
 CONSTRAINT fk_order_column
 FOREIGN KEY (placed_by_customer_num)
 REFERENCES customer (customer_number)
which links each row in the ORDER table to one (and only one) of the rows in the CUSTOMER table. In other words, each and every value in the PLACED BY_CUSTOMER_NUM column in the ORDER table can be found in the CUSTOMER_NUMBER column of the customer table. Thus, every order (child) must have an associated customer (parent) that placed the order.
| |
Note |
When you use the ALTER TABLE statement to add a FOREIGN KEY to a table, the DBMS will check existing data to make sure it does not violate the constraint. In the current example, the DBMS will ensure that every value in the PLACED_BY_CUSTOMER_NUM of the ORDER table exists in the CUSTOMER_NUMBER table of the CUSTOMER table. If the check fails, the DBMS will not create the FOREIGN KEY, thereby maintaining referential data integrity.
|
If you are sure that existing data will not violate the FOREIGN KEY constraint, you can speed up the execution of the ALTER TABLE statement by adding the WITH NOCHECK clause. If you do so, the DBMS will not apply the FOREIGN KEY constraint to existing rows of the table. Only rows subsequently updated or inserted will be checked to make sure that the FOREIGN KEY value exists in the PRIMARY KEY of the referenced (parent) table.
Using the CREATE TABLE Statement to Assign the Primary Key
A key is a column or combination of columns that uniquely identifies a row in a table. As such, a key gives you way to distinguish one particular row in a table from all of the others. Because a key must be unique, you should not include NULL values in any of the columns that make up a key. Remember, the DBMS cannot make any assumptions about the actual value of NULL in a column. Thus, a row with NULL in a key column will be indistinguishable from any other row in the table because the NULL value could, in fact, be equal to the value in any other row.
Each table can have one (and only one) PRIMARY KEY. Because the PRIMARY KEY must uniquely identify each row in a table, the DBMS automatically applies the NOT NULL constraint to each of the columns that make up the PRIMARY KEY. When creating a new table, you can create a single-column PRIMARY KEY by including the key words "PRIMARY KEY" in the column definition.
The syntax of a PRIMARY KEY definition in a CREATE TABLE statement comes in one of two forms
[CONSTRAINT ] PRIMARY KEY
if the PRIMARY KEY is an unnamed constraint defined as part of the PRIMARY KEY column's definition, or
 CONSTRAINT
 PRIMARY KEY (
 [,]])
for a multiple-column (or composite) PRIMARY KEY or a single-column named PRIMARY KEY.
For example, the CREATE TABLE statement
 CREATE TABLE employee
 (employee_id INTEGER PRIMARY KEY,
 first_name VARCHAR(20),
 last_name VARCHAR(30))
identifies the EMPLOYEE_ID column as the PRIMARY KEY in the EMPLOYEE record. As such, every row in the EMPLOYEE table must have a unique, non-NULL value in the EMPLOYEE_ID column.
The system stores the PRIMARY KEY as a constraint in the system tables. As such, if you don't give the PRIMARY KEY a name, the DBMS will generate one for you. The name the system assigns becomes important to you if you ever want to drop a table's PRIMARY KEY so that you can change it. (Since a table can have only one PRIMARY KEY, you will need to drop the existing PRIMARY KEY and create a new one when if you want to change its column[s].)
| |
Note |
If you are using MS-SQL Server, you can call the stored procedure sp_help to display the name that the DBMS assigned to the PRIMARY KEY by executing the command
EXEC sp_help
(where
is the name of the table with the PRIMARY KEY whose name you want to know).
MS-SQL Server will respond with a description of the table identified by
. Look in the index_name column of the section of the report titled PRIMARY to see the name the DBMS assigned to the PRIMARY KEY.
If you don't want the DBMS to generate its own name for the PRIMARY KEY, you can name it yourself by specifying the name when you identify the column that makes up the PRIMARY KEY. For example, to give the name pk_employee_table to the PRIMARY KEY in the current example, use the CREATE TABLE statement:
 CREATE TABLE employee
 (employee_id INTEGER,
 CONSTRAINT pk_employee_table PRIMARY KEY,
 first_name VARCHAR(20),
 last_name VARCHAR(30))
Sometimes no single column in a table has a unique value in every row. Suppose, for example, that each division in your company issues its own employee numbers. Division #1 has employees #123, #124, and #126; division #2 has employees #121, #122, and #123. If you identify EMPLOYEE_ID as the PRIMARY KEY, you will be able to insert all division #1 employees into the EMPLOYEE table. However, when you try to insert division #2 employee #123, the DBMS will not allow you to do so. Because the EMPLOYEE table already has a row with an EMPLOYEE_ID of 123, the DBMS rejects your attempt to add a second row with 123 in the EMPLOYEE_ID column because EMPLOYEE_ID, the PRIMARY KEY, must be unique in each row of the table.
You can still create a PRIMARY KEY for the table where no single column is unique by identifying a set of multiple columns that, when taken together, is different in every row of the table. In the current example, you know that employee numbers are unique by division. Thus, you can use a two-column PRIMARY KEY consisting of EMPLOYEE_ID and DIVISION, such as
 CREATE TABLE employee
 (employee_id INTEGER,
 division SMALLINT,
 first_name VARCHAR(20),
 last_name VARCHAR(30)

 CONSTRAINT pk_employee_table
 PRIMARY KEY (employee_id, division))
to create a PRIMARY KEY for the EMPLOYEE table.
| |
Note |
The Placement of the PRIMARY KEY definition within the CREATE TABLE statement is not important. As such, the CREATE TABLE statement
CREATE TABLE employee
 (employee_id INTEGER
 CONSTRAINT pk_employee_table
 PRIMARY KEY (employee_id, division),
 division SMALLINT,
 first_name VARCHAR(20),
 last_name VARCHAR(30))
is equivalent to the one in the example just prior to this note.
|
Using the CREATE TABLE Statement to Assign Foreign Key Constraints
As was previously discussed, a database key uniquely identifies a row in a table. In Tip 61, "Using the CREATE TABLE Statement to Assign the Primary Key," you learned that each row in a PRIMARY KEY uniquely identifies single row within the table in which the PRIMARY KEY is declared. A FOREIGN KEY, on the other hand, references the PRIMARY KEY in a table other than the one in which the FOREIGN KEY is declared. As such, each row within a FOREIGN KEY in one table uniquely identifies a single row in another table. While each PRIMARY KEY value must be unique within a table, the values within a FOREIGN KEY need not be (and most likely is not) unique.
A FOREIGN KEY is normally represents a parent/child relationship between two tables. When you place a FOREIGN KEY constraint on a column or combination of columns, you are saying that the value in a column (or combination of columns) within the row in the child table can be found in the column (or combination of columns) that makes up the PRIMARY KEY value of a specific row within the parent table.
The syntax of the FOREIGN KEY constraint declaration is:
 [CONSTRAINT ]
 FOREIGN KEY (
 [,...[,]])
 REFERENCES
 (
 [,...
 [,]]}
Suppose, for example, that you want to track customer orders using the CUSTOMER (parent) table and ORDER (child) table created by:
 CREATE TABLE customer
 (customer_number INTEGER,
 first_name VARCHAR(20),
 last_name VARCHAR(30),
 address VARCHAR(35),
 CONSTRAINT pk_customer_table
 PRIMARY KEY (customer_number))

 CREATE TABLE order
 (placed_by_customer_num INTEGER
 FOREIGN KEY (placed_by_customer_num) REFERENCES
 customer(customer_number),
 order_date DATETIME,
 item_number INTEGER,
 quantity SMALLINT,

 CONSTRAINT pk_order_table
 PRIMARY KEY
 (placed_by_customer_num, order_date, item_number))
The FOREIGN KEY defined in the ORDER table tells you that you can find the value in the PLACED_BY_CUSTOMER_NUM column (of the child table ORDER) in the PRIMARY KEY column CUSTOMER_NUMBER of a row in the CUSTOMER (parent) table.
Because the column PLACED_BY_CUST_NUM is a foreign and not a primary key in the ORDER table, you can have more than one ORDER row with the same value in the PLACED_BY_CUST_NUM column, indicating that an individual customer ordered more than one item or placed more than one order.
The FOREIGN KEY constraint on the PLACED_BY_CUSTOMER_NUM column also tells you that the value in the PLACED_BY_CUST_NUM column will appear once and only once in the CUSTOMER_NUMBER field of the CUSTOMER table (because a FOREIGN KEY in a table always refers to the PRIMARY KEY in another table). As such, you will be able to uniquely identify the customer that placed the order because the FOREIGN KEY value (PLACED_BY_CUSTOMER_NUM) in the current table uniquely identifies a row (a customer) in the foreign (CUSTOMER) table.
When you do not provide a name for a FOREIGN KEY constraint, the system will generate one for you so that it can store the constraint in its system tables. In the current example, the FOREIGN KEY in the ORDER table was not explicitly named. As such, the system will generate a name.
If you are using MS-SQL Server, you can determine the name of the FOREIGN KEY by executing the stored procedure sp_help and supplying the name of the parent table (CUSTOMER, in the current example) for
in the statement:
EXEC sp_help
MS-SQL Server will respond with a description of the table and will list the FOREIGN KEY names in the "Table Is Referenced By" section of the report.
If you want to select a name for the FOREIGN KEY (instead of having the DBMS generate one), change the CREATE TABLE statement in the current example to:
 CREATE TABLE order
 (placed_by_customer_num INTEGER
 CONSTRAINT fk_customer_table FOREIGN KEY
 (placed_by_customer_num) REFERENCES
 customer(customer_number),
 order_date DATETIME,
 item_number INTEGER,
 quantity SMALLINT,
 CONSTRAINT pk_order_table
 PRIMARY KEY
 (placed_by_customer_num, order_date, item_number))
As you learned in Tip 61, a PRIMARY KEY may consist of more than one column. When a FOREIGN KEY in one table references a composite (or multi-column) PRIMARY KEY in another table, the FOREIGN key, too, will consist of multiple columns. Suppose, for example, that the ITEM_MASTER table for the orders in the current example was defined by:
 CREATE TABLE item_master
 (item_number INTEGER,
 vendor_id INTEGER,
 quantity_on_hand SMALLINT

 CONSTRAINT pk_item_master_table
 PRIMARY KEY (item_number, vendor_id))
You could reference the composite PRIMARY KEY in the ITEM_MASTER table with the FOREIGN KEY constraint FK_ITEM_MASTER_TABLE using the CREATE TABLE statement:
 CREATE TABLE order
 (placed_by_customer_num INTEGER
 order_date DATETIME,
 item_number INTEGER,
 vendor_id_number INTEGER,
 quantity SMALLINT,

 CONSTRAINT fk_item_master_table FOREIGN KEY
 (item_number, vendor_id_number) REFERENCES
 item_master (item_number, vendor_id),

 CONSTRAINT fk_customer_table FOREIGN KEY
 (placed_by_customer_num) REFERENCES
 customer (customer_number),

 CONSTRAINT pk_order_table
 PRIMARY KEY
 (placed_by_customer_num, order_date, item_number))
The important thing to know about the FOREIGN KEY constraint is that it specifies that the value in the column or combination of columns in one table must be found as the value in the PRIMARY KEY of the table, which it references. As such, if you have a single-column PRIMARY KEY, you will use a single-column FOREIGN KEY. Conversely, if you need to reference a multi-column or composite PRIMARY KEY, you will use a multi-column FOREIGN KEY.
Using the DROP TABLE Statement to Remove a Table from the Database
When you no longer need a table, use the DROP TABLE statement to remove it from the database. Before dropping a table, however, make sure that you no longer need it! When the DBMS executes the DROP TABLE statement, it erases the table data and index(es) from the database and removes the definition of the table and its constraints from the system tables. Thus, the only way to recover a dropped table is to re-create the table and restore data by reading it from the most recent backup. As such, make sure you really no longer need the table or its data before you execute the DROP TABLE statement.
The syntax of the DROP TABLE statement is:
DROP TABLE
 [[.]
.]]
Thus, to drop the CUSTOMER table in Tip 62, "Using the CREATE TABLE Statement to Assign Foreign Key Constraints," you would execute the SQL statement:
DROP TABLE customer
When it receives the DROP TABLE command, the DBMS checks to see if the table you want to drop is referenced by a FOREIGN KEY in another table. If it is (as is the case with CUSTOMER in the current example), the DROP TABLE statement will fail, and the DBMS will display an error message similar to:
 Server: Msg 3726, Level 16, State 1, Line1
 Could not drop object 'customer' because it is referenced
 by a FOREIGN KEY constraint
Before you can remove a table reference by a FOREIGN KEY, you must first use the ALTER TABLE statement to remove the FOREIGN KEY constraint from the other table. In the current example, you must execute the ALTER TABLE statement
ALTER TABLE order DROP CONSTRAINT fk_customer_table
before the DBMS will let you drop the CUSTOMER table.
| |
Note |
While the DBMS checks its system tables for FOREIGN KEY references to the table you want to remove, it does not check VIEWs (which you learned about in Tip 11, "Understanding Views") and stored procedures to see if they reference the table or its columns. Stored procedures that reference a dropped table will fail to run, and the DBMS will return an error message in place of VIEWs data that includes columns from a dropped table. As such, check your database documentation carefully to make sure that you are the only one that uses the table you are about to drop-before you drop the table.
|
Using the DROP VIEW Statement to Remove a View
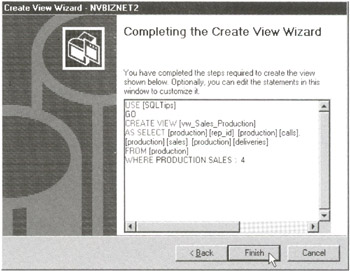
To remove a database view that you no longer need, execute the DROP VIEW statement. Unlike the DROP TABLE statement, the DROP VIEW command does not erase any database tables or data. When you DROP a view, the DBMS simply removes its definition (the name and the SELECT statement that defines the view) from the system tables. If you later decide you need the view again, simply use the CREATE VIEW statement or a tool like the MS-SQL Server Create View Wizard to re-create the view. As long as the underlying table is still in the database, re-creating the view will bring back the virtual table and its data.
The syntax of the DROP VIEW statement is:
DROP VIEW [,...[,]]
As such, to remove a VIEW named VW_SALES_PRODUCTION from the database, you would execute the SQL statement:
DROP VIEW vw_sales_production
You can remove several views at once by separating the names of the views with commas in a single DROP VIEW statement. For example, to remove views VW_SALES_PRODUCTION_EAST and VW_SALES_PRODUCTION_WEST, you would use the SQL statement:
 DROP VIEW
 vw_sales_production_east, vw_sales_production_west
Although no data is erased when you drop a view, you do need to make sure that no stored procedures or other views reference the view you are about to drop. If you run a stored procedure or use view that references a dropped view, the DBMS will respond with an error message in the form:
 Server: Msg 208, Level 16, State 1, Procedure
 , Line 2
 Invalid object name ''.

 Server: Msg 4413, Level 16, State 1, Line 1
 Could not use view '' because of
 previous binding errors.
(The DBMS, of course, substitutes the actual name of the dropped view for "" and the actual name of the view that references the dropped view for "." )
Using the MS SQL Server Enterprise Manager Create View Wizard to Create a View
Views are virtual tables. Although they look and act like regular relational database tables, views contain no data. Rather, a view is a set of instructions for the DBMS that tells it what data stored in physical (real) tables to display and how to display it. MS-SQL Server gives you two ways to define a view. You can use the CREATE VIEW statement (which you will learn about in Tip 206, "Using a View to Display Columns in One or More Tables or Views"), or you can use the MS-SQL Server's Create View Wizard. Whichever method you use to create the view, the DBMS will store its name in the system tables along with the SELECT statement that lists the view's columns and search criteria (its WHERE clause).
At the lowest level, all views are based on one or more physical database tables. (You can create views based on other views. However, at some point, one of the views in the chain has to be based on an actual database table.) Therefore, to see how you can use the Create View Wizard to create a view, you must start by deciding on the data you want to display. Suppose, for example, that you want to create a view based on the data in the PRODUCTION table shown in Figure 65.1.
|
PRODUCTION table
|
|
Rep_ID
|
Call
|
Appointments
|
Sales
|
Deliveries
|
|
1
|
100
|
4
|
3
|
2
|
|
2
|
255
|
7
|
4
|
4
|
|
3
|
750
|
12
|
6
|
5
|
|
4
|
400
|
15
|
9
|
7
|
|
5
|
625
|
10
|
8
|
6
|
|
6
|
384
|
11
|
6
|
4
|
|
7
|
295
|
17
|
4
|
1
|
Figure 65.1: PRODUCTION table with sample data to use in creating a view
To use the Create View Wizard to create a view that displays data from a single table, perform the following steps:
- Start the Enterprise Manager by clicking your mouse on the Start button. When Windows displays the Start menu, move your mouse pointer to Programs, select Microsoft SQL Server 7.0, and then click your mouse on Enterprise Manager.
- To display the list of SQL servers, click your mouse on the plus (+) to the left of SQL Server Group.
- Click your mouse on the icon for the SQL Server with the database in which you wish to create the view. For example, if you want to create a view in a database on a server named NVBIZNET2, click your mouse on the icon for NVBIZNET2.
- Select the Tools menu Wizards option (or click your mouse on the Wizards button, the magic wand on the Standard Toolbar). Enterprise Manager will display the Select Wizard dialog box so that you can select the wizard you want to use.
- Click your mouse on the plus (+) to the left of Database to display the list of database object wizards.
- Click your mouse on Create View Wizard to select it, and then click your mouse on the OK button. Enterprise Manager will start the Create View Wizard, which displays its "Welcome to the Create View Wizard" screen.
- Click your mouse on the Next button. The Create View Wizard will display the Select Database dialog box.
- Click your mouse on the drop-down list button to the right of the Database Name field to display the list of databases on the SQL Server you selected in Step 3.
- Click your mouse on the database in which you wish to create the view. For the current example, click your mouse on SQLTips to select the SQLTips database.
- Click your mouse on the Next button. The Create View Wizard will display a Select Tables dialog box, similar to that shown in Figure 65.2.
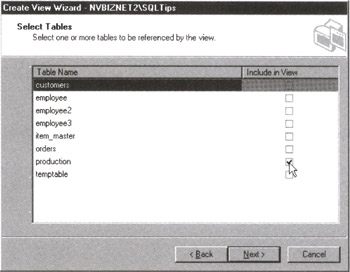
Figure 65.2: The MS-SQL Server Create View Wizard's Select Tables dialog box
- Click your mouse on the check boxes of the tables whose data you want to include your view. For the current example, click your mouse on the check box for the PRODUCTION table until the check mark appears.
- Click your mouse on the Next button. The Create View Wizard will display a Select Columns dialog box, similar to that shown in Figure 65.3.
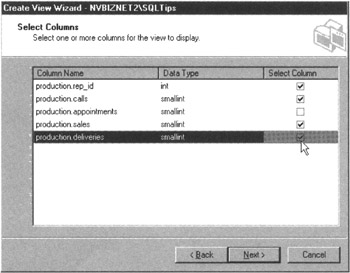
Figure 65.3: The MS-SQL Server Create View Wizard's Select Columns dialog box
- Click your mouse on the check boxes of the columns you want to display. For the current example, select: PRODUCTION.REP_ID, PRODUCTION.CALLS, PRODUCTION. SALES, and PRODUCTION.DELIVERIES.
| |
Note |
The list of columns in the selection area of the Select Columns dialog box includes all of the columns for all of the tables selected in Step 11. The Create View Wizard shows you which columns belong in which tables by using the qualified column name for each column-that is, it displays the column name as
. (where
is the name of the table that contains ).
After you complete Step 19, the Create View Wizard will check the syntax of the statements in the Completing the Create View Wizard dialog box and will prompt you to correct any errors. (If there are any errors, the problem will most likely be with the WHERE clause you entered in Step 14.)
Repeat Steps 18 and 19 until the Create View Wizard displays the "Wizard Complete!" message box, with the message "The view was created successfully." Once you see the message box, click your mouse on its OK button to return to the MS-SQL Server Enterprise Manager application window.
Once the DBMS stores your view in its system tables, use the SELECT statement to display the view data. For example, to display all of the columns and rows in the view you created in the current example, execute the SELECT statement:
SELECT * FROM vw_sales_production
Given that the PRODUCTION table has the data shown in Figure 65.1, MS-SQL Server will display the virtual contents of your view table, VW_SALES_PRODUCTION as
 rep_id calls sales deliveries
 ----------- ------ ------ ----------
 3 750 6 5
 4 400 9 7
 5 625 8 6
 6 384 6 4
 (4 row(s) affected)
Understanding the CASCADE and RESTRICT Clauses in a DROP VIEW Statement
As mentioned in Tip 64, the DBMS will not erase any database data when you drop a view. However, you still have to be careful that the view you are dropping is not referenced by another view. Some DBMS products let you add the CASCADE or RESTRICT clause to a DROP VIEW statement to control the behavior of the DBMS when you tell the system to DROP a view that is referenced by another view.
If you execute the DROP VIEW statement with the CASCADE clause, the DBMS will not only remove the view you name in the DROP VIEW statement, but also any other view that references the view in the DROP VIEW statement. For example, if you have two views as defined by
 CREATE VIEW vw_sales_production AS
 SELECT rep_id, calls, sales, deliveries FROM production
and
 CREATE VIEW vw_delivered_sales_commissions
 (rep_id, deliveries, commission) AS
 SELECT rep_id, deliveries, deliveries * 150.00
 FROM vw_sales_production
when you execute
DROP VIEW vw_sales_production
the DBMS will remove only the VW_SALES_PRODUCTION view from the system tables. If you execute the SELECT statement
SELECT * FROM vw_delivered_sales_commissions
after you DROP the VW_SALES_PRODUCTION view, the DBMS will respond with an error message in the form:
 Server: Msg 208, Level 16, State 1,
 Procedure vw_delivered_sales_commissions, Line 1
 Invalid object name 'vw_sales_production'.

 Server: Msg 4413, Level 16, State 1, Line 1
 Could not use view ' vw_delivered_sales_commissions'
 previous binding errors.
If, on the other hand, you DROP the VW_SALES_PRODUCTION view with the DROP VIEW statement
DROP VIEW vw_sales_production CASCADE
the DBMS will remove both VW_SALES_PRODUCTION and VW_DELIVERED_SALES_COMMISSIONS (which references it) from the system tables.
Conversely, some DBMS products allow you to add the RESTRICT clause to the DROP VIEW statement. The RESTRICT clause will prevent you from dropping a view that is referenced by another view Thus, in the current example, executing the "restricted" DROP VIEW statement
DROP VIEW vw_sales_production RESTRICT
will fail because the view VW_SALES_PRODUCTION view is referenced by the VW_DELIVERED_SALES_COMMISSIONS view.
| |
Note |
Not all DBMS products provide the CASCADE and RESTRICT clauses for the DROP VIEW statement-MS-SQL Server, for example, does not. As such, check your system documentation to see if you can add the CASCADE or RESTRICT clause to the DROP VIEW statement in your DBMS product.
|
Using SQL Data Manipulation Language (DML) to Insert and Manipulate Data Within SQL Tables
|
|
|
|
|