Color Matching
You've examined the color correction tools in depth; now it's time to move on to the bread and butter of compositing: matching foreground and background elements so that the scene appears to have been taken with the same basic light conditions.
Melding images together and eliminating all clues that they came from separate sources is as much science as art. Up to this point we've focused on optimizing source footage, which is a more subjective and artistic practice. Once the background has been properly graded, however, matching the foreground using the same tools is typically more objective (except in cases where essential clues are missingmore on that in a bit). The process obeys such strict rules that you can do it without an experienced eye for color. Assuming the background (or whatever source element you're matching) has already been color-graded, you even can satisfactorily complete a shot on a monitor that is nowhere near correctly calibrated.
How is that possible?
As with so many things in visual effects work, the answer is really a question of correctly breaking down the problem. In this case, the job of matching one image to another obeys rules that can be observed channel by channel, independent of the final, full-color result.
Of course, effective compositing is not simply a question of making colors match; in many cases that is only the first step. You must also obey rules you will understand from having done the kind of careful observing of nature described in the previous chapter. And even if your colors are correctly matched, if you haven't interpreted your edges properly (Chapter 3) or pulled a good matte (Chapter 6), or if such essential elements as lighting (Chapter 12), the camera view (Chapter 9), or motion (Chapter 8) are mismatched, your composite will not succeed.
These same basic techniques will work for other situations in which your job is to match footage preciselyfor example, color correcting a sequence to match a hero shot, a process also sometimes known as color timing.
The Fundamental Technique
Integrating a foreground element into the color space of a background scene breaks down into three steps:
|
1. |
Match contrast without regard to color, using Levels. When matching the black and white points, pay attention to atmospheric conditions. |
|
2. |
Study individual color channels and use Levels to match the contrast of each channel (as needednot all images contain so fundamental a color imbalance). |
|
3. |
Match the color of the midtones (gamma), channel by channel, using Levels or, preferably, Curves. This is sometimes known as "matching grays" and is easily done if there is an object in the background scene that you know is colorless gray (or something close). |
|
4. |
Evaluate the result for other problems that may be interfering with the illusion that the elements belong in the same worldlighting direction, the role of atmospheric conditions, perspective, grain or other ambient movement, and so on (all of which are dealt with in subsequent chapters of this book). |
The overall approach, although not complicated or even particularly sexy, can take you to places your naked eye doesn't readily understand when looking at color. Yet, when you see the results, you realize that nature beats logic every time.
The sad truth is that even an experienced artist can be completely fooled by the context of the image. Figures 5.30a, b, and c show an example in which seeing is most definitely not believing. Therefore you should not feel that the techniques described here are a crutchinstead, they are a necessary scientific advantage. The results of your color adjustments will be challenged by other members of your production teamit's pretty cool to be able to show them that you got it right.
Figures 5.30a, b, and c. There are no yellow dots in 5.30a, and no blue dots in 5.30b; the four dots shown in 5.30c are identical to their counterparts in the other two images.

Ordinary lighting
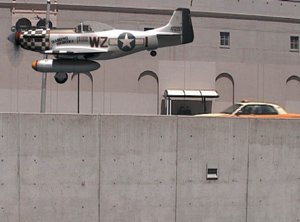
We begin with a simple example: inserting a 3D element lit with ordinary white lights into a daylight scene. As you can see in Figure 5.31, the two elements are close enough in color range that a lazy or hurried compositor might be tempted to leave it as is.
Figure 5.31. An unadjusted foreground layer (the plane) over a daylit background.
With only a few minutes of effort, you can make the plane look as though it belongs there. Make sure the Info palette is somewhere that you can see it, and for now, choose Percent (0100) in that palette's wing menu to have your values line up with the ones discussed here. You are free to choose any of the color modes in this menu; I advocate this one only for the purpose of standardizing the discussion.
This particular scene is a good beginner-level example of the technique because it is full of elements that would be monochromatic under white light; next we'll move on to scenes that aren't so straightforward. The background is dominated by concrete, which is generally flat, colorless gray, and the foreground element is an aircraft with a silver body that is lit from the top with white light with dark shadows underneath.
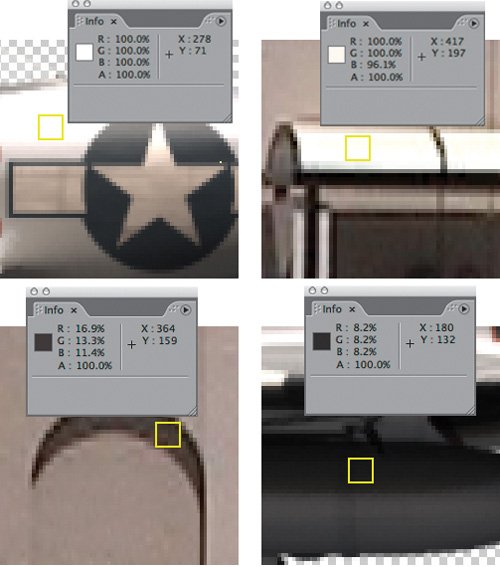
Begin by looking for suitable black and white points to use as references in the background and foreground. In this case, the shadow areas under the archways in the background, and underneath the wing of the foreground plane, are just what's needed for black pointsthey are not the very darkest elements in the scene, but they contain a similar mixture of reflected light and shadow cast onto similar surfaces, and you can expect them to fairly nearly match. For highlights, you happily have the top of the bus shelter to use for a background white point, and the top silver areas of the plane's tail in the foreground are lit brightly enough to contain pure white pixels at this point.
Figure 5.32 shows the targeted shadow and highlight regions and their corresponding readings in the Info palette. The shadow levels in the foreground are lower (darker) than those in the background, while the background shadows have slightly more red in them, giving the background a warmth that the unadjusted foreground lacks. The top of the plane and the top of the bus shelter both contain levels at 100%, or pure white; the blue readings on the bus shelter, which are a few percentage points lower, give it a more yellow appearance.
Figure 5.32. The target highlight and shadow areas for the foreground and background are outlined in yellow; levels corresponding to each highlight (in Percent values, as set in the panel menu) are displayed in the adjacent Info palette.
To correct for these mismatches, apply Levels to the foreground and move the Output Black slider up to about 7.5%. This raises the level of the blackest black in the image, lowering the contrast, something we didn't expect to do when optimizing images earlier in the chapter.
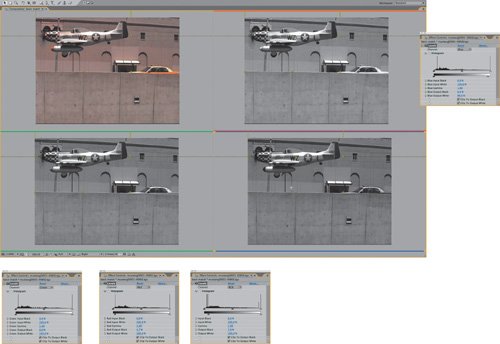
Having aligned the contrast levels, it's time to correct for the differences in color. Remember the red levels in the background shadows are higher than blue or green, which is a clue that you should now switch the Composition panel to the red channel (click on the red marker at the bottom of the panel or use the Alt+1/Option+1 shortcut). A thin red line around the outside of the display reminds you that you are looking only at red levels, and you can zoom in to an area that shows both of the regions you're comparing (Figure 5.33).
Figure 5.33. Evaluate and match black and white levels; start with RGB and then work on each color channel individually. In this case the image is "green matched:" The RGB adjustment is all that is needed for the green channel (often the best channel to match using RGB instead of its individual channel).
Now you can see clearly that the black levels in the red channel are still too low in the foreground, so raise them to match. Switch the Channel pop-up in Levels to Red, and raise Red Output Black slightly to about 3.5%. You can move your cursor from foreground to background and look at the Info palette to check whether you have it right, but the great thing about this method is that your eye usually gets variations in luminance correct when looking at a grayscale image.
Now for the whites. Because the background highlights have slightly less blue in them, switch to the blue channel (clicking the blue marker at the bottom of the Composition panel or use Alt+3/Option+3). Pull back slightly to where you can see the top of the bus shelter and the back of the plane. Switching Levels to the blue channel, lower the Blue Output White setting a few percentage points to match the lower blue reading in the background. Back in RGB mode (Alt+3/Option+3 toggles back from blue to RGB), the highlights on the plane take on a more sunlit, yellow quality. It's subtle, but it seems right.
What about the midtones? In this case, they're taking care of themselves because both the foreground and background are reasonably well balanced and your corrections are mild.
Tip
The human eye is more sensitive to green than red and blue. Often, when you look at a shot channel by channel, you will see the strongest brightness and contrast in the green channel. For that reason, a sensible approach to matching color may be to get the overall match in the ballpark so that the green channels match perfectly, and then adjust the other two channels to make green work. That way, you run less risk of misadjusting the overall brightness and contrast of your footage.
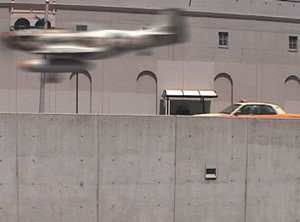
Figure 5.34 displays the result, with the same regions targeted previously, but with the levels corrected. To add an extra bit of realism, I also turned on motion blur, without yet bothering to precisely match it (something you will learn more about in Chapter 8, "Effective Motion Tracking"). You see that the plane is now more acceptably part of the scene. Work on this composite isn't done either; besides matching the blur, you could add some sun glints on the plane as it passes, similar to those on the taxi. On the other hand, you can tell that you don't need to bother adding a pilot to the cockpit; the blur on the plane is too much to even notice that the pilot is missing.
Figure 5.34. This is a better match, particularly in the shadow areas; motion blur helps sell the color adjustment as well.
Dramatic Lighting
Watch contemporary feature films objectively for color and you'll notice that ordinary daylit scenes such as the plane example are relatively rare. Films (not to mention television and theater) use color and light to create the mood of the story (and to signify key characters and plot points). Novice viewers don't always take note of this, because in many cases your eye adapts to even extreme lighting choices if they complement the mood of the story (which is what they are designed to do).
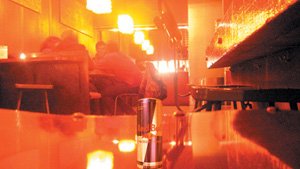
Therefore a scene dominated by a single color, such as Figure 5.35, is much more commonly found in dramatic films than it is in your everyday family snapshots. One of the main reasons films take so long to shoot is that the cinematographer and lighting director require the time and resources to get the lighting the way it needs to be to create an image that is both beautiful and serves the story.
Figure 5.35. This is the unembellished source lighting of this shot. (Image courtesy Shuets Udono via Creative Commons license).
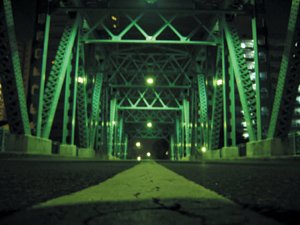
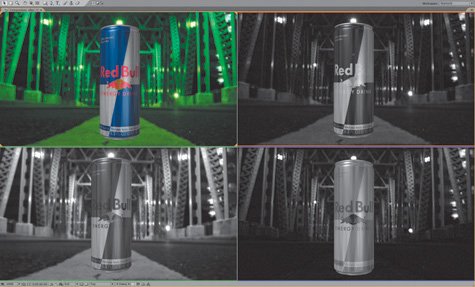
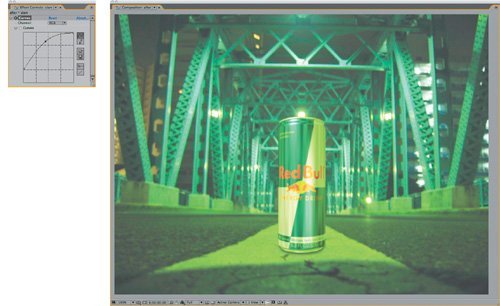
The foreground element added in Figure 5.36 clearly does not belong in this scene; it does not even contain the scene's dominant color, and it has been lit with ordinary white light. That's fine; it will better demonstrate the effectiveness of this technique (although further adjustments, such as adjusting focus and adding a shadow, will be necessary at minimum to sell the shot).
Figure 5.36. Not only is it clear that the can does not belong in the color environment of the background, the mismatch is equally apparent on each color channel.
Notice that both the foreground and the background elements have some areas that you would assume to be flat gray. The bridge has concrete footings for the steel girders along the edges of the road, while the can has areas of bare exposed aluminum.
Notes
This section discusses colors expressed as percentages; to see the same values in your Levels effect, use the wing menu of the Info palette to choose Percent for the Color Display.
To play along with this game, open the project 05_colormatching2.aep and apply Levels to the foreground layer in the "before" composition ("after" is the final comp to which you can refer as needed once you've tried this on your own).
Switch both your Compostion view (Alt+1/Option+1) and the Channel pull-down in Levels to Red. I'm warning you now that the most challenging thing about this technique will be remembering to keep both settings on the same color channel, which is why using a four-up setup as shown in Figure 5.36 is probably worth the trouble.
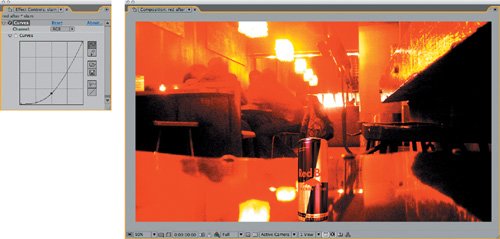
Now, let's pretend that the red channel is a black-and-white photograph in which you're using the red channel of the Levels effect to match the foreground to the background. Clearly, the foreground element is far too bright for the scene. Specifically, the darkest silver areas of the can are way brighter than the brightest areas of the concrete in the background. Therefore, adjust the gamma down (to the right) until it feels more like they inhabit the same world; in my example, I've adjusted Red Gamma way down to 0.67. Now cut down the red highlights a little; bring Red Output White down to about 92.5% or whatever looks right to you. The end result should look like a black-and-white photo whose elements match (Figure 5.37a).
Figures 5.37a, b, and c. It's actually fun to pull off an extreme match like this channel-by-channel. The Levels settings used were not really derived from the histogram, but by a mixture of looking for equivalent black/white/midpoints in the image, as well as just analyzing whether the result looks like a convincing black and white image on each channel.
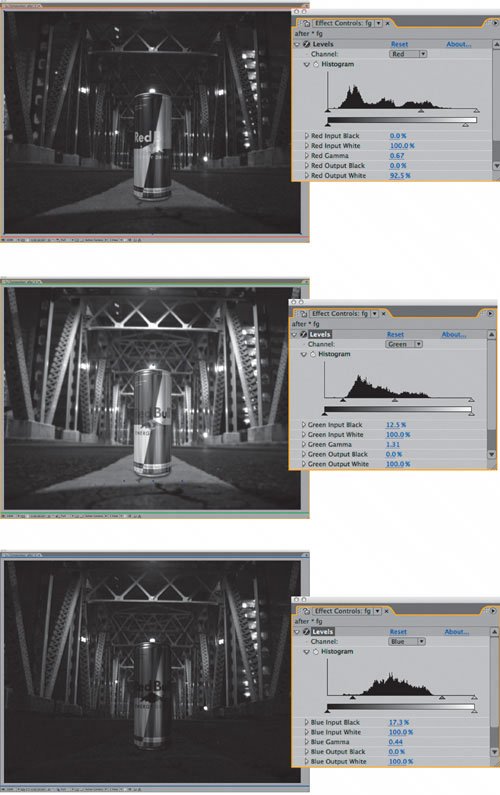
Now move the Levels Channel and Composition view (Alt+2/Option+2) over to green. Green is the dominant color here, and its black contrast and brightness are much higher in the background. Therefore, raise Green Input Black to about 12.5% (for the contrast) and Green Gamma to something like 1.3 (Figure 5.37b). Better than copying my levels, try to find these on your own.
Finally, switch Levels and the Composition viewer (Alt+3/Option+3) to the Blue channel. Whoa; there is almost no match here. The can is way brighter and more washed out than the background. Again the Input Blue Level must come up, to about 17.5%, but this time gamma has to come way down, ending up at about 0.45%. Now the can looks believably like it belongs there (Figure 5.37c).
What's strange about this is that you've made all of these changes without ever looking at the result in full color. So now, go ahead and do that. Astoundingly, that can is now in range of looking like it belongs in that scene; defocus it slightly with a little fast blur and add a shadow and you start to believe it. Make any final contrast adjustments on the Levels RGB Channel, and you have an impressive result that required no guesswork whatsoever (Figure 5.38).
Figure 5.38. The result includes a subtle shadow that has also been color matched as well as a final adjustment to the white contrast.

When There's No Clear Reference
These examples have contained fairly clear black, white, and gray values in the foreground and background elements. Life, of course, is not always so simple.
Figure 5.39 is a scene that lacks any obvious gray values to match; the lighting is so strong, it's hard to tell what color anything in the scene was originally, or whether there were any neutral black, white or gray items in the scene.
Figure 5.39. What the heck is going on here? Again, the source image is as it was shot. Examine some of your favorite films and you may find scenes lit this dramatically; the eye quickly becomes accustomed to strong shifts of color, but the color can also be used to strike a subconscious chord. (Image courtesy Jorge L. Peschiera via Creative Commons license.)
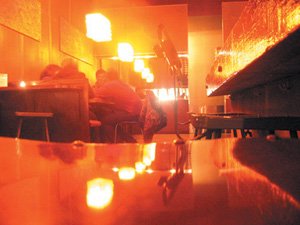
The technique still works in this case, but it may require more in the way of trial and error, or artist's intuition. Looking at each individual color channel, only green is even close to a plausible match right off the bat; the red channel contains blown-out whites, and the blue channel is so dark (and grainy) it hardly exists.
Notes
All kinds of studies show how taking a break once in a while helps your concentration and lets you stay healthy by stretching your body, but in this case there is a more specific use for turning away from your monitor for a minute or two. When you come back, even to a labored shot, you regain an immediate impression that can save you a lot of noodling. The process outlined in this section is designed to remove many variables to color correction, but it's still a question of whether the final shot looks right or not.
Once again, just try to get the brightness and contrast adjusted, working channel by channel, and you get an initial result something like Figure 5.40. Considering how subjective the adjustments have to be, this isn't half bad; and fine adjustments to the RGB channel can bring it where it needs to go.
Figure 5.40. This one requires as much intuition as logic, but adjusting it channel by channel still yields a striking result.
The ability to match color without seeing an image in full color is so powerful that it can seem almost magical the first few times you try it. Why, then, do so few artists work this way? I would have to say that laziness and ignorance are the main culprits here. Switching channels seems like a pain, and few untrained artists clearly realize that color works like this.
Therefore, I must pose a rhetorical question: Which is more of a pain, switching channels in this manner, which can yield an impressive result in a couple of minutes, or fishing around for adjustments without being able to clearly see what's going on, which could take much longer?
Gamma Slamming
Maybe you've seen an old movie on televisionthe example I think of first is Return of the Jedi (before the digital re-release)in which you see black rectangular garbage mattes dancing around the Emperor's head, inside the cloak, that you obviously shouldn't be seeing. Jedi was made prior to the digital age, and some of the optical composites worked fine on film, but when they went to video, subtleties in the black levels that weren't previously evident suddenly became glaringly obvious.
Don't let this happen to you! Now that you know how to match levels, put them to the test by slamming the gamma of the image. To do this, you need to make a couple of adjustment layers. I usually call one slam up and the other slam down, as in the examples. Be sure that both of these are guide layers so that they have no possibility of showing up in your final render.
To slam up, apply Curves with the gamma raised significantly (Figure 5.41). This exposes any areas of the image that might have been too dark to distinguish on your monitor; if the blacks still match with the gamma slammed up, you're in good shape.
Figure 5.41. Slamming gamma is like shining a bright light on your scene. Your black and midtone levels should still match when viewed at these extremes.
Similarly, and somewhat less crucial, you can slam down by lowering the gamma and bringing the highlights more into the midrange (Figure 5.42). All you're doing with these slams is stretching values that may be difficult for you to distinguish into a range that is easy for you to see.
Figure 5.42. If in doubt about the highlights in your footage, you can also slam the gamma downward. Here, the slam makes it clear that the highlight reflected in the can is not as bright or bloomed as the overhead lights, and a lack of grain in the foreground becomes apparent. Grain matching is detailed in Chapter 9, "Virtual Cinematography."
This method is useful anywhere that there is a danger of subtle discrepancies of contrast; you can use it to examine a color key, as you'll learn in the next chapter, or a more extreme change of scene lighting.
Beyond the Basics |
Section I. Working Foundations
The 7.0 Workflow
- The 7.0 Workflow
- Workspaces and Panels
- Making the Most of the UI
- Settings: Project, Footage, Composition
- Previews and OpenGL
- Effects & Presets
- Output: The Render Queue
- Study a Shot like an Effects Artist
The Timeline
- The Timeline
- Organization
- Animation Methods
- Keyframes and The Graph Editor
- Uber-mastery
- Transform Offsets
- Motion Blur
- Manipulating Time Itself
- In Conclusion
Selections: The Key to Compositing
- Selections: The Key to Compositing
- The Many Ways to Create Selections
- Compositing: Science and Nature
- Alpha Channels and Premultiplication
- Masks
- Combining Multiple Masks
- Putting Masks in Motion
- Blending Modes: The Real Deal
- Track Mattes
Optimizing Your Projects
- Optimizing Your Projects
- Navigating Multiple Compositions
- Precomposing and Nesting
- Adjustment and Guide Layers
- Understanding Rendering Order
- Optimizing After Effects
- Onward to Effects
Section II. Effects Compositing Essentials
Color Correction
- Color Correction
- Optimizing Plate Levels
- Color Matching
- Beyond the Basics
Color Keying
- Color Keying
- Good Habits and Best Practices
- Linear Keyers and Hi-Con Mattes
- Blue-Screen and Green-Screen Keying
- Understanding and Optimizing Keylight
- Fixing Typical Problems
- Conclusion
Rotoscoping and Paint
- Rotoscoping and Paint
- Articulated Mattes
- Working Around Limitations
- Morphing
- Paint and Cloning
- Conclusion
Effective Motion Tracking
- Effective Motion Tracking
- The Essentials
- Optimizing Tracking Using 3D
- Extending a Track with Expressions
- Tracking for Rotoscoping
- Using 3D Tracking Data
- Conclusion
Virtual Cinematography
- Virtual Cinematography
- 5D: Pick Up the Camera
- Storytelling and the Camera
- Camera Blur
- The Role of Grain
- Film and Video Looks
- Conclusion
Expressions
- Expressions
- Logic and Grammar
- Muting Keyframes
- Linking Animation Data
- Looping Animations
- Smoothing and Destabilizing
- Offsetting Layers and Time
- Conditionals and Triggers
- Tell Me More
Film, HDR, and 32 Bit Compositing
- Film, HDR, and 32 Bit Compositing
- Details
- Film 101
- Dynamic Range
- Cineon Log Space
- Video Gamma Space
- Battle of the Color Spaces
- Floating Point
- 32 Bits per Channel
- Conclusion
Section III. Creative Explorations
Working with Light
- Working with Light
- Light Source and Direction
- Creating a Look with Color
- Backlighting, Flares, Light Volume
- Shadows and Reflected Light
- HDR Lighting
- Conclusion
Climate: Air, Water, Smoke, Clouds
- Climate: Air, Water, Smoke, Clouds
- Particulate Matter
- Sky Replacement
- The Fog, Smoke, or Mist Rolls In
- Billowing Smoke
- Wind
- Water
- Conclusion
Pyrotechnics: Fire, Explosions, Energy Phenomena
- Pyrotechnics: Fire, Explosions, Energy Phenomena
- Firearms
- Sci-Fi Weaponry
- Heat Distortion
- Fire
- Explosions
- In a Blaze of Glory
Learning to See
Index
EAN: 2147483647
Pages: 157
