Adding Door, Window, and Furniture Shapes to Office Layouts
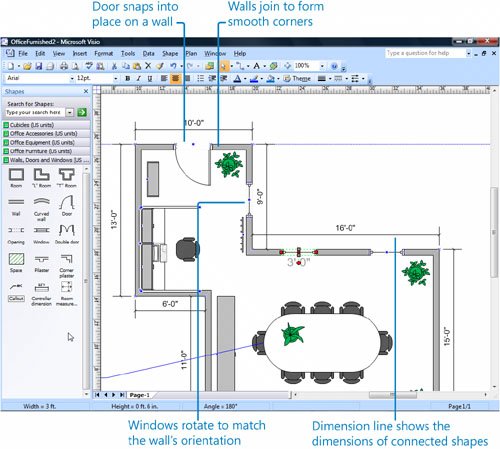
One of the many advantages of creating a scaled diagram with a scaled template is that the template includes shapes that are designed to work in the default drawing scale. The Office Layout template includes many specialized shapes that are designed to work in an architectural drawing scale and that have unique smart behavior. Wall shapes join together to form smooth corners. Door and window shapes snap into place on top of walls, rotating if necessary to match the wall's orientation. Dimension shapes display the dimensions of the shape they're connected to, and they stay connected to the shape when you move it.
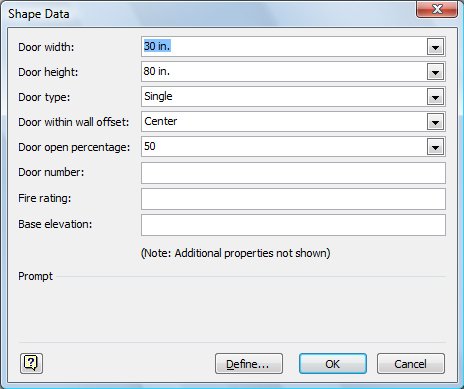
Office Layout shapes are designed only in standard architectural sizes. Because of this, some shapes are locked to prevent you from manually resizing them with the pointer. To change their size, you must modify the property that controls the shape's dimensions. For example, a Door shape has a Door Width property that you can set to 24, 28, 30, 36, 48, 60, or 72 inchesstandard door widths. Visio resizes the shape based on your selection. You can change a shape's properties by using the Properties command on shape's shortcut menu, which contains other specialized commands for modifying the shape. For example, you can't rotate or flip a door to change its orientation. Instead, you must use the Reverse In/Out Opening command or Reverse Left/Right Opening command on the shape's shortcut menu so that Visio rotates or flips the shape for you.
Tip
Right-click an office layout shape to see its shortcut menu of commands that you can use to modify the shape.
In this exercise, you add door, window, and furniture shapes to an office layout. You use shortcut menu commands to modify the door and window shapes. Last, you add furniture to the office and conference space.
OPEN the OfficeWalls file in DocumentsMicrosoft PressVisio 2007 SBS�7_OfficeLayouts.
|
1. |
From the Walls, Doors and Windows stencil, drag the Door shape onto the drawing page and position it in the middle of the top 10-foot wall. 
|
|
2. |
Right-click the door to display its shortcut menu, and then click Properties.
Troubleshooting If you have trouble displaying the shape's shortcut menu, make sure you are right-clicking the shape and not the grid on the drawing page behind the shape. To ensure that you right-click the shape, position the pointer over the shape text, one of the shape's lines, or the white box that appears in the middle of the shape when it's selected, and then right-click. |
|
3. |
In the Door width box, click the down arrow to display a list of dimensions, and then click 36 in. Click OK. |
|
4. |
Right-click the door to display its shortcut menu again, and then click Reverse In/Out Opening. |
|
5. |
From the Walls, Doors and Windows stencil, drag a Window shape onto the vertical wall to the right of the door. 
|
|
6. |
Drag the window's bottom selection handle until the shape is 3 feet wide. Use the Width field in the status bar at the bottom of the drawing page window to determine the shape's width. Tip You might need to zoom in to specify exact dimensions. |
|
7. |
From the Walls, Doors and Windows stencil, drag a Window shape onto the left area of the 16-foot wall. |
|
8. |
Drag the right selection handle on the window you just added to the wall to increase the width of the window to 3 feet. Use the Width field in the status bar at the bottom of the drawing page to determine the shape's width. Tip You can set the display options for one or all the walls, doors, and windows in an office layout at once. For example, you can show or hide all the door frames and swings, window sills and sashes, and wall reference lines in a diagram. To set the display options for all the shapes in a diagram at once, on the Plan menu, click Set Display Options. To set the display options for a single shape, right-click the shape you want to change, and then click Set Display Options on the shortcut menu. |
|
9. |
Hold down the 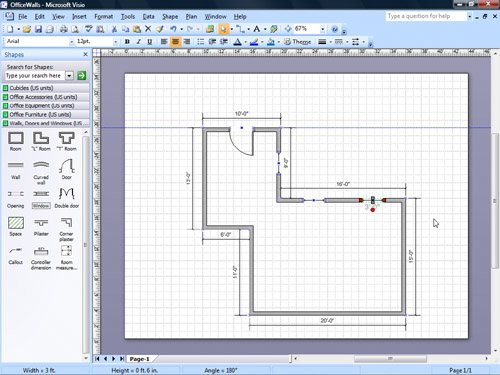
Troubleshooting If you move the window instead of copying it, press |
|
10. |
Click the Cubicles stencil to show it. From the Cubicles stencil, drag the Straight workstation shape into the corner of the office opposite and to the left of the door. 
|
|
11. |
Click the Office Furniture stencil (at the bottom of the Shapes window) to show it. From the Office Furniture stencil, drag the Multi-chair racetrack shape into the empty room. |
|
12. |
With the shape selected, on the Shape menu, point to Rotate or Flip, and then click Rotate Left. 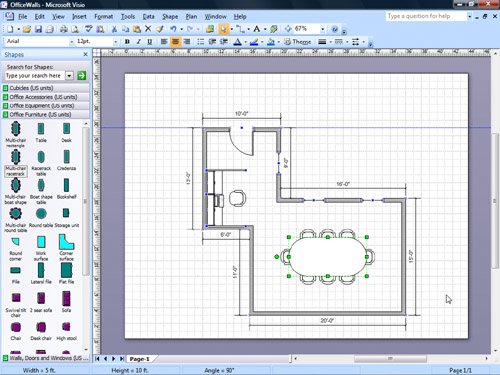
|
|
13. |
On the File menu, click Close, and then click No to close the drawing without saving the changes. |
 key while you drag the window to the right to duplicate the shape and position the copy on the wall to right of the original.
 to undo your action, and then try again. Make sure you release the mouse button before you release the
Quick Reference
Getting Started with Visio 2007
- Getting Started with Visio 2007
- Starting Diagrams by Using Templates
- Working Within the Visio Environment
- Customizing the Visio Environment
- Getting Visio and Diagram Help
- Key Points
Adding Shapes to Diagrams
- Adding Shapes to Diagrams
- Working with 1-D and 2-D Shapes
- Adding Text to Shapes and the Drawing Page
- Moving, Sizing, Rotating, and Copying Shapes
- Working with Groups
- Finding Shapes for Diagrams
- Inserting Pictures into Diagrams
- Key Points
Formatting Shapes and Diagrams
- Formatting Shapes and Diagrams
- Formatting Individual Shapes
- Adding Decorative Elements to Diagrams
- Applying Themes to Entire Diagrams
- Key Points
Connecting Shapes
- Connecting Shapes
- Connecting Shapes in Flowcharts
- Modifying Shape Connections
- Changing the Layout of Connected Shapes
- Key Points
Creating Project Schedules
- Creating Project Schedules
- Creating Timelines to View Projects at a Glance
- Exporting Timelines to Create Gantt Charts
- Tracking Project Details with Gantt Charts
- Key Points
Creating Organization Charts
- Creating Organization Charts
- Importing Data to Create Organization Charts
- Storing and Displaying Employee Information in Organization Charts
- Customizing the Layout of Organization Charts
- Key Points
Laying Out Office Spaces
- Laying Out Office Spaces
- Creating Scaled Office Spaces
- Adding Door, Window, and Furniture Shapes to Office Layouts
- Organizing Shapes in Office Layouts by Using Layers
- Key Points
Creating Network Diagrams
- Creating Network Diagrams
- Connecting Shapes in Network Diagrams
- Storing Information with Network Shapes
- Creating Network Reports
- Key Points
Glossary
About the Authors
Choose the Right Book for You
EAN: 2147483647
Pages: 81
