Moving, Sizing, Rotating, and Copying Shapes
As you create your Visio diagrams, you'll need to move shapes around the drawing page, resize shapes, and maybe even rotate and copy them. When you move shapes, you can move one at a time or many shapes at once. Moving one shape is simplejust select the shape and drag it to a new position. Moving multiple shapes at once is as simple as moving one shape. First you select the shapes you want to move, and then you position the pointer over one of the selected shapes. As you drag, all the selected shapes move as one.
One of the most common ways to select multiple shapes is to select one of the shapes and then hold down the Shift key while you select the rest of the shapes. The first shape you select is the primary shape. Its selection box turns dark magenta after you click an additional shape while holding down the Shift key. The selection boxes for the other shapes you select, called secondary shapes, turn light magenta. Visio also encloses all the selected shapes in a green selection box. Knowing which shape is the primary shape will be useful later when you learn about aligning shapes in Chapter 4 and merging shapes in Chapter 12.

Visio includes several other methods for selecting multiple shapes. If, for example, all the shapes you want to select are in the same area, as they might be in an office layout, you can use the Pointer tool to drag a selection net around the shapes you want to select. After you release the mouse button, everything within the net is selected. You can also use the selection tools on the Pointer Tool menu (on the Standard toolbar) to select multiple shapes without holding down the Shift key. To see the selection tools on the Pointer Tool menu, click the Pointer Tool down arrow.

Tip
To view Visio Help topics that tell you how to use the selection tools on the Pointer Tool menu, type select shapes in the "Type A Question For Help" box, and then press the  key.
key.
The way you resize a shape depends on whether the shape is 1-D or 2-D. You can drag a 1-D shape's end points in any direction to lengthen the shape. When you're working with a 2-D shape, you can change the height or width of the shape by dragging a side, top, or bottom handle. You can also resize the entire shape proportionally by dragging a corner selection handle. To rotate a shape, you can simply drag the shape's rotation handle in the direction you want.
Tip
You can resize more than one shape at a time by selecting all the shapes you want to resize and then dragging a selection handle on the green selection box that encloses the selected shapes.
Copying a shape is also a simple procedure. Select a shape, and on the Edit menu, click Copy. Then, on the Edit menu, click Paste. With Visio, you can go a step further by copying a shape and positioning it in the same action. To do so, instead of working with commands on menus, hold down the Ctrl key while you drag a shape. This action copies the shape and positions it in the location where you release the mouse button. When you're done creating the copy, make sure you release the mouse button before you release the Ctrl key. Otherwise, Visio moves the shape instead of copying it.
In this exercise, you continue working with the block diagram that you updated in the previous exercise. You resize, move, rotate, and copy shapes in the diagram.
OPEN the BlockMove file in DocumentsMicrosoft PressVisio 2007 SBS�2_Shapes.
|
1. |
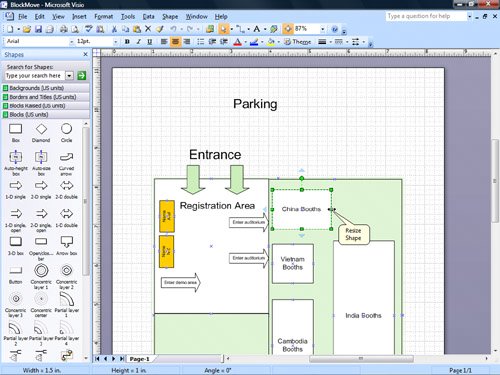
Click the China Booths shape to select it. |
|
2. |
Position the pointer over the middle selection handle on the right side of the shape. Two-headed arrow
|
|
3. |
Drag the section handle until the right side of the box is aligned with the right side of the India Booths shape. |
|
4. |
To get a closer look, position the pointer over the center of the China Booths shape, and hold down 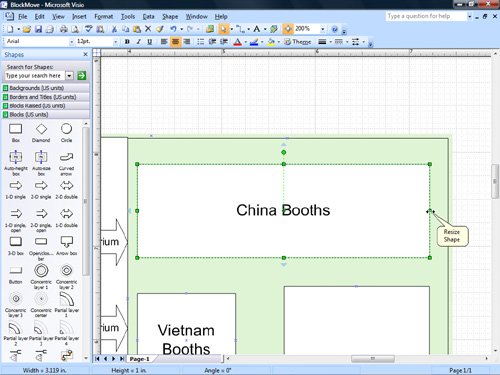 Visio zooms in, and the Zoom box on the Standard toolbar displays the current level of zoom.
 |
|
5. |
If you need to adjust the size of the box, drag the selection handle again. |
|
6. |
Hold down |
|
7. |
Click the pasteboard to deselect the China Booths shape. |
|
8. |
Position the pointer over the Enter demo area shape. Four-headed arrow
|
|
9. |
Click the shape to select it. |
|
10. |
Position the pointer over the Enter demo area shape. Four-headed arrow
|
|
11. |
Drag the shape to move it down a little, and then click the pasteboard or a blank area of the drawing page to deselect the shape. Important If you resize a shape accidentally instead of moving it, you can immediately undo your mistake by clicking Undo on the Edit menu; the keyboard shortcut for this command is |
|
12. |
Position the pointer over the top Enter auditorium shape. |
|
13. |
Click the top Enter auditorium shape to select it. |
|
14. |
Hold down the 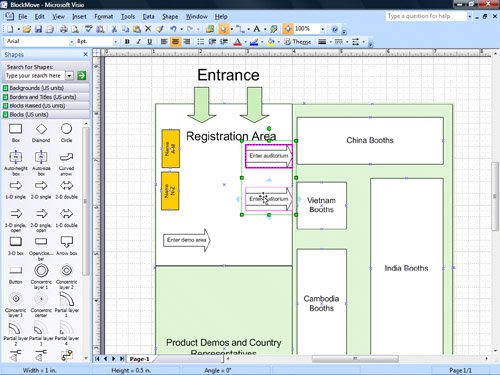
Troubleshooting If you select a shape by mistake, simply undo your mistake by clicking Undo on the Edit menu. Then, begin selecting the shapes again. Or, hold down the |
|
15. |
Point to the top Enter auditorium shape. |
|
16. |
Drag the top shape down approximately one inch. Tip To constrain the direction of shape movement horizontally or vertically, press the |
|
17. |
Click the pasteboard or a blank area of the drawing page to deselect both shapes. |
|
18. |
Click the top Enter auditorium shape to select it. Press the 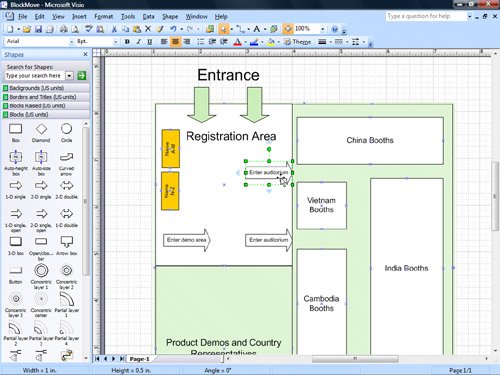
|
|
19. |
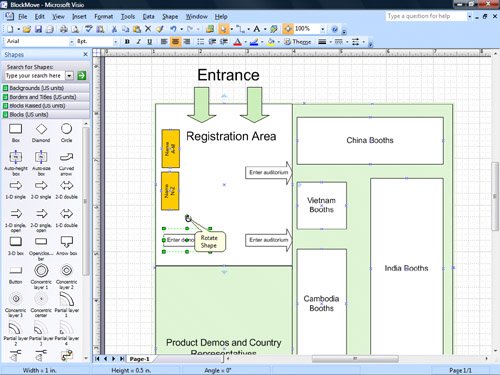
Select the Enter demo area shape, and then position the pointer over the rotation handle on the shape. Circular arrow
|
|
20. |
Drag the rotation handle to the right until the shape points downward or is rotated clockwise 90 degrees. As you drag the rotation handle, watch the status bar, which shows the angle of rotation for the selected shape. 
|
|
21. |
Position the pointer over the selected Enter demo area shape, and then hold down the Plus sign pointer
|
|
22. |
Drag the Enter demo area shape to the right to create a copy of the shape, release the mouse button, and then release the 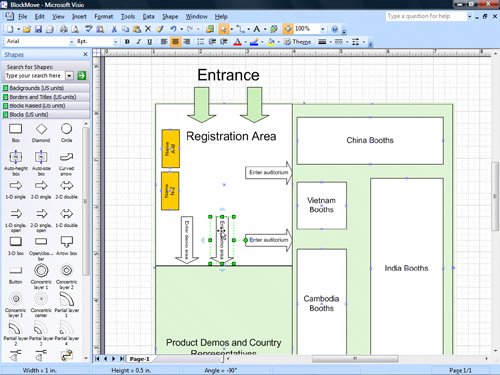
Troubleshooting If you moved the shape instead of copying it, you released the |
|
23. |
Click the pasteboard or a blank area of the drawing page to deselect the shape. |
|
24. |
If you can't see the Parking label at the top of the diagram, drag the vertical scroll bar up until the label is visible. |
|
25. |
From the Blocks stencil, drag the Curved Arrow shape onto the drawing page, and position it to the left of the Parking label. |
|
26. |
On the Shape menu, point to Rotate or Flip, and then click Flip Horizontal. 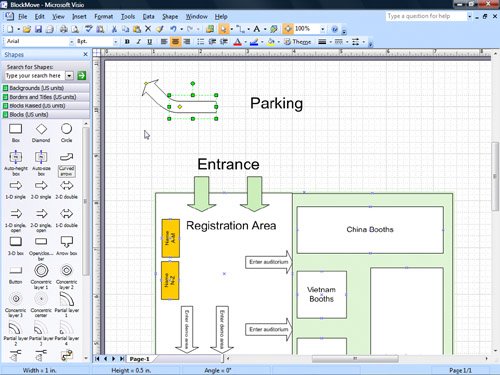
|
|
27. |
Pause the pointer over the yellow control handle at the end of the arrow. |
|
28. |
Drag the control handle down until the shape points toward the Entrance label. 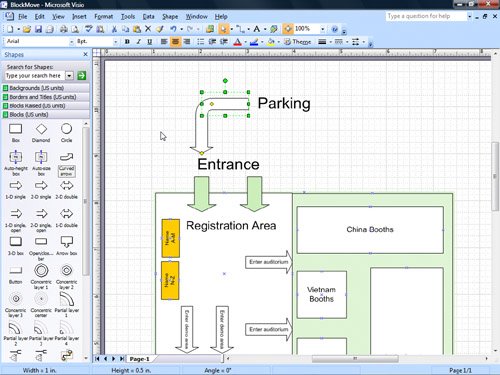
|
|
29. |
If you need to align some of the shapes in your diagram more precisely, select them, and then nudge them using the arrow keys on your keyboard. |
|
30. |
On the Standard toolbar, click Save to save your changes to the diagram. Save
|

 while you left-click.

 . To avoid making this mistake, don't place the pointer over a selection handle when you want to move a shape. Place the pointer over the middle of the shape, and make sure the pointer changes to a four-headed arrow before you move the shape.
 key, and then click the bottom Enter auditorium shape.
 key.
key.

CLOSE the BlockMove file.
Quick Reference
Getting Started with Visio 2007
- Getting Started with Visio 2007
- Starting Diagrams by Using Templates
- Working Within the Visio Environment
- Customizing the Visio Environment
- Getting Visio and Diagram Help
- Key Points
Adding Shapes to Diagrams
- Adding Shapes to Diagrams
- Working with 1-D and 2-D Shapes
- Adding Text to Shapes and the Drawing Page
- Moving, Sizing, Rotating, and Copying Shapes
- Working with Groups
- Finding Shapes for Diagrams
- Inserting Pictures into Diagrams
- Key Points
Formatting Shapes and Diagrams
- Formatting Shapes and Diagrams
- Formatting Individual Shapes
- Adding Decorative Elements to Diagrams
- Applying Themes to Entire Diagrams
- Key Points
Connecting Shapes
- Connecting Shapes
- Connecting Shapes in Flowcharts
- Modifying Shape Connections
- Changing the Layout of Connected Shapes
- Key Points
Creating Project Schedules
- Creating Project Schedules
- Creating Timelines to View Projects at a Glance
- Exporting Timelines to Create Gantt Charts
- Tracking Project Details with Gantt Charts
- Key Points
Creating Organization Charts
- Creating Organization Charts
- Importing Data to Create Organization Charts
- Storing and Displaying Employee Information in Organization Charts
- Customizing the Layout of Organization Charts
- Key Points
Laying Out Office Spaces
- Laying Out Office Spaces
- Creating Scaled Office Spaces
- Adding Door, Window, and Furniture Shapes to Office Layouts
- Organizing Shapes in Office Layouts by Using Layers
- Key Points
Creating Network Diagrams
- Creating Network Diagrams
- Connecting Shapes in Network Diagrams
- Storing Information with Network Shapes
- Creating Network Reports
- Key Points
Glossary
About the Authors
Choose the Right Book for You
EAN: 2147483647
Pages: 81
