Motion Blur
Motion blur is essential to many of the illusions you can create with After Effects. If a layer animates at a sufficiently high velocity, and the Motion Blur toggle is enabled at the Layer and Composition levels, then you get this great illusion for free: The elements blur to match the apparent motion of the scene.
Motion blur is an artifact of motion occurring while a camera shutter is open. You might not notice motion blur with your naked eye, but it does occurwatch a ceiling fan in motion, and then follow the individual blades with your eye; depending on how closely you can follow its movement, you will see more or less blur.
Therefore motion looks very natural (and the lack of it, unnatural) for objects traveling fast. It complements the eye's persistence of vision, fooling your eye into seeing continuity when it actually sees a series of still frames. It can also look quite pretty, even in still photos. All of this helps explain why efforts to eliminate motion blur from a sampled image have tended to seem faddish and strange.
Some users don't realize that After Effects offers you control over how long and precisely when the camera shutter is open, via the Composition Settings dialog's Advanced tab (Figure 2.27). These settings are not intuitive until you know how to decipher them.
Figure 2.27. The Shutter Angle and Shutter Phase settings on the Advanced tab of the Composition Settings dialog control the appearance of motion blur.

The Shutter Angle setting controls how long the shutter is open; a higher number means more blur. Shutter Phase controls at what point, during a given frame, the shutter opens; at the default of 0, the shutter opens at the moment in time when the frame begins.
Notes
One setting you cannot change is the number of sampled steps used to create the blur, which is always 16 in After Effects regardless of the length of the blur being generated.
What the Settings Mean
A physical film camera typically has an angled mechanical shutter that can open in a circular motion anywhere between a few degrees and a full 360 degrees (an electronic shutter does not behave the same, but never mind about that). Theoretically, 360 degrees provides the maximum open aperture, and thus the greatest amount of blur a shot would contain.
After Effects, however, cheats by offering you double the blur overhead of a fully open shutter. The maximum setting for Shutter Angle in the Composition Settings dialog is 720, an impossibility in the real world.
A camera report can help you decide on this setting, although it's typically possible to carefully eyeball it by zooming in on an area where background and foreground elements both have blur and matching them (Figures 2.28a and b). If your camera report includes shutter speed, you can calculate the Shutter Angle setting using the following formula:
shutter speed = 1 / frame rate * (360 / shutter angle)
Figures 2.28a and b. In 2.28a, the default Shutter Angle setting of 180 degrees is too heavy for this white solid masked over the front hubcap, which has been tracked to match the shot motion. In 2.28b, Shutter Angle was cut down by 50% to 90 degrees. In this case, there was no camera report to guide the decisions; they are based on blur that can be observed on the rest of the moving truck.

Close-Up: The Virtual Camera Shutter
Using a real, physical camera, the shutter setting (along with the aperture) determines the amount of light passed onto the film or video pickup. Low-lit scenes are blurrier because the shutter remains open longer, allowing it to gather more light. Other scenes will be deliberately taken with a slow shutter (and the aperture closed down) to produce nice, streaky blur.
After Effects is unconcerned with the need to gather light, and it does not produce (or even emulate) the lens effects associated with a high or low shutter angle setting (nor the Aperture setting on a 3D camera, explored in Chapter 9, "Virtual Cinematography"). Therefore, by opening the aperture, you create only the desirable partthe blur itself.
This isn't as gnarly as it looks, but if you dislike formulas, think of it like this: If your camera takes 24 frames per second, but Shutter Angle is set at 180 degrees, then the frame is exposed half the time (180/360 = ½) or  of a second. If the camera report shows a
  of a second exposure, Shutter Angle should be 90 degrees.
Shutter Phase determines when the shutter opensnot necessarily at the beginning of the frame (although that is the default). Shutter Phase is meaningful as an offset of the Shutter Angle.
So, if 0 opens the shutter and starts the blur at the beginning of the frame, a 90 setting with a 180° Shutter Angle means that half the blur starts before the frame (blurring the previous frame) and half follows it.
Notes
Setting Shutter Phase to 50% of Shutter Angle is useful when motion tracking and should probably be the default. When motion blur is added to the tracked layer, the track stays centered, instead of appearing offset.
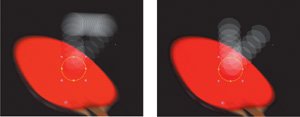
Close-Up: Ricochet
A negative 50% Shutter Phase setting is particularly useful when tracking in an object that ricochets, such as a bouncing ball, allowing you to see the motion in both directions at the frame of impact. However, this effect doesn't work by default in After Effects 7.0, which averages the surrounding frames (Figure 2.29a). You can trick it into making the V-shape of the ricochet by adding a very slight rotation to the ricochet layer. This forces After Effects into sampling all of the frames necessary to create the ricochet (Figure 2.29b). High-speed effects such as this also reveal steps in the blur, due to the number of samples used to create itanother limitation of the current version with no available adjustment.
Figures 2.29a and b. These two images should look the same, but you have to force After Effects into getting the result in 2.29b by adding a slight bit of rotation. The other key is setting the Shutter Phase to 50% of the Shutter Angle, which causes the motion blur to be sampled right at the middle of the motion.
Manipulating Time Itself |
Section I. Working Foundations
The 7.0 Workflow
- The 7.0 Workflow
- Workspaces and Panels
- Making the Most of the UI
- Settings: Project, Footage, Composition
- Previews and OpenGL
- Effects & Presets
- Output: The Render Queue
- Study a Shot like an Effects Artist
The Timeline
- The Timeline
- Organization
- Animation Methods
- Keyframes and The Graph Editor
- Uber-mastery
- Transform Offsets
- Motion Blur
- Manipulating Time Itself
- In Conclusion
Selections: The Key to Compositing
- Selections: The Key to Compositing
- The Many Ways to Create Selections
- Compositing: Science and Nature
- Alpha Channels and Premultiplication
- Masks
- Combining Multiple Masks
- Putting Masks in Motion
- Blending Modes: The Real Deal
- Track Mattes
Optimizing Your Projects
- Optimizing Your Projects
- Navigating Multiple Compositions
- Precomposing and Nesting
- Adjustment and Guide Layers
- Understanding Rendering Order
- Optimizing After Effects
- Onward to Effects
Section II. Effects Compositing Essentials
Color Correction
Color Keying
- Color Keying
- Good Habits and Best Practices
- Linear Keyers and Hi-Con Mattes
- Blue-Screen and Green-Screen Keying
- Understanding and Optimizing Keylight
- Fixing Typical Problems
- Conclusion
Rotoscoping and Paint
- Rotoscoping and Paint
- Articulated Mattes
- Working Around Limitations
- Morphing
- Paint and Cloning
- Conclusion
Effective Motion Tracking
- Effective Motion Tracking
- The Essentials
- Optimizing Tracking Using 3D
- Extending a Track with Expressions
- Tracking for Rotoscoping
- Using 3D Tracking Data
- Conclusion
Virtual Cinematography
- Virtual Cinematography
- 5D: Pick Up the Camera
- Storytelling and the Camera
- Camera Blur
- The Role of Grain
- Film and Video Looks
- Conclusion
Expressions
- Expressions
- Logic and Grammar
- Muting Keyframes
- Linking Animation Data
- Looping Animations
- Smoothing and Destabilizing
- Offsetting Layers and Time
- Conditionals and Triggers
- Tell Me More
Film, HDR, and 32 Bit Compositing
- Film, HDR, and 32 Bit Compositing
- Details
- Film 101
- Dynamic Range
- Cineon Log Space
- Video Gamma Space
- Battle of the Color Spaces
- Floating Point
- 32 Bits per Channel
- Conclusion
Section III. Creative Explorations
Working with Light
- Working with Light
- Light Source and Direction
- Creating a Look with Color
- Backlighting, Flares, Light Volume
- Shadows and Reflected Light
- HDR Lighting
- Conclusion
Climate: Air, Water, Smoke, Clouds
- Climate: Air, Water, Smoke, Clouds
- Particulate Matter
- Sky Replacement
- The Fog, Smoke, or Mist Rolls In
- Billowing Smoke
- Wind
- Water
- Conclusion
Pyrotechnics: Fire, Explosions, Energy Phenomena
- Pyrotechnics: Fire, Explosions, Energy Phenomena
- Firearms
- Sci-Fi Weaponry
- Heat Distortion
- Fire
- Explosions
- In a Blaze of Glory
Learning to See
Index
EAN: 2147483647
Pages: 157
