Appendix B Stateless University Registration System Case Study
System Documentation
Stateless University Registration System (SURS)
User Interface Specification
May 1, 2002
Version 2.3
Prepared By:
Otis Kribblekoblis
Super Duper Software Company (SDSC)
422 South 5th Avenue
Anytown, USA
Introduction
The purpose of this document is to describe the planned user interface for the Stateless University Registration System. It will be revised to reflect that "as-built" software after system testing has begun. It is a customized version of the registration system delivered to Universal Online University (UOU) last year. Stateless U has requested some major modifications to the UOU version, so that it is essentially a rewrite of the software. Some of the modules for database creation and backup have been reused, but that is not apparent from the user interface, which is all new.
This manual has the user interface screens defined in the order in which they are customarily used. It starts with the login screen. Then it provides the data base set-up fields: the addition / change / deletion of students, the addition / change / deletion of courses, and the addition / change / deletion of class sections. The final data entry screen provides the selection of specific course sections for each student. There is also an administrative function that is accessible to only the supervisor. It provides access to the administrative functions of backup and restore of the databases. Each screen is defined in a separate section providing the following information:
- Functionality supported
- Formatting requirements for each data entry field
- A sample screen layout (the final implemented software may differ)
The figure below summarizes the screens and their navigation options.
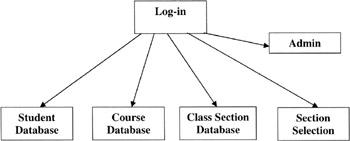
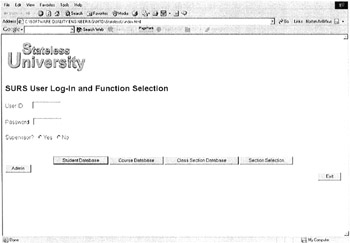
Log in and Select Function Screen
Functions
Each user is required to enter a User ID and a Password. The identification of the status of the user (supervisor: yes or no) is mandatory at the time of log-in. Only Yes or No may be selected by clicking on the appropriate box (not both). After a successful log-in has been completed, then the next function to be executed can be selected. Only a supervisor may access the Administrative screen. The Exit button is active at all times.
Data Entry Formats
The formats for the fields on this screen are:
User ID: eight characters at least two of which are not alphabetic (can be numeric or special characters).
Password: eight characters at least two of which are not alphabetic (can be numeric or special characters).
Screen Format
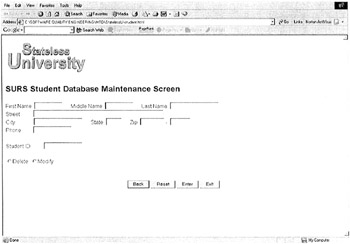
Student Database Maintenance Screen
Functions
This screen allows the entry of the identifying information for a new student and the assignment of his/her student ID number. All fields are required to be filled in before the Enter button is selected. The fields may be entered in any order. The backspace key will work at any time in any field, but the Reset button will clear all of the fields when it is pressed.
If the Student ID is entered first, then the Delete (allows a student to be removed from the database) and Modify (allows the modification of the student's contact information—the data currently in the database will be displayed) buttons become active. The Enter button will cause the Delete or the Modify to be executed and the fields on the screen to be cleared.
Data Entry Formats
The formats for the fields (all mandatory) on this screen are:
First name: one to ten characters
Middle name: one to ten characters or NMN for no middle name
Last name: one to fifteen characters (alpha, period, hyphen, apostrophe, space, numbers)
Street address: four to twenty alphanumeric characters
City: three to ten alpha characters
State: two alpha characters
Zip: the standard five numerics hyphen four numerics
Phone: telephone number in the following format 703.555.1212
Student ID: two characters representing the home campus and a six-digit number which is unique for each student. The home campus designations are:
- AN for Annandale
- LO for Loudoun
- MA for Manassas
- WO for Woodbridge
- AR for Arlington
The six-digit number is generated by the system when the Enter button is selected. It remains displayed until the Reset button is depressed. At that time, all fields are cleared for the next set of entries.
Screen Layout
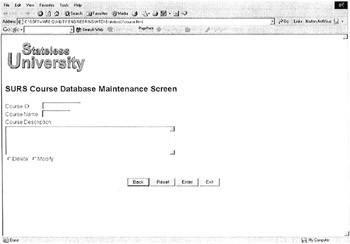
Course Database Maintenance Screen
Functions
This screen allows the entry of the identifying information for a new course and the assignment of the course ID number. All fields are required to be filled in before the Enter button is pressed. The fields may be entered in any order. The backspace key will work at any time in any field, but the Reset button will clear all of the fields when it is entered. The Back button causes a return to the previous screen. The Exit button causes an exit from this application.
If the Course ID is entered first, then the Delete (allows a course to be removed from the database) and Modify (allows the modification of an existing course's information—the data currently in the database will be displayed) buttons become active. The Enter button will cause the Delete or the Modify to be executed and the fields on the screen to be cleared.
Data Entry Formats
The formats for the fields (all are mandatory) on this screen are:
Course ID: three alpha characters representing the department followed by a six-digit integer which is the unique course identification number. The possible departments are:
- PHY - Physics
- EGR - Engineering
- ENG - English
- LAN - Foreign languages
- CHM - Chemistry
- MAT - Mathematics
- PED - Physical education
- SOC - Sociology
- LIB - Library science
- HEC - Home economics
Course name: a free format alphanumeric field of up to forty characters
Course description: a free format alphanumeric field of up to 250 characters
Screen Layout
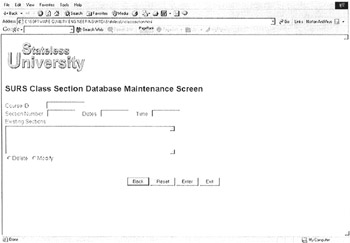
Class Section Database Maintenance Screen
Functions
This screen allows the entry of the identifying information for a new course section. All fields are required to be filled in before the Enter button is pressed. The fields may be entered in any order. The backspace key will work at any time in any field, but the Reset button will clear all of the fields when it is entered. The Back button causes a return to the previous screen. The Exit button causes an exit from this application.
The Course ID is required to be entered first (all existing sections will be displayed as soon as it is entered), followed by the new Section #, Dates and Time fields. The Delete (allows a section to be removed from the database) and Modify (allows the modification of an existing section's information) buttons become active after the Section # is entered. If the section is already in the database, the current information will be displayed as soon as the Section # field is filled in. The Enter button will cause the Delete or the Modify to be executed and the fields on the screen to be cleared.
Data Entry Formats
The formats for the fields (all mandatory) on this screen are:
Course ID: three alpha characters representing the department followed by a six-digit integer
Section #: a three-digit integer (leading zeros are required) assigned by the user
Dates: the days of the week the class meets (up to three with hyphens in between); the weekday designations are:
- Sun
- Mon
- Tue
- Wed
- Thr
- Fri
- Sat
Time: the starting and ending times of the section (using military time) with a hyphen in between, e.g., 12:00–13:30.
Screen Layout
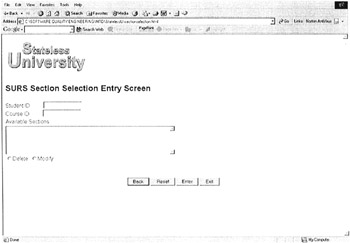
Section Selection Entry Screen
Functions
This screen allows the entry of the selection of specific course sections for an individual student. All fields are required to be filled in before the Enter button is pressed. The fields may be entered in any order. The backspace key will work at any time in any field, but the Reset button will clear all of the fields when it is entered. The Back button causes a return to the previous screen. The Exit button causes an exit from this application.
The Student ID is required to be entered first, followed by the Course ID (all available sections will be displayed as soon as it is entered). Sections are selected by clicking on the section to be assigned. The Enter button will cause the student to be added to the selected section. Entering a new Course ID will cause a new list of available sections to be displayed, allowing another course section to be selected for the same student.
Data Entry Formats
The formats for the fields (all mandatory) on this screen are:
Course ID: three alpha characters representing the department followed by a six-digit integer
Student ID: two characters representing the home campus and a six-digit number that is unique for each student
Available sections: a list of all of the sections that are not full
Screen Layout
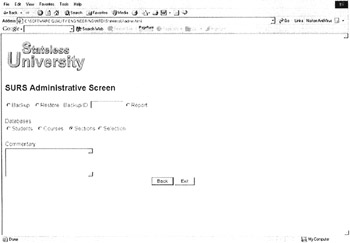
Administrative Screen
Functions
Only the supervisor may access the administrative screen. It permits one of the following three activities at a time:
- Creation of a backup of any or all of the databases
- Restore of a backup of any or all of the databases
- Printing of a report of any or all of the databases
After the activity (create or restore) and the databases have been selected, the name of the backup is to be entered.
The Back and Exit buttons are active at all times.
Data Entry Formats
The formats for the fields on this screen are:
Backup ID: aannnn (required only for backups, not reports)
Commentary: a free format character field 200 characters in length (required only for backups, not reports)
Screen Layout
Preface
Section I - Black Box Testing Techniques
- Section I - Black Box Testing Techniques
- Equivalence Class Testing
- Boundary Value Testing
- Decision Table Testing
- Pairwise Testing
- State-Transition Testing
- Domain Analysis Testing
- Use Case Testing
Section II - White Box Testing Techniques
Section III - Testing Paradigms
Section IV - Supporting Technologies
Section V - Some Final Thoughts
EAN: 2147483647
Pages: 161
