Scripting for Fields
Most people using FileMaker spend a lot of their time working with field data, so it's no surprise that script steps devoted to fields abound. You can put the user in a specific field, select field text, and even play sounds and movies from container fields. You can perform a find and replace operation, run the Replace Field Contents command, and export field contents to a file. Finally, you get more than 10 ways to put data into a field.
14.2.1. Navigating Fields
FileMaker offers a couple of ways to field-hoppressing Tab to move to the next field in order, or just clicking the desired field. It has script steps that mimic both techniques.
14.2.1.1. Go to Field
The simplest field navigation script step is called Go to Field. It's really a two-purpose step, with two checkboxes to prove it. In its simplest form, you turn on the "Go to target field" checkbox and pick the field you want to go to. When the script runs, FileMaker puts the user in the specified field (provided it's on the layout).
Tip: When you use Go to Field in a script, FileMaker dutifully ignores the field behavior specified on the layout and puts the user right into the field. Remember this point if you ever want a field that users can only get to by using your script.
The step also has a checkbox called "Select/perform." When this option is turned on, the script either selects the contents of the field it goes to or does what's in the fieldif possible. For example, if the step goes to a container field that holds a sound or movie, FileMaker plays the contents instead. If the container field holds a reference to a picture or file, FileMaker opens the correct file, using the appropriate program.
The mildly weird thing about Go to Field is you can turn on "Select/perform" and turn off "Go to target field." With the options set this way, Go to Field doesn't go to a field at all. Instead, it simply selects or performs the contents of the field you happen to be in when the script runs.
14.2.1.2. Go to Next Field and Go to Previous Field
To mimic the process of tabbing through fields, FileMaker has two more script steps. The first, called Go to Next Field, just tabs to the next field in the tab order. You probably already figured out that Go to Previous Field goes to the previous field in the tab order. These steps don't have a "Select/perform" optionthey just go to the field.
Tip: To get the effect of Select/Perform, use Go to Next Field or Go to Previous Field to get to the field you want, then use Go to Field to select/perform it. When you add the Go to Field step, don't turn on "Go to target field," and it acts on the field you're already in.
14.2.2. Editing Commands
FileMaker has all the classic commands in its Edit menu: Undo, Cut, Copy, Paste, and Clear. It also has a script step for each of these commands. The Undo step is the simplest. It has no options at all, and has exactly the same effect as choosing Edit  Undo. Its rare that you want to Undo something you just scripted, so you'll rarely use this script step. It's quite handy, though, if you use Custom Menus (Section 19.5.3) to control users' access to certain menu commands because you need to provide scripts for everything your users might want to do.
Cut, Copy, and Clear are slightly more complicated, with two options each. The first, "Select entire contents" lets you decide which part of a field's value gets copied and/or cleared. If you turn this option on, FileMaker selects the entire field before acting. If this option's turned off, FileMaker copies whatever happens to be selected in the field. You also get a "Go to target field" option, through which the script can tell FileMaker which field to act on. If it's not turned on, it uses the current fieldthe one the user's in when the step runs.
The Paste step is the most complicated of these four. In addition to specifying which field you want, and whether or not to select everything in the field before pasting, you get an option to "Paste without style." When you turn this option on, FileMaker pastes the text on the clipboard, but throws away any style information. If you're in Windows, you get a fourth option: "Link if available." If the data on the clipboard comes from a source that supports object linking, FileMaker embeds the linked object. Changes to the original data shows up in FileMaker. Turn this option off if you just want the script to paste a copy of the data.
14.2.3. Selecting Text
FileMaker has two script steps to help you select text. The first, called Select All, selects everything in the current field, just like the Edit Select All command. If you need more control, use Set Selection instead. This step has two options. First, you can specify a target field so that FileMaker operates on the current field. The step also has a separate Specify button (below the one associated with "Go to target field) that brings up the Specify Set Selection window (Figure 14-1).
|
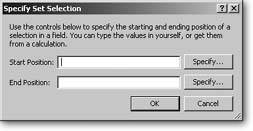
If you imagine the text in your field as a string of letters, numbers, spaces, and punctuation, then you can pretend each of these is numbered. For instance, the word "Missing" has letters numbered one through seven. You first tell FileMaker where the selection should start by putting the number of the first character in the Start Position box. Next, you put the number of the last character in the End Position box. When the step runs, FileMaker selects these two characters and everything in between.
| POWER USERS' CLINIC Positioning the Insertion Point |
|
You can use the Set Selection script step to put the insertion point anywhere in a field too. The trick is to make sure nothing gets selected. When you specify a Start Position and an End Position, FileMaker selects the characters at each position, plus anything in between. If these two numbers are the same, FileMaker selects just one character. But what if the End Position comes before the Start Position? When you set the End Position one number lower than the Start Position, FileMaker doesn't select anything. Instead, it puts the little flashing insertion point right before the Start Position. Using this technique, you can get your script to put the user anywhere you want inside a field. |
14.2.4. Editing Field Data
Editing field data is such an important part of FileMaker that there are more than 10 ways to put stuff in fields with a script step. On Section 13.1.4, you learned that the scripted process for creating a printed report could actually be shorter and more efficient than the manual process. Editing field data via scripts is also different from manually editing data, and the following sections cover those differences.
The first thing to understand is that most of these steps work only if the field is on the current layout. This property's no problem for scripts you use to structure a user's data entry, but it can be a roadblock in other cases. Suppose you have a script that sets a "Paid in Full" flag on an invoice. You want this script to work no matter what layout you're on (as long as it's one that shows Invoice records), and whether the field is on that layout or not. In that case, you need to understand the Set Field script step (Section 14.2.4.2).
14.2.4.1. Using Cut, Copy, and Paste
Your first inclination might be to use Cut, Copy, and Paste in a script to move data from one field to another, and it works well. You can, for example, have a script copy the Customer ID field, then go to the Invoices layout, create a new invoice, and paste it into the Customer ID field there.
But most developers recommend against this approach for two reasons. First, many people consider the user's clipboard to be sacred ground. They argue you should never change what's on the clipboard unless the user asks you to. So it would be OK to have a Copy button by the Address fields, for example, that copies the address to the clipboard. But what if the user copies a long product description to the clipboard, and then runs the Create Invoice for Customer script? She then tries to paste the description in the invoice line item, only to find that the description's gone, replaced by the Customer ID for some odd reason. To keep from frustrating the user (or yourself), you should generally avoid Cut and Copy.
Also, these steps don't work if the field isn't on the layout. People often show the customer's name on an invoice, but not his ID. But if you delete the Customer ID field from the Invoice layout, any scripts that use Cut, Copy or Paste and the Customer ID field break. That's where Set Field steps in to save the day.
14.2.4.2. Set Field
The one field-editing power step that doesn't care a whit about what fields are on the layout is called Set Field. This step replaces the contents of a field with the result of a calculation. Its two options let you specify the field to set, and the calculation to use. The calculation result must be the same type as the field you've specified. For Text, Date, Time, and Timestamp fields, Set Field is usually the step of choice: It's flexible and reliable, no matter what's on the layout.
Like many of the steps you've seen so far, you can choose not to specify a field at all. When you do, Set Field changes the field it's in at the moment the step runs. (The current-field method works only with text results; otherwise, you have to specify the field so FileMaker knows what type you have in mind.)
14.2.4.3. Insert Calculated Result
Set Field's one weakness is that it always overwrites a field completely (but see the tip below). Another step, Insert Calculated Result, lets a script put data in a field while keeping the data that's already there. It has three options. First you can specify a target field. You can also choose "Select entire contents" in the field first (in which case it overwrites the entire field, just like Set Field). Finally, you get to specify the calculation. Here are some variations on these options:
- If you don't turn on the "Select entire contents" option, FileMaker inserts the calculation result after whatever's already in the field.
- If you don't specify a field at all, and you don't turn on "Select entire contents," then FileMaker inserts the result of the calculation into the current field. If you select data when the script step runs, the calculation result overwrites whatever's highlighted. Otherwise, the text goes in wherever the insertion point happens to be, just as though you'd typed it from the keyboard.
Tip: You can, if you wish, use Set Field to append results to existing data: Just include the field's data in the calculation. If you want to add "Esquire" to the end of the customer's last name (in the Last Name field), just use this calculation in your Set Field step:
14.2.4.4. Inserting other values
FileMaker has six other Insert script steps that work like Insert Calculated Result. Each step lets you specify a target field and select the field contents if you want. They differ only in what gets inserted:
- Insert Text lets you specify any arbitrary text value and add it to the field verbatim. Use this if you know ahead of time what you want your script to put in the field, and don't need to calculate it.
- Insert from Index makes your script show the same View Index window just like choosing Insert From Index in Browse or Find mode. The user picks a value from the list and FileMaker inserts it into the field. This options especially valuable in Find mode, both to keep your user from having to type a value (and possibly making a typo) and to make sure that the search always finds records, since if a value's in the index, it's in a record somewhere.
- Insert from Last Visited is an interesting step. It grabs the value from the same field on the last visited record and inserts it. This step is particularly useful on data entry layouts. Imagine, for example, you have to enter 300 Person records from 15 different companies. You could use this step to create a button that pops in the last company you typed into the Company Name field, rather than type it over again.
- Insert Current Date and Insert Current Time do just as they say. Unfortunately, there's no Insert Current Timestamp step (use Insert Calculated Result and the Get (CurrentTimeStamp) function instead).
- Insert Current User Name puts the user name of the person using FileMaker into the field. Your operating system normally determines this user name, but you can easily change it from FileMaker's Preferences' General Tab.
See the box on Section 14.2.5 for advice on when to use Set Field and when to use an insert step.
14.2.4.5. Putting data in container fields
In Part 4, you learned that calculations can work with container data. Set Field and Insert Calculated Result are no exception: You can use either of them to move pictures, movies, sounds, and files from one container field to another. You can also use Cut, Copy, and Paste to work with container fields, provided you're willing to live with the caveats for intruding on your user's Clipboard described on Section 14.2.4.
But FileMaker has special commands in the Insert menu to get container data into your database in the first place, and these commands have script step equivalents:
- Insert Picture lets you specify the file to insert, and whether you want to "Store only a reference" (see Section 2.7.4 for a refresher on references). If you don't specify a file, FileMaker asks the user to pick one when the step runs.
Note: The dialog box the user sees when he's asked to pick a picture file includes the "Store only a reference" checkbox, regardless of how you set this option on the script step itself. In a sense, your choice in the script becomes a suggestion to the user: It determines how the checkbox is set when the dialog box pops up. The user's free to change it.
POWER USERS' CLINIC
Set Field vs. InsertFileMaker's field editing script steps have a lot of overlap (Section 14.2.4.2). For example, Set Field with no target field does exactly the same thing as Insert Calculated Result with no target field and the "Select entire contents" checkbox turned on. And you can use Insert Calculated Result with the appropriate calculation to do the same thing as Insert Date, Insert Time, Insert Text, and Insert Current User Name. In general, it doesn't matter one bit which one you use.
But you should think twice about using the Insert script steps with a target field specified and the "Select entire contents" checkbox turned on. With both options set, these script steps simply overwrite the value in some fieldexactly what Set Field does.
Since these steps need the field on the layout, though, they're more fragile: the script can break if you make changes to a layout. You'll probably save yourself a headache tomorrow if you just use Set Field today.
Of course, if you're inserting into a field (without "Select entire contents" turned on) then you must use an Insert step. Luckily, with settings like this one, a step makes sense only if the user's already in the fieldand thus the field's obviously on the layout.
Finally, you can't accomplish some of the Insert steps from a calculation. Specifically, you can't access the last visited record or the View Index dialog box from a Set Field step.
- Insert QuickTime has only one option: the file you want to insert. Again, if no file is selected, the user gets to pick when the script runs. Since QuickTime files are always stored as a reference, you don't get that choice this time.
- Insert File has the most options of all. Of course you get to pick the file to be inserted. You also get a "Store only a reference" checkbox. This time, though, you also get a "Go to target field" checkbox. You can use it to tell FileMaker which field to put the file in.
Insert Picture and Insert QuickTime don't have an option to tell FileMaker which field to use, which probably seems odd. They're designed to put things in the current container field the user clicks before the script runs. If you want more control, just use Go to Field first, specifying the appropriate field. Then use Insert Picture or Insert QuickTime to insert into that field.
14.2.5. A Field Script in Action
Suppose you decide to add a Notes field to the Customer table in your database. You use this field to hold any arbitrary information you think is important about the customer. Unfortunately, you soon realize this field is a little too unorganized. You've no idea if the note that says, "Customer already paid" is from last Tuesday or last year. What you need is a consistent way to keep track of who left a note, and when. You decide everybody should record this information along with any note they leave. To make things even easier, you want to be sure people add new notesabove older notes. Thus, when a customer record has been around for a while, the Notes field would look something like this:
	--- 12/11/05 @ 3:30 PM by Summer ---
	Called the customer, confirmed order was received.

	--- 12/01/05 @ 1:25 PM by Stacey ---
	Customer called saying he never got his order. I checked and we have no
	record of shipment. I'm shipping again.

	--- 11/03/05 @ 4:58 PM by Dave ---
	Order came in really close to quittin' time. I'll deal with it later!
In this example, you create a script that "forces" all added comments into that format. This script adds a separator line with the date and time (plus a couple blank lines) and leaves the insertion point under the separator. You also create a button next to the Notes field that runs this script. All the user has to do is click and type.
Note: Like almost every problem you ever solve with a script, you can do this process in about 24,601 ways. One way's described below, and another in the box on Section 14.2.5.1. You may prefer a different way, and that's OK.
Before you start creating your script, think about what you need to do in sequence. Here's a breakdown:
- Put the insertion point at the start (top) of the Notes field.
- Insert two blank linesto create some space before the previous comment.
- Put the insertion point back at the start, and add the separator line with the date and time.
- At that point, the script ends and the user can start typing.
Your next mission is to translate these plain-English steps into ScriptMaker steps, which you'll do in the next section.
14.2.5.1. Building the script
If your Customers table doesn't already have a Notes field, create one before you write the script. Then proceed as follows:
- Choose Scripts ScriptMaker. Create a new script called Develop the habit of giving your scripts descriptive names so you can remember what you want them to do.
- Add a Set Selection script step to the script.
You can find this step under Editing in the list, or you can choose "all by name" from the View pop-up menu to see an alphabetical list. When you add the step, it appears in your script.
- Turn on the "Go to target field" checkbox. If necessary, choose Customers from the table pop-up menu, and then choose the Notes field and click OK.
The Set Field step in your script updates to show the target field.
GEM IN THE ROUGH
Fewer Steps, Bigger CalculationsThe Add Note Separator script described on Section 14.2.5.1 is easy to create, but it has one weakness: It uses four steps where two could accomplish the same thing. A more concise approach would be to first put the separator and a few blank lines at the top of the Notes field, then use the Set Selection script step to put the insertion point after the separator. The drawback here is that you have much more complex calculations to write. The choice is yours.
In the Set Selection step, you need a calculation that builds the separator line, adds two blank lines after it, and finally adds the old contents of the Notes field to the end:
	"--- " & Get(CurrentDate) & " @ " &
	Get(CurrentTime) & " by " & Get(UserName)
	& " ---" & Customers::Notes

Once this process is done, you need to get the insertion point into place after the first line, using the Set Selection script step. Remember that when you use Set Selection with an End Position that's smaller than the Start Position, FileMaker puts the insertion point before the character at the Start Position. Since you want it after the end of the first line, you need to find the first new line symbol, add 1 to it, and put that in the Start Position. Here's the calculation that does the trick:
	Position ( Customers::Notes, "", 1, 1 )
	+ 1
You can use this script with or without the Go to Target Field option, as describe in step 3 of the "Building the script" section.
- In the Script Step Options area, click the second Specify button.
It's not labeled, but it's below the first Specify button. When you click it, the Specify Set Selection window appears.
- In both boxes (Start Position and End Position) type 0 (zero).
Zero in both boxes tells FileMaker you want the insertion point right at the start of the field, and you don't want any text selected. (Positioning at the start of a field is the single exception to the box on Section 14.2.4, which discusses how to set the insertion point without selecting text.)
- Add an Insert Text step to the script and turn off the "Select entire contents" option.
You don't want the two blank lines you're about to insert to replace everything in the field.
- Click the bottom Specify button.
A window called simply Specify appears (Figure 14-2).
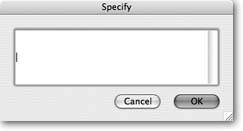
Figure 14-2. The Specify dialog for Insert Text seems puzzling, because there aren't any options for you to click. You just type the exact text you want the script step to insert. Note, this box isn't a calculation dialog box. It only allows the insertion of literal text. Use Insert Calculated Result if you need to insert dynamic text with a script step.
- In the Specify window, add two empty lines (press Return or Enter twice), and then click OK.
That's the regular Enter key, not the one in the numerical keypad: In this dialog box, that key just clicks the OK button. Anyway, after pressing it twice, you don't see the returns you've typed in the dialog box, but you do see two blanks spaces inside quotes in the Insert Text script step. Those returns tell FileMaker to add two blank lines to the top of the Notes field.
- Select the Set Selection step at the top of the script, and then click the Duplicate button at the bottom of the window.
FileMaker adds a second copy of the Set Selection step, right below the first.
- Drag either Set Selection step to the bottom of the script.
Mouse junkies can use Ctrl+down arrow (
 -down arrow) to move script steps.
The ultimate goal is to have a script with Set Selection, then Insert Text, and then Set Selection again. It doesn't matter which Set Selection step you drag, as long as one's on top and the other on the bottom when you're done.
- Add the Insert Calculated Result step to the script and turn off the "Select entire contents" option.
Make sure the step lands afterthe last Set Selection script. If it doesn't, move it there. Turning off the selection option ensures that the calculation goes right in the middle of the text, not on top.
- Click the Specify button to the right of "Calculated result" and enter this calculation in the Specify Calculation window:
	"--- " & Get(CurrentDate) & " @ " & Get(CurrentTime) & " by " &
	Get(UserName) & " ---
"You can use any method you want to enter the calculation, as long as it does the same thing as this one.
- Click OK until you're back in your database.
Your new script is ready to run. Now you just need to add the Notes field to the Customers layout, and a button by it that runs the new script. When you click the button, FileMaker adds the separator to the field, and puts the insertion point in place. Your users can now type notes that are nicely organized and separated.
| POWER USERS' CLINIC A Reusable Notes Separator Script |
|
The mark of a FileMaker power-scripter is someone always on the lookout for the opportunity to write one script that can be used in several places. After all, who wants to spend his life in ScriptMaker? The fact is, you're probably so happy with your new Notes field and its separator script that you want to use it in other placeson a Job, an Invoice, a Payment, and so forth. It would be much nicer if the Add Note Separator script could add a note separator (and place the insertion point) in any field you wanted. You could then tell the user to click the Notes field before running the script. The only thing tying your script to the Customers::Notes field is the "Go to target field" checkbox on the Set Selection steps. If you edit the script and turn this option off for both Set Selection steps, it works on whatever field is active when the script runs. If you don't like to have to click the field before running the script, you can fix it in two ways, but both require information you haven't learned yet. See Section 15.4 for a continuation of this technique. |
14.2.6. Other Steps that Work with Fields
Lots of times, you want to be able to write scripts that work on multiple records. You might need to change values across a found set of records, or you might want to let FileMaker handle the serial numbering of all the records in a table. The next script steps let you manage data in lots of records without lots of hassle.
14.2.6.1. Perform Find/Replace
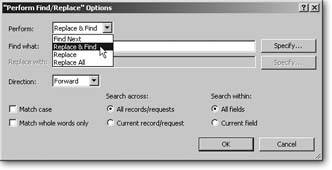
The Perform Find/Replace script step brings all the power of the Find/Replace command (Section 2.5.1) to your scripts. You can include the find parameters in the script step, or create a calculation to determine the parameters on the fly, as shown in Figure 14-3.
When you use this step, you pick which action you want to perform from the Perform pop-up menu. Your choices are Find Next, Replace and Find, Replace, and Replace All (these correspond with the buttons you use to dismiss the normal Find/Replace dialog box). The "Find what" and "Replace with" boxes each have a Specify button by them. If you know exactly what you're looking for, you can type it right in these boxes. If you click Specify, you get to use a calculation to set these values instead.
For example, say your Notes field is such a smashing success, you find some customers have pages of notesand it's becoming a problem to find what you want.
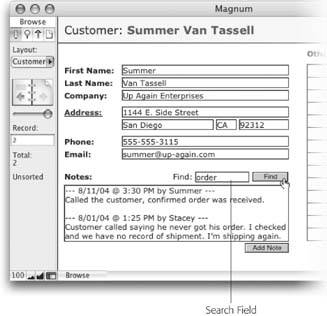
You'd like a quick way to search the material in the Notes fields. Figure 14-4 shows one solutionadd a button to the Customers layout that runs a Find script.
|
|
The script is simple. It just needs to go to the Notes field and use the Perform Find/Replace script step. You need a field to type the search value into, which you could create before opening ScriptMaker, but in real life you probably think of that after you start writing your script. FileMaker makes it easy to create fields without leaving the warmth and protection of ScriptMaker, as you'll see in the following steps.
Here's how to make the script. Call it Search Notes Field:
- Add Go to Field as your first script step. Set it to go to the Customers::Notes field.
First things first: You want to make sure the script searches the correct field. Now you create the Find script itself.
- Add the Perform Find/Replace step to the script, and turn on the "Perform without dialog" option. Click the Specify button.
You see the Perform Find/Replace Options window.
- Make sure the Perform pop-up menu is set to Find Next, then click the Specify button to the right of the "Find what" box.
The Specify Calculation window appears.
- From the pop-up menu above the field list, choose Define Database.
It makes sense for this field to use global storage, and since it doesn't really belong to a customer, you add a new table for it as well. You can do that right here in the Define Database window.
Note: Scripts often make use of global fields, so FileMaker lets you create a quick table to hold them without cluttering or interfering with your relationship graph (Section 8.7.3).
- Click the Tables tab and add a new table called Globals.
This table holds global fields that aren't tied to specific tables. You don't need a relationship to a table in order to grab the value from a global field, so a table like this makes them very easy to find. If you're working in the file you used back in Chapter 8, you may already have a table for your globals. If so, add your new global fields there.
- Click the Fields tab, and select Globals from the Table pop-up menu. Add a new text field called Note Search Value and set it to use global storage. Click OK.
You now have the only field your script needs. See Section 3.3.4.2 for more information on global storage fields.
- Double-click the Globals::Note Search Value field to create its field reference as your calculation. Click OK.
This calculation tells FileMaker where to look when it runs the Perform Find/Replace stepwhatever's in the new field, in this case. Clicking OK when you're done returns you to the Perform Find/Replace Options window.
- In the From the Direction pop-up menu, choose All.
This options tells FileMaker to look through the entire Notes field.
- Turn on the "Current record/request" and "Current field" radio buttons. Click OK until you're back in your database.
You don't want the search to spill into different fields or records. These options restrict it to just the record the user's viewing. Since the script first goes to the Notes field, FileMaker searches only that field.
To finish the job, add the new global field and a Find button to the Customers layout (as shown in Figure 14-4 on Section 14.2.6). Then type a value into the search field and click your script button to test your new script.
14.2.6.2. Replace Field Contents and Relookup Field Contents
It's probably no surprise to you that you can execute the Replace Field Contents and Relookup Field Contents commands from a script. These steps let you specify a specific field to act upon. If you don't specify a field, they act on the current field. You also get the typical "Perform without dialog" checkbox. When you turn this checkbox on, the action happens immediately when the step runs. If you leave this option off with the Replace Field Contents step, the user sees the typical Replace Field Contents dialog box (with all the settings you specified in the script). With the Relookup Field Contents step, the user just sees a confirmation message first, asking if she really wants to perform the relookup operation.
14.2.6.3. Set Next Serial Value
The Set Next Serial Value script step is invaluablein the rare cases when anyone actually uses it. It's a one-trick pony: If a field auto-enters a serial number, this step changes the "next value" stored in the Field Options dialog box. In other words, if you want to start your customer ID values over again, you can use Set Next Serial Value to do it from a script. (See the box on Section 14.3.1 for an example.)
Warning: Use extreme care when you change a field that's used as a key in a relationship. You risk leaving related records orphaned if you don't change their key fields, too. See the box on Section 15.5.6.3.4 for a script that helps you change key fields without losing related records (or your sanity).
The step has two options. First, you can specify the field to update. As usual, if you don't specify a field, it works on the current field. You tell FileMaker what to set the "next value" to by entering a calculation.
Part I: Introduction to FileMaker Pro
Your First Database
- Your First Database
- An Very Quick Database Tour
- Creating a New Database
- Opening and Closing Database Files
- Saving Your Databases
- Adding Records to Your Database
- Navigating Your Database
- Same Database, Multiple Windows
Organizing and Editing Records
- Organizing and Editing Records
- Views
- Advanced Find Mode
- Changing Multiple Records
- Sorting Records
- Editing Whats in Your Fields
- Paragraph Formatting
- Beyond Text: Container Fields
- Checking Spelling
- Printing and Preview Mode
Building a New Database
- Building a New Database
- Tables and Fields
- Defining Fields
- Advanced Field Options
- Bringing It All Together
Part II: Layout Basics
Layout Basics
Creating Layouts
Advanced Layouts and Reports
- Advanced Layouts and Reports
- Setting up Field Controls
- Adding Field Controls to Layouts
- Field Behavior
- Tab Order
- Print-Related Layout Options
- Format the Number/Date/Time/Graphic
- Adding Buttons
- Tab Panels
- Reports and Summary Fields
Part III: Multiple Tables and Relationships
Multiple Tables and Relationships
- Multiple Tables and Relationships
- Relational Databases Explained
- Modeling Your Database
- Creating a Relational Database
- Relational Databases
Advanced Relationship Techniques
- Advanced Relationship Techniques
- Creating Related Records
- Table Occurrences
- Managing Data with Data Tunneling
- Building a Data Tunneling Interface
- Connecting Databases
- Lookups
- Advanced Relationships
Part IV: Calculations
Introduction to Calculations
- Introduction to Calculations
- Understanding Calculations
- The Structure of a Calculation
- Creating a Calculation Field
- Auto-Enter Calculations
- Validate Data Entry with a Calculation
- Replacing Data Using a Calculation
- Comments
Calculations and Data Types
- Calculations and Data Types
- Number Crunching Calculations
- Going Beyond Basic Calculations
- Text Parsing Calculations
- Date and Time Calculations
- Containers in Calculations
Advanced Calculations
- Advanced Calculations
- Stored, Unstored, and Global Fields
- Logical Functions
- The Let Function and Variables
Extending Calculations
Part V: Scripting
Scripting Basics
- Scripting Basics
- Your First Script
- The Importance of the Layout
- Running Scripts
- Branching and Looping in Scripts
Script Steps
- Script Steps
- Go to Layout
- Scripting for Fields
- Working with Records
- Finding Records
- Sorting Records
- Working with Windows
- Working with Files
- Printing
- Other Script Steps
Advanced Scripting
- Advanced Scripting
- Commenting Scripts
- Asking and Telling the User
- Organizing Complex Scripts
- Handling Errors
- Putting a Complex Script Together
Part VI: Security and Integration
Security
Exporting and Importing
- Exporting and Importing
- Exporting a File
- Export Formats
- Importing Data
- Import Data Sources
- Importing and Exporting in a Script
Sharing Your Database
- Sharing Your Database
- FileMaker Network Sharing
- Sharing Over the Internet
- FileMaker Server
- Server Hardware
Developer Utilities
- Developer Utilities
- Script Debugger
- Disable Script Steps
- The Database Design Report
- Tooltips
- Copying Database Structure
- Custom Menus
- Developer Utilities
- File Maintenance
Part VII: Appendixes
Appendix A. Getting Help
EAN: 2147483647
Pages: 176
- MPLS Overview
- Static PE-CE Routing Command Reference
- Option 4: Non-VPN Transit Provider
- Case Study 2: Implementing Multi-VRF CE, VRF Selection Using Source IP Address, VRF Selection Using Policy-Based Routing, NAT and HSRP Support in MPLS VPN, and Multicast VPN Support over Multi-VRF CE
- Case Study 6: Implementing Class-Based Tunnel Selection with MPLS Traffic Engineering
