Hack 29. Detect Networks with Kismet


Troubleshoot network problems with one of the most advanced wireless monitoring tools available.
Unlike simple beacon scanners such as NetStumbler [Hack #24] and MacStumbler [Hack #27], Kismet is one of the most advanced diagnostic tools available for wireless networking. It will run on Linux, Mac OS X, and the various BSDs. There is a port for running Kismet on the Linksys WRT54G, and you can even use it to collect data from remote sources on Windows.
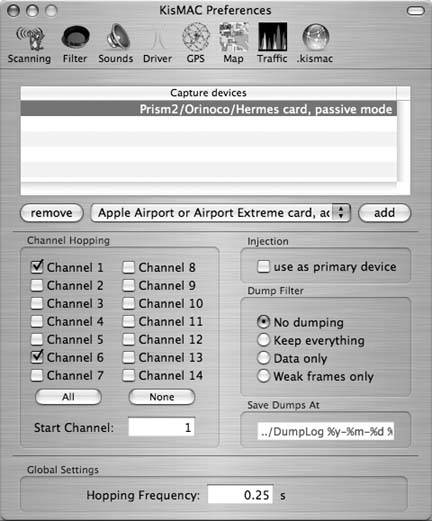
Figure 2-26. KisMAC channel selection
Kismet is a completely passive network scanner, capable of detecting traffic from access points and wireless clients alike (including NetStumbler clients). It finds closed networks by monitoring the traffic sent from network users and logs all raw 802.11 frames in a standard format for later use with specialized diagnostic and analysis tools, as discussed in "Analyze Traffic with Ethereal" [Hack #31].
If you have a machine with multiple wireless cards, Kismet even splits the work of network scanning across all of them, making a scanner capable of simultaneously tracking all 802.11 traffic in range. These are just a few of the features of this amazing piece of free software.
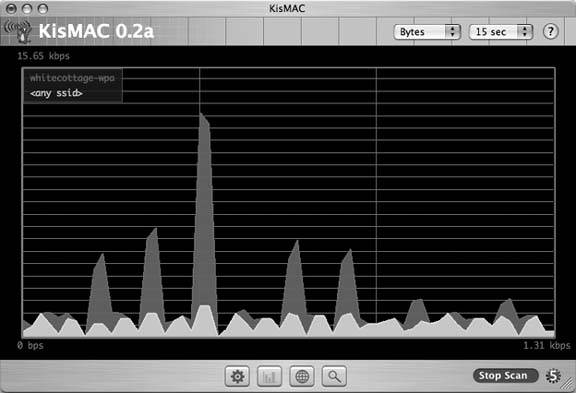
Figure 2-27. Relative traffic graph
Of course, with all of this power comes a fair amount of complexity. For starters, you need an 802.11a/b/g card driver capable of entering Monitor mode. Some of these drivers include Prism-based cards using the HostAP or wlan-ng drivers, Atheros-based cards using the Madwifi or ath(4) drivers, Prism54-based cards using the Prism54 drivers, and the Cisco Aironet cards using Cisco or airo-linux drivers.
2.8.1. Installation
If you don't need to compile any additional options into Kismet, all of the major Linux distributions provide a package. Ubuntu and Debian users can do an apt-get install kismet, Fedora and Red Hat users can use yum install kismet. Users of other distributions should check their package manager for kismet.
This hack also covers compiling Kismet from source. Download Kismet from http://www.kismetwireless.net. Unpack the source tree and navigate into the newly created folder. If you want to use Kismet's dump files with Ethereal (highly recommended), you need a copy of the Ethereal source tree. Configure Kismet with a line like this:
./configure --with-ethereal=../ethereal-0.9.12/
Of course, substitute the full path to your Ethereal source tree. Now, you should be able to build Kismet with a standard:
make; make dep; make install
Next, create a user that Kismet will assume when it isn't running as root. You can also use your own UID if you wish. Kismet needs to run as root initially, but it will drop its privileges to this UID as soon as it begins capturing data.
Edit /usr/local/etc/kismet.conf (if you compiled from source) or /etc/kismet/kismet.conf (if you installed a package) to suit your system. Here, you'll set the user ID that Kismet will use:
suiduser=yourusername
You'll also need to set the source= line to match your hardware. The format for this line is driver,device,description. See the comments in the file for supported drivers. Here's what I entered for my test Atheros card using the Madwifi driver:
source=madwifi_ag,ath0,madwifi
If you want Kismet to be able to read the SSID of detected networks aloud, download and install the Festival text-to-speech software. Fedora, RedHat, Debian, and Ubuntu users can all install the festival package. Kismet will play sound effects if you wish; by default, it expects /usr/bin/play to be installed (part of the SoX sound utility), but any command-line audio player will work. All of the audio and other display parameters are configured in kismet_ui.conf.
2.8.2. Running Kismet
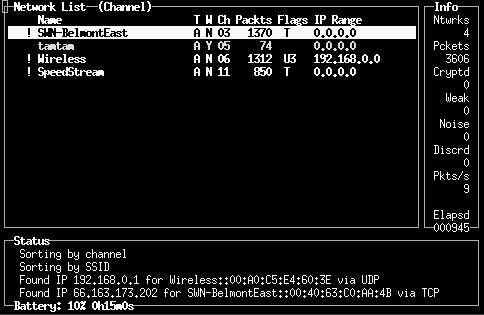
By default, Kismet will attempt to write logs and keep a .pid file in /var. If your user does not have access to /var, you'll need to start kismet as root or by using sudo. Note that once Kismet is in Monitor mode, your card can no longer associate with a wireless network, so you should use Ethernet (or another wireless card) if you need a network connection. Running Kismet will present you with a screen that looks something like Figure 2-28.
Once Kismet is up and running, you should see the main screen spring to life with all sorts of information. By default, Kismet initially sorts the network list based on the last time it saw traffic from each network. This list constantly changes, making it impossible to select one network for more detailed operations. Change the sort order by pressing S at any time, followed by the desired sort order (e.g., to sort on SSID, press SS). You can now use the arrow keys to select a particular network for further inspection.
Figure 2-28. Kismet's main screen
Press H at any time to see the keystroke help, and press Q to close any pop-up window.
Now that networks are sorted, you can get more information on any one of them by selecting it and pressing I. Figure 2-29 shows the network information screen.
Figure 2-29. Detailed network information
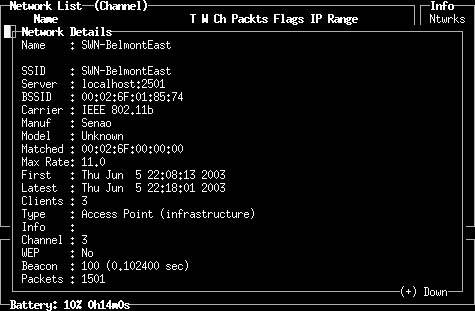
In addition to standard access points (APs), Kismet displays ad hoc networks, as well as closed networks (i.e., ones that do not broadcast their SSID). If there are no clients actively using a closed network, it displays the network information with a name of . Once a client associates with the closed network, this information is updated with the proper SSID.
Kismet also tracks a great deal of information about wireless clients. For example, to see the associated clients of a particular AP, as shown in Figure 2-30, press C from the main screen.
Figure 2-30. Viewing associated clients for a particular wireless network
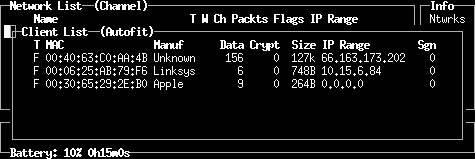
Kismet attempts to guess the IP network in use based on the traffic it sees. It also keeps statistics about how much traffic each client is generating, making it easy to discover who is hogging all of the bandwidth.
If you find that you are missing packets while monitoring a particular wireless network, this is probably because you are still scanning for networks. To focus on a specific channel, press L to lock channel hopping to the current 802.11 channel.
When tuned to one channel, Kismet captures much more data, because it doesn't have to divide its time between multiple channels. Consult the documentation if you would like to add more radio cards to completely cover the entire available spectrum.
2.8.3. Cleaning Up
When you are finished using Kismet, press Shift-Q to quit. This takes your wireless card back out of Monitor mode, but does not always reset its original network parameters. You might need to either eject the card and reinsert it or configure your SSID and other settings manually to start using wireless normally.
These are just a few of the insanely useful features that Kismet has to offer. On top of everything else, Kismet saves all recorded frames to a standard format, so you can use tools such as Ethereal [Hack #31] or AirSnort to pour over your captured data for later analysis. Getting Kismet running can be daunting at first, but it is worth the effort when serious network analysis is called for.
2.8.4. See Also
- Tons of information on RF Monitoring drivers (http://airsnort.shmoo.com)
- AirSnort on the iBook (http://www.macunix.net:443/ibook.html)
- Passive RF Monitoring on the iBook (http://www.swieskowski.net/code/wifi.php)
Bluetooth, Mobile Phones, and GPS
- Hacks 122: Introduction
- Hack 1. Set Up Bluetooth on Linux
- Hack 2. Set Up Bluetooth on Windows XP
- Hack 3. Connect Mac OS X with a Bluetooth Phone
- Hack 4. Connect Linux with a Bluetooth Phone
- Hack 5. Connect Windows XP with a Bluetooth Phone
- Hack 6. Use Your Treo as a Modem
- Hack 7. Send SMS from a PowerBook
- Hack 8. Remote Control Mac OS X with Bluetooth Phones and PDAs
- Hack 9. Remote Control Linux with a Bluetooth Phone
- Hack 10. Control XMMS with Bluetooth
- Hack 11. Liven Up Parties with a Participatory Slideshow
- Hack 12. Send SMS from Linux
- Hack 13. Remote Control Windows with Bluetooth Phones and PDAs
- Hack 14. Control Your Bluetooth Phone with FMA
- Hack 15. Control Your Computer from Your Palm
- Hack 16. Control Your Home Theater from Your Palm
- Hack 17. Choose a Cellular Data Plan
- Hack 18. Blog from Your Mobile Phone
- Hack 19. Get Google Maps on Your Mobile Phone
- Hack 20. Share Your GPS
- Hack 21. Broadcast Your GPS Position
- Hack 22. Map Wi-Fi Networks with Kismet and GPSd
Network Discovery and Monitoring
- Hacks 2339: Introduction
- Hack 23. Find All Available Wireless Networks
- Hack 24. Discover Networks with NetStumbler
- Hack 25. Detect Networks with Handheld PCs
- Hack 26. Find and Join Wireless Networks with AP Radar
- Hack 27. Detect Networks on Mac OS X
- Hack 28. Scan Passively with KisMAC
- Hack 29. Detect Networks with Kismet
- Hack 30. Monitor Wireless Links in Linux with Wavemon
- Hack 31. Analyze Traffic with Ethereal
- Hack 32. Track 802.11 Frames in Ethereal
- Hack 33. Watch Network Traffic
- Hack 34. grep Your Network
- Hack 35. Check Wi-Fi Network Performance with Qcheck
- Hack 36. Estimate Network Performance
- Hack 37. Get Real-Time Network Stats
- Hack 38. Graph Your Wireless Performance
- Hack 39. Find Radio Manufacturers by MAC
Wireless Security
- Hacks 4051: Introduction
- Hack 40. Stop Moochers from Stealing Your Wi-Fi Bandwidth
- Hack 41. Visualize a Network
- Hack 42. Secure Your Linux Network with WPA
- Hack 43. Control Wireless Access by MAC
- Hack 44. Authenticate Wireless Users
- Hack 45. Forward Ports over SSH
- Hack 46. Proxy Web Traffic over SSH
- Hack 47. Securely Connect Two Networks
- Hack 48. Generate a Tunnel Configuration Automatically
- Hack 49. Poll Wireless Clients
- Hack 50. Interrogate the Network
- Hack 51. Track Wireless Users
Hardware Hacks
- Hacks 5262: Introduction
- Hack 52. Add an External Antenna
- Hack 53. Do-It-Yourself Access Point Hardware
- Hack 54. Boot from a Compact Flash Hard Drive
- Hack 55. Increase the Range of a PowerBook
- Hack 56. Send Power over Your Ethernet
- Hack 57. The NoCat Night Light
- Hack 58. Upgrade the Linksys WET11
- Hack 59. Scan for Wireless Networks Automatically
- Hack 60. Backlight Your Zipit
- Hack 61. Unwire Your Pistol Mouse
- Hack 62. Mobilize Your WRT54G with the WiFiCar
Software Hacks
- Hacks 6382: Introduction
- Hack 63. Build Your Own Access Point with Linux
- Hack 64. Bridge Your Linux AP
- Hack 65. Protect Your Bridge with a Firewall
- Hack 66. Filter MAC with HostAP and Madwifi
- Hack 67. Upgrade Your Wireless Router
- Hack 68. Set Up an OLSR Mesh Network
- Hack 69. Extend Your Wireless Network with WDS
- Hack 70. Pebble
- Hack 71. Wall Off Your Wireless
- Hack 72. Run Your Mac as an Access Point
- Hack 73. Run Linux on the Zipit Wireless Messenger
- Hack 74. Capture Wireless Users with NoCatAuth
- Hack 75. Capture Wireless Users on a Small Scale
- Hack 76. Build an Online Community in Your Offline Neighborhood
- Hack 77. Manage Multiple AirPort Base Stations
- Hack 78. Advertise Bonjour Services in Linux
- Hack 79. Advertise Any Service with Bonjour in Mac OS X
- Hack 80. Redirect Brought to you by Bonjour Ads
- Hack 81. Use a Windows-Only Wireless Card in Linux
- Hack 82. Use Your Orinoco Card with Hermes AP
Do-It-Yourself Antennas
- Hacks 8393: Introduction
- Hack 83. Make a Deep Dish Cylindrical Parabolic Reflector
- Hack 84. Spider Omni Antenna
- Hack 85. Pringles Can Waveguide
- Hack 86. Pirouette Can Waveguide
- Hack 87. Primestar Dish with Waveguide Feed
- Hack 88. Primestar Dish with Biquad Feed
- Hack 89. Cut a Cable Omni Antenna
- Hack 90. Build a Slotted Waveguide Antenna
- Hack 91. The Passive Repeater
- Hack 92. Determine Your Antenna Gain
- Hack 93. Build Cheap, Effective Roof Mounts
Wireless Network Design
- Hacks 94100: Introduction
- Hack 94. Analyze Elevation Profiles for Better Long-Range Wireless Networking
- Hack 95. Build a Wireless Network for the Large House
- Hack 96. Establish Line of Sight
- Hack 97. Calculate the Link Budget
- Hack 98. Align Antennas at Long Distances
- Hack 99. Slow Down to Speed Up
- Hack 100. Take Advantage of Antenna Polarization
Appendix A. Wireless Standards
- Appendix A. Wireless Standards
- Section A.1. 802.11: The Mother of All IEEE Wireless Ethernet
- Section A.2. 802.11a: The Betamax of the 802.11 Family
- Section A.3. 802.11b: The De Facto Standard
- Section A.4. 802.11g: Like 802.11b, only Faster
- Section A.5. 802.16: WiMAX Long Distance Wireless Infrastructure
- Section A.6. Bluetooth: Cable Replacement for Devices
- Section A.7. 900 MHz: Low Speed, Better Coverage
- Section A.8. CDPD, 1xRTT, and GPRS: Cellular Data Networks
- Section A.9. FRS and GMRS: Super Walkie-Talkies
- Section A.10. 802.1x: Port Security for Network Communications
- Section A.11. WPA & 802.11i
- Section A.12. BSS Versus IBSS
Appendix B. Wireless Hardware Guide
EAN: 2147483647
Pages: 178
