Hack 11. Liven Up Parties with a Participatory Slideshow


With a laptop, a Bluetooth adapter, and an LCD projector, you can make slideshows of other people's photographs.
Since time immemorial, slideshows have been a dreaded tool of oppression and tedium. Heretofore constrained to only the slides that the presenter wished to show, the slideshow's audience was doomed to mind-numbing boredom, if it turned out that the slides failed to entertain.
Thanks to the ubiquity of mobile phones with both cameras and Bluetooth, the institution of photographic slideshows can now be thrown open, willy-nilly, to the viewing public as both a read and write medium! Allowing people to contribute photos from their phones to a participatory slideshow can offer interesting and often quite entertaining results.
1.12.1. The Slideshow
To set up a participatory slideshow, you'll need a laptop or a PC running Linux, a supported Bluetooth adapter, and an overhead projector. The concept of this hack can certainly be adapted to other operating systems, but the implementation shown here is specific to the Linux Bluetooth stack and to the X11 Window System used on most open source operating systems. The best Linux distros for this purpose are Debian or Ubuntu, because all of the pieces are already available through apt-get.
If you haven't got a Linux PC handy, Ubuntu (http://www.ubuntulinux.org/download) can be installed on an old leftover Pentium in about a half hour. If you use Ubuntu, you'll want to make sure you have the universe and multiverse repositories in your /etc/apt/sources.list. If you're using another version of Linux, you should be able to find the source code and possibly even binary packages for all the software you'll need somewhere on the Net.
Once you've selected a suitable computer, install the BlueZ Bluetooth stack [Hack #1]. Next, plug in your Bluetooth adapter, and make sure the kernel can see it by running dmesg and checking for a suitable notification towards the bottom of the output. (If your Bluetooth adapter is built-in, dmesg | grep -i Bluetooth is your friend.) Next, as root, back up your /etc/bluetooth/hcid.conf and then alter it so that it reads more or less as follows:
	options {
		autoinit yes;
		security none;
		pairing none;
	}
	device {
		name "slideshow";
		class 0x100;
		iscan enable;
		pscan enable;
	}
These settings turn off Bluetooth security (thus allowing anyone to send files to the Bluetooth device), set the name of the device to slideshow, and allow anyone to scan for it. Naturally, once you no longer want anyone sending anything to your computer, you should copy your backup of hcid.conf back into place. Now, as root, run /etc/init.d/bluez-utils restart to restart your Bluetooth manager. On other Linux distros, hcid.conf lives in /etc, rather than /etc/bluetooth, and /etc/init.d/bluez-utils might be called /etc/init.d/bluetooth, instead.
Next, you'll need an OBEX server to receive files sent from people's phones. OBEX is a FTP-like file transfer protocol that runs on top of Bluetooth. A simple OBEX server, quite logically called ObexSERVER, is available using apt-get. The source code for ObexSERVER lives at http://www.frasunek.com/sources/unix/obexserver.c, but you'll need to have the OpenOBEX libraries from http://openobex.sf.net to build it.
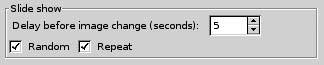
You'll also need an image viewer for X11 that supports a slideshow mode. There are a ton of these out there, with the most popular possibly being GQview and feh. Of these two, I prefer GQview, but I'll show how to use feh also. Again, both of them are available using apt-get. If you decide to use GQview, you'll want to load it up, and then go to Edit images/U2192.jpg border=0> Options… to configure the slideshow options on the General tab. Check the Random and Repeat boxes, and set the delay to something short, like five seconds, as shown in Figure 1-25.
Figure 1-25. Setting the slideshow options in gqview
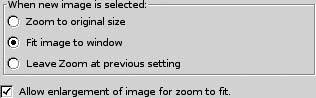
Also, over on the Image tab, you'll probably want to select "Fit image to window" and "Allow enlargement," as shown in Figure 1-26. If you'd rather use feh, we'll see later on that this configuration is done on the command line instead.
Last but not least, you'll need to create an empty directory to hold the contributed slideshow images. I used /home/sderle/slideshow, but any directory you can write to is fine.
Figure 1-26. Setting the default image zoom options in GQview
Finally, seed the slideshow with a single file, which can be an image of anything. The best bet for the seed image is a plain slide that reads "Share your favorite photos by sending them via Bluetooth to 'slideshow'!" You can hack up a slide with some words to that effect using the GIMP in about three minutes. Once everything's configured, you're ready for the code that makes it all go.
1.12.2. The Code
The following shell script accepts images via Bluetooth and displays them in fullscreen mode using GQview:
	#!/bin/bash

	SLIDESHOW_PATH=/home/sderle/slideshow

	xset s off
	xset s noblank
	sdptool add --channel=10 OPUSH

	cd $SLIDESHOW_PATH
	gqview --slideshow --fullscreen &
	while true; do
		obexserver
		mv /tmp/*.{jpg,JPG} .
	done
First, the calls to xset turn off the X11 screensaver functions, so that it doesn't load the screensaver after some period of inactivity or make the screen go blank. The call to sdptool sets up the Bluetooth channel to receive files via the OBEX PUSH profile.
|

Next, the slideshow script switches to the slideshow image directory; don't forget to change SLIDESHOW_PATH to point to wherever you plan to keep the photos. Once in that directory, the script starts up gqview to run in the background, in fullscreen slideshow mode. Then, the script runs obexserver, which waits for a file to arrive via Bluetooth, and then puts the file into /tmp and quits. Our script moves that file into the current directory, where gqview will automatically detect its presence and add it to the slideshow. Finally, we loop back to run obexserver again, and so on.
Once this script is running, all you need to do is plug the computer into an overhead projector, and you're set. To stop the slideshow, hit Ctrl-Q to get out of gqview, and then Ctrl-C in your terminal to kill the slideshow script.
The nice thing about using GQview, as mentioned earlier, is that it regularly scans the current directory for new files, unlike feh, which scans the directory contents once at startup. If you wanted to use feh instead, you could do the following in the slideshow script, which restarts feh every time a new file arrives:
	cd $SLIDESHOW_PATH
	while true; do
		feh -D5 -F -z -Z * &
		obexserver
		mv /tmp/*.{jpg,JPG} .
		killall feh
	done
The principle is basically the same, however. The main advantage of this is that it saves you the trouble of having to configure (and possibly later reconfigure) the image viewer just to display a slideshow; the disadvantage is that it increases the likelihood that feh will display some photos with disproportionate frequency, because each time it reloads it loses its idea of which ones it's already shown.
Enjoy your new participatory slideshow! If you use this idea at a party or other gathering, please do let us know how it works out for you.
Schuyler Erle
Bluetooth, Mobile Phones, and GPS
- Hacks 122: Introduction
- Hack 1. Set Up Bluetooth on Linux
- Hack 2. Set Up Bluetooth on Windows XP
- Hack 3. Connect Mac OS X with a Bluetooth Phone
- Hack 4. Connect Linux with a Bluetooth Phone
- Hack 5. Connect Windows XP with a Bluetooth Phone
- Hack 6. Use Your Treo as a Modem
- Hack 7. Send SMS from a PowerBook
- Hack 8. Remote Control Mac OS X with Bluetooth Phones and PDAs
- Hack 9. Remote Control Linux with a Bluetooth Phone
- Hack 10. Control XMMS with Bluetooth
- Hack 11. Liven Up Parties with a Participatory Slideshow
- Hack 12. Send SMS from Linux
- Hack 13. Remote Control Windows with Bluetooth Phones and PDAs
- Hack 14. Control Your Bluetooth Phone with FMA
- Hack 15. Control Your Computer from Your Palm
- Hack 16. Control Your Home Theater from Your Palm
- Hack 17. Choose a Cellular Data Plan
- Hack 18. Blog from Your Mobile Phone
- Hack 19. Get Google Maps on Your Mobile Phone
- Hack 20. Share Your GPS
- Hack 21. Broadcast Your GPS Position
- Hack 22. Map Wi-Fi Networks with Kismet and GPSd
Network Discovery and Monitoring
- Hacks 2339: Introduction
- Hack 23. Find All Available Wireless Networks
- Hack 24. Discover Networks with NetStumbler
- Hack 25. Detect Networks with Handheld PCs
- Hack 26. Find and Join Wireless Networks with AP Radar
- Hack 27. Detect Networks on Mac OS X
- Hack 28. Scan Passively with KisMAC
- Hack 29. Detect Networks with Kismet
- Hack 30. Monitor Wireless Links in Linux with Wavemon
- Hack 31. Analyze Traffic with Ethereal
- Hack 32. Track 802.11 Frames in Ethereal
- Hack 33. Watch Network Traffic
- Hack 34. grep Your Network
- Hack 35. Check Wi-Fi Network Performance with Qcheck
- Hack 36. Estimate Network Performance
- Hack 37. Get Real-Time Network Stats
- Hack 38. Graph Your Wireless Performance
- Hack 39. Find Radio Manufacturers by MAC
Wireless Security
- Hacks 4051: Introduction
- Hack 40. Stop Moochers from Stealing Your Wi-Fi Bandwidth
- Hack 41. Visualize a Network
- Hack 42. Secure Your Linux Network with WPA
- Hack 43. Control Wireless Access by MAC
- Hack 44. Authenticate Wireless Users
- Hack 45. Forward Ports over SSH
- Hack 46. Proxy Web Traffic over SSH
- Hack 47. Securely Connect Two Networks
- Hack 48. Generate a Tunnel Configuration Automatically
- Hack 49. Poll Wireless Clients
- Hack 50. Interrogate the Network
- Hack 51. Track Wireless Users
Hardware Hacks
- Hacks 5262: Introduction
- Hack 52. Add an External Antenna
- Hack 53. Do-It-Yourself Access Point Hardware
- Hack 54. Boot from a Compact Flash Hard Drive
- Hack 55. Increase the Range of a PowerBook
- Hack 56. Send Power over Your Ethernet
- Hack 57. The NoCat Night Light
- Hack 58. Upgrade the Linksys WET11
- Hack 59. Scan for Wireless Networks Automatically
- Hack 60. Backlight Your Zipit
- Hack 61. Unwire Your Pistol Mouse
- Hack 62. Mobilize Your WRT54G with the WiFiCar
Software Hacks
- Hacks 6382: Introduction
- Hack 63. Build Your Own Access Point with Linux
- Hack 64. Bridge Your Linux AP
- Hack 65. Protect Your Bridge with a Firewall
- Hack 66. Filter MAC with HostAP and Madwifi
- Hack 67. Upgrade Your Wireless Router
- Hack 68. Set Up an OLSR Mesh Network
- Hack 69. Extend Your Wireless Network with WDS
- Hack 70. Pebble
- Hack 71. Wall Off Your Wireless
- Hack 72. Run Your Mac as an Access Point
- Hack 73. Run Linux on the Zipit Wireless Messenger
- Hack 74. Capture Wireless Users with NoCatAuth
- Hack 75. Capture Wireless Users on a Small Scale
- Hack 76. Build an Online Community in Your Offline Neighborhood
- Hack 77. Manage Multiple AirPort Base Stations
- Hack 78. Advertise Bonjour Services in Linux
- Hack 79. Advertise Any Service with Bonjour in Mac OS X
- Hack 80. Redirect Brought to you by Bonjour Ads
- Hack 81. Use a Windows-Only Wireless Card in Linux
- Hack 82. Use Your Orinoco Card with Hermes AP
Do-It-Yourself Antennas
- Hacks 8393: Introduction
- Hack 83. Make a Deep Dish Cylindrical Parabolic Reflector
- Hack 84. Spider Omni Antenna
- Hack 85. Pringles Can Waveguide
- Hack 86. Pirouette Can Waveguide
- Hack 87. Primestar Dish with Waveguide Feed
- Hack 88. Primestar Dish with Biquad Feed
- Hack 89. Cut a Cable Omni Antenna
- Hack 90. Build a Slotted Waveguide Antenna
- Hack 91. The Passive Repeater
- Hack 92. Determine Your Antenna Gain
- Hack 93. Build Cheap, Effective Roof Mounts
Wireless Network Design
- Hacks 94100: Introduction
- Hack 94. Analyze Elevation Profiles for Better Long-Range Wireless Networking
- Hack 95. Build a Wireless Network for the Large House
- Hack 96. Establish Line of Sight
- Hack 97. Calculate the Link Budget
- Hack 98. Align Antennas at Long Distances
- Hack 99. Slow Down to Speed Up
- Hack 100. Take Advantage of Antenna Polarization
Appendix A. Wireless Standards
- Appendix A. Wireless Standards
- Section A.1. 802.11: The Mother of All IEEE Wireless Ethernet
- Section A.2. 802.11a: The Betamax of the 802.11 Family
- Section A.3. 802.11b: The De Facto Standard
- Section A.4. 802.11g: Like 802.11b, only Faster
- Section A.5. 802.16: WiMAX Long Distance Wireless Infrastructure
- Section A.6. Bluetooth: Cable Replacement for Devices
- Section A.7. 900 MHz: Low Speed, Better Coverage
- Section A.8. CDPD, 1xRTT, and GPRS: Cellular Data Networks
- Section A.9. FRS and GMRS: Super Walkie-Talkies
- Section A.10. 802.1x: Port Security for Network Communications
- Section A.11. WPA & 802.11i
- Section A.12. BSS Versus IBSS
Appendix B. Wireless Hardware Guide
EAN: 2147483647
Pages: 178
- The Second Wave ERP Market: An Australian Viewpoint
- The Effects of an Enterprise Resource Planning System (ERP) Implementation on Job Characteristics – A Study using the Hackman and Oldham Job Characteristics Model
- Healthcare Information: From Administrative to Practice Databases
- A Hybrid Clustering Technique to Improve Patient Data Quality
- Relevance and Micro-Relevance for the Professional as Determinants of IT-Diffusion and IT-Use in Healthcare
