Importing Data
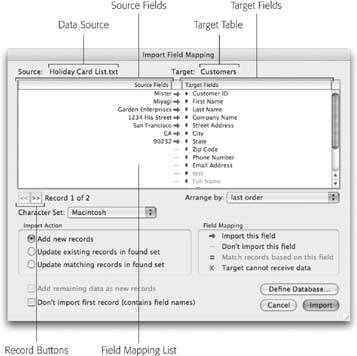
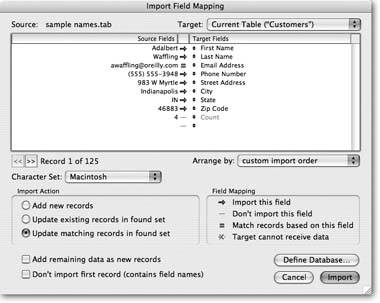
If you need to import information into FileMaker, you'll soon gain a whole new appreciation for the term flexibility. FileMaker can handle the most common data typesand quite a few lesser-known oneswith the same straightforward process. You tell FileMaker which file contains your incoming data, and then show it how you want to match the incoming data (the source) with the fields in your file (the target). This procedure is called field mapping and it's the trickiest part of any import. See Figure 17-4 for a preview of the Import Field Mapping dialog box.
The confusing part comes when you to try to match fields in the source with fields in the target. You can't rearrange the source, but you can drag the fields in your target table up and down. Your job is to line these fields up with the proper source data fields. For instance, you want to move the First Name field so it lines up horizontally with the first name shown at left. Although it's tempting to jump around and move fields as you happen to spot them, this place is one where a formal approach works best. Start at the top, with the first source field, match it, and then move along to the second one.
Between each source and destination field, you see one of two symbols: an arrow or a line. The arrow means FileMaker plans to import the data on the left side into the field on the right. A line tells FileMaker to ignore this particular piece of data in the import file. Click an arrow to change it to a line, or vice versa. (You sometimes see other symbols between fields, but they only show up when you change the Import Action setting. You'll learn about that on Section 17.3.1.)
Tip: If you forget what the importing icons mean, never fear. The Import Field Mapping window has a legend at the bottom right.
|
For the sake of illustration, here's the simple rundown on how importing works:
- Choose File
 Import Records
 images/U2192.jpg border=0> File.
file. When you choose this command, the standard Open File dialog box appears.
- Choose the Holiday Card List.txt file you just created, and then click Open.
The Import Field Mapping dialog box pops up.
- Drag the fields in the target field list so they line up properly with the input data.
As you drag, you can ignore the arrows completely. You can fix them once you've got the fields in the right order.
Tip: If your data source has a field that doesn't match any existing field in your target table, just click the Define Database button to create a new field, and then return to your field mapping. See Section 17.3.2 for how to handle an entire table that's missing.
UP TO SPEED
Mapping Out Your OptionsFileMaker's smart, but when it comes to something as picayune as deciding which field to put where, there's no substitute for human input. As you can see in Figure 17-4, the Import Field Mapping dialog box looks a trifle crowded, but every tool, button, and gizmo has saved a life (or career, anyway).
For example, your input data source may or may not include field names. If it doesn't, the Source Fields list shows you the first record in the import file instead. Or even if your data already has named fields, you may want to see some of the data being imported so you can catch (and repair) mix-ups and errors. Either way, FileMaker lets you check as many records as you wish before you import, by providing arrow buttons below the list. As you click, FileMaker replaces items in the source field list with data from the next (right) or previous (left) record. When field names are included, you see them as the first record. Occasionally, the format you're importing doesn't accommodate field names, but the import file has them anyway, as the first record. When this happens, turn on "Don't import first record" so FileMaker doesn't treat that record as data.
The "Arrange by" pop-up menu lets you bulk-reorder the target fields in the list. Most choices are obvious (alphabetical by field name, and by field type) but others aren't so clear. If you choose "matching names," FileMaker tries to match fields up by matching their names. If your input file has the same field names as your database, this option sets the right order for you. The "last order" choice restores the field order you used the last time you imported data. Choose "creation order" to see the fields in the order you created them. Finally, if you manually drag the fields in the list, FileMaker switches to the "custom import order" choice. If you decide to try one of the other arrangements, you can get back to the order you were working on by choosing "custom import order" yourself.
Finally, just like the export dialog box, this window lets you specify a character set (Section 17.1). This time, though, you don't decide what you want it to be. Rather, you need to tell FileMaker what it is. If you're lucky, this pop-up menu is grayed out, meaning FileMaker was able to figure out the encoding itself. Otherwise, you need to make sure you make the right choice so special characters in the import file come through intact.
- Click the arrows or lines between fields until each matching field has an arrow, and each remaining field has a line.
You can see the field mapping process in Figure 17-5. It also shows how it looks when you're donealthough your import file may have different data, so your source field list looks different.
- Make sure the "Add new records" radio button (in the Import Action area) is turned on.
This action tells FileMaker you want a new record created in the Customers table for each record in the import file. (The Import Field Mapping dialog box has more features, but you don't need them right now. See the box on Section 17.3 for full detail.)
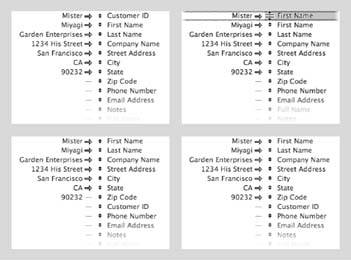
Figure 17-5. This series of images shows the steps involved in setting the import field order (sometimes called "field mapping" or just "import order"). The first picture (top left) shows how the fields look when you first get here. To adjust the order, you drag fields on the right side up and down, as shown in the second picture (top right). When you drop a field somewhere in the list, it changes places with the one that's already there. In this example, the First Name field changes places with Customer ID. The third picture (bottom left) shows how things look once you've moved each field into place. Finally, you need to set the arrows between fields so FileMaker knows which fields to import (bottom right).
- Click Import. When the Import Options dialog box appears (Figure 17-6), turn on "Perform auto-enter options while importing."
You want to make sure the new customers have valid customer IDs, and those come from auto-enter serial numbers.
|
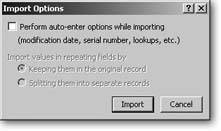
Note: If you import into a field that has auto-enter options set, and you tell FileMaker to perform auto-enter options when importing, you might wonder which value will wind up in the fieldthe auto-entered data or the imported data. In almost every case, the imported data wins. The one exception: If a field is set to auto-enter a looked up value, FileMaker performs the lookup and thus overrides the imported value. Click Import one more time.
After a very short delay, the Import Records Summary dialog box appears (Figure 17-7). Click OK when you're done looking.
|
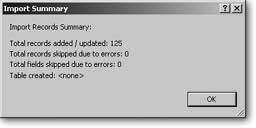
After the import's complete, FileMaker shows you a found set of just the records it imported. But don't reach for the Show All Records command yet: The fact that it's a found set is your safety net. If something goes wrong with your import (the wrong records came through, field mapping doesn't look right, or whatever), just delete the found set and start over. You can scan through the data and make sure you got what you wanted and that the data went into the fields you intended. You can also take this opportunity to perform other actions (like use the Replace Field Contents command) on every imported record.
17.3.1. Importing Over Existing Data
When you import data into a file that already has some records in it, the Import Action section of the Import Field Mapping dialog box (Section 17.3) gives you three ways to specify how you want to deal with that existing data. Normally, it starts out with the "Add new records" setting turned on, meaning that FileMaker simply adds imported records to your database. Sometimes, though, you want to update existing records instead. For example, suppose your database holds shipping rates for every state you ship to. When your freight company updates its rates, it sends you a new file with one record for each state, and the new rates in a Rate field. If you add these records to your database, you end up with two records for each state, which is probably not what you want. So FileMaker gives you two other choices that let you update records as you import.
17.3.1.1. Update existing records in found set
To avoid creating duplicate records as in the shipping rates example, you can turn on "Update existing records in found set" and map just the Rate field to the appropriate field in your table. When you import, FileMaker takes the rate from the first record in the import file and puts it in the first record in the found set. It then copies the second rate into the second record. This process continues until it's imported every rate.
If your import file has more records than the found set, FileMaker simply skips the extra records. If you'd rather import all the records (adding new records once all those in the found set have been updated), turn on "Add remaining data as new records."
Warning: This import action is useful only if you're certain the records in the import file are in the same order as those in the export file. If they're not, FileMaker updates the wrong records, leaving you with incorrect data. If you aren't positive the records are in the right order, use "Update matching records in found set" instead.
17.3.1.2. Update matching records in found set
The "Update matching records in found set" works much the same way. When you import with this action, FileMaker updates data in existing records by copying it from the import file. This time, though, you get to tell FileMaker how to figure out which records in the import file match each record in the found set. You tell FileMaker this by specifying one or more matching fields, as described in Figure 17-8.
|
To get the new symbol in the field mapping list, just click the spot between fields. FileMaker now toggles between the three possible symbols: Import, Don't import, and Match. (If you forget what each symbol means, the "Field Mapping" area in the window reminds you.) Again, if you'd rather have FileMaker import every record in the import file, adding new records when no match is found, turn on "Add remaining data as new records."
17.3.2. Creating Tables on Import
All the importing you've learned about so far assumes that your tables and fields are already defined. In other words, your target table is already in place when you choose your source file. But when you're doing a big conversion job (say, moving a 35-file database system from FileMaker 6 format to FileMaker 7), it'll take quite some time to create all those tables and fields. And even though you have access to the Define Database dialog box while you're importing, this process isn't quick or easy when you've got hundreds of fields coming in from dozens of files. FileMaker's already thought of that, and offers to handle the tedious work of table and field creation for you.
Choose Import File and select a data source. In the Import Field Mapping window, theres a handy pop-up menu called Target. Click it, and you see the current table (remember that's based on the layout that was active when you chose the Import command), all your other tables (grayed out, so you can't choose them), and a very useful command, New Table (Data Source). The stuff in parentheses is the name of your data source and the name FileMaker gives the new table it creates for you. If you already have a table with the same name as your data source, FileMaker appends a number to the end of the new table's name.
Choose New Table, then click Import. FileMaker creates a table and an appropriate set of fields for you, and then populates the new fields with data. You also get a simple form layout for your new table and a table occurrence on your relationships graph. You can treat this table just like one you created yourself. Start hooking it up to other table occurrences and you have a full-fledged related table.
Tip: See Section 19.5.1 to see how FileMaker Pro Advanced lets you import tables and fields, without the data that normally comes with them.
When you let FileMaker create fields for you, it does its best to create the field types you want. For instance, if the data source is a FileMaker file, your new fields match the old file's field names and field types. But if the source is a plain text file with no formatting information to go by, FileMaker doesn't have any names to go by, so the new fields become text fields and get the prosaic names of f1, f2, f3, and so on. In either case, you should check the fields in your new table to make sure you get the names and field types you want. You have to manually define any calculations you need.
Finally, it pays off to think about the order in which you import your files. FileMaker can handle data from related files (lookup fields, and calculations based on relationships) for you if you import the file that contains the supporting records first, and then the file containing the dependent records. If you get the order mixed up, or if your relationships are so complicated that you can't import files in a perfectly clean order, then plan to spend some time cleaning up broken field references after your import.
17.3.3. Converting Files Without Importing
If using the import button is just too much trouble, or you don't need much control over how it's handled, FileMaker has an even simpler way of creating a FileMaker file from another data source, like an Excel file or a text file. Just choose File Open and select the file you want to convert. (On the Mac, you can convert files by dragging them onto FileMakers application icon.)
Tip: If you can see the file you want to convert, but you can't select it because it's grayed out, change the option in the "Files of Type" (Windows) or "Show" (Mac) pop-up list. If your file is one of the formats FileMaker supports, you can select it once you identify its type.
If FileMaker finds data with a first row that looks like field names, it asks you if you want to use those when FileMaker defines fields. If it can't find anything that looks like field names, you get those old standbys, f1, f2, f3. In addition to a single table and the appropriate number of fields (complete with data, of course), you get two very plain layouts. One is a generic form layout, showing one record at the time, and the other is a simple columnar list.
Use this same process (the Open file command), if you're converting files from older versions of FileMaker to the .fp7 format. Converting old files is a huge topic and most people find that conversion requires a certain amount of retrofitting, either to make scripts and other things that break during conversion whole again or to take full advantage of the .fp7 multiple-table-per-file power. (FileMaker offers two excellent white papers on this subject for download at http://www.filemaker.com/support/whitepapers.html. Look under Migration Topics.)
Part I: Introduction to FileMaker Pro
Your First Database
- Your First Database
- An Very Quick Database Tour
- Creating a New Database
- Opening and Closing Database Files
- Saving Your Databases
- Adding Records to Your Database
- Navigating Your Database
- Same Database, Multiple Windows
Organizing and Editing Records
- Organizing and Editing Records
- Views
- Advanced Find Mode
- Changing Multiple Records
- Sorting Records
- Editing Whats in Your Fields
- Paragraph Formatting
- Beyond Text: Container Fields
- Checking Spelling
- Printing and Preview Mode
Building a New Database
- Building a New Database
- Tables and Fields
- Defining Fields
- Advanced Field Options
- Bringing It All Together
Part II: Layout Basics
Layout Basics
Creating Layouts
Advanced Layouts and Reports
- Advanced Layouts and Reports
- Setting up Field Controls
- Adding Field Controls to Layouts
- Field Behavior
- Tab Order
- Print-Related Layout Options
- Format the Number/Date/Time/Graphic
- Adding Buttons
- Tab Panels
- Reports and Summary Fields
Part III: Multiple Tables and Relationships
Multiple Tables and Relationships
- Multiple Tables and Relationships
- Relational Databases Explained
- Modeling Your Database
- Creating a Relational Database
- Relational Databases
Advanced Relationship Techniques
- Advanced Relationship Techniques
- Creating Related Records
- Table Occurrences
- Managing Data with Data Tunneling
- Building a Data Tunneling Interface
- Connecting Databases
- Lookups
- Advanced Relationships
Part IV: Calculations
Introduction to Calculations
- Introduction to Calculations
- Understanding Calculations
- The Structure of a Calculation
- Creating a Calculation Field
- Auto-Enter Calculations
- Validate Data Entry with a Calculation
- Replacing Data Using a Calculation
- Comments
Calculations and Data Types
- Calculations and Data Types
- Number Crunching Calculations
- Going Beyond Basic Calculations
- Text Parsing Calculations
- Date and Time Calculations
- Containers in Calculations
Advanced Calculations
- Advanced Calculations
- Stored, Unstored, and Global Fields
- Logical Functions
- The Let Function and Variables
Extending Calculations
Part V: Scripting
Scripting Basics
- Scripting Basics
- Your First Script
- The Importance of the Layout
- Running Scripts
- Branching and Looping in Scripts
Script Steps
- Script Steps
- Go to Layout
- Scripting for Fields
- Working with Records
- Finding Records
- Sorting Records
- Working with Windows
- Working with Files
- Printing
- Other Script Steps
Advanced Scripting
- Advanced Scripting
- Commenting Scripts
- Asking and Telling the User
- Organizing Complex Scripts
- Handling Errors
- Putting a Complex Script Together
Part VI: Security and Integration
Security
Exporting and Importing
- Exporting and Importing
- Exporting a File
- Export Formats
- Importing Data
- Import Data Sources
- Importing and Exporting in a Script
Sharing Your Database
- Sharing Your Database
- FileMaker Network Sharing
- Sharing Over the Internet
- FileMaker Server
- Server Hardware
Developer Utilities
- Developer Utilities
- Script Debugger
- Disable Script Steps
- The Database Design Report
- Tooltips
- Copying Database Structure
- Custom Menus
- Developer Utilities
- File Maintenance
Part VII: Appendixes
Appendix A. Getting Help
EAN: 2147483647
Pages: 176
