Managing Data with Data Tunneling
In the first part of this chapter, you learned how to manage data that's in a table only one relationship away from your source table. For example, earlier in this chapter, you learned how to create line items through a portal in an Invoice record. (Remember from the graph in Figure 8-10 that the Invoice table occurrence is directly connected to the Line Items table occurrence.)
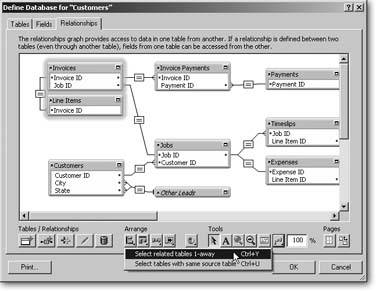
But you can also manage data that's stored farther away on the graph. For example, your Invoice table occurrence is also related to the Expenses table occurrence all the way at the other end of the graph because there's a continuous line of table occurrences connecting them through their respective relationships (Figure 8-13). Even though they aren't directly connected, you can still work with data that's several TOs away from your current table.
Database nerds like to use the term "data tunneling" to describe how you can manage data that's multiple hops away on your relationships graph. This concept means that you don't have to navigate over to a layout based on the table where your data's stored, to create or display it. If there's a path to the table occurrence you need on the graph, you can stay right where you are and tell FileMaker to tunnel through your graph and bring you back the data you need. In this section, you'll learn how to create layouts and arrange table occurrences to bridge the distance between where you are and the data you need.
8.3.1. How to Use Data Tunneling
Relationships like the one between Expenses and Line Items you created in the last section are functional, but they aren't very easy to work with yet. You can create a value list that lets you choose from all your invoice line items and connect them to expenses (Section 6.1.2.1), but as your database grows, so can the problems. First of all, your database could have thousands of line items. And even if it doesn't, line items don't have a very good nametheir descriptions aren't unique and their IDs aren't very meaningful.
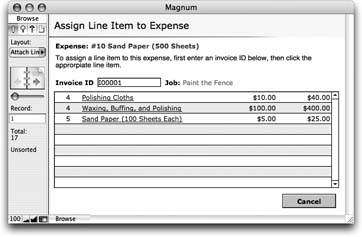
It would be better if you could type in an Invoice ID first. After all, you're used to throwing invoice numbers around. Then it would be easy to pick from a list of items on just that one invoice. A new layout (like the one shown in Figure 8-14) uses data tunneling to let you manage line item data from the Expenses table.
|
|
8.3.1.1. What you need in your data tunneling interface
The Assign Line Items layout provides a special set of tools, or an interface to expedite a certain process. In this case, the process is matching line items records to expense records so you can track whether or not they've been billed. For the new interface to work, you need a few basic supplies. They're listed here to avoid confusion as you start creating them, and you learn more about the role each item plays as you build the interface. You need:
- A field to type in the Invoice ID. Since this field doesn't hold information about any particular entity in your database, it's a good candidate for global storage. Global fields, as you remember from Section 3.3.4.2, have the same value across every record of their table.
Note: The Assign Line Items layout needs fields to show the job name and line item description as well, but you can create them any time. In this example, you add them last (see Figure 8-14). - A value list that shows line items on that invoice. Value lists based on fields come in two forms: those that show all records, and those that show related records. Since you don't want to pick from every line item in the database, you need the second type.
- A relationship for the value list. This relationship needs to show the line items that match the Invoice ID in the new global field.
To get these three major elements to work together, you first have to revisit your relationship graph and decide which table occurrences to connect. Read on.
8.3.2. Understanding Table Occurrence Groups
Since data tunneling involves relating existing table occurrences in multiple new ways, you can easily get tangled in a mass of arrows (see the box on Section 8.4.2). Since you can create as many occurrences of each table as you want, FileMaker makes it easy to create an entirely new group of occurrences, called a table occurrence group, somewhere else in the graph. You can assemble and wire these together in any way that makes sense for your new interface, without complicating the existing group.
Note: Remember, table occurrences aren't tables. You can create as many groups as you like without making your database any bigger. The groups are for your convenience only, each showing you a "snapshot" of your database from a different angle.
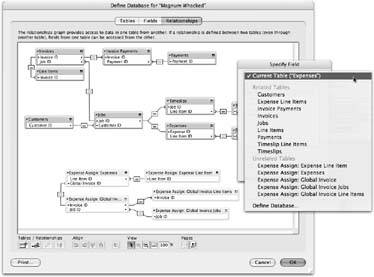
To figure out which table occurrence you need to use to make the new layout in Figure 8-16 work, think about what you need it to do. You're looking at an expenses record on the Expenses layout and you want to attach it to a line item.
You need to get to the new Assign Line Items layoutvia a button, perhaps. After you choose the line item (quite easily with the help of the new layout), FileMaker puts a value in the Line Item ID fieldright there on the original expense record. Every step of the way, the interface takes place from the viewpoint of an expense record.
Tip: FileMaker mavens prefer the term context to refer to the viewpoint of a layout. Just so you know.
Since your new layout is all about modifying an expense record, you must attach it to an occurrence of the Expenses table. The other tables you need are Jobs, Invoices, and Line Items. As shown in Figure 8-15, those tables already have relationships to all the other tables in your database. There's no problem in creating new relationships to the Expenses table, tooat least not for FileMaker. But if you start dragging to create those relationships, you need 3-D glasses to ever make sense of your relationships graph again (see the box on Section 8.4.2).
|

Instead, you can create new TOs for that entire group of tables, and position it off to the side, as shown in Figure 8-16. This graph lets you work separately with the two distinct "sets" of relationships. Since the two groups share no relationships, FileMaker can put the relevant table occurrences in the Expense Assign group, and separate everything else in the unrelated tables group.
Note: There is a downside to this approach. Since each layout is attached to a single table occurrence, if you create a new group, you need a new layout to use it. A small price to pay for the added simplicity.
|
Part I: Introduction to FileMaker Pro
Your First Database
- Your First Database
- An Very Quick Database Tour
- Creating a New Database
- Opening and Closing Database Files
- Saving Your Databases
- Adding Records to Your Database
- Navigating Your Database
- Same Database, Multiple Windows
Organizing and Editing Records
- Organizing and Editing Records
- Views
- Advanced Find Mode
- Changing Multiple Records
- Sorting Records
- Editing Whats in Your Fields
- Paragraph Formatting
- Beyond Text: Container Fields
- Checking Spelling
- Printing and Preview Mode
Building a New Database
- Building a New Database
- Tables and Fields
- Defining Fields
- Advanced Field Options
- Bringing It All Together
Part II: Layout Basics
Layout Basics
Creating Layouts
Advanced Layouts and Reports
- Advanced Layouts and Reports
- Setting up Field Controls
- Adding Field Controls to Layouts
- Field Behavior
- Tab Order
- Print-Related Layout Options
- Format the Number/Date/Time/Graphic
- Adding Buttons
- Tab Panels
- Reports and Summary Fields
Part III: Multiple Tables and Relationships
Multiple Tables and Relationships
- Multiple Tables and Relationships
- Relational Databases Explained
- Modeling Your Database
- Creating a Relational Database
- Relational Databases
Advanced Relationship Techniques
- Advanced Relationship Techniques
- Creating Related Records
- Table Occurrences
- Managing Data with Data Tunneling
- Building a Data Tunneling Interface
- Connecting Databases
- Lookups
- Advanced Relationships
Part IV: Calculations
Introduction to Calculations
- Introduction to Calculations
- Understanding Calculations
- The Structure of a Calculation
- Creating a Calculation Field
- Auto-Enter Calculations
- Validate Data Entry with a Calculation
- Replacing Data Using a Calculation
- Comments
Calculations and Data Types
- Calculations and Data Types
- Number Crunching Calculations
- Going Beyond Basic Calculations
- Text Parsing Calculations
- Date and Time Calculations
- Containers in Calculations
Advanced Calculations
- Advanced Calculations
- Stored, Unstored, and Global Fields
- Logical Functions
- The Let Function and Variables
Extending Calculations
Part V: Scripting
Scripting Basics
- Scripting Basics
- Your First Script
- The Importance of the Layout
- Running Scripts
- Branching and Looping in Scripts
Script Steps
- Script Steps
- Go to Layout
- Scripting for Fields
- Working with Records
- Finding Records
- Sorting Records
- Working with Windows
- Working with Files
- Printing
- Other Script Steps
Advanced Scripting
- Advanced Scripting
- Commenting Scripts
- Asking and Telling the User
- Organizing Complex Scripts
- Handling Errors
- Putting a Complex Script Together
Part VI: Security and Integration
Security
Exporting and Importing
- Exporting and Importing
- Exporting a File
- Export Formats
- Importing Data
- Import Data Sources
- Importing and Exporting in a Script
Sharing Your Database
- Sharing Your Database
- FileMaker Network Sharing
- Sharing Over the Internet
- FileMaker Server
- Server Hardware
Developer Utilities
- Developer Utilities
- Script Debugger
- Disable Script Steps
- The Database Design Report
- Tooltips
- Copying Database Structure
- Custom Menus
- Developer Utilities
- File Maintenance
Part VII: Appendixes
Appendix A. Getting Help
EAN: 2147483647
Pages: 176
