Import Data Sources
You've learned about the most common importing taskwhen your data's coming in from a single file. But you have other needs and FileMaker's got other choices. File  Import is an entire sub-menu, with commands to suit even the most demanding database manager. From there, you get to pick where the data should come from (the 17.4.1. File
The File images/U2192.jpg border=0> Import
images/U2192.jpg border=0> File command shows an Open File dialog box. Select any file that matches one of the export formats explained earlier in this chapter. You see your old friend, the Import Field Mapping dialog box (Figure 17-5). Match your source to your target, and away you go.
You can also use a similar command when you have to move data from one table to another within the same file. Go to your target layout and choose File Import Records images/U2192.jpg border=0> File. In the dialog box, choose the database youre in, and you see the Import Field Mapping dialog box. Select the table that's your data source from the Source pop-up menu and you're ready to go.
17.4.2. Folder
Using this command, you can pick any folder, and FileMaker imports the contents of each appropriate file in that folder. It creates one record for each file it imports, and puts the file into the field you specify. In other words, if you have a folder full of letters you've written in a folder, you can import them into a Letters database using this command. The complete text of each letter would go in a field, with one field per letter. (Remember, though, that FileMaker only supports pictures, movies, and plain text files when importing. If your letters are in Microsoft Word format, for example, you're out of luck.)
Choosing File images/U2192.jpg border=0> Import
images/U2192.jpg border=0> Folder summons the Folder of Files Import Options dialog box shown in Figure 17-9.
|

Normally, FileMaker finds only files directly inside the folder you pickit ignores any other folders contained inside. You have to turn on "Include all enclosed folders" to make FileMaker look inside those folders, too. With this option turned on, it digs as deep as necessary to find every file.
Once you've picked a folder, you get to decide what kind of files to import. You have only two choices: "Picture and movie files" and "Text files." In the first case, FileMaker ignores every file that isn't a supported picture or movie type. You get to decide whether the files themselves are inserted in the container field, or just references to them. If you choose the "Text files" option instead, it seeks out only plain text files.
17.4.2.1. Importing a folder of pictures or movies
When you choose the "Pictures and movie files" option and click Continue, you might be in for a bit of a wait. Depending on the number of files FileMaker has to look through, you may see a progress dialog box for as long as several minutes. When the import is complete, you see the now-familiar Import Field Mapping dialog box. But the list of source fields looks entirely unfamiliarin a good way. As outlined in Figure 17-10, FileMaker translates the file information into logical field types, perfect for database use.
|

17.4.2.2. Importing a folder of text files
When you choose to import text files, you still get an Import Field Mapping dialog box. This time, the source field list includes Text Content, File Name, and File Path. Each expects to be imported into a text field.
17.4.3. Digital Camera
If you're using Mac OS X, the File Import Records menu has a Digital Camera option. Unfortunately, this option relies on a feature unique to Mac OS X, so you cant import directly from a camera on Windows. You have to download the images to your computer first, and then import them. (There's a workaround, if you can set up your camera to show up as a USB disk on Windows, In that case, use the Import images/U2192.jpg border=0> Folder command to import images directly from the camera.)
When you first plug your camera into your Mac, chances are iPhoto launches and prepares to import the images. To avoid any potential confusion, quit iPhoto first (or be careful not to click Import in iPhoto while FileMaker's working with the camera).
Tip: If you import from your camera to FileMaker a lot, you can tell iPhoto to get out of the way: Just launch Image Capture (in your Applications folders) and in its Preferences Camera tab, select FileMaker. If you use iPhoto sometimes, and FileMaker others, choose No Application in the pop-up menu instead. That way, you get to decide what program each time.
images/U2192.jpg border=0> Import Records images/U2192.jpg border=0> Digital Camera. The verbosely titled FileMaker Pro Photo Import Options dialog box appears (Figure 17-11).
|
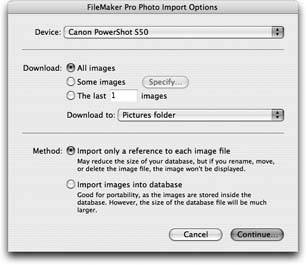
If you want to import everything on the camera, turn on "All images." On the other hand, if you just want, for example, the last five shots you took, turn on the last radio button"The last [blank] images"and put the right number in its box. Finally, you can choose "Some images" and click Specify to see a list of image thumbnails to choose from.
Even if you want to import all the images, the "Some images" choice can come in handy. It's the only place you can rotate the images before you import them. There's no direct way to rotate an image once it's in the container field. You have to export it, rotate it in another program, and then insert it again.
Even if you're importing the images directly into FileMaker (rather than just a reference), it still puts them in the folder you specify in the "Download to" pop-up menu. If you want to, you can simply delete them when you're done. (If you're storing references, though, the folder you pick becomes very important. If you import the pictures and then move them to a different folder, the references are wrong, and the pictures don't display in FileMaker.)
When you're through making choices, click Continue. The Import Field Mapping window that appears next is loaded with source fields this time. FileMaker lets you import loads of image data along with the pictures, including dimensions, resolution, shot date and time, and all that photographer-speak stuff you see when you accidentally put your camera in advanced mode.
At this point you're in familiar territory. Just match up the fields and click Import. Be prepared for a wait as it takes FileMaker longer to import full-color digital pictures than, say, zip codes.
17.4.4. XML Data Source
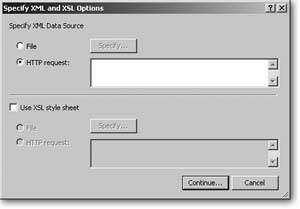
Because there are so many programs and data formats out there, the World Wide Web Consortium (W3C) created the XML format to make data exchange more predictable. FileMaker uses a special subset of XML's code, called FMPXMLRESULT, to facilitate import. If your data source was created by another FileMaker Pro database, it already uses FMPXMLRESULT, and you can import that data straight up, no chaser. But if the XML document doesn't use FileMaker's Document Type Definition (DTD), you'll need an Extensible StyleSheet Language (XSLT) document to tell FileMaker how to make the XML file work with FileMaker.
As you can see in Figure 17-12, the Specify XML and XSL Options window is where you tell FileMaker whether or not your XML Data Source needs a style sheet, and if it needs one, where to find it.
When you're finished choosing XML and XSL options, click Continue. FileMaker processes the XML and XSL (which may take a few minutes), and then shows you the Import Field Mapping dialog box. From there, you can proceed like any import, as described earlier in this chapter.
Note: XML Data Source is a timesaver if you need data from a file that's in an older version of FileMaker (preversion 7). Normally, FileMaker requires that you convert a file before you can import data from it. But if you export its data into an XML file, and then import it as XML, you skip conversion altogether.
|
XML and XSLT are complex languages and this book can't cover it in full. If you need to master XSLT, you can get whole books devoted to the subject. You can also find dozens of premade style sheets on FileMaker's Web site at www.filemaker.com/technologies/xslt_library.html.
17.4.4.1. XML Export
When you export to XML, FileMaker exports the data in the FMPXMLRESULT format, and then applies the style sheet. You create the style sheet to translate this XML into the appropriate format for your intended recipient. You have slightly more flexibility when exporting than when importing: XSLT can translate only XML documents, but it can produce any text-based format. So although you can import only XML files, you can export just about anything.
17.4.5. ODBC Data Source
The last import data source is called ODBC. This data source is a popular standard to allow programs to access information stored in database systems. For instance, if your company has an Oracle, Sybase, or Microsoft SQL Server database to manage orders, you can extract data directly from that database and import it into your FileMaker Pro database (perhaps you want to make your own reports with FileMaker).
ODBC is the most complex import data source to set up. It's a two-step process:
- First, you need to install an ODBC Driver for the kind of database you're connecting to. For example, if your corporate database is in Oracle, you need an ODBC driver for Oracle. These drivers are platform specific, and most vendors only supply drivers for Microsoft Windows. If you're using Mac OS X, you can buy high-quality FileMaker compatible drivers from www.openlinksw.com.
- Next, you need to set up an ODBC data source. FileMaker doesn't connect to the database directly. Rather, it uses a data source that's been defined in the ODBC system on your computer. So you have to set up that data source first. In Microsoft Windows, you do this setting up in the ODBC control panel. In Mac OS X, you need to refer to the documentation that came with your driver (most drivers install their own data source management program).
| POWER USERS' CLINIC XML and HTTP |
|
Sometimes the XML data you want to import is in a file on your computer. But a big part of the XML Data Source feature's power is that FileMaker can also get XML data from other computers using HTTP, or Hyper-Text Transport Protocol. You probably recognize this acronym because it usually sits in front of Web addresses (as in http://www.missingmanuals.com). HTTP is the way Web browsers talk to Web sites, but it's used for a lot more than that. Often, companies make important information available on HTTP servers in XML format. It's this kind of information that FileMaker wants to let you tap in to: Many news-oriented Web sites make headlines and article excerpts available in XML formats called RSS or Atom. Using the XML Data Source feature in FileMaker, you could import news from www.reuters.com directly into your FileMaker database. You can grab current or historical exchange rates from various sources to perform accurate currency conversions in FileMaker. Some shippers let you track packages by downloading XML data. You can build package tracking right into FileMaker Pro. FileMaker's XML import does have two significant limitations. First, it can't access data that's available only over a secure connection (in other words, it doesn't support HTTP over SSL, or HTTPS). If the data you need to access is only available in this form, you need to find another way. Second, some XML data sources need information passed to them as post argumentsthe equivalent of form fields on some Web pages. FileMaker can't send post arguments with the URL. Luckily, most data sources allow you to pass this information as part of the URL instead. Refer to the documentation for your data source for details. |
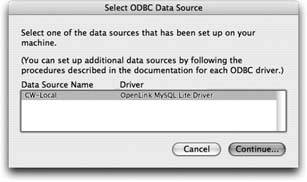
Once you have a driver installed and a data source set up, you can use the File images/U2192.jpg border=0> Import Records
images/U2192.jpg border=0> ODBC Data Source command. When you do, you see the Select ODBC Data Source window (Figure 17-13).
When you click Continue in this window, you probably need to enter a user name and password for the database you're connecting to. You need to get this information from the database administrator, unless you created it in the ODBC software yourself.
Next, FileMaker shows the SQL Query Builder dialog box (Figure 17-14). When you extract data from most databases (FileMaker being the notable exception), you have to use a special programming language called Structured Query Language, or SQL (often pronounced sequel). Writing an SQL query (or program) is a complicated affair. Luckily, in most cases, FileMaker can do it for youyou just make the right choices. (For more detail, see the box on Section 17.5.)
|
|
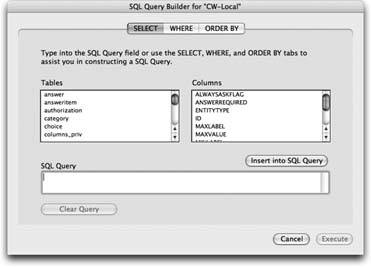
When you're all finished building your query, click Execute. FileMaker performs the query, gathers the data from the data source, and shows the same Import Field Mapping dialog box you always see when importing data. If you find yourself doing a lot of ODBC imports, you might be well served by a good book on SQL.
Although the query builder supports only a little SQL, you can use any SQL commands supported by your database server if you type the query directly. And SQL can do a lot.
| POWER USERS' CLINIC SQL Queries |
|
To make use of FileMaker's query builder, you need to know just a little bit about SQL. An SQL query is made up of clauses, each of which influences the results you receive from the database server. Although SQL understands several clauses, the query builder window supports just three of them: SELECT, WHERE, and ORDER BY. The window has a tab for each of these. The SELECT clause is where you tell the database what fields you want to import. You can include fields from more than one table if necessary. A SELECT clause alone imports every record in the table. If you include fields from more than one table, you get a result that might surprise you: Every record from each file is mixed in every possible combination. In other words, you import lots of records (multiply the record counts from each table to figure out how many). The WHERE clause's job is to control which records get imported and how the tables are related. To specify certain records, you build find criteria into the WHERE clause. First, select a table and column from the pop-up menus. Then select something from the Operator pop-up menu. You can match this field with a value you type yourself (turn on the Value radio button) or with another field (turn on the Column radio button). Either way, enter or select the correct value. Finally, select either the And radio button or the Or radio button and turn on Not if you want to omit the matching records. When you're finished defining the criteria, click Insert into SQL Query. Relationships in SQL are probably the most confusing. SQL databases don't have a relationship graph like FileMaker, so the database doesn't know how things relate to one another at all. Each time you build a query, it's your job to tell it how to relate records from one table to those in another. You do this job by matching field values in each table in the WHERE clause. For instance, you might pick the Customer ID field from the Customers table, the "=" operator, and the Customer ID field from the Orders table. When you add a criteria like this to your WHERE clause, you've told the database how Order and Customer records relate. You can add as many criteria in this way as you need. The last tab is called ORDER BY. This clause lets you specify a sort order for your data. It works just like FileMaker's normal Sort dialog box: Just add the fields to the Order By list, selecting Ascending or Descending as appropriate. When you've given it the order you want, click Insert into SQL Query again. As you do these things, FileMaker builds the actual query in the SQL Query box at the bottom of the window so you can see how it comes together. If you feel adventurous, you can manually change this query at any time.  |
Part I: Introduction to FileMaker Pro
Your First Database
- Your First Database
- An Very Quick Database Tour
- Creating a New Database
- Opening and Closing Database Files
- Saving Your Databases
- Adding Records to Your Database
- Navigating Your Database
- Same Database, Multiple Windows
Organizing and Editing Records
- Organizing and Editing Records
- Views
- Advanced Find Mode
- Changing Multiple Records
- Sorting Records
- Editing Whats in Your Fields
- Paragraph Formatting
- Beyond Text: Container Fields
- Checking Spelling
- Printing and Preview Mode
Building a New Database
- Building a New Database
- Tables and Fields
- Defining Fields
- Advanced Field Options
- Bringing It All Together
Part II: Layout Basics
Layout Basics
Creating Layouts
Advanced Layouts and Reports
- Advanced Layouts and Reports
- Setting up Field Controls
- Adding Field Controls to Layouts
- Field Behavior
- Tab Order
- Print-Related Layout Options
- Format the Number/Date/Time/Graphic
- Adding Buttons
- Tab Panels
- Reports and Summary Fields
Part III: Multiple Tables and Relationships
Multiple Tables and Relationships
- Multiple Tables and Relationships
- Relational Databases Explained
- Modeling Your Database
- Creating a Relational Database
- Relational Databases
Advanced Relationship Techniques
- Advanced Relationship Techniques
- Creating Related Records
- Table Occurrences
- Managing Data with Data Tunneling
- Building a Data Tunneling Interface
- Connecting Databases
- Lookups
- Advanced Relationships
Part IV: Calculations
Introduction to Calculations
- Introduction to Calculations
- Understanding Calculations
- The Structure of a Calculation
- Creating a Calculation Field
- Auto-Enter Calculations
- Validate Data Entry with a Calculation
- Replacing Data Using a Calculation
- Comments
Calculations and Data Types
- Calculations and Data Types
- Number Crunching Calculations
- Going Beyond Basic Calculations
- Text Parsing Calculations
- Date and Time Calculations
- Containers in Calculations
Advanced Calculations
- Advanced Calculations
- Stored, Unstored, and Global Fields
- Logical Functions
- The Let Function and Variables
Extending Calculations
Part V: Scripting
Scripting Basics
- Scripting Basics
- Your First Script
- The Importance of the Layout
- Running Scripts
- Branching and Looping in Scripts
Script Steps
- Script Steps
- Go to Layout
- Scripting for Fields
- Working with Records
- Finding Records
- Sorting Records
- Working with Windows
- Working with Files
- Printing
- Other Script Steps
Advanced Scripting
- Advanced Scripting
- Commenting Scripts
- Asking and Telling the User
- Organizing Complex Scripts
- Handling Errors
- Putting a Complex Script Together
Part VI: Security and Integration
Security
Exporting and Importing
- Exporting and Importing
- Exporting a File
- Export Formats
- Importing Data
- Import Data Sources
- Importing and Exporting in a Script
Sharing Your Database
- Sharing Your Database
- FileMaker Network Sharing
- Sharing Over the Internet
- FileMaker Server
- Server Hardware
Developer Utilities
- Developer Utilities
- Script Debugger
- Disable Script Steps
- The Database Design Report
- Tooltips
- Copying Database Structure
- Custom Menus
- Developer Utilities
- File Maintenance
Part VII: Appendixes
Appendix A. Getting Help
EAN: 2147483647
Pages: 176
