Adding Records to Your Database
When you first open a new FileMaker database (the Contact Management template in this example), it has everything you need to make a database except…well, data. Now that you understand the basic components of a FileMaker database, it's time to start adding your own content. Whether your database contains information about individual persons, objects, pictures, dung beetles, or whatever, FileMaker always thinks of that information in individual chunks called records. Each record contains everything the database knows about that person, thing, insect, or whatever.
Now, because you need to store many smaller pieces of information in each record (like a person's phone number, address, birthday, and so on), FileMaker can bestow each record with an almost infinite number of fieldsthe specific bits of data that define each record and make it unique.
For example, each person in a database of magazine subscribers gets her own record. Her first name, last name, phone number, street address, city, state, zip code, and the expiration date of her subscription are all examples of fields each record might include.
The techniques in this section work the same whether you're creating a new database for the first time (from the Contact Management template described on Section 1.2.1, for example), or adding to an existing one (like the example file described on Section 1.6.1).
Note: All records in a database must contain the same fields, but that doesn't mean you have to have to fill them all in. For instance, in a gift list database, if your boyfriend refuses to disclose his hat size, you can just leave that field blank in his record.
| UP TO SPEED Refining Your Finds |
|
When FileMaker looks for records, it expects them to match your find request exactly. For example, if you put "John" in the First Name field, and "Smith" in the Last Name field, FileMaker only finds John Smith. John Jones won't cut it, and neither will Sam Smith. FileMaker ignores any fields that are empty in your request, so it doesn't matter what John's title is because you didn't include a Title field in your find request. Although FileMaker insists that every field in each found record matches each field in your request, the data inside each field doesn't have to be a perfect match. The next chapter explains how FileMaker decides when a match is good enough, and how you can change its decision-making process. Finding the right records can be a real balancing act. Be too specific and you might not find anything at all; be too vague and you'll find more than you can handle. Bear these in mind when you enter your find requests:
|
1.5.1. Creating a Record
When you opened the template for your Contact Management database (Section 1.2.1), it was blank and lacking in even a single record, so the first thing you need to do is create one. It's simple: Choose Records  New Record or press Ctrl+N (-N). (Since you'll be creating lots of records in your FileMaker career, this is one keyboard shortcut you'll want to memorize.)
Note: When you're adding new records, you must be in Browse mode (see Section 1.1.1).
1.5.2. Editing a Record
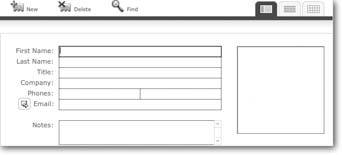
Now that you've created a record, you can enter information about the first person you want to keep track of. This is where those fields come in handy. To enter information in any field in a record, just point, click, and type. What to type? As Figure 1-8 illustrates, each field in this database has a label to its left, which indicates the type of information the field contains. Each field is also outlined in a light gray color.
|
| UP TO SPEED The Many Faces of a Field |
|
Fields are inside the content area (see Section 1.1.1), so don't be surprised if they don't always look the same. Unlike the status area, FileMaker Pro's content area is one place you can let your creative urges go wild. You can design your database to make them look almost any way you want. A field can have a label to the right ofor below or abovewhere you enter text, or no label at all. A field can be white, blue, green, or any other color. The same goes for the border around a field. In fact, if mystery is your thing, you can make your field invisibleno label, no border, and no color. (But here's a tip: When designing your own databases, make sure folks can tell where the fields are and what goes in them.) Usually, if you click in a blank space in the content area, all the fields appear with the dotted outline shown in Figure 1-14, but you can't count on this (you can turn this feature off, as described on Section 4.4.3.1). So don't expect every field to look like those shown here. See Chapter 3 for more detail on customizing and beautifying the fields in your database.  |
1.5.2.1. Moving between fields
To get from the field you're in to another where you can add or edit text, the most obvious way is to reach for the mouse, slide over to the new field, and click. Unless you're eager to burn that extra half a calorie, you may want to try a quicker, less exercise-intensive way, like the following:
- Press the Tab key to move to the next field. If you're not in any field, the Tab key puts you in the first field.
- Hold down the Shift key and press Tab to move to the previous field. This time, if you're not in any field, FileMaker puts you in the last field.
Note: If you're wondering who decides which field is next or previous, dig this: you do. When you design a database, you get to set the Tab Order, or the order FileMaker follows when you press Tab or Shift-Tab to move among fields. See Section 6.4 for details.
| UP TO SPEED On the Record |
|
To get out of all fieldsso you're not in any field at allpress Enter, or click a blank spot in the content area. This process is called committing the record. No, you're not sending the record away for a little quiet time; rather, you're telling FileMaker you're ready to commit to the changes you've made. (If you don't want to commit to the changes you've made, you can choose Records opened the record. If you imagine an old-fashioned file cabinet, you'd have to open someone's file before you could change something in it. As long as you have a record open, you're in the record. You can be in only one record at any given moment, and that record is said to be active. Rounding out this nonsense, when you've committed the record, you're on the record but you're not in the record. Believe it or not, getting this terminology straight makes things easier later on. |
1.5.3. Adding More Records
When you've filled in all the fields and you're ready to move on to your next subscriber, you must create an additional record to hold that contact, as each record can contain only one person's information. You've probably already figured out that you can just select Records New Record again, and get another empty record to fill. Youve also figured out you'll be creating records a lot as you enter all your subscribers. To speed things along, you can use the New Record keyboard shortcut: Ctrl+N ( -N).
-N).
1.5.3.1. Duplicating a record
While no two people are alike, it may not always seem that way from their contact information. For instance, if you want to include three people from the same company in your database, the data in the Company field is the same for each person.
| UP TO SPEED Lost in the Wilderness |
|
The database template you're using in this chapter has an assortment of buttons in its content area (they're all labeled here). They can look like tabs, text links, or just about anything else (a few even look like buttons). A click on one of these might show you things you're not familiar withmaybe even make you feel like you've lost your place. To avoid an accidental left turn when you try to commit the record, avoid clicking a button by clicking somewhere in the empty white area around the fields (see figure below). If you've already clicked a button, and now you're lost in the wilderness, finding your way back won't require a trail of breadcrumbs. Just follow these steps, in order.
You should now be back in your comfort zone. Phew! 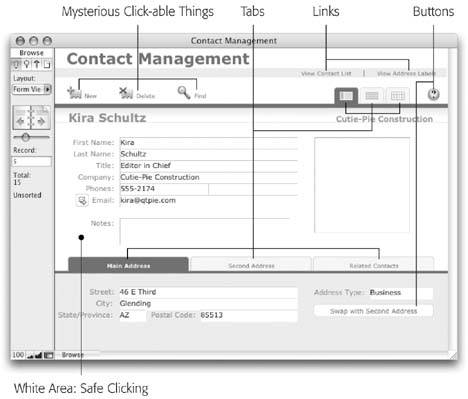 |
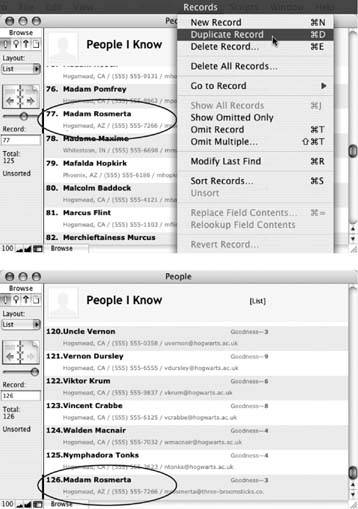
The Email and Phone fields won't be the same, but they might be close. It's time for a little organized laziness to kick in: Instead of making new blank records and retyping all that stuff, just choose Records images/U2192.jpg border=0> Duplicate (Figure 1-9). FileMaker displays a new record containing all the same information as the record you chose to duplicate. (FileMaker copied everything from the first record into a new one for you.) Now you can just edit the information that needs to be changed.
|
Tip: Be sure you don't accidentally leave in the first person's email address or phone number, lest a message or phone call get misdirected later.
| WORKAROUND WORKSHOP An Error a Day |
|
When you create a database, FileMaker is nice enough to create the first record for you, so you can start typing right away. But when you start a database using a template, you're not so lucky. If you try clicking in a field, you're met with the first error message shown at top. Luckily, that error message tells you exactly what you need to do: Choose File before you've clicked in a field, FileMaker decides it better warn you with the box shown here. Apparently, the folks at FileMaker are afraid you'll type madly away before you figure out nothing's showing up onscreen. So instead, you'll have to dismiss an error message every time you bump a key on your keyboard. This gets annoying quickly, but there's no way to get rid of the error message for good. Just remember that you have to be in a field before you can start typing. 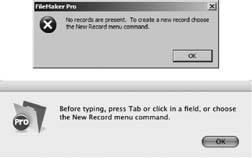 |
1.5.3.2. Deleting records
Last but not least, getting rid of a record you no longer need is a breeze. FileMaker Pro gives you three commands that let you delete one record, a group of records, or even all the records in your database.
Warning: Deleting records can't be reversed. There's no Undo option, since FileMaker saves changes automatically (Section 1.4). So when you delete a record (or all the records in a database), make sure you're ready to part with the data.
- One record. Just choose Records Delete Record to delete the record youre currently on. FileMaker asks if you're sure you want to delete the record, lest you accidentally send, say, your aunt's address to the trash bin. If you've indeed written heror anyone elseout of your life, simply click Delete in the message box to complete the purge.
- Multiple records. FileMaker has a neat command (Records Delete Found Records) that trashes any group of records of your choosing. Before you can use this command, you have to tell FileMaker what those records are, which you do by using the Find command (Section 1.6.3.1). In your FileMaker career, youll often use the Find command to locate the records you want to act upon before you tell FileMaker what to do with them.
- All records. In some cases, you may want to delete all the records in a database. Maybe your friend wants an empty copy of your database for his own use. Or perhaps your database holds data you just don't need anymore, like test results you're about to reproduce. Complete record elimination is easily accomplished by way of two menu commands: Just choose Records
images/U2192.jpg border=0> Show All Records, then choose Records
Tip: If you're feeling confident about a delete choice and want FileMaker to skip its "Are you sure?" confirmation message, hold down the Shift (Option) key while choosing Records Delete Record.
Revert Record and FileMaker throws away any changes you made since you first entered the record. This trick comes in handy when you accidentally modify a field by bumping into the keyboard, or realize you accidentally entered Uncle Johns address in Aunt Ethel's record. Just revert the record and you can be confident that whatever you did has been forgotten.
But keep in mind that the Revert Record command is only available when you're in a record, and you've made changes. If you don't have the record open, or you haven't made any changes since you last committed the record, the Revert Record command is grayed out.
Note: Committing a record isn't exactly difficult: You just press Enter or click somewhere in the window and FileMaker dutifully saves the record without a peep. Once this happens, you can no longer choose the Revert Record command. (How's that for commitment?) If you want a little more control, you can tell FileMaker to ask you for confirmation before a record is committed. You'll learn how to do this on Section 4.4.3.1.
Using the tools described so far for adding, deleting, and editing records in your database, you can quickly amass a large number of records. The next section explains how to find your way around this vast body of information.
Part I: Introduction to FileMaker Pro
Your First Database
- Your First Database
- An Very Quick Database Tour
- Creating a New Database
- Opening and Closing Database Files
- Saving Your Databases
- Adding Records to Your Database
- Navigating Your Database
- Same Database, Multiple Windows
Organizing and Editing Records
- Organizing and Editing Records
- Views
- Advanced Find Mode
- Changing Multiple Records
- Sorting Records
- Editing Whats in Your Fields
- Paragraph Formatting
- Beyond Text: Container Fields
- Checking Spelling
- Printing and Preview Mode
Building a New Database
- Building a New Database
- Tables and Fields
- Defining Fields
- Advanced Field Options
- Bringing It All Together
Part II: Layout Basics
Layout Basics
Creating Layouts
Advanced Layouts and Reports
- Advanced Layouts and Reports
- Setting up Field Controls
- Adding Field Controls to Layouts
- Field Behavior
- Tab Order
- Print-Related Layout Options
- Format the Number/Date/Time/Graphic
- Adding Buttons
- Tab Panels
- Reports and Summary Fields
Part III: Multiple Tables and Relationships
Multiple Tables and Relationships
- Multiple Tables and Relationships
- Relational Databases Explained
- Modeling Your Database
- Creating a Relational Database
- Relational Databases
Advanced Relationship Techniques
- Advanced Relationship Techniques
- Creating Related Records
- Table Occurrences
- Managing Data with Data Tunneling
- Building a Data Tunneling Interface
- Connecting Databases
- Lookups
- Advanced Relationships
Part IV: Calculations
Introduction to Calculations
- Introduction to Calculations
- Understanding Calculations
- The Structure of a Calculation
- Creating a Calculation Field
- Auto-Enter Calculations
- Validate Data Entry with a Calculation
- Replacing Data Using a Calculation
- Comments
Calculations and Data Types
- Calculations and Data Types
- Number Crunching Calculations
- Going Beyond Basic Calculations
- Text Parsing Calculations
- Date and Time Calculations
- Containers in Calculations
Advanced Calculations
- Advanced Calculations
- Stored, Unstored, and Global Fields
- Logical Functions
- The Let Function and Variables
Extending Calculations
Part V: Scripting
Scripting Basics
- Scripting Basics
- Your First Script
- The Importance of the Layout
- Running Scripts
- Branching and Looping in Scripts
Script Steps
- Script Steps
- Go to Layout
- Scripting for Fields
- Working with Records
- Finding Records
- Sorting Records
- Working with Windows
- Working with Files
- Printing
- Other Script Steps
Advanced Scripting
- Advanced Scripting
- Commenting Scripts
- Asking and Telling the User
- Organizing Complex Scripts
- Handling Errors
- Putting a Complex Script Together
Part VI: Security and Integration
Security
Exporting and Importing
- Exporting and Importing
- Exporting a File
- Export Formats
- Importing Data
- Import Data Sources
- Importing and Exporting in a Script
Sharing Your Database
- Sharing Your Database
- FileMaker Network Sharing
- Sharing Over the Internet
- FileMaker Server
- Server Hardware
Developer Utilities
- Developer Utilities
- Script Debugger
- Disable Script Steps
- The Database Design Report
- Tooltips
- Copying Database Structure
- Custom Menus
- Developer Utilities
- File Maintenance
Part VII: Appendixes
Appendix A. Getting Help
EAN: 2147483647
Pages: 176
