Creating a Layout from Scratch
FileMaker's built-in layout types are nice for quick-and-dirty work, but if you want your database to look great and work exactly the way you say, you may need to do some heavy customization. In fact, you often find it easier to start with a blank layout and add exactly what you need than to try and slice'n'dice a standard form into the avant-garde arrangement you have in mind.
5.2.1. Adding a New Layout
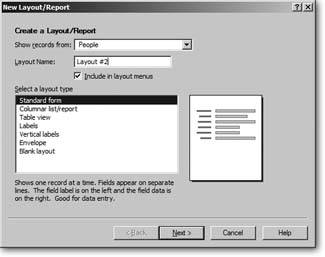
However they may end up, all new layouts start the same way. Open a database, switch to Layout mode, choose Layout images/U2192.jpg border=0> New Layout/Report. You see the window shown in Figure 5-4the New Layout/Report dialog box.
|
Note: As its name suggests, you'll see this dialog box again when you learn how to create reports, on Section 5.3.2.
In this box, you tell FileMaker a few basic facts about the new layout you have in mind. (You can always tweak these settings later.) From top to bottom, here's how it works:
- Show records from. For now, you can just ignore this pop-up menu. (It lets you choose a table, but you have only one table so far.)
- Layout Name. Enter a name for your layout here. You can use any name you want, but you have to keep it to 100 characters or less.
- Include in Layout menu. Use this checkbox to tell FileMaker whether or not it shows up in the status area's Layout pop-up menu. Most new developers turn on this option for every layout, to make sure they can always find their work. As your databases get more advanced, you might have special layouts that you want people to access only under certain circumstances. When you get that fancy, you can turn this checkbox off so folks can't switch to the layout any time they want.
Note: Every layout shows in the Layout pop-up menu when you're in Layout mode. This checkbox controls what shows up when you're in other modes.
Right now, the most important decision you make in this window is the choice of items in the "Select a layout type" list. FileMaker asks you questions specific to the type of layout you ask for, and then creates the layout based on your answer. When you select a layout type, FileMaker shows a little graphic mock-up of what this kind of layout looks like, just to the right of the list.
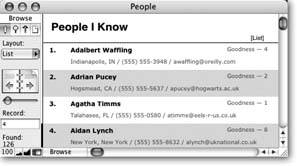
To get a feel for how it works, you're going to create a layout in the People database like the one shown in Figure 5-5. Because this layout doesn't match any of the canned layout types in the New Layout/Report window, you'll start with a blank layout and build everything by hand. The goal is to see several people at once, so you'll tailor it with list view in mind.
|
First, create the layout:
- Open the People database (see Section 3.4.5 for download instructions). In Layout mode, choose Layout
 New Layout/Report.
In the Layout Name box, type a fitting name, like List. Then, from the "Select a layout type" list, choose "Blank layout."
The Next button changes to Finish, since you don't have any more choices for a blank layout.
- Click Finish.
FileMaker returns you to your database, and shows you the new blank layout.
5.2.2. Set up the Header
This layout needs a header almost exactly like the one on the People layout. Unfortunately, you can't copy and paste the header part (Section 4.3.1) itself, but you can copy everything on the header, and paste it on this new layout.
Before you do, you need to make this header the same size as the other so everything fits properly. As with many things in FileMaker, you have at least two good ways to perform this task. Which you use depends entirely on your personal taste.
5.2.2.1. Matching part sizes with the Object Size palette
If you're a numbers person, this method is for you. Using the Object Size palette, you can resize or reposition any layout object with pixel-perfect precision. To learn how to tackle it, you first check the exact size of the header part on the People layout, then adjust the new header so its size matches.
- Switch to the People layout.
You can switch using the Layout pop-up menu, or simply by clicking the left-hand page on the Book icon. When you do, you immediately see the People layout.
- If the Object Size palette isn't showing, choose View Object Size.
Make sure the palette is measuring in pixel units.
You should see "px" by each number in the palette. If you don't, click the unit you do see repeatedly until "px" shows.
- Click the Header part tag to select the part.
The Object Size palette updates to show measurements for the header part. The last fieldwith a double arrow pointing up and downis the height. Jot down the height number you see there.
- Switch to the new List layout, then select the header by clicking its tag.
The Object Size palette now measures this part.
- Type the number you got in step 5 into the height field on the Object Size palette, and then press Enter.
The part doesn't move while you type; you have to press Enter to see your change take effect. When you do, the header part resizes, and now perfectly matches the header on the People layout.
If you prefer less typing and more mousing, you can use the T-Squares instead.
5.2.2.2. Matching part sizes with the T-Squares
In the last chapter, you learned about the T-Squares (Section 4.4.2.5). These handy liner-uppers don't just help you keep objects on the layout straight. They can also help you make sure parts and objects are in the same place on different layouts. Start on the People layout, and then follow these steps:
- If the T-Squares aren't showing, choose View T-Squares.
Tip: On a busy layout, the T-Squares can be hard to spot. If you know they're showing, but you can't find them, just turn them off and back on. When you do, they reappear smack-dab in the center of the layout.
- Position the horizontal T-Square between the header and body.
The T-Squares float above everything else on a layout, so it covers the dotted part boundary line perfectly. If you add a black line between your header and body, you may not see the boundary. Just put the T-Square over your line instead.
Tip: If you're having trouble getting the lines to match perfectly, the Object Grids may be holding you back. Choose Align Object Grids to tell FileMaker to let you move the T-square exactly where you want them.
Switch to the new list layout, and drag the header part tag into the right place, using the T-Square as a guide.
Since T-Squares stay in the same spot as you switch layouts, you can rest assured your new header is just the right size.
Now that the header is the right size, you can fill it with the necessary objects. You could drag objects into the header manually, just as you did in the last chapter when you built the People layout. But you've already done that work once. Why not take advantage of it here as well? You can easily reuse these items: Copy and paste them from the People layout. You use copy and paste a lot when you design layouts.
- Switch back to the People layout. Select the graphic, "People I Know" text, and "[Detail]" text.
You can Shift-click or use the rubber band. If you have a horizontal line on your layout, select it too.
- Choose Edit Copy.
Switch back to the list layout, then choose Edit
Paste.Drag the objects (as a group) into their proper place in the header.
Since they're all selected, if you drag one object, the others follow.
Tip: If you're a stickler for details, you may want to use the T-Squares or Object Size palette to be sure everything's in the same place on both layouts. If you do, just check one of the objects. Since they were copied, pasted, and moved as a group, if one is in place, the others are too.
5.2.2.3. Adding the finishing touches
Your header part is nearly complete. To finish it, give it a colored fill (Section 4.4.4.4). Finally, since you're not making a detail layout, it probably shouldn't say "[Detail]" in the header. Change that text object to say "[List]" instead, so it matches the name of the layout. Figure 5-6 shows how your layout should look now.
|
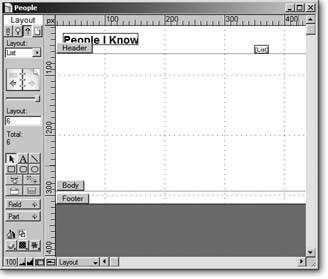
5.2.3. Set up the Body
Now that the header is in place, it's time to work on the bodyand learn a few new tricks. You add the first and last name fields to the layout, and make them flow nicely together. You'll also tell FileMaker to show the record number next to each person's name.
5.2.3.1. Making data flow with merge fields
Knowing what you know now, if you set out to build this layout yourself, you'd probably jump right for the field tool and start dragging new field on the layout. But look closely at Figure 5-7 first.
|

When you put a field on a layout, you're putting it exactly where you want it. No matter what record you're on when you look at the layout, that field value is in the same spot. Usually, that's where you want it to be, but sometimeslike in the new list layoutyou want something a little more flexible. You want the Last Name field to start where the first name ends. Since some first names are longer than others, this spot changes from record to record.
In FileMaker, you solve this problem using merge fields. These work a lot like a mail merge in a word processing program. You create an ordinary text object on your layout (not a field object), and then tell FileMaker to merge different field values into the text. For example, to put the first and last names together on your new layout, you create a text object like this:
<> <>
Merge fields always show up in Layout mode with angle brackets around their names, just like <>. When you look at this text object in Browse mode, though, you see the value of the First Name field, then a space, then the Last Name field. Since all these values show up in a single text object, FileMaker sorts out the exact positions for you.
Merge fields have a downside, though: They're for display only. You need a real field if you want your users to be able to get into a field and change its contents. Your database already has a layout with real fields just for editing data (the details layout), so in this case, merge fields are just what the doctor ordered.
Putting merge fields into a text object is easy:
- In the status area, click the text tool.
FileMaker activates the text tool; it changes your mouse arrow to an I-beam, and darkens the text tool button. Now set up the font for the text object you're about to create.
- Using the Font, Size, and Style menus (in the Format menu) choose Verdana, 11 Point, and Bold. Then click somewhere in the body part.
A new editable text box appears, ready for you to type.
- Choose Insert Merge Field.
Select the First Name field, and then click OK.
FileMaker types <<First Name>> into the text object for you.
- Type a single space.
Since you don't want the first and last name right next to each other, you've just added a space.
- Choose Insert Merge Field again. When the Specify Field dialog box returns, select the Last Name field, and then click OK.
You now have a text object that shows the first and last names with a single space between them (you can switch to Browse mode and try it out if you want). You just need to put it into place.
The address, phone, and email information should also be in a merge field (study Figure 5-7 to see whythey all flow together in a nicely formatted line). In this case you want Verdana, 9-Point, Plain. You can also select a gray color (or any color you like) from the Format
images/U2192.jpg border=0> Text Color menu. Repeat the steps above to build a text object like this:
<>, <> / <> / <>
Tip: You can mix and match merge fields and normal text to your heart's content. When you were setting up the first and last name, you added a space between the merge fields. This time you add even more. After you add the City merge field, type a comma, and a space. After the State and Phone Number merge fields, type space-slash-space.
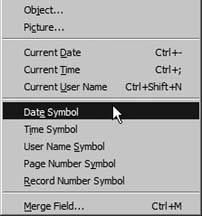
5.2.3.2. Using symbols to show important info
Merge fields aren't the only things FileMaker can squeeze into a text object on the fly. You can also insert a handful of special symbolsstand-in characters that you can replace with useful information when you view your database in Browse or Preview mode. For instance, notice in Figure 5-8, how each record in the list is numbered. You can accomplish this effect with the record number symbol.
Tip: FileMaker offers a host of other symbols besides the record number symbol. See the box on Section 5.2.3.3 for full detail.
Since you're creating a list layout, it would be nice to show record numbers. That way you can easily see where you are in the list at any time, even if you've scrolled down from the top. You use the record number symbol to make it happen.
- Select the first and last name text object you just created.
If you just make a new text object with the text tool, you have to set the font, size, style, and possibly color. Instead, you can take a text object that already has all the attributes you want and use it as a starting point.
- Choose Edit Duplicate.
In the status area, click the text tool. Click anywhere in the new text object you're about to edit.
FileMaker outlines the text object and adds a flashing insertion point. Now select all the text in the object.
- Choose Edit Select All, and then press Delete or Backspace.
Choose Insert
Record Number Symbol. - Type a period, then press Enter.
If you want a period after the record number symbol, you have to type it yourself. Pressing Enter tells FileMaker you're done editing the text object.
You now have a text object that contains "@@." But if you peek at it in Browse mode, you see that FileMaker actually puts the current record number in its place.
UP TO SPEED
Other SymbolsFileMaker includes symbols for several special values you might want to show on a layout. You insert these symbols on the layout because you don't know in advance what they're going to be, such as the current date or record number. Then, when you switch to Browse mode (or Preview mode), FileMaker replaces the symbol with the up-to-the-moment correct value. You can read about the record number symbol on Section 5.2.3.2. Here are the others:
- The date symbol (//) is replaced by the current date. People often include this symbol on printed reports so you can easily see when they were generated.
- The time symbol (::) is replaced by the current time.
- The user name symbol (||) is replaced by the current user's name. FileMaker takes the user name of whoever's logged into your computer. (That's two pipe symbolsShift-backslash on most keyboardstyped side by side)
- The page number symbol (##) is replaced by the page number in Preview mode or when you print. Otherwise, it just shows as a question mark.
The Insert menu has three related options as well, but unlike symbols, these don't get replaced by anything in Browse or Preview mode. When you use the Insert
Current Date command, for instance, FileMaker simply adds todays date to the text object in Layout mode. It will show this same date forever in either mode.You can use the Insert menu to place symbols where you need them, but it's faster and easier to type them in manually. So once you've seen that "##" makes a page number, forget about mousing around and just type the two number signs.
Tip: You can apply the same formatting to date and time symbols as you can to regular versions of those fields. Just select the text block that contains your date symbol ("//"). Then select FormatDate and choose the formatting you want. Works for the time symbol ("::"), too.
5.2.3.3. Arranging the objects
Now that you've added three new text objects to the body part, you can arrange them on the layout. Using Figure 5-8 as a guide, use the techniques you learned on Section 4.4.9 to move the text objects into a clear, attractive arrangement. Once they're in place, you just need to add the Goodness Rating field and make a few adjustments to the body part. You're almost done!
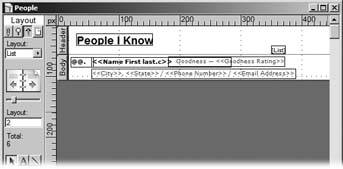
Figure 5-8. Here's how to arrange your text objects on the layout. As you're dragging text objects around, you see a dotted line near the bottom of the item. That's an imaginary line called the baseline. You can use it to make sure your rows of data are neatly lined up.
5.2.3.4. Adding a field
The Goodness Rating is always a single-digit number, so unlike the First Name and Last Name fields, you don't need a merge field (Section 5.2.3.1) to get its spacing right. You use an ordinary field object instead.
- From the status area, drag the Field tool onto the layout.
The Specify Field dialog box appears.
- Make sure the "Create field label" checkbox is turned on.
When this option is on, FileMaker automatically adds a text object to serve as a label for your field.
- Select the Goodness Rating field, and then click OK.
FileMaker adds the Goodness Rating field to the layout, along with a new text object that says "Goodness Rating."
5.2.3.5. Copying formatting with the format painter
Unfortunately, the new field and label aren't formatted properly. They have the wrong font, size, style, and color. Instead of fixing each object manually as you learned in Chapter 2, you can use the format painter.
This intuitive tool copies all the formatting from one object and applies it to another. Here's how to use it:
- Click the text object that shows City, State, Phone Number and Email Address to select it.
That object has the very formatting you want to copy.
- Choose Format Format Painter.
Click the Goodness Rating label.
The label instantly changes to reflect the correct formatting. Also, it's already selected, so copying its formatting to the Goodness Rating field is a snap.
- Choose Format Format Painter again, and then click the Goodness Rating field.
Choose Format
Style The format painter is certainly easier than choosing each formatting option individually, but it seems to work for only one object at a time. There are actually a couple of ways to extend Format Painter's abilities. If the objects you want to format together are close enough, you can rubber band them with Format Painter and they all change together. Just like the regular rubber band, you have to fully enclose each object for the change to take place. But pressing the Ctrl (
 ) key lets you merely touch an object with the rubber band to get the same effect.
But maybe even that method doesn't work for you, because your objects are all over the place. Wouldn't it be nice if Format Painter were a button like the other tools? Then you could double-click it to lock it. Well, you're in luck, because that's just how it works.
- Choose View Toolbars
Select the object that has the formatting you want to copy
You've just copied a text block's formatting, but you can also use a field, a drawn object, or anything that has formatting.
- Double-click the format painter toolthe one that looks like a paintbrush, and then click each object you need to format.
Double-clicking locks the tool, so you can use it over and over. You can even grab some rubber band selections if you want to.
- Click the Selection tool to let FileMaker know you're finished formatting.
All good things must come to an end.
You now just need to make the Goodness Rating field smaller (just wide enough to hold one number) and put it in its place on the right side of the layout. Delete the word "Rating" from the Goodness Rating label, and then add a "-" to the end and position it just to the left of the field. Figure 5-9 shows where you're at.

Figure 5-9. With the Goodness Rating field in place, your layout is almost complete. In fact, you could stop here. But with just a few more steps, you can make your list much easier to scan and read. Simply add a gray background to every other record.
5.2.3.6. Alternating the body color
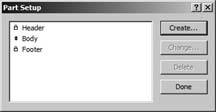
As Figure 5-5 plainly shows, the rows on this list layout are supposed to alternate between gray and white. FileMaker gives you this effect for free; you just have to turn it on. To do that, you pay a visit to the Part Definition dialog box via the Part Setup dialog box.
- Choose Layout Part Setup.
In the Part Setup dialog box's list, select Body, and then click Change.
This window lists every part in your layout. To select a part, just click its name. When you click Change, the Part Definition window opens (Figure 5-10).
Tip: There's a shortcut to the Part Definition dialog box: On the layout, just double-click the part tag. Turn on the "Alternate background fill" checkbox.
The Fill Color Menu and Fill Pattern Menu buttons, which had been grayed out, become available and ready for you to make a choice.
- From the Fill Color Menu, choose a color to use for your alternate row color.
The Fill Sample changes to show your selection. Choose a color that's not too dark, or you'll have trouble seeing the beautiful layout you've created.
- Click OK, and then Done.
Nothing changes in Layout mode, but if you switch to Browse mode, you see the new effect.
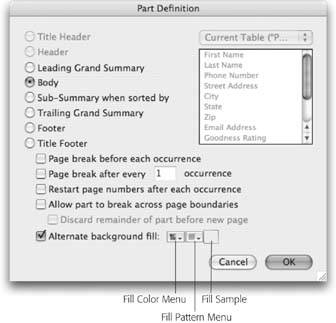
Figure 5-10. The Part Definition dialog lets you configure every nitty-gritty detail of any layout part. Here, the "Alternate background fill" checkbox is turned on, telling FileMaker to use different fill color and style for even and odd records in list view.
When you use the "Alternate background fill" option, the settings you make in the Part Definition window apply to the even numbered records. You can still control the fill for odd numbered records by adjusting the body part fill right on the layout, just like you did with the header part. In this example, you tell FileMaker to color the even rows gray, and leave the odd rows white. You can use this feature any time you want to make it easier to see where one record ends and another begins, in a list.
Now all you need to do is resize the body part so it just fits its contents, using any of the methods described earlier in this chapter. When you've done that, your layout design is nearly finished.
5.2.4. Setting Layout View
Switch to Browse mode to admire your handiwork. If you're seeing only one record at a time, switch to list view (choose View
View as List). When you choose the blank layout template, you get complete freedom to make the layout look just the way you want. But one tradeoff is that you have to remember to tell the layout which view its supposed to be in.UP TO SPEED
Part Setup Dialog BoxWhen you choose Layout
Part Setup, FileMaker shows you Part Setup Dialog Box. This often-ignored box isnt just a slower way to get to the Part Definition window, though. From this one screen, you can create new parts and edit, delete, and rearrange existing parts. But, as you'll read on Section 6.9.3, you can do most of this work more easily without this window, so you won't use it very often.To add a new part, click Create. You're presented with the Part Definition dialog box, where you can decide what kind of part to create, and set various options. You can do the same thing by dragging the part tool from the status area or choosing Insert
Part.To delete a part, select it and click Delete. If the part contains any objects on the layout, FileMaker asks you if you're sure, because when you delete a part, you delete everything on it as well. You've already deleted parts without using this window, though, by selecting the part and choosing Edit
Clear. But if you hate menus, you can also just press Delete.locked in place and you can't move it. The reason is simple: It doesn't make sense to move most parts. For example, the header is always below the title header and above everything else. You really only need to rearrange parts when creating subsummary reports, which the next chapter covers.
Since FileMaker always starts out showing form view, that's what you see until you tell the layout something different.
- Still in the People database, switch to Layout mode, then choose Layouts Layout Setup.
On the Views tab, turn off Form View and Table View.
You've just told FileMaker to make these two menu choices off-limits in Browse and Find modes. After all, they don't make much sense in a layout that's designed specifically to work as a list.
- Click OK to dismiss the dialog box.
Honestly, you have to tell some programs everything.
Now, when you switch to Browse mode and look at the View menu, View as Form and View as Table are grayed out. FileMaker won't accidentally switch your list to a useless view of the data.
POWER USERS' CLINIC
Getting Table View to Mind Its MannersTable view is a real boon if you want a quick and easy way to make your data look like a spreadsheet. With one command, your layout displays data in rows and columns, which you can rearrange and sort. But if you dig a little deeper, you find that you have a lot of control over how table view works. These controls lurk under the Layout Setup command. When you click the Views tab, you see that the Table View option has a button that leads you one dialog box deeperinto Table View Properties.
- With the Grid controls, you can show or hide table view's horizontal and vertical gridlines. Try switching off the Vertical gridlines to make rows more prominent. This way, it's easier to read across the data pertaining to a single record.
- With the Grid Style option come two familiar pop-up menus. You can choose a new color for the grids with the color pop-up or apply a pattern to them from the pattern pop-up menu. A sample swatch shows you the choices you've made.
- Under Header and Parts, you control the header, footer, and column heads. Headers and footers anchor to the top or bottom of the screen while the records scroll through long lists. Column heads are the field names at the top of each column.
- Headers and footers are normally suppressed when a layout's in table view. Choose Include header part or Include footer part to display those parts of the layout. (For obvious reasons, these options have no effect on a layout in which you don't have those particular parts.)
- Since the column heads tell you what information you're looking at, you don't often find a reason to turn off their display. But you can do it if you want to, by unchecking "Include column headers."
- More commonly, you might want to turn off some of the column headers' other features. Stop users from resizing columns by unchecking Resizable columns. Turn off Reorderable columns to keep folks from rearranging their order on the table. That way, nobody can move the First Name field so far away from the Last Name that the data loses its meaning. Nobody can sort records if you uncheck Sort data when selecting column.
- Choose Use custom height to set Rows to a specific height, and then select one of the measurement systems and type the height you want.
Creating Layouts for Reports
- Choose View
- Select the first and last name text object you just created.
Part I: Introduction to FileMaker Pro
Your First Database
- Your First Database
- An Very Quick Database Tour
- Creating a New Database
- Opening and Closing Database Files
- Saving Your Databases
- Adding Records to Your Database
- Navigating Your Database
- Same Database, Multiple Windows
Organizing and Editing Records
- Organizing and Editing Records
- Views
- Advanced Find Mode
- Changing Multiple Records
- Sorting Records
- Editing Whats in Your Fields
- Paragraph Formatting
- Beyond Text: Container Fields
- Checking Spelling
- Printing and Preview Mode
Building a New Database
- Building a New Database
- Tables and Fields
- Defining Fields
- Advanced Field Options
- Bringing It All Together
Part II: Layout Basics
Layout Basics
Creating Layouts
- Creating Layouts
- The Lowdown on Layouts
- Creating a Layout from Scratch
- Creating Layouts for Reports
Advanced Layouts and Reports
- Advanced Layouts and Reports
- Setting up Field Controls
- Adding Field Controls to Layouts
- Field Behavior
- Tab Order
- Print-Related Layout Options
- Format the Number/Date/Time/Graphic
- Adding Buttons
- Tab Panels
- Reports and Summary Fields
Part III: Multiple Tables and Relationships
Multiple Tables and Relationships
- Multiple Tables and Relationships
- Relational Databases Explained
- Modeling Your Database
- Creating a Relational Database
- Relational Databases
Advanced Relationship Techniques
- Advanced Relationship Techniques
- Creating Related Records
- Table Occurrences
- Managing Data with Data Tunneling
- Building a Data Tunneling Interface
- Connecting Databases
- Lookups
- Advanced Relationships
Part IV: Calculations
Introduction to Calculations
- Introduction to Calculations
- Understanding Calculations
- The Structure of a Calculation
- Creating a Calculation Field
- Auto-Enter Calculations
- Validate Data Entry with a Calculation
- Replacing Data Using a Calculation
- Comments
Calculations and Data Types
- Calculations and Data Types
- Number Crunching Calculations
- Going Beyond Basic Calculations
- Text Parsing Calculations
- Date and Time Calculations
- Containers in Calculations
Advanced Calculations
- Advanced Calculations
- Stored, Unstored, and Global Fields
- Logical Functions
- The Let Function and Variables
Extending Calculations
Part V: Scripting
Scripting Basics
- Scripting Basics
- Your First Script
- The Importance of the Layout
- Running Scripts
- Branching and Looping in Scripts
Script Steps
- Script Steps
- Go to Layout
- Scripting for Fields
- Working with Records
- Finding Records
- Sorting Records
- Working with Windows
- Working with Files
- Printing
- Other Script Steps
Advanced Scripting
- Advanced Scripting
- Commenting Scripts
- Asking and Telling the User
- Organizing Complex Scripts
- Handling Errors
- Putting a Complex Script Together
Part VI: Security and Integration
Security
Exporting and Importing
- Exporting and Importing
- Exporting a File
- Export Formats
- Importing Data
- Import Data Sources
- Importing and Exporting in a Script
Sharing Your Database
- Sharing Your Database
- FileMaker Network Sharing
- Sharing Over the Internet
- FileMaker Server
- Server Hardware
Developer Utilities
- Developer Utilities
- Script Debugger
- Disable Script Steps
- The Database Design Report
- Tooltips
- Copying Database Structure
- Custom Menus
- Developer Utilities
- File Maintenance
Part VII: Appendixes
Appendix A. Getting Help
EAN: 2147483647
Pages: 176
