Privilege Sets
Generally, you create your privilege sets first, and then add accounts for each user, as you'll see in the following sections. When you add an account, FileMaker asks you to pick a privilege set to control that person's access. But true to the FileMaker way, if you start to create an account, and don't yet have an appropriate privilege set, you can easily create one right then and there, before you save the account.
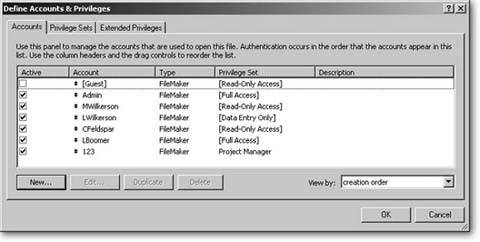
All the work of creating and maintaining accounts and privilege sets is done in the Define Accounts & Privileges window (Figure 16-1). You can get there by way of the File images/U2192.jpg border=0> Define
images/U2192.jpg border=0> Accounts & Privileges command.
|
When you're creating privilege sets, there's a big temptation to give people too much power. The more folks can do on their own, the less often they'll come bugging you, right? Unfortunately, this attitude invites trouble. For instance, if your database holds credit card numbers along with order records, and your Order Entry privilege set allows users to export data, you might one day find yourself the subject of an FBI investigation. To be on the safe side, if you aren't sure someone needs a privilege, don't give it to him.
There's a practical component to this rule as well. If someone has access to a feature he shouldn't have, it's very unlikely he'll complain. He probably won't even notice, and neither will you until someone abuses it. On the other hand, if you lock someone out of a capability she needs, you can bet you'll hear about it right away. You can easily add the needed power when it comes up. In other words, if your privilege sets start out too restrictive, they'll naturally grow to the right level of power over time based on user feedback.
16.2.1. Managing Privilege Sets
To create or edit privilege sets, click the Privilege Sets tab. The first thing you notice is that you already have some. Every FileMaker database has three built-in privilege sets: [Full Access], [Data Entry Only], and [Read-Only Access] (the brackets help to remind you that these privilege sets are special). You can see the Privilege Sets tab in Figure 16-2.
|

The standard privilege sets cover three very common access levels, and you're welcome to use them if you want:
- Although you probably didn't know it, you've been using the Full Access privilege set all along. As the name says, it gives you full access to the file with absolutely no restrictions.
- The Data Entry Only privilege set is much less powerful. Accounts assigned to this privilege set can't create or modify tables, field definitions, scripts, or layouts. But they can add, edit, and delete records in any table.
- The least powerful built-in privilege set is Read-Only Access. Not only does it prevent developer activities, but it also prevents modification of the data. Accounts with this privilege set can't create, edit, or delete records. They can only view the data that's already there.
These built-in privilege sets provide basic security, but they don't give you a range of possibilities. Using just FileMaker's default privilege sets, you can't give Malcolm full control of some tables, but let him just enter data in others. In developer's lingo, you don't get a lot of granularity.
Tip: Think of granularity as a medium for sculpture. If you're building a statue from boulders, you can't create delicate details like the nose or eyelashes. If you're building with grains of sand (get it?), you can work at a much finer level. Similarly, granularity in security lets you control specific access to very specific aspects of your database.
In FileMaker, you can exercise precise, granular control over security by creating your own privilege sets and assigning them to certain people or groups.
16.2.1.1. Creating a new privilege set
Before you create a new privilege set, you have a decision to make: Do you start from scratch, or do you take a shortcut? If you click New, FileMaker makes a new privilege set with absolutely no privileges. In other words, accounts attached to this setif left alonecan't do anything in the database. You have to turn on exactly the privileges you think the user should have.
To save time, you can start by duplicating the [Data Entry Only] or [Read-Only Access] privilege set, and then add or remove privileges as necessary. This way is usually a little faster, but it does open up the possibility that you'll accidentally leave something turned on that shouldn't be.
Note: For some reason, you can't duplicate the [Full Access] privilege set. This is FileMaker's way of encouraging you to really think about the privileges you assign, and it should encourage you to give users the least access possible for them to do their jobs. If you want a privilege set that grants almost full access, you have to build it up by hand.
16.2.2. Other Privileges
Draw your attention to the Other Privileges area. Here is where you decide on some basic FileMaker features. Most of these are pretty self-explanatory:
- Allow printing. Turn this option on, and the user can print layouts. If you turn this option off, the Print menu command is grayed out and the Print script step fails.
- Allow exporting. This option lets people access the Export Records command. Again, if it's off, the menu command is grayed out, and the Export Records script step doesn't work.
Note: There's a workaround to let scripts do things the active privilege set doesn't let them do. See Section 16.5.2. - Manage Extended Privileges. Normally, only accounts with full access can manage security settings. But extended privileges are one exception. You'll learn about these shortly, but if this option's turned on, users can assign extended privileges to different privilege sets themselves.
- Allow user to override data validation warnings. When you use field validation, FileMaker shows displays an error message if people enter invalid data in a field. In the Field Options dialog box, you can turn on "Allow user to override during data entry" if you want to give folks the power to ignore this error. But you get one more layer of control with the "Allow user to override data validation warnings" checkbox in the Edit Privilege Set window. If you turn this option off, they can't override the errors even when the field options say they should be able to.
- Disconnect user from FileMaker Server when idle. This isn't actually a privilege. It's more of an un-privilege, and it's turned on when you create a new privilege set. When it's on, users are kicked out of a shared database if they don't use it for a while (you get to decide how long when you configure FileMaker Server). Turn it off if you want to give these users the power to stay connected right through lunch break.
- Allow user to modify their own password. FileMaker lets you implement some typical password management features. First, you get to decide if someone can change his account password at all. If you want to give him this power, turn this option on. Once it's on, you can choose "Must be changed every" and enter a number of days to force the user to change his password periodically. You can also enforce a minimum password length.
Note: You probably want to turn this option off if people share accounts in the same database. If you have just one account for each group, for instance, you don't want one wisenheimer changing the password on everybody else just for laughs. - Available menu commands. A brand-new privilege set gets full access to the menu bar. Of course most menu commands don't actually do anything unless you turn on the appropriate privileges. If you don't want your users running menu commands willy-nilly, you can change the "Available menu commands" pop-up menu. Choose "Editing only" to give these people access only to the Edit menu and basic formatting commands. Choose "None" to turn off every menu command that affects the current database.
To develop a full understanding of how privilege sets work, why not try building one from scratch?
- Click New.
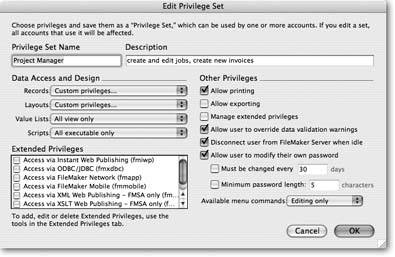
FileMaker pops up the Edit Privilege Set dialog box (Figure 16-3). First off, every privilege set needs a name, which can be anything you want. Call this one Project Manager by typing it in the Privilege Set Name box. While you're at it, in the Description box, type: create and edit jobs, create new invoices.
- For the Project Manager privilege set you're defining, turn on these checkboxes:
- Allow Printing
- Allow user to override data validation warnings.
- Disconnect user from FileMaker server when idle.
- Allow user to modify their own password.
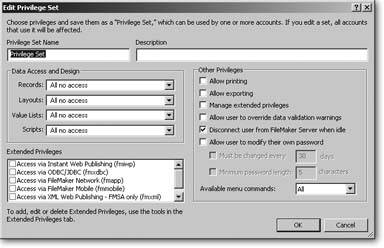
Figure 16-3. When you create a new privilege set, FileMaker shows you a window where you can choose its settings. Notice how many things aren't turned on, or say "All no access." This set offers very few privileges.
- Then set the "Available menu commands" pop-up menu to "Editing only."
That's it for the "Other Privileges" part of the dialog box. But if you leave the Project Manager privilege set with these settings, your users can't do anything very useful. Next, you'll look at the section where all the granularity is hiding so you can start adding real privileges to the list.
Note: You may have noticed there's no checkbox for "Allow user to define the database," or "Allow user to create tables." Only accounts with full access can open the Define Database window and use its features. The same goes for the Accounts and Privilege Sets tabs in the Accounts & Privileges window.
16.2.3. Data Access and Design Privileges
The Data Access and Design section of the Edit Privilege Set dialog box is where you control access to your specific database elements. The window has a pop-up menu for Records, Layouts, Value Lists, and Scripts. Right now, the Project Manager privilege set doesn't allow access to any of these. To start adding privileges, click the Records pop-up menu. Figure 16-4 shows all your choices.
16.2.3.1. Record privileges
If the three built-in privilege sets form the first level of granularity in the security system, the options in this pop-up menu are part of the second level.
|
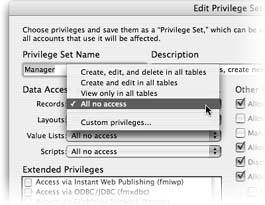
Without much fuss, you can pick one of the prebuilt options:
- Create, edit, and delete in all tables is the level you're accustomed to. It lets these people do anything they want with the recordsincluding delete them all.
- Create and edit in all tables is almost as good. It just prevents the users from deleting records.
- View only in all tables is for the browsers among you. They can see anything they want, but they can't change anything.
- If, for some reason, you want to give somebody access to your database but not your data, then keep All no access selected.
Each of these options applies to every record in every table. But you might want to let some users "Create, edit, and delete" only in some tables, and let them "View only" in others. For instance, you can let part-timers create new customer records, but not tamper with the Expenses table. For that kind of control, choose "Custom privilege" (Figure 16-5).
To modify privileges for a particular table, you first have to select it. But don't waste time: You can select several tables if you want to, and then modify the settings for all of them at once. FileMaker even gives you a Select All button so you can easily make a change to every table.
For the Project Manager privilege set, you want to give at least View access to every table:
- From the Records pop-up list, choose Custom Privileges, and then click Select All.
FileMaker selects every table in the list.
- From the View pop-up menu, choose yes.
The word "yes" appears in the View column for every table. Accounts with the Project Manager privilege set can see data in every table in the file.
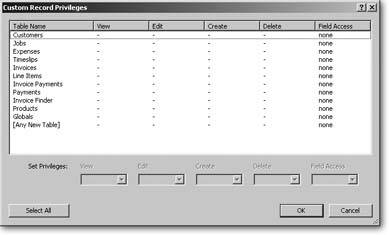
Figure 16-5. Now you're starting to see some real granularity. The Custom Record Privileges window lets you control view, edit, create, and delete privileges on each individual table. You can also control exactly which fields the users have access to by choosing options from the Field Access pop-up menu.
- From the Field Access pop-up menu, choose all.
This time, "all" appears in the Field Access column. Now Project Managers can see the contents of every field in all the tables. Project Managers need to work with customers, jobs, expenses, and timeslips, so you'll give them access to those tables next.
- Click in the list to deselect the group, then select the only the Customers, Jobs, Expenses, and Timeslips tables by holding the Control key (Windows) or
 key (Mac OS X) while you click each one.
Managers should be able to create, edit, and delete in those tables, not just view them.
- With all four tables selected, choose "yes" from the Edit pop-up menu, the Create pop-up menu, and the Delete pop-up menu.
16.2.3.2. Creating record-level access
Invoice privileges are a little more complicated. You want Project Managers to be able to "create invoices," but invoices involve multiple tables and processes, which you have to translate into a set of privileges. They need to create invoice records, of course, but they also need to be able to create line item records. And once they've added items to an invoice, they should also be able to edit those items. You decide, however, that they shouldn't be able to edit items on invoices from last year. In fact, they probably shouldn't change any invoice that isn't dated today. You can handle even a complicated security requirement like this easily in FileMaker: Just add a simple calculation to the mix. (See Chapter 9 for a refresher on calculations.)
When you choose to limit access like this, FileMaker lets you use a calculation to decide which records the users can edit. This calculation gives you tremendous control over the security system. You can use data from the record itself, information about the current date, time, or account name, and even global field or global variable values. Your calculation must return a Boolean result: True if the record should be editable, and False if it shouldn't.
Here are the steps to set up the invoice privileges described above:
- In the Custom Record Privileges dialog box, select just the Invoices table. Then, from the Create pop-up menu, choose yes.
FileMaker puts "yes" in the Create column, meaning that managers with this privilege set can create invoice records. From here on, things get more complicated.
- From the Edit pop-up menu, choose limited.
You don't want the user to be able to edit any invoice record. Instead, you're giving them limited edit privileges. Your old friend, the Specify Calculation dialog box, appears.
- In the calculation box, enter Date >= Get ( CurrentDate ).
This calculation returns a true result when the invoice date is on or after the current date. It's false for invoices dated before today, so that FileMaker allows Project Managers to edit only today's invoices.
You're going to use the exact same calculation shortly, so why bother retyping?
- Select the entire calculation, and choose Edit
 Copy, and Unsurprisingly, you're back in the Custom Record Privileges window. The word "limited…" shows in the Edit column for Invoices.
 - From the Delete pop-up menu, choose limited.
The Specify Calculation dialog box returns. This time, you're going to limit the managers' ability to delete invoice records. The rule is the same: They can only delete new invoices.
- Choose Edit Paste to use the calculation from step 3 here.
Repeat the above steps for the Line Items table. In this case, though, you want to let managers edit or delete line items when the invoice they're attached to contains today's date. So use the following in steps 3 and 6:
Invoices::Date
 Get ( CurrentDate )
Note: FileMaker shows a "" instead of the word "no" when you turn off a privilege. The dashes make the denied privileges easier to spot when you're looking at a long list.
16.2.3.3. Field-level access
If you remember the original design requirements for this database, the Payments table has a field called Credit Card Number. This type of information falls into the need-to-know category: Unless someone needs it to do his job, he has no business seeing it. Even though Project Managers can view Payment records, you can still control access to individual fields in that table. You're about to exercise field-level granularity:
- Select the Payments table. Then, from the Field Access pop-up menu, choose limited.
The Custom Field Privileges window appears (Figure 16-6). FileMaker offers three field-level privileges: modifiable means users can see and edit the field data; view only means they can see the information in the field, but can't change it; and no access means they can't even see it.
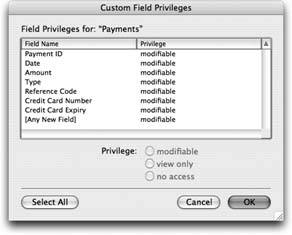
Figure 16-6. The Custom Field Privileges window lets you control access to individual fields. Select the fields you want to change, and then select one of the Privilege radio buttons. FileMaker dutifully changes every selected field accordingly. Click Select All to quickly select every field.
- Select the Credit Card Number and Credit Card Expiry fields. When they're both highlighted, select the no access radio button.
And indeed, the words "no access" appear in the Privilege column for the selected fields. Click OK.
Note: Even though the other fields in this list say "modifiable," the entire record isn't editable for these people, so they can't change field data. The record-level security settings effectively trump those at the field level.
The two tables whose privileges you haven't touched yetInvoice Finder and Globalshave only global fields, so they don't need records at all. But you still need to turn on the Edit privilege, so the managers can change values in the globals. Select both tables and simply choose "yes" from the Edit pop-up menu. When you're finished, your Custom Record Privileges dialog box should look a lot like the one in Figure 16-7.
|

When you're done looking, click OK to close this dialog box. Because you just made a set of complex choices, FileMaker sums up everything you just did by displaying "Custom privileges" in the Records pop-up menu in the Data Access and Design section of the Edit Privilege Set dialog box. To review or edit the record-or field-level access you've set, click "Custom Privileges" in the pop-up menu again.
16.2.3.4. Layout privileges
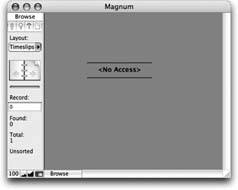
If you've been following along in this section, you've given Project Managers just the right access to the data in your database. But if you stop now, they still can't get very far. They don't have access to any layouts yet, and without layouts, a FileMaker database isn't of much use. If someone were to open the database with this privilege set now, she'd see something like Figure 16-8.
|
FileMaker uses layouts to display your file's data, which means you'll need to add layout access to your privilege sets. To give your users all-important access to the various database layouts, use the Edit Privilege Set window's Layouts pop-up menu:
- All modifiable means the users can use and edit every layout. (Here, "edit," means, "add fields, delete portals, resize parts, and the whole nine yards.")
- All view only gives the users access to every layout, but won't let them change any.
- All no access prevents any layouts from showing, as shown in Figure 16-9.
|
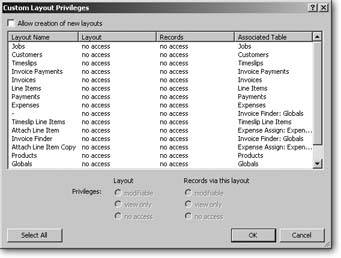
The final option, Custom Privileges… lets you exercise the most control over access to specific layouts. Because layouts are a vehicle for the other database items on the layout, there are two distinct layers of privilege.
- Layout. These privileges controls the users' ability to view or edit the layout itself. They're basically the same as the All layout privileges described above, but they apply only to the selected layout. Choose modifiable if you want to let people edit the layout (enter Layout mode and move fields and things around), view only if you want them only to see it, and no access if you want them to see that gray screen thing in Figure 16-8 instead.
- Records via this layout. Use this option to determine whether or not the users should be able to see or edit data in fields on a particular layout. If you make records from the Customer layout "view only," you can still edit them from the Customer List layout.
Tip: If you want to prevent editing of customer data altogether, it'd make more sense to use the record-level privileges instead. The "Records via this layout" setting is available just in case you want to restrict editing from one particular layout, even though the data in the table can be edited elsewhere.
| UP TO SPEED Any New Anything |
|
Both the table list in the Custom Record Privileges window and the field list in the Custom Field Privileges window have an unusual last item: [Any New Table] and [Any New Field]. These items don't really exist in your database. Instead, when you set privileges for them, you're telling FileMaker how this privilege set should treat any new items that are added later. Most FileMaker databases are living creatures that grow and adapt constantly. You might add new fields, layouts, scripts, and even tables at any time, so it would be fool-hardy to give everybody access to any and every new item. Instead, you'll be more secure assuming that no one gets access to anything new, until you set the new privileges specifically. To implement this more strict security rule, turn off all privileges for the [Any New…] items. In fact, FileMaker already has "any new" turned off whenever you make a new privilege set. |
Figure 16-9 shows the Custom Layout Privileges dialog box. This window has something else that didn't exist on the Custom Record Privileges dialog box: The "Allow creation of new layouts" checkbox lets you decide if these people can create their own new layouts. In fact, you can let users who can't even add or edit data, create layouts. For example, you might have a whole class of peoplethe Accounting Department, saywho shouldn't be editing customer records or adding product information, but they need to create monthly and annual reports (read: layouts) from that data.
In the current example, you want Project Managers to be able to use any layout (and edit records through them). But you also want them to be able to create their own layouts in case they need to do some custom reporting. These new layouts should of course be editable.
- If you're looking at the Custom Layout Privileges window, click OK to dismiss it and return to the Edit Privilege Set dialog box. Then, from the Layouts pop-up menu, choose "All view only."
You really intend to make custom privilege settings, but when you first visit the Custom Layout Privileges dialog box, everything is turned off. Since you want most options on, save your wrist by choosing "All view only," and FileMaker turns them all on for you. In the next step, you'll just turn a few options off.
- From the Layouts pop-up menu, choose "Custom privileges."
The Custom Layout Privileges window reappears. This time, though, every layout is set to "view only" with "modifiable" records.
- Turn on "Allow creation of new layout." Then select the [Any New Layout] item in the layout list.
You may have to scroll down to see it; it's always at the bottom of the list.
- Turn on the "modifiable" radio button under Layout.
This action tells FileMaker you want new layouts to be modifiable. Click OK when you're done.
If you had tried to click OK without making new layouts modifiable, FileMaker would complain that it doesn't make sense to let someone make a new layout he can't edit. Now, any user with the Project Manager privilege set can edit any new layouts he creates.
16.2.3.5. Value list privileges
Value lists may not seem as critical a security choice as records and layouts, but since value lists help your users enter consistent data, you want to pay attention to these choices. If you put a pop-up menu on a field to limit data input, but then you give those same users the ability to modify the value list underlying the pop-up menu, they have a way to circumvent your control.
You can see the Custom Value List Privileges window in Figure 16-10. This window lets you assign any of three privileges to each value list: modifiable, view only, or no access. You can also let the user create new value lists with an "Allow creation of new value lists" checkbox, and set the privileges to be assigned to any new value lists.
You can control access to value lists in much the same way you manage record and layout privileges. And like record and layout privileges, you have three canned choices in the pop-up menu, plus Custom privileges:
- All modifiable means the users can use and edit every value list.
- All view only lets the users see and select from your value lists, but not change them.
- All no access prevents the users from seeing value lists at all.
- Custom privileges gives you a dialog box where you can create your own set of privileges.
|

In the business rules you're applying to your database, Project Managers should have view-only access to all value lists, so click Cancel and choose "All view only" from the Value Lists pop-up menu. The Value List access you assign to a privilege set overrides layout designs. That is, even if you set up a pop-up menu with the option of "Include 'Edit…' item to allow editing of value list," users with the Project Manager's privilege set can't edit values in the list.
16.2.3.6. Script privileges
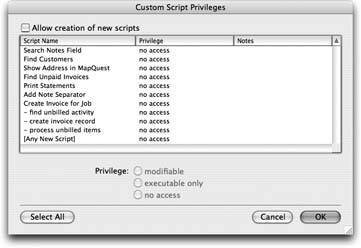
The final option under Data Access and Design lets you control access to your scripts. As with layouts, it's possible to have a class of users who can create new scripts, but can't edit data. If it's the Accountants mentioned in the example on Section 16.1.2, they need to write scripts to run the reports on the layouts you're letting them create. You could also create a privilege set that lets a level of users run most scripts, but doesn't let them run certain scripts that do destructive activities like deleting sets of records. You could save those scripts for higher-level users instead. Figure 16-11 shows the control choices you have.
Again, the pop-up menu gives you three canned choices and a Custom option:
- All modifiable means the users can run and edit any script.
- All executable only lets the users run scripts, but not edit them.
- All no access keeps them from running any scripts at all.
- Custom Privileges brings up the now-familiar Custom Privileges dialog box.
For the Project Managers set, choose "All executable only" from the Scripts pop-up menu. With this change, you've finished creating your privilege set. Your window should look just like Figure 16-12.
|
|
To save your new privilege set, click OK. FileMaker adds Project Manager to the list of privilege sets in the Define Accounts & Privileges window (Figure 16-1).
Note: When you give an elementa record, field, layout, value list, or scriptthe "no access" setting, it literally disappears from the user's view. Scripts disappear from the Scripts menu, layouts from the Layout pop-up menu, fields from sort dialog boxes, and records from lists and portals. Your users won't be tempted to run a script or go to a layout they don't have access to.
16.2.3.7. Editing a privilege set
If you need to make changes to this privilege set later, just come back to this window, select it in the list, and click Edit. You see the Edit Privilege Set window again, and you're free to change anything you want.
You can't edit FileMaker's built-in privilege sets. If you want to change one, duplicate it first and then change the duplicate. Remember, though, that you can't duplicate [Full Access].
Part I: Introduction to FileMaker Pro
Your First Database
- Your First Database
- An Very Quick Database Tour
- Creating a New Database
- Opening and Closing Database Files
- Saving Your Databases
- Adding Records to Your Database
- Navigating Your Database
- Same Database, Multiple Windows
Organizing and Editing Records
- Organizing and Editing Records
- Views
- Advanced Find Mode
- Changing Multiple Records
- Sorting Records
- Editing Whats in Your Fields
- Paragraph Formatting
- Beyond Text: Container Fields
- Checking Spelling
- Printing and Preview Mode
Building a New Database
- Building a New Database
- Tables and Fields
- Defining Fields
- Advanced Field Options
- Bringing It All Together
Part II: Layout Basics
Layout Basics
Creating Layouts
Advanced Layouts and Reports
- Advanced Layouts and Reports
- Setting up Field Controls
- Adding Field Controls to Layouts
- Field Behavior
- Tab Order
- Print-Related Layout Options
- Format the Number/Date/Time/Graphic
- Adding Buttons
- Tab Panels
- Reports and Summary Fields
Part III: Multiple Tables and Relationships
Multiple Tables and Relationships
- Multiple Tables and Relationships
- Relational Databases Explained
- Modeling Your Database
- Creating a Relational Database
- Relational Databases
Advanced Relationship Techniques
- Advanced Relationship Techniques
- Creating Related Records
- Table Occurrences
- Managing Data with Data Tunneling
- Building a Data Tunneling Interface
- Connecting Databases
- Lookups
- Advanced Relationships
Part IV: Calculations
Introduction to Calculations
- Introduction to Calculations
- Understanding Calculations
- The Structure of a Calculation
- Creating a Calculation Field
- Auto-Enter Calculations
- Validate Data Entry with a Calculation
- Replacing Data Using a Calculation
- Comments
Calculations and Data Types
- Calculations and Data Types
- Number Crunching Calculations
- Going Beyond Basic Calculations
- Text Parsing Calculations
- Date and Time Calculations
- Containers in Calculations
Advanced Calculations
- Advanced Calculations
- Stored, Unstored, and Global Fields
- Logical Functions
- The Let Function and Variables
Extending Calculations
Part V: Scripting
Scripting Basics
- Scripting Basics
- Your First Script
- The Importance of the Layout
- Running Scripts
- Branching and Looping in Scripts
Script Steps
- Script Steps
- Go to Layout
- Scripting for Fields
- Working with Records
- Finding Records
- Sorting Records
- Working with Windows
- Working with Files
- Printing
- Other Script Steps
Advanced Scripting
- Advanced Scripting
- Commenting Scripts
- Asking and Telling the User
- Organizing Complex Scripts
- Handling Errors
- Putting a Complex Script Together
Part VI: Security and Integration
Security
Exporting and Importing
- Exporting and Importing
- Exporting a File
- Export Formats
- Importing Data
- Import Data Sources
- Importing and Exporting in a Script
Sharing Your Database
- Sharing Your Database
- FileMaker Network Sharing
- Sharing Over the Internet
- FileMaker Server
- Server Hardware
Developer Utilities
- Developer Utilities
- Script Debugger
- Disable Script Steps
- The Database Design Report
- Tooltips
- Copying Database Structure
- Custom Menus
- Developer Utilities
- File Maintenance
Part VII: Appendixes
Appendix A. Getting Help
EAN: 2147483647
Pages: 176
