Creating a Relational Database
The tedious planning is finally over. Now comes the fun partactually making the database. And believe it or not, this part will go much more smoothly with your plan in place. You create a relational database in three steps. First, you tell FileMaker what tables you want. Then you define the fields in each table. Finally, you add relationships. Don't be alarmed if you forget a table or miss a field: You can go back at any time and make changeseven six months from now when your tables are loaded with data.
Relational databases start out like any other. Go to FileMaker and choose File images/U2192.jpg border=0> New Database. Name your new database, pick the folder to save it in, and click Save.
Note: If you see an option to "Create a new file using a template," choose "Create a new empty file" and click OK. Then you'll be able to name and save your new database.
7.3.1. Defining the Tables
When you first create a database, FileMaker shows you the Define Database window's Field tab (you first saw this on Section 3.2). Without your knowledge, it has already created a table for you with the same name as the database itself. FileMaker assumes you just want one table, and it's ready for you to add fields to that table.
| UP TO SPEED Relationship Types and Key Types |
|
As this picture shows, the position of the primary and foreign keys in a relationship determines its type. In a one-to-many relationship (or its identical counterpart, many-to-one), the foreign key belongs on the many side. Since a primary key guarantees uniqueness, there can be only one record with a particular key value. But a foreign key doesn't have to have unique values, so you can have as many matching records as you want. In the rare case that you define a one-to-one relationship, you'll be matching two primary keys together. In this case, both tables share the same primary key. The uniqueness ensures that you have only one matching record in each table. 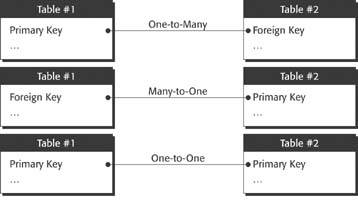 |
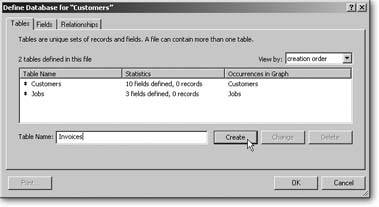
This time, though, you don't want just one table, so click the Tables tab (you can see it in Figure 7-15). Your first job is to remove the table FileMaker added for you since it doesn't match one of the entities in your ER diagram. Just select the table in the table list, and then click Delete.
Now that you've deleted the starter table, you're ready to add your own carefully planned tables. Grab the ER diagram and create a table for each entity. The diagram has eight tables in all, so make sure you create all of them.
Warning: Deleting a table is a dangerous operation. Right now there's no risk because you're working in a brand-new database. But imagine you come to this window two years from now. If you accidentally delete a table, you lose all the data in it. You'll also have a lot of work to do putting your relationships and layouts back together. FileMaker warns you before it lets you delete the table, but it's worth an extra measure of caution.
|
7.3.2. Defining the Fields
With the tables defined, you're ready to add fields. Click the Define Database window's Fields tab (see Figure 7-16). You choose which fields to add to each table the same way you learned to in Chapter 3, with one caveat: key fields. Every table needs a primary key. In this database, you'll be using surrogate (made-up) keys in each table.
7.3.2.1. Adding primary keys
To keep things consistent, each primary key field will match the name of the entity, with the word "ID" added to the end. For example, the primary key in the Customers table should be called Customer ID. This technique is so common, in fact, that you can often spot the primary keys in any database by looking for the letters "ID."
The easiest way to make a surrogate key in FileMaker is to use a serial number. The process is simple:
- Click on the Fields tab in the Define Database dialog box, if necessary. Then, from the Table pop-up menu, select Customers.
You're now ready to add a field to the Customers table. You'll start with the primary key.
- In the Field Name text box, type Customer ID. In the Type pop-up menu, make sure Text is selected.
Key fields can be any type, but text is a good choice because you have the most flexible formatting options.
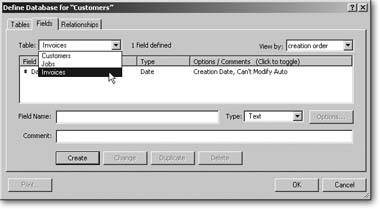
Figure 7-16. When you have multiple tables defined, they all show up in the Tables popup menu. When you choose a table from the menu, its fields show in the field list. When you add a field, it gets added to the selected table. You can also double-click a table in Tables tab to jump straight to its field definitions.
- Click Create.
FileMaker adds your new field to the field list. But so far all you have is a normal text field.
- Click Options, and make sure the Auto-Enter tab is selected, as shown in Figure 7-17.
To be a good primary key, this field needs a unique value on every record. That sounds like a job for a computer:
- Turn on the "Serial number" checkbox.
When you tell FileMaker to auto-enter a serial number, it automatically makes up a new unique number every time you create a record. It sets the field to a number one bigger than the last value it created. Since the number always grows, it never repeats.
- Make sure the "On creation" radio button is turned on.
When you make a field a serial number, you get to choose when the serial number gets entered. It can happen when you create the record, or when you commit it. In other words, FileMaker can automatically put the serial number in the field for you right away, when you first create the record, and most of the time, that's exactly what you want. (As you'll see on Section 8.1, FileMaker lets you set your layout up so that you can create related records automatically while editing a record; you need the serial number for that to work.)
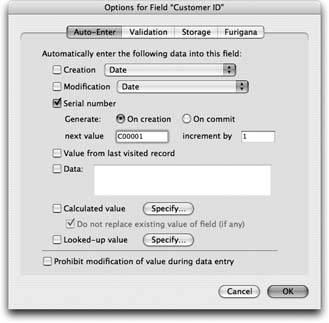
Figure 7-17. Here's the Field Options window's Auto-Enter tab, in case you've forgotten what it looks like. Pretty slick, huh? In the next few steps, you'll be setting up those "Serial number" options.
Alternatively, you can have FileMaker wait until you finish entering data and actually commit the record. You might choose "on commit" if, for instance, you have a complex, automated database that adds new people to your database from lists you get from other offices. You can have the database add a person record first, and then see if it's a duplicate before committing the record. That way, you don't skip serial numbers. (And if you know how to do that, you probably should be the one writing this book.)
- In the "next value" text box, type C00001. Make sure the "increment by" box reads "1."
You've just established your starting serial number and told FileMaker how to continue. Your first customer record will have the Customer ID C00001, your second will be C00002, and so on.
- Select the "Prohibit modification of value during data entry" option.
Since key fields provide the links between your tables, relationships would break and other database disasters could ensue if key values got changed. When you turn on this option, you prevent that unhappy fate.
Click OK to return to the Define Database window. You'll get a chance to test that serial number field in a few minutes. First, though, you need to follow those steps again for each table. You can, of course, add any field to any table at any time, but here you'll create tables, then primary keys, then foreign keys, and finally other fields. It's not the quickest way, but creating a relational database requires lots of steps, and you don't want to forget anything, so an organized approach pays off.
| INCREDULOUSLY ASKED QUESTION Serial Text? |
|
I'm telling FileMaker to put a serial number into a text field, but my serial number isn't a number at all. Is this OK? As funny as it sounds, not only can you auto-enter serial numbers into text fields, but the values themselves can contain text. FileMaker looks at the text you've specified for "next value" and tries to find a number in it somewhere. When it comes time to generate a new value, it pulls that number out, increments it, and stuffs it back in its place. Say your "next value" is C000LX and "increment by" is set to 10. The first record you create will get C000LX. The second will get C010LX, and then C020LX, and so on. When you get to C990LX, FileMaker doesn't just give up. Instead, it makes more room: C1000LX. If your "next value" has more than one embedded number (C000LX22, for example), FileMaker uses the last number only. Likewise, if you don't have a number at all, it simply adds one to the end. |
When you set your serial number options, use a different letter in the "next value" for each table. For instance, use E00001 as the starting value in the Expenses table, and IP00001 in the Invoice Payment table. That way, whenever you see a serial number, you'll have a clue table it belongs to. You don't have to name your serial numbers that way, but it might come in handy. Sometimes you take data out of FileMaker to put it into other programs (like Microsoft Excel, so you can make charts). When you do, you'll lose your field names and just see lists of data. Although most data is easy to identify (phone numbers look like phone numbers, for example), primary keys can be a mystery. Having a textual primary key like these can eliminate just a touch of mystery, should you ever be in this situation.
Note: Strictly speaking, you don't need to add an Invoice Payment ID field to the Invoice Payment table. Since you're making a simple join table, it's going to have two foreign keys, one for the Payment ID and one for the Invoice ID. A record in this table represents the connection between an Invoice and a Payment, so you can just use these two foreign keys together as the primary key (a composite key, as you remember from the box on Section 7.2.5). You'll never have one payment on the same invoice twice, so the combination of these two values will be unique. That said, lots of people add surrogate keys to their join tables anyway, and it certainly won't hurt.
7.3.2.2. Adding foreign keys
Adding foreign keys requires a little more thought than the primary keys, but not muchyou already did the hard part by creating an ER diagram (Section 7.2.4). To decide where the foreign keys go, just look for the crow's feet. Figure 7-18 offers a refresher.
|
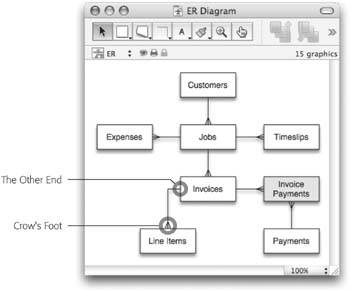
Since your primary key fields are all Text fields, your foreign key fields should be tooafter all, the foreign keys hold primary key values. Following the crow's feet, you come up with these foreign keys (remember that a foreign key is always just a primary key from another table):
- In the Expenses table, add a field called Job ID.
- In the Jobs table, add a field called Customer ID.
- In the Timeslips table, add a field called Job ID.
- In the Line Items table, add a field called Invoice ID.
- In the Invoices table, add a field called Job ID.
- In the Invoice Payments table, add two fields: Invoice ID and Payment ID.
Go ahead and add the foreign keys now.
Note: Because these are foreign key fields, they don't need to be unique. They're just plain old text fields. If you turn on Auto-Enter serial number options for foreign key fields, you can get some squirrely results.
7.3.3. Defining the Relationships
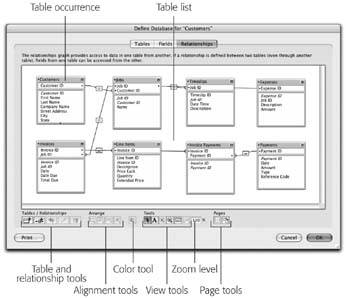
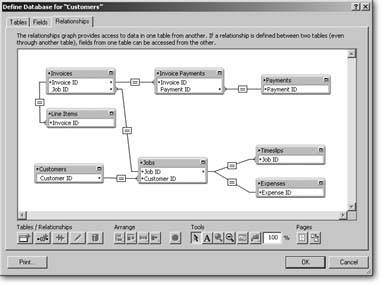
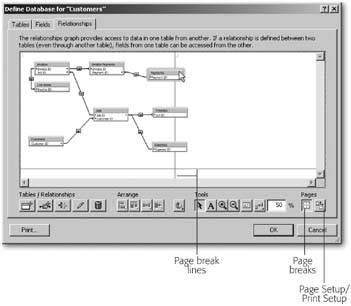
With tables and keys, you have everything you need to define some relationships. In other words, you tell FileMaker how the tables in your database fit together by matching up keys. As usual, FileMaker manages to make a tricky task seem kind of fun. You get to work with a visual, intuitive picture of the relationships between your tablesthe Relationship Graph. In the Define Database window, click the Relationships tab, which is reproduced in Figure 7-19.
|
Your table occurrences (TOs) may not be in precisely the same order as Figure 7-19; they appear in the order you created them. If you want to move them around, just drag them. Or you can drag right through a table occurrence that's in your way. (Later on, you'll see how the Relationships Graph's tools work to help you manage the graph further.) To create relationships, you simply drag in the Define Relationships window.
- Point to the Customer ID field in the Jobs table occurrence and press your mouse button.
The field name highlights and the mouse arrow changes shape indicating you're about to join (relate) two tables together.
- With the mouse button held down, drag the arrow over the Customer ID field in the Customers table.
As you drag, FileMaker draws a line starting from the first Customer ID field. When your cursor is over the second Customer ID field, it too highlights.
Tip: If you make a mistake and start dragging the wrong field, just point to some empty space in the graph before you let go of the mouse button. That way, you haven't actually defined a relationship, and you can just start over.
- Release the mouse button.
Poof! You have a relationship. The Customers and Jobs table occurrences change in appearance slightly: FileMaker adds a new panel to each box, and shows the key fields in this space. You can see each step, and the end result, in Figure 7-20.
|

With the technique mastered, you can now define the rest of your relationships. You can refer to your ER diagram at this point, or use this handy cheat sheet:
- Drag Expenses::Job ID to Jobs::Job ID.
- Drag Invoices::Job ID to Jobs::Job ID.
- Drag Line Items::Invoice ID to Invoices::Invoice ID.
- Drag Invoice Payments::Invoice ID to Invoice ID.
- Drag Invoice Payments::Payment ID to Payments::Payment ID.
- Drag Timeslips::Job ID to Jobs::Job ID.
| DON'T PANIC Lost and Found Again |
|
You may not see table occurrences in the Relationships Graph for all the tables you create. Remain calm. You have all the right table occurrences; you just can't see them all at once. Chances are you just need to scroll the graph to the right. Unfortunately, it can be tricky to drag between two fields if you can't get them both on the screen at once. (You can do it, mind you. When you approach the edge of the graph while dragging, FileMaker automatically starts scrolling. It's just a little tedious.) If you have a big enough computer screen, you can simplify things by making the entire window bigger by dragging the bottom-right corner. If you still can't fit everything in, even when the window is as big as it can get, you can zoom in on the window. Click the Shrink to Fit button (shown here) and FileMaker shrinks everything so it all fits on the graph at once. In this reduced view, you can still drag relationships. When you're ready to see things full-size again, just type 100 in the Zoom Level box and press tab. (Don't press Enter or Return after changing the zoom level or FileMaker will think you meant to click the OK button and make the Define Database window go away. If you do close it accidentally, just choose File When you're done zooming, be sure to choose the Selection tool again so you can drag relationships or table occurrences. 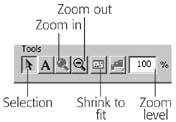 |
 Define Database again.)
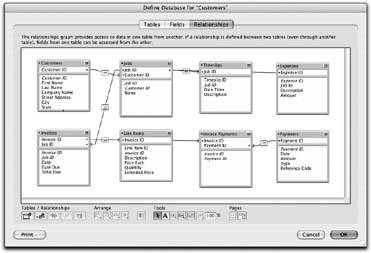
When you're done, you can spot-check your work by counting the lines in the relationship graph. Including the one between Customers and Jobs, you should have seven, and the graph should look like the one in Figure 7-21.
|
| FREQUENTLY ASKED QUESTION FileMaker's Sixth Sense: Crow's Feet |
|
I haven't done anything to tell FileMaker what kind of relationships I created. How does it know where to put the crow's feet? You never have to tell FileMaker about the types of relationships because it doesn't really matter. The work FileMaker performs to deal with a one-to-many relationship is no different than what it does for a one-to-one, so it doesn't care about the distinction. However, it's useful to you as the database designer to know what kind of relationships you have. (It helps you decide whether an invoice should have room for one line item or a whole list of them, for example.) FileMaker tries its best to figure out where the crow's feet go, as a special service to you. It assumes every end of every line needs a crow's foot unless it finds evidence to the contrary. Such evidence includes:
A line that connects to a field that meets either of these conditions will not have a crow's foot. Since all your primary keys are serial numbers, FileMaker has no trouble figuring out where to leave off the crow's feet. |
7.3.4. Cleaning up the Relationship Graph
Although this relationship graph is small and easy to understand, chances are it will grow as you power up your database by adding more tables, layouts, and fields. As it grows, your graph can easily get messy and hard to decipher. To make your graph manageable, first get rid of unnecessary information. Right now your graph shows every field in each table occurrence (in fact, it shows some fields twice, and a healthy dose of empty space too). But you don't need to see every field herethat's what the Fields tab is for. Figure 7-22 shows how to reclaim the wasted space.
|
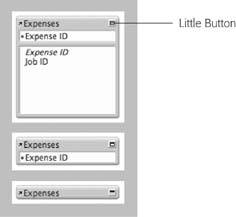
To make your graph more efficient, switch every table occurrence to show only the fields used in relationships (one click should do it). Now a lovely graph is just a few drags away: You can move the table occurrences around so they form a pleasing arrangement that's easier to understand than the mess you had before. Figure 7-23 shows the result.
Instead of closing up the table occurrences, you can resize them. Hover the mouse over any of a table occurrence's four edges and the pointer changes to a double-headed arrow. Drag with the arrow to resize.
Tip: If you have a stray table occurrence (named the same as the database itself) on your Relationships Graph, just select it and hit Delete. It's a useless artifact from the table you deleted when you first defined this file. Since this table occurrence is not part of your ER diagram, you can safely ignore FileMaker's protestations that deleting it will break things.
7.3.4.1. Arrange the graph
The table occurrences in the graph behave a lot like layout objects in Layout mode. You can Shift-click or drag across more than one table occurrence to select them all. You can even press Ctrl+A ( -A) to select all the table occurrences. Just click into empty space on the graph to deselect. Once you have some selected, you can use the Arrange tools to line them up. Figure 7-24 shows them close up.
|
|
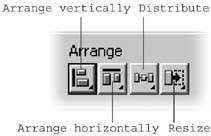
Once you've dragged a few table occurrences around on your graph, it can look pretty sloppy. Here's how to use the tools to inflict some order on the graph:
- The Arrange vertically tool lets you choose whether to align the left edges, centers, or right edges of any highlighted table occurrences.
- The Arrange horizontally tool lets you align the top edges, centers, or bottom edges of the highlighted table occurrences.
- The Distribute tool makes the space between selected table occurrences uniform. You can choose horizontal or vertical distribution.
- The Resize tool makes short work of getting those manually resized table occurrences back in parade dress. Select some table occurrences, then click the Resize tool to tell FileMaker whether you want all the highlighted table occurrences resized to the smallest width or height, the largest width or height, or even the smallest or largest width and height.
7.3.4.2. Color your table occurrences
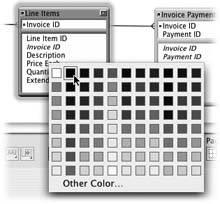
You can also change the color of the selected table occurrences. This won't affect the database's behavior at all. It's just there to help you organize your graph (you could make all the occurrences of the Invoice table blue, or all the join tables green, for example). Just select one or more table occurrences, then use the Color tool as explained in Figure 7-25.
|
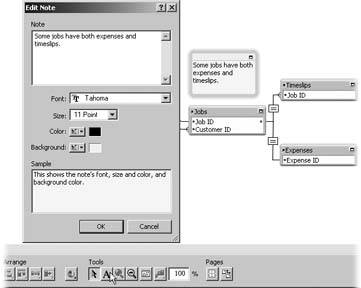
7.3.4.3. Adding notes
To notate your graph, select the Note tool, then drag on the graph to create the note. The Edit Note dialog box appears. There you type the text of the note and set its font, size, text and background colors. If you want to edit a note, double-click it and the dialog reappears, ready to do your bidding (Figure 7-26).
7.3.4.4. Printing the graph
Last but not least, FileMaker offers some tools to help you print the graph. Since the graph is a roadmap to your tables, some people like to print it and tape it up beside the computer for quick reference while building layouts. Figure 7-27 shows how to lay out the graph so you can print without surprises.
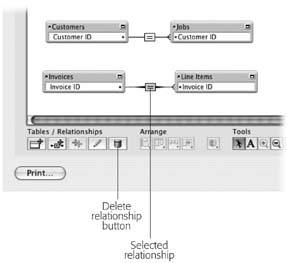
7.3.4.5. Deleting relationships
If you accidentally connect the wrong fields, or later decide you don't want a relationship you already created, you can easily delete it. Just click the relationship line itself to select it. Then click the Delete Relationship button or press the Delete key on the keyboard. You can see a selected relationship and the button in Figure 7-28.
|
|
7.3.5. Finishing the Field Definitions
Now that your relationships are defined, you can add the rest of the fields to your tables. Since you already know how to define fields, there's no need to bore you with the gory details. Below is a list of all the fields needed to complete this database.
|
Tip: To save time, you can find the completed database with all fields defined on the "Missing CD" page at www.missingmanuals.com. If you choose the ready-made option, you can skip ahead to Section 7.3.5.7 and start learning how to use a relational database.
7.3.5.1. Customers table fields
Create the following fields in the Customers table:
- A text field called First Name.
- A text field called Last Name.
- A text field called Company Name.
- A text field called Street Address.
- A text field called City.
- A text field called State.
- A text field called Zip Code.
- A text field called Phone Number.
- A text field called Email Address.
7.3.5.2. Jobs table fields
In the Jobs table, you need only one more field: a text field called Name. Of course, you could call this field Job Name, so that at a glance you could tell what table it comes from. But in FileMaker such redundancy is unnecessary. Almost everywhere the program shows field names, it includes the table occurrence name as wellJobs::Name, for example. The exception, inexplicably, is Layout mode, where related fields look like this::Name. You can always double-click a field to see where it comes from, but that gets boring after about the 79th time. To spare yourself the tedium, you have permission to change any field names listed here.
7.3.5.3. Expenses table fields
The Expenses table needs three new fields:
- A text field called Expense.
- A number field called Amount.
- A text field called Company Name.
7.3.5.4. Timeslips table fields
Timeslips also needs three fields:
- A timestamp field called Date Time.
- A number field called Duration.
- A text field called Work Description.
Note: You might be tempted to call the Date Time field Date and Time instead, but if you try to do it, FileMaker sternly warns you against putting the word "and" in a field name. You can create fields that break the naming rules, but you'll have to jump through hoops to use them in calculations (Chapter 9). It isn't usually worth the hassle: pick a safe name instead.
7.3.5.5. Invoices table fields
The invoices table is easy too; just three new fields:
- A date field called Date (as in the date of the invoice).
- A date field called Date Due.
- A number field called Total Due.
7.3.5.6. Line items table fields
Add four new fields to the Line Items table:
- A text field called Description.
- A number field called Price Each.
- A number field called Quantity.
- A number field called Extended Price.
7.3.5.7. Payments table fields
The invoices table is easy too; just three new fields:
- A date field called Date (as in the payment date).
- A number field called Amount.
- A text field called Type.
- A text field called Reference Code (this will hold a check number, direct deposit transaction number, Credit Card transaction ID, or other appropriate value).
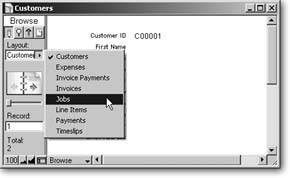
Click OK in the Define Database window, and FileMaker shows you your database. After all that work, the result is wholly uninspiringit looks exactly like the single-table database you already created. But take a peek at the Layouts pop-up menu (or Figure 7-29). Surprise: FileMaker has made several layouts for youone for each table occurrence on your relationship graph. At this point, everything you know about using a FileMaker database still applies. The only difference is that each layout is attached to a different table.
|
Part I: Introduction to FileMaker Pro
Your First Database
- Your First Database
- An Very Quick Database Tour
- Creating a New Database
- Opening and Closing Database Files
- Saving Your Databases
- Adding Records to Your Database
- Navigating Your Database
- Same Database, Multiple Windows
Organizing and Editing Records
- Organizing and Editing Records
- Views
- Advanced Find Mode
- Changing Multiple Records
- Sorting Records
- Editing Whats in Your Fields
- Paragraph Formatting
- Beyond Text: Container Fields
- Checking Spelling
- Printing and Preview Mode
Building a New Database
- Building a New Database
- Tables and Fields
- Defining Fields
- Advanced Field Options
- Bringing It All Together
Part II: Layout Basics
Layout Basics
Creating Layouts
Advanced Layouts and Reports
- Advanced Layouts and Reports
- Setting up Field Controls
- Adding Field Controls to Layouts
- Field Behavior
- Tab Order
- Print-Related Layout Options
- Format the Number/Date/Time/Graphic
- Adding Buttons
- Tab Panels
- Reports and Summary Fields
Part III: Multiple Tables and Relationships
Multiple Tables and Relationships
- Multiple Tables and Relationships
- Relational Databases Explained
- Modeling Your Database
- Creating a Relational Database
- Relational Databases
Advanced Relationship Techniques
- Advanced Relationship Techniques
- Creating Related Records
- Table Occurrences
- Managing Data with Data Tunneling
- Building a Data Tunneling Interface
- Connecting Databases
- Lookups
- Advanced Relationships
Part IV: Calculations
Introduction to Calculations
- Introduction to Calculations
- Understanding Calculations
- The Structure of a Calculation
- Creating a Calculation Field
- Auto-Enter Calculations
- Validate Data Entry with a Calculation
- Replacing Data Using a Calculation
- Comments
Calculations and Data Types
- Calculations and Data Types
- Number Crunching Calculations
- Going Beyond Basic Calculations
- Text Parsing Calculations
- Date and Time Calculations
- Containers in Calculations
Advanced Calculations
- Advanced Calculations
- Stored, Unstored, and Global Fields
- Logical Functions
- The Let Function and Variables
Extending Calculations
Part V: Scripting
Scripting Basics
- Scripting Basics
- Your First Script
- The Importance of the Layout
- Running Scripts
- Branching and Looping in Scripts
Script Steps
- Script Steps
- Go to Layout
- Scripting for Fields
- Working with Records
- Finding Records
- Sorting Records
- Working with Windows
- Working with Files
- Printing
- Other Script Steps
Advanced Scripting
- Advanced Scripting
- Commenting Scripts
- Asking and Telling the User
- Organizing Complex Scripts
- Handling Errors
- Putting a Complex Script Together
Part VI: Security and Integration
Security
Exporting and Importing
- Exporting and Importing
- Exporting a File
- Export Formats
- Importing Data
- Import Data Sources
- Importing and Exporting in a Script
Sharing Your Database
- Sharing Your Database
- FileMaker Network Sharing
- Sharing Over the Internet
- FileMaker Server
- Server Hardware
Developer Utilities
- Developer Utilities
- Script Debugger
- Disable Script Steps
- The Database Design Report
- Tooltips
- Copying Database Structure
- Custom Menus
- Developer Utilities
- File Maintenance
Part VII: Appendixes
Appendix A. Getting Help
EAN: 2147483647
Pages: 176
