Organizing Complex Scripts
Sometimes you need a script that does a lot. At the end of this chapter you'll build a script that generates an invoice for a selected job. As you'll see, this process involves a lot of steps across several tables. To do all this work in one long script can be cumbersome, especially when several levels of If and Loop steps get mixed up with one another.
In other situations, you might need two or more scripts that do similar things. In fact, sometimes entire sections of two scripts are identical. You might have a script that finds unpaid invoices so it can print a statement, and another that finds unpaid invoices to send email payment reminders.
| WORKAROUND WORKSHOP Really Custom Dialog Boxes |
|
If the window created by the Show Custom Dialog script step (Figure 15-5) doesn't meet your needs, all is not lost. You have two options. For professional-level needs (real, resizable dialog boxes with text you can calculate, progress bars, multiple input fields), get a third-party plug-in made for the task. See Section 12.2 for more information on how to use plug-ins and where to find them. But for light duty, you can get the a similar effect by assembling your own dialog box from a window, a layout, and a script. First, you need a layout that shows what you want. You can use text objects on the layout to show messages, fields of any kind to gather input, and layout buttons in any quantity and configuration. Once you've got the layout just the way you like it, you need a script to show it. To get the effect of a typical dialog box, a few things need to happen. First, the new layout should appear in its own window. It probably shouldn't have the status area showing. And while the window is up, your users shouldn't be able to switch to a different window. Here's how to do all these things in a script:
This layout-based approach has some drawbacksmost notably, it lacks the convenient default Cancel button of FileMaker's built-in custom dialog boxes. If you want this behavior in a layout-based box, you have to take special measures to avoid losing valuable data if someone clicks the wrong button. For instance, you could put entered data into global fields, and then move the entered data into the real fields only when the script continues. |
If you build these two scripts independently, you have two problems. First, you have to write all the "find the unpaid invoices" stuff twice, which is a waste of time. More importantly, next month when you realize you need to exclude voided invoices from the list, you'll have to remember make the change in both places. A database that's been growing for years can be a real bear to manage if the same general business logic is implemented over and over in dozens of different scripts.
In both these situations, you can improve your prospects by dividing your scripts into smaller parts. That way, you can break up a complex script into four simpler scripts that each do part of the job. By the same token, you can make one script that finds unpaid invoices and use it both when you print a statement and when you send an email payment reminder.
15.3.1. The Perform Script Script Step
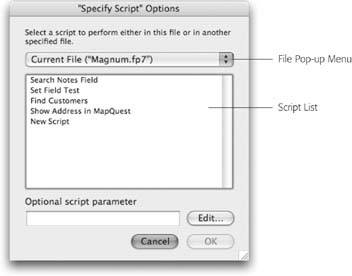
The key to each of these techniques is the Perform Script script step. It lets one script run another scripta subscript, in programming lingo. When you add the Perform Script step to your script, you get only one option: a Specify button. Figure 15-7 shows how to use the Specify Script dialog box to tell your script which subscript script you want to run and what file to find it in.
|
15.3.2. Halt Script and Exit Script
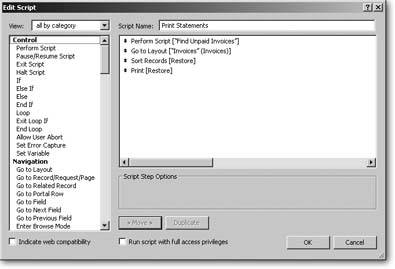
When one script runs another, it waits for the subscript to finish before continuing. Imagine you have a script called Find Unpaid Invoices and you want to make a new script to print statements for all your customers. The Print Statements script might start off by performing the Find Unpaid Invoices script. It would then go to the appropriate layout, sort the records, and print them. The script might look like the one shown in Figure 15-8, which performs the Find Unpaid Invoices script, goes to the Statement layout, and then sorts and prints the invoices.
|
When you perform a script in another file, FileMaker uses that file's front most window (which is behind the user's window). If it doesn't have any windows, FileMaker automatically creates one. In either case, you're in a unique scripting situation: The window you're working with in your script isn't the one in front. Here is where the Current Window option in the Select Window script step comes in handy.
Normally a script ends when its last step runs. For example, the script in Figure 15-8 ends as soon as the Print step finishes. But you can force a script to end early if you want to. FileMaker actually has two script steps that end a script prematurely: Exit Script and Halt Script. These two steps do exactly the same thing if you run a script yourself directly. But if the current script was run by another scriptvia the Perform Script stepthen they do different things. The Exit Script step tells FileMaker to stop the current script and continue the script that ran it. Halt Script, on the other hand, causes all script execution to stop immediately, no matter how the current script was started. (To learn more about these ominously powerful steps and when to use them, see the box on Section 15.3.3.)
15.3.2.1. Exit Script (Result)
Their behavior is different when subscripts are involved, but Exit Script also has a powerful option that Halt Script doesn't have. You can tie all the power of the calculation dialog box to Exit Script. Then your main script can check the script result and decide how to proceed based on the results of the test.
| WORD TO THE WISE The Dark Side of Halt Script and Exit Script |
|
The Halt Script and Exit Script steps are convenient when you want to abort a script's execution because some problem has come up. But more often than not, you're better off without them. Take, for example, the two scripts shown here. The top script first performs a find. If no records are found, it shows a custom dialog box and moves on to an Exit Script step. The bottom version does the same thing, but doesn't exit the script afterwards. Instead, it puts all the remaining script steps in the Else section of the condition. The result is the samethe extra steps run only if some records were foundbut the bottom script always ends after the last step. The top script, on the other hand, can end in two different places, depending on what it finds. Suppose you revisit this script later and want to add some more steps to the end that you want to happen last, every time the script runsnot just when records are found. If your script looks like the one on top, you have a problem. You either have to add your new steps to the script twice (once before the Exit Script, and again at the end of the script) or reorganize the entire script to support the changes. But the script on the bottom is easy to fixjust add the new steps to the end. In general, if a script ends in more than one place, it will come back to bite you later. You're much better off organizing your script so that it always reaches the same ending place. Halt Script has an even bigger downside. Since scripts can run other scripts, and most databases grow and change over time, you never know for sure if the script you're writing today is going to be run by another script some day in the future. But it's rarely acceptable to run another script that may potentially halt. It gives your new script no opportunity to recover if something goes wrong 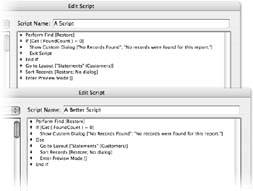 |
15.3.3. Script Parameters
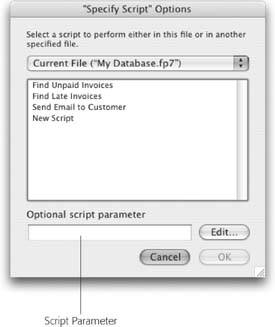
When a script or button runs a script, the Specify Script window shows a box labeled "Optional script parameter." As you can see in Figure 15-9, you can use script parameters to influence a script's behavior when you run it. For example, you might make a script that can sort the records in four different ways. The script parameter you specify when you run the script tells it which sort order to use.
Your script accesses its parameter using the Get ( ScriptParameter ) function. This function returns whatever value you specified in the "Optional script parameter" box in the button or Perform Script step.
Tip: A script can have only one parameter. If you really want to send it more than one value, you can put them all together in some way, and then pull them apart again in the script. For example, you could use this for a script parameter:The script could then use the MiddleValues function to grab each unique value.
|
Suppose you wanted buttons to sort your Customer records by Name, City and State, or Zip Code. You might think each button needs its own script, but using script parameters, you can get the job done with just one script. Each button passes a different parameter to the script, which takes the appropriate action. Before you can create the buttons, you need to create the script they'll run:
- Create a new script called Sort Customers (see Section 13.1.3 for a refresher on creating scripts). Add the If step to the script.
FileMaker adds two new lines (If and End If) to your script.
- Click the Specify button. From the View pop-up menu, choose Get functions.
The function list now shows all the Get functions.
- Find Get ( Script Parameter ) in the list and add it to your calculation.
You can choose "Get Functions" or "all functions by name" from the View menu to help you narrow the search. The Get ( ScriptParameter ) function returns the parameter value specified when this script was called. If the parameter was a calculation, it returns the result of the calculation. It's now in the calculation box.
- After Get (ScriptParameter) in the calculation box, type = "Name", and then click OK.
You're back in the Edit Script window, where the If step shows your calculation. Your calculation should look like this: Get ( ScriptParameter ) = "Name". Its result is true if the parameter sent to this script is "Name" and false otherwise.
- Add the Sort Records script step to the script and turn on the "Perform without dialog" option.
Insert it after the If step and before the End If step. (If yours is somewhere else, move it between these two steps.)
Tip: New script steps are inserted just below any highlighted step. If no script step is highlighted, the new script step lands at the end of your script.
- Turn on the "Specify sort order" checkbox, add the Last Name, then First Name fields to the Sort Order list, and then click OK.
Your script now looks like the one shown in Figure 15-10.
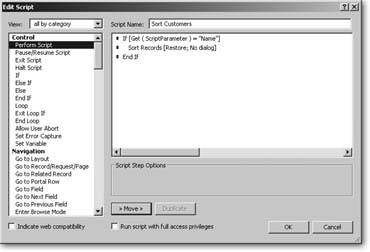
Figure 15-10. This is how your sort script should look after you've added the Sort Records step and specified a sort order (step 5 above). In its current form, it sorts the records (by last name, then first name) if "Name" is given as a parameter when the script is run. As described on Section 15.3.3, you need to add support for the other sort orders.
- Add the Else If script step to the script.
You want Else If to come after the Sort Records step. (If it doesn't land there, move it there.)
- Click Specify. In the Specify Calculation box, enter Get ( ScriptParameter ) = "City and State," and then click OK.
You're setting up a new test, this time checking to see if "City and State" is the script parameter. If so, you want a Sort step following this parameter to sort byyou guessed itCity and State.
- Add another copy of the Sort Records script step to the script. Turn on "Perform without dialog." Set the sort order to State, then City, and then click OK.
Your second test, and what to do if that test is true, is now complete.
- Add one more copy of the Else If script step, this time with Get ( ScriptParameter ) = "Zip Code" as the calculation.
If the first two tests fail, your script makes this third test.
- Add another Sort Record step, this time set to sort by the Zip Code field. Then click OK until you're back in the database.
Your finished script should look something like Figure 15-11.
|
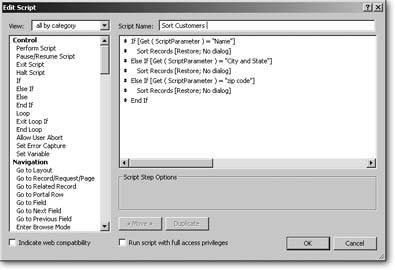
Note: When you're making a series of tests like the ones in this script, it's more efficient to put the condition that most often test as true at the top. That way, the script doesn't have to test conditions that usually fail.
Now it's time to add buttons to the Customers layout to make it easy for your users to run the script. You need three buttons, one for each sort in the script you just wrote.
- Add a new button to the Customers layout.
Quickest way: Use the button tool (you know, the one that looks like a finger pushing a button). FileMaker shows you the Specify Button dialog box.
- Choose the Perform Script button command, and then click Specify. In the "Specify Script" Options list, select Sort Customers.
This is the script you created on Section 15.5.3.
- In the "Optional script parameter" box, type Name, and then click OK until you're back on the Customers layout.
The first test of the Sort Customers script (Get ( ScriptParameter ) = "Name") is true when the users run it by clicking this button. Back on the layout, your button awaits its new name.
Note: If you check the text in the Optional script parameter box, you see that FileMaker put double quotes around Name for you. That's because it considers "Name" a text constant. If you click the Edit button beside the Optional script parameter field, you see the Specify Calculation dialog box, which signals that you can use any value you can calculate as a script parameter.
- Name the button Sort by Name.
You now have one button on your layout. Test it. It always sorts by name.
Time to work on the second button. To do so, you can save time by starting from a copy of the one you already have.
- Duplicate the Sort by Name button and double-click the new copy. In the dialog box's Options section, click the Specify button.
The Specify Script Options window pops up.
- Change the "Optional script parameter" box so it contains City and State.
Type carefully, since you're telling the script to exactly match what's in the Else If statement. The second test of the Sort Customers script (Get ( ScriptParameter ) = "City and State") is true when the users run it by clicking this button.
- Click OK until you're back on the Customers layout and can rename your button.
Now you have two appropriately named buttons and you can switch the sort order back and forth by clicking each button in turn.
To add the third button, follow steps 1 through 3 again. This time, set the parameter to "Zip Code" and name the button Sort by Zip Code.
These three buttons each call the same script, but the script parameters attached to each button allow the script to do double, even triple duty. To make this script even more flexible, you could keep adding Else If and Sort steps, and then make a button with a script parameter that matches each new test. See the box below for a way to use script parameters to extend the flexibility of the Notes Separator script you wrote back in Chapter 14.
| UP TO SPEED Note Separators Revisited |
|
In the previous chapter, you learned how to make the Insert Notes Separator script work with any field (Section 14.2.6). The only drawback was that you had to click the field you wanted to work with before running the script. With script parameters, though, you can easily fix this problem. Just add a series of If and Else If script steps to the top of the script. Each one checks for one of the Notes field types (Invoice, Job, Customer, and so on) in the script parameter. For instance, if the script parameter is "Invoice," then the script should use the Go to Field script step to go to the Invoices::Notes field first. With these conditions in place, you just need to pass the right parameter from your Add Notes button. The picture here shows the finished script. Now if you want to add a new Notes field, you just need to add an Else If and a Go to Field step to this script. If you want to change the way the note separators look, you can change it in one place and the change applies to every Notes field in the database. 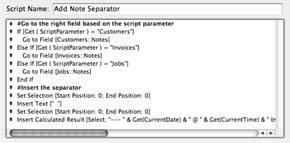 |
Part I: Introduction to FileMaker Pro
Your First Database
- Your First Database
- An Very Quick Database Tour
- Creating a New Database
- Opening and Closing Database Files
- Saving Your Databases
- Adding Records to Your Database
- Navigating Your Database
- Same Database, Multiple Windows
Organizing and Editing Records
- Organizing and Editing Records
- Views
- Advanced Find Mode
- Changing Multiple Records
- Sorting Records
- Editing Whats in Your Fields
- Paragraph Formatting
- Beyond Text: Container Fields
- Checking Spelling
- Printing and Preview Mode
Building a New Database
- Building a New Database
- Tables and Fields
- Defining Fields
- Advanced Field Options
- Bringing It All Together
Part II: Layout Basics
Layout Basics
Creating Layouts
Advanced Layouts and Reports
- Advanced Layouts and Reports
- Setting up Field Controls
- Adding Field Controls to Layouts
- Field Behavior
- Tab Order
- Print-Related Layout Options
- Format the Number/Date/Time/Graphic
- Adding Buttons
- Tab Panels
- Reports and Summary Fields
Part III: Multiple Tables and Relationships
Multiple Tables and Relationships
- Multiple Tables and Relationships
- Relational Databases Explained
- Modeling Your Database
- Creating a Relational Database
- Relational Databases
Advanced Relationship Techniques
- Advanced Relationship Techniques
- Creating Related Records
- Table Occurrences
- Managing Data with Data Tunneling
- Building a Data Tunneling Interface
- Connecting Databases
- Lookups
- Advanced Relationships
Part IV: Calculations
Introduction to Calculations
- Introduction to Calculations
- Understanding Calculations
- The Structure of a Calculation
- Creating a Calculation Field
- Auto-Enter Calculations
- Validate Data Entry with a Calculation
- Replacing Data Using a Calculation
- Comments
Calculations and Data Types
- Calculations and Data Types
- Number Crunching Calculations
- Going Beyond Basic Calculations
- Text Parsing Calculations
- Date and Time Calculations
- Containers in Calculations
Advanced Calculations
- Advanced Calculations
- Stored, Unstored, and Global Fields
- Logical Functions
- The Let Function and Variables
Extending Calculations
Part V: Scripting
Scripting Basics
- Scripting Basics
- Your First Script
- The Importance of the Layout
- Running Scripts
- Branching and Looping in Scripts
Script Steps
- Script Steps
- Go to Layout
- Scripting for Fields
- Working with Records
- Finding Records
- Sorting Records
- Working with Windows
- Working with Files
- Printing
- Other Script Steps
Advanced Scripting
- Advanced Scripting
- Commenting Scripts
- Asking and Telling the User
- Organizing Complex Scripts
- Handling Errors
- Putting a Complex Script Together
Part VI: Security and Integration
Security
Exporting and Importing
- Exporting and Importing
- Exporting a File
- Export Formats
- Importing Data
- Import Data Sources
- Importing and Exporting in a Script
Sharing Your Database
- Sharing Your Database
- FileMaker Network Sharing
- Sharing Over the Internet
- FileMaker Server
- Server Hardware
Developer Utilities
- Developer Utilities
- Script Debugger
- Disable Script Steps
- The Database Design Report
- Tooltips
- Copying Database Structure
- Custom Menus
- Developer Utilities
- File Maintenance
Part VII: Appendixes
Appendix A. Getting Help
EAN: 2147483647
Pages: 176
