Closing the Books
Overview
Congratulations! You've made it to the end of the project, the stakeholders are ecstatic, and you've received great praise for a job well done. Now it's time to kick back, put your feet up, and relax—right?
Not quite yet. Even though the work of the project is finished, your job isn't over yet. The Closing phase of the project life cycle involves closing out the books, paying the vendors, documenting the final project outcomes, and evaluating the project. During this phase, you will examine all the things that went right and all the things that didn't go quite so right on the project, learn from those things, and document them. All the documents you created on this project will serve as a reference for your next project.
In this chapter, you will learn:
- Ending the project
- Reassigning the project team
- Documenting lessons learned
- Obtaining project sign-off
- Assessing customer satisfaction
- Archiving project documents
- Celebrating your accomplishments
Happy Endings
I don't know about you, but I like happy endings. When I'm closing in on the last chapter or two of the novel I'm reading, I want things to work out. I want the guy to get the girl, I want the bad guy to get caught, and I want the revenge to be sweet. I feel the same way about my project endings. Especially the revenge part…all those stakeholders who thought the project would never be successful. Ha! We fooled them. Oh…um…back to project closeout.
We started off our study of project management by stating that a project is considered successful when it meets or exceeds the stakeholders' expectations. This means that the deliverables have been completed, the requirements met, and the budget and schedule followed closely throughout the project. It also means that you've applied good project management techniques and communicated with the stakeholders throughout the process.
Everything we've talked about up until this point will help you meet or exceed customer expectations at the end of your project. As we've stated many times, project planning and communication are the two biggest allies you have in your camp. When you fight the daily project management battles with a good plan as your foundation and you have the ability to communicate honestly and can resolve conflict, you can conquer the world. (Okay, maybe not the world, but certainly your next project!)
Details, Details
The Closing process is often hurried through at best or skipped altogether. Closing has several purposes that will help you on your next project. Here you'll get formal project approval of the product or service of the project, close out the contracts, pay the vendors, and close out the financial records for this project. You'll file away the project documentation for future reference and take some lessons learned from this project with you to the next project. You'll also take one last look back and examine the work of the project and make sure everything is complete.
project approval
Verification and formal acceptance of the product or service of the project.
Remember the checklist we started with in Chapter 1, "Building the Foundation"? Table 12.1 shows an updated version of that checklist, with some new items added that we've learned about throughout the course of this book. Use this checklist to help you manage your next project through the project life-cycle phases.
|
Project name: |
||||
|---|---|---|---|---|
|
Project number: |
||||
|
Project Manager's name: |
||||
|
Complete |
Process or Document Name |
Responsibility |
Notes |
Project Life Cycle |
|
❑ |
Project charter |
Project sponsor |
Describes project purpose, business justification, and outcomes. |
Initiation |
|
❑ |
Cost benefit analysis |
Project manager with input from stakeholders |
Determines whether project is financially (or otherwise) beneficial to the organization. Included in the project charter and scope statement. |
Planning |
|
❑ |
Assumptions and constraints |
Project manager with input from stakeholders |
Describes project assumptions and any constraints limiting the project team. Included in the scope statement. |
Planning |
|
❑ |
Project scope statement |
Project manager with input from stakeholders |
Describes project goals, contains a comprehensive list of deliverables, and describes the specific requirements of the product or service of the project. Signed by project sponsor, project manager, and stakeholders. |
Planning |
|
❑ |
Critical success factors |
Project manager with input from stakeholders |
Describes those things that must be completed accurately in order to consider the project a success. These may include project deliverables or requirements. Can be included with the scope statement. |
Planning |
|
❑ |
Communications plan |
Project manager |
Describes the information needs of stakeholders and the project team and how the information is distributed. |
Planning |
|
❑ |
Work breakdown structure (WBS) |
Project manager |
Formatted as a deliverables-oriented hierarchy that defines the work of the project. |
Planning |
|
❑ |
Roles and responsibility matrix |
Project manager |
Ties roles and responsibilities of project team members with WBS elements. |
Planning |
|
❑ |
Resource plan |
Project manager |
Describes physical resources and human resources needed to complete the project. |
Planning |
|
❑ |
Procurement plan |
Project manager and/or procurement department |
Describes resources or services to be purchased from an outside provider. |
Planning |
|
❑ |
Risk management plan |
Project manager with input from stakeholders, risk analysis team, and project team members |
Identifies, describes, ranks, and plans for project risks. Includes risk response plans for high-ranking risks. |
Planning |
|
❑ |
Quality plan |
Project manager and/or quality team |
Describes how quality will be assured and measured. |
Planning |
|
❑ |
Project schedule |
Project manager |
Displays task dependencies, task durations, and milestones. Used to determine the critical path. |
Planning |
|
❑ |
Project budget |
Project manager and/or finance manager |
Determines targeted costs of the project. |
Planning |
|
❑ |
Project team kickoff meeting |
Project manager |
Assigns all team members to their responsibilities. |
Executing |
|
❑ |
Status meetings and status reports |
Project manager |
Describes current status of the project including project schedule updates, budget updates, task updates, and action items. Created and distributed according to the communications plan. |
Executing and Controlling |
|
❑ |
Change management plan |
Project manager and change control board |
Describes how changes to the project plan will be identified and managed. |
Planning and used in Controlling |
|
❑ |
Monitoring project performance and taking corrective action |
Project manager |
Oversees project performance. May require updates to project Planning documents. |
Controlling |
|
❑ |
Closing the accounting records and finalizing the contracts |
Project manager and finance manager |
Project manager notifies finance manager to close all project accounts so that no more charges are incurred against the project budget. |
Closing |
|
❑ |
Implementation checklist |
Project manager |
Describes issues to be discussed or information to be turned over regarding the product or service of the project to internal departments or the customer. |
Closing |
|
❑ |
Lessons learned document |
Project manager with input from stakeholders and team members |
Documents processes, plans, communications, etc. that worked well. Also documents things that did not work well so that they will not be repeated in future projects and, if practical, integrates them into the standard company project management processes or templates. |
Controlling and Closing |
|
❑ |
Obtaining project sign-off and sending formal notice of closure |
Project manager |
Assures acceptance of the product or service of the project and notifies all parties that the project is officially closed. |
Closing |
|
❑ |
Project feedback |
Project manager, stakeholders, and team members |
Provides information to improve performance on future projects. Can be included in the lessons learned document. |
Closing |
|
❑ |
Archiving project documents |
Project manager |
Archives project records for future reference. |
Closing |
|
❑ |
Celebrating your success |
Project manager and project team |
Provides a means to publicly thank team members for their hard work and recognize success. Brings closure to the project and helps team members make the transition to new assignments. |
Closing |
This checklist shows the primary documents you're responsible for creating and the processes you'll follow throughout the project life cycle. All the Executing, Controlling, and Closing processes have now been added to the list. You can use this checklist template when starting your next project as a reminder of the important documents and activities you'll need to complete as you manage the project. You should periodically review this list throughout the project to make certain that you've covered all the bases. It also serves as a good reminder or reference for what's to come, so you should review the checklist as you approach the end of each life-cycle phase to remind yourself of what needs to happen during the next process. File this checklist in the front of the project notebook, and use it as an informal measure of your progress throughout the project by checking off each process as you complete it.
You can see from the list that we have several things left to complete in the Closing process. The first item we'll talk about is closing the accounts and finalizing the contracts. We'll deal with the remaining items throughout this chapter.
Closing the Accounts
When the project is completed, you'll want to make sure that the accounts for the project are closed so that no more spending is charged against the project budget. Your accounting staff or finance manager usually does this. We talked about the unique account identifiers or codes associated with the WBS elements back in Chapter 5, "Breaking Down the Project Activities." These codes associate the accounts with the project budget and were used by the accounting office to track expenditures. When the finance manager closes the accounts, the codes are closed out also, and no additional charges will be approved against the project's code of accounts.
| Tip |
Stop runaway charging and over-budget conditions by closing the project accounts when the work of the project is completed. |
If you're working on a small project, you're probably the only one approving orders and invoices, so you'll know when to stop charging items against the project budget. But large projects may have several approvers, or your finance manager may be the one who has managed the budget throughout the project. Make certain that you formally communicate to them that the project is over and the books should be closed out so no more spending goes against your project.
Finalizing the Contracts
During the Closing process, contracts are finalized and closed out. When projects are completed under contract or you've used contract help to do the work of the project, you'll want to verify that the work of the contract was completed accurately and satisfactorily according to the terms of the contract prior to closing them out. Review the contract and the statement of work, and compare them against the project outcome to make certain that all the requirements have been fulfilled. This should be a fairly easy step because you would have monitored the work of the project and requested that the vendor make corrections when needed during the Controlling phase. Now you'll make one more pass through the SOW and make certain that none of the requirements have been missed.
One of the most important activities you'll fulfill during this process is the formal notification to the seller that the contract is complete and the product or service is satisfactory and accepted. This notification should be put in writing. If the product or service doesn't meet your expectations, inform the vendor that there are outstanding issues they need to resolve before you can issue a final acceptance notice. This usually happens in the Controlling process as you monitor and measure the project outcomes and at that time notify the vendor of problems. Sometimes, though, you don't have the final product until the Closing phase. If that's the case and the product isn't acceptable, let the vendor know as soon as possible.
Be aware that some contracts have specific conditions or terms that you must meet in order to close out the contract. Review the contract, or ask your procurement department to make you aware of these conditions, so that you can fulfill the requirements of closeout and don't hold up the project.
Breaking Up Is Hard to Do
As the project comes to a close, you'll release team members back to their functional duties or to assignments on other projects. This will likely happen slowly and may even begin in the Controlling phase as tasks are completed and approved.
This process involves good communication on your part. You'll want to keep the functional managers informed prior to the release of team members so that they have a chance to prepare for their return. If the team members are being released to another project, let the project manager know the dates the team members will be released. This gives the other managers time to plan activities and schedule due dates for activities for the new work. Start informing the managers about four to six weeks prior to the team members' release, and keep them posted as you approach the date for their return.
| Warning |
Watch for signs of project slowdown toward the end of the project. Team members may not want to move on to new assignments and will try to extend the fun on the current project by making up problems or delaying final due dates. |
Team members may begin to drag their feet as the end of the project approaches. Keep an eye out for this situation, especially with teams in the performing stage. They've formed friendships, are committed to the goals of the project, and are generally having a great deal of fun doing the work of the project. As the end approaches, they know that the camaraderie and the synergy they've created as a team are coming to an end. This may cause them to slow down their work in order to prolong the project and postpone their reassignment. Communicate openly with the team during this time, and let them know how valuable their work has been on this project. Assure them that their new assignments are important to the organization and that they'll have many opportunities to form relationships with their new team members. Remind them that they'll have a chance now to educate others in the organization on how good teams function and that they'll have the ability to help form great teams in other parts of the organization because of their experience on this team.
Prior to sending team members on their way, you should write up performance reviews and hold one-on-one meetings with each team member to discuss their performance on the project. These reviews will be given to their functional managers or to their new project managers and will become part of their over-all performance rating for the year.
Training and Warranty Period
Have you ever brought home a new gadget or appliance you couldn't wait to try out? It hums along fine the first day or two and then quits, right when you need it most. "Thank goodness for the warranty," you think. Project warranties work the same way.
Some projects, particularly those in the information technology arena, require that some of the primary team members remain assigned to the team, or at a minimum are available for assistance, for a specified length of time after the project is completed and turned over to the customer. This time period is called the warranty period. (Some vendors offer warranty periods on their work as well.) It's inevitable that problems will creep up on newly written programs or newly installed hardware. The idea is, as the user works with the new programs or hardware, they can report problems to the team and have them addressed immediately during the warranty period. This is not a time for the team to work on additional features or enhancements. The warranty period is for bug fixes only, and once the warranty period expires, problems are prioritized and handled according to the organizational policies designed to handle day-to-day problems.
warranty period
A period of time when the stakeholders can notify the team of problems and have them corrected immediately.
| Note |
If you don't establish a warranty period and the customer finds problems, it can be frustrating for them to have to wait for these problems to make it to the top of the priority list before being addressed. The warranty period gives them a buffer period when problems can be addressed as soon as they occur. |
Some projects require training upon completion. If this is the case, the training activity is included as part of the overall project plan. Once training is completed, the product is turned over to the customer. Again, you might choose to institute a warranty period to answer training questions and issues as they come up.
Implementing the Project
At the end of the warranty period, it's time to turn the product of the project over to the customer. You'll want to make sure that all the processes are complete and the proper information is turned over to the customer. Table 12.2 shows a sample checklist that you can use at the end of the project to make certain that the product is ready to be delivered and the customer receives all the information they need regarding the product. As the project manager, you should verify that these items are complete and correct prior to delivering the product to the customer.
|
Project name: |
||
|---|---|---|
|
Project number: |
||
|
Project Manager's name: |
||
|
Completed |
Description |
Comments |
|
❑ |
Deliverables completed |
|
|
❑ |
Deliverables accepted and approved |
|
|
❑ |
Contracts closed out |
|
|
❑ |
Vendors paid |
|
|
❑ |
Customer training completed |
|
|
❑ |
Product documentation provided to customer |
|
|
❑ |
Warranty information given to customer |
|
|
❑ |
Contact information provided to customer |
|
|
❑ |
Final product delivered |
|
Documenting Lessons Learned
We're a lot smarter now that we've made it to the end of the project than we were before we started. We've learned some things simply by performing the project management practices throughout the project and watching the life-cycle processes play out. Now what you need to do, and should do throughout the project, is document those things you learned that will help you perform the next project more efficiently.
My dad, while giving me lecture number 343, would often tell me I was lucky to be able to benefit from his experience. He was happy to help me out by passing on valuable information so that I wouldn't have to "learn the hard way." It's taken me a while, but I've come to see the wisdom in this, especially in the project management field. Why should you repeat the same mistakes a former project manager made, or even ones you made in the past, when you can avoid them and have your next project run more smoothly than the last one?
The lessons learned document contains information about all the project life-cycle processes but most important the Executing and Controlling processes. These two processes are when the work of the project is performed and when you'll likely find mistakes that were made in the Planning documents or processes. Anything you discover that could have been clearer or any additional information that would have helped to avoid confusion should be noted here. Process improvements, communication glitches, or any other information that will help you perform the next project better should be noted here.
lessons learned
The documented successes and failures of the project.
Ask your team members, stakeholders, and the project sponsor to help you compile the lessons learned document. Ask them what went well on the project and what could have gone better. Don't wait until the end of the project to start making notes, however. Start this document during the Executing phase and begin making notes to yourself as soon as problems occur. Document how the situation could have been handled differently to avoid these same types of problem on future projects. Information you should include in your lessons learned document includes the following:
- How the project management processes were used throughout the project and how successful they were in planning and tracking progress
- How well the project plan and project schedule reflected the actual work of the project
- How well the change management process worked and what might have worked better
- Why corrective actions were taken
- Causes of performance variances and how they could have been avoided
- Outcomes of corrective actions
- Risks response plans that were implemented and whether they adequately addressed the risk events
- Unplanned risk events that occurred
- Mistakes that occurred and how they could have been avoided
- Team dynamics, including what could have helped the team perform more efficiently
Don't limit your lessons learned document to only the items on this list. Anything that worked well, or didn't work well, that will help you perform your next project better or smooth out problems before they get out of hand should be documented here. That means positive and negative feedback. This process is particularly useful for failed projects as there are many things you can learn from projects that fail that will help prevent your next project from suffering the same fate.
Many project managers skip this step because, let's face it, most of us don't like to admit our mistakes and we don't want others knowing that we made them. Encourage your team to be honest and forthcoming about their lessons learned. If you've spent the time throughout the project building their trust and creating an open atmosphere of communication, documenting lessons learned won't be that difficult. Assure your employees that this is for the benefit of future projects and is not a means to punish or judge their work. Establish some ground rules that say no one may blame someone else for anything that went wrong and that no names will be taken. Documenting lessons learned allows you to bring a wealth of knowledge to future projects, and you'll benefit by learning from past mistakes without having to repeat them.
The lessons learned document should get filed in the project notebook with all the other project information. This is one of the first documents you'll want to review when starting your next project.
Obtaining Project Sign off
Now it's time to formalize project closure and obtain sign-off on the final product or service of the project. This process assures that the customer and stakeholders have formally accepted the product by verifying that the outcomes meet all the requirements outlined in the scope statement.
One way to obtain sign-off is to produce and distribute a final status report for the project that includes a section for acceptance signatures. The final status report looks different than the periodic status reports you've been producing all along. The final report should recap the goals of the project and detail the major milestones and deliverables accepted and completed.
A final status report template is shown in Figure 12.1. Use this template for your projects and modify it to meet the needs of your projects.
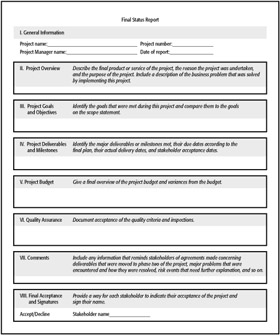
The idea here is to provide a high-level overview of the project, its successes and problems, and to note the dates when stakeholders accepted the key deliverables for the project. This report is for public consumption, so keep it honest, but not brutally honest. If major problems occurred on the project because of certain stakeholders or team members who were particularly difficult to deal with, consider creating a confidential report or briefing to give to the project sponsor or appropriate executive managers. If other political hot potatoes arise during the project that you don't feel should be noted publicly in this status report, put them in the confidential report.
Once the stakeholders sign the acceptance document, the process concludes with a formal notice of the acceptance to the stakeholders, customers, and project sponsor. The project manager is responsible for distributing this last piece of communication. This notice should be written, dated, and sent according to the communications plan. If the project is internal to the organization, an e-mail notification might work. If the project was completed on contract, I recommend sending formal notice through the post office the old-fashioned way. This is the last time you'll hear me say this: File the acceptance document in the project notebook.
Is the Customer Happy?
By the time you reach this point in the project, you know whether the stakeholders' expectations have been met. Part of the Controlling process involves reviewing the project plan, deliverables, and requirements and making certain the actions of the project team are satisfying the requirements and thus satisfying the stakeholders. But another part of stakeholder satisfaction includes the softer skills of communication, customer service, and problem resolution. The only way to get the answers to these questions is to ask them.
If the project is small with only a handful of stakeholders involved, hold one-on-one interviews to ask them their opinions on the progress of the project and project management processes. Or, consider creating a questionnaire to hand out to your stakeholders and customers to determine their level of satisfaction with the project. You can also use this technique to help you with the lessons learned document we discussed earlier.
Here are some sample questions you can use in your interviews, or questionnaire, to determine stakeholder satisfaction. If you're creating a questionnaire, provide them with a scale of 1 to 5, where 1 is not at all satisfied and 5 is very satisfied, or a similar scale.
- Are you satisfied that the deliverable dates were met according to the final project plan?
- Are you satisfied with the level of involvement you had on the project?
- How satisfied are you that the status reports were clear and concise and contained enough information to determine project progress?
- Are you satisfied with the change management process?
- Do you think that problems were addressed and resolved in a timely manner?
- What is your overall level of satisfaction with the product or service of the project?
- Are you satisfied with the quality process used during the project?
- What is your overall level of satisfaction with the project management process?
- Overall, are you satisfied with the amount of information you received during the project regarding status, problems, and progress?
Tailor this questionnaire to your specific project, and always give the respondents room for free-form comments and feedback.
You should also interview your project sponsor. Ask them the same questions you asked the stakeholders and also ask them about your working relationship. Were there things either of you could have done differently to help the project progress more efficiently? Were the communication channels open? Did they have enough information to report the status to executive managers and answer questions regarding the project when confronted?
And don't forget the team members. While some of the questions in the above list won't apply to them, you should ask them how they think the project progressed. Were communication channels open between you and the team? Did they feel adequately informed of progress, changes, and new information? What do they think of the change control process? What do they think of the team effectiveness, and what are their suggestions for future team enhancements? All of this information will help you improve your next project if you take the time to analyze what they've told you and initiate changes where needed.
| Note |
Each project is a learning experience. Even though each project exists to create a unique product or service and no two projects will ever be the same, the processes you use to manage the projects will be similar and there is always room for improvement. |
Back in Chapter 1 we talked about how our ancient project management counterparts probably followed processes that are similar to the processes we use today. We've cleaned them up and made them more efficient, and we've certainly made our job easier through the use of computer software programs, but the management processes we use to assure that the outcomes of the project meet the requirements are basically the same. So, take the time to learn from the good and bad on every project, get feedback from your stakeholders and team members, and then apply these ideas to your next project.
Archiving Project Documents
You've created a lot of project information, documents, and processes throughout the project. Since you, or other project managers, can benefit from this information when creating the same documents for future projects, you'll want to archive all the project documents so that they will be accessible when needed. This includes everything you've created during the life of this project: the project charter, scope statement, project planning documents, quality plan, risk response plans, status reports, lessons learned, final acceptance document, and so on.
This includes any information you've stored on the intranet as well. You may find that you have a combination of documents if you've used the intranet as your project notebook. At the close of the project, I recommend that you create a file on the intranet site that describes where future project managers might find the paper documents that are associated with the project. The documents with signatures, such as the scope statement or final acceptance and so on, should be filed in a notebook or file drawer. Note their location in one of the intranet files. I recommend keeping your project information on the intranet as long as you can. Create an archived section on the intranet and move closed projects under that heading.
There's only one official project function remaining. Let's get to it.
It s Party Time!
Celebrate your success! Throw a party, take the team to lunch, or buy noise-makers and set them off at the last project team meeting. Recognize the success of the team, no matter how small the project.
This is also the time for you to officially thank the team members for their participation on the project. If significant accomplishments were made during the course of the project, consider giving awards to those who made the contributions. If the project was successful, this recognition should be done publicly. Keep in mind this isn't the first time you will have recognized team members who've done an exemplary job, but it does give you one last opportunity to recognize individual excellence as well as team effort. And reflecting on a job well done builds confidence and encourages you and the team members to stretch your skills and take on even more complex projects.
Celebration brings closure to the project and helps the team formally recognize the project's end. It helps smooth the transition and lets team members know that their contributions were appreciated. It also helps them cut the ties and begin thinking about their new assignments, so don't skip this process.
Now, go celebrate your own success! You've finished this book and learned some new things about project management that will help you manage your coming projects more efficiently and should grant you much success in your project management endeavors. Even if you never work under the title of "project manager," you'll no doubt be involved in several projects during the course of your career. What you've learned here will help you successfully see these projects through to completion.
Terms to Know
- lessons learned
- project approval
- warranty period
Review Questions
|
1. |
What is the definition of a successful project? ____________________________________________________________ |
|
|
2. |
Describe the purpose of the Closing process. ____________________________________________________________ |
|
|
3. |
Why should you close the project accounts at the end of the project? ____________________________________________________________ |
|
|
4. |
What should the project manager do after contract closeout? ____________________________________________________________ |
|
|
5. |
What sometimes happens with team members in the performing stage of development as they approach the end of the project? ____________________________________________________________ |
|
|
6. |
Describe the purpose of a warranty period. ____________________________________________________________ |
|
|
7. |
What are lessons learned? ____________________________________________________________ |
|
|
8. |
Why should the project manager get formal project sign-off? ____________________________________________________________ |
|
|
9. |
What information should be archived at the close of the project? ____________________________________________________________ |
|
|
10. |
Why is celebration important for team members? ____________________________________________________________ |
|

Answers
|
1. |
A successful project meets or exceeds the expectations of the stakeholders. |
|
2. |
The Closing process involves getting final approval of the product of the project, closing out the accounts, documenting lessons learned, and archiving project information. |
|
3. |
The project accounts should be closed at the end of the project so that no more spending is charged against the project budget. If more charges are applied to the budget than what are called for in the plan, you'll have budget variances. |
|
4. |
After performing contract closeout, the project manager should formally notify the seller in writing that the contract is complete and the product or service of the project is satisfactory and acceptable. |
|
5. |
Teams in the performing stage of development sometimes delay the close of the project by creating problems or dragging out due dates. They're reluctant to move on because they are enjoying their work on the project and don't want it to come to an end. |
|
6. |
A warranty period provides a period of time after the implementation of the project when stakeholders or customers can report problems and have them addressed immediately. |
|
7. |
Lessons learned are the successes and failures of the project, and they should be noted and archived with the project documentation for future reference. |
|
8. |
Final, formal sign-off on the project assures that the customer and stakeholders have verified that the outcomes of the project meet all the requirements outlined in the scope statement. |
|
9. |
All project documentation should be archived at the close of the project. This includes the project charter, all project planning documents, lessons learned, and more. |
|
10. |
Celebration brings closure to the project and helps the team members formally recognize the end of the project. It's also a chance for the project manager to recognize the contributions of the team members and thank them for their participation. |
- Building the Foundation
- Developing Project Management Skills
- Initiating the Project
- Defining the Project Goals
- Breaking Down the Project Activities
- Planning and Acquiring Resources
- Assessing Risk
- Developing the Project Plan
- Budgeting 101
- Executing the Project
- Controlling the Project Outcome
- Closing the Books
- Appendix A Answers to Review Questions
- Appendix B Sample Project Management Forms
- Appendix C Sample Project Management Checklists
EAN: 2147483647
Pages: 139
