Creating Related Records
The first thing you probably notice with the database you worked on in Chapter 7 is that getting the records to relate is a tedious affair. To add a job record, for example, you go to the Customers layout, copy the Customer ID, and then go to the Jobs layout, add the record, and paste in the ID. That's a pain. Since FileMaker is all about relieving the pain of working with databases, it gives you a better waya couple, in fact. In the last chapter you learned how to use a portal to display related records. Here you'll learn how a portal can also create related records. But first, you'll learn how to use a value list to help you enter appropriate data into a key field.
8.1.1. Value Lists Based on Fields
You've already seen value lists based on field valueson Section 6.1.2.1, you attached a value list to the State field to make sure folks enter only valid state names. In a relational database, valid data entry is even more critical, since relationships work only when the key fields in each table match. Similarly, you can use a value list in the table on the "to-many" side of a relationship to make sure that the key field in table on the "one" side of the relationship only accepts valid key values. When you make this change to your layout design once, you save hours of data entry work down the line. Good database design is all about this kind of up-front work. In the Customers database, for example, you may want to create a value list that ensures the entry of valid Customer ID numbers. Just follow the steps below:
Tip: You can download this sample database from the "Missing CD" page of MissingManuals.com (Section 3.4.5).
- In the Customers database, choose File
 Define
 images/U2192.jpg border=0> Value Lists, and then click New.
All Customers. You want this list to automatically show all the customers in the Customers table.
- Turn on the "Use values from field" radio button.
When you click this radio button, the Specify Fields for Value List window immediately appears. (You can see an example in the box on Section 8.1.1.)
- In the pop-up menu under "Use values from first field," choose Customers.
Way back in the dark ages, when you had only one table, FileMaker put that table in the pop-up menu for you. Now that you have multiple tables, you get to choose which table you want.
- In the list of fields, select Customer ID.
When you use this value list, you want to be able to choose a Customer ID for the job record, so you're basing the value list on this field.
- Turn on the "Also display values from second field" checkbox. Then, from the right-hand field list, choose First Name.
Since you're trying to avoid having to remember Customer IDs, you display another field value too, so that you can more easily find the Customer ID. In this case, the value list shows the first name and the customer ID.
Note: Of course, showing first and last name is the best way to find the right customer but the dialog box lets you pick only one field.
- Turn on the "Sort by second field" radio button.
After all, you'd probably prefer a list of customers in alphabetical order to one ordered by ID.
- Click OK, then OK again, and one more time.
It took three clicks to get here, so it takes three more to get back out.
| UP TO SPEED Field-Based Value Lists |
|
A value list doesn't have to be a simple list of canned values." In the Edit Value List dialog box (Section 6.1.2), you can also" tell FileMaker to "Use values from field." When you do, you" see the window shown here. You get to decide whether the" list includes values from every record in the entire table, or" only the related records. First and most important, you need to choose which field" the value list is based on. The pop-up menu under "Use values" from first field" lets you pick a table occurrence. When" you do, the list below it shows all the table's fields. Simply" select the field you want. You can also elect to show a second field in the value list. The field you choose has no effect on the actual value FileMaker inserts when you pick an item from the list. It just helps you decide which item to pick. To show a second field, just turn on "Also display values from a second field" and pick it from the list (see step 5 on Section 8.1). You can choose a field from any table occurrenceif the second value isn't from the same table as the first field, FileMaker uses the value from a related record. Once you've chosen what fields to show, you get to choose which records to use. If you turn on "Include all values," FileMaker puts the field's value from every record in the value list. When "Include only related values" is turned on, FileMaker looks at only the records related to the one you're sitting on. For this method to work, FileMaker has to know which table occurrence you're coming from. In other words, if you ask for only the related Jobs, do you mean jobs related to the Customer record or to the Invoice record? You make that choice in the pop-up menu below these radio buttons. (When you define a value list like this, it works properly only when it's attached to a field on a layout associated with the same table occurrence selected in this menu. If you try to use it on a different layout, FileMaker doesn't know which record to start from and the value list won't show the right values.) Display options let you choose how the list should be sorted: by the first field or the second field. Finally, you can tell the list to display values from only the second fieldan ideal use for a Pop-up Menu. 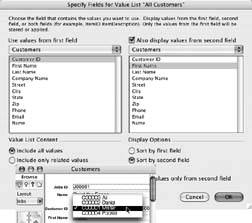 |
Now that you've defined the value list, you can attach it to the Customer ID field on the Jobs layout. And to do that, you need to go back to the layout:
- Switch to the Jobs layout, and then go to Layout mode. Select the Customer ID field, and then choose Format Field/Control
In the "Format field as" pop-up menu, choose Pop-up Menu.
You want to let your employees pick the customer ID from a menu. (You could use a Drop-down List instead if you want, as discussed on Section 6.2.1.)
- From the "Display values from" pop-up menu, choose All Customers.
In other words, choose the value list you just created.
- Click OK, then switch back to Browse mode.
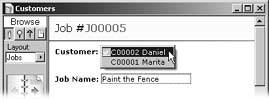
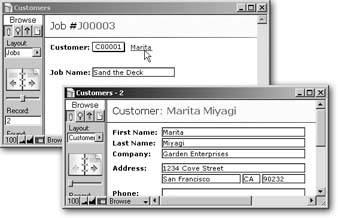
Now, when you click the Customer ID field, you get a list of customers to choose from. You can see it in Figure 8-1.
|
8.1.2. Creating Related Records Through a Portal
As the database designer, you have to think about how data gets entered and where (what layout) it makes sense for that data to go. Sometimes choosing a related record's primary key from a menu doesn't make sense. The Invoices and Line Items tables illustrate this scenario. To use the pop-up menu like you just created in Jobs, you'd have to add it to the Line Items layout. This process is how you'd create an invoice:
- Create the invoice record.
- Go to the Line Items layout.
- Add every line item, choosing the correct invoice ID each time.
Again, FileMaker has a better way. You need to edit your relationship so that it lets the program create new records; then you add a portal to the Invoice layout.
8.1.2.1. Preparing the relationship
When you first drag a relationship into existence in the relationships graph, it starts off pretty plain vanilla. But there are three special properties that you can set to make your workflow more efficient. You get to set whether a relationship lets FileMaker create or delete related records and whether it sorts those records before it displays them. To make these changes, you need to visit the Edit Relationship dialog box:
- In the Customers database, choose File Define
Select the relationship between Invoices and Line Items table occurrences.
Click the = signs in the middle of the line for an easy target.
- Click the Edit Relationship button (see Figure 8-2).
The Edit Relationship dialog box is now on your screen, as shown in Figure 8-3. (You can also double-click a relationship to open this box, saving the trip to the button.)
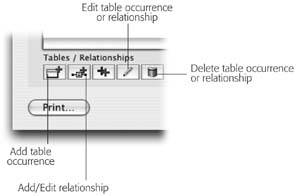
Figure 8-2. The buttons at the lower left of the Define Database window open dialog boxes where most of the relationship work in this chapter gets done. You can always back out of your mistakes…er, experiments by clicking the trash can (Delete) icon.
- In the set of checkboxes under Line Items, turn on "Allow creation of records in this table via this relationship."
Now if you put the Line Items::Description field on the Invoices layout, FileMaker lets you type in the field even when there is no related Line Item record. When you do, FileMaker immediately creates a new Line Item record for you and automatically enters the correct value in its Invoice ID field to make the two records related.
Tip: Since a relationship goes in two directions, you get to pick from the same three options for both table occurrences involved in a relationship. If you need a portal to display records through that relationship, then that's going to be the side that needs to allow record creation.
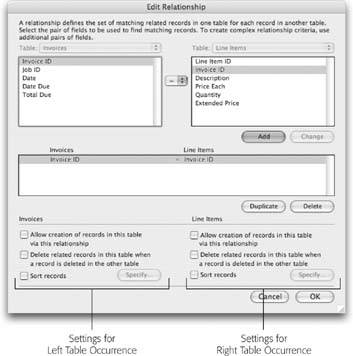
Figure 8-3. The Edit Relationship dialog box lets you further refine the relationship between Invoices and Line Items. You see two sets of checkboxes: The set on the left pertains to the Invoices table occurrence (you can see its name above the checkboxes). The checkbox on the right affects the Line Items table occurrence. In either case, you can set the relationship's automatic create, delete, and sort capabilities.
- Again, in the checkboxes under Line Items, turn on "Delete related records in this table when a record is deleted in the other table."
With this option turned on, if you delete an Invoice record, FileMaker automatically deletes all the related Line Item records for you. This step is what you want, since a Line Item without an Invoice is meaningless.
- Click OK a couple of times to dismiss the Define Database window.
8.1.2.2. Adding a portal to a layout
In the last tutorial, you edited the relationship to allow FileMaker to create records from Invoices to Line Items. Now you're ready to fix up your Invoices layout to use that edited relationship. You're set to build a portal to display the Line Items from the relationship you've just edited.
| UP TO SPEED Cascading Deletes |
|
The "Delete related records" option can be dangerous for a couple of reasons. First, if you turn it on accidentally, you can find yourself in an odd situation: Records keep disappearing for no apparent reason. You'll get frustrated if you don't realize how this option works. But even if you want it on, keep this fact in mind: FileMaker can't bring back a record you delete. It's one thing if someone accidentally deletes a Jobs recordyou just have to look up the Job Name and enter it again, being careful to give the job the same ID it had before. It's something else entirely if you also have Delete turned on in the Jobs-to -Customers relationship, and the Customers- to-Invoices relationship, and again in the Invoices-to- Line Items relationship. You've set up the Towering Inferno scenario called "cascading deletes." Because now, when you delete one job record, perhaps thinking that the job is finished and you don't need the record anymore, FileMaker also obeys your "hidden" instructions and deletes the Customer record attached to that Job record, all the Invoices attached to the Customer and all his line items, too! Some people decide it's not worth the risk and leave the delete option off even when it should be on. For a better solution to the cascading deletion problem, read up on security in Part 6. |
In the Customers database, you want to create a portal on the Invoices layout. Switch to Layout mode. Then, using the portal tool (Figure 8-4), drag out a large portal on the layout.
|
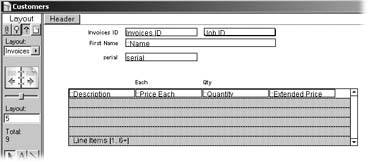
After you draw a portal, FileMaker shows the Portal Setup dialog box so you can specify which data to show in it. Proceed as follows:
- From the "Show related records from" pop-up menu, choose Line Items.
Your new Invoice record needs some Line Items, so that's the table you'll display in this portal.
- In the Portal Setup window, turn on "Show vertical scroll bar" and "Allow deletion of portal records." Click OK when you're done.
Turn them both on, since you never know how many items you'll add to an invoiceor take off.
The Add Fields to Portal window appears.
- Add the fields Description, Price Each, Quantity, and Extended Price to the "Included fields" list.
Notice the pop-up menu under Available fields. Because you selected the Line Items relationship three steps ago, FileMaker assumes that's where the fields are, too.
- Click OK.
FileMaker adds your portal to the layout, and divides the available space among the four fields.
You don't get field headings to help you see which field is which, and you may need to tweak the relative widths of your fields, but FileMaker's done the bulk of the work for you.
Tip: The "Alternate background fill" option in the Portal Setup dialog box lets you add color and/or a fill pattern to every other row of your portal. A subtle color really helps make it easier to read across each line. Test colors on a variety of monitors and light conditions first, so you don't end up making your data harder to read, instead of easier.
| FREQUENTLY ASKED QUESTION How Do I Know Where to Sort? |
|
In the last chapter I set the sort order for a portal when I was adding it to my layout. Now you're saying I can set the sort order in the relationship. What's the difference? Does it matter? When you set a sort order in the Edit Relationship dialog box (Section 8.1.2.2), it applies to the relationship itself. Any time you use that relationship, the sort order applies: in portals on any layout, when showing a single related field, and when finding a set of related records (that's covered in the next section). A portal's sort order (Section 7.4.4.1), on the other hand, applies only to the portal itself. If you don't tell the portal to sort, FileMaker uses the relationship's sort orderif anyinstead. If you know that every time you look at your related data, it should be shown in a specific order, set the relationship to sort. But if you think the related data ought to be sorted different ways in different contexts (and thus in different portals), don't sort the relationship because you add some overhead. FileMaker has to sort the records for the relationship, then sort them a different way for your portal. (You don't see this process happening, but FileMaker's doing it behind the scenes.) So when you're planning on viewing data in lots of different orders, rely on sorted portals instead of sorted relationships. |
8.1.2.3. Adding records in a portal
Now that you've edited a relationship to allow the creation of related records, and provided a portal on the Invoice layout for viewing the records, you're ready to try out some Auto-creation goodness:
- On the Invoice layout, switch to Browse mode.
The portal is empty right now because you have no line items. You probably don't have an invoice record yet either.
- If necessary, create a new record.
Once you have a record, you see that the four fields in the portal are ready for a click. There isn't a related record yet, but FileMaker is offering you the chance to create one.
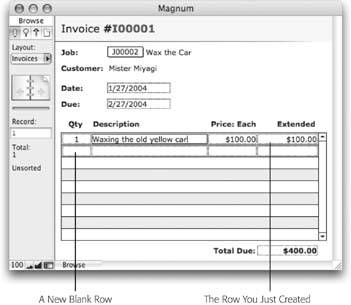
- Click the first (left-most) field in the portal and type Waxing the old yellow car.
As soon as you start typing, a second row of fields appears in the portal. That second row is FileMaker showing you that it's ready to make another new record for you. Figure 8-5 explains.
|
You can fill out the remaining fields if you feel up to it. You can even add more line items: Just keep clicking into the last portal row. You can test your auto-deletion setting that you added in step 5 on Section 8.1.2.2 by deleting the invoice you just created. When you do, the line item records should also go away. If you still have both windows open, you see this action happen live.
Note: The last portal row is not a new record until and unless you type something in it. (See Section 3.3.1.4 for a refresher on committing records.)
Of course, the Invoices to Line Items relationship isn't the only relationship in your database that can benefit from the use of portals. For an exercise in thinking like a designer, take a look at your relationships graph and think about where else you could put portals to make data viewing and record creation easier. There's no real right or wrong answer. That's the beauty of FileMakeryou can use its tools to create virtually any system your business needs.
8.1.3. Navigating Between Related Records
With pop-up menus and auto-creating records, adding data to your new database is now a joy. But you still do some serious work navigating around the system. For example, if you're looking at an invoice and you want to see details about the related customer, you have to note the Customer ID, switch to the Customers layout, and then find the customer. That's three steps too many.
Simplify this process with a button (see Section 6.6.5.3) on the layoutone that uses the Go to Related Record command. This command (affectionately called GTRR by FileMaker gurus) does the obvious, plus a little more. It goes to the related record to be sure. But it also changes the layout appropriately, and it can find all the related records and sort them too. It can create a new window, too, while it's at it. That's a lot of work for one little command. Since there are so many ways to use this little powerhouse, you can look at a couple of different sets of optionswith and without the use of a found set.
8.1.3.1. Go to Related Record
|
Here's one way to create a button that activates the Go to Related Record command. In the Customers database, you already have people's names showing on a layoutjust waiting to be made into buttons.
|
| POWER USERS' CLINIC Auto Creation Without a Portal |
|
You don't have to have a portal to get automatic creation of related records. It works when you type in any related field as long as the relationship is set up to allow it. Suppose you have a one-to-one relationship with one table for photographs and another for photo information. Both tables have a Photo ID field, but only the Photos::Photo ID field is a serial number. Finally, you tell FileMaker to allow creation of related Photo Information records. You might wind up with a database that looks like the one shown here. There aren't any portals in sight. (Who needs them with just a one-to-one relationship?) But since the relationship is set to auto-create Photo Information records, you can add a new photo record, and then just type a name right in the Quilt field. FileMaker creates the related record for you. If you type in the Type or Size field, it doesn't need to create a record because it can use the one that already exists. If you don't have Auto-creation turned on, you can't click into the Quilt field. FileMaker shows the dotted field outline, but doesn't let you in. 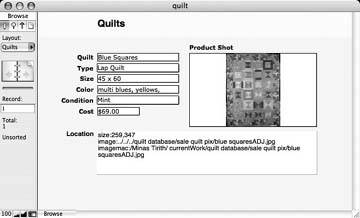 |
- From the Navigation section of the list, select the Go to Related Record script step. When the Options section of the window appears, click its Specify button.
The Go to Related Records Options dialog box appears (Figure 8-6).
- From the "Get related record from" pop-up menu, choose Customers.
When you pick a table occurrence, you determine which record the button goes to. Notice that FileMaker shows you only the layouts that use the table occurrence you just selected.
- From the "Show record using layout" pop-up menu, choose Customers.
If you're going to a related record, it's usually from a different table occurrence. Your current layout can't show you related data, because it doesn't have the required fields. So you need to tell the button which layout it can use.
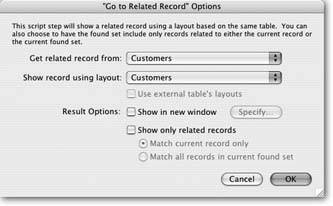
Figure 8-6. Go To Related Record options pack a powerful punch. If you turn on "Show in new window," FileMaker leaves your current window alone and shows the related record(s) in a new window.
- Click OK, then OK again to return to your layout.
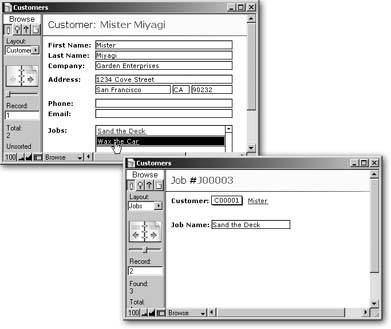
Now give your creation a trial run: Switch to Browse mode. First make sure you have a customer related to this job. If you don't, click the Customer ID field to choose one. When you assign a customer, your button works. Click the Customer First Name field and you're transported directly to that customer's record. Figure 8-7 shows what it looks like.
|
Tip: The "Use external table's layout" option applies only when you're linking multiple databases together. You'll learn about that later in this chapter.
8.1.3.2. GTRR with a found set
If you're looking at a customer record, you can see all that customer's jobs because they're right there in the Jobs portal. But what if you want to see those jobs (and only those jobs) in a sorted list on the Jobs layout? It would take a bunch of steps if you had to do it manually. But the Go to Related Record command does all those steps for youwhen you add a few new options to the mix.
- On the Customers layout, switch to Layout mode, and then select the Jobs:: Name field.
It's the one in the jobs portal.
- Choose Format Button Setup. In the Button Setup dialog box, select the Go to Related Record command from the list, and then click Specify.
From the "Get related record from" pop-up menu, choose Jobs. From the "Show record using layout" pop-up menu, choose Jobs.
You need a layout that shows you meaningful data from the Jobs table. So far, this process is just like creating a related record button without a found set. The next steps make all the difference.
- Turn on "Show only related records."
When you turn on "Show only related records," FileMaker changes the found set, showing just the related records. You land on the desired record, and you have all the other records in the found set. If the relationship has a sort order, FileMaker sorts the found set, too.
For now, leave "Match current record only." (Selecting "Match all records in the current found set" lets you a new feature called Enhanced GTRR. See the box on Section 8.2.1 for more detail.)
- Click OK, and then OK again.
You're looking at your layout again.
- For good measure, make the Jobs::Name field blue and underlined as well, using FileMaker's editing tools (Section 4.4.6.3).
It's good to provide some kind of clue that the field is clickable. Anybody who's ever surfed the Net knows that blue underlined things take you to faraway places.
Now you have a Go to Related Record button in a portal. Switch to Browse mode to see what happens. First, use the book icon to navigate to a customer record that has more than one related job. Click the second portal record. Because you're on the second row, the button takes you to the second record in your found set, not the first one. Then click the Customer name button again.
Note: If you don't have any customers with multiple jobs, just switch back to the Jobs layout and fix it: Attach a few jobs to one customer. Then come to the Customers layout again and find that customer.
As you switch back and forth, you can see another difference: the portal changes the button's context (Figure 8-8). That is, the records related in a portal are already a set, unlike the single field you made into a button in the previous tutorial. In other words, when you click the GTRR button on the Jobs layout, you expect to see only the single Customer that's related to your job. When you click the button in the Jobs portal, you get a found set of only the job records that you just saw in the portal.
|
Part I: Introduction to FileMaker Pro
Your First Database
- Your First Database
- An Very Quick Database Tour
- Creating a New Database
- Opening and Closing Database Files
- Saving Your Databases
- Adding Records to Your Database
- Navigating Your Database
- Same Database, Multiple Windows
Organizing and Editing Records
- Organizing and Editing Records
- Views
- Advanced Find Mode
- Changing Multiple Records
- Sorting Records
- Editing Whats in Your Fields
- Paragraph Formatting
- Beyond Text: Container Fields
- Checking Spelling
- Printing and Preview Mode
Building a New Database
- Building a New Database
- Tables and Fields
- Defining Fields
- Advanced Field Options
- Bringing It All Together
Part II: Layout Basics
Layout Basics
Creating Layouts
Advanced Layouts and Reports
- Advanced Layouts and Reports
- Setting up Field Controls
- Adding Field Controls to Layouts
- Field Behavior
- Tab Order
- Print-Related Layout Options
- Format the Number/Date/Time/Graphic
- Adding Buttons
- Tab Panels
- Reports and Summary Fields
Part III: Multiple Tables and Relationships
Multiple Tables and Relationships
- Multiple Tables and Relationships
- Relational Databases Explained
- Modeling Your Database
- Creating a Relational Database
- Relational Databases
Advanced Relationship Techniques
- Advanced Relationship Techniques
- Creating Related Records
- Table Occurrences
- Managing Data with Data Tunneling
- Building a Data Tunneling Interface
- Connecting Databases
- Lookups
- Advanced Relationships
Part IV: Calculations
Introduction to Calculations
- Introduction to Calculations
- Understanding Calculations
- The Structure of a Calculation
- Creating a Calculation Field
- Auto-Enter Calculations
- Validate Data Entry with a Calculation
- Replacing Data Using a Calculation
- Comments
Calculations and Data Types
- Calculations and Data Types
- Number Crunching Calculations
- Going Beyond Basic Calculations
- Text Parsing Calculations
- Date and Time Calculations
- Containers in Calculations
Advanced Calculations
- Advanced Calculations
- Stored, Unstored, and Global Fields
- Logical Functions
- The Let Function and Variables
Extending Calculations
Part V: Scripting
Scripting Basics
- Scripting Basics
- Your First Script
- The Importance of the Layout
- Running Scripts
- Branching and Looping in Scripts
Script Steps
- Script Steps
- Go to Layout
- Scripting for Fields
- Working with Records
- Finding Records
- Sorting Records
- Working with Windows
- Working with Files
- Printing
- Other Script Steps
Advanced Scripting
- Advanced Scripting
- Commenting Scripts
- Asking and Telling the User
- Organizing Complex Scripts
- Handling Errors
- Putting a Complex Script Together
Part VI: Security and Integration
Security
Exporting and Importing
- Exporting and Importing
- Exporting a File
- Export Formats
- Importing Data
- Import Data Sources
- Importing and Exporting in a Script
Sharing Your Database
- Sharing Your Database
- FileMaker Network Sharing
- Sharing Over the Internet
- FileMaker Server
- Server Hardware
Developer Utilities
- Developer Utilities
- Script Debugger
- Disable Script Steps
- The Database Design Report
- Tooltips
- Copying Database Structure
- Custom Menus
- Developer Utilities
- File Maintenance
Part VII: Appendixes
Appendix A. Getting Help
EAN: 2147483647
Pages: 176
