Asking and Telling the User
Sometimes a script needs to tell your users something"There are no records to include in this report"or ask the user a question"How many copies of the report do you want?" To this end, the Show Custom Dialog script step can display a dialog box that you control. Calling it a "Custom" dialog box might be a bit too generous (you don't have much say in how it looks), but you do get to give information to people using your database, and ask them simple questions.
|
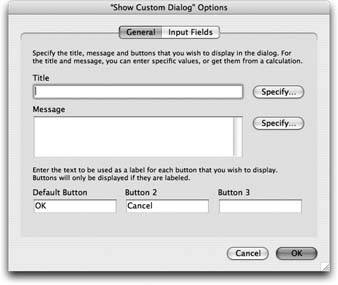
When you add the Show Custom Dialog step to your script and click its Specify button, you see the window shown in Figure 15-2.
|
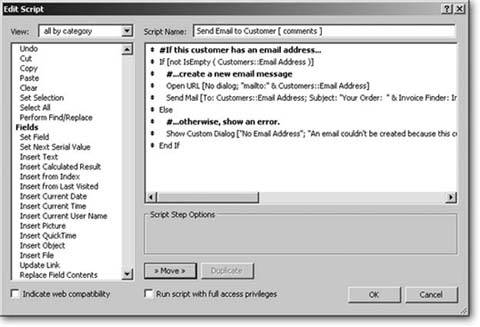
Note: There's another way to help people understand what your scripts are doing: Put comments in any embedded calculations. When a script has an If statement that uses a complex calculation for its condition, you're free to put comments in the calculation itself.
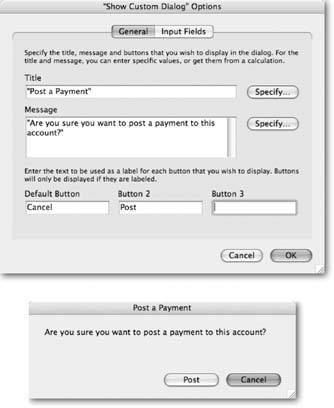
The Show Custom Dialog script step has three basic purposes. First, it can display a simple message. In a script that finds all overdue invoices, for example, you can have a message that says, "No invoices are overdue" if FileMaker finds nothing. Second, you can create a dialog box that asks a simple question. Say you have a script that posts a customer payment. Before launching into the process, your custom dialog box can ask, "Are you sure you want to post a payment?" and include Post Payment and Cancel buttons for your users' feedback. Finally, you can use this script step when you need to ask your users to enter some data, not just click a button. For example, a script that runs a sales report might start by asking what date range to report on. Here's how to create all three types:
15.2.1. Showing a Simple Message
In its simplest form, the Show Custom Dialog script step just delivers a message to the user. Figure 15-3 shows how to configure a box like this, and how the final result looks.
|
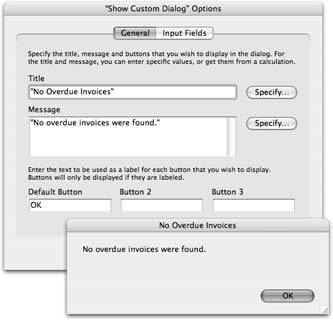
You can generate the title and message from a calculation to make it more dynamic. For instance, if someone wants to see all open invoices for a particular client, but there aren't any, you can show a calculated custom message that says, "Lucy Pevensie's account is paid in full," instead of something equally true, but less helpful, like "No records were found."
Using a custom dialog box like this in a script is simple. Just use the Show Custom Dialog step wherever you want in your script. When the dialog box pops up, your script waits for the user to click the button, and then continues with the next step.
15.2.2. Asking a Simple Question
To ask the user a simple question (one with either two or three possible responses), just add more buttons to the dialog box by filling in the Button 2 and Button 3 boxes in the Show Custom Dialog Options window. You can see this process in action in Figure 15-4.
|
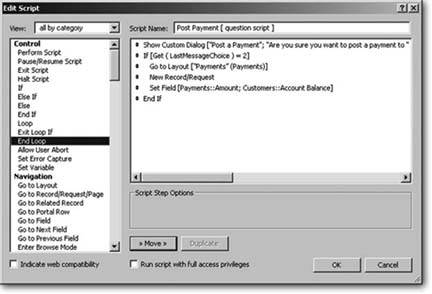
When a dialog box like this appears, your script waits for a click of one of its buttons, then continues. Although FileMaker knows whether button 1, 2, or 3 got clicked, you have to add logic to your script to tell the program what to do in each case. For that, you use the Get ( LastMessageChoice ) function and If statements based on its results. (The function returns 1 for the default button, 2 for Button 2, and 3 for Button 3.) The script in Figure 15-5 uses Get ( LastMessageChoice ) to take some steps only when someone clicks a custom dialog box's default button.
|
15.2.3. Asking a Not-so-simple Question
If you need user input that goes beyond two or three simple choices, you can venture into the second tabInput Fieldsin the Show Custom Dialog script step (Figure 15-6). The Show Custom Dialog Options window's Input Fields tab lets you add fields to your custom dialog box. To add a field to a custom dialog box, turn on one of the "Show input field" checkboxes in the Input Fields tab of the Show Custom Dialog Options window. When you do, FileMaker shows a Specify Field dialog box, in which you can pick the field to use. (If you want to change the field later, click the Specify button).
You can also give the field a label (like Start Date and End Date in Figure 15-6). The label can be the result of a calculation. Finally, if you turn on "Use password character" for an input field, the field works like a typical Password box: It shows * or • instead of the letters you type, so someone watching over your shoulder can't see what you're entering.
The fields you add to a custom dialog box have some limitations, including the ones listed below. (For other alternatives, see the box on Section 15.3.)
- As far as data entry goes, Show Custom Dialog can have only free-entry fields like those shown in Figure 15-6. You can't use radio buttons, checkboxes, or pop-up menus. You also have no control over the size of the field, so short fields for dates, or tall fields for lots of text, aren't an option.
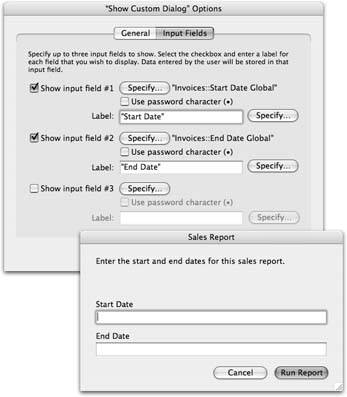
Figure 15-6. You can have, at most, three fields, each of which corresponds to a real field in your database. The window in the front shows how the dialog box looks when the script runs. When the user types something in one of the fields and then clicks the default button, FileMaker puts the entered value into the real field on the current record. If the user clicks Button 2 or Button 3, on the other hand, FileMaker leaves your record's fields alone.
- "Data-entry only" validation doesn't apply to fields in custom dialog boxes. If you use a dialog box to gather data for a record, either use the Always option in the field validation, or check the validity of the data in your script (Section 15.5.1).
- You must use the OK button as the default when you're using input fields in a custom dialog box. Consequently, you have to trust people to read the dialog box when they need to enter data in it.
Part I: Introduction to FileMaker Pro
Your First Database
- Your First Database
- An Very Quick Database Tour
- Creating a New Database
- Opening and Closing Database Files
- Saving Your Databases
- Adding Records to Your Database
- Navigating Your Database
- Same Database, Multiple Windows
Organizing and Editing Records
- Organizing and Editing Records
- Views
- Advanced Find Mode
- Changing Multiple Records
- Sorting Records
- Editing Whats in Your Fields
- Paragraph Formatting
- Beyond Text: Container Fields
- Checking Spelling
- Printing and Preview Mode
Building a New Database
- Building a New Database
- Tables and Fields
- Defining Fields
- Advanced Field Options
- Bringing It All Together
Part II: Layout Basics
Layout Basics
Creating Layouts
Advanced Layouts and Reports
- Advanced Layouts and Reports
- Setting up Field Controls
- Adding Field Controls to Layouts
- Field Behavior
- Tab Order
- Print-Related Layout Options
- Format the Number/Date/Time/Graphic
- Adding Buttons
- Tab Panels
- Reports and Summary Fields
Part III: Multiple Tables and Relationships
Multiple Tables and Relationships
- Multiple Tables and Relationships
- Relational Databases Explained
- Modeling Your Database
- Creating a Relational Database
- Relational Databases
Advanced Relationship Techniques
- Advanced Relationship Techniques
- Creating Related Records
- Table Occurrences
- Managing Data with Data Tunneling
- Building a Data Tunneling Interface
- Connecting Databases
- Lookups
- Advanced Relationships
Part IV: Calculations
Introduction to Calculations
- Introduction to Calculations
- Understanding Calculations
- The Structure of a Calculation
- Creating a Calculation Field
- Auto-Enter Calculations
- Validate Data Entry with a Calculation
- Replacing Data Using a Calculation
- Comments
Calculations and Data Types
- Calculations and Data Types
- Number Crunching Calculations
- Going Beyond Basic Calculations
- Text Parsing Calculations
- Date and Time Calculations
- Containers in Calculations
Advanced Calculations
- Advanced Calculations
- Stored, Unstored, and Global Fields
- Logical Functions
- The Let Function and Variables
Extending Calculations
Part V: Scripting
Scripting Basics
- Scripting Basics
- Your First Script
- The Importance of the Layout
- Running Scripts
- Branching and Looping in Scripts
Script Steps
- Script Steps
- Go to Layout
- Scripting for Fields
- Working with Records
- Finding Records
- Sorting Records
- Working with Windows
- Working with Files
- Printing
- Other Script Steps
Advanced Scripting
- Advanced Scripting
- Commenting Scripts
- Asking and Telling the User
- Organizing Complex Scripts
- Handling Errors
- Putting a Complex Script Together
Part VI: Security and Integration
Security
Exporting and Importing
- Exporting and Importing
- Exporting a File
- Export Formats
- Importing Data
- Import Data Sources
- Importing and Exporting in a Script
Sharing Your Database
- Sharing Your Database
- FileMaker Network Sharing
- Sharing Over the Internet
- FileMaker Server
- Server Hardware
Developer Utilities
- Developer Utilities
- Script Debugger
- Disable Script Steps
- The Database Design Report
- Tooltips
- Copying Database Structure
- Custom Menus
- Developer Utilities
- File Maintenance
Part VII: Appendixes
Appendix A. Getting Help
EAN: 2147483647
Pages: 176
