Working with Images in ASP.NET
Overview
Difficulties strengthen the mind, as labour the body.
-Seneca
As we all know, the World Wide Web wouldn't be the same without the images. Effective browser support for images was one key to the rapid success of the Web because it sanctioned the Web platform as a new multimedia channel. Many Web pages today are topped with so many images and are so well conceived and well designed that an overall page looks more like a magazine advertisement than an HTML page. Looking at the current pages displayed by portals, it's rather hard to imagine there was a time—and it was only six or seven years ago—when one could create a Web site by using only a text editor and some assistance from a friend who had some familiarity with Adobe PhotoShop.
These days, although images are a common presence in Web pages, their use is still largely limited to art designers and other specialized professional figures. Programmers are rarely involved with images because although many images are the fruit of intense work and planning, they are nearly always deployed as static files. When static JPEG or GIF images are involved, a programmer can't do much to add more spice to the final page served to the user.
Over the Web, images are not merely and not always used as a publishing tool. In many applications, images play a much more active role and are as significant as data. Examples of this include image data banks, photographic galleries, museums, and also financial and business analysis applications. In all these cases, the application might need to work with dynamically generated images (for example, charts) or images that must undergo special treatment before display (for example, adding a watermark or copyright message).
Several third-party vendors provide powerful and professional tools to perform charting and image processing over the Web. Prior to the release of the .NET Framework, the need to resort to these tools was a foregone conclusion. Thanks to GDI+, ASP.NET applications can sometimes accomplish a variety of tasks in-house without requiring additional tools and libraries. You'll be surprised to see how many tasks can be accomplished with the wise use of GDI+ and other .NET Framework facilities.
Accessing Images from Web Pages
There is just one way in which Web pages can reference an image—by using the HTML tag. By design, this tag points to a URL. As a result, to be displayable within a Web page, an image must be identifiable through a URL and its bits should be contained in the output stream returned by the Web server for that URL. In many cases, the URL points to a static resource such as a GIF or JPEG file. In this case, the Web server takes the request upon itself and serves it without invoking external components.
The fact that many tags on the Web are bound to a static file does not mean there's no other way to include images in Web pages. Let's start with a few basic points on this topic and briefly recall the main points of Web image access.
The Element
The HTML element is used to display an image within an HTML page. It supports a few attributes such as width, height, and alternate text to display if the image is not available. The HTML definition of the element is as follows:
Note that the element does not require a closing tag. In ASP.NET, the tag is rendered through the HtmlImage class. The Image control represents another way of generating the tag. HtmlImage belongs to the HtmlControls namespace, whereas Image is a member of the WebControls namespace and provides a more abstract programming interface but no extra features.
Although it's good that two controls are provided to create a server-side representation of the tag, a highly optimized ASP.NET application will not use any. Even though server controls are extremely easy to use, they're not always the best choice for a relatively simple task such as showing an image, because they consume server resources without really needing to. In many cases, a simple rendering or data-binding substitution will nicely and more efficiently do the job of showing an image.
The following code snippet successfully displays an image but doesn't require the creation of a server-side control:
When the tag is configured on the server, you should pay careful attention to the URL you output, especially if the URL is in some way a function of the user input. The URL associated with the element can be tampered with by a malicious user and result in undesired script code that runs on the client. Also, to validate the URL you don't necessarily have to resort to a server control. A call to a local function within the data-bound expression can also do the job.
Although the element is mostly used with static files, it can easily display images stored on other storage media—for example, a database or even the Web server's memory. The key structure of the element doesn't change to support this feature. What changes, instead, is the extension of the URL and the content type of the HTTP response. If you make the tag point to an .aspx page, the Web server will run the specified page and send the resultant output to the tag. As long as the output can be recognized as a valid image format, it is displayed. Let's see how.
Referencing Nonfile Images
From the browser's perspective, a Web page is nothing more than a long strip of characters to be processed sequentially. The browser displays some characters and interprets some others, such as , according to special rules. When an tag is found, the browser knows that it has to open another download channel and request the specified URL. To the browser's eyes, the type of the URL and the protocol have no importance. What matters is that the expected output matches a given format—the MIME type.
The browser requests the image URL and processes the returned output as the expected MIME type dictates. If the bytes form an image of the correct type, the picture is displayed with the attributes set in the tag; otherwise, an error is raised and a standard bitmap is displayed. For a better understanding of the whole process, let's see the steps needed to send an image to the browser from within an .aspx page.
Setting the Content Type
All the response packets that reach the browser contain a Content-Type header that provides information about the type, and subsequently the format, of the incoming data. The browser looks at that value to decide how to process the data. The following snippet shows the Internet Information Services (IIS) response to a browser that requested a JPEG image:
HTTP/1.1 200 OK
Server: Microsoft-IIS/5.1
Date: Thu, 13 Mar 2003 14:30:12 GMT
X-Powered-By: ASP.NET
X-AspNet-Version: 1.1.4322
Cache-Control: private
Content-Type: image/jpeg
Content-Length: 28521
In ASP.NET, the HttpResponse object is responsible for setting the Content-Type header in the response packet. By default, the ContentType property of the HttpResponse object is set to text/html. Accepted values for the property are all HTTP MIME types. Of course, for the success of the download, the content type must be set only once in the page and before having sent some data to the output stream.
Response.ContentType = "image/jpeg";
This code illustrates how to set the ContentType property of a page that returns a JPEG image.
Flushing to the Output Stream
The following code demonstrates a simple page that requires an image from an ASP.NET page:
The image.aspx page will first gain access to the bytes of the image and then serialize them all to the output stream.
<%@ Page Language="C#" %>
<%@ Import Namespace="System.IO" %>
In their overall simplicity, this pair of pages illustrate well the pattern needed to obtain and manipulate images dynamically. The client page sets the src attribute of the tag to an .aspx resource. The server page, in turn, will retrieve or generate the bytes of the image and write them to the output stream along with the proper content type.
Accessing Database Images
The use of the database as the storage medium for images is controversial. Some people have good reasons to push it as a solution; others tell you bluntly they would never do it and that you shouldn't either. Some people could tell you wonderful stories of how storing images in a properly equipped database was the best experience of their professional life. With no fear that facts could prove them wrong, other people would confess that they would never use a database again for such a task.
I have had some experience in the past working with images and database systems, but I'll tell you that story later. In the meantime, let's go by facts. The facts say that all database management systems (DBMS) of a certain reputation and volume have supported binary large objects (BLOB) for quite some time. A BLOB field doesn't necessarily contain an image, but it can contain a multimedia file or a long text file. There must be a good reason for having this BLOB support!
Working with Binary Fields
To read a binary database field, you use ADO.NET classes as you would for any other database query. At the end of the day, in fact, a BLOB field is only a database column of a special type and of a reasonably large size. If you know that the size of the object is not excessive (say, tens of kilobytes), you can go for a single-step read; otherwise, you might want to opt for sequential access and read one chunk of information at a time.
The data reader is the tool that proves most useful for reading information out of a BLOB field. This doesn't mean you can't store large binary content in a DataSet. It's only that the DataSet is an in-memory cache of data, and caching data of that size in the memory of the Web server is rarely a great solution. BLOB fields are the type of data that should be read, consumed, and disposed of as soon as possible, without the programmer being tempted by the siren of caching techniques.
For now, consider we'll store BLOB fields in Microsoft SQL Server; later on, I'll share some thoughts about Oracle.
Reading Images from BLOB Fields
To read an image from a BLOB field with ADO.NET, you execute a SELECT statement on the column and use the ExecuteScalar method to catch the result and save it in an array of bytes. Next, you send this array down to the client through a binary write to the response stream. The following code shows how to proceed:
// photo.aspx file
void Page_Load(object sender, EventArgs e)
{
 // Ensure the parameter is a number
 int id = Convert.ToInt32(Request.QueryString["id"]);

 string connString = "SERVER=localhost;DATABASE=northwind;UID=sa;";
 string cmdText = "SELECT photo FROM employees WHERE employeeimage/jpeg";
 Response.BinaryWrite(img);
}
In this code, we assume that the field named photo contains image bits and that the format of the image is JPEG. Notice the attempt to convert the value of the id query parameter to an integer before proceeding. This simple check significantly reduces the surface attack for malicious users by verifying that what is going to be used as a numeric ID is really a numeric ID. Especially when you're inoculating user input into SQL query commands, filtering out extra characters and wrong data types is a fundamental measure for preventing attacks.
The BinaryWrite method of the HttpResponse object writes an array of bytes to the output stream. In addition to writing arrays of bytes, the BinaryWrite method also differs from the Write method because it writes directly to the output stream. All other writing methods of the Response object output data through the services of an HTTP writer object, which, in particular, provides buffering capabilities.
| Note |
If the database you're using is Northwind (as in the preceding example), an extra step is required to ensure that the images are correctly managed. For some reason, the SQL Server version of the Northwind database stores the images in the photo column of the Employees table as OLE objects. This is probably due to the conversion that occurred when the database was upgraded from the Microsoft Access version. As a matter of fact, the array of bytes you receive contains a 78-byte prefix that has nothing to do with the image. Those bytes are just the header created when the image was added as an OLE object to the first version of Access. While the preceding code would work like a champ with regular BLOB fields, it must undergo the following modification to work with the photo field of the Northwind.Employees database. Response.OutputStream.Write(img, 78, img.Length); Instead of using the BinaryWrite call, which doesn't let you specify the starting position, use the code shown here. |
A sample page to test BLOB field access is shown in Figure 22-1.
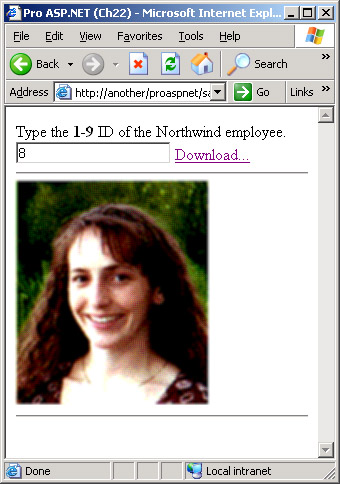
Figure 22-1: Downloading images stored within the BLOB field of a database.

{
int sizeOfFile = theFile.PostedFile.ContentLength;
// Prepare for the SQL command
string conn_string = "SERVER=localhost;DATABASE=proaspnet;UID=sa;";
SqlConnection conn = new SqlConnection(conn_string);
string cmd_text = "INSERT INTO images " +
"(bits, description, uploader, uploadtime, imagesize, mime) " +
"VALUES (@imageBits, @description, @uploader, @uploadTime, " +
"@imageSize, @mimeType)";
SqlCommand cmd = new SqlCommand(cmd_text, conn);
// Set parameters
SqlParameter p1, p2, p3, p4, p5, p6;
p1 = cmd.Parameters.Add("@imageBits", SqlDbType.Image);
p2 = cmd.Parameters.Add("@description", SqlDbType.NVarChar);
p3 = cmd.Parameters.Add("@uploader", SqlDbType.Int);
p4 = cmd.Parameters.Add("@uploadTime", SqlDbType.DateTime);
p5 = cmd.Parameters.Add("@imageSize", SqlDbType.Int);
p6 = cmd.Parameters.Add("@mimeType", SqlDbType.NVarChar);
p1.Value = GetImageBits(theFile.PostedFile.InputStream, sizeOfFile);
p2.Value = theDesc.Value; // name of the file
p3.Value = theUploader.SelectedItem.Value; // code of the uploader
p4.Value = DateTime.Now; // time of upload
p5.Value = sizeOfFile; // size of the image
p6.Value = theFile.PostedFile.ContentType; // MIME type
// Copy the bits into the table
cmd.Connection.Open();
int recAffected = cmd.ExecuteNonQuery();
cmd.Connection.Close();
return;
}
private byte[] GetImageBits(Stream fs, int size)
{
byte[] img = new byte[size];
fs.Read(img, 0, size);
return img;
}</pre>
</p>
<table border="0" cellspacing="0" cellpadding="0">
<tr>
<td valign="top"></td><td valign="top">Note</td><td valign="top">
<p>Prior to ASP.NET, a server-side process was required to run in the background to handle a file upload to the server. The background application the posting acceptor is called to handle <i>multipart/form-data</i> submissions. IIS and ASP applications use the Microsoft Posting Acceptor, but other tools (mostly CGI applications) are available over the Web. In ASP.NET, the role of the posting acceptor is no longer necessary, as it is carried out by the ASP.NET runtime.</p>
</td>
</tr>
</table>
</p>
</p>
<p>
<h3>Real World Scenarios</h3>
<p>
In the code discussed so far, we silently made a couple of assumptions which, in many cases, is the difference between good and not-so-good applications. More often than not, you need to retrieve information about a certain entity defined in the domain of the problem. The information might include both text and binary fields. As we architected the solution, a distinct database access is necessary to retrieve the BLOB and no special countermeasures are taken to minimize the memory footprint if the images are particularly large.</p>
<p>
<h4>Optimizing the Database Query</h4>
<p>It) tag generates a distinct and extra call to the database. In practice, you make one call to retrieve all the text-based information and one call to fill each image bound to a Web page.
tag generates a distinct and extra call to the database. In practice, you make one call to retrieve all the text-based information and one call to fill each image bound to a Web page.
If you decide this model is not what you want, consider the following alternatives to optimize database access. First, you could create copies of the image in a temporary directory and look for local files before you embark into a database query. Especially if the size of the image is considerable, at a minimum you save a segment of the bandwidth. Because database fields are global resources shared by all sessions, figuring out an effective naming convention for these images shouldn't be an issue. In addition, you can also modify the source code of the calling page so that it points to an existing image file rather than to a server-side page. In this case, you also gain faster access because IIS will resolve the call to the image without posting the request to ASP.NET.
If the size and number of images allow for it, a second alternative to optimize database access is to use caching. This entails that you make a full query of all fields and cache the BLOB field temporarily, just long enough for the successive request for the image to be served. To make sure the object is not maintained in memory for long, you can store it in Cache and define a short-term expiration policy.
Optimizing Memory Usage
The ExecuteScalar method we used to read BLOB contents works by loading the incoming data as soon as it becomes available. In other words, the BLOB is read in a single shot, along with the rest of the data row, potentially consuming a lot of memory. Such large objects should be treated in a different way, in particular when you know they might contain hundreds of megabytes of data. For this reason, ExecuteScalar, or the default data reader, are not always the best approach.
In Chapter 5, "The ADO.NET Object Model," while discussing the data reader object, I mentioned the CommandBehavior enumeration, in particular its SequentialAccess value. When specified in a call to ExecuteReader, the sequential access attribute changes the standard behavior of the reader and makes it return data as it is received instead of one complete row at a time.
| Note |
This sequential access behavior will vary depending on your data source. For example, returning a BLOB from Access will result in the entire BLOB being loaded into memory rather than data being loaded sequentially, as it is received. |
|||
If you configure the reader for sequential reading, the order in which you access fields is important. The data reader, in fact, is a forward-only cursor and can't move back to consider bytes it has read past. For example, once you have accessed the third field, it's too late to access the first and the second fields.
When accessing the data in the BLOB field, you should use the GetBytes method of the data reader and fill an array with data.
bytesRead = reader.GetBytes(colIndex, startPos, buf, 0, bufSize);
while (bytesRead == bufSize)
{
 // Process the bytes
 ProcessBytes(buf);

 // Reposition the start index
 startPos += bufSize;
 bytesRead = reader.GetBytes(colIndex, startPos, buf, 0, bufSize);
}

// Process the remaining buffer
ProcessBytes(buf);
GetBytes accepts a starting position and a buffer size and returns the number of bytes effectively read. Using sequential access and GetBytes for reading allows you to conserve system resources, which could be compromised by too large of a BLOB value.
Should You Really Store Images in the Database?
About eight years ago, I started on one of the first Internet projects—an image data bank. We were supposed to deliver images of various size and resolution to registered users. Each image was designed as a collection of images, from the thumbnail to the highest resolution. The largest image available was about 4 megabytes. Each image stored in the archive took up a total of 6 megabytes of space.
The back-end database was not running on a Microsoft platform but provided support for BLOB fields. Without much debate, we decided to store descriptions and other catalog information in the database and to store images as individual files under a well-known path. We also stored in the database enough information for the software to retrieve the file. Being designed for a relatively small number of registered users, the application never showed scalability problems and at no time did anyone on the team or any users complain about performance.
Can this brief experience—especially an experience from a relatively old age of software and database technologies—be used as an example of the superiority of file-based storage over database storage? Certainly not, but reading between the lines of how modern DBMS systems implement BLOB fields, I've used this experience to formulate an idea about image storage and databases.
As long as the image size doesn't exceed a critical and mostly application-specific threshold, storing images in the database is fine. Images are treated as data, and access is protected and subject to locking in case of concurrent access. However, you might feel less comfortable if you need to edit images or in any way retouch them frequently. The importance of smart tools for inserting and extracting images from the database is significant. As things currently stand, in many cases the programmer must build these tools himself.
SQL Server stores images in a field of type Image, which should be used for any binary content exceeding 8 kilobytes and up to 2 gigabytes. Regardless of the availability of smart and to-the-point T-SQL commands such as UPDATETEXT, READTEXT, and WRITETEXT, working with large images (several megabytes each) is complex and difficult.
Oracle supplies two different data types to deal with large binary objects—the BFILE and the LOB data type. Both reference binary data with a maximum size of 4 gigabytes. A BFILE differs from a LOB data type in that its data is stored in a physical file in the operating system instead of within the database. Other characteristics distinguish BFILEs from LOBs. In particular, the BFILE uses reference copy semantics, meaning that if you perform a copy operation on a BFILE, only the reference to the file is copied, not the data in the file.
The BFILE data type should be used for referencing binary objects that are very large in size and, therefore, not practical to store in the database. On the other hand, using a BFILE introduces a slight increase in overhead because of the extra communication necessary to synchronize the database engine, the file, and the client application. In general, it's more efficient to access a BFILE if you need to obtain only a small amount of data. It's preferable to access a database-resident LOB if you need to obtain all the data.
In short, should you consider storing images in a database? If you need to frequently edit the images, I suggest storing the images as separate files. If the size of the images are very large (for example, hundreds of megabytes), I suggest storing the images as separate files. If your images are essentially read-only and relatively static, and if you measure the size in kilobytes or a few megabytes, you can consider storing your images in the database.
Generating Images Dynamically
Some Web sites offer a nice feature: you ask for something, and they return your request graphically. A lot of financial Web sites do this to satisfy their users. Isn't it true that an image is worth dozens of words? Web-deployed charts are often dynamically generated on the server and served to the browser as a stream of bytes traveling over the classic response output stream.
So far we've returned images read from a file or a database. In the end, the key thing with dynamically generated images is not so much the ability to return pictures from the Web server—that is nothing new and can be accomplished with almost all languages and over almost all platforms. The real issue is how easily you can create and manipulate server-side images. For these tasks, Web applications normally rely on ad hoc libraries or the graphics engine of other applications (for example, Microsoft Office applications). ASP.NET applications are different and, to some extent, luckier. ASP.NET applications, in fact, can rely on a powerful and integrated graphics engine capable of providing an object model for image generation. This back-end system is GDI+.
A Quick Tour of GDI+ Classes
GDI+ is the graphics engine of Windows XP made available also for other 32-bit and 64-bit platforms such as Windows 2000. As its name suggests, GDI+ is the successor of GDI, the Graphics Device Interface included with earlier versions of the Windows operating system. GDI+ is a programming interface exposed through a set of managed classes. The .NET Framework encapsulates the key GDI+ functionalities in a handful of namespaces and makes those functions available to Web, Windows Forms, and Web service applications.
Most of the GDI+ services belong to the following categories: 2D vector graphics and imaging. 2D vector graphics involves drawing simple figures such as lines, curves, and polygons. Under the umbrella of imaging are functions to display, manipulate, save, and convert bitmap and vector images. Finally, a third category of functions can be identified—typography, which has to do with the display of text in a variety of fonts, sizes, and styles.
Having the goal of creating images dynamically, we are most interested in drawing figures and text and in saving the work as JPEGs or GIFs.
The Graphics Class
The central element in the Win32 GDI programming model is the device context. The device context is a data structure that stores information about the capabilities of a particular display device. A device context is associated with a drawing surface such as a window, printer, or block of memory. Win32 programs obtain a handle to a device context and pass that handle to all GDI functions they call. A device context also maintains a list of the graphics attributes that are set—background and foreground color, pen, brush, and font. The device context is the connecting link between the high-level front-end API and the underlying device drivers.
GDI+ replaces the concept of a device context and its child handle-based programming style with a truly object-oriented approach. In GDI+, the role of the central console for drawing is played by the Graphics object. A big step forward is that graphics surfaces (such as the window and the printer) and graphics objects (such as the pen or the brush) are independent entities. GDI+ drawing methods take graphics objects only as an argument, whereas in Win32 you have to select those objects in the device context.
The first step for a GDI+ application is creating, or obtaining, a new graphics context. The Graphics class has no constructor; a new Graphics object can be obtained using any of the following methods:
- Control.CreateGraphics You use this method to create a Graphics object that draws to a Windows Forms control or form background. This method is one of the few that, on a control or a form, is safe to call from any thread.
- Graphics.FromHdc Designed for use within Windows Forms applications, this method creates a new Graphics object from the specified handle to a Win32 device context.
- Graphics.FromHwnd Designed for use within Windows Forms applications, this method creates a new Graphics object from the specified handle to a Win32 window.
- Graphics.FromImage This is the only creator method that makes sense in the context of ASP.NET applications. It creates a Graphics object from an instance of a .NET graphic object. Any operation performed on the Graphics is recorded in the associated image.
No matter how you obtain it, when a Graphics object is no longer needed, it must be disposed of through a call to the Dispose method.
The Bitmap Class
The Bitmap class encapsulates a GDI+ bitmap, which consists of the pixel data for a graphics image plus some attributes. A bitmap object is an object used to work with images defined by pixel data. In GDI+, we have three types of images—bitmaps, icons, and metafiles. All three classes derive from a common abstract class named Image. Note that an instance of the Bitmap class doesn't necessarily represent a .EPS file. It is, instead, a generic container of pixel data that could be saved as a .EPS or .jpg image, as required.
When you create a Graphics object, you associate it with a particular canvas. As mentioned, for a Web application an in-memory bitmap is the only viable option. The following code shows how to instantiate a Bitmap object of the desired size and creates a drawing context from it:
Bitmap bmp = new Bitmap(100, 100);
Graphics g = Graphics.FromImage(bmp);
From now on, any graphics primitives called to operate on the Graphics object will affect the underlying Bitmap object. Once you're done with the graphics work, a Bitmap object can be saved to a number of formats, including Portable Network Graphics (PNG), JPEG, BMP, and GIF. Note also that the Bitmap class supplies methods to rotate and flip the image and that you can also instantiate a bitmap from an existing file.
Filling Rectangles
To fill a rectangle, you need only a brush, aside from the dimensions of the rectangle to paint. The method to use is FillRectangle, and the area to work on can be indicated using coordinates or a RectangleF structure.
g.FillRectangle(brush, area);
The brush is the object you use to paint the rectangle. GDI+ supports different types of brushes, including solid, gradient, and textured brushes. A solid brush fills the region with a uniform color; a gradient brush uses a dithered combination of two or more colors. Finally, a textured brush tiles the rectangle with the specified image. The following code snippet shows how to draw and fill a rectangle:
// Draw the border
Pen p = new Pen(Color.Black);
g.DrawRectangle(p, 0, 0, width, height);

// Fill the interior
Brush brInterior = new SolidBrush(Color.SkyBlue);
g.FillRectangle(brInterior, 1, 1, width-2, height-2);
GDI+ also provides a tailor-made method to draw the border of a rectangle. Instead of a brush, the DrawRectangle method takes a pen object.
A gradient is a special brush you use to fill a shape with a gradually changing color. GDI+ supports two breeds of gradients: linear and path gradients. A linear gradient is fully identified with two colors and two points. The actual filling varies from the starting color to the final color, as you move from the initial point to the final point. The LinearGradientBrush class implements the functionality of a linear gradient. The following code snippet shows how to create and fill a rectangle with a linear and horizontal gradient:
// Fill the interior using a gradient
Rectangle area = new Rectangle(0, 0, width, height);
LinearGradientBrush brInterior;
brInterior = new LinearGradientBrush(area, Color.SkyBlue,
 Color.AntiqueWhite, LinearGradientMode.Horizontal);
brInterior.Dispose();
p.Dispose();
In a linear gradient, the color changes linearly, but you can adjust how the color intensity varies from one edge of the gradient to the next. To do that, you use the Blend property to set arrays of color intensities and corresponding positions in a 0-1 range.
// Set intensities and relative positions
float[] relativeIntensities = {0.0f, 0.6f, 1.0f};
float[] relativePositions = {0.0f, 0.1f, 1.0f};

// Create a Blend object and assign it to the brush
Blend blend = new Blend();
blend.Factors = relativeIntensities;
blend.Positions = relativePositions;
brInterior.Blend = blend;
The gradient will have three key intensity points, two of which are clearly the starting and the ending points of filling. The default blending for a linear gradient is expressed by the following code:
float[] relativeIntensities = {0.0f, 1.0f};
float[] relativePositions = {0.0f, 1.0f};
The code just shown indicates that the minimum and maximum intensities are reached at the beginning and end of the filling. The code we looked at prior to this states that 60 percent (the value 0.6 in a 0-1 range) of the color transition must be accomplished within the first 10 percent of the area to cover (the value 0.1 in a 0-1 range). Figure 22-3 shows the effect of the code. The top rectangle shows the default gradient; the bottom rectangle shows what happens when blending is used.
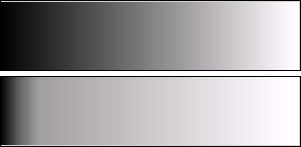
Figure 22-3: Gradient brushes with different settings for blending.
The third type of brush is the textured brush. A textured brush lets you fill a shape with a pattern stored in a bitmap. You can use a textured brush to draw lines, draw figures, and even write text.
Graphics g = this.CreateGraphics();
Image img = Image.FromFile("pattern.EPS");
TextureBrush brInterior = new TextureBrush(img);
g.FillRectangle(brInterior, area);
Drawing Text
The DrawString method on the Graphics object accepts the string to write, the font object, and the brush to color the text. Another block of arguments you can pass on to DrawString allows you to specify the rectangle within which the text should fit. You can decide the vertical and horizontal alignment and whether the text can exceed the assigned area or must be trimmed if too long. The StringFormat structure lets you set all these parameters in a single shot.
StringFormat sf = new StringFormat();

sf.Alignment = StringAlignment.Center;
sf.LineAlignment = StringAlignment.Center;

// Draw the text
Font f = new Font("Tahoma", 16);
g.DrawString("Hello, world", f, new SolidBrush(Color.White),
 new Rectangle(0, 0, width, height), sf);
GDI+ is much more than just these simple operations. Covering all the capabilities of GDI+ is beyond the goal of this book. A good resource to see GDI+ in action within the context of .NET applications is Programming Microsoft Windows with C#, by Charles Petzold (Microsoft Press, 2002).
Writing Images to Memory
As we already hinted at in Chapter 15, "ASP.NET Security," and Chapter 16, "Working with the File System," writing images—that is, creating disk files—from within an ASP.NET application might require some security adjustments. Normally, the ASP.NET worker process runs under the aegis of the user ASPNET account. In case of anonymous access with impersonation disabled—these are the default settings in ASP.NET—the worker process lends its own identity and security token to the thread that executes the user request of creating the file. Always with regard to the default scenario, an access denied exception is thrown because ASPNET doesn't normally have writing permissions on virtual directories.
To implement a file-based cache of images, you can create a new folder and give ASPNET, or any other account you use to run the application, full control over that folder. In this way, files can be created seamlessly. ASP.NET and GDI+ provide an interesting alternative to writing files on disk. The dynamically generated image can be saved directly to the output stream in the needed image format or in a memory stream. (I'll say more about this in a moment.)
Supported Image Formats
GDI+ supports quite a few image formats, including JPEG, GIF, BMP, and PNG. The whole collection of image formats is in the ImageFormat structure. You can save a memory-resident Bitmap object to any of the supported formats by using one of the overloads of the Save method.
bmp.Save(outputStream, ImageFormat.Gif);
When you attempt to save an image to a stream or a disk file, the system attempts to locate an encoder for the requested format. The encoder is a GDI+ module that converts from the native format to the specified format. Note that the encoder is a piece of unmanaged code that lives in the underlying Win32 platform. For each save format, the Save method looks up the right encoder by using an internal method named FindEncoder and calls into another more general overload for the Save method.
// Can't call FindEncoder from ASP.NET code due to the
// protection level. FindEncoder is marked "internal" and
// is usable only within the same assembly where it is declared
bmp.Save(outputStream, ImageFormat.Gif.FindEncoder(), null);
Getting the encoder for a particular type is important because it can allow you to change settings for that type. For example, if you want to control the compression ratio of a dynamically created JPEG image, you must obtain the GDI+ encoder for the JPEGs. We'll return to the subject of encoders later in the "Controlling the Compression Ratio of JPEG Images" section.
Writing Copyright Notes on Images
The next example wraps up all the points we touched on. This example shows how to load an existing image, add some copyright notes, and serve the modified version to the user. In doing so, we'll load an image into a Bitmap object, obtain a Graphics for that bitmap, and use graphics primitives to write. When finished, we'll save the result to the page's output stream and indicate a particular MIME type.
The sample page that triggers the example is easily created, as shown in the following listing:
Pro ASP.NET (Ch22)
The page contains no ASP.NET code and displays an image through an HTML tag. The source of the image, though, is an .aspx resource with the same name as the target image but a different extension. The idea is that whenever you need an image.gif image, you reference an image.aspx page.
The server-side page is built around its Page_Load event handler. The physical path of the URL is translated into a JPG extension to obtain the file system path to an existing resource. Next, once it's ascertained that the file exists, the image is loaded into memory, processed, and returned to the user as a GIF.
void Page_Load(object sender, EventArgs e) {
 string msg = "Courtesy of 'Programming ASP.NET'";

 // The name of the image is same name of the page with jpg extension
 string file = Path.ChangeExtension(Request.PhysicalPath, ".jpg");

 if (File.Exists(file)) {
 Bitmap bmp = AddCopyright(file, msg);
 Response.ContentType = "image/gif";
 bmp.Save(Response.OutputStream, ImageFormat.Gif);
 bmp.Dispose();
 }
}
Note that the server-side page performs two different tasks indeed. First, it writes copyright text on the image canvas; next, it converts the original format (JPEG) into another format (GIF).
Bitmap AddCopyright(string file, string msg) {
 // Load the file and create the graphics
 Bitmap bmp = new Bitmap(file);
 Graphics g = Graphics.FromImage(bmp);

 // Define text alignment
 StringFormat strFmt = new StringFormat();
 strFmt.Alignment = StringAlignment.Center;

 // Write the topmost note, horizontally centered
 SolidBrush topColor = new SolidBrush(Color.Black);
 Rectangle area = new Rectangle(0, 0, bmp.Width, bmp.Height);
 Font f = new Font("Verdana", 8);
 g.DrawString(msg, f, topColor, area, strFmt);
 topColor.Dispose();
 f.Dispose();

 // Create brushes for the bottom writing
 // (green text on black background)
 SolidBrush btmForeColor = new SolidBrush(Color.PaleGreen);
 SolidBrush btmBackColor = new SolidBrush(Color.Black);

 // To calculate writing coordinates, obtain the size of the text
 // given font typeface and size
 Font btmFont = new Font("Verdana", 3);
 string author = "written by Dino Esposito";
 SizeF textSize = new SizeF();
 textSize = g.MeasureString(author, btmFont);

 // Calculate the output rectangle and fill
 float x = ((float) bmp.Width-textSize.Width-3);
 float y = ((float) bmp.Height-textSize.Height-3);
 float w = ((float) x + textSize.Width);
 float h = ((float) y + textSize.Height);
 RectangleF textArea = new RectangleF(x, y, w, h);
 g.FillRectangle(btmBackColor, textArea);

 // Draw the text and free resources
 g.DrawString(author, btmFont, btmForeColor, textArea);
 btmForeColor.Dispose();
 btmBackColor.Dispose();
 btmFont.Dispose();

 g.Dispose();

 return bmp;
}
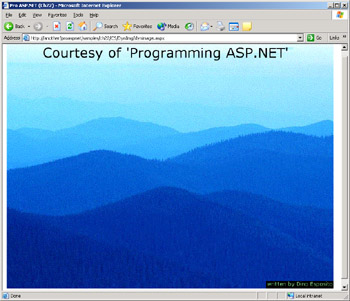
Figure 22-4: A server-resident image has been modified before display.
It is worth noting that the text and copyright note is part of the image the user receives. If the user saves the picture by using the Save Picture As menu from the browser, the text and copyright will be saved with the image.
Generating Thumbnails
GDI+ also provides other handy facilities, such as the ability to generate thumbnails. Although browsers have no particular problem stretching and shrinking images to make them fit into the assigned space, if a small-sized image is needed there's no reason to return a big one. In doing so, you pay a double price: first you consume more bandwidth, and second you require the browser to do extra work to shape up the image.
A Web site that makes its bread and butter from images will probably conserve predefined thumbnails for each displayable image. In other circumstances, a thumbnail can be generated on the fly using the GetThumbnailImage method on the Bitmap class.
Bitmap GetThumbnail(string file) {
 Bitmap bmp = new Bitmap(file);
 Bitmap newImg = (Bitmap) bmp.GetThumbnailImage(bmp.Width/3,
 bmp.Height/3, null, IntPtr.Zero);
 return newImg;
}
You decide the scale factor to use, and you can also indicate fixed measures. Pay attention, though, that your width and height values are taken as absolute values, meaning that no aspect ratio is guaranteed if your parameters don't ensure that.
Controlling the Compression Ratio of JPEG Images
JPEG images are the result of a lossy compression algorithm. To save more space, a JPEG compressed image discards some raw information during the compression. A decompressed image, therefore, is different from the original. However, because the JPEG format is mostly used to store photographic images, the effective loss often passes unnoticed to the human eye. JPEGs store 24 bits per pixel and are capable of displaying 16 million colors, but they don't support transparency or animation. The level of compression in JPEG images is configurable. You should note that higher compression levels result in smaller files, but only because more data is discarded and therefore lost. Subsequently, the quality of the decompressed image might be bad. It's hard to indicate a compression ratio that fits every scenario. In general, a 15 to 1 ratio is acceptable and generates an imperceptible loss of data. This doesn't mean you can't compress at 30 to 1 with good results.
Choosing the compression ratio for a JPEG image using GDI+ is a bit tricky because you need to deal with the JPEG encoder, which is not easily found. To find the encoder for a particular image format, you must loop through the collection of supported encoders and find one whose MimeType property matches that of the type you're interested in.
// Search for the JPEG encoder
string mimeType = "image/jpeg";
ImageCodecInfo[] encoders;
ImageCodecInfo jpegEncoder = null;

// Loop through all GDI+ encoders
encoders = ImageCodecInfo.GetImageEncoders();
for(int j=0; j < encoders.Length; j++) {
 if(encoders[j].MimeType == mimeType)
 jpegEncoder = encoders[j];
}
Once the encoder has been found, you set some of its parameters. In particular, you create an encoder parameter that affects the quality of the final image.
// Create an encoding parameter for the expected quality
EncoderParameter paramRatio;
paramRatio = new EncoderParameter(Encoder.Quality, ratio);
The ratio value you pass to the constructor indicates the quality you want for the image. It is not a mere compression ratio. The higher the value, the better the quality and the larger the size of the image.
// Add the just created encoding param to the collection of
// parameters for the encoder
EncoderParameters jpegParams;
jpegParams = new EncoderParameters(1); // only one param
jpegParams.Param[0] = paramRatio;

// Send the image
Response.ContentType = "image/jpeg";
bmp.Save(Response.OutputStream, jpegEncoder, jpegParams);
bmp.Dispose();
Saving to Larger Formats
For quite some time, using the aforementioned techniques I had been able to save images only to GIF and JPEG formats. Whenever I tried to save as the BMP, TIFF, or PNG formats from within an ASP.NET application, I regularly encountered a GDI+ generic error message. The exception was always raised as the code attempted to write to the stream. The GDI+ unmanaged code caught some sort of anomalous situation and bubbled the exception up to ASP.NET as an ExternalException error. This resulted in what was frankly not a very helpful error message.
After a few unfortunate attempts, I decided to make one last attempt using a different approach. I used an intermediate MemoryStream object to hold the image bits and BinaryWrite to flush the response back to the browser. Well, believe it or not, the pair MemoryStream and BinaryWrite did the trick.
Response.ContentType = "image/png";
MemoryStream ms = new MemoryStream();
bmp.Save(ms, ImageFormat.Png);
Response.BinaryWrite(ms.GetBuffer());
My hunch is that the GDI+ exception has something to do with the size of the images—PNG, TIFF, and BMP images are normally 10 times larger at a minimum than JPEG and GIF images. However, this is just a supposition not supported by clear evidence. To add one more thrill to this winning story, let me say that BinaryWrite doesn't perform any special trick such as buffering or caching data to minimize the memory footprint. The behavior of BinaryWrite, in fact, is all in this somehow trivial pseudo-code:
public void BinaryWrite(byte[] buffer) {
 OutputStream.Write(buffer, 0, (int) buffer.Length);
}
An even slightly faster code can be obtained by omitting the call to BinaryWrite and using the WriteTo method of the MemoryStream class.
Response.ContentType = "image/png";
MemoryStream ms = new MemoryStream();
bmp.Save(ms, ImageFormat.Png);
ms.WriteTo(Response.OutputStream);
Incidentally, I've received several messages from readers lately about this point and such undocumented behavior. I know that if you use an intermediate MemoryStream object it works. If you know why, please, let me know!
The MemoryStream Class
Because the MemoryStream class proved so helpful in saving large image files through the ASP.NET response stream, it might be worthwhile to take a closer look inside it. The MemoryStream class represents a stream of data completely held in memory. When you instantiate the class, it's normally created with an expandable capacity initially set to zero. Typical methods of a stream class are available to read, seek, and write content. In the end, MemoryStream is just a nice stream-like wrapper for an array of unsigned bytes. The GetBuffer method simply returns the contents as a byte array. The capacity of the current stream automatically increases when you use the SetLength method to set the length to a value larger than the capacity of the current stream.
The encapsulated data is directly accessible in memory at any time. Such memory-resident streams can reduce the need for temporary buffers and files in an application. More importantly, the Bitmap class accepts a MemoryStream object as a constructor argument, meaning that a graphic object can be created using the bytes stored in a memory stream.
Building Chart Generator Pages
Let's put the various pieces of the puzzle together and build a sample page that exploits the aforementioned techniques to generate and display graphics charts. To start, build a page that contains a couple of child tags and make each tag point to an ASP.NET page that returns a chart image.
The tags are configured during the page loading to point to a particular URL. Dynamic binding is needed to pass required arguments to the page. Note that instead of using server HtmlImage controls, you could more effectively use data-bound expressions. The following code snippet shows how the image controls are actually initialized:
void Page_Load(object sender, EventArgs e) {
 if (!IsPostBack) {
 ddYears.Items.Add("1998");
 ddYears.Items.Add("1997");
 ddYears.Items.Add("1996");
 }
 bar.src="__BarChartGen.aspx?Year=" + ddYears.SelectedItem.Text;
 pie.src="__PieChartGen.aspx?Year=" + ddYears.SelectedItem.Text;
}
The chart generator pages include all the logic necessary to fetch data and create the chart. In general, you should pass any required argument, including data, through the query string.
Drawing a Pie Chart
Once you hold the data to create the chart, drawing a pie chart is a matter of running a couple of loops. To draw a wedge, you need the sweep angle, the color, and the whole area of the pie. The loop begins with a sweep angle of zero and is increased, at any step, by the angle that is proportional to the value to represent.
// Get the total of sales from the DataTable
float maxValue = Convert.ToSingle(data.Compute("Sum(sales)", ""));

// Calculate the sweep angle for the value to represent in the wedge
float sweep = Convert.ToSingle(value) / maxValue * 360;
To draw the wedge, you use the FillPie method, whereas the DrawEllipse method can be used to give it a border. Both methods are exposed by the Graphics object.
g.FillPie(new SolidBrush(wedgeColor), rcChart, angle, sweep);
g.DrawEllipse(new Pen(Color.DarkGray, 1), rcChart);
If you want to make things look finer, add a shadow. Because of the lack of specific support from the graphics system, the shadow can be obtained only by drawing the wedge many times with a different offset. To improve the graphics result, we also use a hatch brush. The following listing shows the source code that draws a pie chart with a 3D shadow:
for(int j=ShadowDepth; j>0; j--) { for(int i=0; i
For pie charts, choosing the wedge color and drawing a descriptive label are two nontrivial problems. Choosing the color, in particular, is a relatively simple instance of a complex problem—the map coloring problem. It's been proven that you never need more than four colors to fill a map so that adjacent regions have different colors. In this case, two colors might be enough, but not if the total number of wedges is odd. Three colors would suffice, but that amount doesn't ensure a good graphical result. A better approach is defining a relatively large subset of colors, say 10 colors, and iterating through them, paying attention to pick up a color that has not been used for the previous wedge or the first wedge. In case of conflict, you resort to an extra color not included in the list or just pick up a nonconflicting color from the same list.
To draw the label within the wedge, you need to know the point at the center of the area. This requires just a little bit of trigonometry. Assuming that the pie is a circle, you obtain the coordinates of the point using the following formulas:
// width is the width of the smallest rectangle that contains the pie
int radius = width / 2;

// Get the radiant. The variable angle is angle of wedge
double rad = Math.PI * 2 * angle / 360;

// Get the coordinates of the point, including an offset
Point pt = new Point();
pt.X = (int) (radius * Math.Cos(rad)) + radius;
pt.Y = (int) (radius * Math.Sin(rad)) + radius;
The point you obtain in this way is located on the arc that represents the pie wedge. To move it to the center of the wedge, do the following:
pt.X = (int) ((rcChart.Right - rcChart.Left) / 2 + pt.X) / 2;
pt.Y = (int) ((rcChart.Bottom - rcChart.Top) / 2 + pt.Y) / 2;
centers[i] = pt;
The center is calculated during the generation of the pie, but no label is drawn at this time. The points are stored in an array and used to render text later. Because labels could likely exceed the space of the wedge, drawing them within the loop would truncate the text. For this reason, we draw the labels only when the pie has been created.
for(int i=0; i
Figure 22-5 shows the final results.
 Figure 22-5: A dynamically generated 3D pie chart with inside labels.
Drawing a Bar Chart
Drawing a bar chart is slightly simpler than drawing a pie chart because you don't have to deal with sweep angles, radius, and other trigonometry tidbits. A bar chart is made of two labels and a rectangle to fill. The top label represents the value; the bottom label shows the legend for the chart.
Assuming that all the x,y coordinates for the various elements have been set up, the following code demonstrates how to create a 3D-like bar chart with a shadow effect:
// Draw the top label with the value
g.DrawString(String.Format("{0:c}", dt.Rows[i]["Sales"]),
 new Font("Tahoma", 8), new SolidBrush(Color.Blue),
 xBarPos, yCaptionPos);

// Calculate the bar
Rectangle rcBar = new Rectangle(xBarPos, yBarPos, barWidth, barHeight);

// Draw the shadow
Rectangle rcShadow = new Rectangle(rcBar.Location, rcBar.Size);
rcShadow.Offset(j, -j);
g.FillRectangle(new HatchBrush(HatchStyle.Percent50, Color.Orange),
 rcShadow);

// Draw the bar
g.FillRectangle(new LinearGradientBrush(rcBar, Color.Orange, Color.Yellow,
 LinearGradientMode.Horizontal), rcBar);

// Draw the bottom bar
Font fnt = new Font("Tahoma", 8, FontStyle.Bold);
g.DrawString(dt.Rows[i]["Employee"].ToString(), fnt,
 new SolidBrush(Color.Blue), xBarPos, yBarBottom);
The final result is shown in Figure 22-6.
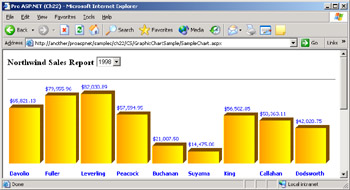
Figure 22-6: A dynamically generated 3D bar chart with top and bottom labels.
Conclusion
These days, it's unquestionable that images are fundamental elements of the Web. They aren't part of the infrastructure and don't contribute to the functionality of sites, yet they are a critical element for the success of the Web as an extremely powerful and expressive medium. In spite of the key role images play, the HTML language doesn't provide support that goes beyond the tag. The tag can be bound only to a URL and requires an extra roundtrip for the download.
If you bind the tag to an .aspx page, you can gain some level of flexibility and use any needed logic to generate the image dynamically or to read it out of a database. To generate an image dynamically, you simply set the content type of the HTTP response and flush the bits of the image to the output stream. In ASP.NET, the process of generating images is extremely simplified and empowered with the addition of GDI+.
GDI+ is the graphics library of Windows XP and has been made available for other 32-bit and 64-bit Windows platforms. In the .NET Framework, GDI+ is offered as a set of managed wrapper classes that define drawing surfaces and tools for you to create images algorithmically.
In this chapter, we demonstrated various techniques to edit and create images and serve them to a Web browser. In particular, we discussed how to add watermarks and copyright notes on existing images, how to extract images out of the BLOB fields of a database, and how to create images dynamically. The typical example of a dynamically generated image is the chart. We created a couple of charts—3D pie charts and bar charts. An interesting follow-up for chart generators can be found in the ASP.NET Starter Kits available at http: //www.asp.net.
In the next chapter, we'll analyze HTTP handlers and modules, which among other things, can be used to generate images even more effectively than .aspx pages.
Resources
- Programming Microsoft Windows with C#, by Charles Petzold (Microsoft Press, 2002)
- GDI+ Programming in C# and VB.NET, by Nick Symmonds (APress, 2002)
- Generate and Modify Images with GDI+ (http://www.devx.com/dotnet/Article/10031)
- Modify Image Data (http://www.fawcette.com/vsm/2003_01/magazine/columns/aspnet)
- KB 322796—HOW TO: Pass a BLOB as a Parameter to an Oracle Package by Using the .NET Managed Provider for Oracle
- KB 317043—HOW TO: Read and Write a File to and from a BLOB Column by Using Chunking in ADO.NET and Visual C# .NET
Part I - Building an ASP.NET Page
Part II - Adding Data in an ASP.NET Site
- The ADO.NET Object Model
- Creating Bindable Grids of Data
- Paging Through Data Sources
- Real-World Data Access
Part III - ASP.NET Controls
Part IV - ASP.NET Application Essentials
- Configuration and Deployment
- The HTTP Request Context
- ASP.NET State Management
- ASP.NET Security
- Working with the File System
- Working with Web Services
Part V - Custom ASP.NET Controls
- Extending Existing ASP.NET Controls
- Creating New ASP.NET Controls
- Data-Bound and Templated Controls
- Design-Time Support for Custom Controls
Part VI - Advanced Topics
Index
EAN: 2147483647
Pages: 209
