Working with the File System
Overview
Everything happens to everybody sooner or later if there is time enough.-George Bernard Shaw
One reason I welcome the .NET Framework is because it reworks, rationalizes, and simplifies a large part of the old, and still underlying, Win32 API. Within the .NET Framework, the whole Win32 API—with very few exceptions—has been redesigned and made available to programmers in an object-oriented fashion. Not only do you have more effective and handy programming tools, but the object orientation of the .NET Framework makes programming easier, and makes code more reusable than ever.
ASP.NET applications are not specifically related to file-system functions; however, many ASP.NET applications happen to work with local files and need to explore the contents of folders. In this chapter, we'll review the main aspects of file-system programming using ASP.NET. By reading on, you'll see how to (finally) manage path names with ad hoc methods and properties, how to extract as much information as possible about files and directories, and how to read and write files, including XML files.
The file system is definitely a huge topic. So let's start by grouping the main categories of functionality in the API that you're most likely to encounter.
File I O in the NET Framework
The key namespace for operations and classes that relate to file-system activity is System.IO. Within this namespace, you find four logical groups of specialized types. These classes allow programmers to:
- Get information and perform basic operations on files and directories
- Perform string-based manipulation on path names
- Read and write operations on data streams and files
- Be notified of dynamic changes that occur to files and folders in a given directory tree
A bunch of classes let you access each of these features through methods, properties, and fairly easy-to-use enumeration types.
Working with Files
To manage the contents of files and directories, the .NET Framework provides two global static classes, named File and Directory. To use them, you don't need to create specific instances of the classes. File and Directory are just the repository of global, type-specific functions that you call to create, copy, delete, move, and open files and directories. All these functions require a file or a directory name to operate. Table 16-1 shows the methods of the File class.
|
Method Name |
Description |
|---|---|
|
AppendText |
Creates and returns a stream object for the specified file. The stream allows you to append UTF-8 encoded text. |
|
Copy |
Copies an existing file to a new file. The destination cannot be a directory name or an existing file. |
|
Create |
Creates a new file. |
|
CreateText |
Creates (or opens if one exists) a new file for writing UTF-8 text. |
|
Delete |
Deletes the file specified. |
|
Exists |
Determines whether the specified file exists. |
|
GetAttributes |
Gets the attributes of the file. |
|
GetCreationTime |
Returns the creation date and time of the specified file. |
|
GetLastAccessTime |
Returns the last access date and time for the specified file. |
|
GetLastWriteTime |
Returns the last write date and time for the specified file. |
|
Move |
Moves a specified file to a new location. Also provides the option to specify a new file name. |
|
Open |
Opens a file on the specified path. |
|
OpenRead |
Opens an existing file for reading. |
|
OpenText |
Opens an existing UTF-8 encoded text file for reading. |
|
OpenWrite |
Opens an existing file for writing. |
|
SetAttributes |
Sets the specified attributes for the given file. |
|
SetCreationTime |
Sets the date and time the file was created. |
|
SetLastAccessTime |
Sets the date and time the specified file was last accessed. |
|
SetLastWriteTime |
Sets the date and time that the specified file was last written. |
The path parameter that all methods require can indicate a relative or absolute path. A relative path is interpreted as relative to the current working directory. To obtain the current working directory, you use the GetCurrentDirectory method on the Directory class. Path names are case insensitive and can also be expressed in the Universal Naming Convention (UNC) format if they contain a server and share name. Writing methods create the specified file if it doesn't exist; if the file does exist, it gets overwritten as long as it isn't marked read-only.
| Note |
Most path names contain a backslash () character, which has a special meaning to C-based languages such as C#. In C#, the backslash is used in conjunction with other characters to specify escape sequences, such as the tab character. To indicate that a single backslash character is needed, you can use a double backslash (\). C# also provides a more elegant solution—prefixing the path name with the @ symbol. The following two path names are equivalent within a C# source file: string path1 = "c:\path\file.txt"; string path2 = @"c:pathfile.txt"; The @ character tells the C# compiler to consider the following string as literal text and to process it verbatim. |
The global Directory class exposes static methods for creating, copying, and moving directories and for enumerating their files and subdirectories. Table 16-2 lists the methods of the Directory class.
|
Method Name |
Description |
|---|---|
|
CreateDirectory |
Create all directories and subdirectories as specified by the path. |
|
Delete |
Deletes a directory and, optionally, all of its contents. |
|
Exists |
Determines whether the given directory exists. |
|
GetCreationTime |
Gets the creation date and time of the specified directory. |
|
GetCurrentDirectory |
Gets the current working directory of the application. |
|
GetDirectories |
Returns an array of strings filled with the names of the child subdirectories of the specified directory. |
|
GetDirectoryRoot |
Gets volume and root information for the specified path. |
|
GetFiles |
Returns the names of files in the specified directory. |
|
GetFileSystemEntries |
Returns an array of strings filled with the names of all files and subdirectories contained in the specified directory. |
|
GetLastAccessTime |
Returns the date and time the specified directory was last accessed. |
|
GetLastWriteTime |
Returns the date and time the specified directory was last written. |
|
GetLogicalDrives |
Returns an array of strings filled with the names of the logical drives found on the computer. Strings have the form ":". |
|
GetParent |
Retrieves the parent directory of the specified path. The directory is returned as a DirectoryInfo object. |
|
Move |
Moves a directory and its contents to a new location. An exception is thrown if you move the directory to another volume or if a directory with the same name exists. |
|
SetCreationTime |
Sets the creation date and time for the specified directory. |
|
SetCurrentDirectory |
Sets the application's current working directory. |
|
SetLastAccessTime |
Sets the date and time the specified file or directory was last accessed. |
|
SetLastWriteTime |
Sets the date and time a directory was last written to. |
You should note that the Delete method has two overloads. By default, it deletes only empty directories and throws an IOException exception if the directory is not empty or marked as read-only. The second overload includes a Boolean argument that, if set to true, enables the method to recursively delete the entire directory tree.
// Clear a directory tree
Directory.Delete(dirName, true);
The global classes File and Directory provide you with a lot of helpful methods. However, many of those methods are also available on helper data structures that collect information about a particular file or directory. These classes are named FileInfo and DirectoryInfo.
| Caution |
Each time a method of the Directory or File class is invoked, a security check is performed on the involved file-system elements. The check is aimed at verifying that the current user has the permission to operate. This might result in a slight performance hit, especially if you use the same files or directories several times. In similar situations, consider using the corresponding instance method of the FileInfo or DirectoryInfo class. In this case, in fact, the security check would occur only once. In contrast, for single, one-shot use the global classes are preferable because their internal implementation results in more direct code. |
The FileInfo Class
If you look at the overall functionality, the FileInfo class looks very similar to the static File class. However, the internal implementation and the programming interface is slightly different. The FileInfo class works on a particular file and requires that you first instantiate the class to access methods and properties.
FileInfo fi = new FileInfo("info.txt");
When you create an instance of the class, you specify a file name, either fully or partially qualified. The file you indicate is checked only for the name consistency and not for existence. The class, in fact, can also be used to create a new file, as shown here:
FileInfo fi = new FileInfo("info.txt");
FileStream stream = fi.Create();
If the file name you indicate through the class constructor is clearly an unacceptable name, an exception is thrown. Common pitfalls are colons in the middle of the string, invalid characters, blank names, and path and file names that exceed the maximum length. Table 16-3 lists the properties of the FileInfo class.
|
Property Name |
Description |
|---|---|
|
Attributes |
Gets or sets the attributes of the current file. |
|
CreationTime |
Gets or sets the time when the current file was created. |
|
Directory |
Gets a DirectoryInfo object representing the parent directory. |
|
DirectoryName |
Gets a string representing the directory's full path. |
|
Exists |
Gets a value that indicates whether a file with the current name exists. |
|
Extension |
Gets the string representing the extension of the file name, including the period (.). |
|
FullName |
Gets the full path name of the current file. |
|
LastAccessTime |
Gets or sets the time when the current file was last accessed. |
|
LastWriteTime |
Gets or sets the time when the current file was last written. |
|
Length |
Gets the size in bytes of the current file. |
|
Name |
Gets the name of the file. |
The methods available for the FileInfo class are summarized in Table 16-4. As you can see, methods can be grouped in two categories: methods to perform simple stream-based operations on the contents of the file, and methods to copy or delete the file itself.
|
Method |
Description |
|---|---|
|
AppendText |
Creates and returns a stream object for the current file. The stream allows you to append UTF-8 encoded text. |
|
CopyTo |
Copies the current file to a new file. |
|
Create |
Creates a file. It's a simple wrapper for the File.Create method. |
|
CreateText |
Creates a file, and returns a stream object to write text. |
|
Delete |
Permanently deletes the current file. Fails if the file is open. |
|
MoveTo |
Moves the current file to a new location, providing the option to specify a new file name. |
|
Open |
Opens the file with various read/write and sharing privileges. |
|
OpenRead |
Creates and returns a read-only stream for the file. |
|
OpenText |
Creates and returns a stream object to read text from the file. |
|
OpenWrite |
Creates and returns a write-only stream object that can be used to write text to the file. |
|
Refresh |
Refreshes the information that the class can have about the file. |
|
ToString |
Returns a string that represents the fully qualified path of the file. |
The FileInfo class represents a logical wrapper for a system element that is continuously subject to concurrent changes. Can you be sure that the information returned by the FileInfo object is always up to date? Properties such as Exists, Length,Attributes, and LastAccessTime can easily contain inconsistent values if other users can concurrently access the machine and modify files.
Keeping File Information In Sync
When you create an instance of FileInfo, no information is actually read from the file system. As soon as you attempt to read the value of one of the aforementioned critical properties, the class invokes the Refresh method, reads the current state of the file, and caches that information. For performance reasons, though, the FileInfo class doesn't automatically refresh the state of the object each time properties are read. It does that only the first time one of the properties is read.
To counteract for this built-in behavior, you should call Refresh whenever you need to read up-to-date information about the attributes or the length of a file. However, you don't necessarily need to do that all the time. Whether you need it or not mostly depends on the characteristics and requirements of the application.
The Refresh method makes a call to a Win32 API function—FindFirstFile—and uses the information contained in the returned WIN32_FIND_DATA structure to populate the properties of the FileInfo class.
Copying and Deleting Files
To make a copy of the current file, you use the CopyTo method. CopyTo comes with two overloads. Both copy the file to another file, but the first overload disallows overwriting, while the other gives you a chance to control overwriting through a Boolean parameter.
FileInfo fi = fi.CopyTo("NewFile.txt", true);
Note that both overloads consider the file name argument as a file name. You cannot pass just the name of a directory where you want the file to be copied. If you do so, the directory name will be interpreted as a file name.
The Delete method permanently deletes the file from disk. Using this method, there is no way to programmatically send the deleted file to the recycle bin. To accomplish this, you must resort to creating a .NET wrapper for the Win32 API function designed to do that. The API function needed is named SHFileOperation.
Attributes of a File
The Attributes property indicates the file system attributes of the given file. For an attribute to be read or set, the file must exist and be accessible. To write an attribute value to a file, you must also have write permissions; otherwise, a FileIOPermissionAccess exception is raised. The attributes of a file are expressed using the FileAttributes enumeration. Table 16-5 lists the values for the FileAttributes enumeration.
|
Attribute |
Description |
|---|---|
|
Archive |
Indicates that the file is an archive. |
|
Compressed |
The file is compressed. |
|
Device |
Not currently used. Reserved for future use. |
|
Directory |
The file is a directory. |
|
Encrypted |
The file or directory is encrypted. For a file, this means that all data in the file is encrypted. For a directory, this means that encryption is the default for newly created files and directories but all current files are not necessarily encrypted. |
|
Hidden |
The file is hidden and doesn't show up in directory listings. |
|
Normal |
The file has no other attributes set. Note that this attribute is valid only if used alone. |
|
NotContentIndexed |
The file should not be indexed by the system indexing service. |
|
Offline |
The file is offline and its data is not immediately available. |
|
ReadOnly |
The file is read-only. |
|
ReparsePoint |
The file contains a reparse point, which is a block of user-defined data associated with a file or a directory. Requires an NTFS file system. |
|
SparseFile |
The file is a sparse file. Sparse files are typically large files whose data are mostly zeros. Requires an NTFS file system. |
|
System |
The file is a system file, part of the operating system, or used exclusively by the operating system. |
|
Temporary |
The file is temporary and can be deleted by the application when it is no longer needed. |
Note that not all attributes in Table 16-5 are applicable to both files and directories.
| Note |
The FileAttributes type is an enumerated type marked with the [Flags] attribute.
[Flags]public enum FileAttributes {...}
The [Flags] attribute set for an enumeration type allows programmers to use a bitwise combination of the member values as if the resultant value were itself a native member of the enumeration. |
You set attributes on a file by using code as in the following code snippet:
// Make the file read-only and hidden
FileInfo fi = new FileInfo("info.txt")
fi.Attributes = FileAttributes.ReadOnly | FileAttributes.Hidden;
Note that not all attributes listed in Table 16-5 can be set through the Attributes property. For example, the Encrypted and Compressed attributes can be assigned only if the file is contained in an encrypted folder or is programmatically encrypted. Likewise, a file can be given a reparse point or can be marked as a sparse file only through specific API functions and only on NTFS volumes.
The FileAttributes type has another nice feature. When you call the ToString method, the class returns a string with a description of the attributes. The returned text consists of a comma-separated string in which each attribute is automatically translated into descriptive text. This following text shows the output of ToString when called to operate on a read-only and hidden file:
Readonly, Hidden
Working with Directories
To manage a directory as an object, you resort to the DirectoryInfo class. The class supplies methods and properties to read attributes and performs basic operations on directories. Let's look at it in a bit more detail.
The DirectoryInfo Class
The DirectoryInfo class represents the instance-based counterpart of the Directory class we explored earlier. The class works on a particular directory.
DirectoryInfo di = new DirectoryInfo(@"c:");
To create an instance of the class, you specify a fully qualified path name. Just as for FileInfo, the path name is checked for consistency but not for existence. Note that the path name can also be a file name or a UNC name. If you create a DirectoryInfo object passing a file name, the directory that contains the specified file will be considered for use. Table 16-6 shows the properties available with the DirectoryInfo class.
|
Property |
Description |
|---|---|
|
Attributes |
Gets or sets the attributes of the current directory |
|
CreationTime |
Gets or sets the creation time of the current directory |
|
Exists |
Gets whether the directory exists |
|
Extension |
Gets the extension (if any) in the directory name |
|
FullName |
Gets the full path of the directory |
|
LastAccessTime |
Gets or sets the time when the current directory was last accessed |
|
LastWriteTime |
Gets or sets the time when the current directory was last written |
|
Name |
Gets the name of the directory bound to this object |
|
Parent |
Gets the parent of the directory bound to this object |
|
Root |
Gets the root portion of the directory path |
Note that the Name property of the file and directory classes is read-only and can't be used to rename the corresponding file system's element.
The methods you can use in the DirectoryInfo class are listed in Table 16-7.
|
Method Name |
Description |
|---|---|
|
Create |
Creates a directory. It's a simple wrapper for the Directory.Create method. |
|
CreateSubdirectory |
Creates a subdirectory on the specified path. The path can be relative to this instance of the DirectoryInfo class. |
|
Delete |
Deletes the directory. |
|
GetDirectories |
Returns an array of DirectoryInfo objects, each pointing to a subdirectory of the current directory. |
|
GetFiles |
Returns an array of FileInfo objects, each pointing to a file contained in the current directory. |
|
GetFileSystemInfos |
Retrieves an array of FileSystemInfo objects representing all the files and subdirectories in the current directory. |
|
MoveTo |
Moves a directory and all of its contents to a new path. |
|
Refresh |
Refreshes the state of the DirectoryInfo object. |
The method GetFileSystemInfos returns an array of objects, each pointing to a file or a subdirectory contained in the directory bound to the current DirectoryInfo object. Unlike the GetDirectories and GetFiles methods, which simply return the names of subdirectories and files as plain strings, GetFileSystemInfos return a strongly typed object for each entry—either DirectoryInfo or FileInfo. The return type of the method is an array of FileSystemInfo objects.
public FileSystemInfo[] GetFileSystemInfos()
FileSystemInfo is the base class for both FileInfo and DirectoryInfo. GetFileSystemInfos has an overloaded version that can accept a string with search criteria.
Listing the Contents of a Directory
Let's see how to use the FileInfo and DirectoryInfo classes to write a small application that creates a navigation mechanism across Web folders. Figure 16-1 shows the page in action.
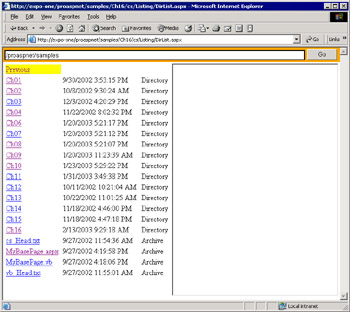
Figure 16-1: An ASP.NET application that navigates through Web folders.
The user interface consists of a text box, in which the user enters the virtual path to search in, and a button to start the search. The results are displayed using a Repeater control within a scrollable area. (We're reusing some of the tricks we've learned in Chapter 9, "ASP.NET Iterative Controls.") Finally, an inline frame is used to display the contents of listed .aspx pages.
When the user clicks on the Go button, the following code runs and displays all the files and subdirectories contained in the physical folder that maps to the given virtual path.
public void OnGo(object sender, EventArgs e) {
 // Reset the current URL
 SetFullUrl("");

 // Command to list the contents of the directory
 string url = folderName.Text;
 ListDirectory(url);
}
The ListDirectory method retrieves all the information available using the GetFileSystemInfos method. As mentioned, the GetFileSystemInfos method returns an array of FileSystemInfo objects. The array is then bound to the Repeater.
private void ListDirectory(string url) {
 // Build an absolute URL using the cached "current URL"
 string tmp = GetFullUrl(url);

 // Refresh the address bar
 folderName.Text = tmp;

 // Set this URL as the new "current URL"
 SetFullUrl(tmp);

 // Reset the contents of the frame (in case a page was displayed)
 SetView(null);

 // Obtain a physical path from the URL and instantiate the
 // DirectoryInfo class
 string path = Server.MapPath(tmp);
 DirectoryInfo di = new DirectoryInfo(path);

 // Bind to data
 Listing.DataSource = di.GetFileSystemInfos();
 Listing.DataBind();
}
Any public property on the FileSystemInfo object can be accessed through DataBinder.Eval and used in the resulting user interface. The following code snippet shows the template of the Repeater.
 <%# DataBinder.Eval(Container.DataItem, "Name") %>

 <%# DataBinder.Eval(Container.DataItem, "LastWriteTime") %>
 <%# DataBinder.Eval(Container.DataItem, "Attributes") %>
The template generates a link button for each selected file or directory. Directories are given a command name of SELECT, whereas files are associated with the OPEN command. When the user clicks on any of them, the page responds by either recursively running the ListDirectory method or updating the frame view. The first option is chosen when the user clicks on a directory; the second option is reserved for when the click hits an .aspx page. The following code illustrates the process that updates the user interface of the application.
string GetCommandName(object fsInfo) {
 FileSystemInfo fsi = (FileSystemInfo) fsInfo;
 if (fsi is DirectoryInfo)
 return "Select";
 else
 return "Open";
}

void ItemCommand(object sender, RepeaterCommandEventArgs e) {
 switch(e.CommandName) {
 case "Select":
 ListDirectory(e.CommandArgument.ToString());
 break;
 case "Open":
 SetView(GetFullUrl(e.CommandArgument.ToString()));
 break;
 }
 return;
}

void SetView(string url) {
 if (url == null)
 view.Attributes["src"] = "about:blank";
 else
 view.Attributes["src"] = url;
}
Filtering the Contents of a Directory
The GetFileSystemInfos method accepts a filter string by means of which you set some criteria. The filter string can contain commonly used wild-card characters such as ? and *. The ? character is a placeholder for any individual character, while * represents any string of one or more characters. Characters other than the wild-card specifiers just represent themselves. The following statement demonstrates how to scan a given directory searching for text files only:
foreach(FileSystemInfo fsi in di.GetFileSystemInfos("*.txt"))
{

}
}
A bit more problematic is selecting all files that belong to one group or another. Likewise, there's no direct way to obtain all directories plus all the files that match certain criteria. In similar cases, you must query each result set individually and then combine them in a single array of FileSystemInfo objects. The following code snippet shows how to select all the subdirectories and all the .aspx pages in a given folder:
FileSystemInfo fsiDirs = (FileSystemInfo[]) di.GetSubdirectories();
FileSystemInfo fsiAspx = (FileSystemInfo[]) di.GetFiles(".aspx");
You can fuse the two arrays together using the methods of the Array class.
Working with Path Names
Although path names are nothing more than strings, it's widely agreed that they deserve their own tailor-made set of functions for easier and handy manipulation. This old dream of programmers finally came true with the .NET Framework, particularly thanks to the Path class. The Path type provides programmers with the unprecedented ability to perform operations on instances of a string class that contain file or directory path information. Path is a single-instance class that contains only static methods. A path can contain either absolute or relative location information for a given file or folder. If the information about the location is incomplete and partial, the class completes it using the current location, if applicable.
The Programming Interface of the Path Class
The members of the Path class let you perform, quickly and effectively, everyday operations such as determining whether a given file name has a certain extension, changing only the extension and leaving the remainder of the path intact, combining partial path strings into one valid path name, and more. The Path class doesn't work in conjunction with the operating system and should be simply viewed as a highly specialized string manipulation class.
No members of the class ever interact with the file system to verify the correctness of a file name. From this point of view, you simply manipulate a string of text. So even though you successfully verified that a fully qualified file name has a given extension, nothing could give you the certainty that the file really exists. Likewise, even though you can combine two strings to get a valid directory name, that would not be sufficient to actually create that new directory. On the other hand, the members of the Path class are smart enough to throw an exception if they detect that a path string contains invalid characters. Table 16-8 summarizes the public fields of the class.
|
Property Name |
Description |
|---|---|
|
AltDirectorySeparatorChar |
The alternate character used to separate directory levels in a path. It is the forward slash (/) in Windows. |
|
DirectorySeparatorChar |
The platform-specific character used to separate directory levels in a path. It is the backslash () in Windows. |
|
InvalidPathChars |
Array of characters that are not permitted in a path string on the current platform. |
|
PathSeparator |
The character used to separate path strings in environment variables. It is the semicolon (;) in Windows. |
|
VolumeSeparatorChar |
The character used to separate a volume from the remainder of the path. It is the colon (:) in Windows. |
Table 16-9, on the other hand, lists the methods of the Path class.
|
Method Name |
Description |
|---|---|
|
ChangeExtension |
Changes the extension of the specified path string. |
|
Combine |
Concatenates two path strings together. |
|
GetDirectoryName |
Extracts and returns the directory information for the specified path string. |
|
GetExtension |
Returns the extension of the specified path string. |
|
GetFileName |
Returns the file name and extension of the specified path string. |
|
GetFileNameWithoutExtension |
Returns the file name of the specified path string without the extension. |
|
GetFullPath |
Returns the absolute path for the specified path string. |
|
GetPathRoot |
Returns the root directory for the specified path. |
|
GetTempFileName |
Returns a unique temporary file name, and creates a zero-byte file by that name on disk. |
|
GetTempPath |
Returns the path of the temporary folder. |
|
HasExtension |
Determines whether the specified path string includes an extension. |
|
IsPathRooted |
Returns a value that indicates whether the specified path string contains an absolute path. |
It's interesting to note that any call to GetTempFileName promptly results in a zero-length file actually being created on disk, and specifically in the user's temporary folder. This is the only case in which the Path class happens to interact with the operating system.
Combining Paths
A couple of considerations apply to the behavior of the Combine method, whose prototype is as follows:
public static string Combine(string path1, string path2)
If one of the specified arguments is an empty string, the method returns the other argument. If any of the arguments contains an absolute path, the first argument with an absolute path is returned. If any of the two arguments is a null string, the ArgumentNullException exception is thrown. Generally, the exception is thrown whenever a member of the Path class happens to work with a null argument.
In addition, if the first argument does not terminate with a valid separator, the character is appended to it before the concatenation takes place. A valid separator is either the character that DirectorySeparatorChar indicates or the character returned by AltDirectorySeparatorChar. In all other cases, the Combine method fuses the two strings together. However, under some circumstances (such as spaces and UNC paths in the second argument), the Combine method does not throw any exception, but the result should be programmatically verified prior to making use of it.
| Note |
Although useful and effective, the Path class doesn't seem to have a method to verify whether a given path is a URL. A similar method exists in Win32 API and in particular in the Shell Lightweight API (shlwapi.dll). The function is named PathIsURL and has the following prototype: bool PathIsURL(string path) To make use of it in managed code, you must resort to the P/Invoke platform and connect to the DLL from within managed code. |
Readers and Writers
In the .NET Framework, the classes in the System.IO namespace provide for both synchronous and asynchronous operations (for example, reading and writing) on two distinct categories of data: streams and files. A file is an ordered and named collection of bytes and is persistently stored to a disk. A stream represents a block of bytes that is read from and written to a data store, which can be based on a variety of storage media. So a stream is a kind of superset of a file, or, if you prefer, a stream is just a file that can be saved to a variety of storage media, including memory. To work with streams, the .NET Framework defines reader and writer classes.
Readers and writers are generic software components that provide a common programming interface for both synchronous and asynchronous operations on streams and files. Readers and writers work in isolated compartments in the sense that readers work in a read-only fashion while writers operate in writing only. A reader works in much the same way as a client-side database cursor. The underlying stream is seen as a logical sequence of units of information whose size and layout depend on the particular reader. The reader moves through the data in a read-only, forward-only way. Just as a database cursor reads one record at a time and stores the content in some internal data structure, a reader working on a disk file stream would consider as its own atomic unit of information the single byte, whereas a text reader would perhaps specialize in extracting one row of text at a time.
To work with streams, the .NET Framework defines several flavors of reader and writer classes. Figure 16-2 shows how each class relates to the others.
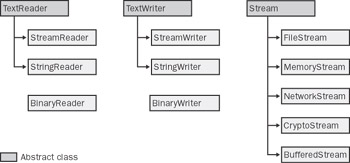
Figure 16-2: Various reader, writer, and stream classes.
The base classes are TextReader, TextWriter, BinaryReader, BinaryWriter, and StreamTextReader. , TextWriter, and Stream are marked abstract and cannot be directly instantiated in code. You can use abstract classes, though, to reference living instances of derived classes.
Working with Streams
The Stream class supports three basic operations: reading, writing, and seeking. Reading and writing operations entail transferring data from a stream into a data structure and vice versa. Seeking consists of querying and modifying the current position within the stream of data.
The .NET Framework provides a number of predefined stream classes, including FileStream, MemoryStream, and the fairly interesting CryptoStream, which automatically encrypts and decrypts data as you write or read. As you can see, the .NET Framework lacks a compressed stream class, but some third-party vendors already provide that. Overall, the methods and properties of the Stream base class are designed for a byte I/O. The Read and Write methods that you find in any derived class have the following signatures:
public abstract int Read(
 in byte[] buffer,
 int offset,
 int count
);
public abstract void Write(
 byte[] buffer,
 int offset,
 int count
);
A stream class works on top of a back-end storage medium, such as a disk or memory. Each different storage medium implements its own stream as an implementation of the Stream class. Each stream type reads and writes bytes from and to its given backing store. The constructors of a Stream class have the parameters necessary to connect the stream to the backing store. For example, FileStream has constructors that specify a path, whereas the CryptoStream class requires information about the cryptographic transformation to apply.
An interesting aspect of .NET streams is that they can be composed and piled up. Base streams can be attached to one or more pass-through streams that provide the desired functionality. Base streams are those which provide connectivity with the physical data source; pass-through streams are those which connect to an existing stream, modify data, and expose the new contents as a stream. A typical example of a pass-through stream is CryptoStream. You can't create a CryptoStream directly from a file; however, you can encrypt the contents of any object exposed as a stream. While composing streams, you end up building a chain of objects at the end of which there's the calling application. For the application's ease, a reader or writer can be attached to the end of the chain so that the desired types can be read or written more easily. The overall architecture is depicted in Figure 16-3.
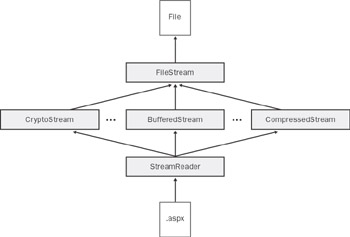
Figure 16-3: Composing streams to connect an ASP.NET page with a target file.
Working with Readers and Writers
The TextReader and TextWriter classes are designed to be the base classes for specialized readers and writers. In particular, they are designed for character I/O and, especially, to handle Unicode characters. For example, using the TextReader class, you can read an entire line of text in a single shot. The method that does this is ReadLine. A line of characters is intended as the sequence that flows from the current position to the end of the line. The end of the line is marked by a carriage return (0x000d), a line feed (0x000a), or the physical end of stream.
Along with ReadLine, the TextReader class provides a couple of more specialized methods for reading. They are ReadBlock and ReadToEnd. ReadBlock reads a given number of characters from the current stream and writes them to the specified buffer beginning at the given index. ReadToEnd, on the other hand, just reads from the current position to the end of the stream. To write text, you use either the Write method of the TextWriter class or the more specialized, and extremely handy, WriteLine method.
Specialized Readers and Writers
The TextReader and TextWriter classes act as the foundation for more specialized readers and writers. The StreamReader and StreamWriter classes are just examples of classes that provide a unified programming interface to read and write the contents of a stream. The .NET Framework also provides the StringReader and StringWriter classes to let you read and write characters on strings.
The .NET Framework uses the concept of reader and writer classes extensively. So you find ad hoc writer classes such as HttpWriter and HtmlWriter, which write bytes from ASP.NET pages to the browser and prepare HTML pages, respectively. Other ad hoc reader and writer classes exist throughout the framework, although they have a different programming interface and do not directly inherit from TextReader or TextWriter. In this category you find a pair of classes for binary data management: BinaryReader and BinaryWriter. These classes read and write primitive data types as binary values in the specified encoding. Other reader and writer classes can be found in particular areas of the framework, including XML (XmlReader and XmlWriter) and ADO.NET (DataReader).
We've already met ADO.NET data readers in Chapter 5, "The ADO.NET Object Model." We'll discuss XML readers and writers with practical examples later in this chapter.
Reading Local Files
In the .NET Framework, all files can be read and written only through streams. You transform the contents of a file into a stream by using the FileStream class. The following code shows how to open a file for reading:
FileStream fs = new FileStream(filename, FileMode.Open, FileAccess.Read);
Streams supply a rather low-level programming interface which, although functionally effective, is not always an appropriate interface for classes that need to perform more high-level operations such as reading the entire content or an entire line. For this reason, the .NET Framework provides you with reader classes. In particular, two types of file readers are available—text readers and binary readers.
To manipulate the contents of a file as a binary stream, you just pass the file stream object down to a specialized reader object that knows how to handle it.
BinaryReader bin = new BinaryReader(fs);
If you want to process the file's contents in a text-based way, you can use the StreamReader class. Note that unlike BinaryReader, the StreamReader class can be directly instantiated on a file, thus saving one step of programming. So if your goal is manipulating text files, you might find the following code more compact:
StreamReader reader = new StreamReader(fileName);
Finally, you should note that all the File and FileInfo methods that allow for data manipulation return stream objects. This code snippet shows how to get a stream reader directly from a FileInfo object using the OpenText method.
FileInfo fi = new FileInfo(fileName);
StreamReader reader = fi.OpenText();
The StreamReader Class
The StreamReader class inherits from TextReader and is designed for character input in a particular encoding scheme. You use it to read lines of information from a text file. StreamReader defaults to UTF-8 encoding unless otherwise specified. UTF-8 has the advantage of managing Unicode characters, which allows it to provide consistent results on localized versions of the operating system. The source that StreamReader works on doesn't have to be a disk file; it can be any store that supports access via streams.
Streams can be null objects. A quick test to see whether you're using a reader built around a null stream involves the static Null field.
StreamReader reader = new StreamReader(fileName);
if (!reader.Equals(StreamReader.Null)) {
 reader.BaseStream.Seek(0, SeekOrigin.Begin);
 string text = reader.ReadToEnd();

}
reader.Close();
The StreamReader class defines several constructors and can be created on top of a disk file or an existing stream. Other parameters you can specify are the character encoding, byte-order mark, and buffer size.
| Note |
When instantiating the StreamReader class, you can indicate whether to look for byte-order marks at the beginning of the file. The class automatically recognizes UTF-8, little-endian Unicode, and big-endian Unicode text if the file starts with the appropriate byte-order marks. Otherwise, the user-provided encoding is used. |
The StreamReader class exposes only two properties—BaseStream and CurrentEncoding. The BaseStream property returns the underlying stream the class is working on; the CurrentEncoding property gets the current character encoding being used.
Accessing the Underlying Stream
The programming interface of the StreamReader class doesn't include any method to seek data or perform position-based reading. Similar functions are, instead, available on the underlying stream object. You use the method on the BaseStream object to move the internal pointer to a particular position.
// Skip the first 14 bytes
StreamReader reader = new StreamReader(fileName);
reader.BaseStream.Seek(14, SeekOrigin.Begin);
Note that reading methods on the StreamReader class doesn't update the pointer on the stream class. For this reason, the position of the underlying stream normally doesn't match the StreamReader position. The StreamReader maintains the current position internally, but this information is not made public and can be reset using the DiscardBufferedData method. To keep the pointers in sync, you must manually move the base stream pointer ahead after each reading. The following code snippet shows how to proceed:
StreamReader reader = new StreamReader(fileName);

// Set the file pointer to the beginning
reader.BaseStream.Seek(0, SeekOrigin.Begin);
reader.BaseStream.Position = 0;

// Read one character at a time
char[] buffer = new char[1];
while(reader.BaseStream.Position < reader.BaseStream.Length) {
 reader.Read(buffer, 0, 1);
 reader.BaseStream.Position ++;
 DoSomething(buffer[0].ToString());
}

// Reset and close
reader.DiscardBufferedData();
reader.Close();
If you continue reading from the reader after a call to DiscardBufferedData is made, you read back from the origin of the stream.
Character Encoding
The CurrentEncoding property returns the current character encoding the reader is using. The encoding scheme is expressed through an object that inherits from the Encoding class. Characters are abstract entities that can be represented using many different character schemes or code pages. An encoding scheme is a way of mapping source characters to an effective representation that the application understands.
In the .NET Framework, specifically in the System.Text namespace, the encoding classes that are defined are shown in Table 16-10.
|
Class |
Description |
|---|---|
|
ASCIIEncoding |
Encodes Unicode characters as single 7-bit ASCII characters. Supports character values between 0 and 127. |
|
UnicodeEncoding |
Encodes each Unicode character as two consecutive bytes (16-bit). Both little-endian (code page 1200) and big-endian (code page 1201) byte orders are supported. Also known as UTF-16. |
|
UTF7Encoding |
Encodes Unicode characters using the UCS Transformation Format, 7-bit form (UTF-7) encoding. Supports all Unicode character values, and can also be accessed as code page 65000. |
|
UTF8Encoding |
Encodes Unicode characters using the UTF-8 encoding. Supports all Unicode character values, and can also be accessed as code page 65001. |
If the StreamReader object is created using one of the constructors with the byte-order detection option turned on, the actual encoding scheme is determined only the first time you read from the stream. In this case, the encoding class you pass to the constructor is considered as a default scheme and can be different from the actual encoding detected looking at the first three bytes in the stream.
Methods of the StreamReader Class
The methods of the StreamReader class are detailed in Table 16-11.
|
Method |
Description |
|---|---|
|
Close |
Closes the StreamReader object, and releases any system resources associated with the reader. |
|
DiscardBufferedData |
Resets all internal variables that track the current position and buffered data. |
|
Peek |
Reads the next available character, but does not consume it. The next reading operation returns only this character. The method acts as a preview and always forward-checks one character. |
|
Read |
Reads the next character or next set of characters from the input stream. |
|
ReadBlock |
Reads up to the specified maximum of characters from the current stream and writes the data to buffer, beginning at a given index. |
|
ReadLine |
Reads a line of characters from the current stream, and returns the data as a string. |
|
ReadToEnd |
Reads characters from the current position to the end of the stream. Returns a string. |
The preview capabilities of the Peek method can be used to control the loop that is typically used to scan a stream.
// Loop until the end of the stream is reached
while (reader.Peek() > -1) {

}
The Peek method returns -1 if there's nothing else to read or if the stream does not support seeking.
Reading a Text File
If an ASP.NET application deals with a text file, chances are good that the file contains configuration data. As we saw in Chapter 12, "Configuration and Deployment," ASP.NET touts the use of .config files with an XML syntax. However, many developers feel quite comfortable with probably less expressive but terrifically handy INI files. The typical syntax of an INI file is as follows:
Server=http://localhost
Machine=expo-one
Options=Debug, Trace
Introduced with Windows 3.x, the INI syntax has never changed over time and has resisted change in spite of the invention of the registry and then XML configuration stores. In the simplest case, an INI file consists of any number of lines of text expressed in the form of key=value.
As we mentioned in Chapter 12, a similar collection of key/value pairs can be easily managed using the AppSettingsReader class and a .config file. However, with the tools available in the .NET Framework, even the old-fashioned, but still effective, pure INI approach becomes straightforward to implement. Let's see how to read from an INI-like file and build a key/value collection to display in a DataGrid control.
void Page_Load(object sender, EventArgs e)
{
 // File to process
 string path = Server.MapPath(@"info.txt");

 // Read and caches the contents
 StreamReader reader = new StreamReader(path);
 string text = reader.ReadToEnd();
 reader.Close();

 // Split data and builds a name/value collection
 string[] tokens = text.Split('
');
 NameValueCollection coll = new NameValueCollection();
 foreach(string s in tokens) {
 string[] parts = s.Split('=');
 coll.Add(parts[0], parts[1]);
 }

 // Print data
 grid.DataSource = coll;
 grid.DataBind();
}
The contents of the file are read in a single shot thanks to the ReadToEnd method and cached in a local string variable. By using the Split method of the String class, we can tokenize the original string in individual substrings by using the specified character as the separator. We use the newline ( ) character and obtain an array of strings, each of which represents a line of text. (Note that you can obtain the same result by reading one line at a time, but this would probably lock the file for a longer time.)
The next step consists in calling Split on each line of text using the equal (=) symbol. The two parts of the string—left and right of the = symbol—are copied into a newly created NameValueCollection object as the key and the value, respectively. Finally, the collection is bound to a DataGrid control for display.
Binding the Contents of a File to a DataGrid
If automatically bound, a DataGrid control displays only the Name column of a name/value collection. To display it correctly, use a couple of templated columns.
 <%# Container.DataItem %>


 <%# ExtractData(Container.DataItem) %>
The Container.DataItem expression evaluates to a string—specifically, the string that represents the key. To extract the physical data, you must access the key within the collection, as shown here:
string ExtractData(object dataItem) {
 // Get the collection object
 NameValueCollection coll = (NameValueCollection) grid.DataSource;

 // Get the text to display
 string displayText = coll[dataItem.ToString()];

 // Map the contents to a custom enum type
 if ((string) dataItem == "Options") {
 MyOptions opt;
 opt = (MyOptions) Enum.Parse(typeof(MyOptions), displayText);
 displayText = String.Format("{0} ({1})", displayText, (int) opt);
 }

 return displayText;
}
The collection is just what the DataSource property of the DataGrid returns. Once you hold the collection, getting the value is a child's game. The preceding code also demonstrates a very nice feature about enumeration and the persistence of the enumeration values.
Suppose you need to configure some options for your application. In practice, you never use strings to indicate features; instead, you use numbers. Subsequently, when you persist those settings, only numbers are saved to a file. This wouldn't be a big deal except for the fact that it makes it harder for administrators and developers to edit settings offline. Look at the Options element in the sample file we just discussed—wouldn't it be more confusing if we used, say, 3 instead of descriptive and human-readable text like "Debug, Trace"? How can you translate that easily editable string into a number? Let's start by defining a custom enumeration type named MyOptions.
[Flags]
enum MyOptions {
 Debug = 1,
 Trace = 2
}
Once the enumeration is defined, you can have the static Enum.Parse method parse any string trying to match it to a combination of values in the enumeration. A comma-separated list of strings that represent elements of the enumeration is automatically recognized as the AND of the corresponding values. Enum.Parse returns an object that evaluates to an element (or a combination of elements) in the enumeration. Figure 16-4 shows the output of the sample page we have built so far.
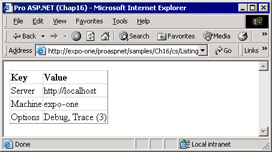
Figure 16-4: The contents of a text file that has been read, copied into a collection, and displayed using a DataGrid control.
The BinaryReader Class
A binary reader works by reading primitive data types from a stream with a specific encoding. The default encoding is UTF-8. The set of methods includes Read, PeekChar, and a long list of ReadXxx methods specialized to extract data of the given type. The generic Read method works by extracting only one character from the stream and moving the internal pointer ahead according to the current encoding.
Reading Binary Information
Binary readers are ideal for extracting information out of a binary file. The following code snippet shows how to read width, height, and color depth for a .bmp file.
void DisplayBmpInfo(string bmpFile) {
 FileStream fs = new FileStream(bmpFile, FileMode.Open,
 FileAccess.Read);
 BinaryReader reader = new BinaryReader(fs);

 // Skip the file header (14 bytes)
 reader.ReadBytes(14);

 // Skip the structure's size
 reader.ReadUInt32();

 // Read width and height of the BMP file
 int width = reader.ReadInt32();
 int height = reader.ReadInt32();

 // Skip info about BMP planes of colors
 Int16 planes = reader.ReadInt16();

 // Read color depth (bit per pixel)
 Int16 bitsPerPixel = reader.ReadInt16();

 // Clean-up
 reader.Close();
 fs.Close();

 // Print information
 Response.Write(width + " x " + height + " x " + bitsPerPixel * planes);
}
If you want to skip over the specified number of bytes, you just indicate the number of bytes explicitly.
reader.ReadBytes(14);
However, this is not always a smart approach. If you know what data structure the bytes represent, you can just skip the size of the type. For example, the file header of a .bmp file is given by a structure named BITMAPFILEHEADER, which counts a total of 14 bytes: three UInt16 and two UInt32. How can you indicate the number of bytes in a parametric way?
Skipping Bytes While Reading
You cannot rely on handy functions such as sizeof (in C#) or Len (in Visual Basic) to indicate the number of bytes to skip in a parametric way. The sizeof function, in particular, works only on unmanaged resources. A more viable alternative would be to use the Marshal.SizeOf function, which works on a type or an object. In any case, you must import the type declaration straight from the Win32 API.
// Must import System.Runtime.InteropServices

// Skip the BITMAPFILEHEADER BMP's file header
reader.ReadBytes(Marshal.SizeOf(typeof(BITMAPFILEHEADER)));
When imported in the managed world, the BITMAPFILEHEADER structure looks like the following class:
[StructLayout(LayoutKind.Sequential, Pack=1)]
public class BITMAPFILEHEADER {
 public UInt16 bfType;
 public UInt32 bfSize;
 public UInt16 bfReserved1;
 public UInt16 bfReserved2;
 public UInt32 bfOffBits;
}
Pay attention to the role of the Pack attribute, which is set to 8 by default. The attribute determines the size of the minimum block of memory that is allocated for the structure. In other words, the size of the class can only be a multiple of the Pack value. It goes without saying that setting Pack to 1 is the only way to get an exact size with a byte precision.
More important than how you get the size to skip, though, is the fact that as long as you use a ReadXxx method, the bytes are read and not skipped. To really jump over the specified number of bytes, you must resort to the methods of the underlying stream object. You get the current stream by using the BaseStream property. Here is how you skip the header of a .bmp file:
int bytesToSkip = Marshal.SizeOf(typeof(BITMAPFILEHEADER));
reader.BaseStream.Seek(bytesToSkip, SeekOrigin.Begin);
You can also choose to move a given offset from the bottom of the stream or from the current position. The following code shows how to actually skip a short integer:
reader.BaseStream.Seek(2, SeekOrigin.Current);
Finally, if you need to read a complex structure from a binary stream, you must do that sequentially on a per-field basis.
Writing Local Files
All reader classes have a writing counterpart that works according to the same model. To write a text file, you use the StreamWriter class. To create a binary file, you use the BinaryWriter class. Writing local files is a bit more problematic than just reading in ASP.NET because of the default security model. Personally, I consider the need to create a local file as an alarm bell, which prompts me to think about possible alternatives. Let's quickly review a couple of common scenarios.
If you need to persist user settings, you're better off using a database, which provides more speed and flexibility in terms of search and manipulation. As for global settings, they are a type of information individual users should never access and modify. ASP.NET applications can be programmatically driven by a configuration file, but you will likely edit that file offline and not through an ASP.NET front-end.
The StreamWriter Class
The StreamWriter class implements a text writer and outputs characters to a stream in a particular encoding. The default encoding is UTF-8. The constructor of the class lets you specify the output stream as a Stream object or a file name. If you indicate a file name, you're also given a chance to specify whether you want to write it from scratch or just append text.
The Programming Interface of the StreamWriter Class
Table 16-12 details the properties available on the StreamWriter class.
|
Property |
Description |
|---|---|
|
AutoFlush |
Gets or sets whether the writer will flush its buffer to the underlying stream after every call to a writing method. |
|
BaseStream |
Gets the underlying stream that interfaces with a backing store. |
|
Encoding |
Gets the encoding scheme in which the output is written. |
|
FormatProvider |
Gets an object that controls formatting for the text according to a specific culture. |
|
NewLine |
Gets or sets the line terminator string used by the writer. The default string is a carriage return followed by a line feed ( ). |
When AutoFlush is set to true, only the data is flushed from the buffer to the stream. The encoder state is retained so that it can encode the next block of characters correctly. Especially when working with UTF-8 and UTF-7 encodings, the writer might happen to manage characters that can only be encoded when having adjacent characters available. The AutoFlush state is checked at the bottom of all WriteXXX methods defined on the class. Setting AutoFlush to true should be used when the user expects immediate feedback on the output device, such as the console. In ASP.NET, you might get better performance by setting AutoFlush to false and calling Close (or at least Flush) when you're done writing.
The line terminator string is appended to the output stream whenever the WriteLine method is called. Although in theory you can use any string to terminate the line, be aware that the resulting text would be correctly readable through a StreamReader only if either
or
is used. If you set NewLine to null, the default new line sequence is used. If you're using StreamWriter to dynamically create, say, HTML pages, you can use the HTML break tag
instead.
Table 16-13 details the methods exposed by the StreamWriter class.
|
Method |
Description |
|---|---|
|
Close |
Closes the current writer and the underlying stream |
|
Flush |
Clears all buffers for the current writer, and causes any buffered data to be written to the underlying stream |
|
Write |
Writes data to the stream |
|
WriteLine |
Differs from Write because it always adds a line terminator |
Both Write and WriteLine have several overloads, each of which enables you to write data of a particular value type—Boolean, character, string, decimal, and so forth. In all cases, what the methods really write is a textual representation of the value. For example, if you write a Boolean, the whole False or True strings are written, not a single byte!
Persisting a Collection of Data
Let's see how to write a sample text file. If you're going to write a text file from within an ASP.NET application, chances are that you are just persisting a collection of data. So to exemplify, let's dump the contents of the Request.ServerVariables collection.
Note that for this code to work, the account running the ASP.NET service must have writing permissions on the folder. If not, writing permissions must be granted. You can do that either manually, through the Explorer's Properties dialog box, or programmatically using the cacls.exe utility. (See Chapter 15, "ASP.NET Security.")
Writing Binary Files
There are a couple of interesting scenarios in ASP.NET in which you might need to write binary files. The first scenario has to do with the creation of dynamic images—that is, images that are created while users work with the application. Dynamic images are typically obtained from the contents of binary large object (BLOB) fields in a database or from the output of charting applications. In many cases, it's dynamically generated output that doesn't necessarily need to be cached. For this reason, you implement the generation of the image as a new page with a graphical content type. In this case, page output caching is the only possibility you have to reuse an image over and over again. In some cases, if the number of images is not that big, and the likelihood of reusing them is quite significant, you can persist the dynamically generated stream of bytes to a disk file.
Creating Images Dynamically
Suppose that you manage a Web site for registered users. Whenever a user is authenticated and connected to the system, you might want to display a welcome message. You can compose the message by using static graphics and rich-formatted HTML text, or you could generate the message dynamically, obtaining effects not otherwise possible with the normal tools. For example, if you use GDI+ you can easily draw any text using a gradient brush. (You'll probably never use this technique in a real-world application to generate messages, but persisting dynamically generated images can be a useful technique to know.)
In the current directory, the following method creates a GIF file that is the graphical representation of the specified text. The text is written using a cyan-to-yellow gradient of colors on a black background.
void CreateWelcomeBitmap(string userID, string file) {
 // Prepare the drawing context
 Rectangle area = new Rectangle(0,0,200,30);
 Font f = new Font("Verdana", 12);
 Bitmap bmp = new Bitmap(200, 30);
 Graphics g = Graphics.FromImage(bmp);

 // Prepare the text
 StringFormat sf = new StringFormat();
 sf.Alignment = StringAlignment.Center;
 sf.LineAlignment = StringAlignment.Center;

 // Draw the text
 LinearGradientBrush brForeColor = new LinearGradientBrush(area,
 Color.SkyBlue, Color.Yellow, LinearGradientMode.Horizontal);
 g.DrawString(userID, f, brForeColor, area, sf);

 // Create the file
 FileStream fs = new FileStream(file, FileMode.Create);
 bmp.Save(fs, ImageFormat.Gif);
 fs.Close();

 // Clean-up
 brForeColor.Dispose();
 f.Dispose();
 bmp.Dispose();
 g.Dispose();
}
The picture is created executing a few GDI+ operations on a logical canvas represented by a Bitmap object. The content of the object is then saved to the specified stream compressed as a GIF stream. The FileStream class is used to create and fill the new file. A reference to the stream is passed to the Save method of the Bitmap class for the actual writing. For the sake of completeness, you should note that the Bitmap Save method can also accept a direct file name, which would save you from creating a file stream. Figure 16-5 shows an example of the output.
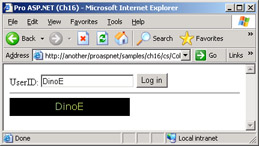
Figure 16-5: A dynamically generated image.
The user enters the user ID and clicks to log in. The system looks at the user ID and determines whether an appropriate bitmap is already present. If not, a new GIF file is generated and displayed through a server-side tag.
void OnWelcome(object sender, EventArgs e)
{
 string userID = theUserID.Text;
 string file = Server.MapPath(userID + ".gif");
 if (!File.Exists(file))
 CreateWelcomeBitmap(userID, file);
 picture.src=file;
}
The layout of the sample page is as follows:
UserID:
| Caution |
Before attempting to create a new file, the Save method of the Bitmap class demands the write permission on the resource. It does that by calling the Demand method on a file-specific instance of the FileIOPermission class. The method forces a security exception at run time if all callers higher in the call stack (including your code) have not been granted the permission requested. Normally, though, no callers would prevent the GDI+ method from writing, so the Save method successfully passes the common language runtime (CLR) permission check and yields to a COM library, which is actually in charge for creating the file. At this point, the COM library operates on behalf of the ASP.NET account, and if no write permissions have been granted to that account, a system exception is raised. The module that catches the exception is the COM Interop infrastructure, which bubbles it up as an ExternalException exception because of some generic failure in the underlying COM code. The GDI+ layer can't translate that exception into a more meaningful message, and all that you get is a "Generic GDI+ Error". There might be several reasons for that message, one of which is the lack of write permissions. |
In Chapter 22, "Working with Images in ASP.NET," we'll return to image processing in ASP.NET and cover the topic of dynamic images more in detail.
The BinaryWriter Class
The BinaryWriter class is another alternative to writing binary data to a stream or a file. The class writes primitive types in a binary format according to the specified encoding. BinaryWriter doesn't have a complex and rich programming interface. It features only one property—BaseStream—and a few methods, including Close, Flush, and Write. The BinaryWriter class also exposes the Seek method, which allows you to set the current position within the stream. As usual, you set the position by indicating a byte position and an origin—beginning, current position, or end of the stream.
Serializing Data Structures
Persisting binary data is a problem that can be approached in at least two different ways. You can write all the necessary pieces of data to disk one after the next, or you can group them all into a more manageable, all-encompassing data structure and save it to disk in a single step. The difference between the two approaches is not particularly relevant in terms of the file creation. The final output, in fact, is nearly identical. More significant is the difference when reading data back. When reading binary data in pieces, you are responsible for transforming all the pieces of data into a common memory structure that represents the data. When reading binary data in one chunk, the transformation step is unnecessary, as you can read data directly into a new instance of the class.
Working with objects and binary data exploits a key feature of the .NET Framework—run-time object serialization and deserialization. Object serialization and deserialization is offered through the classes exposed by the System.Runtime.Serialization namespace. It allows you to store public, protected, and private fields, and it automatically handles circular references. A circular reference occurs when a child object references a parent object, and the parent object also references the child object.
Serialization can generate output in multiple formats by using different formatter modules. A formatter is a sort of pass-through stream that accepts raw data and formats it for storage in a particular scheme. The .NET Framework comes with two predefined formatters—the BinaryFormatter and SoapFormatter classes—which write the object's state in binary format and SOAP format, respectively.
The run-time serialization engine works only with classes explicitly declared as serializable. Classes make themselves serializable in two ways. They can either support the [Serializable] attribute or implement the ISerializable interface. If the class supports the [Serializable] attribute, the class doesn't need to do anything else, and the serialization takes place automatically through reflection. The ISerializable interface, on the other hand, lets the class author exercise closer control on how the bits of the living object are actually persisted. Object serialization is a large topic that deserves much more space than is available in this context. In the rest of the section, we'll examine serialization only from the perspective of an ASP.NET application that wants to persist information in a format that is both compact and easy to manage.
The BinaryFormatter Class
To serialize an object to a file, you first select a serialization formatter. This is normally the binary or the SOAP formatter. Each formatter has its own class.
IFormatter binFormatter = new BinaryFormatter();
IFormatter soapFormatter = new SoapFormatter();
Once you hold a living instance of the serializer, you simply call the Serialize method, passing the stream to write to and the object to save.
MyClass obj = new MyClass();
Rebuilding objects from a storage medium is easy too. You simply call the Deserialize method on the specified formatter.
MyClass obj = (MyClass) binFormatter.Deserialize(stream);
It goes without saying that you cannot serialize to, say, SOAP and then deserialize through the binary formatter.
An object can only be serialized to, and deserialized from, a stream. However, a stream can be, in turn, attached to a disk file, a more specialized stream, a memory buffer, and even to a string.
Serializing Data Through Classes
Let's go through a practical example to see how the contents of a data structure can be serialized to a binary file. We'll consider the following class—MenuItem—which represents a menu item to display on the page.
[Serializable]
public class MenuItem {
 private int _key;
 private string _displayText;

 public MenuItem(string text, int value) {
 _key = value;
 _displayText = text;
 }

 public string DisplayText {
 get {return _displayText;}
 }

 public int Key {
 get {return _key;}
 }
}
The page reads out of a disk file the structure of its menu. The disk file simply consists of an array of MenuItem objects.
void Page_Load(object sender, EventArgs e) {
 string fileName = Server.MapPath(@"menu.dat");
 if (!File.Exists(fileName))
 BindMenu();
 else {
 ArrayList values = LoadFromFile();
 BindMenu(values);
 }
}

private void BindMenu() {
 ArrayList values = new ArrayList();
 values.Add(new MenuItem("File", 1));
 values.Add(new MenuItem("Tools", 2));
 values.Add(new MenuItem("Help", 3));

 Repeater1.DataSource = values;
 Repeater1.DataBind();

 SaveToFile(values);
}

private ArrayList LoadFromFile() {
 string fileName = Server.MapPath(@"menu.dat");
 FileStream stream = new FileStream(fileName, FileMode.Open,
 FileAccess.Read);
 BinaryFormatter reader = new BinaryFormatter();
 ArrayList values = (ArrayList) reader.Deserialize(stream);
 stream.Close();

 return values;
}
The deserialization process is straightforward once you know the structure of the disk file. The first time the page is accessed, it creates and persists the default menu. The menu is serialized as an array of MenuItem objects. You can also edit the structure of the menu, and any changes will be promptly detected.
private void SaveToFile(ArrayList values) {
 string fileName = Server.MapPath(@"menu.dat");
 FileStream stream = new FileStream(fileName, FileMode.Create);
 BinaryFormatter writer = new BinaryFormatter();
 writer.Serialize(stream, values);
 stream.Close();
}
Figure 16-6 shows the page in action.
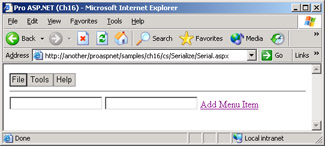
Figure 16-6: The structure of the menu is serialized to disk using a binary formatter.
Each class involved in the serialization process must be serializable; otherwise, a run-time exception is thrown. In this case, the rule applies to both ArrayList and MenuItem. ArrayList is serializable by design.
The resulting file contains more than just the class information. The .NET Framework, in fact, also inserts a signature and information about the assembly from which the class was read. Using the binary formatter is helpful because it lets you save and restore data using the same memory pattern. On the other hand, the layout of the data follows a well-known pattern decided by the .NET Framework and requires more space than if you write the data yourself.
Watching for File Changes
It's not uncommon that ASP.NET applications based on local files have to update their user interface and behavior if one of those files changes. Since Windows 95, the operating system has offered a feature that can be extremely useful in many situations in which you need to detect changes in a certain portion of the file system. This feature is called file notification and basically consists of the system's ability to notify through events several types of changes that affect files and folders under a given tree. ASP.NET exploits this feature extensively to detect changes in the source .aspx files.
The file notification mechanism works in a slightly different manner under the operating systems of the Windows 9x (including Windows ME) and Windows NT, Windows 2000, and Windows XP families. Under Windows 9x, the notification mechanism does not provide information about the actual files or directories involved in the change. What the programmer gets is the notification that a certain change occurred. To detect what really changed, you must scan the contents of the watched tree of directories and figure it out yourself. Windows NT 4.0 added an extra bunch of API functions to read the details of any directory changes. The whole notification mechanism was extended in particular by the ReadDirectoryChangesW function.
There's good news and bad news about the integration of the file notification mechanism in .NET. The good news is that all the intricacies of the underlying ReadDirectoryChangesW function have been straightened out and wrapped into an easy-to-use and elegant class named FileSystemWatcher. The bad news is that the file notification support built into .NET is completely based on the features of the ReadDirectoryChangesW function. This means that you can use the FileSystemWatcher class only if your code runs on a Windows NT 4.0, Windows 2000, or Windows XP machine. This is not an issue for ASP.NET code, though.
The FileSystemWatcher Class
The FileSystemWatcher class watches a specified directory for changes that involve contained files and subdirectories. The class can monitor what happens to the file system of a local computer, network drive, or remote computer. The FileSystemWatcher class does not raise events for CD and DVD drives because nothing can happen on these drives to change contents or timestamps.
You can initialize the FileSystemWatcher class using three possible constructors. You can use the default, parameterless constructor, but you can also create a new instance of the FileSystemWatcher class indicating the directory to watch and even the search string for the files to watch.
FileSystemWatcher fsw = new FileSystemWatcher(path, "*.txt");
Table 16-14 lists the properties of the class.
|
Property Name |
Description |
|---|---|
|
EnableRaisingEvents |
Gets or sets a value that indicates whether the component is watching |
|
Filter |
Gets or sets the filter string used to determine what files are monitored in a directory |
|
IncludeSubdirectories |
Gets or sets a value that indicates whether subdirectories should be monitored too |
|
InternalBufferSize |
Gets or sets the size of the internal buffer used to retrieve file system information |
|
NotifyFilter |
Gets or sets the type of changes to watch for |
|
Path |
Gets or sets the path of the directory to watch |
You set up a file system watcher in three steps. First, you define the root directory to monitor and the criteria for the files to watch for. Next, you indicate the events you want to be notified of and write event handlers accordingly. Finally, you start watching.
The Path property defines the root directory to watch for. Unless you also set the IncludeSubDirectories property to true, only the directory assigned to Path will be monitored. By default, IncludeSubDirectories is set to false. When true, IncludeSubDirectories works recursively through the entire sub tree and not just the immediate child directories. Of course, setting IncludeSubDirectories to true might significantly increase the number of notifications you get.
To filter out some notifications, you can specify search criteria for files and directories. You do this by setting the Filter property with a wild card expression such as *.txt. Interestingly, the default value for Filter is *.*, which means that all files without an extension are not processed. To process all files, set the Filter property to the empty string.
What are the events you can be notified of? The whole set of potential events you can watch for are defined in the NotifyFilters enumeration type, as described in Table 16-15.
|
Member |
Notifies when a change is detected on… |
|---|---|
|
Attributes |
The attributes of the file or folder |
|
CreationTime |
The time the file or folder was created |
|
DirectoryName |
The name of the directory |
|
FileName |
The name of the file |
|
LastAccess |
The date the file or folder was last opened |
|
LastWrite |
The date the file or folder last had anything written to it |
|
Security |
The security settings of the file or folder |
|
Size |
The size of the file or folder |
The next code snippet shows how to use a file system watcher.
FileSystemWatcher fsw = new FileSystemWatcher();
fsw.Path = @"c:";
fsw.Filter = "*.txt";
fsw.NotifyFilter = NotifyFilters.FileName |
 NotifyFilters.LastWrite |
 NotifyFilters.LastAccess;
Once you've finished with the preliminaries, you set up the object to work by setting the EnableRaisingEvents property to true. Setting EnableRaisingEvents to false would stop the monitoring activity for the current directory.
Hooking Up Events
The FileSystemWatcher class has only one significant method: WaitForChanged. This method works synchronously and waits indefinitely until the first change occurs. Once the first change has been detected, the method returns. WaitForChanged also has an overload that accepts the number of milliseconds to wait prior to time out. When one of the events you registered for occurs, the FileSystemWatcher class raises an event to the application. The list of events is shown in Table 16-16.
|
Event Name |
Description |
|---|---|
|
Changed |
Occurs when a file or directory is modified (by date, security, size, or content) |
|
Created |
Occurs when a file or directory is created |
|
Deleted |
Occurs when a file or directory is deleted |
|
Error |
Occurs when the internal buffer overflows |
|
Renamed |
Occurs when a file or directory is renamed |
The following code shows how to register events and then begin watching:
fsw.Changed += new FileSystemEventHandler(OnChanged);
fsw.Created += new FileSystemEventHandler(OnChanged);
fsw.Deleted += new FileSystemEventHandler(OnChanged);
fsw.Renamed += new RenamedEventHandler(OnRenamed);
fsw.EnableRaisingEvents = true;
An event handler routine for the Changed event would look like this:
void OnChanged(object sender, FileSystemEventArgs e) {
 // what to do
}
The event data structure might change according to the particular event. Events such as Changed, Created, and Deleted use the FileSystemEventHandler delegate, which results in the signature just shown.
The FileSystemEventArgs structure has three extra properties: ChangeType, FullPath, and Name. ChangeType gets the type of event that occurred, FullPath returns the fully qualified path of the affected file or directory, and Name contains the name of the affected file or directory. If the event is Renamed, you must use a different delegate—RenamedEventHandler.
The argument class for the event handler is RenamedEventArgs. The RenamedEventArgs class extends FileSystemEventArgs by adding two more properties—OldFullPath and OldName. As the names suggest, the properties let you know about the old path and file names that have just been renamed.
Isolated Storage and ASP.NET
Isolated storage is a .NET security feature designed to enable data storage for partially trusted applications in general and network-deployed client components in particular. Isolated storage assigns each application a unique storage area that is fully isolated from other applications and essentially private. It provides true isolation in the sense that the identity of an application or a component uniquely determines the root of a virtual, sandboxed file system that only that application or component can access.
The isolated storage is accessible from user code through tailor-made streams. When you open such streams, you can't indicate absolute file names, though. Your application is assigned a distinct and identity-based portion of the file system and can't cross its boundaries.
As of version 1.1, ASP.NET applications don't support isolated storage. However, Microsoft is considering some extensions to the current isolated storage model to make it suitable for the next generation of ASP.NET applications.
Loading XML Documents
XML documents are a special type of text file. They are text-based and human-authorable files in which each piece of information can be given a particular meaning and role using a descriptive syntax. XML documents are written using a markup language made of a vocabulary of terms and a few strict rules. Just the markup nature of the XML language raises the need for a worker tool capable of analyzing and understanding the schema and the contents of the documents. This tool is the XML parser—a sort of black box component that reads in markup text and returns platform-specific objects.
All the XML parsers available to programmers fall into one of two main categories: tree-based and event-based. The most popular implementations of both types of parsers are the XML Document Object Model (DOM) and Simple API for XML (SAX). The XML DOM parser is a generic tree-based API that renders an XML document as an in-memory structure. The SAX parser, on the other hand, provides an event-based API for processing each significant element in a stream of XML data. SAX parsers control the whole process and push data to the application which, in turn, is free to accept or just ignore it. The model is extremely lean and features very limited memory occupation. The .NET Framework provides full support for the XML DOM parsing model, but not for SAX.
The lack of support for SAX parsers doesn't mean you have to renounce the functionality that a SAX parser can bring. All the functions of a SAX parser can be easily, and even more effectively, implemented using an XML reader—the second parsing model within the .NET Framework. Unlike a SAX parser, a .NET reader works under the total control of the client application. In this way, the application itself can pull out only the data it really needs and skip over the remainder of the XML stream. A SAX parser, on the other hand, will read the entire file and push the whole stream, one piece at a time, to the application.
Readers are based on streams and work in much the same way as a database cursor. Reading and writing are two completely separated functions that require different and unrelated classes—XmlReader and XmlWriter.
So in the .NET Framework, you have two possible approaches when it comes to processing XML data. You can either use any classes directly built on top of the base XmlReader and XmlWrite classes or expose information through the XML DOM.
Reading XML Files
An XML reader supplies a programming interface that callers use to connect to XML documents and pull out all the data they need. XmlReader is an abstract class that provides the foundation for all XML reader classes. You'll never use it in your code except to simply reference more specific and richer classes. User applications are normally based on any of the following three derived classes: XmlTextReader, XmlValidatingReader, and XmlNodeReader. All these classes share a common set of properties and methods.
The Programming Interface of XML Readers
Table 16-17 lists the properties defined for the XmlReader base class. Concrete classes such as XmlTextReader can add more properties specific to their way of working.
|
Property |
Description |
|---|---|
|
AttributeCount |
Gets the number of attributes on the current node. |
|
BaseURI |
Gets the base URI of the current node. |
|
CanResolveEntity |
Gets a value indicating whether the reader can resolve entities. |
|
Depth |
Gets the depth of the current node in the XML document. |
|
EOF |
Gets whether the reader has reached the end of the stream. |
|
HasAttributes |
Gets whether the current node has any attributes. |
|
HasValue |
Gets whether the current node can have a value. |
|
IsDefault |
Gets whether the current node is an attribute that originated from the default value defined in the DTD or schema. |
|
IsEmptyElement |
Gets whether the current node is an empty element with no attributes or value. |
|
Item |
Indexer property that returns the value of the specified attribute. |
|
LocalName |
Gets the name of the current node with any prefix removed. |
|
Name |
Gets the fully qualified name of the current node. |
|
NamespaceURI |
Gets the namespace URI of the current node. Relevant to Element and Attribute nodes only. |
|
NameTable |
Gets the name table object associated with the reader. |
|
NodeType |
Gets the type of the current node. |
|
Prefix |
Gets the namespace prefix associated with the current node. |
|
QuoteChar |
Gets the quotation mark character used to enclose the value of an attribute. |
|
ReadState |
Gets the state of the reader from the ReadState enumeration. |
|
Value |
Gets the text value of the current node. |
|
XmlLang |
Gets the xml:lang scope within which the current node resides. |
|
XmlSpace |
Gets the current xml:space scope from the XmlSpace enumeration (Default, None, or Preserve). |
Table 16-18 details the methods common to all XML reader classes in the .NET Framework.
|
Method |
Description |
|---|---|
|
Close |
Closes the reader, and sets the internal state to Closed. |
|
GetAttribute |
Gets the value of the specified attribute. An attribute can be accessed by index or by local or qualified name. |
|
IsStartElement |
Indicates whether the current content node is a start tag. |
|
LookupNamespace |
Returns the namespace URI to which the given prefix maps. |
|
MoveToAttribute |
Moves the pointer to the specified attribute. An attribute can be accessed by index or by local or qualified name. |
|
MoveToContent |
Moves the pointer ahead to the next content node or to the end of file. The method returns immediately if the current node is already a content node such as non–white space text, CDATA, Element, EndElement, EntityReference, or EndEntity. |
|
MoveToElement |
Moves the pointer back to the element node that contains the current attribute node. Relevant only when the current node is an attribute. |
|
MoveToFirstAttribute |
Moves to the first attribute of the current Element node. |
|
MoveToNextAttribute |
Moves to the next attribute of the current Element node. |
|
Read |
Reads the next node, and advances the pointer. |
|
ReadAttributeValue |
Parses the attribute value into one or more Text, EntityReference, or EndEntity nodes. |
|
ReadElementString |
Reads and returns the text from a text-only element. |
|
ReadEndElement |
Checks that the current content node is an end tag and advances the reader to the next node. Throws an exception if the node is not an end tag. |
|
ReadInnerXml |
Reads and returns all the content below the current node, including markup information. |
|
ReadOuterXml |
Reads and returns all the content of the current node, including markup information. |
|
ReadStartElement |
Checks that the current node is an element and advances the reader to the next node. Throws an exception if the node is not a start tag. |
|
ReadString |
Reads the contents of an element or text node as a string. The method concatenates all the text until the next markup. For attribute nodes, it is equivalent to reading the attribute value. |
|
ResolveEntity |
Expands and resolves the current entity reference node. |
|
Skip |
Skips the children of the current node. |
To process an XML document, you normally use an instance of the XmlTextReader. You can create it in a number of ways and from a variety of sources, including disk files, URLs, streams, and text readers.
XmlTextReader reader = new XmlTextReader(file);
Once the reader object is up and running, you have to explicitly open it using the Read method. To move from any node to the next, you can continue using Read as well as a number of other more specialized methods, including Skip and MoveToContent. The Read method, in fact, returns false when nothing else is left to read and true otherwise. The following code snippet shows the typical .NET way to process the contents of an XML file:
XmlTextReader reader = new XmlTextReader(file);
while (reader.Read())
{
 // Verify the type of the current node
 if (reader.NodeType == XmlNodeType.Element)
 { ... }
}
reader.Close();
A lot of XML documents begin with several tags that don't represent any informative content. The reader's MoveToContent method lets you skip all the heading nodes and position the pointer directly onto the first content node. In doing so, the method skips over nodes such as ProcessingInstruction, DocumentType, Comment, Whitespace, and SignificantWhitespace.
Reading Attributes
Attribute nodes are not automatically visited by a reader that moves ahead through Read. To visit the set of attributes of the current node, you must use a loop controlled by the MoveToNextAttribute method. The following code snippet accesses all the attributes of the current node—the one you selected with Read—and concatenates their names and values into a comma-separated string.
if (reader.HasAttributes)
 while(reader.MoveToNextAttribute())
 buf += reader.Name + "="" + reader.Value + "",";
reader.MoveToElement();
Once you're done with node attributes, consider calling MoveToElement on the reader object. The MoveToElement method moves the internal pointer back to the element node that contains the attributes. To be precise, the method does not really "move" the pointer because the pointer never moved away from that element node during the attributes navigation. The MoveToElement method simply refreshes some internal variables, making them expose values read from the element node rather than the last attribute read. For example, the Name property returns the name of the last attribute read before you call MoveToElement and the name of the parent node afterward. If you just need to proceed with the next element once finished with the attributes, you don't really need to call MoveToElement. Instead, you need it if you have more work to do on the node before you move to the next one.
In most cases, but not always, the content of an attribute is a simple string of text. Sometimes, the attribute value consists of the string representation of a more specific type (for example, a date or a Boolean) that you then convert into the native type using the methods of the static class XmlConvert or System.Convert. The two classes perform nearly identical tasks, but the XmlConvert class works according to the XML Schema Definition (XSD) data type specification and ignores the current locale. Suppose you have an XML fragment such as the following:
Let's also assume that, according to the current locale, the birth date is May 20, 1998. If you convert the string into a specific .NET type (the DateTime type) using the System.Convert class, all will work as expected and the string is correctly transformed into the expected date object. In contrast, if you convert the string using XmlConvert, you'll get a parse error because the XmlConvert class doesn't recognize a correct date in the string. The reason is that in XML, a date must have the YYYY-MM-DD format to be understood. In summary, the XmlConvert class works as a translator to and from .NET types and XSD types. When the conversion takes place, the result is rigorously locale independent.
Validating Readers
The XmlTextReader class only checks the input document for well-formedness. In no case can the class validate the document against a schema. The XmlValidatingReader class is the XML reader class that provides support for several types of XML validation: DTD, XSD, and XML-Data Reduced (XDR) schemas. DTD and XSD are official recommendations issued by the W3C, whereas XDR is Microsoft's implementation of an early working draft of XML Schemas. It's supported only for backward compatibility.
The XmlValidatingReader class works on top of an XML reader—typically an instance of the XmlTextReader class. The text reader is used to walk through the nodes of the document, whereas the validating reader is expected to validate each piece of XML according to the requested validation type. The validator class implements internally only a small subset of the functionalities that an XML reader must expose. The class always works on top of an existing XML reader and simply mirrors many methods and properties. The dependency of validating readers on an existing text reader is particularly evident if you look at the class constructors. An XML validating reader, in fact, cannot be directly initialized from a file or a URL. The list of available constructors is composed of the following overloads:
public XmlValidatingReader(XmlReader);
public XmlValidatingReader(Stream, XmlNodeType, XmlParserContext);
public XmlValidatingReader(string, XmlNodeType, XmlParserContext);
A validating reader can parse any XML document for which a reader is provided as well as any XML fragments accessible through a string or an open stream. Table 16-19 details the properties of the XmlValidatingReader class.
|
Property |
Description |
|---|---|
|
CanResolveEntity |
Gets a value indicating whether this reader can parse and resolve entities. Always returns true because the XML validating reader can always resolve entities. |
|
EntityHandling |
Gets or sets a value that indicates how entities are handled. Acceptable values for this property come from the EntityHandling enumeration type. The default value is ExpandEntities, which means that all entities are expanded. If set to ExpandCharEntities, only character entities are expanded (for example, '). General entities are returned as EntityReference node types. |
|
Namespaces |
Gets or sets a value that indicates whether namespace support is requested. |
|
NameTable |
Gets the name table object associated with the underlying reader. |
|
Reader |
Gets the XmlReader object used to construct this instance of the XmlValidatingReader class. The return value can be cast to a more specific reader type, such as XmlTextReader. Any change entered directly on the underlying reader object can lead to unpredictable results. Use the XmlValidatingReader interface to manipulate the properties of the underlying reader. |
|
Schemas |
Gets an XmlSchemaCollection object that holds a collection of preloaded XDR and XSD. Schema preloading is a trick used to speed up the validation process. Schemas, in fact, are cached, and there's no need to load them every time. |
|
SchemaType |
Gets the schema object that represents the current node in the underlying reader. This property is relevant only for XSD validation. The object describes whether the type of the node is one of the built-in XSD types or a simple or complex type. |
|
ValidationType |
Gets or sets a value that indicates the type of validation to perform. Acceptable values come from the ValidationType enumeration: Auto, None, DTD, XDR, and Schema. |
|
XmlResolver |
Sets the XmlResolver object used for resolving external DTD and schema location references. The XmlResolver is also used to handle any import or include elements found in XML Schema Definition language (XSD) schemas. |
Just like a nonvalidating reader, the XmlValidatingReader class provides methods to navigate over the source document. The difference is that any movement methods validate the text. For example, the Skip method jumps over the children of the currently active node in the underlying reader. It's worth noting that you cannot skip over badly formed XML text. The Skip method, in fact, also attempts to validate the skipped contents and raises an exception in case of unexpected data.
The validation occurs incrementally, and no method is provided to tell you in a single shot whether the given document is valid or not. You move around the input document using the Read method. At each step, the structure of the currently visited node is validated against the specified schema and an exception is raised if an error is found. The following code shows how you can validate an XML document.
void Validate(String fileName) {
 // Prepare for validation
 XmlTextReader _coreReader = new XmlTextReader(fileName);
 XmlValidatingReader reader = new XmlValidatingReader(_coreReader);
 reader.ValidationType = ValidationType.Auto;
 reader.ValidationEventHandler += new ValidationEventHandler(Handler);

 // Validate (any errors results in a call to the handler)
 while (reader.Read()) {}

 _coreReader.Close();
 reader.Close();
}
The ValidationType property sets the type of validation you want—DTD, XSD, XDR, or none. If no validation type is specified (the ValidationType.Auto option), the reader automatically applies the validation it reckons to be most appropriate for the document. The caller application is notified of any error through a ValidationEventHandler event. If you fail to specify a custom event handler, an XML exception is thrown against the application.
The XML DOM Parser
Although stored as flat text in a linear text file, XML content is inherently hierarchical. Readers just parse the text as it is read out of the input stream. They never cache read information and work in a sort of stateless fashion. As a result, you can neither edit nodes nor move backward. The limited navigation capabilities also prevent you from implementing node queries of any complexity. The XML DOM philosophy is diametrically opposed to readers. XML DOM loads all the XML content in memory and exposes it through a suite of collections that, overall, offer a tree-based representation of the original content. In addition, the supplied data structure is fully searchable and editable.
Advanced search and editing are the primary functions of the XML DOM, while readers (and SAX parsers as well) are optimized for document inspection, simple searches, and any sort of read-only activity.
Loading and Caching XML Documents
The central element in the .NET XML DOM implementation is the XmlDocument class. The class represents an XML document and makes it programmable by exposing its nodes and attributes through ad hoc collections. The XmlDocument class represents the entry point in the binary structure and the central console that lets you move through nodes reading and writing content. Each element in the original XML document is mapped to a particular .NET class with its own set of properties and methods. Each element can be reached from the parent and can access all of its children and siblings. Element-specific information such as content and attributes are available via properties.
Any change you enter is applied immediately but only in memory. The XmlDocument class, though, provides an I/O interface to load from, and save to, a variety of storage media, including disk files. Subsequently, all the changes to constituent elements of an XML DOM tree are normally persisted all at once. When you need to load an XML document into memory for full-access processing, you start by creating a new instance of the XmlDocument class.
The following code snippet demonstrates how to load an XML document into an instance of the XmlDocument class:
XmlDocument doc = new XmlDocument();
doc.Load(fileName);
The Load method always works synchronously; so when it returns, the document has been completely mapped to memory and is ready for further processing. The XmlDocument class internally uses an XML reader to perform any reading operation and build the final tree structure for the source document.
To locate one or more nodes in an XML DOM object, you can use either the ChildNodes collection or the SelectNodes method. In the ChildNodes collection, you are given access to the unfiltered collection of first-level child nodes. The SelectNodes (and the ancillary SelectSingleNode) method exploits the XPath query language to let you extract nodes based on logical conditions. In addition, XPath queries can go deeper than one level as long as you specify the path to the node as the root of the search.
Walking Your Way Through Documents
The ChildNodes collection connects each node to its children. As mentioned earlier, though, the collection returns only the direct children of a given node. Of course, this is not enough to traverse the tree from the root to the leaves. The following code snippet demonstrates how to recursively walk through all the nodes in an XML document.
void ProcessData(string fileName) {
 XmlDocument doc = new XmlDocument();
 doc.Load(fileName);
 XmlElement root = doc.DocumentElement;
 LoopThroughChildren(root);
 return;
}

void LoopThroughChildren(XmlNode root) {
 foreach(XmlNode n in root.ChildNodes)
 {
 if (n.NodeType == XmlNodeType.Element)
 LoopThroughChildren(n);
 }
 // Process the node here
 // root represents the current node

}
The LoopThroughChildren method goes recursively through all its child nodes whose type is Element. The order in which you execute node-specific processing, before or after looping through children, determines the visiting algorithm for the document.
Validating Documents Through XML DOM
The XML document loader checks input data only for well-formedness. In the case of parsing errors, an XmlException exception is thrown and the resulting XmlDocument object remains empty. To load a document and validate it against a DTD or a schema, you must use the Load overload that accepts an XmlReader object. You pass it a properly initialized instance of the XmlValidatingReader class and proceed as usual.
XmlTextReader _coreReader;
XmlValidatingReader reader;
_coreReader = new XmlTextReader(fileName);
reader = new XmlValidatingReader(_coreReader);
doc.Load(reader);
Any schema information found in the file is taken into account, and the content is validated. Parser errors, if any, are passed on to the validation handler you might have defined. If your validating reader doesn't have an event handler, the first error stops the loading and throws an exception.
Creating XML Documents
Creating XML documents programmatically doesn't seem to be a hard task to accomplish. You just concatenate a few strings into a buffer and flush them out to a storage medium when you're done. XML documents, though, are mostly made of markup text, and complying with markup text is boring—and more importantly, error prone. The XML DOM supplies a more abstract way of creating elements, but it requires you to accumulate the entire document in memory before saving.
XML writers are the writing counterpart of the cursor-like parsing model we discussed earlier. The underlying engine takes care of the markup details, while you focus on the data to write and the structure to lay out.
Using XML Writers
An XML writer is a component that provides a fast, noncached, forward-only way of outputting XML data to streams or files. More importantly, an XML writer guarantees—by design—that all the XML data it produces conforms to the W3C XML 1.0 and Namespaces recommendations.
A writer features ad hoc write methods for each possible XML node type and makes the creation of XML output more logical and much less dependent on the intricacies, and even the quirkiness, of the markup languages. The following code shows how to write the content of an array of strings to disk using XML writers:
// Open the XML writer (default encoding charset)
XmlTextWriter writer = new XmlTextWriter(filename, null);
writer.Formatting = Formatting.Indented;

writer.WriteStartDocument();
writer.WriteStartElement("array");
foreach(string s in theArray) {
 writer.WriteStartElement("element");
 writer.WriteAttributeString("value", s);
 writer.WriteEndElement();
}
writer.WriteEndDocument();

// Close the writer
writer.Close();
Newline and indentation characters are inserted automatically. An XML writer is based on the XmlWriter abstract class. The XmlWriter class is not directly creatable from user applications, but it can be used as a reference type for objects that happen to be living instances of derived classes. Actually, the .NET Framework provides just one class that provides a concrete implementation of the XmlWriter interface—the XmlTextWriter class.
Using the XML DOM Writer
To create an XML document using the XML DOM API, you must first create the document in memory and then call the Save method or one of its overloads. This gives you great flexibility because no changes you make are set in stone until you save. In general, though, using the XML DOM API to create a new XML document is often overkill, unless the creation of the document is driven by a really complex and sophisticated logic.
In terms of the internal implementation, it's worth noting that the XML DOM Save method makes use of an XML text writer to create the document. So unless the content to generate is really complex and subject to a lot of conditions, using an XML text writer to create XML documents is faster. The following code shows how to use the Save method to save a changed document.
// Load the document
XmlDocument doc = new XmlDocument();
doc.Load(fileName);

// Retrieve a particular node and update an attribute
XmlNode n = root.SelectSingleNode("PageStructure");
n.Attributes["backcolor"] = "white";

// Save the document
doc.Save();
The XmlDocument class provides a bunch of factory methods to create new nodes. These methods are named consistently with the writing methods of the XmlTextWriter class. You'll find a CreateXXX method for each WriteXXX method provided by the writer. Actually, each CreateXXX method just creates a new node in memory, while the corresponding WriteXXX method on the writer just writes it to the output stream. Once created, a node must be bound to its parent using the AppendChild method, as shown here:
XmlDocument doc = new XmlDocument();
XmlNode n;

// Write and append the XML heading
n = doc.CreateXmlDeclaration("1.0", "", "");
doc.AppendChild(n);

// Write a node with one attribute
n = doc.CreateElement("info");
XmlAttribute a = doc.CreateAttribute("path");
a.Value = path;
n.Attributes.SetNamedItem(a);
doc.AppendChild(n);
Bear in mind that nodes and attributes, although created, are not automatically bound to the XML document tree until the AppendChild (for nodes) or SetNamedItem (for attributes) method are called.
| Tip |
To insert many nodes at the same time and to the same parent, you can exploit a little trick based on the concept of a document fragment. You concatenate all the necessary markup into a string and then create a document fragment. XmlDocumentFragment frag = doc.CreateDocumentFragment(); frag.InnerXml = "12"; parentNode.AppendChild(frag); Set the InnerXml property of the document fragment node with the string and then add the newly created node to the parent. The nodes defined in the body of the fragment will be inserted one after the next in the parent node of the XML DOM. |
XML Documents in ASP NET
XML writers are more efficient than XML DOM writers. They require far less memory and run faster. It's not coincidental that XML DOM writers are implemented through XML writers. In general, XML writers are appropriate in all those situations in which the application needs to create documents from scratch, even when overwriting existing documents.
The approach based on XML DOM is more suited to when the application must logically edit the content of an existing document. In this case, in fact, an XML DOM parser can save you from having an intimate knowledge of the overall document structure. You must know only the details that you need to modify. All the rest can be automatically managed by the XML DOM infrastructure. Likewise, reading complex configuration documents using XML DOM can save a lot of development time and reduce the possibility of errors. Parsing and representing large documents with custom in-memory structures can be significantly worse than employing a more greedy component such as the XML DOM parser.
Server Side XML Transformations
Many ASP pages describe portions of their user interface through XML documents, which are then dynamically processed and translated into HTML. To accomplish this task, you must write all the code necessary to perform the XML-to-HTML transformation and then append the resulting text to the output stream. In ASP.NET, an ad hoc control has been designed specifically to simplify this task—it's the Xml control, which uses the tag.
The control is the declarative counterpart of the XslTransform class—that is, the .NET Framework class that performs style sheet transformations. You use the XML server control when you need to embed XML documents in a Web page either verbatim (for example, a data island) or transformed (for example, a browser-dependent piece of user interface). The XML data can be included inline within the HTML, or it can be in an external file. By combining this control's ability with a style sheet that does browser-specific transformations, you can transform server-side, XML data into browser-proof HTML.
| Note |
The Xml control comes in extremely handy when you need to create XML data islands for the client to consume. In particular, you can write an XSLT transformation capable of rendering ADO.NET DataSet objects in the XML representation of ADO Recordset objects. By combining the capabilities of the XML server control with such a style sheet, you can make the contents of a DataSet available on the client to some client script procedures. |
Programming the Xml Server Control
In addition to the typical and standard properties of all server controls, the Xml control provides the properties listed in Table 16-20. The document properties represent the source XML data, while the transform properties handle the instance of the XslTransform class to be used and the style sheet.
You can specify a source document in various ways: using a file, a string, or an XML DOM. A style sheet, on the other hand, can be specified by file or using a preconfigured XslTransform object. The output of the transformation, if any, is the Web page output stream.
|
Property |
Description |
|---|---|
|
Document |
Gets or sets the XML source document using an XmlDocument |
|
DocumentContent |
Gets or sets the XML source document using a string |
|
DocumentSource |
Gets or sets the XML source document using a file |
|
Transform |
Gets or sets the XslTransform class to use for transformations |
|
TransformArgumentList |
Gets or sets the argument list for transformations |
|
TransformSource |
Gets or sets the style sheet to use for transformations |
The settings are mutually exclusive and the last setting wins. For example, if you set both Document and DocumentSource, no exception is thrown but the first assignment is overridden. The DocumentContent property can be set programmatically using a string variable or declaratively by placing text between the opening and closing of the control.
You can optionally specify an XSL style sheet document that formats the XML document before it is written to the output. The output of the style sheet must be HTML, XML, or plain text. It cannot be, for example, ASP.NET source code or a combination of ASP.NET layout declarations.
Working with the Xml Server Control
The following listing demonstrates a simple but effective way to describe a portion of your Web page using XML code. The actual XML-to-HTML transformation is automatically and silently performed by the style sheet.
The Xml control can have an ID and can be programmatically accessed. This opens up a new possibility. You can check the browser's capabilities and decide dynamically which style sheet best suits it.
You could also describe the whole page with XML and employ a style sheet to translate it to HTML. This is not always, and not necessarily, the best solution to gain flexibility, but the Xml control definitely makes implementing that solution considerably easier.
If you need to pass in some argument, just create and populate an instance of the XsltArgumentList class and pass it to the control using the TransformArgumentList property.
Conclusion
The structure of the Windows file system has not radically changed in the past few years. With Windows 2000, Microsoft introduced some new features in the NTFS file system, but the most significant changes we observed remain those related to the infrastructure that has been built to keep up with the shell enhancements—for example, the desktop.ini file to assign additional attributes to folders. Significant changes to the file system are slated only for the next major Windows release.
Although the substance of the underlying file system is not something that changed with .NET (.NET is a development platform and not an operating system), .NET significantly changed the way you work with the constituent elements of a file system—the files and the directories.
The introduction of streams is a key step in the sense that it unifies the API necessary to perform similar operations on a conceptually similar storage medium. Another key enhancement is the introduction of reader and writer objects. They provide a kind of logical API by means of which you read and write any piece of information. The .NET Framework also provides a lot of facilities to perform the basic management operations with files and directories. Although managing files and directories is probably not the primary task of a typical ASP.NET application, many ASP.NET applications need to do it.
Reading and writing files is another file system–related activity that is common to many ASP.NET applications. Creating and editing files is subject to account restrictions and should be considered as the last resort. Databases are probably the first option to consider for Web applications that need to manage persistent and programmatically updateable data.
Text, XML, or binary files are all good choices when you're implementing a file-based solution. XML files are the most expressive option, and thanks to XSLT transformations, the Xml server control, and XML data islands, they are also the option that is best integrated with the rest of the .NET Framework. This chapter offered an overview of file management, with a discussion of XML files. However, both the file system API and the XML API are topics that deserve much more coverage.
Resources
- Applied XML Programming with Microsoft .NET, by Dino Esposito (Microsoft Press, 2002)
Part I - Building an ASP.NET Page
Part II - Adding Data in an ASP.NET Site
- The ADO.NET Object Model
- Creating Bindable Grids of Data
- Paging Through Data Sources
- Real-World Data Access
Part III - ASP.NET Controls
Part IV - ASP.NET Application Essentials
- Configuration and Deployment
- The HTTP Request Context
- ASP.NET State Management
- ASP.NET Security
- Working with the File System
- Working with Web Services
Part V - Custom ASP.NET Controls
- Extending Existing ASP.NET Controls
- Creating New ASP.NET Controls
- Data-Bound and Templated Controls
- Design-Time Support for Custom Controls
Part VI - Advanced Topics
Index
EAN: 2147483647
Pages: 209
