Same Database, Multiple Windows
So far, you've spent all your time in the same Contact Management window. If you're feeling a little claustrophobic, fear not. At any time, you can get yourself another window by choosing Window  New Window. What you get is an exact copy of the window you were just looking at. Whats the big deal, you ask? The big deal is that you can switch to another record or do almost anything else in the new window, without affecting what's displayed in the first one.
|
When you have multiple windows open, you can change most of the settings you've seen so far for each window. For example, if you want to compare two contacts side-by-side, you can show one contact in each window.
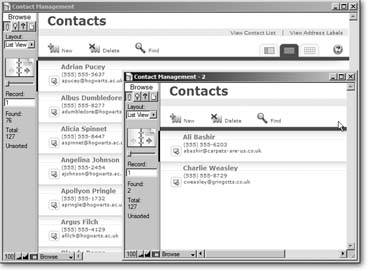
You can even zoom one window in and another one out, or show the status area in one window but not the other (if that's your idea of fun). Another time multiple windows are useful is when you're working with one set of found records (Section 1.6.3.2) but need to do another search. You can perform a find in a new window without disrupting your work in the original window. Say you've been fiddling with the Find command to come up with all your contacts who live in California, then suddenly need to find the phone number for a colleague in New York. Just create a new window and look up your East Coast colleague there (Figure 1-15). Your California group is safe and sound in the first window.
Note: If you have two windows open, both of them are connected in one way. If you edit the data in one window, the changes show up in the other window (or every window you have open, if you're working with multiple windows). Since FileMaker's windows just display the records in your database, a second window doesn't mean you have a second databaseinstead, both windows share the same data.
|
1.7.1. Automatically Arranging Windows
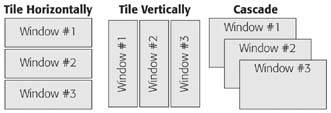
If you have a lot of windows on your screen and don't feel like rearranging them yourself, you can use one of several commands that arrange the windows for youor at least try to. Using FileMaker's Window menu, you can choose one of three commands: Tile Vertically, Tile Horizontally, or Cascade. Each command rearranges the windows in a different manner, as shown in Figure 1-16.
The Window menu commands are a great place to start when you have so many windows open, you don't even know which one you're looking for! However, 99 times out of 100, these automatic rearrangements somehow seem to make every window the wrong size, and put each window in the wrong place. So use these commands with the understanding that you may still have to do some rearranging yourself.
1.7.2. Hiding Windows
If you have a window just the way you want it (for example, showing all the neighbors you need to hit up for Girl Scout Cookies), but it's in your way onscreen, you can opt to hide it instead of closing it. (When you close a window after using the Find command, your results disappear.) Hiding a window makes it disappear from your screen completely, but keeps the information stashed in a handy place in your computer so you can get it back if you want it. It's a neat timesaver when you're screen is crowdedor when you want to keep prying eyes away from your information.
|
To hide the window displayed on the front of your screen, choose Window Hide Window. To bring it back again, choose Window images/U2192.jpg border=0> Show Window, and pick the window you want back from the list. In order for this to work, you have to remember the Warning: You may be used to using your operating system's built-in features for dealing with windows, like minimizing them to the Mac OS X Dock. These techniques work just fine in FileMaker, but they might play havoc when a FileMaker script needs to control the same window. If you're using any of these little software robots to automate tasks, as you'll learn in Chapter 13, it's best to stick to FileMaker's own window commands.
1.7.2.1. Closing hidden windows
On Section 1.3.1, you learned that the way to close a database is to simply close its windows. As with most rules, there's an exception: Even if you close all visible windows, the database itself may still be openin a hidden window.
The easiest way to close all FileMaker's open windows, hidden ones included, is to press the Alt (Option) key and choose File images/U2192.jpg border=0> Close All. The ordinary Close command changes to Close All when you press that key.
| POWER USERS' CLINIC Record Locking |
|
If you try editing a record in one window while it's showing in another window, you'll notice that your changes don't appear in the second window as you type. In order for the changes to appear, you must first commit the record (see the box on Section 1.5.3). Once you do, the changes appear everywhere else. Here's a hypothetical example. Suppose you start making changes to Auntie Marie's contact info in one window, but you're interrupted by a phone call before you finish. To help the caller, you need to look something up in the database. Since you're a savvy FileMaker guru, you make a new window and look it up there so you don't have to lose track of the changes you're making to Auntie Marie. Unfortunately, by the time you finish the phone call, you've forgotten that you already started editing Marie's record. Now you go to Marie's record in the new window to make the changes. Bear in mind the record is already half-changed but uncommitted in the first window. What happens if you start making changes now? Which set of changes wins? To avoid the problem of which changes "win," FileMaker automatically performs record locking for you. If you try to edit a record that's already being edited in another window, you see this error message. Yes, it's frustrating to get this message, but just remember that automatic record locking really is your protection against major problems. (This is especially true when you have multiple users accessing your database at the same timesee Chapter 18.) This message is your friend.  |
Part I: Introduction to FileMaker Pro
Your First Database
- Your First Database
- An Very Quick Database Tour
- Creating a New Database
- Opening and Closing Database Files
- Saving Your Databases
- Adding Records to Your Database
- Navigating Your Database
- Same Database, Multiple Windows
Organizing and Editing Records
- Organizing and Editing Records
- Views
- Advanced Find Mode
- Changing Multiple Records
- Sorting Records
- Editing Whats in Your Fields
- Paragraph Formatting
- Beyond Text: Container Fields
- Checking Spelling
- Printing and Preview Mode
Building a New Database
- Building a New Database
- Tables and Fields
- Defining Fields
- Advanced Field Options
- Bringing It All Together
Part II: Layout Basics
Layout Basics
Creating Layouts
Advanced Layouts and Reports
- Advanced Layouts and Reports
- Setting up Field Controls
- Adding Field Controls to Layouts
- Field Behavior
- Tab Order
- Print-Related Layout Options
- Format the Number/Date/Time/Graphic
- Adding Buttons
- Tab Panels
- Reports and Summary Fields
Part III: Multiple Tables and Relationships
Multiple Tables and Relationships
- Multiple Tables and Relationships
- Relational Databases Explained
- Modeling Your Database
- Creating a Relational Database
- Relational Databases
Advanced Relationship Techniques
- Advanced Relationship Techniques
- Creating Related Records
- Table Occurrences
- Managing Data with Data Tunneling
- Building a Data Tunneling Interface
- Connecting Databases
- Lookups
- Advanced Relationships
Part IV: Calculations
Introduction to Calculations
- Introduction to Calculations
- Understanding Calculations
- The Structure of a Calculation
- Creating a Calculation Field
- Auto-Enter Calculations
- Validate Data Entry with a Calculation
- Replacing Data Using a Calculation
- Comments
Calculations and Data Types
- Calculations and Data Types
- Number Crunching Calculations
- Going Beyond Basic Calculations
- Text Parsing Calculations
- Date and Time Calculations
- Containers in Calculations
Advanced Calculations
- Advanced Calculations
- Stored, Unstored, and Global Fields
- Logical Functions
- The Let Function and Variables
Extending Calculations
Part V: Scripting
Scripting Basics
- Scripting Basics
- Your First Script
- The Importance of the Layout
- Running Scripts
- Branching and Looping in Scripts
Script Steps
- Script Steps
- Go to Layout
- Scripting for Fields
- Working with Records
- Finding Records
- Sorting Records
- Working with Windows
- Working with Files
- Printing
- Other Script Steps
Advanced Scripting
- Advanced Scripting
- Commenting Scripts
- Asking and Telling the User
- Organizing Complex Scripts
- Handling Errors
- Putting a Complex Script Together
Part VI: Security and Integration
Security
Exporting and Importing
- Exporting and Importing
- Exporting a File
- Export Formats
- Importing Data
- Import Data Sources
- Importing and Exporting in a Script
Sharing Your Database
- Sharing Your Database
- FileMaker Network Sharing
- Sharing Over the Internet
- FileMaker Server
- Server Hardware
Developer Utilities
- Developer Utilities
- Script Debugger
- Disable Script Steps
- The Database Design Report
- Tooltips
- Copying Database Structure
- Custom Menus
- Developer Utilities
- File Maintenance
Part VII: Appendixes
Appendix A. Getting Help
EAN: 2147483647
Pages: 176
