Exporting a File
When you export data, FileMaker needs to know what data to export. You tell it with the Export dialog box (Figure 17-1). The Table pop-up menu shows you what FileMaker considers the current tablein this case, Customers. Below it, the Field list shows every field in the current layout for that table. But click the pop-up menu, and you'll see that you can choose Current Table ("Table Name"), which shows you all the fields defined in the current table. You're also welcome to pick other tables from the pop-up menu and see their fields. When you choose fields from other tables, you're still exporting Customer records. If you include fields from other tables, FileMaker gets the values from the first record related to each customer record.
|
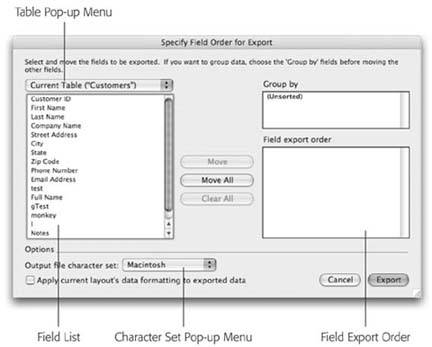
To choose a field for export, select it and click Move. FileMaker adds the field to the "Field export order" list, but doesn't actually move it there. Rather, the field stays in the list because you may want to export the same field twice in the same export file. Imagine, for example, you are creating an export file that needs the billing address info in the first four fields, and the shipping address info in the next four fields. Since your database has only one set of address fields, you can export them twice so the resulting file has the right number of fields. (Unfortunately, you can't ask FileMaker to export a blank field. If you often export to a format that needs fields you don't have, and leaving them blank is OK, just export an empty global field in each one's place.)
Tip: If a field isn't on the current layout, it doesn't show up in the export field list, so if you're wasting time scrolling through fields that you don't need, switch to a simpler layout from the same table. But if you can't find a field that you know is in the table, use the pop-up menu to choose Current Table. That way, you'll get a list of all the fields in the table, regardless of which ones are on the current layout.
At the bottom of the window, the Character Set pop-up menu lets you tell FileMaker how to encode characters in the export file so the receiving computer can read them properly. For instance, if you're using Mac OS X and you know the person receiving the export file is using Windows, it probably makes sense to choose the Windows (ANSI) choice. Unfortunately, the conversion from Macintosh to Windows or Windows to Mac is imperfect, so some less common characters may be switched for others in the output file. Unicode is the best choice, assuming your recipient can accept it, because it can handle all the characters you might have in your database (even foreign language characters like Chinese and Korean).
Finally, the checkbox called "Apply current layout's data formatting to exported data" is a little misleading. It has nothing to do with font, size, style, or color. Rather, when you turn this option on, FileMaker formats numbers, dates, times, and timestamps according to the formatting options for each field on the layout number of decimal places, date formats, and so forth. If you leave this option off, FileMaker exports the data exactly as it was originally entered.
Note: The "Group by" list lets you sort data as you export it. You'll learn how this feature works in the upcoming "grouped Export"; section.
Here's an example of a typical database export. You've hired a printing company to print, address, and mail personalized cards to all your customers at holiday time. To do the job, the card company needs a list of names and addresses. Instead of typing all your customer info by hand, you can produce the list by exporting it from your database in the appropriate format. Often, plain text is fine, so that's what this example uses.
- Switch to the Customers layout.
Like many FileMaker features, the Export command is layout based. That is, it decides which table to export (and from which table occurrence to find related data) by looking at the current layout. To export customer records, you need to be on a layout associated with the Customers table.
- Choose Records
 Show All Records.
every customer.
- Choose File Export Records. If the command isnt available, you're probably in Find mode, so switch to Browse mode.
You can also export from Layout and Preview modes, too, should the need arise. The Export Records to File dialog box appears. It looks a lot like a normal Save dialog box, except that it has a pop-up menu at the bottom called Type.
- Name the file Holiday Card List.txt, and choose any location you want.
When FileMaker exports data, it creates a new file and puts the data in it. You use this window to tell FileMaker what to call the file and where to put it.
- From the Type pop-up menu, choose Comma-Separated Text, and then click Save.
You'll learn what each of these types means in the next section. The Specify Field Order for Export window appears (Figure 17-2).
- While pressing Ctrl (Windows) or
 (Mac), select these fields in the field list: First Name, Last Name, Company Name, Street Address, City, State, and Zip Code. Then click Move.
FileMaker adds the highlighted fields to the field export order list.
Tip: If you want to export most of your fields, but not quite all of them, it may be faster to click the Move All button, then clear the few you don't want from the Field export order list.
- Click Export.
FileMaker creates the file and returns you to your database.
So what just happened? If you open the Holiday Card List file you just created, you see names, company names, and addresses from your customers file. Dig a little deeper and you notice a few things:
- Each record is on its own line (if the program you're viewing the file in wraps lines, it might look like a record goes across two or more lines, but there's a return character at the end of each record).
- Each field value is in quotes, and there are commas between them.
These factors are important because this file conforms to a standard. Other programsincluding the program used by the card printing companythat support files in the Comma-Separated Text format can read this file and grab the data.
17.1.1. Grouped Exports
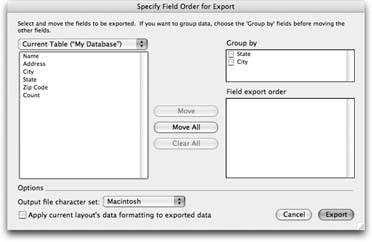
When you were learning about exporting data above, you may have noticed the "Group by" list in the Specify Field Order for Export dialog box. Under normal circumstances, you see "(Unsorted)" in this list. But if you sort the records in the found set before choosing the Export Records command, you see instead a list of the fields in your sort order, each with a checkbox by its name. You can see this in action in Figure 17-2.
If you opt to group the data, you get just one record in the export file for each unique value in the "group by" field. For example, if you export 300 people records, grouped by state, you get one record for each state. Why would you ever want to do this? Because you can include summary fields in your export list and FileMaker properly summarizes all the records represented by each group. You could see, for example, how many people you have in each state.
You're free to select as many fields as you want in the "group by" list. If you select more than one, you get a hierarchical list of records, similar to a sub-summary report (Chapter 6). For example, if you sort first by state, then by city, and turn on the checkbox next to both fields in the "group by" list, you get a list of states, and below each state, you see one record for each city in that state. Again, summary fields included in your export show proper totals for both the state as a whole, and each city.
|
Part I: Introduction to FileMaker Pro
Your First Database
- Your First Database
- An Very Quick Database Tour
- Creating a New Database
- Opening and Closing Database Files
- Saving Your Databases
- Adding Records to Your Database
- Navigating Your Database
- Same Database, Multiple Windows
Organizing and Editing Records
- Organizing and Editing Records
- Views
- Advanced Find Mode
- Changing Multiple Records
- Sorting Records
- Editing Whats in Your Fields
- Paragraph Formatting
- Beyond Text: Container Fields
- Checking Spelling
- Printing and Preview Mode
Building a New Database
- Building a New Database
- Tables and Fields
- Defining Fields
- Advanced Field Options
- Bringing It All Together
Part II: Layout Basics
Layout Basics
Creating Layouts
Advanced Layouts and Reports
- Advanced Layouts and Reports
- Setting up Field Controls
- Adding Field Controls to Layouts
- Field Behavior
- Tab Order
- Print-Related Layout Options
- Format the Number/Date/Time/Graphic
- Adding Buttons
- Tab Panels
- Reports and Summary Fields
Part III: Multiple Tables and Relationships
Multiple Tables and Relationships
- Multiple Tables and Relationships
- Relational Databases Explained
- Modeling Your Database
- Creating a Relational Database
- Relational Databases
Advanced Relationship Techniques
- Advanced Relationship Techniques
- Creating Related Records
- Table Occurrences
- Managing Data with Data Tunneling
- Building a Data Tunneling Interface
- Connecting Databases
- Lookups
- Advanced Relationships
Part IV: Calculations
Introduction to Calculations
- Introduction to Calculations
- Understanding Calculations
- The Structure of a Calculation
- Creating a Calculation Field
- Auto-Enter Calculations
- Validate Data Entry with a Calculation
- Replacing Data Using a Calculation
- Comments
Calculations and Data Types
- Calculations and Data Types
- Number Crunching Calculations
- Going Beyond Basic Calculations
- Text Parsing Calculations
- Date and Time Calculations
- Containers in Calculations
Advanced Calculations
- Advanced Calculations
- Stored, Unstored, and Global Fields
- Logical Functions
- The Let Function and Variables
Extending Calculations
Part V: Scripting
Scripting Basics
- Scripting Basics
- Your First Script
- The Importance of the Layout
- Running Scripts
- Branching and Looping in Scripts
Script Steps
- Script Steps
- Go to Layout
- Scripting for Fields
- Working with Records
- Finding Records
- Sorting Records
- Working with Windows
- Working with Files
- Printing
- Other Script Steps
Advanced Scripting
- Advanced Scripting
- Commenting Scripts
- Asking and Telling the User
- Organizing Complex Scripts
- Handling Errors
- Putting a Complex Script Together
Part VI: Security and Integration
Security
Exporting and Importing
- Exporting and Importing
- Exporting a File
- Export Formats
- Importing Data
- Import Data Sources
- Importing and Exporting in a Script
Sharing Your Database
- Sharing Your Database
- FileMaker Network Sharing
- Sharing Over the Internet
- FileMaker Server
- Server Hardware
Developer Utilities
- Developer Utilities
- Script Debugger
- Disable Script Steps
- The Database Design Report
- Tooltips
- Copying Database Structure
- Custom Menus
- Developer Utilities
- File Maintenance
Part VII: Appendixes
Appendix A. Getting Help
EAN: 2147483647
Pages: 176
