Creating a Basic Logical Database Model
The Database Model Diagram Solution
Most people who have used both Object Role Modeling (ORM) and Entity Relationship (ER) modeling prefer to use ORM for conceptual analysis, because of its expressiveness , completeness, and flexibility. An added benefit of ORM is the automatic normalization that occurs during the mapping process. However, if you prefer working with entity relationship models, VEA allows you to bypass ORM and create data models using ER techniques.
VEA provides two ways to create a logical database model using ER techniques. You can create an ER (Entity Relationship) source model, or you can directly draw a logical database diagram using the database model diagram solution. We'll cover the database model diagram in sections 10.3 to 10.7 of the chapter, and discuss ER source models at the end. Building a database model diagram and building an ER source model are very similar, so nearly all the material in sections 10.3 to 10.7 of this chapter applies to ER source models as well.
Unlike ORM and ER source models, database model diagrams cannot be part of larger projects. The database model diagram is well suited for simple or one time tasks . If you intend to model a complex or large universe of discourse that could benefit from being developed as a set of sub models, then you should consider using source models instead of just the database model diagram solution.
In pure ER modeling, entity types and attributes are conceptual constructs, and relationships between entity types may be expressed directly. In the VEA database model diagram and ER source model solutions, the correspondence between entity types and tables is 1:1, as is the correspondence between attributes and columns . VEA supports separate conceptual and physical naming for these constructs, which allows the modeler to present users with familiar business names for objects, while maintaining physical naming standards at the database level.
For ease of reference, the remainder of this chapter will use the term "entity" loosely to mean either a conceptual entity type or a relational table scheme, and the term "attribute" to mean either a conceptual attribute or relational column.
Notation Options
A logical data model can be expressed in different notations. VEA supports a generic relational notation, IDEF1X notation, and some other variations. The choice of notations and display options does not affect the underlying model. Before discussing how to create models using the database model diagram solution, let's take a quick look at some the different logical notations available in VEA.
Relational Notation
With relational notation, each entity is shown as rectangular box. The name of the entity is in the gray shaded portion of each box. The entities represented by the model in Figure 10-1 are Country, Patient, BloodPressureTest and PapSmear .
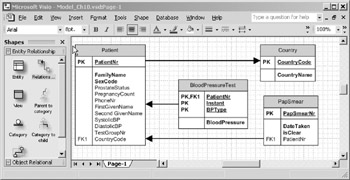
Figure 10-1: Data Model expressed in relational notation.
Each entity's primary key is underlined and is also identified by the letters PK on the left hand side of the entity. The primary key is shown just below the name of the entity, and is separated from the other attributes by a horizontal line. For instance, the primary key of Patient is PatientNr . All of the non primary key attributes are listed below the horizontal line. Required attributes are shown in boldface type, and migrated attributes (i.e., attributes that are part of a foreign key) are marked with the letters FK=ordinal> on the left hand side of the entity. Attributes like Country.CountryName that represent an alternate identifier for an entity are marked with the uniqueness symbol U=ordinal> on the left hand side of the entity.
Relationships (foreign key references) are shown as solid arrows. With VEA's relational notation, all relationship lines look the same, as do all entity outlines. As you will discover in the next section, this is not the case with IDEF1X notation. The arrowhead always points to the "parent" (e.g., the "one" side of a l:m) entity in the relationship. For instance, in the relationship between Country and Patient, many patients may be born in one country, but each patient is born in at most one country.
If you are used to notations that reverse the arrowheads, it can be confusing to remember which way the arrow points in VEA. Thinking in terms of logical implication may help. In the Country/Patient example, the constraint symbolized by the relationship line can be verbalized thus: " If a country code is listed in the Patient entity, then that country code MUST be listed in the Country entity." Substituting the variable P for the antecedent ("a country code is listed in the Patient entity") and the variable C for the consequent ("that country code must be listed in the Country entity") yields the argument from If P then Q . By longstanding convention, such argument forms are graphically denoted with an arrow pointing from the antecedent to the consequent like this: P ’ Q . If one thinks of the entities as the variables in the statement, the direction of the arrow in VEA is consistent with the conventional direction of the arrow in logical statements.
As an option, VEA's relational notation can display cardinality indicators next to each relationship line. Cardinality is the number of instances of each entity that can participate in the relationship. The cardinality display option is turned off by default, and is not enabled for Figure 10-1, so the symbols are not visible in the figure. However, Table 10-1 shows the full set of cardinality indicators that could be displayed if you enabled the cardinality display option. In addition to this UML-style notation, you can choose the popular crowsfoot notation used in approaches such as Information Engineering (see the Glossary for examples).
|
Indicator |
Relationship Cardinality |
|---|---|
|
* |
One to zero or more |
|
1..* |
One to one or more |
|
0..1 |
One to zero or one |
|
1 |
One to exactly one |
|
x..y |
One to (range between x and y inclusive where x and y are positive whole numbers ) |
IDEF1X Notation
This notation has become quite popular in certain sectors, especially for military contractors, because of its adoption as a FIPS (Federal Information Processing Standard), as outlined in FIPS 184.
With IDEF1X notation, each entity is shown as a rectangular box, but the shape of the rectangle depends on the kind of relationships in which the entity participates. An entity whose primary key does not contain any foreign keys is said to be "independent." An entity whose primary key contains at least one foreign key is termed "dependent." IDEF1X uses rectangles with square corners to represent independent entities, and rectangles with rounded corners to depict dependent entities. In Figure 10-2, the Country, Patient, and PapSmear entities are independent, while BloodPressureTest is a dependent entity.
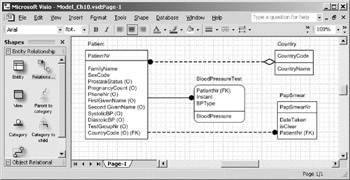
Figure 10-2: Data model expressed in IDEF1X notation.
Relationships appear as lines between that terminate in a solid dot on the "child" entity of the relationship. The line itself is either dashed or solid, depending on the type of relationship depicted. If the migrated attribute becomes part of the primary key of the "child" entity the relationship is called "identifying." Relationships where the migrated attribute does not become part of the child's primary key are termed "non-identifying." IDEF1X shows identifying relationships as solid lines, and non-identifying relationships as dashed lines. In Figure 10-2, the relationship between "Patient" and "BloodPressureTest" is identifying. The other relationships in the diagram are non-identifying.
In contrast to relational notation, IDEF1X uses special symbols to indicate if a relationship is optional. A hollow diamond on the "parent" side (e.g., the side opposite the dot) of the relationship indicates that the relationship, and thus the associated migrated attribute, is optional. In Figure 10-2, the hollow diamond on the relationship line touching the Country entity means that a given instance of Patient (the entity at the other end of the line) may or may not be related to an instance of Country . On a relational level, the optional nature of this relationship causes the attribute Patient.CountryCode to be optional. Contrast this with the relationship between "PapSmear" and "Patient" where the lack of a hollow diamond shows that the relationship is mandatory. Thus, it is impossible to record an instance of PapSmear that is not related to some instance of Patient .
As in relational notation, IDEF1X separates the primary key of the entity from the non key attributes with a horizontal line. However, the primary key itself is not underlined, nor are there any additional letters denoting the key. Boldface type is not used for any attribute, regardless of whether the attribute is optional or mandatory. A display option (which has been enabled for Figure 10-2) allows VEA to use the standard IDEF1X method for indicating optional attributes ”letter ˜O enclosed in parentheses after the attribute name. Migrated attributes are indicated by the letters FK enclosed in parentheses after the attribute name.
As with relational notation, IDEF1X can optionally display relationship cardinality. Table 10-2 shows the full set of cardinality indicators that that VEA can display if you enable the cardinality option when using IDEF1X notation.
|
Indicator |
Relationship Cardinality |
|---|---|
|
=none> |
One to zero or more |
|
P |
One to one or more |
|
Z |
One to zero or one |
|
I |
One to exactly one |
|
x .. y |
One to (range between x and y inclusive where x and y are positive whole numbers) |
VEA's use of notation and other display options are controlled through a number of menus and dialog boxes. It is easier to see the effect of these display options in a simple diagram. In the next few sections, you will learn how create a simple diagram. Chapter 12 explains how to control the appearance of your diagram through the use of document display options.
Creating a Database Model Diagram
From the main menu, choose File > New > Database > Database Model Diagram to create a blank database model diagram. Your screen should look similar to Figure 10-3.
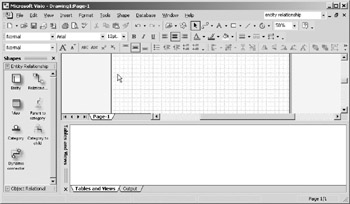
Figure 10-3: Creating a New Database Model Diagram.
Because of VEA's anchored windows and dockable toolbars , your screen may look somewhat different. However, you should see at least three major areas: the shape stencils (shown here on the left side of the screen), the drawing pane (upper portion of screen), and the Tables and Views anchored window in the bottom portion of the screen.
If you cannot see the Tables and Views window, choose Database > View > Tables and Views from the menu. You may or may not have an Output tab . Anytime you perform an action that causes the tool to generate status messages, the Output window will automatically be displayed. Because the tab will automatically show up when you need it, there is no need to specifically enable the Output tab from the Database > View menu, though you can if you wish.
It will be easier to follow the examples in this chapter if you ensure that your display options are set to the original factory defaults. From the main menu, choose Database > Options > Document . A tabbed dialog box like the one in Figure 10-4 will appear. Click on the Defaults button and choose Restore Original from the sub menu. Click the OK button to return to the diagram.
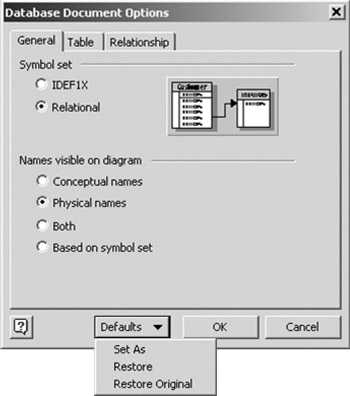
Figure 10-4: Database Document Options, General pane.
In the next chapter, you will learn how to set up the database drivers that come with VEA. Database drivers translate your model into platform specific DDL (data definition language) code with platform specific data types. You will find it easier to follow the examples in this chapter if you set the Microsoft SQL Server driver as your default driver. To set the default driver, choose Database > Options > Drivers from the main menu. Your screen should look like Figure 10-5. Highlight Microsoft SQL Server if it is not already selected and click the OK button. The other tabs in the dialog box and the Setup button are described in the next chapter, so don't worry about them for now.
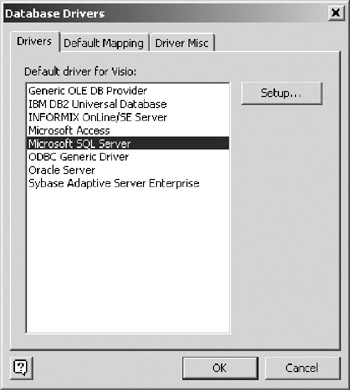
Figure 10-5: Selecting a default database driver.
In contrast to the ORM solution, the database model diagram does not provide a sentence driven tool like the Fact Editor to help you build the data model. Instead, you build the model by dragging and dropping shapes . Before going onto the next section, make sure that the Entity Relationship stencil is open. If you cannot see the Entity Relationship stencil, open it with the command File > Stencils > Database > Entity relationship. VEA also provides an Object-Relational stencil that you can use to create models for servers that support object-relational constructs. The Object-Relational stencil is described in Chapter 13.
Adding Entities to a Diagram
To add an entity to the diagram, drag the entity shape from upper left portion of the stencil, and drop it on the drawing surface. While you are dragging the shape, you will notice that the object is named Table . As soon as you drop the entity on the drawing surface, it will receive a default physical name of Table1 . The ordinal appended to the word Table will increase with each new entity added, so the next entity added would be called Table2, the third would be called Table3 and so on The entity will show up as box on the drawing surface, and it will be listed in the Tables and Views window, shown at the bottom of Figure 10-6.
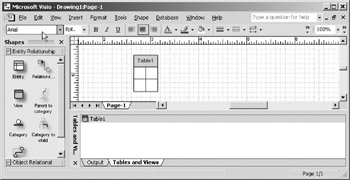
Figure 10-6: Just added a new entity.
To give the entity a meaningful name, double click on the new entity to bring up the Database Properties window in the anchored window portion of the screen.
Click on the Definition category if it is not already selected. Your screen should now look like Figure 10-7. The default physical name for the newly created entity is Table1, and the default conceptual name is Entity1 . You can change either the physical or conceptual name of the entity by typing into the appropriate field. For this example, type the word "Patient" into the Physical name field. You will notice that the conceptual name automatically changes to match the Physical name. Because of the default display options, only the physical name of the entity will show on the diagram. In this case, the physical and conceptual names are the same, so the display option chosen doesn't make much difference. Chapter 12 will discuss controlling the display of physical or conceptual names on the diagram.

Figure 10-7: The Database Properties Window; Definition category.
| Hint |
To assign different physical and conceptual names to an entity, clear the checkbox labeled Sync names when typing . If this checkbox is selected, the Physical name and Conceptual name will be forced to match as soon as you type into either field. This checkbox is selected by default. The discussion of Modeling Options at the end of chapter 12 explains how to change the default behavior. |
The Name Space property should rarely, be used. Name spaces are designed for differentiating entities that are actually different in nature, but share the same name (e.g. the "homonym problem"). If you find homonyms in the Universe of Discourse that you are modeling, it is vastly preferable to facilitate a change of terms among users than to perpetuate the confusion in a data model. However, in very large environments, it may be impossible to resolve all homonyms, so the namespace option provides a way for the model to accommodate the issue.
The Owner and Source database properties are specific to reverse engineering and will be discussed in the chapter on reverse engineering. The Defining type property is only used in Object-Relational models, which are discussed in chapter 13.
Adding Attributes to an Entity
To add attributes to the Patient entity, double click on the entity and select the Columns category of the Database Properties window to view the Columns pane. The fastest way to add attributes is to enter text directly into the various fields of the Columns table as shown in Figure 10-8.
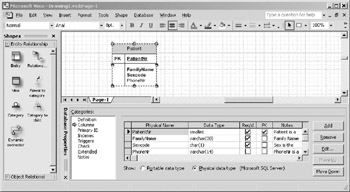
Figure 10-8: Adding an attributes to an entity.
As you fill out the fields of the table in the Database Properties window, VEA creates the attributes for the selected entity. This window makes it easy to add multiple attributes to an entity very quickly. Table 10-3 explains the purpose of each field in the Columns table of the Database Properties window.
|
Field Name |
Purpose |
|---|---|
|
Physical Name |
The name the attribute should have when it is generated as a column in the physical database. |
|
Data Type |
The data type the attribute should use. The radio button at the bottom of the window switches between portable and physical data types. Portable data types are platform independent data types, while physical data types are specific to particular database engine products. This field has a drop down list of available data types. |
|
Req'd |
The field name is an abbreviation for "Required." If the attribute is mandatory, check this box. Checking the PK box (see below) will cause the Req'd box to be automatically checked. |
|
PK |
The field name is an abbreviation for "Primary Key." If the attribute is part of the primary key (or the entire primary key) of the entity, check this box. |
|
Notes |
A descriptive comment about the attribute. This note can be generated into the physical database as a comment for those servers that support the feature. |
Adding attributes through in-place editing of the table in the Database Properties window is very fast, but it does not address every property that an attribute can have. The Conceptual name of an attribute can only be set through the Column Properties dialog which is invoked via the Edit button. To set the conceptual name of an attribute, highlight the attribute in the Database Properties table and click the Edit button on the right side of the window. Performing these actions on the screen in Figure 10-8 would invoke the dialog box shown in Figure 10-9.
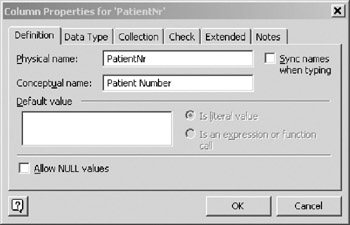
Figure 10-9: Column Properties Dialog.
| Note |
In the VEA tool itself, the Notes for an entity or attribute are essentially unlimited in length. However, certain database engines impose length limitations on comments that are generated into the data dictionary. For instance, Oracle 8.x and above allows comments of 4,000 characters, while Microsoft Access only allows comments of 256 characters , and MS SQL Server doesn't store any comments in the database dictionary. When you generate DDL (explained in the next chapter), your comments may be truncated or suppressed based on your target database server. |
By default, the conceptual name of the attribute will be the same as the physical name. To make the conceptual name different from the physical name, clear the Sync names when typing checkbox, and type "Patient Number" in the Conceptual Name field .
Many organizations have strict physical naming conventions that dictate the use of class words (for instance, "Nr" for all numbers ) and forbid embedded spaces in the database. By setting physical and conceptual names independently, the modeler conforms to physical naming standards while retaining the more readable conceptual name for user reviews.
The Allow NULL values checkbox in Figure 10-9 is in effect a "mirror image" of the Req'd checkbox in Figure 10-8. Checking the Allow NULL values checkbox in Figure 10-9 has the effect of making the attribute optional, while checking the Req'd checkbox in the Database Properties (Figure 10-8) makes the attribute mandatory.
The Data Type pane of the Column Properties dialog allows the user to edit the data type for an attribute. Data Types are dealt with extensively in section 4.10 of chapter four and thus only receive a short explanation here. The radio button at the bottom of the pane switches the mode of the pane between portable and physical data types. In Figure 10-10, the radio button has been set for portable data types.
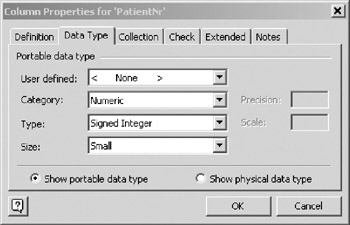
Figure 10-10: Data Type Pane (Portable Data Types).
Portable data types are generic, while physical data types are specific to a particular DBMS product. The mapping from portable to physical data types is determined by your choice of database driver. For instance, the Numeric, Signed integer, Small portable data type shown in Figure 10-10 will generate a SMALLINT column when using the Microsoft SQL Server driver. The same portable data type will generate a NUMBER column when using the Oracle driver.
Many modelers know their target database, and prefer to work directly with physical data types. Figure 10-11 illustrates the results of changing the radio button selection for the Data Type pane of the Column Properties window.
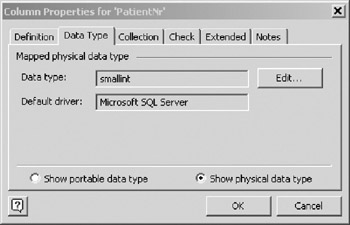
Figure 10-11: Data Type Pane (Physical Data Types).
You cannot use this pane to edit a physical data type. If you want to change a data type, click on the Edit button and use the pop up dialog box, as shown in Figure 10-12.
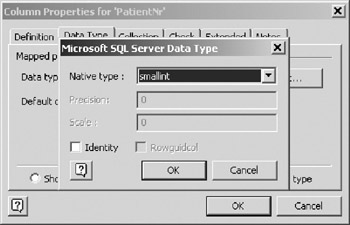
Figure 10-12: Editing physical data types.
The drop down list is populated with all the data types that are supported by the DBMS driver you have chosen . This window also allows one to select the Identity and Rowguidcol properties for data types that support these features.
| Hint |
Invoking the window in Figure 10-12 can be time consuming if done one step at a time. Fortunately, there is a much quicker way to reach this window. Simply type a non-recognized data type (the letter "x" works well) into the Data Type field of the Database Properties window (see Figure 10-8), and hit =Return>. VEA will immediately invoke the window in Figure 10-12. Clicking the Okay or Cancel button returns you directly to the Database Properties window. |
Adding Basic Constraints
Constraints are rules that restrict the population of the schema to allowable sets of data. Previous chapters covered the ORM constraints, which are more comprehensive than the constraints supported by Entity Relationship diagrams and source models. This section addresses only four constraints, the Primary Key, Alternate Uniqueness, the Mandatory (also called Not Null ) constraint, and the Foreign Key constraint.
Primary Key Constraint
The most fundamental constraint is the Primary Key constraint, which ensures that each row in an entity is uniquely identifiable. Section 10.4 showed how to apply a primary key constraint by checking the PK checkbox in the Database Properties window (see Figure 10-8). You can also add (or edit) the primary key of an entity in the Primary ID pane of the Database Properties window, as shown in Figure 10-13
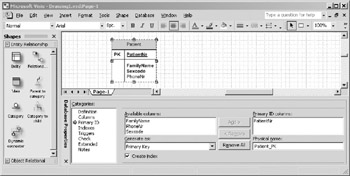
Figure 10-13: Database Properties window, Primary ID pane.
The Primary ID pane allows you to choose from the available attributes to construct a Primary key. VEA has special generation and physical naming options that are described in chapter 12.
Alternate Unique Constraint
Sometimes there is more than one way to uniquely identify a particular row of data in an entity. The Country entity is a good example. The ISO (international standards organization) assigns a two letter code to each country. Because these codes are unique, and Country_code is the most common way to refer to a country (at least for the purposes of this model), the Country_code attribute is the primary key of the Country entity. However, it is important to keep Country Names from being repeated within the entity. Table 10-4 shows an example of the Country entity improperly populated with repeating country names.
|
Country_code |
CountryName |
|---|---|
|
CA |
Canada |
|
GB |
Canada |
|
FR |
France |
|
US |
United States |
Rows one and two cannot both be true, because two countries with different codes should not use the same name . The data modeler should apply a rule so that the value of the attribute CountryName cannot repeat within the entity Country, even though CountryName is not the primary key of the entity. The Alternate unique constraint is designed for these exact situations.
The alternate unique constraint is enforced through a unique database index. VEA's database model diagram does not actually use the words "Alternate Unique Constraint." To apply the constraint in VEA, you must apply a unique index. Follow these steps to apply a unique index:
- Click on the Country entity to invoke the Database Properties window.
- Choose the Index category on the left side of the window.
- Click on the New button in the Index pane and type a name for your new index in the popup dialog box, as shown in Figure 10-14.
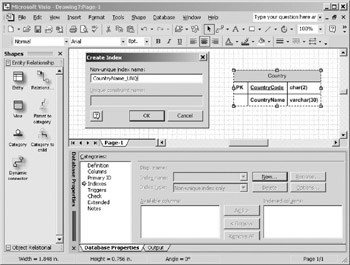
Figure 10-14: Creating a new index. - After you click the OK button to close the popup dialog box, the Available columns box will be populated with the names of the columns in the entity. Double click on the column CountryName to move the column to the Indexed columns box.
- By default, the index type is non unique. Make the index unique by choosing from the Index Type list box one of the three choices that contains the word "unique," as shown in Figure 10-15. The three different choices for uniqueness are: Unique Index with constraint, Unique index only, and Unique constraint only. Depending on your database implementation, you may wish to avoid catalog constraints, but still have the unique index, or vice versa.

Figure 10-15: Making the index unique.
Not Null Constraints
The not null constraint roughly corresponds to the ORM simple mandatory constraint that is discussed in section 5.3, and has the effect of requiring a value to be supplied for the attribute to which it is applied. To create a not null constraint, use either the Req'd field of the Database Properties window, shown in Figure 10-8, or the Allow NULL values checkbox shown in Figure 10-9.
Section 5.3 also discussed disjunctive mandatory constraints, which involve multiple roles and cannot be enforced by declaring an individual attribute to be required (not null). Enforcement of a mandatory disjunctive constraint involves the creation of database code. If you use the ORM solution, VEA will write the code for you. If you create the logical model directly you will have to write the code yourself. In certain cases, the enforcement of even simple mandatory constraints can require database code. Regardless of the source of your database code, editing and managing database code is covered in chapter 13.
Foreign Key Constraints
A foreign key constraint is a relational implementation of a conceptual subset constraint. Consider the relationship line between Country and Patient shown in Figure 10-1. The relationship line is a graphical notation for the fact type " Patient was born in Country ." The information in the schema will be inconsistent if a user is allowed to record a non-existent country as the birthplace of patient, or to delete country information for a country that is recorded in the Patient entity. The explanation that follows makes use of the sample populations in Table 10-5 and Table 10-6.
|
Country_code |
CountryName |
|---|---|
|
CA |
Canada |
|
GB |
United Kingdom |
|
FR |
France |
|
US |
United States |
|
PatientNr |
FamilyName |
FirstGivenName |
Country_code |
|---|---|---|---|
|
101 |
Sara |
Jones |
CA |
|
102 |
Dan |
Smith |
US |
|
103 |
Rex |
Green |
US |
|
104 |
Joseph |
Jones |
GB |
|
105 |
Mary |
Fischer |
ZM |
The set of valid country codes recorded in the Country entity shown in Table 10-5 is { ˜CA , ˜GB , ˜FR , ˜US }. The set of country codes associated with patients 101 “104 in the Patient entity (Table 10-6) is { ˜CA , ˜GB , ˜US }. Every element in the second set is contained in the first, set, so patients 101 “104 present no constraint violations. However, patient 105 was born in Zambia, and the code for that country (ZM), does not exist in the set recorded in the Country entity. To maintain data integrity, the row for patient 105 cannot be inserted into the Patient entity unless a row for Zambia is first added to the Country entity.
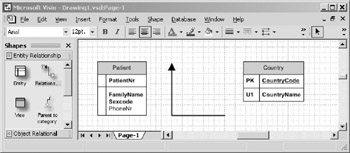
Figure 10-16: Dropping a relationship shape onto the drawing surface.
Conversely, deleting a row of data from the Country entity may also violate the subset constraint. For example, deleting the row for the United States in the Country entity will have the effect of "orphaning" the rows for patients 102 and 103. A foreign key constraint protects against both insert and deletes that would violate the subset rule.
Adding a relationship between two entities will automatically create a foreign key constraint when VEA generates DDL for your model. If you want to follow along with the upcoming example, first add a Country entity to your sample model. To add a relationship in VEA, do the following:
- Position the involved entities so that at least a portion of both entities are visible on the screen. If necessary, zoom the display to make room.
- Drag a relationship shape from the stencil, and drop it onto the drawing surface, as shown in Figure 10-6. Do not worry about the orientation of the relationship shape. The shape will automatically orient itself in the next step.
- Click on the arrowhead of the relationship, and drag it to the Country entity. When the cursor approaches the middle of the Country entity, the entity will be automatically outlined in red, as shown in Figure 10-17.
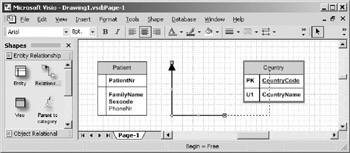
Figure 10-17: Attaching the relationship to the Country entity.
Release the mouse button, and the relationship will be attached to Country as shown in Figure 10-18.
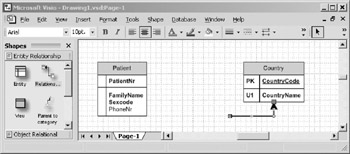
Figure 10-18: Relationship successfully attached to the Country entity.
Perform the same steps to attach the other end of the relationship to the Patient entity. Successful attachment of the second end of the relationship will yield a screen similar to the one in Figure 10-19.
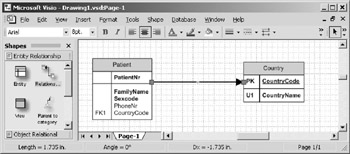
Figure 10-19: Relationship successfully attached to both entities.
The attribute Country_code has been automatically migrated to the Patient entity and marked as a foreign key. Note that the migrated attribute is marked with the symbol FK. The second foreign key in a table would be marked FK2, the third, FK3 and so on.
| Hint |
VEA does not rely on the order in which the relationship is attached to determine "parent" (superset) and "child" (subset) entities. VEA relies on which end of the relationship is attached to an entity. When using relational notation, the arrowhead always attaches to the parent, and the plain end of the relationship attaches to the child. When using IDEF1X notation, the plain end of the relationship attaches to the parent, and the "dot" end of the relationship attaches to the child. |
Basic Model Housekeeping
Deleting and Displaying Entities
An entity may exist in a model without being displayed on a diagram. The same entity may be displayed in many places on the diagram, on the same or different pages. You can delete an entity from the drawing window by selecting it, and then pressing the Delete key. This invokes a message box with the prompt "Remove selected item from the underlying model?" If you answer Yes the entity is removed from the model, so every shape depicting it on the diagram is also removed. If you answer No the selected shape is only removed from the diagram you are viewing. Because the entity still exists in the model, any shapes depicting the entity elsewhere on the diagram remain unchanged.
The Tables and Views window contains a list of all entities in a model, regardless of whether they are displayed. To display an entity, drag its icon from the Tables and Views window to the drawing surface. Right clicking on any entity in this window allows you to sort the entities alphabetically . To ensure that an entity you intended to delete is truly gone, sort the list in the Tables and View window, and check for the entity in this list.
Deleting Attributes
Invoke the Database Properties window by clicking on the entity containing the attributes you wish to delete, and select the Columns category on the left side of the window. Highlight the attribute you wish to delete, and click the Remove button, as shown in Figure 10-20.
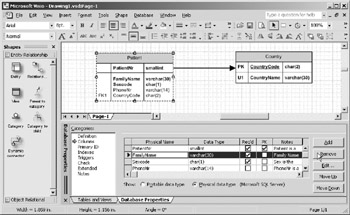
Figure 10-20: Ready to delete the attribute FamilyName .
Unlike entities, removal of an attribute is immediate and complete, with no confirming dialog box. If you accidentally remove an attribute, use the undo command to restore it.
Saving Models
To save your model, choose File > Save from the File menu, or click the Save (diskette) icon. If the model has not been saved before, this opens the Save As dialog box. Choose the folder where you want to save the model, add a filename for the model, press the Save button in the dialog, then press OK in the properties dialog. The file will be saved with the extension ".vsd" (Visio document). If you previously saved the file, then the Save operation simply replaces the old copy with the latest version of the model without opening any dialog boxes.
Projects and ER Source Models
Chapter 7 discussed VEA's use of the Project construct for mapping ORM models to logical models. Projects also allow the modeler to merge multiple source models into a single logical schema, as part of the build process. The source models contained in a project are not restricted to ORM models. In fact, you can mix ER and ORM source models in the same project and still build a single logical schema.
Earlier in this chapter, you created a database model diagram without a source model. When using source models, the modeler does not directly create a database model diagram. Instead, VEA builds the database model diagram from the source model(s). The process of building the database model diagram is known as a project build.
The biggest functional difference between an ER source model and a database model diagram revolves around projects. An ER source model can (in fact must) be built as part of a project, while the database model diagram cannot be part of a project. If a project contains more than one source model, those models can use external objects.
An external object is a pointer to a natively defined object in another source model. For the external reference to be successfully resolved, both the model referencing the object and the model with the definition of the object must be included in the same project. Using external objects allows the modeler to separate the Universe of Discourse into smaller units that can be modeled individually, and then merged back into a single logical schema.
| Caution |
In theory, ER source models can contain external objects (pointers to objects in other models), as well as exposing their natively defined objects to other source models. However, a bug in the VEA beta used to develop this book prevents ER source models from properly using external objects. You should check with Microsoft to see if this bug has been fixed in your release. The bug in the beta version does not prevent an ER source model from exposing its natively defined objects to ORM source models. The example that follows shows how to create a project that has two source models, one ER model and one ORM model. The ER source model will expose its natively defined objects, which will be used by an external object in the ORM source model. |
Creating an ER Source Model
The same stencils, shapes and windows you used to create a database model diagram are used to create an ER source model. To avoid repetition, this section will only give detailed explanations for operations that are unique to source models. Operations that have already been covered will be referred to but not be explained in this section. For this example, you will need one ER source model and one ORM source model.
Create the first source model by choosing File > New > Database > ER Source Model from the main menu. Add Patient and Country entities to the new model. To save time, you do not have to add lots of attributes to each entity. However, make sure that each entity includes at least the primary key attribute. Also add the relationship between Patient and Country . Save the new model to a file called Patient_ER_Source.vsd, and then remove it from memory by closing the document.
Create the second model by choosing File > New > Database > ORM Source Model from the main menu. In this second model, you will create facts about the PapSmear object and relate it to the Patient object that is already defined in Patient_ER_Source.vsd. Add the facts and constraints shown in Table 10-7 to your ORM source Model. The first column in the table shows the fact as you should type it into the Fact Editor. The second column tells you how to answer Constraint Question #1 on the Constraints tab of the Fact Editor (don't answer Constraint Question #2, the default is fine). The third column shows the constraint verbalization. Compare the text in this column with the output of the VEA verbalizer to confirm that you have entered the proper constraints.
|
Fact Type |
Fact Editor Constraint |
Constraint Verbalization |
|---|---|---|
|
PapSmear was taken on Date |
Exactly One |
Each PapSmear was taken on Some Date |
|
PapSmear is clear |
|
|
|
PapSmear is from Patient |
Exactly One |
Each PapSmear is from Some Patient |
Use the following reference modes for the objects in your model: Patient(nr), PapSmear (nr), and Date (mdy). Assign the MS SQL server physical data type "datetime" to the Date object. Assigning the other data types is not important for this example. At this point, your ORM source model should look like the model in Figure 10-21.
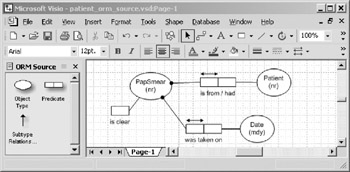
Figure 10-21: Patient ORM source Model.
Your ORM model makes use of a Patient object, but the entity Patient has already been defined in the model Patient_ER_Source.vsd. Both the ER and ORM source models are going to be included in the same project, so one of the models must have the natively defined Patient object, and the other model must use a pointer to the natively defined Patient object. This pointer is called an external object. In this example, you will make Patient an external object in the ORM source model. Click on the Patient entity to invoke the Database Properties window, as shown in Figure 10-22 and select the External checkbox.
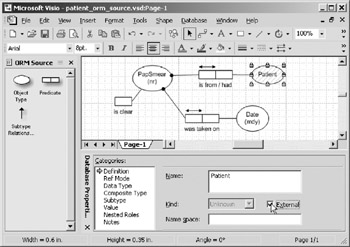
Figure 10-22: Making Patient an external object.
Selecting the External checkbox tells VEA that the object is a pointer to the fully defined object in another model. As a visual cue, the oval that represents the object will be shaded with gray diagonal lines. It may be useful to think of the object as being "grayed out" because the actual definition of the object Patient resides in another model.
The reference mode is automatically removed from external objects. Since the object is defined in another model, there is no way for this ORM source model to be aware of the reference mode before the project is built. Also note that the Kind list box immediately to the left of the External checkbox has been grayed out. The Kind list box normally stores information denoting whether the object is an entity or a value. However, since this object is defined externally, the Kind (entity or value) is unknown until the project is built.
| Hint |
For an external reference to resolve successfully within a project, the conceptual name of the natively defined object in one source model and the conceptual name of the external object in the other source model(s) must be exactly the same. For a given object name, only one source model in a project can contain the natively defined object. If other source models have objects of the same name , those objects must be external. |
Save your ORM source model to a file named Patient_ORM_source.vsd, and close the document to remove it from memory. You are now ready to create and build a database project. To build a project, do the following:
- Create an empty database model diagram by choosing File > New > Database > Database Model from the main menu.
- Save the new diagram to a file called Patient_Project_Build.vsd This file will contain your database project, and will be referred to as "the project" in the rest of this example.
- Add the ER source model to the project:
- Choose Database > Project > Add Existing Document . A browse window like the one in Figure 10-23 will be shown.
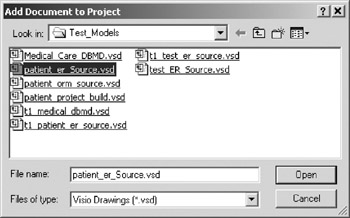
Figure 10-23: Adding a document to a project. - Highlight the ER source model, and click the Open button (or double simply double click on the file name).
- A new pane called "Project" will automatically open at the bottom of the model. This pane shows which models are included in the current project. Your screen should now look similar to Figure 10-24.
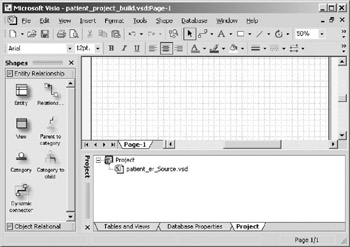
Figure 10-24: Patient ER source model successfully added to project.
- Choose Database > Project > Add Existing Document . A browse window like the one in Figure 10-23 will be shown.
- Add the patient ORM source model to the project. As an alternate to choosing using the Database > Project > Add Existing Document in step 3a, you can highlight the root node in the Project pane, right click to bring up the context menu and choose Add Existing Document .
- Choose Database > Project > Build from the main menu. VEA will now merge the two source models into a single logical schema and create a database model diagram from the result of the project build. The database model diagram should
Caution If you change any column names or table names in your project model, you will be prompted (see the dialog box in Figure 10-26) to migrate your changes back to the source model(s). If you click on the Yes button, VEA will "push" the column and table name changes into the source model(s) of your project, so that on the next build, the table and column name changes will be preserved. A bug in the VEA beta used to develop this book prevents VEA from migrating column name changes back to ORM source models for projects that have multiple source models. There is no problem migrating these names back to a single source model. You should check with Microsoft to see if this bug has been fixed in your release.
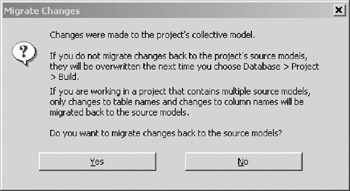
Figure 10-26: Project Migrate Prompt.show the three entities Patient, Country and PapSmear in the Tables and Views pane. Dragging the entities onto the drawing surface will reveal the foreign key relationships as shown in Figure 10-25.
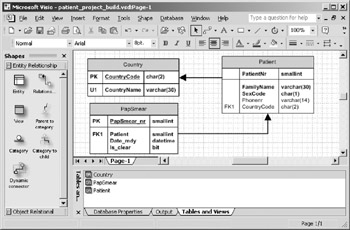
Figure 10-25: Project Successfully Built. - Save your project model.
Overview of Database Modeling and the Database Modeling Tool
The Conceptual Modeling Solution (ORM)
- Object Types, Predicates, and Basic Constraints
- ORM Constraints
- Configuring, Manipulating, and Reusing ORM Models
- Mapping ORM Models to Logical Database Models
- Reverse Engineering and Importing to ORM
- Conceptual Model Reports
The Logical Modeling Solution (ER and Relational)
- Creating a Basic Logical Database Model
- Generating a Physical Database Schema
- Editing Logical Models”Intermediate Aspects
- Editing Logical Models”Advanced Aspects
- Reverse Engineering Physical Schemas to Logical Models
- Logical Database Model Reports
Managing Database Projects
EAN: 2147483647
Pages: 150
