Game Graphics Learning to Use Bitmaps
Bitmapped images are the core and substance of every game, whether it is a 2D vertical scrolling arcade game like the classic Heavy Barrel, a war simulation like Battlefield 1942, a first-person shooter like Doom III, or a real-time strategy game like Warcraft III: Reign of Chaos. None of these games would amount to anything without the ability to load, manipulate, and display bitmap images in one form or another. So when you learn how to use bitmaps, you are really getting down to the core of what it takes to make a game.
This chapter covers the subject of handling bitmaps in great detail, showing you how to load, create, and display Windows bitmap files (which have a .bmp extension). The commands in this chapter will also show you how to manipulate bitmap images to create special effects. This chapter will be a helpful introduction to the more advanced subject of sprites, which is covered in Chapter 11, "The Art of Using Animated Sprites for 2D Games."
Introduction to Bitmaps
The phrase bitmapped graphics files, in the truest sense, refers to any file format used to store pictures, such as those taken with digital cameras or scanners, downloaded off the Internet, or even hand-drawn. The term bitmap refers to the way bits in the image are encoded in the image file or in the memory prior to being displayed.
| Tip |
Recall that 8 bits equal 1 byte, and a 32-bit video card requires 4 bytes for every pixel. |
The bit format of the display screen (your monitor) is not always the same as the bit format of a picture in memory or in a disk file, but Windows and DirectX (which powers DarkBASIC) are able to handle the task of converting pictures from disk to a format that is supported by your video card.
Bitmaps range from simple letters to complex pictures and anything in between. Early game consoles such as the Nintendo and the Sega relied almost solely on small bitmaps for the graphics in video games. (In contrast, most current games run in 3D and use polygons with textures, which are bitmaps too.)
What Is a Bitmap?
So what exactly is a bitmap? It might help if you first had an inkling of what bitmaps are useful for, but I'll get to that shortly. A bitmap is nothing more than a collection of bytes (where each byte equals 8 bits) that represent a picture or graphic image. The simplest form of a bitmap is a black and white picture. All white pixels are represented as 0, and all black pixels are represented as 1. Figure 10.1 shows a simple 88 bitmap using 1s and 0s.
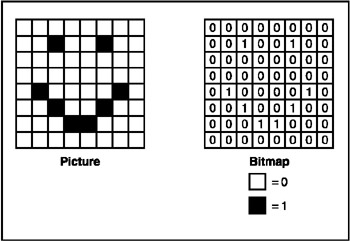
Figure 10.1: A simple monochrome bitmap, showing how a very simple picture is constructed
Notice how you can visualize the image made up of 1s and 0s. A pattern emerges from the pixels as you look closer at them. (If you don't know what a pixel is, refer back to Chapter 9 for an explanation.) Each 1 or 0 represents a colored pixel (black or white, respectively). With a little more imagination, you might enhance this theoretical bitmap with additional colors by using other numbers, such as 2, 3, and 4, to represent red, green, and blue. In fact, the actual bit encoding of a bitmap is extremely complicated; it involves different color depths (such 16-bit or 32-bit color), which I'll not get into at this point.
Bitmap File Formats
There are many different bitmap file formats, but they are all based on the simple format described in Figure 10.1. DarkBASIC handles all the details of converting the bitmap format so it is displayed on the screen as expected. If you can imagine the difficulties involved in converting an 8-bit image to a 32-bit image, you will develop considerable respect for the amount of work that DarkBASIC and DirectX handle automatically. DarkBASIC uses the BMP (Windows Bitmap) file format natively. Although there are other popular formats such as TIF (Tagged Image File Format), JPEG (Joint Photographic Experts Group), GIF (Graphical Interchange Format), and PCX (Picture Exchange), it is easier to simply use the format natively supported by DarkBASIC and DirectX.
Color depth is the most important factor to consider when working with bitmaps. The most common color depths include 8, 16, 24, and 32 bits. The number of colors in an image is often referred to as the bit depth because the number is representative of the bits, not the number of colors. To figure out how many colors are supported by a color depth (also referred to as bits per pixel or BPP), use the following formula:
Total Colors = 2 ∧ (Bit Depth)
This formula takes 2 to the power of the bit depth of the image (or video display). Table 10.1 shows the common bit depths, along with the total number of colors associated with each.
|
Bit Depth |
Number of Colors |
|---|---|
|
8 |
256 |
|
12 |
4,096 |
|
16 |
65,536 |
|
24 |
16,777,216 |
|
32 |
4,294,967,296 |
You'll notice that the number of colors increases with the higher color depth. That is because the computer has more bits to represent colors. In Figure 10.1 you had 2 bits—black and white. In a 16-bit image, you have a total of 65,535 combinations from which to choose. Don't worry too much about the details because DarkBASIC takes care of them for you.
Creating Bitmaps
At this point, you might be curious about how to load a bitmap from a disk and draw it on the screen. I'll show you how to do that soon enough. First, I want to explain something important before you jump in and start using bitmaps in DarkBASIC.
How do you create a bitmap? I guess that would be a good place to start, especially if you are not familiar with paint programs. There are two ways to create a bitmap. First, you can use some of the built-in DarkBASIC commands, such as those covered in Chapter 9. Alternatively, you can use a paint program such as Paint Shop Pro to create some interesting graphics, and then load them into your DarkBASIC program. To create a bitmap that will be loaded by DarkBASIC, you need a graphics editor program. My favorite graphic editor is Paint Shop Pro by Jasc Software (http://www.jasc.com). A trial version of Paint Shop Pro is included on the CD-ROM (see Figure 10.2), and you can install it from the CD-ROM menu.
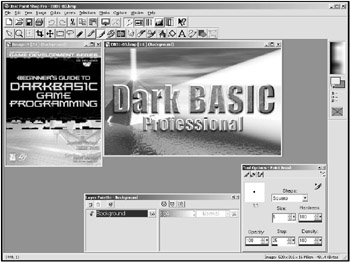
Figure 10.2: Paint Shop Pro is a powerful graphics editor.
This program has all the tools you need to create a bitmap file for use in DarkBASIC. There are numerous image editing tools, and a zoom feature that is useful for precision graphics editing. Editing and manipulating game graphics is a serious subject, as well as a serious career choice for many who find employment in the graphic arts, advertising, and games industries. However, full coverage of this topic is beyond the scope of this book. I recommend you pick up a book or two on the subject, such as Paint Shop Pro 7 Fast & Easy (Premier Press, 2000). Even if you are interested solely in 3D graphics, you should know how to create 2D graphics because 3D textures are created with programs like Paint Shop Pro. For more information, fast-forward to Chapter 17, "Fundamentals of 3D Graphics Programming."
Uses for Bitmaps
So what kinds of uses are there for bitmaps? There are plenty of different things you can do with them. You can create beautiful backgrounds or use smaller bitmaps to display score lines and statistics. Instead of drawing your pictures pixel-by-pixel or line-by-line, you can use bitmaps to stamp the entire image on the screen.
I have found quite a few uses for bitmaps in the years I have been programming. I have used them to create fonts (for text on the screen) and textures (for skins of models), and even for height mapping. Because a bitmap is nothing more than a series of bytes, you can use it for anything. (Why we don't call them byte maps, I don't know.)
Creating and Loading Bitmaps
First I will cover the series of commands to load and create bitmaps. These commands are useful for loading a picture you create in Microsoft Paint or for creating your own pictures within DarkBASIC.
DarkBASIC can support a maximum of 32 bitmaps at one time. This might seem like a small number, but you can be creative and eliminate any problems related to the small number of bitmaps. Usually you won't be using more than five or six bitmaps at a time, because most of the work in a 2D game is handled by sprites, which are stored separately from bitmaps (as you'll see in Chapter 11, "The Art of Using Animated Sprites for 2D Games").
Each bitmap is addressed like an array. That is to say, each bitmap has a number attached to it, ranging from 0 to 31. Bitmap 0 is special in that it is displayed on the screen by default. Therefore, if you load a graphic into bitmap 0, it will be displayed on the screen.
| Note |
Bitmap 0 is an important bitmap. It is reserved for the screen. Anything loaded, drawn, or pasted on this bitmap will appear directly on the screen. |
Loading a Bitmap File
LOAD BITMAP is the first of the important bitmap commands. The command format is LOAD BITMAP Filename, Bitmap Number. The first parameter is the name of the file to load; the second one is the bitmap number (between 0 and 31) into which to load the image. In DarkBASIC, there are no bitmap variables; instead, there is a built-in array of bitmaps that you can use. In other languages, such as C++, Visual Basic, and Delphi, you would have to create a variable and then load the bitmap into memory, after which you would be able to draw it on the screen. In DarkBASIC, though, you can just load a bitmap into the bitmap array.
It is easy to load a bitmap and display it on the screen at the same time. DarkBASIC defines bitmap 0 as the screen, so if you pass a value of 0 to LOAD BITMAP, it will load the file directly onto the screen. Note that the bitmap file you want to load must be located in the same directory in which the program resides, or else DarkBASIC will return an error message that it could not find the file.
Creating a New Bitmap in Memory
CREATE BITMAP is the second of the important bitmap commands. Whereas LOAD BITMAP loaded a bitmap from disk and displayed it on the screen, CREATE BITMAP creates a blank bitmap with whatever dimensions you want. This is the command you would use to create bitmaps on which to draw within DarkBASIC. The syntax for this command is CREATE BITMAP Bitmap Number, Width, Height.
Unlike the LOAD BITMAP command that has a Bitmap Number parameter, when you call the CREATE BITMAP command, all drawing operations (such as LINE or CIRCLE) then take place on that new bitmap by default. Therefore, if you create a new bitmap and then perform some drawing commands, those operations will not go to the screen, but instead to the new bitmap! Be mindful of this situation; when things do not appear on the screen as you expected, you might want to make sure that you have first called SET CURRENT BITMAP 0 to set the current output to the screen.
CREATE BITMAP requires three parameters to work (none are optional). The first parameter is the number of the bitmap you want to create. This parameter will accept any number between 1 and 31. You cannot use 0 in this parameter because 0 is the screen. Technically, you can only load 31 bitmaps at a time in DarkBASIC, although the screen acts like a bitmap as well. Also, you cannot use a bitmap number that has already been used (either via CREATE BITMAP or LOAD BITMAP) without first deleting the bitmap.
The second and third parameters are the width and height of the bitmap. These do not have to match the screen's width and height. You can make a bitmap 100100 pixels, or you can make it 16001200 pixels, although I can't imagine why you would need one that big!
The CreateBitmap program creates a bitmap and displays circles on it. Figure 10.3 shows the results of the CreateBitmap program. This program is located on the CD-ROM in the SourcesDarkBASICCH10CreateBitmap folder. (The DarkBASIC Pro version is located in SourcesDBProCH10CreateBitmap.)
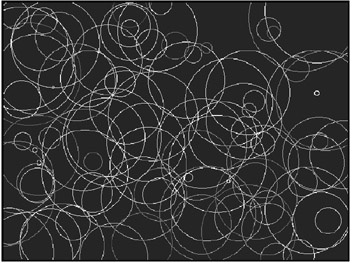
Figure 10.3: The CreateBitmap program shows how to create and draw onto a bitmap in memory.
'----------------------------------
'Beginner's Guide To Game Programming With DarkBASIC
'Copyright (C)2002 Jonathan S. Harbour and Joshua R. Smith
'Chapter 10 - CreateBitmap program
'----------------------------------
HIDE MOUSE

'create a new bitmap
PRINT "Creating the bitmap..."
CREATE BITMAP 1, 640, 480

'display message on the screen
SET CURRENT BITMAP 0
PRINT "Drawing circles..."

'draw some circles on the bitmap surface
SET CURRENT BITMAP 1
FOR N = 1 TO 100
 INK RGB(RND(255), RND(255), RND(255)), 0
 CIRCLE RND(640), RND(480), RND(100)
NEXT N

SET CURRENT BITMAP 0
PRINT "Press a key to display the bitmap..."
WAIT KEY

'copy bitmap 1 to the screen
COPY BITMAP 1, 0

WAIT KEY
END
Checking the Status of a Bitmap
Creating and loading bitmaps can be complicated, especially if you don't know whether one has been created or loaded already. The BITMAP EXIST command can help you there. The command format is BITMAP EXIST(Bitmap Number). This command takes one parameter—the bitmap number—and tells you whether that bitmap has been created or loaded. It returns a 0 if the bitmap does not exist and a 1 if it does exist. These two numbers are standard in most languages, where true = 1 and false = 0. Personally, I find it easier to remember that false always equals zero instead of trying to remember both.
The BitmapStatus program demonstrates the effects of the BITMAP EXIST command. Figure 10.4 shows the output of this program. Note that bitmap 0 (the screen) will always return true, because the screen always exists. This program is located on the CD-ROM in the SourcesDarkBASICCH10BitmapStatus folder. (The DarkBASIC Pro version is located in SourcesDBProCH10BitmapStatus.)
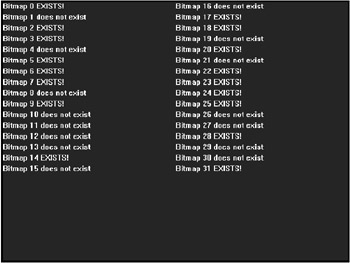
Figure 10.4: The BitmapStatus program demonstrates the use of the BITMAP EXIST command.
'---------------------------------
'Beginner's Guide To DarkBASIC Game Programming
'Copyright (C)2002 Jonathan S. Harbour and Joshua R. Smith
'Chapter 10 - BitmapStatus program
'---------------------------------

'initialize some variables
N = 0
status = 0
message$ = ""

'create the status messages
DIM E$(2)
E$(0) = " does not exist"
E$(1) = " EXISTS!"

'create some bitmaps (randomly)
RANDOMIZE TIMER()
FOR N = 1 TO 31
 IF RND(10) < 5
 CREATE BITMAP N, 640, 480
 ENDIF
NEXT N

'set up the screen
HIDE MOUSE
SET CURRENT BITMAP 0

'display status of each bitmap
FOR N = 0 TO 15
 'check bitmaps 0-15
 message$ = E$(BITMAP EXIST(N))
 'display the status
 TEXT 0, N * 20, "Bitmap " + STR$(N) + message$

 'check bitmaps 16-31
 message$ = E$(BITMAP EXIST(N+16))
 'display the status
 TEXT 320, N * 20, "Bitmap " + STR$(N+16) + message$
NEXT N

WAIT KEY
END
Bitmap Information Commands
Now that you know how to load and create bitmaps, it is time to move on to some other important commands. Each bitmap has specific information, and there are three things that every bitmap has—width, height, and depth. The width and height are pretty self-explanatory. The depth is the color depth of the bitmap. DarkBASIC provides you with commands to find these properties.
Determining Width and Height
The BITMAP WIDTH command returns the width in pixels of a specified bitmap. It takes one parameter—the bitmap number. The BITMAP WIDTH command syntax is BITMAP WIDTH (Bitmap Number). The BitmapInfo program demonstrates the use of the BITMAP WIDTH command.
The BITMAP HEIGHT command returns the height in pixels of a specified bitmap. It takes one parameter, just like the BITMAP WIDTH command. In fact, it is the same parameter. The BITMAP HEIGHT command format is BITMAP HEIGHT (Bitmap Number). The Bitmap Info program demonstrates the use of the BITMAP HEIGHT command.
Determining Color Depth
The BITMAP DEPTH command returns the color depth of a specified bitmap. It has one parameter as well—the bitmap number. The command format is BITMAP DEPTH (Bitmap Number). It returns a bit depth value shown in Table 10.1, not the number of colors. The BitmapInfo program demonstrates how to use the BITMAP DEPTH command.
The BitmapInfo Program
The BitmapInfo program (which is located on the CD-ROM under SourcesChapter10BitmapInfo) loads a bitmap file and then displays the width, height, and depth of the bitmap. Figure 10.5 shows the output of the program.
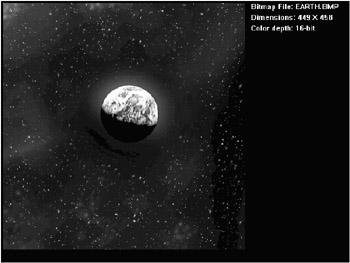
Figure 10.5: The BitmapInfo program demonstrates how to read the width, height, and color depth of a bitmap.
'---------------------------------
'Beginner's Guide To DarkBASIC Game Programming
'Copyright (C)2002 Jonathan S. Harbour and Joshua R. Smith
'Chapter 10 - BitmapInfo program
'---------------------------------

HIDE MOUSE

'load and display the BMP image
ShowBitmap("EARTH.BMP")
WAIT KEY
CLS
'load and display the JPG image
ShowBitmap("SUNSET.JPG")
WAIT KEY
CLS
'load and display the TGA image
ShowBitmap("EXPLODE.TGA")
WAIT KEY
END

FUNCTION ShowBitmap(Filename$)
 'load the bitmap file
 LOAD BITMAP Filename$, 1
 'display the bitmap file
 COPY BITMAP 1, 0
 'read information about the bitmap
 width$ = STR$(BITMAP WIDTH(1))
 height$ = STR$(BITMAP HEIGHT(1))
 depth$ = STR$(BITMAP DEPTH(1))
 'display information about the bitmap
 SET CURRENT BITMAP 0
 TEXT 460, 0, "Bitmap File: " + Filename$
 TEXT 460, 20, "Dimensions: " + width$ + " X " + height$
 TEXT 460, 40, "Color depth: " + depth$ + "-bit"
 'delete the bitmap from memory
 DELETE BITMAP 1
ENDFUNCTION
Basic Bitmap Commands
Now that you know the commands to create and measure bitmaps, it's time to manipulate them. This is not as hard as it sounds. All the commands required to manipulate bitmaps are included in DarkBASIC. However, you will need to keep track of where each bitmap is located in the bitmap array. Remember how I told you that DarkBASIC supports 32 bitmaps (0–31)? The next set of commands will allow you to manipulate those different bitmaps.
Copying One Bitmap to Another
Finally, the COPY BITMAP command that you have been using throughout the examples is explained! This is one of the more complicated commands because it can take two different sets of parameters. If you want to copy the contents of an entire bitmap from one bitmap to another, the format is COPY BITMAP From Bitmap, To Bitmap, where the entire "from" bitmap is copied to the "to" bitmap.
You use the slightly more complicated version of the command when you want to copy only part of a bitmap. In that case, the COPY BITMAP command takes 10 parameters. The command format is COPY BITMAP From Bitmap, Left, Top, Right, Bottom, To Bitmap, Left, Top, Right, Bottom. The From Bitmap and To Bitmap parameters are the same as in the first command. The Left, Right, Top, and Bottom parameters on both sides specify what pixels to copy and to where. Figure 10.6 will give you a better visual explanation of the COPY BITMAP command.
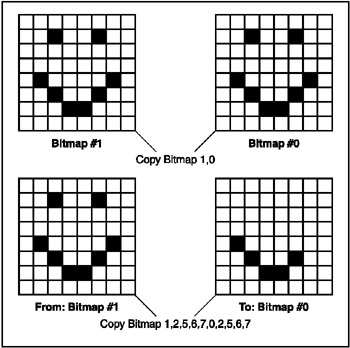
Figure 10.6: A portion of one bitmap is copied to another bitmap
There is a catch to the 10-parameter COPY BITMAP command. When copying pixels from one bitmap to another, the COPY BITMAP command uses 0,0 as the upper-left corner. This means that when you copy to or from a bitmap, the furthest right you should copy is BITMAP WIDTH -1, and the furthest down you should copy is BITMAP HEIGHT -1.
Changing the Current Bitmap
SET CURRENT BITMAP is the most common command for programming bitmaps because it changes the bitmap number to which drawing commands are directed. If you use the CIRCLE command, the normal output is to the screen, which is bitmap 0 in the array. The TEXT command works the same way, drawing to the current bitmap. The SET CURRENT BITMAP command allows you to change the current bitmap. The command format is SET CURRENT BITMAP Bitmap Number. When you use this command, you can draw to any bitmap, not just to the screen.
Likewise, the CURRENT BITMAP command returns the number of the currently active bitmap. The command format is Return Value = CURRENT BITMAP() (meaning that this command has no parameters). This is a useful command to help you keep track of which bitmap you are using.
The CurrentBitmap program demonstrates the use of both commands (as shown in Figure 10.7). This program is located on the CD-ROM in SourcesCH10DarkBASICCurrentBitmap. (The DarkBASIC Pro version is located in SourcesCH10DBProCurrentBitmap.)

Figure 10.7: The CurrentBitmap program demonstrates the use of the SET CURRENT BITMAP command.
The source code for the SetCurrentBitmap program follows. Notice that after each section, I set the current bitmap back to 0. This is because I want to display something to the screen. I told you earlier that bitmap 0 is the screen. This is a case in which you need to change the bitmap back to 0 to display some text.
| Tip |
Remember that the screen is always referenced as bitmap 0. Drawing commands performed on bitmap 0 are displayed directly on the screen. |
'----------------------------------
'Beginner's Guide TO DarkBASIC Game Programming
'Copyright (C)2002 Jonathan S. Harbour and Joshua R. Smith
'Chapter 10 - CurrentBitmap program
'----------------------------------

'initialize some variables
maxballs = 10
source=31
DIM xpos(maxballs)
DIM ypos(maxballs)
DIM xdir(maxballs)
DIM ydir(maxballs)

'initialize screen and load the source bitmap
HIDE MOUSE
SYNC ON
LOAD BITMAP "circles.bmp", source

'change font size and transparency
SET TEXT TRANSPARENT
SET TEXT SIZE 16

'create and set up the bitmaps
FOR N = 1 TO maxballs
 'create bitmap and copy image from source
 CREATE BITMAP N, 33, 33
 COPY BITMAP source, N*32, 0, N*32+31, 32, N, 0, 0, 32, 32
 'draw the bitmap # on the image
 SET CURRENT BITMAP N
 INK RGB(10,10,10), 0
 CENTER TEXT 14, 6, STR$(N)
 INK RGB(255,255,255), 0
 CENTER TEXT 15, 7, STR$(N)
 'set the starting position
 xpos(N) = RND(600)
 ypos(N) = RND(460)
 xdir(N) = RND(4)-3
 ydir(N) = RND(4)-3
NEXT N

'draw to the screen
SET CURRENT BITMAP 0
REPEAT
 CLS
 FOR N = 1 TO maxballs
 'update X position
 xpos(N) = xpos(N) + xdir(N)
 'make sure X stays on the screen
 IF xpos(N) < 10
 xpos(N) = 10
 xdir(N) = xdir(N) * -1
 ENDIF
 IF xpos(N) > 600
 xpos(N) = 600
 xdir(N) = xdir(N) * -1
 ENDIF
 'update Y position
 ypos(N) = ypos(N) + ydir(N)
 'make sure Y stays on the screen
 IF ypos(N) < 10
 ypos(N) = 10
 ydir(N) = ydir(N) * -1
 ENDIF
 IF ypos(N) > 440
 ypos(N) = 440
 ydir(N) = ydir(N) * -1
 ENDIF

 'draw the bitmap on the screen
 X = xpos(N)
 Y = ypos(N)
 COPY BITMAP N, 0, 0, 32, 32, 0, X, Y, X+32, Y+32
 NEXT x
 'update the screen
 SYNC
'loop until user presses ESC or clicks mouse
UNTIL ESCAPEKEY()=1 OR MOUSECLICK()=1

END
Saving a Bitmap to a File
Sometimes you will want to save the work that you do. DarkBASIC provides a command for that as well—the SAVE BITMAP command. Again, it takes two different sets of parameters. If you want to save the contents of the screen, the command is SAVE BITMAP Filename. If you want to save the contents of a specific bitmap number, the command is SAVE BITMAP Filename, Bitmap Number.
The SaveBitmap program draws circles to one of the memory bitmaps and then saves the bitmap to a disk file called  output.bmp (see Figure 10.8). The source code for this program follows.
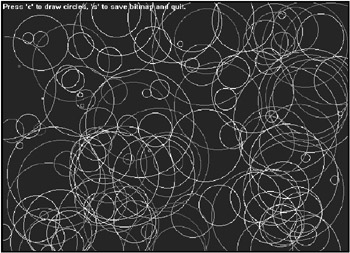
Figure 10.8: The output generated by the SAVE BITMAP command in the SaveBitmap program
| Note |
This program needs to be copied to your hard drive to work properly. You will not be able to save a file onto the CD-ROM because it is read-only. |
'---------------------------------
'Beginner's Guide To DarkBASIC Game Programming
'Copyright (C)2002 Jonathan S. Harbour and Joshua R. Smith
'Chapter 10 - SaveBitmap program
'---------------------------------

'initialize screen
HIDE MOUSE
SYNC ON
PRINT "Press 'c' to draw circles, 's' to save bitmap and quit."

'perform a loop
DO
 'check for keyboard input
 key$ = INKEY$()
 IF key$ = "c" OR key$ = "s"
 SELECT key$
 'draw random circles
 CASE "c"
 INK RGB(RND(255), RND(255), RND(255)), 0
 CIRCLE RND(640), RND(480), RND(100)
 ENDCASE
 'end the program
 CASE "s"
 EXIT
 ENDCASE
 ENDSELECT
 ENDIF
 SYNC
LOOP

'save the screen to a file and then quit
SAVE BITMAP "output.bmp", 0
END
Deleting a Bitmap
Now comes one of the most important commands in bitmap manipulation—DELETE BITMAP. Remember how I told you that you can only have 32 bitmaps at a time? The DELETE BITMAP command helps you manage those 32 bitmaps by allowing you to delete the ones that are no longer in use. After you are done with a bitmap, it is a good habit to delete it so it will be available elsewhere in the program. All bitmaps are deleted automatically when a DarkBASIC program ends, but it is good programming practice to delete things when you no longer need them—and before a program ends.
| Caution |
Remember bitmap 0 is a special bitmap that points to the screen. Therefore, you really have 31 bitmaps you can delete. If you delete bitmap 0, you might get some unexpected results. |
Special Effects Commands
DarkBASIC comes with some great special effects commands for bitmaps. There are five types of special effects you can use with bitmaps. They are MIRROR, FLIP, FADE, BLUR, and SET GAMMA. These commands are easy to use and can be a lot of fun.
The Bitmap Mirror Effect
Just like looking in a mirror, the MIRROR effect will flip your bitmap horizontally. If the image has writing on it, the writing will appear backward. The MIRROR BITMAP command takes one parameter—the bitmap number. The format is MIRROR BITMAP Bitmap Number. The MirrorBitmap program demonstrates the command and is listed below (see Figure 10.9). This program is located on the CD-ROM in the SourcesDarkBASICCH10MirrorBitmap folder. (The DarkBASIC Pro project is located in SourcesDBProCH10MirrorBitmap.)
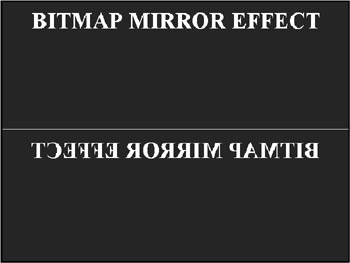
Figure 10.9: The MirrorBitmap program demonstrates the bitmap mirror effect.
'---------------------------------
'Beginner's Guide To DarkBASIC Game Programming
'Copyright (C)2002 Jonathan S. Harbour and Joshua R. Smith
'Chapter 10 - MirrorBitmap program
'---------------------------------

'initialize program
HIDE MOUSE
RANDOMIZE TIMER()

'create two bitmaps
CREATE BITMAP 2, 640, 240
CREATE BITMAP 1, 640, 240

'draw a message on bitmap 1
SET TEXT FONT "Times New Roman"
SET TEXT SIZE 48
SET TEXT TO BOLD
INK RGB(RND(255),RND(255),RND(255)), 0
CENTER TEXT 320, 10, "BITMAP MIRROR EFFECT"
'copy bitmap 1 to the screen
SET CURRENT BITMAP 0
COPY BITMAP 1, 0

'draw a line across the center
LINE 0, 235, 639, 235

'copy bitmap 1 to bitmap 2 and mirror it
COPY BITMAP 1, 2
MIRROR BITMAP 2

'display bitmap 2 on the screen
COPY BITMAP 2, 0, 0, 639, 239, 0, 0, 239, 639, 479

'wait and then clean up
WAIT KEY
DELETE BITMAP 2
DELETE BITMAP 1
END
How can you tell whether a bitmap has been mirrored? By using the BITMAP MIRRORED command, of course. This command takes one parameter—the bitmap number. It returns a 0 if the bitmap is mirrored or a 1 if it is not. The command format is BITMAP MIRRORED (Bitmap Number), where Bitmap Number is the bitmap you are checking.
The Bitmap Flip Effect
The FLIP BITMAP command is similar to the MIRROR BITMAP command, but it works vertically rather than horizontally. This command takes one parameter—the bitmap number. The command format is FLIP BITMAP Bitmap Number. The FlipBitmap program shows you how to use this command (see Figure 10.10). You can type in the following source code or load the project from the CD-ROM. The project is located in SourcesDarkBASICCH10FlipBitmap. (The DarkBASIC Pro version is located in SourcesDBProCH10FlipBitmap.)
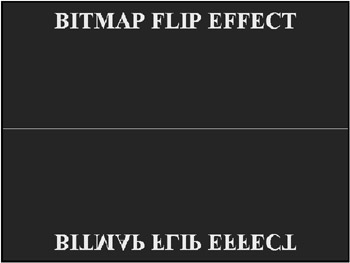
Figure 10.10: The FlipBitmap program demonstrates the bitmap flip effect.
'---------------------------------
'Beginner's Guide To DarkBASIC Game Programming
'Copyright (C)2002 Jonathan S. Harbour and Joshua R. Smith
'Chapter 10 - FlipBitmap program
'---------------------------------

'initialize program
HIDE MOUSE
RANDOMIZE TIMER()

'create two bitmaps
CREATE BITMAP 2, 640, 240
CREATE BITMAP 1, 640, 240

'draw some text on the screen
SET TEXT FONT "Times New Roman"
SET TEXT SIZE 48
SET TEXT TO BOLD
INK RGB(RND(255),RND(255),RND(255)), 0
CENTER TEXT 320, 10, "BITMAP FLIP EFFECT"
'copy bitmap 1 to the screen
SET CURRENT BITMAP 0
COPY BITMAP 1, 0

'draw a line across the center
LINE 0, 235, 639, 235

'copy bitmap 1 to bitmap 2 and flip it
COPY BITMAP 1, 2
FLIP BITMAP 2

'display bitmap 2 on the screen
COPY BITMAP 2, 0, 0, 639, 239, 0, 0, 239, 639, 479

'wait and then clean up
WAIT KEY
DELETE BITMAP 2
DELETE BITMAP 1
END
Whereas the FLIP BITMAP command vertically inverts a bitmap, the BITMAP FLIPPED command determines whether the bitmap has been flipped. This command is similar to the BITMAP MIRRORED command in that it returns 1 if the bitmap is flipped or 0 if it is not flipped. The syntax is BITMAP FLIPPED(Bitmap Number).
The Bitmap Fade Effect
The FADE BITMAP command fades the contents of a bitmap by a percentage of darkness. The command takes two parameters—the bitmap number and the fade value. The fade value ranges from 0 (blackness) to 100 (no fading). The syntax is FADE BITMAP Bitmap Number, Fade Value. When you have run the FADE BITMAP command, the effects are permanent until you create or load the bitmap again.
The FadeEffect program demonstrates how to use this command by moving a bitmap around the screen, fading it in and out (see Figure 10.11). This program is located on the CD-ROM in SourcesDarkBASICCH10FadeEffect. (The DarkBASIC Pro version is located in SourcesDBProCH10FadeEffect.)
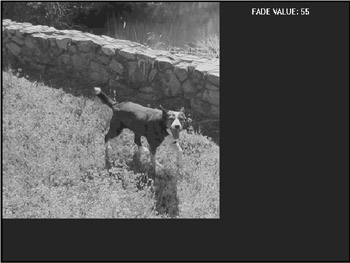
Figure 10.11: The FadeEffect program demonstrates the bitmap fade effect.
'---------------------------------
'Beginner's Guide To DarkBASIC Game Programming
'Copyright (C)2002 Jonathan S. Harbour and Joshua R. Smith
'Chapter 10 - FadeEffect program
'---------------------------------

'create some variables
fade = 100
change = -1

'initialize program
HIDE MOUSE
SYNC ON

'load the source bitmap and create the scratch bitmap
LOAD BITMAP "tippy.bmp", 1
CREATE BITMAP 2, BITMAP WIDTH(1), BITMAP HEIGHT(1)
SET CURRENT BITMAP 0

REPEAT
 'change the fade value
 fade = fade + change
 'bounce fade value off the extremes
 IF fade < 1
 fade = 1
 change = 1
 ENDIF
 IF fade > 100
 fade = 100
 change = -1
 ENDIF

 'draw the faded bitmap
 CLS
 COPY BITMAP 1, 2
 FADE BITMAP 2, fade
 COPY BITMAP 2, 0

 'display fade value on the screen
 TEXT 460, 10, "FADE VALUE: " + STR$(fade)

 'update the screen
 SYNC

'wait for ESC key or mouse click
UNTIL ESCAPEKEY()=1 OR MOUSECLICK()=1
END
The Bitmap Blur Effect
The BLUR BITMAP command blurs a bitmap, which makes it look fuzzy and indistinct. This command takes two parameters, like the FADE BITMAP command—bitmap number and blur value. The blur value ranges between 1 (a couple beers) to 6 (a bottle of tequila). The command format is BLUR BITMAP Bitmap Number, Blur Value. Just like the FADE BITMAP command, BLUR BITMAP is also permanent.
The BlurEffect program demonstrates the BLUR BITMAP command (see Figure 10.12). You can type in the program from the following listing or load it from the CD-ROM in the SourcesDarkBASICCH10BlurEffect folder. (The DarkBASIC Pro version of the project is located in SourcesDBProCH10BlurEffect.)
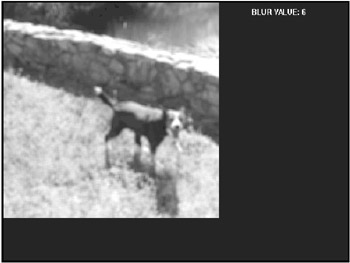
Figure 10.12: The BlurEffect program demonstrates the bitmap blur effect.
'----------------------------------
'Beginner's Guide To DarkBASIC Game Programming
'Copyright (C)2002 Jonathan S. Harbour and Joshua R. Smith
'Chapter 10 - BlurEffect program
'----------------------------------

'create some variables
blur = 1
change = 1

'initialize program
HIDE MOUSE
SYNC ON SYNC
RATE 10

'load the source bitmap and create the scratch bitmap
LOAD BITMAP "tippy.bmp", 1
CREATE BITMAP 2, BITMAP WIDTH(1), BITMAP HEIGHT(1)
SET CURRENT BITMAP 0

REPEAT
 'change the fade value
 blur = blur + change
 'bounce fade value off the extremes
 IF blur < 1
 blur = 1
 change = 1
 ENDIF
 IF blur > 6
 blur = 6
 change = -1
 ENDIF

 CLS
 'restore bitmap using original
 COPY BITMAP 1, 2
 'blue the bitmap
 BLUR BITMAP 2, blur
 'draw the blurred bitmap
 COPY BITMAP 2, 0

 'display blur value on the screen
 TEXT 460, 10, "BLUR VALUE: " + STR$(blur)

 'update the screen
 SYNC

'wait for ESC key or mouse click
UNTIL ESCAPEKEY()=1 OR MOUSECLICK()=1
END
The Bitmap Gamma Effect
The SET GAMMA command is the last of the special effects commands. It takes three parameters and adjusts the gamma display, which is related to the brightness of an image. The three parameters are red, green, and blue. Each value ranges from 0 to 511, with 255 being the middle value. For instance, you can remove all the red from a bitmap by setting Red = 0. The command syntax is SET GAMMA Red, Green, Blue. There is a warning that comes with this command: Some graphics cards do not support the SET GAMMA command.
The GammaEffect program combines the mirror, flip, fade, blur, and gamma commands for an interesting effect (see Figure 10.13). The program is located on the CD-ROM at SourcesChapter10GammaEffect. (The DarkBASIC Pro version of the program is located in SourcesDBProCH10GammaEffect.)

Figure 10.13: The GammaEffect program shows how the SET GAMMA command changes the light level of a bitmap (or the screen).
'---------------------------------
'Beginner's Guide To DarkBASIC Game Programming
'Copyright (C)2002 Jonathan S. Harbour and Joshua R. Smith
'Chapter 10 - GammaEffect program
'---------------------------------

'create some variables
gamma = 255
change = -10

'initialize program
HIDE MOUSE
SYNC ON

'load the source bitmap and create the scratch bitmap
LOAD BITMAP "tippy.bmp", 1
SET CURRENT BITMAP 0

REPEAT
 'change the gamma value
 gamma = gamma + change
 'bounce gamma value off the extremes
 IF gamma < 0
 gamma = 0
 change = 10
 ENDIF
 IF gamma > 510
 gamma = 510
 change = -10
 ENDIF

 'draw the bitmap
 CLS
 COPY BITMAP 1, 0

 'display gamma value on the screen
 TEXT 460, 10, "GAMMA VALUE: " + STR$(gamma)

 'update the screen
 SET GAMMA gamma, gamma, gamma
 SYNC

'wait for ESC key or mouse click
UNTIL ESCAPEKEY()=1 OR MOUSECLICK()=1
END
ImageShuffle A Complete Bitmap Based Game
This chapter project is a fun one. Do you remember the old plastic-tile games? The ones that had tiles numbered 1 through 15, and you had to get the numbers in the correct order? The chapter project mimics that game. You simply click a tile to move it into the blank space. Figure 10.14 shows what the ImageShuffle game looks like when it starts, and Figure 10.15 shows the game screen after the puzzle has been completed successfully.
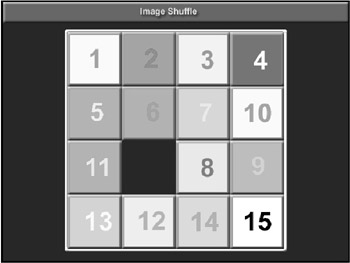
Figure 10.14: The ImageShuffle game in action. Can you reorganize the tiles?
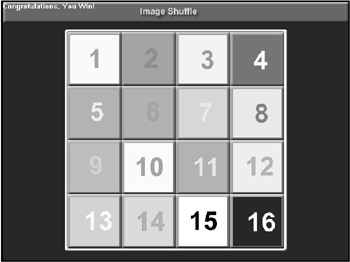
Figure 10.15: The ImageShuffle game completed. The tiles are in order.
'---------------------------------
'Beginner's Guide To DarkBASIC Game Programming
'Copyright (C)2002 Jonathan S. Harbour and Joshua R. Smith
'Chapter 10 - ImageShuffle Program
'---------------------------------

'Tile position data for calculating valid moves
DATA 2,5,0,0
DATA 1,3,6,0
DATA 2,4,7,0
DATA 3,8,0,0
DATA 1,6,9,0
DATA 2,5,7,10
DATA 3,6,8,11
DATA 4,7,12,0
DATA 5,10,13,0
DATA 6,9,11,14
DATA 7,10,12,15
DATA 8,11,16,0
DATA 9,14,0,0
DATA 13,10,15,0
DATA 14,16,11,0
DATA 12,15,0,0

'Declare some variables
DIM Tiles(17)
DIM MovingMatrix(64)
DIM Selected(2)
DIM MoveIt(4)
TempX = 0
TempY = 0
done = 0
Width = 0
Height = 0

'Initialize the display
SYNC ON

'Load the game graphics
LOAD BITMAP "mainback.bmp", 17
LOAD BITMAP "tiles.bmp", 18

'Create the tile bitmaps
FOR x = 1 TO 16
 CREATE BITMAP x, 100, 100
NEXT x

'Copy the tile bitmaps
FOR y = 0 TO 3
 FOR x = 0 TO 3
 pos = (y * 4 + x) + 1
 TX = x * 100
 TY = y * 100
 COPY BITMAP 18,TX,TY,TX + 99,TY + 99,pos,0,0,99,99
 NEXT x
NEXT y

'Set the moving matrix
FOR x = 1 TO 64
 READ a
 MovingMatrix(x) = a
NEXT x

'Initialize the game
SET CURRENT BITMAP 0
ShuffleTiles
DisplayBoard
Selected(1) = 0
Selected(2) = 0

'Main game loop
REPEAT
 SYNC
 IF MOUSECLICK()=1
 'Wait for mouse button to be released
 WHILE MOUSECLICK()=1
 ENDWHILE
 'Figure out which tile was clicked
 bitmap = BitmapNumber(MOUSEX(), MOUSEY())
 b2 = CheckValid(bitmap)

 'Swap the clicked tile and the blank tile
 IF b2 <> 0
 SwapTiles(bitmap, b2)
 DisplayBoard
 done = CheckForWin()
 ENDIF
 ENDIF
UNTIL done = 1

'Game over
PRINT "Congratulations, You Win!"
SYNC

'Delete the tile bitmaps from memory
FOR x = 1 TO 16
 DELETE BITMAP x
NEXT x

'End the game
WAIT KEY
END

'This function will randomize the tiles
FUNCTION ShuffleTiles
 FOR count = 1 TO 16
 Tiles(count) = count
 IF count = 16 THEN Tiles(count) = -1
 NEXT count
 RandomMoves = RND(50) + 100
 FOR count = 1 TO RandomMoves
 MoveTheSpace
 NEXT count
ENDFUNCTION

'This function displays the tiles on the screen
FUNCTION DisplayBoard

 COPY BITMAP 17,0
 FOR y = 0 TO 3
 FOR x = 0 TO 3
 pos = (y * 4 + x) + 1
 IF Tiles(pos) >= 0
 TX = x * 100
 TY = y * 100
 W = TX + 99 + 120
 H = TY + 99 + 56
 COPY BITMAP Tiles(pos),0,0,99,99,0,TX+120,TY+56,W,H
 ENDIF
 NEXT x
 NEXT y
 SYNC
ENDFUNCTION

'This function checks the coordinates for a valid tile
FUNCTION CheckValid(rx)
 IF rx = -1 OR Tiles(rx) = -1 THEN EXITFUNCTION 0

 FOR x= 1 TO 16
 ptr = ((x - 1) * 4) + 1
 IF rx = x
 a1 = MovingMatrix(ptr)
 a2 = MovingMatrix(ptr + 1)
 a3 = MovingMatrix(ptr + 2)
 a4 = MovingMatrix(ptr + 3)
 IF a1 <> 0 and Tiles(a1) = -1 THEN EXITFUNCTION a1
 IF a2 <> 0 and Tiles(a2) = -1 THEN EXITFUNCTION a2
 IF a3 <> 0 and Tiles(a3) = -1 THEN EXITFUNCTION a3
 IF a4 <> 0 and Tiles(a4) = -1 THEN EXITFUNCTION a4
 ENDIF
 NEXT x
ENDFUNCTION 0

'This function returns the value of the bitmap located at x,y
FUNCTION BitmapNumber(x, y)
 dx = x - 120
 dy = y - 56
 IF dx < 0 or dy < 0 THEN EXITFUNCTION -1

 dx = dx / 100
 dy = dy / 100

 pos = ((dy * 4) + dx) + 1

 IF pos > 16 THEN pos = -1
 IF pos < 0 THEN pos = -1
ENDFUNCTION pos

'This function swaps two tiles in the Tiles array
FUNCTION SwapTiles(c1, c2)
 temp = Tiles(c1)
 Tiles(c1) = Tiles(c2)
 Tiles(c2) = temp
ENDFUNCTION

'This function moves the empty tile
FUNCTION MoveTheSpace
 spt = 0
 FOR x = 1 TO 16
 IF Tiles(x) = -1 THEN spt = x
 NEXT x

 IF spt = 0 THEN EXITFUNCTION

 FOR x= 1 TO 16
 ptr = ((x-1)*4)+1
 IF spt = x
 MoveIt(1) = MovingMatrix(ptr)
 MoveIt(2) = MovingMatrix(ptr + 1)
 MoveIt(3) = MovingMatrix(ptr + 2)
 MoveIt(4) = MovingMatrix(ptr + 3)

 movenum = RND(3)+1
 WHILE MoveIt(movenum) = 0
 movenum = RND(3)+1
 ENDWHILE
 c1 = spt
 c2 = MoveIt(movenum)
 SwapTiles(c1,c2)
 ENDIF
 NEXT x
ENDFUNCTION

'This function scans the tiles for a win
FUNCTION CheckForWin
 FOR x = 1 TO 15
 IF Tiles(x) <> x THEN EXITFUNCTION 0
 NEXT x
 Tiles(16) = 16
 DisplayBoard
 SLEEP 2500
 EXITFUNCTION 1
ENDFUNCTION
This is a simple yet fun game. However, there are some things that you can add to make this game even more fun. Here are some suggestions for improving the ImageShuffle game.
- High score. Keep track of how many clicks it takes the player to solve the puzzle.
- Different levels. Use a different set of tiles for each level of the game.
- Board size. Increase the number of tiles to 64 (an 88 array).
- Special effects. Add a special effect when the tiles move (such as sliding or fading).
Summary
Bitmaps are the key to writing 2D games in DarkBASIC, and this introductory chapter merely scratched the surface of what DarkBASIC can do. There are many different commands that you can use with bitmaps, such as the special effects commands covered in this chapter. The next chapter will take bitmaps to another level entirely, combining the bitmap image with transparency using a technique called sprite animation.
Quiz
The chapter quiz will help reinforce the material you learned in this chapter, and will provide feedback on how well you have learned the subjects. For the answers to the quiz, refer to Appendix A, "Answers to the Chapter Quizzes."
|
1. |
How many colors are in an 8-bit bitmap?
|
|
|
2. |
What does the following code do? LOAD BITMAP "images est1.bmp", 1
|
|
|
3. |
How many bitmaps does DarkBASIC support at one time?
|
|
|
4. |
Which bitmap represents the screen?
|
|
|
5. |
Which command copies the contents of bitmap 1 into bitmap 0?
|
|
|
6. |
Which command deletes bitmap 1?
|
|
|
7. |
To what does the following code set the current bitmap? bitmapnum = (10/2)+10 SET CURRENT BITMAP bitmapnum
|
|
|
8. |
Which command flips bitmap 1 horizontally?
|
|
|
9. |
Which command creates a bitmap that is 100150 pixels?
|
|
|
10. |
SAVE BITMAP will save any bitmap to the hard drive.
|
|

Answers
|
1. |
B |
|
2. |
B |
|
3. |
C |
|
4. |
D |
|
5. |
D |
|
6. |
C |
|
7. |
C |
|
8. |
B |
|
9. |
D |
|
10. |
A |
Part I - The Basics of Computer Programming
- Welcome to DarkBASIC
- Introduction to Computer Programming
- Basic Commands, Variables, and Data Types
- Characters, Strings, and Text Output
- Looping Commands
- Making Programs Think Branching Statements and Subroutines
- More Power to the Numbers Data Sequences and Arrays
- Number Crunching Mathematical and Relational Operators and Commands
Part II - Game Fundamentals Graphics, Sound, Input Devices, and File Access
- Basic Graphics Commands
- Game Graphics Learning to Use Bitmaps
- The Art of Using Animated Sprites for 2D Games
- Programming the Keyboard, Mouse, and Joystick
- Adding Sound Effects to Your Game
- Playing Some Tunes CD Audio, MIDI and MP3 Music
- Loading and Saving Information Using Files
- Playing Intro Movies and Cut-Scenes
Part III - Advanced Topics 3D Graphics and Multiplayer Programming
Epilogue
Part IV - Appendixes
EAN: 2147483647
Pages: 203
