Loading and Saving Information Using Files
Overview
This chapter focuses on the subject of file input and output—that is, the commands used for opening, reading, writing, copying, moving, and deleting files (as well as folders). Almost every application on a PC supports some form of file input and output. From a word processor to the latest game, files are possibly the single most important item in a computer system. DarkBASIC provides plenty of commands to manage files and folders, read and write files to load, and save game data.
Although DarkBASIC abstracts the processes involved in loading textures, reading a 3D Studio Max file, or picking up an MP3 song, such features all involve reading files of one format or another. DarkBASIC handles the details for most of these processes for you, but there might be new types of files, unusual files, or perhaps a file of your own creation that you want to load into your program. Naturally, you will need some way to open and read those files, and DarkBASIC provides you with the commands to do so.
In addition, there might be times when you want to write data to a file. The most common such situation involves saving a game, a feature that most games provide. Without the ability to save a game—and the means to record that game's current state to a file—some games (such as lengthy adventure games or mission-based games) would be unplayable.
Introduction to File Input Output
Behind the scenes, DarkBASIC reads all kinds of different files. It is so sophisticated, in fact, that you can store all the data files your program needs right inside the compiled executable program. You do not need to modify any source code to do this because it is an option that is built into DarkBASIC. When you choose to build an executable with attached media, DarkBASIC writes the bitmaps, 3D models, sound effects, music, and any data files to the executable, allowing you to share just a single file with others. This is one of my favorite features of DarkBASIC because it does not require an annoying install program. The only prerequisite is that DirectX 8.1 must be installed before a DarkBASIC program will run.
Files generally contain some type of data. Data was originally stored on punched cards, but the latest achievement in modern mass-market data storage is the DVD (Digital Versatile Disc). You can now purchase your own DVD burner for less than $300 and make use of a once extravagant but now commonplace 4.7 gigabytes!
Data has not always been stored in files as it is in modern operating systems. However, the concepts we now take for granted, such as drive letters, folders, and files, have been around for several decades. Some of the earliest PC operating systems (CPM, UNIX, and DOS) featured the same (or similar) drive-folder-file hierarchical structure that we use today. Figure 15.1 shows the drive-folder-file hierarchical structure in a typical folder listing under MS-DOS.
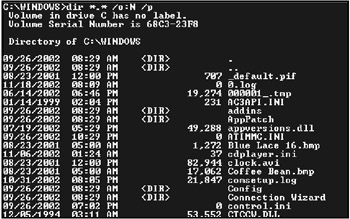
Figure 15.1: The drive-folder-file hierarchical structure under MS-DOS
| Note |
For the record, the correct pronunciation of the word "data" is "day-tuh." Mispronouncing the word as "dat-uh" is acceptable, but technically not correct. Furthermore, correcting others in the proper pronunciation of "day-tuh" will result in you being labeled a nerd of the highest caliber. Trust me …I know. |
Drive and Directory Commands
The hierarchy of drives, folders, and files makes it possible to organize a file system on a hard drive, CD-ROM, or removable disk (such as an IOMega Zip 750 disk). The best analogy for a computer's file system is an actual file cabinet (see Figure 15.2). Some file cabinets are larger than others, just like some forms of media (such as a hard drive) can store more data than others (such as a DVD). A file cabinet has several drawers that you must pull out to gain access to the folders within them. This is analogous to opening a drive and folder on the computer's file system. The folders in a file cabinet are similar to a computer's folders. Finally, each folder can contain one or more documents that are analogous to the files in a computer system.
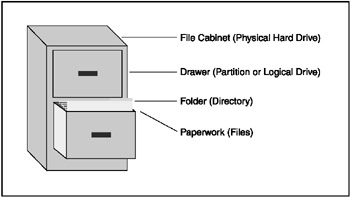
Figure 15.2: A computer's file system is analogous to a file cabinet with drawers, folders, and documents.
| Note |
Folders are synonymous with directories; the two words are interchangeable. In general, the more common term is folders. |
DarkBASIC provide commands to get information about drives, folders, and files. It also provides commands to create, change, enter, and delete folders and files. Throughout this chapter, you will use these commands to create file managers with DarkBASIC.
File managers are programs that allow you to navigate the directories and files on any of your computer's drives. The most common file manager is Windows Explorer.
The GET DIR$ Command
The GET DIR$ command returns a string that contains two of the three aspects of a file name—the current drive letter and the folder name. Figure 15.3 shows the typical output of the command and its breakdown.
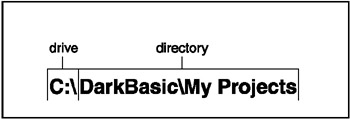
Figure 15.3: Typical output of the GET DIR$ command
The drive is denoted by a letter (A to Z) followed by a colon, such as C: or D:. More than likely you will be working on the C drive, but you might have additional partitions or hard drives called D, E, F, or G. My computer has seven drive letters (which include the floppy drive, hard drives, DVD-ROM, and CD burner), so I could be working in quite a few different drives at any given time. Each folder and subfolder is appended to the drive letter with the backslash character (). Every time you see this character, the main folder or a subfolder (or perhaps the final file name) will follow. C: references the root directory of the C drive. C:winntsystem32 points to the system32 folder, which is located inside the winnt folder on the C drive. But you probably already knew that, right?
The root directory is the base location on a drive. Just like real trees have roots, so do directory trees.
The DRIVELIST Command
The DRIVELIST command prints all the current drives available on the computer to the screen, which gives you a quick view of what drives are available. However, the PERFORM CHECKLIST FOR DRIVES command is better for retrieving the data in a usable format.
The DIR Command
The DIR command prints all of the files within the current directory. This command also provides quick access to information about the current directory. To get a string of the current directory, use the GET DIR$ command. To get a list of the files in a usable format, use the PERFORM CHECKLIST FOR FILES command.
The SET DIR Command
The SET DIR command changes the current directory to one that you specify. The command takes one parameter—a string of the path you want to change. The path can be absolute, such as C:Windows, or it can be relative, such as newdir. You should note that this command does not return anything. Your program will error out if you attempt to set the directory to a location that does not exist. Use the data collected from the PERFORM CHECKLIST FOR FILES command (which I will cover in a moment) to make sure the directory you want exists.
| Note |
Relative and absolute paths can be confusing. To keep them straight, just remember that relative paths do not have drive letters attached to them. Relative paths are only relevant to your current location on the hard drive. For example, to move from the root directory of the C drive to the Windows directory, you would use the command SET DIR "Windows". That is an example of using the relative path. If you needed to use the absolute path, you would use the command SET DIR "C:Windows". There are also two special relative directories. They are "." which means the current directory, and ".." which means the previous directory. |
The CD command is a shorthand version of the SET DIR command. It takes the same parameter (a folder name) and follows the same pattern as SET DIR if it does not find the path you specify.
The PERFORM CHECKLIST FOR DRIVES Command
The PERFORM CHECKLIST FOR DRIVES command returns all the available drives in the form of a checklist. This command will come in handy in the DirectoryManager example, which you will create in just a few moments. Instead of blindly looking for a drive (and most often failing), this command returns all the available drive letters in the CHECKLIST STRING$ command. It provides an easy way to store the available drives, but it does tie up the checklist while in use. Therefore, I would suggest storing this data elsewhere.
The PERFORM CHECKLIST FOR FILES Command
The PERFORM CHECKLIST FOR FILES command returns all the files and directories within the current directory. This command fills up the checklist with all the file and directory names, which can be located in the CHECKLIST STRING$. To tell the difference between a file and a folder, use the CHECKLIST VALUE A command. If it returns a value of 0, then CHECKLIST STRING$ is a file; otherwise, it is a folder.
The MAKE DIRECTORY Command
The MAKE DIRECTORY command creates a new subfolder under the current folder (or under the root). The command takes a single string—the name of the folder you want to create. The directory must not exist, or the command will fail. When you want to create a folder, it is a good practice to at some point use the PERFORM CHECKLIST FOR FILES command (which searches for both files and folders) to check to see whether the folder already exists.
The DELETE DIRECTORY Command
The DELETE DIRECTORY command is the counterpart to the MAKE DIRECTORY command. Its only parameter is a string, which is the directory you want to delete. This folder must exist and be empty for you to delete it.
The DirectoryManager Program
The first project in this chapter is a directory manager. This program is akin to programs such as XTREE and DOSSHELL, but it is written in DarkBASIC. You will add to this program later in the chapter as you learn more of the file commands. You can find the entire program on the CD under the folder for this chapter. Figure 15.4 shows the output of the DirectoryManager program.
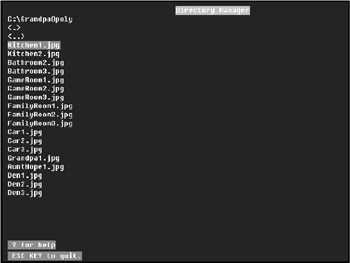
Figure 15.4: The DirectoryManager program uses the commands you have learned thus far.
This program is divided into eight functions, plus the main source code listing. I did this to make the source code easier to read and modify, due to its length. The main source code listing creates numerous global variables used throughout the entire program. Although the source code is a bit on the long side, it is straightforward and should be easy to understand, and it helps to demonstrate the file and folder commands you have encountered up to this point.
REMSTART
---------------------------------
Beginner/s Guide To Game Programming With DarkBASIC
Copyright (C)2002 Jonathan S. Harbour and Joshua R. Smith
Chapter 15 - File and Directory Operations: Managing the I/O
---------------------------------
REMEND

DIM CurrentSelectedItem(1)
DIM CurrentFile$(1)
DIM CurrentFileType(1)
DIM CurrentPage(1)
DIM MaxFiles(1)
DIM PageSize(1)
DIM NewCommand(1)
DIM PageStartY(1)
DIM FileSpacing(1)
NewCommand(1) = 0
CurrentPage(1) = 0
CurrentSelectedItem(1) = 1
MaxFiles(1) = 0
PageSize(1) = 20
PageStartY(1) = 40
FileSpacing(1) = 16
SYNC ON
SYNC RATE 30
SET TEXT OPAQUE
DisplayInfo()
DisplayFiles()
WHILE ESCAPEKEY() = 0
 CheckKeyMovement()
 CheckMouseMovement()
 ProcessCommands()
 SYNC
ENDWHILE
END
The first function to enter is the DisplayFiles() function. This is the heart of the DirectoryManager program. It performs the checklist and displays all the files. It also highlights the currently selected file.
FUNCTION DisplayFiles()
 Black = RGB(0,0,0)
 White = RGB(255,255,255)
 Blue = RGB(0,0,255)
 PERFORM CHECKLIST FOR FILES
 IF CHECKLIST QUANTITY() = 0 THEN EXITFUNCTION
 MaxFiles(1) = CHECKLIST QUANTITY()
 StartA = (CurrentPage(1)*PageSize(1))+1
 StartB = ((CurrentPage(1)+1)*PageSize(1))

 if StartB > MaxFiles(1) THEN StartB = MaxFiles(1)

 FOR x = StartA TO StartB
 PosY = ((x-StartA)*FileSpacing(1))+PageStartY(1)
 IF CHECKLIST VALUE A(X) = 0
 TempString$ = CHECKLIST STRING$(x)
 ELSE
 TempString$ = "<"+CHECKLIST STRING$(x)+">"
 ENDIF

 IF CurrentSelectedItem(1)=(x-StartA)+1
 INK White,Blue
 CurrentFile$(1) = CHECKLIST STRING$(X)
 CurrentFileType(1) = CHECKLIST VALUE A(X)
 ELSE
 INK White,Black
 ENDIF
 TEXT 10, PosY , TempString$
 NEXT X
ENDFUNCTION
The second and third functions are the interface functions. The CheckKeyMovement and CheckMouseMovement functions routinely check the input devices and set up the appropriate command information. If any new commands are added to the program, these functions add the interface to the commands.
FUNCTION CheckKeyMovement()
 IF INKEY$()="?"
 WHILE INKEY$()="?"
 SYNC
 ENDWHILE
 NewCommand(1) = 1
 ENDIF
 IF UPPER$(INKEY$())="D"
 WHILE UPPER$(INKEY$()) = "D"
 SYNC
 ENDWHILE
 NewCommand(1) = 2
 ENDIF
 IF UPKEY()=1
 WHILE UPKEY()=1
 SYNC
 ENDWHILE
 NewCommand(1) = 3
 ENDIF
 IF DOWNKEY()=1
 WHILE DOWNKEY()=1
 SYNC
 ENDWHILE
 NewCommand(1) = 4
 ENDIF
 IF RETURNKEY()=1 and CurrentFileType(1)<>0
 WHILE RETURNKEY()=1
 SYNC
 ENDWHILE
 NewCommand(1) = 5
 ENDIF
 IF KEYSTATE(201) = 1
 WHILE KEYSTATE(201) = 1
 SYNC
 ENDWHILE
 NewCommand(1) = 6
 ENDIF
 IF KEYSTATE(209) = 1
 WHILE KEYSTATE(209) = 1
 SYNC
 ENDWHILE
 NewCommand(1) = 7
 ENDIF
 IF KEYSTATE(211) = 1 and CurrentFileType(1)<>0
 WHILE KEYSTATE(211) = 1
 SYNC
 ENDWHILE
 NewCommand(1) = 8
 ENDIF
 IF KEYSTATE(210) = 1
 WHILE KEYSTATE(210) = 1
 SYNC
 ENDWHILE
 NewCommand(1) = 9
 ENDIF
ENDFUNCTION

FUNCTION CheckMouseMovement()
 IF MOUSECLICK() = 0 THEN EXITFUNCTION
 IF MOUSEY() < PageStartY(1) THEN EXITFUNCTION
 IF MOUSEY() > PageStartY(1)+(PageSize(1)*FileSpacing(1))
 EXITFUNCTION
 ENDIF
 LastPage = MaxFiles(1)/PageSize(1)
 IF CurrentPage(1) = LastPage
 LastItem = MaxFiles(1) - (LastPage*PageSize(1))
 ELSE
 LastItem = PageSize(1)
 ENDIF
 CurrentSelectedItem(1) = ((MOUSEY()-PageStartY(1))/FileSpacing(1))+1
 IF CurrentSelectedItem(1) >= LastItem
 CurrentSelectedItem(1) = LastItem
 DisplayFiles()
 ENDIF
 DisplayFiles()
ENDFUNCTION
The fourth function, ProcessCommands, is the brains of the program. It checks to see whether there is a new command to process. If so, it processes the command. Each command is assigned a number, so this function checks to see whether that number is a command to process.
FUNCTION ProcessCommands()
' New Commands List.. If NEWCOMMAND equals these values
' The New command will be processed
' 0 -- No New Commands
' 1 -- Get Help
' 2 -- Change Drives
' 3 -- Move Up
' 4 -- Move Down
' 5 -- Change Dirs
' 6 -- Page up
' 7 -- Page Down
' 8 -- Delete Dir
' 9 -- Make Dir
' Determine where the last file and page are..
 LastPage = MaxFiles(1)/PageSize(1)
 IF CurrentPage(1) = LastPage
 LastItem = MaxFiles(1) - (LastPage*PageSize(1))
 ELSE
 LastItem = PageSize(1)
 ENDIF
 IF CurrentSelectedItem(1) >= LastItem
 CurrentSelectedItem(1) = LastItem
 DisplayFiles()
 ENDIF
 IF NewCommand(1) = 0 THEN EXITFUNCTION
 CmdToProcess = NewCommand(1)
 NewCommand(1) = 0
' Get the Help
 IF CmdToProcess = 1
 DisplayHelp()
 CLS
 DisplayInfo()
 DisplayFiles()
 ENDIF
' Change Drives
 IF CmdToProcess = 2
 ChangeDrive()
 CLS
 DisplayInfo()
 DisplayFiles()
 ENDIF
' Move Up
 IF CmdToProcess = 3
 CurrentSelectedItem(1) = CurrentSelectedItem(1) - 1
 IF CurrentSelectedItem(1) <= 0
 CurrentSelectedItem(1) = LastItem
 ENDIF
 DisplayFiles()
 ENDIF
' Move Down
 IF CmdToProcess = 4
 CurrentSelectedItem(1) = CurrentSelectedItem(1) + 1
 IF CurrentSelectedItem(1) > LastItem
 CurrentSelectedItem(1) = 1
 ENDIF
 DisplayFiles()
 ENDIF
' Change Directories
 IF CmdToProcess = 5
 NewDir$ = CurrentFile$(1)
 SET DIR NewDir$
 CurrentPage(1) = 0
 CLS
 DisplayInfo()
 DisplayFiles()
 ENDIF
' Page Up -- Change Pages
 IF CmdToProcess = 6
 CurrentPage(1) = CurrentPage(1) - 1
 IF CurrentPage(1) < 0
 CurrentPage(1) = 0
 ENDIF
 CLS
 DisplayInfo()
 DisplayFiles()
 ENDIF
' Page Down -- Change Pages
 IF CmdToProcess = 7
 CurrentPage(1) = CurrentPage(1) + 1
 IF CurrentPage(1) > LastPage
 CurrentPage(1) = LastPage
 ENDIF
 CLS
 DisplayInfo()
 DisplayFiles()
 ENDIF
' Delete a Directory
 IF CmdToProcess = 8
 DeleteDir$ = CurrentFile$(1)
 ' You do not want to delete . or the .. directory..
 ' Trust me on this
 IF DeleteDir$ = "." THEN EXITFUNCTION
 IF DeleteDir$ = ".." THEN EXITFUNCTION
 TempString$ = "Are you sure you want to delete " + DeleteDir$
 TEXT 10,400,TempString$
 A$ = AskYesNo$()
 IF A$ = "YES"
 DELETE DIRECTORY DeleteDir$
 ENDIF
 CLS
 DisplayInfo()
 DisplayFiles()
 ENDIF
' Create a Directory
 IF CmdToProcess = 9
 SET CURSOR 10,400
 INPUT "Type in the name of the Directory: ",newdir$
 MAKE DIRECTORY newdir$
 CLS
 DisplayInfo()
 DisplayFiles()
 ENDIF
ENDFUNCTION
The fifth and sixth functions display the rest of the information shown by the program. The DisplayInfo function shows the title bar, the current directory, and how to get help. The DisplayHelp function displays a screen that shows which keys perform the various commands. Any time a new command is added to this program, the help screen should be updated to reflect the new command.
FUNCTION DisplayInfo()
 Red = RGB(255,0,0)
 White = RGB(255,255,255)
 Black = RGB(0,0,0)
 Blue = RGB(0,0,255)
 INK White,Red
 TEXT 320,8,"Directory Manager"
 TempString$ = GET DIR$()
 INK White,Black
 TEXT 10,24,TempString$
 INK White,Blue
 TEXT 10,440," ? for help" TEXT 10,460," ESC KEY to quit."
ENDFUNCTION

FUNCTION DisplayHelp()
 CLS
 PRINT "This is the Directory Manager Program for Chapter 15"
 PRINT "Up ARROW -- Move Up"
 PRINT "DOWN ARROW -- Move Down"
 PRINT "PAGE UP -- Page up the file list"
 PRINT "PAGE DOWN -- Page down the file list"
 PRINT "DELETE -- Delete a Directory"
 PRINT "INS -- Create a new Directory"
 PRINT "D -- Change Drives"
 CENTER TEXT 320,400," Press Q To Leave This Menu"
 WHILE UPPER$(INKEY$())<>"Q"
 SYNC
 ENDWHILE
 WHILE UPPER$(INKEY$())="Q"
 SYNC
 ENDWHILE
ENDFUNCTION
The seventh function, AskYesNo, is a simple input function. It just waits for the user to press Y or N on the keyboard, and then it returns a string containing "YES" or "NO."
FUNCTION AskYesNo$()
 ch$ = UPPER$(INKEY$())
 WHILE ch$ <> "Y" AND ch$ <> "N"
 ch$ = UPPER$(INKEY$())
 SYNC
 ENDWHILE
 IF ch$ = "Y" THEN Ret$ = "YES"
 IF ch$ = "N" THEN Ret$ = "NO"
 WHILE ch$ = "Y" OR ch$ = "N"
 ch$ = UPPER$(INKEY$())
 SYNC
 ENDWHILE
ENDFUNCTION Ret$
The eighth and final function, ChangeDrive, changes the current drive for you. It lists all the available drives and allows the user to select which one they would like to go to.
FUNCTION ChangeDrive()
 White = RGB(255,255,255)
 Black = RGB(0,0,0)
 INK White,Black
 PERFORM CHECKLIST FOR DRIVES
 IF CHECKLIST QUANTITY()<=1 THEN EXITFUNCTION
 TempString$ = "Select Drive Letter: "
 FOR x=1 TO CHECKLIST QUANTITY()
 TempString$ = TempString$ + CHECKLIST STRING$(X)+" "
 NEXT x
 Done = 0
 TEXT 10,400,TempString$
 SYNC
 SYNC
 WHILE Done = 0
 ch$ = UPPER$(INKEY$())
 FOR x=1 TO CHECKLIST QUANTITY()
 IF ch$ = LEFT$(CHECKLIST STRING$(X),1)
 Done = 1
 ENDIF
 NEXT x
 SYNC
 ENDWHILE
 WHILE INKEY$()<>""
 SYNC
 ENDWHILE
 newdrive$ = ch$+":"
 SET DIR newdrive$
ENDFUNCTION
Introduction to Files
Now that you have been introduced to the basics of managing folders, and you've written a file management program, it is time to cover a more significant subject— files.
What Is a File?
What exactly is a file on a computer? It is a collection of information stored sequentially or randomly and referenced by a specific name on the medium in which it is stored. A file allocation table associates that file name with the starting location of the actual data stored on the medium (such as a CD or floppy disk). Each piece of data in the file points to the next piece until an end-of-file marker is found.
A medium is a physical object on which an electronic file exists. Mediums include CDs, floppy disks, and hard drives, to name a few.
Reading and Writing Files
When you have an electronic file, how do you get and set the information from that file? By reading and writing to it. Reading an electronic file is like reading a paper file. You just need to know where to look and what to look for. Regardless of the medium, electronic files are written in binary. That is, they always conform to 1s and 0s (ON and OFF). DarkBASIC, like most other programming languages, combines the 1s and 0s into bytes. A single byte can store a single letter, number, or other alphanumeric symbol; this is the type of information stored in a file.
File Access Modes
Once you gain an understanding of how the bits are sorted, the next step is to understand how the bytes (groups of bits) are sorted. There are two modes for storing data in a file—sequential and random-access.
Sequential (Text Files)
A sequential file is written in order. The most common type of sequential file is the text file, which is a collection of strings. Each string usually ends with a byte value of 13. To find string number 5, you simply scan the text file for the fourth byte value of 13, and the next byte will be the start of the fifth line.
Random-Access Files
The name "random-access" is a little misleading. It doesn't mean that you randomly guess at where the data is, but rather that the file is structured in such a way that you can find any piece of data without looking at any of the previous data. Random-access files (also called structured files) are made up of several variables in what is called a structure. A structure is a group of variables with a fixed size. Although this might sound a little restricting (compared to a sequential file), this type of structure is great for storing database-style records in a file, which would be nearly impossible with a simple sequential file. Most media files, such as bitmap (.bmp) and wave (.wav) files, are made up of structures, including a header portion and a data portion inside the file.
If you want to read the fifth record in a sequential file, you must read all four records preceding the fifth record because that is how sequential access works. In contrast, you can simply jump to the fifth record in a random-access file and read it immediately, without having to read the previous four records. Random-access files are generally used to keep track of data in a structured and fixed format. If you write a game with many different opponents with different capabilities, you might use a random-access file to store the data for each character or object in the game for easy lookup and retrieval.
Basic File Commands
DarkBASIC provides quite a few commands for basic file operations. The commands can be divided into three groups.
- Search commands
- Information commands
- Management commands
Searching for Files
Although you can use the PERFORM CHECKLIST FOR FILES command to get a list of files, DarkBASIC provides another means to retrieve file information. These commands give you a little more information than the PERFORM CHECKLIST FOR FILES command; therefore, they are treated a little differently.
The FIND FIRST Command
The FIND FIRST command locates the first file of the current directory. If the command succeeds, it fills the GET FILENAME$, GET FILE DATE$, and GET FILE TYPE commands with the appropriate information. This command should always be successful because it returns both files and folders. It takes no parameters and returns nothing.
The FIND NEXT Command
The FIND NEXT command continues the file search begun by the FIND FIRST command. This command takes no parameters and returns nothing. It fills the GET FILENAME$, GET FILE DATE$, and GET FILE TYPE commands with the appropriate information.
The GET FILE NAME$ Command
The GET FILE NAME$ command returns the file name that is currently being searched. It takes no parameters but returns a string with the name of the file currently being searched.
The GET FILE DATE$ Command
The GET FILE DATE$ command returns the date of the file currently being searched. It takes no parameters, but returns the date of the file being examined. This information is not found in the PERFORM CHECKLIST FOR FILES command.
The GET FILE TYPE Command
The GET FILE TYPE command returns the type of file you are examining. If the file is a directory, this command returns a 1; otherwise, it returns a 0. If there are no more files to search, the command returns −1.
Upgrading the DirectoryManager Program to the FileManager Program
Now that you have learned the file-searching commands, your next project is to upgrade DirectoryManager to a full-blown file manager program. There will be only a few changes to the original program to add the new features, but it will provide more useful information about each file. You will replace one function and modify two others. The new FileManager program uses FIND FIRST, FIND NEXT, and related commands instead of the CHECKLIST command. If you prefer, you can load this project from the CD; it is located under the folder for this chapter. Figure 15.5 shows the new FileManager program in action.
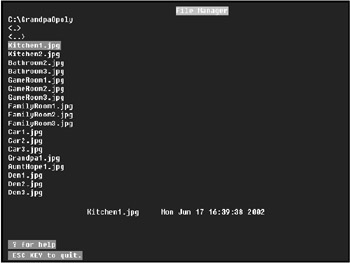
Figure 15.5: The FileManager program uses the new file management commands you have learned.
The first thing you need to do to convert to the FileManager is replace the DisplayFiles function. This function needs to use the new file commands instead of the PERFORM CHECKLIST FOR FILES command.
FUNCTION DisplayFiles()
 Black = RGB(0,0,0)
 White = RGB(255,255,255)
 Blue = RGB(0,0,255)
 Red = RGB(255,0,0)
 FIND FIRST

 MaxFiles(1) = 0
 WHILE GET FILE TYPE()<> -1
 MaxFiles(1) = MaxFiles(1) + 1
 FIND NEXT
 ENDWHILE

 FIND FIRST
 PageOfFiles = CurrentPage(1)*PageSize(1)
 FOR X = 1 to PageOfFiles
 FIND NEXT
 NEXT X

 FOR X = 0 TO PageSize(1)-1
 IF GET FILE TYPE() = -1
 EXIT
 ENDIF
 PosY = ((x)*FileSpacing(1))+PageStartY(1)
 IF GET FILE TYPE() = 0
 TempString$ = GET FILE NAME$()
 TempString2$ = GET FILE NAME$()+" "+GET FILE DATE$()
 ELSE
 TempString$ = "<"+GET FILE NAME$()+">"
 TempString2$ = "<"+GET FILE NAME$()+"> "+GET FILE DATE$()
 ENDIF

 IF CurrentSelectedItem(1)=(x-StartA)+1
 INK White,Blue
 CurrentFile$(1) = GET FILE NAME$()
 CurrentFileType(1) = GET FILE TYPE()
 TEXT 10,PosY, TempString$
 SpaceString$ = " "
 FOR y = 1 to 120
 SpaceString$ = SpaceString$ + " "
 NEXT y
 INK White, Black
 CENTER TEXT 320,380, SpaceString$
 CENTER TEXT 320,380, TempString2$
 ELSE
 INK White,Black
 TEXT 10,PosY, TempString$
 ENDIF
 FIND NEXT
 NEXT X
ENDFUNCTION
You need to update the DisplayInfo function to display the new title of the program. The existing line in the DisplayInfo function is
TEXT 320,8,"Directory Manager"
It should be replaced with:
TEXT 320,8,"File Manager"
You need to update the DisplayHelp function as well, to reflect the new title of the program. Look for the following line in the DisplayHelp function.
PRINT "This is the DirectoryManager program for Chapter 15"
Now replace that line with this new version of the title:
PRINT "This is the FileManager program for Chapter 15"
Reading Detailed Information about Files
After searching for the files in a directory, you will want to get information about certain files. Some programs use information-gathering techniques to determine whether a file is valid before reading it. For example, a game might look at the size of its own .exe file. If the .exe file does not match a defined size, then it has been tampered with. Some copy protection methods rely on file size, but not many. DarkBASIC provides three commands to get key information about a file or directory: FILE SIZE, FILE EXIST, and PATH EXIST.
The FILE SIZE Command
The FILE SIZE command returns the size of a file in bytes. This is helpful when you need to know how many bytes to read out of the file when you open it. The command takes one parameter, which is the name of the file, and returns the size of the specified file.
The FILE EXIST Command
The FILE EXIST command lets you know whether a file exists in the current directory. It takes one string parameter—the name of the file. It returns a 1 if the file exists and a 0 if it does not. Use this command prior to using the FILE SIZE command if you are not sure whether the file exists.
The PATH EXIST Command
The PATH EXIST command lets you know whether a directory exists. You should call this command before you perform any directory action on an unknown location. This command takes one string parameter, which is the location of the path. It returns a 1 if the path exists and a 0 if it does not.
Updating the FileManager Program
Using the new file information commands I just covered, you can update the FileManager program to make it even more useful. I'll explain how to modify the file display function, as well as how to add a new function. This updated version of the program is located on the CD under the folder for this chapter; it is called FileManager2. Figure 15.6 shows the updated FileManager program.
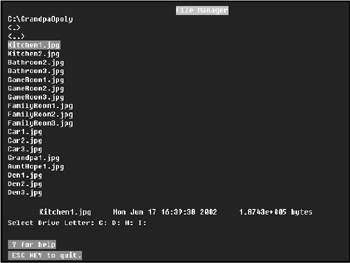
Figure 15.6: The FileManager2 program displays everything you could possibly need to know about a file.
The first function to modify is DisplayFiles. You do not need to replace the entire function this time; instead, you just need to add two lines. Look for the following line in the DisplayFiles function.
TempString2$ = "<"+GET FILE NAME$()+"> "+GET FILE DATE$()
Now, just add the following lines below that line.
TempString2$ = TempString2$+" "
TempString2$ = TempString2$+STR$(FILE SIZE(GET FILE NAME$()))+" bytes"
Now you need to add the new command, which allows you to type a directory to which you want the file manager to go. It checks to see whether the path exists; if it does, the command takes you there. You need to append two functions with new command information. The first is the CheckKeyMovement function. Look for the following lines in the CheckKeyMovement function.
 IF KEYSTATE(210) = 1
 WHILE KEYSTATE(210) = 1
 SYNC
 ENDWHILE
 NewCommand(1) = 9
 ENDIF
Add the following snippet of code below the aforementioned code.
 IF UPPER$(INKEY$())="G"
 WHILE UPPER$(INKEY$()) = "G"
 SYNC
 ENDWHILE
 NewCommand(1) = 10
 ENDIF
The next function to modify is ProcessCommands. This is where the logic of the "G" key is handled. Look for the following section of code in the ProcessCommands function.
' Create a Directory
 IF CmdToProcess = 9
 SET CURSOR 10,400
 INPUT "Type in the name of the Directory: ",newdir$
 MAKE DIRECTORY newdir$
 CLS
 DisplayInfo()
 DisplayFiles()
 ENDIF
Now just add the following snippet of code right below that section.
' Go to a new directory
 IF CmdToProcess = 10
 SET CURSOR 10,400
 INPUT "Type in the new location: ",newdir$
 IF PATH EXIST(newdir$) = 1
 CD newdir$
 ENDIF
 CLS
 DisplayInfo()
 DisplayFiles()
 ENDIF
The last thing to modify in this new program is the help screen. Look for the following line in the DisplayHelp function.
PRINT "D -- Change Drives"
Now add the following line right after it.
PRINT "G -- Goto a specified directory"
File Management
Now that you know where and what files exist, you can use the commands to manage those files. Managing files in DarkBASIC is similar to managing files in Windows Explorer. You can use the MAKE FILE, COPY FILE, DELETE FILE, MOVE FILES, and RENAME FILE commands to perform the same activities that you might perform in Windows Explorer using the various menus. The commands allow you to do the same things you do in Windows Explorer, but within the DarkBASIC environment.
The MAKE FILE Command
The MAKE FILE command creates an empty file on the drive. Why would you need this command? It is useful when you need to open a new file that does not exist yet. You must first make the file, and then you can open it. The command takes one parameter, which is the name of the file you want to create. This command will fail if the file you are trying to make already exists.
The COPY FILE Command
The COPY FILE command copies a file from one location to another. This command takes two string parameters. The first parameter is the name of the file you want to copy (the source). The second parameter is the name of the file to which you want to copy (the destination). The names (both source and destination) can also include the path. This command will fail if a file already exists in the destination location with the name of the destination file.
The DELETE FILE Command
The DELETE FILE command deletes a file from the drive. This command takes one string parameter—the file name. It will fail if the file does not exist. Be careful with this command because you can wipe out important files accidentally.
The MOVE FILE Command
The MOVE FILE command moves a file from one directory to another. Moving a file is different than copying a file because a move will delete the source file. This command takes two string parameters. The first is the name of the file to move; the second is the name of the file to which you want to move the first file. The names (both source and destination) can also include the path. This command will fail if a file already exists in that destination with the name of the destination file.
The RENAME FILE Command
The RENAME FILE command renames a file. This command takes two string parameters and returns nothing. The first string is the original name of the file; the second is the new name of the file. This command will fail if the first name does not exist or if the second name already exists.
Updating the FileManager Program
This is the last time you will revisit the FileManager program. You will be adding a few new commands to make it more useful as a file browser. Specifically, you will add features to move, rename, copy, and delete files—all within DarkBASIC! You will find this updated version of the program on the CD in the folder for this chapter. The project is called FileManager3. Figure 15.7 shows what the new version of the program looks like.
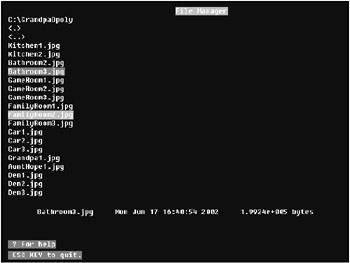
Figure 15.7: The new-and-improved FileManager3 program now has additional features.
The first few things that you need to add to this program are new global variables. These variables will keep track of which files need to be cut, copied, or pasted. Any file that is to be copied in this program will be marked first. Look for the following lines in the main portion of the source code.
DIM PageStartY(1)
DIM FileSpacing(1)
Now add the following lines after them.
DIM MarkedFileDir$(1)
DIM MarkedFile$(1)
Then look for the following lines in the main portion of the source code.
PageStartY(1) = 40
FileSpacing(1) = 16
Now add the following lines after them.
MarkedFileDir$(1) = ""
MarkedFile$(1) = ""
You only need to add one small part to the DisplayFiles function. This part will display the marked files in red. Look for the following lines in the DisplayFiles function.
 CENTER TEXT 320,380, TempString2$
ELSE
 INK White,Black
Then add the following lines of code after them.
CurrentDir$ = GET DIR$()
IF CurrentDir$ = MarkedFileDir$(1)
 IF TempString$ = MarkedFile$(1)
 INK White,Red
 ENDIF
ENDIF
You need to add a pretty hefty amount of code to the CheckKeyMovements function. You will be adding the keys for the MARK, CUT, COPY, and RENAME functions. Look for the following lines of code in the CheckKeyMovements function.
 IF UPPER$(INKEY$())="G"
 WHILE UPPER$(INKEY$()) = "G"
 SYNC
 ENDWHILE
 NewCommand(1) = 10
 ENDIF
Add the following lines after them.
 IF UPPER$(INKEY$())="M"
 WHILE UPPER$(INKEY$()) = "M"
 SYNC
 ENDWHILE
 NewCommand(1) = 11
 ENDIF
 IF UPPER$(INKEY$())="X"
 WHILE UPPER$(INKEY$()) = "X"
 SYNC
 ENDWHILE
 NewCommand(1) = 12
 ENDIF
 IF UPPER$(INKEY$())="C"
 WHILE UPPER$(INKEY$()) = "C"
 SYNC
 ENDWHILE
 NewCommand(1) = 13
 ENDIF
 IF UPPER$(INKEY$())="R"
 WHILE UPPER$(INKEY$()) = "R"
 SYNC
 ENDWHILE
 NewCommand(1) = 14
 ENDIF
Now you need to modify the ProcessCommands function. There are two things that you need to do in this function. You need to replace one section of code and add another. Look for the following section of code in CheckKeyMovements function.
' Delete a Directory
 IF CmdToProcess = 8
 ...
 ENDIF
Now just replace all the code in the "Delete a Directory" section with the following lines of code.
' Delete a Directory or File
 IF CmdToProcess = 8
 DeleteDir$ = CurrentFile$(1)
 ' You do not want to delete . or the .. directory..
 ' Trust me on this
 IF CurrentFileType(1) = 1
 IF DeleteDir$ = "." THEN EXITFUNCTION
 IF DeleteDir$ = ".." THEN EXITFUNCTION
 tempstring$ = "Are you sure you want to delete " + DeleteDir$
 TEXT 10,400, tempstring$
 A$ = ASKYESNO$()
 IF A$ = "YES"
 DELETE DIRECTORY DeleteDir$
 ENDIF
 ELSE
 tempstring$ = "Are you sure you want to delete " + DeleteDir$
 TEXT 10,400, tempstring$
 A$ = ASKYESNO$()
 IF A$ = "YES"
 DELETE FILE DeleteDir$
 ENDIF
 ENDIF
 CLS
 DisplayInfo()
 DisplayFiles()
 ENDIF
While you are still in the CheckKeyMovements function, look for the following section of code.
' Go to a new directory
 IF CmdToProcess = 10
 SET CURSOR 10,400
 INPUT "Type in the new location: ",newdir$
 IF PATH EXIST(newdir$) = 1
 CD newdir$
 ENDIF
 CLS
 DisplayInfo()
 DisplayFiles()
 ENDIF
Add the following lines below this code.
 ' Set Marked File
 IF CmdToProcess = 11
 MarkedFileDir$(1) = GET DIR$()
 MarkedFile$(1) = CurrentFile$(1)
 CLS
 DisplayInfo()
 DisplayFiles()
 ENDIF
 ' Move Marked File
 IF CmdToProcess = 12
 OldFile$ = MarkedFileDir$(1)+""+MarkedFile$(1)
 NewFile$ = GET DIR$()+""+MarkedFile$(1)
 MOVE FILE OldFile$, NewFile$
 MarkedFileDir$(1) = GET DIR$()
 CLS
 DisplayInfo()
 DisplayFiles()
 ENDIF
 ' Copy Marked File
 IF CmdToProcess = 13
 OldFile$ = MarkedFileDir$(1)+""+MarkedFile$(1)
 NewFile$ = GET DIR$()+""+MarkedFile$(1)
 COPY FILE OldFile$, NewFile$
 MarkedFileDir$(1) = GET DIR$()
 CLS
 DisplayInfo()
 DisplayFiles()
 ENDIF
 ' Rename File
 IF CmdToProcess = 14
 SET CURSOR 10,400
 INPUT "Type in the new name of the file: ",newname$
 IF newname$ <> ""
 RENAME FILE CurrentFile$(1),newname$
 ENDIF
 CLS
 DisplayInfo()
 DisplayFiles()
 ENDIF
The last thing you need to update in this version of the FileManager program is the help. Look for the following two lines in the DisplayHelp function.
 PRINT "D - Change Drives"
 PRINT "G - Goto a specified directory"
Add the following code below them.
 PRINT "C - Mark File"
 PRINT "X - Move Marked File"
 PRINT "P - Copy Marked File"
 PRINT "R - Rename File"
File Input Output Commands
Up to this point, you have been exposed to the DarkBASIC commands to manipulate files and folders, but you have not actually used files to read or write information to disk. Therefore, I will spend the rest of this chapter showing you how to read and write files! There are many processes that benefit from storing data in files. For example, you might store the high scores for your game in a file. The most common use of file I/O is to create a data-driven game. By storing data outside your game, you can modify game data and items without recompiling the entire game. As games get more and more complex, the ability to edit the game- play without modifying the source code becomes a valuable timesaver. As an example, the game Real War uses a scripting language to handle many of the different aspects of the game, so it is possible to change the way the game plays without recompiling the source code.
Opening and Closing Files
After you know (or have created) the file you want to work with, you must open the file. There are two different methods for opening a file. You can open a file for reading or for writing. If you want to output data to a file, you must open it for writing. If you want to input data from a file, you need to open it for reading. After you have written or read all the data from the file, you must then close it. If you do not perform this step, you can write or read the wrong information later, resulting in corrupt data.
The OPEN TO READ Command
The OPEN TO READ command opens a file for reading. The command takes two parameters, the first of which is the file number. DarkBASIC supports up to 32 files open for reading or writing at the same time. The second parameter is the name of the file. The file must exist, or the command will fail.
Here is an example of the OPEN TO READ command:
OPEN TO READ 1,"NewFile.txt"
The OPEN TO WRITE Command
The OPEN TO WRITE command opens a file for writing. This command takes two parameters. The first is the file number, and the second is the name of the file. The file must exist, or the command will fail.
Here is an example of the OPEN TO WRITE command:
OPEN TO WRITE 1,"NewFile.txt"
The CLOSE FILE Command
The CLOSE FILE command closes a file number so that no more read or write operations can be performed on that file. This command takes one parameter—the number of the file that you want to close. The command will fail if the specified file is not already open.
Here is an example of the CLOSE FILE command:
CLOSE FILE 1
| Tip |
Remember that DarkBASIC can only open 32 files at a time. If you need to open multiple files, make sure you close them with the CLOSE FILE command when you are finished. |
The FILE OPEN Command
The FILE OPEN command reports whether a file number is open or closed. This command takes one parameter—the file number. If a file has previously been opened, this command will return a 1; otherwise, it will return a 0.
Here is an example of the FILE OPEN command:
IsTheFileOpen = FILE OPEN(1)
The FILE END Command
The FILE END command lets you know when you have reached the end of an open file. It takes one parameter, which is the file number, and returns a 1 if the end of the file has been reached. Every time data is read, the end of the file should be checked. Data from a file will be invalid if it is read after the end of the file.
Here is an example of the FILE END command:
IsTheFileAtTheEnd = FILE END(1)
Integer File Commands
The integer READ and WRITE commands read or write an integer from a file, respectively. If you call enough of these commands, the FILE END command will equal 1.
The READ FILE Command
The READ FILE command reads one integer from a file and places it in a variable. The command takes two parameters. The first is the file number, and the second is the variable that you want to store the integer. An integer is four bytes in size.
The Read File program reads through any file and prints the integer values contained in that file. This program displays many numbers on the screen because it is displaying the integer values from that file. Figure 15.8 displays the output of this program on a 20-byte (5 integers) file.
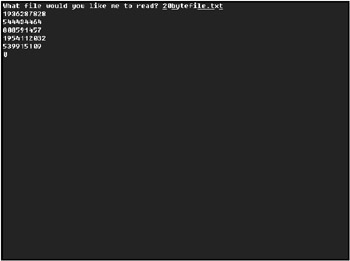
Figure 15.8: The Read File program reads all the integers in the 20-byte file.
---------------------------------
Beginner's Guide To Game Programming With DarkBASIC
Copyright (C)2002 Jonathan S. Harbour and Joshua R. Smith
Chapter 15 - File and Directory Operations: Managing the I/O
---------------------------------
REMEND

INPUT "What file would you like me to read? ", FileName$
IF FILE EXIST(FileName$) = 0
 PRINT "That file does not exist!"
 WAIT KEY
 END
ENDIF

OPEN TO READ 1,FileName$

Value = 0
WHILE FILE END(1) = 0
 READ FILE 1,Value
 PRINT STR$(Value)
ENDWHILE

CLOSE FILE 1
WAIT KEY
The WRITE FILE Command
The WRITE FILE command writes one integer to a file. The command takes two parameters. The first is the file number, and the second is the value to write.
Byte File Commands
The byte READ and WRITE commands read or write one byte from or to a file, respectively. If you call enough of these commands, the FILE END command will equal 1 (which means true).
The READ BYTE Command
The READ BYTE command reads one byte from a file and places it in a variable. The command takes two parameters. The first is the file number, and the second is the variable that you want to store the byte.
The WRITE BYTE Command
The WRITE BYTE command writes one byte to a file. The command takes two parameters. The first is the file number, and the second is the byte to write. A byte ranges from 0 to 255.
Word (Two Byte) File Commands
There are two commands for reading and writing word variables to a file. If you call enough of these commands, the FILE END command will equal 1. A word variable is equal to two bytes.
The READ WORD Command
The READ WORD command reads one word from a file and places it in a variable. The command takes two parameters. The first is the file number, and the second is the variable that you want to store the number.
The WRITE WORD Command
The WRITE WORD command writes one word number to a file. The command takes two parameters. The first is the file number, and the second is the variable to write. A word ranges from 0 to 65,535.
Long (Four Byte) File Commands
The long number READ and WRITE commands read or write one long number to a file, respectively. These commands function similarly to the READ FILE and WRITE FILE commands. If you call enough of them, the FILE END command will equal 1. A long is equal to four bytes.
The READ LONG Command
The READ LONG command reads one long number from a file and places it in a variable. The command takes two parameters. The first is the file number, and the second is the variable that you want to store the number.
The WRITE LONG Command
The WRITE LONG command writes one word-sized number to a file. The command takes two parameters. The first is the file number, and the second is the word number to write. A byte ranges from 0 to 4,294,967,295.
Floating Point Number File Commands
The floating-point number READ and WRITE commands read or write one number to a file, respectively. If you call enough of these commands, the FILE END command will equal 1. A float is 4 bytes.
The READ FLOAT Command
The READ FLOAT command reads one floating-point number from a file and places it in a variable. The command takes two parameters. The first is the file number, and the second is the variable that you want to store the number.
The WRITE FLOAT Command
The WRITE FLOAT command writes one floating-point number to a file. The command takes two parameters. The first is the file number, and the second is the number to write.
String File Commands
The string READ and WRITE commands read or write one sting from or to a file, respectively. If you call enough of these commands, the FILE END command will equal 1.
The READ STRING Command
The READ STRING command reads one string from a file and places it in a variable. The command takes two parameters. The first is the file number, and the second is the variable that you want to store the string. A newline (ASCII 13) character separates strings in a file.
The following program reads through any file and prints the strings contained in that file. Figure 15.9 displays the output of this program on the same 20-byte file as used in the Read File program. The difference is that this program displays the string that was stored in the file.
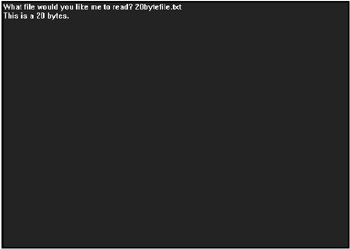
Figure 15.9: The program reads all the integers in the 20-byte file.
---------------------------------
Beginner's Guide To Game Programming With DarkBASIC
Copyright (C)2002 Jonathan S. Harbour and Joshua R. Smith
Chapter 15 - File and Directory Operations: Managing the I/O
---------------------------------
REMEND

INPUT "What file would you like me to read? ", FileName$
IF FILE EXIST(FileName$) = 0
 PRINT "That file does not exist!"
 WAIT KEY
 END
ENDIF

OPEN TO READ 1,FileName$

Value$ = ""
WHILE FILE END(1) = 0
 READ STRING 1,Value$
 PRINT Value$
ENDWHILE

CLOSE FILE 1
WAIT KEY
The WRITE STRING Command
The WRITE STRING command writes a string to a file. The command takes two parameters. The first is the file number, and the second is the string to write.
Writing Your Own File
The Write File program creates a file and will write it in with whatever text you specify. Just like the SaveBitmap program in Chapter 10, this program will not work off of the CD-ROM. It must be copied to the hard drive because the CD-ROM is read-only (you can not write to it). Figure 15.10 displays the output this program.
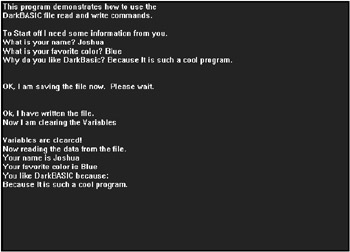
Figure 15.10: The Write File program shows you how to read and write to a file.
REMSTART
---------------------------------
Beginner's Guide To Game Programming With DarkBASIC
Copyright (C)2002 Jonathan S. Harbour and Joshua R. Smith
Chapter 15 - Write File.
---------------------------------
REMEND

PRINT "This program demonstrates how to use the"
PRINT "DarkBASIC file read and write commands."
PRINT
PRINT "To Start off I need some information from you."
INPUT "What is your name? ", MyName$
INPUT "What is your favorite color? ", MyColor$
INPUT "Why do you like DarkBasic? ", WhyILike$
PRINT
PRINT
PRINT "OK, I am saving the file now. Please wait."
PRINT
PRINT
IF FILE EXIST("MyTextFile.txt") = 1
 DELETE FILE "MyTextFile.txt"
ENDIF
OPEN TO WRITE 1,"MyTextFile.txt"
WRITE STRING 1,MyName$
WRITE STRING 1,MyColor$
WRITE STRING 1,WhyILike$
CLOSE FILE 1
PRINT "Ok, I have written the file."
PRINT "Now I am clearing the Variables" MyName$ = ""
MyColor$ = ""
WhyILike$ = ""
PRINT
PRINT "Variables are cleared!"
PRINT "Now reading the data from the file."
OPEN TO READ 1,"MyTextFile.txt"
READ STRING 1,MyName$
READ STRING 1,MyColor$
READ STRING 1,WhyILike$
PRINT "Your name is "+MyName$
PRINT "Your favorite color is "+MyColor$
PRINT "You like DarkBASIC because:"
PRINT WhyILike$
WAIT KEY
Using the Clipboard
The Clipboard is memory that Windows has set aside to store and retrieve data. It is like a file, but you do not have to open or close it. Almost any program has access to this memory through its copy to Clipboard, cut to Clipboard, and paste from Clip- board commands. DarkBASIC gives you access to the Clipboard any time you want.
Reading from the Clipboard
If you want to read from the Clipboard, you can use the GET CLIPBOARD$ command, which is the DarkBASIC equivalent of pasting text in a word processor, e-mail software, or other program that supports copy and paste functions. The command takes no parameters, but it returns a string containing the contents of the Clipboard.
Saving to the Clipboard
Any time you need to save information to the Clipboard, you can use the WRITE TO CLIPBOARD command to store a string. This is the DarkBASIC equivalent of the copy feature in a copy-and-paste operation (such as in a word processor). The command takes one parameter—the string you want to save to the Clipboard.
Project The GuessingGame Program
To fully appreciate the usefulness of file commands, you should write some sort of game that uses files to read or write data—hence, the GuessingGame program. In this game, the computer picks a random number and keeps track of how long it takes you to guess the number. The really interesting part is that the game stores the top five scores in a file.
GuessingGame is a simple program, but it is fun to play and it highlights the commands used in the second half of this chapter, involving file input and output. Figure 15.11 shows the output from the game.
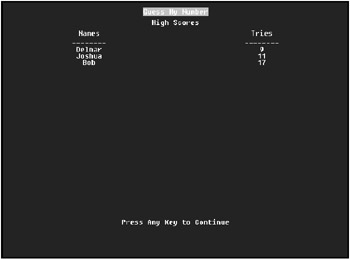
Figure 15.11: The GuessingGame program keeps track of high scores.
| Tip |
There is a cheat in this game that helps to demonstrate the Clipboard commands. The game writes the random number that it has picked to the Clipboard. If you want to cheat, just look at the Clipboard to find the number. I will leave it up to you to figure out how to view the Clipboard while running the game. |
REMSTART
---------------------------------
Beginner's Guide To Game Programming With DarkBASIC
Copyright (C)2002 Jonathan S. Harbour and Joshua R. Smith
Chapter 15 - File and Directory Operations: Managing the I/O
---------------------------------
REMEND

DIM HighName$(20)
DIM HighTries(20)
Playing = 1
SYNC RATE 30
SYNC ON
SET TEXT TRANSPARENT
WHILE Playing = 1
 DisplayTitle()
 PlayGame()
 Playing = PlayAgain()
ENDWHILE
END

' This function displays the title page for the game
FUNCTION DisplayTitle()
 Red = RGB(255,0,0)
 White = RGB(255,255,255)
 Black = RGB(0,0,0)
 INK White,Red
 CENTER TEXT 320,10, "Guess My Number"
 INK White,Black
 CENTER TEXT 320,400, "Press Any Key to Continue"
 SYNC
 DisplayHighScores()
 Counter = 1
 WHIlE INKEY$() = ""
 Counter = Counter + 1
 SYNC
 ENDWHILE
 RANDOMIZE Counter
 WHIlE INKEY$() <> ""
 SYNC
 ENDWHILE
ENDFUNCTION

' This plays the main game
FUNCTION PlayGame()
 MyNumber = RND(1000)
 YourNumber = -1
 Tries = 0
 TempString$ = ""
 WHILE YourNumber <> MyNumber
 Tries = Tries + 1
 CLS
 CENTER TEXT 320,10,"I have picked a number between 1 and 1000"
 CENTER TEXT 320,22,"You have to guess. I will help you!"
 TEXT 10,420,TempString$
 SYNC
 SET CURSOR 10,400
 PRINT "What is your number? ";
 INPUT YourNumber
 SYNC
 IF YourNumber > MyNumber
 TempString$ = "My Number is less then that number! (Lower)"
 ENDIF
 IF YourNumber < MyNumber
 TempString$ = "My Number is greater then that number! (Higher)"
 ENDIF
 IF YourNumber = MyNumber
 TempString$ = "You are correct. Way to go"
 ENDIF
 IF Tries = 5 THEN WRITE TO CLIPBOARD STR$(MyNumber)
 ENDWHILE
 CLS
 CENTER TEXT 320,10,"I have picked a number between 1 and 1000"
 CENTER TEXT 320,22,"You have to guess. I will help you!"
 TEXT 10,420, TempString$
 SYNC
 SYNC
 SLEEP 1000
 HighScore = CheckHighScore(Name$,Tries)
 IF HighScore
 CLS
 CENTER TEXT 320,10,"Congratulations, you have made it into the high scores"
 SET CURSOR 10,400
 SYNC
 INPUT "What is your name? ",Name$
 EnterHighScore(Name$,Tries)
 ENDIF
ENDFUNCTION

' This checks to see if the player
' want's to play again
FUNCTION PlayAgain()
 Flag = 0
 CLS
 CENTER TEXT 320,240,"Would you like to play again? Y/N"
 SYNC
 Answer$ = AskYesNo$()
 IF Answer$ = "YES" THEN Flag = 1
 ClS
 SYNC
ENDFUNCTION Flag

' This function displays the highscores
FUNCTION DisplayHighScores()
 CENTER TEXT 320,30,"High Scores"
 CENTER TEXT 160,50,"Names"
 CENTER TEXT 480,50,"Tries"
 CENTER TEXT 160,68,"___"
 CENTER TEXT 480,68,"___"

 IF FILE EXIST("HIGHSCORE.DAT") = 0 THEN EXITFUNCTION
 OPEN TO READ 1, "HIGHSCORE.DAT"
 ypos = 80
 FOR x = 1 TO 20
 READ STRING 1, Name$
 READ LONG 1, Tries
 IF Tries <> 0
 CENTER TEXT 160,ypos,Name$
 CENTER TEXT 480,ypos,STR$(Tries)
 ENDIF
 ypos = ypos + 12
 NEXT x
 CLOSE FILE 1
ENDFUNCTION

' This function records a new highscore
FUNCTION EnterHighScore(Name$,Tries)
 IF FILE EXIST("HIGHSCORE.DAT") = 0
 OPEN TO WRITE 1,"HIGHSCORE.DAT"
 WRITE STRING 1, LEFT$(Name$,20)
 WRITE LONG 1,Tries
 FOR X = 2 TO 20
 WRITE STRING 1," "
 WRITE LONG 1,0
 NEXT X
 CLOSE FILE 1
 EXITFUNCTION
 ENDIF
 OPEN TO READ 1,"HIGHSCORE.DAT"
 FOR X = 1 TO 20
 READ STRING 1,a$
 HighName$(X) = a$
 READ LONG 1, a
 HighTries(X) = a
 NEXT X
 CLOSE FILE 1
 strtoplace$ = Name$
 numtoplace = Tries
 FOR x = 1 TO 20
 IF HighTries(x) >= numtoplace OR HighTries(x) = 0
 tempstr$ = HighName$(x)
 tempnum = HighTries(x)
 HighName$(x) = strtoplace$
 HighTries(x) = numtoplace
 strtoplace$ = tempstr$
 numtoplace = tempnum
 ENDIF
 NEXT X
 DELETE FILE "HIGHSCORE.DAT"
 OPEN TO WRITE 1, "HIGHSCORE.DAT"
 FOR X = 1 TO 20
 WRITE STRING 1, HighName$(X)
 WRITE LONG 1, HighTries(X)
 NEXT X
 CLOSE FILE 1
ENDFUNCTION

' This function checks to see if a highscore
' qualifies.
FUNCTION CheckHighScore(Name$,Tries)
 IF FILE EXIST("HIGHSCORE.DAT") = 1
 EXITFUNCTION 1
 ENDIF
 OPEN TO READ 1,"HIGHSCORE.DAT"
 FOR X = 1 TO 20
 READ STRING 1,a$
 HighName$(X) = a$
 READ LONG 1, a
 HighTries(X) = a
 NEXT X
 CLOSE FILE 1
 Flag = 0 FOR
 X = 1 TO 20
 IF HighTries(x) >= Tries OR HighTries(x) = 0
 Flag = 1
 ENDIF
 NEXT X
ENDFUNCTION Flag

' This waits for a Y/N key
FUNCTION AskYesNo$
 ch$ = UPPER$(INKEY$())
 WHILE ch$ <> "Y" AND ch$ <> "N"
 ch$ = UPPER$(INKEY$())
 SYNC
 ENDWHILE
 IF ch$ = "Y" then Ret$ = "YES"
 IF ch$ = "N" then Ret$ = "NO"
 WHILE ch$ = "Y" OR ch$ = "N"
 ch$ = UPPER$(INKEY$())
 SYNC
 ENDWHILE
ENDFUNCTION Ret$
Summary
You have now covered the exhaustive concepts of file system management and file input and output programming in DarkBASIC. This chapter provided an introduction to the commands you will need to tackle these important subjects in your own game projects. In the end, you were shown a complete game that used file access to store the high scores for the game. You might want to recycle the functions in GuessingGame to add a high-score list to any games you write later. But why stop there? Enjoy your newfound power over files that you have discovered with DarkBASIC. When you have access to the file system, you can literally write any type of application or utility that you set your mind to … even if it isn't a game.
Quiz
The chapter quiz will help you retain the information that was covered in this chapter, as well as give you an idea of how well you're doing at understanding the subjects. The answers for this quiz can be found in Appendix A, "Answers to the Chapter Quizzes."
|
1. |
What information does the GET DIR$ command not contain?
|
|
|
2. |
The CD command in DarkBASIC stands for:
|
|
|
3. |
How many bits are in a byte?
|
|
|
4. |
What information does FILE SIZE return?
|
|
|
5. |
Where does the data from the WRITE TO CLIPBOARD command go?
|
|
|
6. |
Which command opens HelloWorld.txt for reading as file #1?
|
|
|
7. |
Which command reads the number 1,000,000 in integer from file #1?
|
|
|
8. |
Which command writes the string "Hello World" to file #1?
|
|
|
9. |
Which command changes the file name "HelloWorld.txt" to "GoodBye.txt?"
|
|
|
10. |
A bit can be 0, 1, or 2.
|
|

Answers
|
1. |
C |
|
2. |
D |
|
3. |
C |
|
4. |
A |
|
5. |
D |
|
6. |
C |
|
7. |
B |
|
8. |
C |
|
9. |
C |
|
10. |
B |
Part I - The Basics of Computer Programming
- Welcome to DarkBASIC
- Introduction to Computer Programming
- Basic Commands, Variables, and Data Types
- Characters, Strings, and Text Output
- Looping Commands
- Making Programs Think Branching Statements and Subroutines
- More Power to the Numbers Data Sequences and Arrays
- Number Crunching Mathematical and Relational Operators and Commands
Part II - Game Fundamentals Graphics, Sound, Input Devices, and File Access
- Basic Graphics Commands
- Game Graphics Learning to Use Bitmaps
- The Art of Using Animated Sprites for 2D Games
- Programming the Keyboard, Mouse, and Joystick
- Adding Sound Effects to Your Game
- Playing Some Tunes CD Audio, MIDI and MP3 Music
- Loading and Saving Information Using Files
- Playing Intro Movies and Cut-Scenes
Part III - Advanced Topics 3D Graphics and Multiplayer Programming
Epilogue
Part IV - Appendixes
EAN: 2147483647
Pages: 203
