Programming the Keyboard, Mouse, and Joystick
This chapter is dedicated to the subject of input—specifically, taking control of the computer's input devices with DarkBASIC. DarkBASIC includes numerous commands for handling input events from the keyboard, mouse, and joystick. It also includes features such as force feedback that are available with many joysticks.
Introduction to User Input
Every device, from a TV to a microwave oven, requires some sort of control device to use it. A TV requires a remote to change channels, and a microwave has a front control panel for programming the temperature and the time to cook a meal. In fact, most consumer electronics devices require some sort of user input. User input is what makes the difference between a technical demo and a game. Reading the input from a control allows the game to ascertain what the player would like to do, and then perform that task.
Every game console, from the Atari 2600 to the Xbox, has some form of user input. The user input is relayed to the console via some form of controller. Figure 12.1 shows a collection of different controllers for user input.
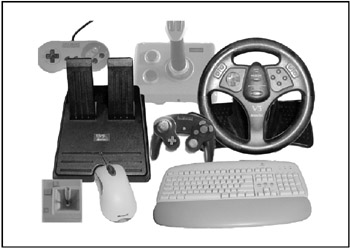
Figure 12.1: A collection of game input controllers
DarkBASIC uses the DirectInput library to get all of its input. If you are familiar with DirectInput, you will recognize some of the functions in DarkBASIC, as well as how they correspond to their DirectInput counterparts.
DarkBASIC supports three different basic types of controllers—the keyboard, mouse, and joystick. Most PC users have one or more of these devices. These days, it is hard to imagine a computer without at least a keyboard and a mouse. However, it was not long ago that PC games only had one type of input—the keyboard.
Keyboard Basics
The keyboard is the most basic form of user input to which you will have access. Every computer has a keyboard. However, this was not always the case. The keyboard itself has been around since 1868, when an inventor by the name of Christopher Lathem Sholes took out a patent on the first typewriter. Computers in their present form were not even around then. In fact, some of the earliest computers did not use keyboards; they used punch cards, on which the computer instructions were punched and then fed into the computer.
In 1964, MIT, Bell Labs, and General Electric designed the first computer that used a keyboard. It was called the Mutlics. It was nothing more than a collection of monitors and keyboards (called dumb terminals) hooked up to a larger system, but since that moment every computer has used a keyboard.
A keyboard has many different keys, but most keyboards are laid out in the QWERTY format. The QWERTY format, also invented by Christopher Lathem Sholes, specifies the layout of the keys on the keyboard. Q, W, E, R, T, and Y are the first six letters in the top row of letter keys on the QWERTY keyboard. Figure 12.2 shows a picture of a QWERTY keyboard.
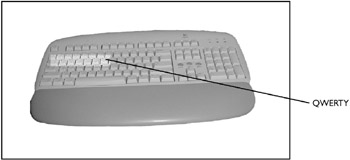
Figure 12.2: A QWERTY keyboard gets its name from the position of the QWERTY keys.
Many keyboards have 101 to 104 keys. Most of the older keyboards have 101 keys, and the newer keyboards have 104 or more keys. To help visualize the keyboard as a control device, you must view each key as a button (like on a joystick, which I will cover in the "Joystick Commands" section later in this chapter). Each button has three different states: UP, DOWN, and PRESSED. Although it might seem a little odd that there are three different states, it's really quite simple. If a key has not been pressed, it is in the UP state. If a key is being pressed currently, it is in the DOWN state. If a key is currently in the UP state but was previously in the DOWN state, it is in the PRESSED state. Figure 12.3 illustrates this point.
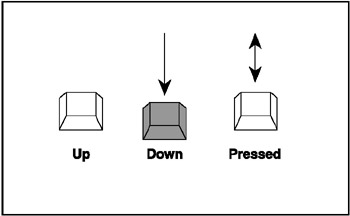
Figure 12.3: The three different states of a key
Most game applications use four main keys for movement. They traditionally are the up, down, left, and right arrows. The A, W, S, and D keys are sometimes used for movement, but this is rather uncommon. In that case, W is used for up, A is used for left, S is used for down, and D is used for right. Generally, there is one key used for fire in a game; this is usually the Ctrl key. Other keys commonly used in games are the Enter key, the Alt key, and the spacebar.
Although the keyboard is the largest control that is hooked up to the computer, it is not the only common controller. Almost all computers have a mouse attached to them; at $10 for a cheap mouse, who can't own one?
Mouse Basics
It is hard to imagine a computer without a mouse; they feel unusable without one. However, the mouse has not always been part of the computer. In 1964, a man by the name of Douglas C. Engelbart created the first mouse. He patented this mouse as an X-Y position indicator, but he nicknamed it the "mouse" because it had a tail coming out the back of it. His original mouse was nothing more then a wooden box with two roller balls inside. In 1998, Douglas Engelbart was inducted into the National Inventors Hall of Fame. I think he most richly deserves that induction for inventing the most well-loved and oft-used input device since the keyboard.
Mouse devices come in all different shapes and sizes, from a traditional ball-and-wheel mouse to a more complex optical mouse to a trackball. Each mouse, though unique in style, has the same basic function—to indicate an X-Y position. In the Windows and Macintosh operating systems, the mouse controls your cursor. In DarkBASIC you might have a cursor that looks slightly different but serves the same function as the Windows or Macintosh cursor. You might be wondering about games such as Quake III or Doom 2. They don't have a cursor, right? You are correct, but they still read the mouse information and convert the X-Y position into a useful user control. Figures 12.4 and 12.5 show mouse movement and the corresponding results.
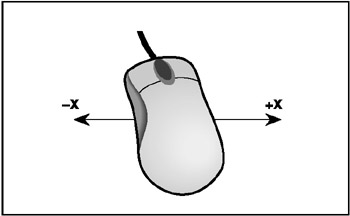
Figure 12.4: A mouse moving left or right
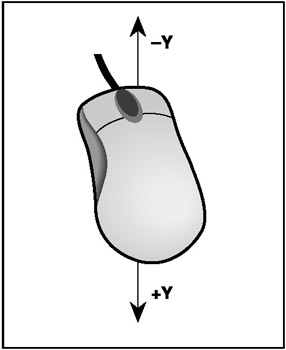
Figure 12.5: A mouse moving up or down
The mouse has one other feature that makes it a popular gaming control—buttons. Most mouse devices have two or more buttons (unless you have a Macintosh mouse, in which case you only have one button). These buttons can each be assigned to a different aspect of a program. Windows uses the buttons to select, execute, and control different files. Just as the keyboard keys have different states, so do the mouse buttons. However, there are four different states for a mouse button—UP, DOWN, CLICKED, and DOUBLE CLICKED.
The UP state is just like the keyboard UP state—the mouse button has not been clicked. The DOWN state is just like the keyboard DOWN state, but with one unique difference. In most applications, the mouse button DOWN state is used to drag a box around a collection of items. This is the most common use of the DOWN state, but it does not always have to be the case. The CLICKED state is the same as the keyboard PRESSED state. The DOUBLE CLICKED state is nothing more than the mouse being in the CLICKED state twice in a row. Figure 12.6 shows an example of the different states of the mouse.
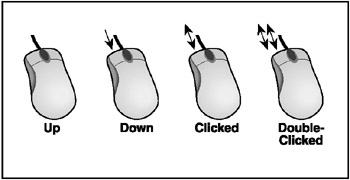
Figure 12.6: The different mouse button states
There is one more aspect of the mouse that I need to cover. Most new mouse devices have a wheel, which allows the user to scroll up and down. This feature is usually used to scroll between weapons in a game or to scroll up and down on a Web page without using the side scroll bar.
Although the mouse is a wildly popular input device for PC games (I would almost venture to say that it is the most popular for PC games), it is not the only gaming input device. There is also the joystick, which is almost as popular as the mouse for most computer-or console-based games.
Joystick Basics
The joystick is the most common user input device for any console or console-based game. The Atari 2600 had a basic one-button controller, while the GameCube has a more complex control. They all serve the same function: To allow human input into a game in the most convenient manner possible. Figure 12.7 shows a collection of different joysticks.
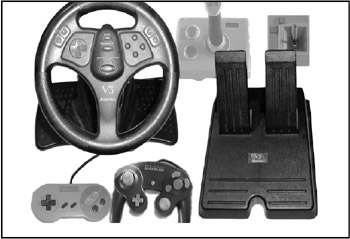
Figure 12.7: Different joystick controllers
Although I cannot pinpoint the exact inventor of the joystick, I know that joysticks have been hooked to computers since 1964, when the first computer game (Space War) was written. The standard for joystick connection to the PC did not come until much later, however. The game port is the most common type of connection for a joystick. Also known as the joystick port, the game port is generally connected like a traditional mouse and is found on most sound cards. You can use a Y splitter to connect two joysticks to a game port at once.
The USB port is becoming a wildly popular connection for the joystick. I think this is a great idea because USB ports support faster communications between the joystick and the computer, which allows greater precision in the joystick.
Precision is the accuracy of a controller. The more precise a joystick or mouse is, the better the input that the game will receive from it.
The joystick is a lot like the mouse in that it is an X-Y indicator. Most joysticks have some form of X and Y input. What makes a joystick different than a mouse is that the X and Y input can be separated on a joystick, whereas they cannot on the mouse. A prime example of this is a driving wheel. The wheel portion of the joystick is the X input, and the pedals are considered the Y input. Figure 12.8 shows a joystick with combined X and Y axes, and Figure 12.9 shows a joystick with separated X and Y axes.
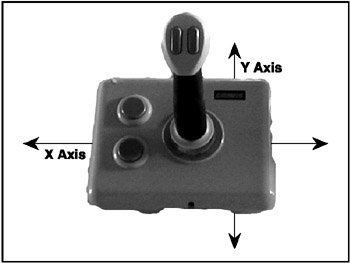
Figure 12.8: A controller with combined X and Y axes
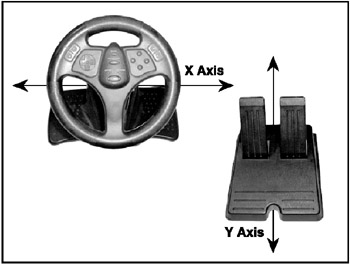
Figure 12.9: A controller with separated X and Y axes
Just like the keyboard and mouse, the joystick also has buttons. (This seems to be a common theme among controllers, doesn't it?) Joysticks generally have between two and ten buttons, a mouse usually has two to five buttons, and a keyboard has approximately 104 buttons.) Each button again has three different states—UP, DOWN, and PRESSED. The UP state for the joystick is just like the UP state for the mouse and keyboard—the button has not been pressed. The DOWN state is the same as well, but most games use the DOWN state for rapid fire functions. The PRESSED state is also the same as for the keyboard and mouse, and it is usually used for single fire. Figure 12.10 shows the different states of joystick buttons.
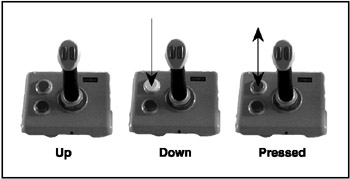
Figure 12.10: Various states of a joystick button
Now that you have covered the three major input devices for a PC game, it is time to cover them in detail, from concepts to commands. Each device has a unique set of commands assigned to it to make it function with DarkBASIC. I will start with the keyboard and work through the mouse and the joystick.
Keyboard Commands
The keyboard commands in DarkBASIC are pretty easy to use. There are commands for reading entire strings as well as for reading one character. You have used many of the commands in previous chapters without knowing exactly what they are or what they do.
Reading Text Input
The most fundamental requirement of basic input commands is reading a string or number input. You need to read a string to gather information such as the player's name or his favorite color. Although you can create your own string input routine with the key-press commands, DarkBASIC provides a command to read strings for you.
The INPUT Command
The INPUT command is one of the oldest commands in any BASIC language. In fact, it is as old and widely used as the PRINT command. The INPUT command can take two forms. The first format of the command is a simple INPUT string$, where keyboard keys are read and the keys are stored in string$. The second format of the INPUT command is INPUT string$, variable$, where the keyboard input is read and placed in string$, and variable$ is printed on the string. This form is a little more useful because it will print something right before the location where the user will input text.
The following program (aptly named KeyboardInput) demonstrates how to use the INPUT command. Figure 12.11 shows you the output of the program.
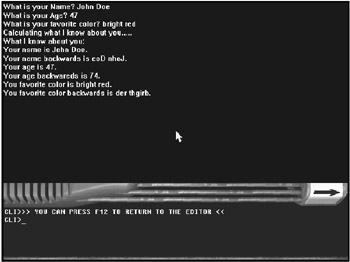
Figure 12.11: The KeyboardInput program demonstrates the use of the INPUT command.
'-----------------------------
'Beginner's Guide To DarkBASIC Game Programming
'Copyright (C)2002 Jonathan S. Harbour and Joshua R. Smith
'Chapter 12 - KeyboardInput program
'-----------------------------

'create some variables
name$ = ""
age = 0
color$ = ""

'initialize the program
CLS
HIDE MOUSE
'ask user for some personal info
PRINT
INPUT "What is your name? ", name$
INPUT "What is your age? ", age
INPUT "What is your favorite color? ", color$

'display the delay message
PRINT
PRINT "Calculating what I know about you";

'delay for 2 seconds
SLEEP 500
PRINT ".";
SLEEP 500
PRINT ".";
SLEEP 500
PRINT ".";
SLEEP 500
PRINT ".";
PRINT

'display the info on the screen
PRINT
PRINT "What I know about you:"
PRINT "Your name is " + name$ + "."
PRINT "Your name backwards is " + StringBackwards$(name$)
PRINT "Your age is " + STR$(age)
PRINT "Your age backwards is "+StringBackwards$(STR$(age))
PRINT "Your favorite color is " + color$
PRINT "Your favorite color backwards is " + StringBackwards$(color$)

'pause and then end
WAIT KEY
END

FUNCTION StringBackwards$(A$)
 newstring$ = ""
 FOR N = LEN(A$) TO 1 STEP -1
 newstring$ = newstring$ + MID$(A$, N)
 NEXT N
ENDFUNCTION newstring$
I must tell you about one important drawback to the INPUT command. Although it is a useful command for reading entire strings, it might not always be the best command for game programming because it is a blocking command, which means that it will not allow any other commands to run until it is finished. INPUT is a good command to use if you do not need to process anything else while you are waiting for the user to type something. At the end of the keyboard section, I will show you how to write a non-blocking INPUT command.
Reading Key Presses
The INPUT command is not the only keyboard command that DarkBASIC supports. DarkBASIC can also use the keyboard as a series of buttons. Remember, the keyboard has three states for its keys: UP, DOWN, and PRESSED. The following commands will help you determine these states accurately.
The WAIT KEY and SUSPEND FOR KEY Commands
The WAIT KEY command waits for any key to be pressed. This command takes no parameters. Like INPUT, it is a blocking command. This command is good for holding title screens and winning screens. The SUSPEND FOR KEY command performs the same function. These commands will wait for any key to be in the PRESSED state before continuing.
The INKEY$( ) Command
The INKEY$() command is one my favorites. It tells you which key is currently being pressed. It is a non-blocking command, so you can use it in loops without stalling the program. The INKEY$() command takes no parameters, but it returns a single character that represents the key that is currently being pressed. Note that INKEY$() only returns one letter (or chr$). You can only read one key at a time in the DOWN state with this command.
You can use INKEY$() to detect the three different states of each key on the keyboard. To detect the DOWN state of a key, just check to see whether INKEY$() is equal to the value of that key. To detect the UP state, check to see whether INKEY$() is not equal to that key's value. To detect the PRESSED state, check to see whether INKEY$() is equal to, and then not equal to, the value of that key.
The following game, called TextBlast, uses the INKEY$() function to scan for all three states. It detects when a key is in the DOWN state and sets a flag for that key (DIM charhit). The flag indicates that the key was pressed. When you release the key (previously in the DOWN state and flagged as such), the program processes that key as being in the PRESSED state. When the program finishes processing the key in the PRESSED state, it resets the flag for that key, and the key is returned to the UP state.
The object of TextBlast is simple. Just type the key that corresponds to the letters or numbers falling down the screen to destroy them. Each character falls at a different speed, so your reflexes will have to be fast. Figure 12.12 shows the output of the TextBlast program, which you will find on the CD in the SourcesChapter12TextBlast folder.
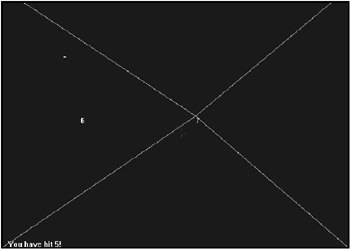
Figure 12.12: The TextBlast game demonstrates a practical use of the INKEY$() command.
REMSTART
---------------------------------
Beginner's Guide To Game Programming With DarkBASIC
Copyright (C)2002 Jonathan S. Harbour and Joshua R. Smith
Chapter 12 - Taking Control: Programming the Input Devices
---------------------------------

REMEND
CLS
DIM char$(100)
DIM charx(100)
DIM chary(100)
DIM charspeed(100)
DIM charhit(100)
DIM hitschars(1)
DIM CharCount(1)

SYNC ON
SYNC RATE 30

RndCounter = 0

White = RGB(255,255,255)
Black = RGB(0,0,0)

' This will set a random seed
SET TEXT OPAQUE
WHILE INKEY$()<>" "
 RndCounter = RND(1000)
 INK White,Black
 CENTER TEXT 320,240,"Text Blast"
 RndColor = RGB(rnd(100)+150,rnd(100)+150,rnd(100)+150)
 INK RndColor,Black
 CENTER TEXT 320,260,"Press Space to Continue"
 SYNC
ENDWHILE
RANDOMIZE RndCounter

SET TEXT TRANSPARENT
InitChars()
hitschars(1) = 0
CharCount(1) = 1

' Loop until 100 chars have passed
WHILE CharCount(1) < 100
 INK 0,0
 BOX 0,0,639,479
 IF NoneFalling()=1 THEN StartNewFalling()
 ProcessText()
 DisplayScoreLine()
 SYNC
ENDWHILE

CLS
INK White,Black
TempString$ = "You have hit "+STR$(hitschars(1))+" out of "+STR$(100)+"!"
CENTER TEXT 320,240,TempString$
WAIT KEY
END

' Intialize all the characters for falling
FUNCTION InitChars()
 FOR x = 1 TO 100
 charnum = RND(92)+33
 char$(x) = CHR$(charnum)
 charx(x) = RND(600)+20
 chary(x) = -1
 charhit(x) = 0
 charspeed(x) = RND(6)+1
 NEXT x
ENDFUNCTION

' Are any characters falling
FUNCTION NoneFalling()
 Flag = 1
 FOR x = 1 TO 100
 IF chary(x) >= 0 AND chary(x) < 450 THEN EXITFUNCTION 0
 NEXT x
ENDFUNCTION Flag
' Set some new characters falling
FUNCTION StartNewFalling()
 FOR x = 1 to 4
 chary(x+CharCount(1)) = 0
 NEXT x
 CharCount(1) = CharCount(1) + 4
ENDFUNCTION

' Check the keyboard to see if any of the falling
' Characters have been hit..
FUNCTION ProcessText()
 White = RGB(255,255,255)
 Black = RGB(0,0,0)
 Red = RGB(255,0,0)
 FOR x = 1 TO 100
 IF chary(x) >= 0 AND chary(x)<450
 IF INKEY$() = char$(x)
 INK Red,Black
 charhit(x) = 1
 chary(x) = chary(x) + charspeed(x)
 LINE 0,479,charx(x),chary(x)
 LINE 0,0,charx(x),chary(x)
 LINE 639,0,charx(x),chary(x)
 LINE 639,479,charx(x),chary(x)
 ELSE
 INK White,Black
 IF charhit(x) = 1
 chary(x) = 490
 hitschars(1) = hitschars(1) + 1
 ELSE
 chary(x) = chary(x)+ charspeed(x)
 ENDIF
 ENDIF
 TEXT charx(x),chary(x),char$(x)
 ENDIF
 NEXT x
ENDFUNCTION

' Display the Score line...
FUNCTION DisplayScoreLine()
 WHITE = RGB(255,255,255)
 BLACK = RGB(0,0,0)

 INK WHITE,BLACK
 STRING$ = "You have hit "+str$(hitschars(1))+"!"
 TEXT 10,465,string$
ENDFUNCTION
There are two other things to note about the INKEY$() command. First, INKEY$() will detect the difference between uppercase and lowercase letters, so the p and P keys are two different things in the INKEY$() command. When you are detecting whether the P key is pressed, you should look for both the P and p keys. You can also take the input of INKEY$() and pass it to the UPPER$ command to convert it to uppercase automatically.
Second, the INKEY$() command can return more than just the letters on the keyboard. It can also return the ASCII value of whatever key is currently pressed. Remember the CHR$(value) command? This is where it comes in handy because you can now detect different keys being pressed. For example, to detect whether the Enter key has been pressed, check to see whether INKEY$() = CHR$ (13). Appendix C, "ASCII Chart" contains a complete listing of all the ASCII values and the corresponding keys. Table 12.1 shows some of the most common keys and their ASCII values.
|
Value |
Key |
|---|---|
|
8 |
Tab |
|
9 |
Backspace |
|
13 |
Enter |
|
27 |
Esc |
|
32 |
Spacebar |
Reading Special Keys
In addition to reading any key with the INKEY$() command, DarkBASIC also supports the reading of special keys, such as the up, down, left, and right arrows. There are a total of nine special keys that DarkBASIC exclusively reads. Figure 12.13 shows a keyboard with the special keys highlighted. These special keys are detailed in the following sections.
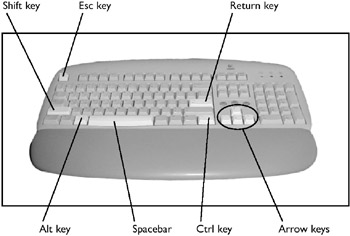
Figure 12.13: A keyboard illustration showing the special keys that DarkBASIC reads.
The UPKEY() Command
The UPKEY() command reads whether the up arrow is in the UP or DOWN state. It takes no parameters and returns a 0 if the up arrow is in the UP state and a 1 if it is in the DOWN state. To detect whether the up arrow is in the PRESSED state, look for it to be in the DOWN state (1), and then in the UP state (0). The up arrow is most commonly used to move a character upward in a keyboard-based game.
The DOWNKEY Command
The DOWNKEY() command reads whether the down arrow is in the UP or DOWN state. It returns a 0 if the down arrow is in the UP state and a 1 if it is in the DOWN state. The down arrow is most commonly used to move a character downward in a keyboardbased game.
The LEFTKEY Command
The LEFTKEY() command reads whether the left arrow is in the UP or DOWN state. It returns a 0 if the left arrow is in the UP state and a 1 if it is in the DOWN state. The left arrow is most commonly used to move a character left in a keyboard-based game.
The RIGHTKEY Command
The RIGHTKEY() command reads whether the right arrow is in the UP or DOWN state. It returns a 0 if the right arrow is in the UP state and a 1 if it is in the DOWN state. The right arrow is most commonly used to move a character right in a keyboard-based game.
The CONTROLKEY Command
The CONTROLKEY() command reads whether the Ctrl key is in the UP or DOWN state. This command returns a 0 if the Ctrl key is in the UP state and a 1 if it is in the DOWN state. The Ctrl key is most commonly used to fire weapons in a keyboard-based game. This command does not tell you whether the left or right Ctrl key was hit; it just lets you know that one was hit.
The SHIFTKEY Command
The SHIFTKEY() command reads whether the Shift key is in the UP or DOWN state. It returns a 0 if the Shift key is in the UP state and a 1 if it is in the DOWN state. This command does not tell you whether the left or right Shift key was hit; it just lets you know that one was hit.
The SPACEKEY Command
The SPACEKEY() command reads whether the spacebar is in the UP or DOWN state. It returns a 0 if the spacebar is in the UP state and a 1 if it is in the DOWN state. The spacebar is most commonly used to either fire or jump in a keyboard-based game.
The RETURNKEY Command
The RETURNKEY() command reads whether the Return key is in the UP or DOWN state. The Return key is generally labeled Enter on the keyboard; it can be found above the right Shift key. Do not confuse this key with the Return key on the number pad (which is sometimes labeled Enter as well). Although the Return key on the number pad returns the same ASCII value in INKEY$() as the Enter key above the Shift key, the RETURNKEY() command only detects the Enter key above the Shift key. It returns a 0 if the Enter key is in the UP state and a 1 if it is in the DOWN state. The Enter key is most commonly used to perform an action in a keyboard-based game, which can range from opening a door to talking to another character.
The ESCAPEKEY Command
The ESCAPEKEY command returns whether the Esc key is in the UP or DOWN state. This command returns a 0 if the Esc key is in the UP state and a 1 if it is in the DOWN state. The Esc key is most commonly used to quit a game.
Summing Up the Special Key Commands
There are nine special key commands for the common keys used in a game. DarkBASIC uses a different set of commands for reading the rest of the keys on the keyboard simultaneously, as you will see in the next section. Table 12.2 sums up the nine special key commands.
|
Command |
Key |
|---|---|
|
UPKEY Up |
arrow |
|
DOWNKEY |
Down arrow |
|
LEFTKEY |
Left arrow |
|
RIGHTKEY |
Right arrow |
|
CONTROLKEY |
Ctrl |
|
SHIFTKEY |
Shift |
|
SPACEKEY |
Spacebar |
|
RETURNKEY |
Enter (not the number pad Enter) |
|
ESCAPEKEY |
Esc |
Reading Multiple Keys and Scan Codes
Sometimes reading one key is just not enough. There are times when you need to read multiple keys. Although you can use all of the special functions at the same time, sometimes that is not enough. For example, you might want to move upward while firing your guns at the same time. This works fine if the fire command is attached to the Ctrl key and the up command is attached to the up arrow. But what if the fire command is attached to the P key and the up command is attached to the W key?
DarkBASIC provides a few commands that will detect whether multiple keys are pressed. To detect multiple key presses, you must understand scan codes, which are different from ASCII values. A scan code is the raw number that the keyboard assigned to a key before sending it to the computer. Usually scan codes are assigned from the upper-left of the keyboard to the lower-right.
A scan code is the value assigned by the keyboard (not Windows, ASCII, or anyone else) to a specific key. The keyboard actually has a small microcontroller inside of it that handles all the key presses and complexities of the keyboard's operation. This controller is programmed with a standard set of scan codes for PC-AT 101 keyboards, and is the ultimate source of keyboard information for the computer.
The SCANCODE Command
Although it only returns the value of one key, the SCANCODE() command is useful for determining what scan code is assigned to each key. This command takes no parameters, but it returns the scan code of the key currently being pressed.
The KEYSTATE Command
The KEYSTATE() command takes one parameter—the scan code of the key you are looking for—and returns whether the key is up or down. The UP state of the key returns a 0, and the DOWN state returns a 1.
Using KEYSTATE and SCANCODE: The VirtualKeyboard Program
The following program uses the KEYSTATE and SCANCODE commands to mimic the UP and DOWN states of the keys on the screen. You must press Esc and Enter to quit this program. If you run this program within the DarkBASIC environment, you can also escape from the program by pressing F12. Figure 12.14 shows the output of this program.
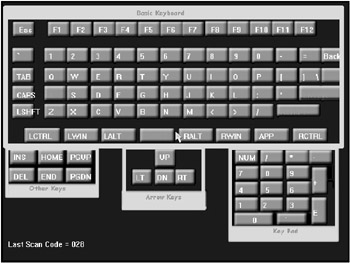
Figure 12.14: The VirtualKeyboard program, demonstrating the use of the KEYSTATE() command
'---------------------------------
'Beginner's Guide To Game Programming With DarkBASIC
'Copyright (C)2002 Jonathan S. Harbour and Joshua R. Smith
'Chapter 12 - VirtualKeyboard Program
'---------------------------------

DIM KEY$(256)
DIM KEYX(256)
DIM KEYY(256)

' Key State Data
DATA 1,"Esc",30,43
DATA 59,"F1",93,43
DATA 60,"F2",137,43
DATA 61,"F3",178,43
DATA 62,"F4",218,43
DATA 63,"F5",262,43
DATA 64,"F6",303,43
DATA 65,"F7",343,43
DATA 66,"F8",385,43
DATA 67,"F9",425,43
DATA 68,"F10",467,43
DATA 87,"F11",507,43
DATA 88,"F12",551,43
DATA 41,"'",26,92
DATA 2,"1",85,92
DATA 3,"2",126,92
DATA 4,"3",172,92
DATA 5,"4",210,92
DATA 6,"5",254,92
DATA 7,"6",297,92
DATA 8,"7",340,92
DATA 9,"8",383,92
DATA 10,"9",428,92
DATA 11,"0",469,92
DATA 12,"-",513,92
DATA 13,"=",555,92
DATA 14,"Back",593,92
DATA 15,"TAB",26,130
DATA 16,"Q",85,130
DATA 17,"W",126,130
DATA 18,"E",172,130
DATA 19,"R",210,130
DATA 20,"T",254,130
DATA 21,"Y",297,130
DATA 22,"U",340,130
DATA 23,"I",383,130
DATA 24,"O",426,130
DATA 25,"P",469,130
DATA 26,"[",513,130
DATA 27,"]",555,130
DATA 43,"",580,130
DATA 58,"CAPS",26,164
DATA 30,"A",85,164
DATA 31,"S",126,164
DATA 32,"D",172,164
DATA 33,"F",210,164
DATA 34,"G",254,164
DATA 35,"H",297,164
DATA 36,"J",340,164
DATA 37,"K",383,164
DATA 38,"L",426,164
DATA 39,";",469,164
DATA 40,"’",513,164
DATA 28,"ENTER",555,164
DATA 42,"LSHFT",26,195
DATA 44,"Z",85,195
DATA 45,"X",126,195
DATA 46,"C",172,195
DATA 47,"V",210,195
DATA 48,"B",254,195
DATA 49,"N",297,195
DATA 50,"M",340,195
DATA 51,"<",383,195
DATA 52,">",426,195
DATA 53,"/",469,195
DATA 54,"RSHIFT",513,195
DATA 29,"LCTRL",48,240
DATA 219,"LWIN",120,240
DATA 56,"LALT",187,240
DATA 57,"SPACE",262,240
DATA 184,"RALT",335,240
DATA 220,"RWIN",404,240
DATA 221,"APP",475,240
DATA 157,"RCTRL",547,240
DATA 200,"UP",290,279
DATA 203,"LT",246,317
DATA 208,"DN",285,317
DATA 205,"RT",323,317
DATA 183,"SYSRC",0,0
DATA 70,"SCRLOCK",0,0
DATA 210,"INS",20,279
DATA 199,"HOME",71,279
DATA 201,"PGUP",125,279
DATA 211,"DEL",20,315
DATA 207,"END",71,315
DATA 209,"PGDN",125,315
' Keypad keys
DATA 69,"NUM",436,280
DATA 181,"/",486,280
DATA 55,"*",531,280
DATA 74,"-",574,280
DATA 71,"7",436,309
DATA 72,"8",486,309
DATA 73,"9",531,309
DATA 75,"4",436,340
DATA 76,"5",486,340
DATA 77,"6",531,340
DATA 78,"+",574,326
DATA 79,"1",436,368
DATA 80,"2",481,368
DATA 81,"3",531,368
DATA 82,"0",462,396
DATA 83,".",522,387
DATA 156,"E",574,382

DISABLE ESCAPEKEY

LOAD BITMAP " keyboard.bmp",1

SET TEXT TRANSPARENT
SYNC ON
SYNC RATE 30

ReadKeyboardData()

' Scan for all the keys being hit.
WHILE ESCAPEKEY()=0 OR RETURNKEY()=0
 COPY BITMAP 1,0
 SET TEXT TRANSPARENT
 DisplayKeyboard()
 SET TEXT OPAQUE
 LastScanCode = SCANCODE()
 IF LastScanCode < 10 AND LastScanCode >=0
 tempstring$ = "Last Scan Code = 00"+STR$(LastScanCode)
 ENDIF
 IF LastScanCode < 100 AND LastScanCode >=10
 tempstring$ = "Last Scan Code = 0"+STR$(LastScanCode)
 ENDIF
 IF LastScanCode < 1000 AND LastScanCode >=100
 tempstring$ = "Last Scan Code = "+STR$(LastScanCode)
 ENDIF
 TEXT 10,440, tempstring$
 SYNC
ENDWHILE
DELETE BITMAP 1
END

' Displays the keys and
' highlights the ones that are hit.
FUNCTION DisplayKeyboard()
 White = RGB(255,255,255)
 Black = RGB(0,0,0)
 Red = RGB(255,0,0)
 INK White, Black
 FOR x = 1 to 256
 IF KEYX(x) <> 0
 StateOfKey = KEYSTATE(x)
 IF StateOfKey = 0
 TEXT KEYX(x), KEYY(x), KEY$(x)
 ELSE
 INK Red, Black
 TEXT KEYX(x), KEYY(x), KEY$(x)
 INK White, Black
 ENDIF
 ENDIF
 NEXT x
ENDFUNCTION

' Loads all the DIM values with
' the DATA values
FUNCTION ReadKeyboardData()
 FOR x = 1 to 256
 KeyX(x) = 0
 NEXT x
 FOR x = 1 TO 256
 READ KeyValue
 READ KeyName$
 READ KeyXpos
 READ KeyYPos
 KEY$(KeyValue) = KeyName$
 KEYX(KeyValue) = KeyXpos
 KEYY(KeyValue) = KeyYpos
 NEXT x
ENDFUNCTION
A Non Blocking Input Command
The ENTRY$() and the CLEAR ENTRY BUFFER commands in DarkBASIC make nonblocking input a simple task. These two commands use the Windows keyboard buffer to track what has been typed on the keyboard without having to keep track of every key (as would be the case with an INKEY$() based non-blocking input).
The ENTRY$() command reads whatever string is stored in the Windows keyboard buffer at the time it is called. The Windows keyboard buffer stores every key typed on the keyboard until CLEAR ENTRY BUFFER is called. The CLEAR ENTRY BUFFER command clears the Windows keyboard buffer so a new string can be read.
The NonBlocking program shows you how to use the ENTRY$() and CLEAR ENTRY BUFFER commands in conjunction with the INKEY$() command to keep track of input while other processes are running. There is a clock in the upper-left corner. It changes as you are typing in your text. Change the program to use INPUT$ instead, and notice the difference. Figure 12.15 also shows the output of the NonBlocking example.
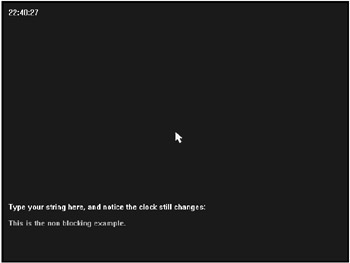
Figure 12.15: The NonBlocking program demonstrates the use of the ENTRY$() and CLEAR ENTRY BUFFER commands.
'---------------------------------
'Beginner's Guide To Game Programming With DarkBASIC
'Copyright (C)2002 Jonathan S. Harbour and Joshua R. Smith
'Chapter 12 - NonBlocking program
'---------------------------------
CLS
SYNC ON
SYNC RATE 30

White = RGB(255,255,255)
Black = RGB(0,0,0)
SET TEXT TRANSPARENT

InputString$ = ""
StaticString$ = ""
INK White,Black
CLEAR ENTRY BUFFER
' Process clock and keys until ESC is pressed.
WHILE ESCAPEKEY()=0
 INK 0,0
 BOX 0,0,639,479
 INK White,Black
 TEXT 10,10, GET TIME$()
 TEXT 10,370, "Type your string here, and notice the clock still changes:"

 charhit$ = INKEY$()
 IF charhit$ = CHR$(8)
 StaticString$ = StaticString$ + ENTRY$()
 NewLen = LEN(StaticString$)-1
 StaticString$ = LEFT$(StaticString$,NewLen)
 CLEAR ENTRY BUFFER
 ENDIF

 InputString$ = StaticString$ + ENTRY$()
 TEXT 10,400, InputString$
 SYNC
ENDWHILE
END
Mouse Commands
Next to the keyboard, the mouse is the most popular input device for the PC. Almost any program requires a mouse. Mouse devices come in all shapes, colors, and sizes. However, they all have one thing in common: They move the cursor on the screen. There are 10 different DarkBASIC commands that control the mouse.
The HIDE MOUSE Command
The HIDE MOUSE command gets rid of that pesky mouse cursor. The mouse cursor is cute, but sometimes it can be annoying when it follows your mouse. The two most annoying examples I can think of are in a flight-simulator-type game, where the mouse cursor should not be seen, and in a game where you need a custom mouse cursor, such as a targeting game. The command takes no parameters and returns nothing.
The SHOW MOUSE Command
The SHOW MOUSE command does just the opposite of the HIDE MOUSE command. It returns the cute, lovable mouse cursor. The command takes no parameters and returns nothing.
Mouse Position
Perhaps the most important data received from the mouse is the cursor's X and Y position on the screen. A game programmer translates this information into useful data for movement of characters, sprites, or 3D objects. The X and Y positions of the mouse start from the upper-left corner of the screen and work toward the lower-right corner. The mouse cursor moves further right the more positive the X value is, and further down the more positive the Y value is. Figure 12.16 will help you to visualize this concept.
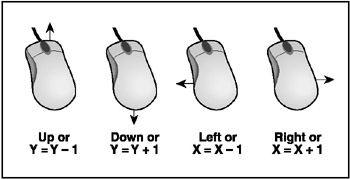
Figure 12.16: The X-Y relative positions of the mouse
There is a third position of the mouse that DarkBASIC reads—the Z position. It is hard to visualize a mouse with three positions because there is only a left-right, up-down orientation on a mouse pad. Most often, the Z position of the mouse refers to the wheel located in the center of the mouse. It is a little misleading, but it makes sense after you have used it. Figure 12.17 demonstrates the concept of the mouse wheel and how it relates to a Z value.
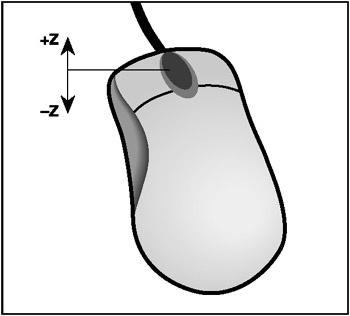
Figure 12.17: The mouse wheel and corresponding Z values
The MOUSEX Command
The MOUSEX() command returns the X position of the mouse cursor on the screen. This command takes no parameters but returns the X value of the cursor, which is between 0 and the width of the screen in pixels minus 1. The maximum value is the screen width minus 1 because the minimum position starts at 0.
The MOUSEY Command
The MOUSEY() command returns the Y position of the mouse cursor on the screen. It takes no parameters but returns the Y value of the cursor, which is between 0 and the height of the screen in pixels minus 1. The maximum value is the screen height minus 1 because the minimum position starts at 0.
The MOUSEZ Command
The MOUSEZ() command returns the value of the mouse wheel, which ranges from 0 to 100. It takes no parameters.
The POSITION MOUSE Command
The POSITION MOUSE command positions the mouse cursor on the screen. It takes two parameters (X position and Y position) and returns nothing.
Using the Mouse Position Commands: The MousePositon Program
The MousePosition program demonstrates the use of the mouse position commands. It displays the X, Y, and Z positions of the mouse on the screen and shows the mouse cursor. It also uses the keyboard to move the mouse using the POSITION MOUSE command. Figure 12.18 shows the results of this program.
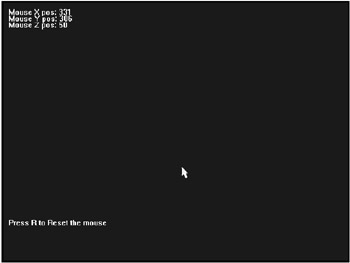
Figure 12.18: The MousePosition program demonstrates the use of the mouse commands.
'---------------------------------
'Beginner's Guide To Game Programming With DarkBASIC
'Copyright (C)2002 Jonathan S. Harbour and Joshua R. Smith
'Chapter 12 - MousePosition Program
'---------------------------------
CLS
SYNC ON
SYNC RATE 30
White = RGB(255,255,255)
Black = RGB(0,0,0)
WHILE ESCAPEKEY()=0
 INK 0,0
 BOX 0,0,639,479
 INK White,Black
 tempstring$ = "Mouse X pos: "+STR$(MOUSEX())
 TEXT 10,10, tempstring$
 tempstring$ = "Mouse Y pos: "+STR$(MOUSEY())
 TEXT 10,22, tempstring$
 tempstring$ = "Mouse Z pos: "+STR$(MOUSEZ())
 TEXT 10,34, tempstring$
 tempstring$ = "Press R to Reset the mouse"
 TEXT 10,400, tempstring$
 IF INKEY$()="R" OR INKEY$()="r"
 POSITION MOUSE 0,0
 ENDIF
 SYNC
ENDWHILE
Mouse Movement
Now that you know how to use the mouse position commands, you can read the difference between the mouse positions. The oldest way of knowing how far the mouse moved is by using the following formulas: dx = x2−x1, dy = y2−y1, dz = z2−z1. dx, dy, and dz are all delta values. In other words, they are the difference between the last mouse position and the current mouse position. DarkBASIC provides some mouse movement commands so that it is not necessary to calculate dx, dy, and dz. Figure 12.19 better illustrates the concept of mouse movement.
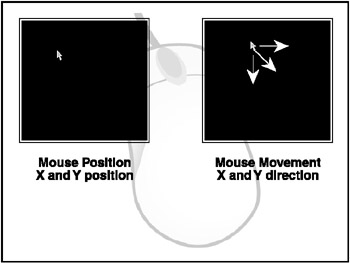
Figure 12.19: Mouse position versus mouse movement
The MOUSEMOVEX Command
The MOUSEMOVEX command tells you the distance between the current MOUSEX() and the last MOUSEX(). It is the same as the dx = x2–x1 formula. This command takes no parameters and returns the distance in the x position.
The MOUSEMOVEY Command
The MOUSEMOVEY command tells you the distance between the current MOUSEY() and the last MOUSEY(). It is the same as the dy = y2–y1 formula. This command takes no parameters and returns the distance in the y position.
The MOUSEMOVEZ Command
The MOUSEMOVEZ command tells you the distance between the current MOUSEZ() and the last MOUSEZ(). It is the same as the dz = z2−z1 formula. This command takes no parameters and returns the distance the mouse wheel has moved.
Using the Mouse Movement Commands
The MouseMove program demonstrates the uses of the mouse movement commands. It scales a bitmap based on the movement of the mouse. To quit the program, just press the Esc key. Figure 12.20 shows the output of the MouseMove example.

Figure 12.20: The MouseMove program demonstrates the use of the mouse-movement commands.
'---------------------------------
'Beginner's Guide To Game Programming With DarkBASIC
'Copyright (C)2002 Jonathan S. Harbour and Joshua R. Smith
'Chapter 12 - MouseMove Program
'---------------------------------
LOAD BITMAP " graphic.bmp", 1

HIDE MOUSE
SYNC ON
SYNC RATE 30
White = RGB(255,255,255)
Black = RGB(0,0,0)
SIZEX = 100
SIZEY = 100
SET CURRENT BITMAP 0
' Size the picture until Esc is hit.
WHILE ESCAPEKEY()=0
 INK 0,0
 BOX 0,0,639,479
 INK White,Black
 sizex = sizex + (MOUSEMOVEX()/10)
 sizey = sizey + (MOUSEMOVEY()/10)
 IF sizex > 100 THEN sizex = 100
 IF sizex < 1 THEN sizex = 0

 IF sizey > 100 THEN sizey = 100
 IF sizey < 1 THEN sizey = 0

 x1 = 0
 x2 = (638*sizex)/100+1
 y1 = 0
 y2 = (478*sizey)/100+1
 COPY BITMAP 1,0,0,639,479,0,x1,y1,x2,y2
 tempstring$ = "Move the mouse to scale the picture"
 TEXT 10,460,tempstring$
 SYNC
ENDWHILE
Mouse Buttons
Now that you can determine the position and movement of the mouse, there is one more item that must be read—the state of the mouse button. A given mouse button has four states: UP, DOWN, CLICKED, and DOUBLE CLICKED. The CLICKED and DOUBLE CLICKED states are derived from the UP and DOWN states.
The MOUSECLICK Command
The MOUSECLICK() command returns which button on the mouse is currently pressed. This command takes no input but returns a value that indicates which button is being pressed.
The left mouse button is a value of 1; the right mouse button is a value of 2. If there are more than two buttons, the third and fourth buttons are valued at 4 and 8, respectively. This way, you can determine which buttons are being pressed at one time. The MOUSECLICK() command adds the values of the buttons that are being clicked, so if the left and right mouse buttons are pressed, the value is 3. Table 12.3 shows the return values for MOUSECLICK() and what they mean.
|
Value |
Buttons Pressed |
|---|---|
|
0 |
None |
|
1 |
Left |
|
2 |
Right |
|
3 |
Left and right |
|
4 |
Third |
|
5 |
Third and left |
|
6 |
Third and right |
|
7 |
Third, left, and right |
|
8 |
Fourth |
|
9 |
Fourth and left |
|
10 |
Fourth and right |
|
11 |
Fourth, left, and right |
|
12 |
Fourth and third |
|
13 |
Fourth, third, and left |
|
14 |
Fourth, third, and right |
|
15 |
Fourth, third, left, and right |
Determining CLICKED versus DOUBLE CLICKED
Determining CLICKED and DOUBLE CLICKED states is not that hard. For the CLICKED state, you simply detect when the button is pressed. At that point, you wait until the mouse button is up: MOUSECLICK() = 0. You now have a button in a CLICKED state.
The DOUBLE CLICKED state is a little trickier. You must determine that the button is in a CLICKED state two times within a given timeframe. The Click States program shows an example of the CLICKED and DOUBLE CLICKED states. Figure 12.21 shows the output of the program.
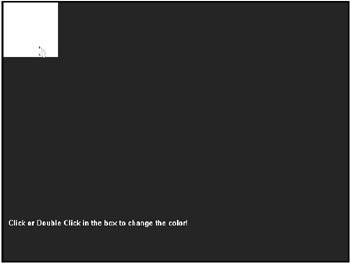
Figure 12.21: The Click States program demonstrates the use of the MOUSECLICK() command.
'---------------------------------
'Beginner's Guide To Game Programming With DarkBASIC
'Copyright (C)2002 Jonathan S. Harbour and Joshua R. Smith
'Chapter 12 - Click States Program
'---------------------------------
CLS
SYNC ON
SYNC RATE 30

' This is to color the box
' Click types are as follows
' 0 = No click
' 1 = Mouse Down
' 2 = Mouse Click
' 3 = Mouse Double Clicked
ClickType = 0
Dclick = 0

Red = RGB(255,0,0)
Green = RGB(0,255,0)
White = RGB(255,255,255)
Blue = RGB(0,0,255)
Black = RGB(0,0,0)

SYNC ON
SYNC RATE 30
' Run this program until Escape is hit.
WHILE ESCAPEKEY()=0
 IF ClickType = 0 THEN INK Blue,Black
 IF ClickType = 1 THEN INK Red,Black
 IF ClickType = 2 THEN INK White,Black
 IF ClickType = 3 THEN INK Green,Black
 IF DClick > 0 THEN DClick = DClick - 1
 IF DClick = 0 THEN DClick = -1
 BOX 0,0,100,100
 INK White,Black
 TEXT 10,400,"Click or Double Click in the box to change the color!"
 IF MOUSECLICK()=1
 IF MOUSEX()<=100 AND MOUSEY() <=100
 IF Dclick > 0 OR Dclick = -3
 Dclick = -3
 ClickType = 1
 ELSE
 ClickType = 1
 Dclick = -2
 ENDIF
 ELSE
 ClickType = 0
 Dclick = -1
 ENDIF
 ENDIF
 IF MOUSECLICK()=0 AND Dclick = -2
 IF ClickType = 1
 ClickType = 2
 Dclick = 50
 ENDIF
 ENDIF
 IF MOUSECLICK()=0 AND Dclick = -3
 IF ClickType = 1
 ClickType = 3
 Dclick = -1
 ENDIF
 ENDIF
 SYNC
ENDWHILE
The Mouse Handler
The mouse handler is a concept that works well with game programming. It is nothing more than a function that is created to handle all mouse-related input. Every stage of a game can contain a different mouse handler, but placing all of the mouse-related input into a function will make it easier to control items with the mouse.
The ShootingGallery program is a simple shooting gallery game. It uses most of the mouse commands that I have covered in this chapter. The mouse handler is clearly defined. To destroy the targets, move the cursor over the target and left-click on it. Figure 12.22 shows the output of the ShootingGallery program.
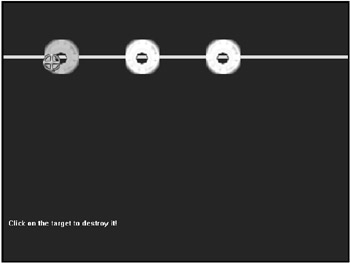
Figure 12.22: Output of the ShootingGallery program
'---------------------------------
'Beginner's Guide To Game Programming With DarkBASIC
'Copyright (C)2002 Jonathan S. Harbour and Joshua R. Smith
'Chapter 12 - ShootingGallery program
'---------------------------------

SYNC ON
SYNC RATE 30
DIM SpriteHit(20)
DIM SpriteTimer(1)
HIDE MOUSE
SpriteTimer(1) = 0
LOAD IMAGE "crosshair.bmp",25
LoadTargetAnims()
' Initialize all the sprites
FOR x = 2 TO 20
 SPRITE X,-100,68,5
 SET SPRITE x,1,1
 SpriteHit(x) = 0
NEXT X
' Set th mouse cursor spite
SPRITE 1,320,240,1
SET SPRITE 1,1,1
' Seting up the lines in the background
SET CURRENT BITMAP 0
Green = RGB(0,255,0)
Red = RGB(255,0,0)
Black = RGB(0,0,0)
White = RGB(255,255,255)
INK Green,Black
BOX 0,98,639,102
INK Red,Black
BOX 0,100,639,100
INK White,Black
inum = 5
TEXT 10,400,"Click on the target to destroy it!"
' Play the game until the Escape key is hit.
WHILE ESCAPEKEY()=0
 ProcessSprites()
 ControllerHandler()
 SYNC
ENDWHILE

END

' This moves the crosshairs to where the mouse is.
FUNCTION ControllerHandler()
 SPRITE 1, MOUSEX(), MOUSEY(), 25
 IF MOUSECLICK()=1
 FOR X = 2 TO 20
 IF SPRITE COLLISION(1,X)
 SpriteHit(X) = 1
 ENDIF
 NEXT X
 ENDIF
ENDFUNCTION

' This does all the Sprite Collision processing.
FUNCTION ProcessSprites()
 SpriteTimer(1) = SpriteTimer(1) - 1
 IF SpriteTimer(1) <= 0 THEN MoveNewSprite()
 FOR X = 2 TO 20
 IF SPRITE X(X) > 704
 SPRITE X,-100,68,5
 ENDIF
 IF SpriteHit(X)
 SPRITE X,SPRITE X(x)+5,SPRITE Y(X), SPRITE IMAGE(X)+1
 IF SPRITE IMAGE(X) >= 15
 SPRITE X,-100,68,5
 SpriteHit(X) = 0
 ENDIF
 ELSE
 IF SPRITE X(X) >= -64
 SPRITE X,SPRITE X(x)+5,SPRITE Y(X), 5
 ENDIF
 ENDIF
 NEXT X
ENDFUNCTION

' Moves out a new sprite
FUNCTION MoveNewSprite()
 FOR X = 2 TO 20
 IF SPRITE X(X) <= -100
 SPRITE X , -64, SPRITE Y(X), 5
 X = 21
 ENDIF
 NEXT X
 SpriteTimer(1) = 30
ENDFUNCTION

' Loads are the Target Animations.
FUNCTION LoadTargetAnims()
 LOAD BITMAP "target.bmp",1
 inum = 5
 fadestep = 100
 SET CURRENT BITMAP 1
 FOR X = 0 TO 10
 FADE BITMAP 1,90
 GET IMAGE inum,0,0,64,64
 inum = inum + 1
 NEXT X
 DELETE BITMAP 1
 SET CURRENT BITMAP 0
ENDFUNCTION
Joystick Commands
What do all gaming consoles have in common? Their joysticks! Every gaming console has the potential to have a joystick. From the Atari 2600 to the modern PC, the joystick is the choice of most game developers for input. DarkBASIC has a wide selection of commands to control the joystick.
Analog versus Digital Input
Before you get into the wonderful world of DarkBASIC joystick commands, you need a little understanding of how a joystick works. There are two different types of joysticks—digital and analog. Each type works with a PC, but they generate the data in completely different ways.
An analog joystick is like most old-school mouse devices. It consists of two rollers that, when moved, calculate the distance and report the information to the computer. All older joysticks generate this analog input. When the input is generated, it is converted to a digital signal for the computer to use. The problem with analog input is that the joystick has a tendency to drift because of slight movements.
Digital joysticks read differently than analog joysticks. Instead of having two rollers to read the distance between movements, digital joysticks use an optical or light sensor that converts user movements into a digital signal. This gives you a much more accurate reading of the user input without the drifting problems. A common digital joystick (the one I use) is the Microsoft Sidewinder 3D.
Joystick Position
Like the mouse, the joystick has two common positions—X and Y. Unlike the mouse, however, you do not have to move the joystick around a large pad to get your X and Y position readings. You just move your hand up while holding the joystick, and the Y position decreases. Move your hand left to decrease the X position.
Some joysticks also contain a third position—the Z position. This is very much like the mouse wheel. Figure 12.23 shows the three positions and how they correspond to the joystick.
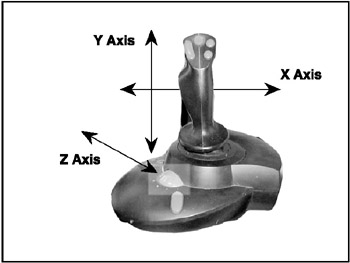
Figure 12.23: The three axes of a joystick
The JOYSTICK X Command
The JOYSTICK X() command returns the X position of the joystick, which ranges from −1000 to +1000. The joystick is in the center of the X axis when the X position is equal to 0.
The JOYSTICK Y Command
The JOYSTICK Y() command returns the Y position of the joystick, which also ranges from −1000 to +1000. The joystick is in the center of the Y axis when the Y position is equal to 0.
The JOYSTICK Z Command
The JOYSTICK Z() command returns the Z position of the joystick, which also ranges from −1000 to +1000. The joystick is in the center of the Z axis when the Z position is equal to 0.
Recycling an Old Program
To demonstrate the X, Y, and Z joystick commands, I have rewritten the mouse movement command to read the joystick. Notice that there is no joystick position command because you cannot reposition the joystick. Figure 12.24 shows the output of the JoystickPosition program.
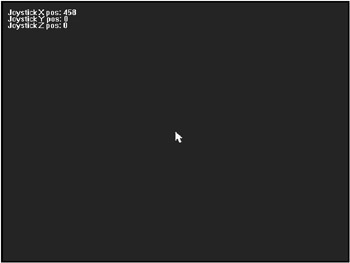
Figure 12.24: Output of the JoystickPosition program
'---------------------------------
'Beginner's Guide To Game Programming With DarkBASIC
'Copyright (C)2002 Jonathan S. Harbour and Joshua R. Smith
'Chapter 12 - JoystickPosition Program
'---------------------------------
CLS
SYNC ON
SYNC RATE 30
White = RGB(255,255,255)
Black = RGB(0,0,0)
' Reads the Joystick position until
' the escape key is hit..
WHILE ESCAPEKEY()=0
 INK 0,0
 BOX 0,0,639,479
 INK White,Black
 tempstring$ = "Joystick X pos: "+STR$(JOYSTICK X())
 TEXT 10,10,tempstring$
 string$ = "Joystick Y pos: "+STR$(JOYSTICK Y())
 TEXT 10,22,tempstring$
 string$ = "Joystick Z pos: "+STRr$(JOYSTICK Z())
 TEXT 10,34,tempstring$
 SYNC
ENDWHILE
Joystick Movement
The joystick movement commands are not like the mouse movement commands. They do not give you the distance that the joystick moves; rather, they tell you what direction the joystick is moving.
The JOYSTICK UP Command
The JOYSTICK UP() command tells you whether the joystick is moving upward. This command takes no parameters and returns a 1 if the joystick is moving up. If the joystick is moving downward, this command returns a 0.
The JOYSTICK DOWN Command
The JOYSTICK DOWN() command tells you whether the joystick is moving downward. This command takes no parameters and returns a 1 if the joystick is moving down. If the joystick is moving upward, this command returns a 0.
The JOYSTICK LEFT Command
The JOYSTICK LEFT() command tells you whether the joystick is moving left. This command takes no parameters and returns a 1 if the joystick is moving to the left. If the joystick is moving right, this command returns a 0.
The JOYSTICK RIGHT Command
The JOYSTICK RIGHT() command tells you whether the joystick is moving right. This command takes no parameters and returns a 1 if the joystick is moving to the right. If the joystick is moving left, this command returns a 0.
Recycling Yet Another Old Program
The MouseMove program scaled a bitmap with the mouse. You are now going to recycle that code and scale the picture with the joystick. Notice that the JOYSTICK UP() value is subtracted from the scalex value, and JOYSTICK DOWN() is added. This is different than the code for the MouseMove program, in which you just added one value, because neither JOYSTICK UP() nor JOYSTICK DOWN() returns a negative number. Therefore, you just create the negative value. The same is true with JOYSTICK LEFT() and JOYSTICK RIGHT(). Figure 12.25 shows the output of the JoystickMove program.

Figure 12.25: Output of the JoystickMove program
'---------------------------------
'Beginner's Guide To Game Programming With DarkBASIC
'Copyright (C)2002 Jonathan S. Harbour and Joshua R. Smith
'Chapter 12 - JoystickMove Program
'---------------------------------
CLS
LOAD BITMAP " graphic.bmp", 1

HIDE MOUSE
SYNC ON
SYNC RATE 30
White = RGB(255,255,255)
Black = RGB(0,0,0)
SIZEX = 100
SIZEY = 100
SET CURRENT BITMAP 0
' Scales with Joystick movement
' until the escape key is pressed
WHILE ESCAPEKEY()=0
 INK 0,0
 BOX 0,0,639,479
 INK White,Black
 sizex = sizex - JOYSTICK UP()
 sizex = sizex + JOYSTICK DOWN()
 sizey = sizey - JOYSTICK LEFT()
 sizey = sizey + JOYSTICK RIGHT()
 IF sizex > 100 THEN sizex = 100
 IF sizex < 1 THEN sizex = 0

 IF sizey > 100 THEN sizey = 100
 IF sizey < 1 THEN sizey = 0
 x1 = 0
 x2 = (638*sizex)/100+1
 y1 = 0
 y2 = (478*sizey)/100+1
 COPY BITMAP 1,0,0,639,479,0,x1,y1,x2,y2
 tempstring$ = "Move the JoyStick to scale the picture"
 TEXT 10,460,tempstring$
 SYNC
ENDWHILE
Joystick Buttons
Just like the mouse, the joystick has buttons. Some joysticks have lots of buttons (such as for the Xbox, GameCube, and PlayStation 2), while other joysticks have one button (such as for the Atari 2600). However, each button has one thing in common—it provides a game with user input. Each button is assigned to a specific action or series of actions. In Super Mario Brothers, for example, one button is used to jump, and the other button is used to fire. DarkBASIC provides commands to read these buttons from the joystick and use them in your game.
The JOYSTICK FIRE A Command
The JOYSTICK FIRE A() command lets you know when the primary button on the joystick has been pressed. This is commonly used for firing at objects in most firstperson shooters. The command takes no parameters, but it returns a 0 if the primary button is in the UP state and a 1 if it is in the DOWN state.
The JOYSTICK FIRE B Command
The JOYSTICK FIRE B() command lets you know when the secondary button on the joystick has been pressed. This is commonly used for a secondary firing function in most first-person shooters. The command takes no parameters, but it returns a 0 if the secondary button is in the UP state and a 1 if it is in the DOWN state.
The JOYSTICK FIRE C Command
The JOYSTICK FIRE C() command lets you know when the third button on the joystick has been pressed. This is commonly used to check status or perform actions in some first-person shooters. The command takes no parameters, but it returns a 0 if the third button is in the UP state and a 1 if it is in the DOWN state.
The JOYSTICK FIRE D Command
The JOYSTICK FIRE D() command lets you know when the fourth button on the joystick has been pressed. This is not commonly used in first-person shooters, but it can be assigned to change things in the display. The command takes no parameters, but it returns a 0 if the fourth button is in the UP state and a 1 if it is in the DOWN state.
Joystick Sliders
Some joysticks, both analog and digital, have sliders on them, much like you would see in the cockpit of a spaceship or on top of a soundboard. DarkBASIC provides a means to read these sliders as well.
The JOYSTICK SLIDER A Command
The JOYSTICK SLIDER A() command returns the value of the primary slider on a joystick. I usually use this slider to control my thrust in a space flight simulation. The command takes no input, but returns a value between 0 and 65535. This is much more precise than JOYSTICK X() and JOYSTICK Y(), so you can get more precision out of a slider.
| Note |
The number 65535 will show up frequently when you are programming devices. This is because it has 16 bits and is a computer-friendly number (because it is based on a power of 2). |
The JOYSTICK SLIDER B Command
The JOYSTICK SLIDER B() command returns the value of a secondary slider on a joystick. The command also takes no input, but it returns a value between 0 and 65535. I have never had a joystick with two sliders before, but I'm sure it is a great combination of control and style.
Additional Joystick Commands
There are four other joystick commands that I need to address. These commands cover some of the unconventional aspects of joysticks. However, DarkBASIC would not be complete without them.
The JOYSTICK TWIST X Command
The JOYSTICK TWIST X() command reads the twist of the X position of the joystick. It takes no parameters but returns the value of the joystick twisted in the X direction. This value is between 0 and 65535.
The JOYSTICK TWIST Y Command
The JOYSTICK TWIST Y() command reads the twist of the Y position of the joystick. It takes no parameters but returns the value of the joystick twisted in the Y direction. This value is between 0 and 65535.
The JOYSTICK TWIST Z Command
The JOYSTICK TWIST Z() command reads the twist of the Z position of the joystick. It takes no parameters but returns the value of the joystick twisted in the Z direction. This value is between 0 and 65535.
The JOYSTICK HAT ANGLE Command
The JOYSTICK HAT ANGLE command returns the degrees of the hat controller on your joystick. Some joysticks have more than one hat, so this command takes one parameter—the number of the hat. It supports up to four different hats, and returns the angle at which the hat is pointing in tenths of a degree. The value of the angle ranges from 0 to 3600. Table 12.4 lists the most common hat directions.
|
Direction |
Angle (in Tenths of a Degree) |
|---|---|
|
North |
0 |
|
East |
900 |
|
South |
1800 |
|
West |
2700 |
A hat is a multidirectional button on a joystick. You simply press down most buttons, but you press a hat button in a particular direction.
Revising the ShootingGallery Program
Now that you know all the joystick commands, it is time to revisit the ShootingGallery program. This time you will replace the mouse commands with joystick commands. Because of the way the program was written, you only need to change one function—the mouse handler. The following source code lists the changes you need to make to enable the ShootingGallery program to use the joystick. You can find the full source code for the JoystickShootingGallery program on the CD in the Chapter 12 directory.
Place the following source code after the SYNC RATE 30 command in the original ShootingGallery program.
DIM XPos(1)
DIM YPos(1)
XPos(1) = SCREEN WIDTH() /2
YPos(1) = SCREEN HEIGHT() /2
Now replace the ControllerHandler() section with this new section, which uses the JOYSTICK commands.
FUNCTION ControllerHandler()
 IF JOYSTICK UP() = 1 THEN YPos(1) = YPos(1) - 3
 IF JOYSTICK DOWN() = 1 THEN YPos(1) = YPos(1) + 3
 IF JOYSTICK LEFT() = 1 THEN XPos(1) = XPos(1) - 3
 IF JOYSTICK RIGHT() = 1 THEN XPos(1) = XPos(1) + 3
 IF XPos(1) < 0 THEN XPos(1) = 0
 IF YPos(1) < 0 THEN YPos(1) = 0
 IF XPos(1) > SCREEN WIDTH()-1 THEN XPos(1) = SCREEN WIDTH()-1
 IF YPos(1) > SCREEN HEIGHT()-1 THEN YPos(1) = SCREEN HEIGHT()-1
 SPRITE 1, XPos(1), YPos(1) , 25
 IF JOYSTICK FIRE A()=1
 FOR X = 2 TO 20
 IF SPRITE COLLISION(1,X)
 SPRITEHIT(X) = 1
 ENDIF
 NEXT X
 ENDIF
ENDFUNCTION
Defining Control Devices
Before you move on to the final capabilities of the joystick, you need to take a side trip. This trip takes you down the path of control devices. Some computers have more than one control device, which can be just about any human input device. Some examples are joysticks, head-mounted trackers, and driving wheels. The next set of commands tells DarkBASIC which one of those control devices to use and sets the default control devices.
The PERFORM CHECKLIST FOR CONTROL DEVICES Command
The PERFORM CHECKLIST FOR CONTROL DEVICES command fills up the check list information with all the available control devices. Each device gets its own space within the checklist. The name of the device is returned in CHECKLIST STRING$(). If the device supports force feedback, CHECKLIST VALUE A() returns a 1; otherwise, it returns a 0.
The SET CONTROL DEVICE Command
After you have listed the control devices, you need to set the default control device using the SET CONTROL DEVICE command. This command takes one parameter, which is a string with the name of the device. If PERFORM CHECKLIST FOR CONTROL DEVICES returns more than one control device, you should ask the user which device to use and then pass the string for that device to this command.
The CONTROL DEVICE NAME$ Command
The CONTROL DEVICE NAME$ command returns the string name of the control device. This is very useful because you will not have to keep track of the current control device; you can just read its name from CONTROL DEVICE NAME$. This command takes no parameters, but returns a string with the control device's name.
The CONTROL DEVICE X Command
The CONTROL DEVICE X command returns the X value of the current controller. This is exactly like the JOYSTICK X() command, but it works for any control device specified.
The CONTROL DEVICE Y Command
The CONTROL DEVICE Y command returns the Y value of the current controller. This is exactly like the JOYSTICK Y() command, but it works for any control device specified.
The CONTROL DEVICE Z Command
The CONTROL DEVICE Z command returns the Z value of the current controller. This is exactly like the JOYSTICK Z() command, but it works for any control device specified.
Selecting the Current Control Device
The SetControlDevice program provides a simple example of how to detect and set the current control device. It contains a function that you will use in quite a few other programs to determine which control device to use. Figure 12.26 shows the output of the SetControlDevice program.
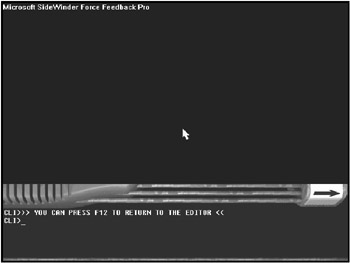
Figure 12.26: Output of the SetControlDevice program
'---------------------------------
'Beginner's Guide To Game Programming With DarkBASIC
'Copyright (C)2002 Jonathan S. Harbour and Joshua R. Smith
'Chapter 12 - SetControlDevice Program
'---------------------------------
SYNC ON
SYNC RATE 30

SetControlDevice()
PRINT CONTROL DEVICE NAME$()

END

' Sets the current control device
FUNCTION SetControlDevice()
 PERFORM CHECKLIST FOR CONTROL DEVICES
 IF CHECKLIST QUANTITY() = 1
 SET CONTROL DEVICE CHECKLIST STRING$(1)
 EXITFUNCTION CHECKLIST STRING$(1)
 ENDIF
 CLS
 PRINT "Please Select Control Device"
 FOR X = 1 TO CHECKLIST QUANTITY()
 tempstring$ = STR$(X)+": "+CHECKLIST STRING$(X)
 PRINT tempstring$
 NEXT X
 INPUT ConDev
 SET CONTROL DEVICE CHECKLIST STRING$(ConDev)
ENDFUNCTION CHECKLIST STRING$(ConDev)
One special thing to note about this function is that is there is only one control device—the function does not list the devices, it just picks that one control device. This is useful for keeping the flow of a program going. Also, if there are no control devices available, this function returns a string of "none." That way, you can check up front to see whether there are any control devices.
Force Feedback
Now that you have learned about the control devices, I will cover force feedback, which includes more than just the standard joystick. Driving wheels and other control devices (including some mouse devices) also support force feedback.
What is force feedback? It is a tactile sensation returned to the gamer by the control device he is using. An example would be a gamer playing a boxing game. In real boxing, when your opponent hits you, you feel the hit on your face. In the gaming world, you really don't want to be hit in the face, but you would like some other feedback to let you know you've been hit. Thus your joystick will rumble or move to one side as your opponent strikes you. That is why it is called force feedback—the joystick is forcing you to feel some feedback. The joystick or input device accomplishes this with small motors and sensors that are built into it.
Programming Force Feedback
Programming force feedback in DarkBASIC does not take a rocket scientist. When I finish explaining the command, you will add some source code to the ShootingGallery program to add force feedback.
Before activating any of the force-feedback commands, you must first determine whether the device supports it. Remember that the checklist created by PERFORM CHECKLIST FOR CONTROL DEVICES stores a value of 1 in CHECKLIST VALUE A() if the device supports force feedback. Your program will fail if you attempt to use force feedback on a device that does not support it.
You can split the force-feedback commands into two groups—the standard commands and the special commands. Each group of commands takes similar input. At least one of their parameters (unless otherwise specified) takes a magnitude value.
Magnitude value is the extent of the force-feedback effect. This value ranges from 0 to 100, where 0 is no effect and 100 is the largest possible effect.
Standard Force Feedback Commands
The standard force-feedback commands allow you to create your own force-feedback effects. They give you the ability to move the joystick in any direction you want. The commands are FORCE ANGLE, FORCE UP, FORCE DOWN, FORCE LEFT, FORCE RIGHT, FORCE AUTO CENTER ON, FORCE AUTO CENTER OFF, and FORCE NO EFFECT.
The FORCE ANGLE Command
FORCE ANGLE is the most versatile of the standard force-feedback commands. It takes three parameters and returns none. The first parameter is the magnitude of the force. The second value is the angle at which you want to put the force-feedback device. The third value is the time for which you want to leave the device at that angle, measured in milliseconds.
The FORCE UP Command
The FORCE UP command forces the joystick into the up position. It provides resistance if you are trying to pull down on the joystick. The command takes one parameter, which is the magnitude of the force, and returns nothing.
The FORCE DOWN Command
The FORCE DOWN command forces the joystick into the down position. It provides resistance if you are trying to pull up on the joystick. The command takes one parameter, which is the magnitude of the force, and returns nothing.
The FORCE LEFT Command
The FORCE LEFT command forces the joystick into the left position. It provides resistance if you are trying to pull the joystick right. The command takes one parameter, which is the magnitude of the force, and returns nothing.
The FORCE RIGHT Command
The FORCE RIGHT command forces the joystick into the right position. It provides resistance if you are trying to pull the joystick left. The command takes one parameter, which is the magnitude of the force, and returns nothing.
The FORCE AUTO CENTER ON Command
The FORCE AUTO CENTER ON command forces the joystick to always return to the center, instead of forcing left, right, up, or down. This command is great for stiffing the joystick. It takes no parameter, and it returns nothing.
The FORCE AUTO CENTER OFF Command
The FORCE AUTO CENTER OFF command frees the joystick to stay in whatever position it is in. This command is great for loosening the joystick. It takes no parameter, and it returns nothing.
The FORCE NO EFFECT Command
The FORCE NO EFFECT command is the last of the standard commands, and it affects both the standard and the special force-feedback commands. This command cancels all force feedback applied to the joystick. It takes no parameters and returns nothing.
Special Force Feedback Commands
Sometimes just moving the joystick up, down, left, and right is not enough. DarkBASIC provides commands to do more than just standard stuff. These are special case commands that perform more complex actions. DarkBASIC supports four special commands: FORCE CHAINSAW, FORCE SHOOT, FORCE IMPACT, and FORCE WATER EFFECT.
The FORCE CHAINSAW Command
The FORCE CHAINSAW command creates a chainsaw effect within the control device. Imagine revving up a chainsaw and keeping it running. That's what this command simulates. It takes two parameters. The first is the magnitude value, and the second is the duration of the effect. Like all force-feedback effect commands, the duration is measured in milliseconds.
The FORCE SHOOT Command
The FORCE SHOOT command emulates the kickback from a pistol. The kickback occurs when you pull the trigger—your hand moves back and the bullet moves forward. This command takes two parameters. The first is the magnitude value, and the second is the duration value.
The FORCE IMPACT Command
The FORCE IMPACT command is probably the most versatile of the special force-feedback commands. You can use it for hitting walls, hitting people, or getting hit.
I think this might be my favorite special force-feedback command. It takes two parameters. The first is the magnitude value, and the second is the duration value.
The FORCE WATER EFFECT Command
FORCE WATER EFFECT is an interesting command. It creates the sensation of walking through water. This command takes two parameters. The first is the magnitude value, and the second is the duration value.
Revising the ShootingGallery Program Again
This is your last visit to the ShootingGallery program. This time you will add special force-feedback commands to the program. You will add two new commands, change the control handler, and modify the main portion of the program. You can find the full source code for this program on the CD in the Chapter 12 directory, under ForceShootingGallery.
First, add the following source code after the SYNC RATE 30 section. This code checks the force-feedback capabilities of the joystick. You will enter SETCONTROLDEVICE() in a little while.
DIM SupportsForceFeedBack(1)
SupportsForceFeedBack(1) = 0
SetControlDevice()
Add the following source code after inum = 5. These are the instructions to activate the force-feedback commands if the joystick supports them.
IF SupportsForceFeedBack(1) = 1
 TEXT 10,292,"C - Chain Saw Effect"
 TEXT 10,304,"V - Water Effect"
 TEXT 10,316,"W - Force UP"
 TEXT 10,328,"S - Force DOWN"
 TEXT 10,340,"A - Force LEFT"
 TEXT 10,352,"D - Force RIGHT"
 TEXT 10,364,"O - Auto Center On"
 TEXT 10,376,"P - Auto Center Off"
ENDIF
Add the following line of code after ControllerHandler(). This processes the other force-feedback effects.
DoOtherEffects()
Next, replace the existing ControllerHandler() function with the following ControllerHandler() function.
FUNCTION ControllerHandler()
 IF JOYSTICK UP() = 1 THEN YPos(1) = YPos(1) - 3
 IF JOYSTICK DOWN() = 1 THEN YPos(1) = YPos(1) + 3
 IF JOYSTICK LEFT() = 1 THEN XPos(1) = XPos(1) - 3
 IF JOYSTICK RIGHT() = 1 THEN XPos(1) = XPos(1) + 3
 IF XPos(1) < 0 THEN XPos(1) = 0
 IF YPos(1) < 0 THEN YPos(1) = 0
 IF XPos(1) > SCREEN WIDTH()-1 THEN XPos(1) = SCREEN WIDTH()-1
 IF YPos(1) > SCREEN HEIGHT()-1 THEN YPos(1) = SCREEN HEIGHT()-1
 SPRITE 1, XPos(1), YPos(1) , 25
 IF JOYSTICK FIRE A()=1
 IF SupportsForceFeedBack(1) <> 0 THEN FORCE SHOOT 50,25
 FOR x = 2 TO 20
 IF SPRITE COLLISION(1,x)
 IF SupportsForceFeedBack(1) <> 0
 FORCE IMPACT 50,25
 ENDIF
 SpriteHit(x) = 1
 ENDIF
 NEXT x
 ENDIF
ENDFUNCTION
Now add the following two functions to the end of your program, and you will have force-feedback capability in your ShootingGallery program.
FUNCTION SetControlDevice()
 PERFORM CHECKLIST FOR CONTROL DEVICES
 IF CHECKLIST QUANTITY() = 0
 EXITFUNCTION "NONE"
 ENDIF
 IF CHECKLIST QUANTITY() = 1
 SET CONTROL DEVICE CHECKLIST STRING$(1)
 SupportsForceFeedBack(1) = CHECKLIST VALUE A(1)
 EXITFUNCTION CHECKLIST STRING$(1)
 ENDIF
 CLS
 PRINT "Plese Select Control Device"
 FOR x = 1 TO CHECKLIST QUANTITY()
 tempstring$ = STR$(x)+": "+CHECKLIST STRING$(x)
 PRINT tempstring$
 NEXT X
 INPUT ConDev
 SupportsForceFeedBack(1) = CHECKLIST VALUE A(X)
 SET CONTROL DEVICE CHECKLIST STRING$(ConDev)
ENDFUNCTION CHECKLIST STRING$(ConDev)

FUNCTION DoOtherEffects()
 IF SupportsForceFeedBack(1) =0 THEN EXITFUNCTION
 KeyPress$ = UPPER$(INKEY$())
 IF KeyPress$ = "" THEN EXITFUNCTION
 IF KeyPress$ = "C" THEN FORCE CHAINSAW 50,1000
 IF KeyPress$ = "V" THEN FORCE WATER EFFECT 50,1000
 IF KeyPress$ = "W" THEN FORCE UP 50
 IF KeyPress$ = "S" THEN FORCE DOWN 50
 IF KeyPress$ = "A" THEN FORCE LEFT 50
 IF KeyPress$ = "D" THEN FORCE RIGHT 50
 IF KeyPress$ = "O" THEN FORCE AUTO CENTER ON
 IF KeyPress$ = "P" THEN FORCE AUTO CENTER OFF
ENDFUNCTION
Summary
Wow, there are a lot of commands to take control of input devices. This chapter explained all of the commands and how to execute them. User input devices make a technical demo a game. The ShootingGallery program is an excellent example of using input devices. Someday, I hope to see someone take that program and add sounds, high scores, and plenty of bells and whistles.
Quiz
The chapter quiz will help you retain the information that was covered in this chapter, as well as give you an idea about how well you're doing at understanding the subjects. You will find the answers for this quiz in Appendix A, "Answers to the Chapter Quizzes."
|
1. |
Which command is used to read a string or number entered from the keyboard?
|
|
|
2. |
What does the INKEY$() command do?
|
|
|
3. |
Which command returns 1 when the spacebar is pressed?
|
|
|
4. |
What is the value of mouseclick() when the left and right mouse buttons are both pressed?
|
|
|
5. |
When a mouse is located at x = 100, y = 300, which command returns 100?
|
|
|
6. |
How many joystick hats does DarkBASIC support?
|
|
|
7. |
Which checklist value returned from PERFORM CHECKLIST FOR CONTROL DEVICES returns whether the device supports force feedback?
|
|
|
8. |
Which command cancels all force-feedback effects on a joystick?
|
|
|
9. |
Which command returns the scan code of the key currently being pressed?
|
|
|
10. |
ESCAPEKEY() = 1 means the Esc key is being held down.
|
|

Answers
|
1. |
A |
|
2. |
A |
|
3. |
A |
|
4. |
C |
|
5. |
C |
|
6. |
B |
|
7. |
B |
|
8. |
C |
|
9. |
A |
|
10. |
A |
Part I - The Basics of Computer Programming
- Welcome to DarkBASIC
- Introduction to Computer Programming
- Basic Commands, Variables, and Data Types
- Characters, Strings, and Text Output
- Looping Commands
- Making Programs Think Branching Statements and Subroutines
- More Power to the Numbers Data Sequences and Arrays
- Number Crunching Mathematical and Relational Operators and Commands
Part II - Game Fundamentals Graphics, Sound, Input Devices, and File Access
- Basic Graphics Commands
- Game Graphics Learning to Use Bitmaps
- The Art of Using Animated Sprites for 2D Games
- Programming the Keyboard, Mouse, and Joystick
- Adding Sound Effects to Your Game
- Playing Some Tunes CD Audio, MIDI and MP3 Music
- Loading and Saving Information Using Files
- Playing Intro Movies and Cut-Scenes
Part III - Advanced Topics 3D Graphics and Multiplayer Programming
Epilogue
Part IV - Appendixes
EAN: 2147483647
Pages: 203
