Painting with QPainter
A QPainter can be used to draw on a "paint device", such as a widget or a pixmap. QPainter is useful when we write custom widgets or custom item classes with their own look and feel. QPainter is also the class to use for printing; this will be explained in detail later in the chapter.
QPainter can draw geometric shapes: points, lines, rectangles, ellipses, arcs, chords, pie segments, polygons, and cubic Bézier curves. It can also draw pixmaps, images, and text.
When we pass a paint device to the QPainter constructor, QPainter adopts some settings from the device and initializes other settings to default values. These settings influence the way drawing is performed. The three most important are the painter's pen, brush, and font:
- The pen is used for drawing lines and geometric shape boundaries. It consists of a color, a width, a line style, a cap style, and a join style.
Figure 8.1. QPainter functions for drawing geometric shapes
Figure 8.2. Pen styles
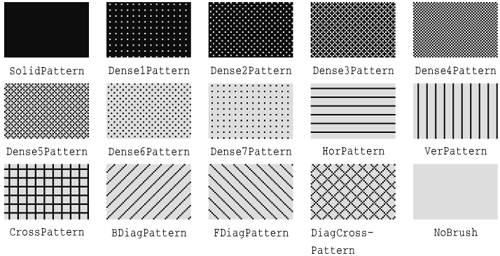
- The brush is the pattern used for filling geometric shapes. It consists of a color and a style.
- The font is used for drawing text. A font has many attributes, including a family and a point size.
These settings can be modified by calling one of setPen(), setBrush(), and setFont() with a QPen, QBrush, or QFont object.
Figure 8.3. Cap and join styles
Figure 8.4. Brush styles
Here's the code to draw the ellipse shown in Figure 8.5 (a):
Figure 8.5. Geometric shape examples
QPainter painter(this);
painter.setPen(QPen(black, 3, DashDotLine));
painter.setBrush(QBrush(red, SolidPattern));
painter.drawEllipse(20, 20, 100, 60);
Here's the code to draw the pie segment shown in Figure 8.5 (b):
QPainter painter(this);
painter.setPen(QPen(black, 5, SolidLine));
painter.setBrush(QBrush(red, DiagCrossPattern));
painter.drawPie(20, 100, 60, 60 * 16, 270 * 16);
The last two arguments to drawPie() are expressed in sixteenths of a degree.
Here's the code to draw the cubic Bézier curve shown in Figure 8.5 (c):
QPainter painter(this);
QPointArray points(4);
points[0] = QPoint(20, 80);
points[1] = QPoint(50, 20);
points[2] = QPoint(80, 20);
points[3] = QPoint(120, 80);
painter.setPen(QPen(black, 3, SolidLine));
painter.drawCubicBezier(points);
The current state of a painter can be saved on a stack by calling save() and restored later on by calling restore(). This can be useful if we want to temporarily change some painter settings and then reset them to their previous values.
The other settings that control a painter, in addition to the pen, brush, and font, are:
- The background color is used to fill the background of geometric shapes (beneath the brush pattern), text, or bitmaps when the background mode is OpaqueMode (the default is TransparentMode).
- The raster operation specifies how the newly drawn pixels should interact with the pixels already present on the paint device. The default is CopyROP, which means that the new pixels are simply copied onto the device, ignoring the previous pixel value. Other raster operations include XorROP, NotROP, AndROP, and NotAndROP.
- The brush origin is the starting point for brush patterns, normally the top-left corner of the widget.
- The clip region is the area of the device that can be painted. Drawing operations performed outside the clip region are ignored.
- The viewport, window, and world matrix determine how logical QPainter coordinates map to physical paint device coordinates. By default, these are set up so that the logical and physical coordinate systems coincide.
Let's take a closer look at the coordinate system defined by the viewport, window, and world matrix. (In this context, the term "window" does not refer to a window in the sense of a top-level widget, and the "viewport" has nothing to do with QScrollView's viewport.)
The viewport and the window are tightly bound. The viewport is an arbitrary rectangle specified in physical coordinates. The window specifies the same rectangle, but in logical coordinates. When we do the painting, we specify points in logical coordinates, and those coordinates are converted into physical coordinates in a linear algebraic manner, based on the current windowviewport settings.
By default, the viewport and the window are set to the device's rectangle. For example, if the device is a 320 x 200 widget, both the viewport and the window are the same 320 x 200 rectangle with its top-left corner at position (0, 0). In this case, the logical and physical coordinate systems are the same.
The windowviewport mechanism is useful to make the drawing code independent of the size or resolution of the paint device. We can always do the arithmetic to map logical coordinates to physical coordinates ourselves, but it's usually simpler to let QPainter do the work. For example, if we want the logical coordinates to extend from (-50, -50) to (+50, +50), with (0, 0) in the middle, we can set the window as follows:
painter.setWindow(QRect(-50, -50, 100, 100));
The (-50, -50) pair specifies the origin, and the (100, 100) pair specifies the width and height. This means that the logical coordinates (-50, -50) now correspond to the physical coordinates (0, 0), and the logical coordinates (+50, +50) correspond to the physical coordinates (320, 200). In this example, as is often the case, we don't need to change the viewport.
Figure 8.6. Converting logical coordinates into physical coordinates

Now comes the world matrix. The world matrix is a transformation matrix that is applied in addition to the windowviewport conversion. It allows us to translate, scale, rotate, or shear the items we are drawing. For example, if we wanted to draw text at a 45° angle, we would use this code:
QWMatrix matrix;
matrix.rotate(45.0);
painter.setWorldMatrix(matrix);
painter.drawText(rect, AlignCenter, tr("Revenue"));
The logical coordinates we pass to drawText() are transformed by the world matrix, then mapped to physical coordinates using the windowviewport settings.
If we specify multiple transformations, they are applied in the order in which they are given. For example, if we want to use the point (10, 20) as the rotation's pivot point, we can do so by translating the window, performing the rotation, and then translating the window back to its original position:
QWMatrix matrix;
matrix.translate(-10.0, -20.0);
matrix.rotate(45.0);
matrix.translate(+10.0, +20.0);
painter.setWorldMatrix(matrix);
painter.drawText(rect, AlignCenter, tr("Revenue"));
A simpler way to specify transformations is to use QPainter's translate(), scale(), rotate(), and shear() convenience functions:
painter.translate(-10.0, -20.0);
painter.rotate(45.0);
painter.translate(+10.0, +20.0);
painter.drawText(rect, AlignCenter, tr("Revenue"));
But if we want to use the same transformations repeatedly, it's faster to store them in a QWMatrix object and set the world matrix on the painter whenever the transformations are needed.
If we want to just save the world matrix and restore it later, we can use saveWorldMatrix() and restoreWorldMatrix().
To illustrate painter transformations, we will review the code of the OvenTimer widget shown in Figure 8.7. The OvenTimer widget is modeled after the physical oven timers that were used before it was common to have ovens with clocks builtin. The user can click a notch to set the duration. The wheel automatically turns counterclockwise until 0 is reached, at which point OvenTimer emits the timeout() signal.
Figure 8.7. The OvenTimer widget
class OvenTimer : public QWidget
{
 Q_OBJECT
public:
 OvenTimer(QWidget *parent, const char *name = 0);

 void setDuration(int secs);
 int duration() const;
 void draw(QPainter *painter);

signals:
 void timeout();

protected:
 void paintEvent(QPaintEvent *event);
 void mousePressEvent(QMouseEvent *event);

private:
 QDateTime finishTime;
 QTimer *updateTimer;
 QTimer *finishTimer;
};
The OvenTimer class inherits QWidget and reimplements two virtual functions: paintEvent() and mousePressEvent().
#include
#include
#include

#include
using namespace std;

#include "oventimer.h"

const double DegreesPerMinute = 7.0;
const double DegreesPerSecond = DegreesPerMinute / 60;
const int MaxMinutes = 45;
const int MaxSeconds = MaxMinutes * 60;
const int UpdateInterval = 10;

OvenTimer::OvenTimer(QWidget *parent, const char *name)
 : QWidget(parent, name)
{
 finishTime = QDateTime::currentDateTime();
 updateTimer = new QTimer(this);
 finishTimer = new QTimer(this);
 connect(updateTimer, SIGNAL(timeout()), this, SLOT(update()));
 connect(finishTimer, SIGNAL(timeout()), this, SIGNAL(timeout()));
}
In the constructor, we create two QTimer objects: updateTimer is used to refresh the appearance of the widget at regular intervals, and finishTimer emits the widget's timeout() signal when the timer reaches 0.
void OvenTimer::setDuration(int secs)
{
 if (secs > MaxSeconds)
 secs = MaxSeconds;
 finishTime = QDateTime::currentDateTime().addSecs(secs);
 updateTimer->start(UpdateInterval * 1000, false);
 finishTimer->start(secs * 1000, true);
 update();
}
The setDuration() function sets the duration of the oven timer to the given number of seconds. The false argument passed in the updateTimer's start() call tells Qt that this a repeating timer that will time out every 10 seconds. The finishTimer only needs to timeout once, so we use a true argument to indicate that it is a single-shot timer. We compute the finish time by adding the duration in seconds to the current time, obtained from QDateTime::currentDateTime(), and store it in the finishTime private variable.
The finishTime variable is of type QDateTime, the Qt data type for storing a date and a time. The date component of the QDateTime is important in situations where the current time is before midnight and the finish time is after midnight.
int OvenTimer::duration() const
{
 int secs = QDateTime::currentDateTime().secsTo(finishTime);
 if (secs < 0)
 secs = 0;
 return secs;
}
The duration() function returns the number of seconds left before the timer is due to finish.
void OvenTimer::mousePressEvent(QMouseEvent *event)
{
 QPoint point = event->pos() - rect().center();
 double theta = atan2(-(double)point.x(), -(double)point.y())
 * 180 / 3.14159265359;
 setDuration((int)(duration() + theta / DegreesPerSecond));
 update();
}
If the user clicks the widget, we find the closest notch using a subtle but effective mathematical formula, and we use the result to set the new duration. Then we schedule a repaint. The notch that the user clicked will now be at the top and will move counterclockwise as time passes until 0 is reached.
void OvenTimer::paintEvent(QPaintEvent *)
{
 QPainter painter(this);
 int side = QMIN(width(), height());
 painter.setViewport((width() - side) /2, (height() - side) /2,
 side, side);
 painter.setWindow(-50, -50, 100, 100);
 draw(&painter);
}
In paintEvent(), we set the viewport to be the largest square area that fits inside the widget, and we set the window to be the rectangle(-50, -50, 100, 100), that is, the 100 x 100 rectangle extending from (-50, -50) to (+50, +50). The QMIN() macro returns the lowest of its two arguments.
Figure 8.8. The OvenTimer widget at three different sizes
If we had not set the viewport to be a square, the oven timer would be an ellipse when the widget is resized to a non-square rectangle. In general, if we want to avoid such deformations, we must set the viewport and the window to rectangles with the same aspect ratio.
The window setting of (-50, -50, 100, 100) was also chosen bearing these issues in mind:
- QPainter's draw functions take int coordinate values. If we choose a window that is too small, we might not be able to specify all the points we need as integers.
- If we use a large window and use drawText() to draw some text, we will need a larger font to compensate.
This makes (-50, -50, 100, 100) a better choice than, say, (-5, -5, 10, 10) or (-2000, -2000, 4000, 4000).
Now let's look at the drawing code:
void OvenTimer::draw(QPainter *painter)
{
 static const QCOORD triangle[3][2] = {
 { -2, -49 }, { +2, -49 }, { 0, -47 }
 };
 QPen thickPen(colorGroup().foreground(), 2);
 QPen thinPen(colorGroup().foreground(), 1);

 painter->setPen(thinPen);
 painter->setBrush(colorGroup().foreground());
 painter->drawConvexPolygon(QPointArray(3, &triangle[0] [0]));
We start by drawing the tiny triangle that marks the 0 position at the top of the widget. The triangle is specified by three hard-coded coordinates, and we use drawConvexPolygon() to render it. We could have used drawPolygon(), but when we know the polygon we are drawing is convex, we can save some microseconds by calling drawConvexPolygon().
What is so convenient about the windowviewport mechanism is that we can hard-code the coordinates we use in the draw commands and still get good resizing behavior. Nor do we have to worry about non-square widgets; this is handled by setting the viewport appropriately.
painter->setPen(thickPen);
painter->setBrush(colorGroup().light());
painter->drawEllipse(-46, -46, 92, 92);
painter->setBrush(colorGroup().mid());
painter->drawEllipse(-20, -20, 40, 40);
painter->drawEllipse(-15, -15, 30, 30);
We draw the outer circle and the two inner circles. The outer circle is filled with the palette's "light" component (typically white), while the two inner circles are filled with the "mid" component (typically medium gray).
 int secs = duration();
 painter->rotate(secs * DegreesPerSecond);
 painter->drawRect(-8, -25, 16, 50);

 for (int i = 0; i <= MaxMinutes; ++i) {
 if (i % 5 == 0) {
 painter->setPen(thickPen);
 painter->drawLine(0, -41, 0, -44);
 painter->drawText(-15, -41, 30, 25,
 AlignHCenter | AlignTop,
 QString::number(i));
 } else {
 painter->setPen(thinPen);
 painter->drawLine(0, -42, 0, -44);
 }
 painter->rotate(-DegreesPerMinute);
 }
}
We draw the knob, the notches, and at every fifth notch we draw the number of minutes. We call rotate() to rotate the painter's coordinate system. In the old coordinate system, the 0-minute mark was on top; now, the 0-minute mark is moved to the place that's appropriate for the time left. We draw the rectangular knob handle after the rotation, since its orientation depends on the rotation angle.
In the for loop, we draw the tick marks along the outer circle's edge and the numbers for each multiple of 5 minutes. The text is put in an invisible rectangle underneath the tick mark. At the end of one iteration, we rotate the painter clockwise by 7°, the amount corresponding to one minute. The next time we draw a tick mark, it will be at a different position around the circle, although the coordinates we pass to the drawLine() and drawText() calls are always the same.
Another way of implementing an oven timer would have been to compute the (x,y) positions ourselves, using sin() and cos() to find the positions along the circle. But then we would still need to use a translation and a rotation to draw the text at an angle.
There is one issue left: flicker. Every ten seconds, we repaint the widget entirely, causing it to flicker each time. The solution is to add double buffering. This can be done by passing the WNoAutoErase to the base class constructor and by replacing the paintEvent() function shown earlier with this one:
void OvenTimer::paintEvent(QPaintEvent *event)
{
 static QPixmap pixmap;
 QRect rect = event->rect();

 QSize newSize = rect.size().expandedTo(pixmap.size());
 pixmap.resize(newSize);
 pixmap.fill(this, rect.topLeft());

 QPainter painter(&pixmap, this);
 int side = QMIN(width(), height());
 painter.setViewport((width() - side) / 2 - event->rect().x(),
 (height() - side) / 2 - event->rect().y(),
 side, side);
 painter.setWindow(-50, -50, 100, 100);
 draw(&painter);
 bitBlt(this, event->rect().topLeft(), &pixmap);
}
This time, we paint on a pixmap instead of on the widget directly. The pixmap is given the size of the area to repaint, and the windowviewport pair is initialized in such a way that the painting is performed the same as if it was done directly on the widget. The draw() function is also unchanged. At the end, we copy the pixmap onto the widget using bitBlt().
This is similar to what we explained in the "Double Buffering" section of Chapter 5 (p. 113), but there's one important difference: In Chapter 5, we used translate() to translate the painter, while here we subtract the paint event's x and y coordinates when setting up the viewport. Using translation here would not be as convenient, because the translation would have to be expressed in logical window coordinates, whereas the event's rectangle is in physical coordinates.
Part I: Basic Qt
Getting Started
Creating Dialogs
- Creating Dialogs
- Subclassing QDialog
- Signals and Slots in Depth
- Rapid Dialog Design
- Shape-Changing Dialogs
- Dynamic Dialogs
- Built-in Widget and Dialog Classes
Creating Main Windows
- Creating Main Windows
- Subclassing QMainWindow
- Creating Menus and Toolbars
- Implementing the File Menu
- Setting Up the Status Bar
- Using Dialogs
- Storing Settings
- Multiple Documents
- Splash Screens
Implementing Application Functionality
- Implementing Application Functionality
- The Central Widget
- Subclassing QTable
- Loading and Saving
- Implementing the Edit Menu
- Implementing the Other Menus
- Subclassing QTableItem
Creating Custom Widgets
- Creating Custom Widgets
- Customizing Qt Widgets
- Subclassing QWidget
- Integrating Custom Widgets with Qt Designer
- Double Buffering
Part II: Intermediate Qt
Layout Management
- Layout Management
- Basic Layouts
- Splitters
- Widget Stacks
- Scroll Views
- Dock Windows
- Multiple Document Interface
Event Processing
- Event Processing
- Reimplementing Event Handlers
- Installing Event Filters
- Staying Responsive During Intensive Processing
2D and 3D Graphics
- 2D and 3D Graphics
- Painting with QPainter
- Graphics with QCanvas
- Printing
- Graphics with OpenGL
Drag and Drop
Input/Output
- Input/Output
- Reading and Writing Binary Data
- Reading and Writing Text
- Handling Files and Directories
- Inter-Process Communication
Container Classes
Databases
Networking
XML
Internationalization
- Internationalization
- Working with Unicode
- Making Applications Translation-Aware
- Dynamic Language Switching
- Translating Applications
Providing Online Help
- Providing Online Help
- Tooltips, Status Tips, and Whats This? Help
- Using QTextBrowser as a Simple Help Engine
- Using Qt Assistant for Powerful Online Help
Multithreading
- Multithreading
- Working with Threads
- Communicating with the GUI Thread
- Using Qts Classes in Non-GUI Threads
Platform-Specific Features
EAN: 2147483647
Pages: 140
