Camera Blur
Real cameras blur images in unique and specific ways when areas of the image fall out of focus. This is not always seen as a flaw; it has practical purposes, such as narrowing the audience's attention. Hence a rack focus shot, in which the focus changes from a figure in the background to one in the foreground, or vice versa, is a fully fledged storytelling tool for a cinematographer.
Like the camera, your eye has a limited focal range, so limitations of depth of field are quite natural to vision. Camera lenses additionally contribute their own blur characteristics which many visual artists consider beautiful to behold when shot properly. The Japanese coined a term for the quality of the out-of-focus image, boke (also spelled bokeh, which is closer to a phonetic spelling).
Notes
Certain photographers have regarded defocused objects in shot only as mistakes; Gregg Toland, visionary cinematographer of Citizen Kane, famously went to extraordinary lengths to maintain sharp focus in shots containing extreme depth of field, even devising (with Orson Welles) a customized camera for this purpose.
After Effects 7.0 can help you achieve each of these types of blur, but not both together; new in this version is the addition of the Lens Blur effect from Photoshop, while the 3D camera includes properties that can mimic depth of field with a blurring algorithm that does not re-create lens effects.
Image Planes and Rack Focus
If source footage can easily be divided into planes of depth, you can achieve a rack focus effect that matches the way this effect is achieved in a physical camera. The focal point passes from an object in the foreground to one in the background or vice versa, and the depth of field is narrow enough that only the immediate plane of focus is seen in sharp detail.
Notes
Plenty of information about the phenomenon of boke is available on the Web, at sites such as www.bokeh.com and luminous-landscape.com.
With a physical camera, this type of shot requires a narrow depth of field, which is created by lowering the f-stop value. Doing so influences shutter angle and the amount of light passing through the aperture, so the color response and likelihood of motion blur in the shot are affected.
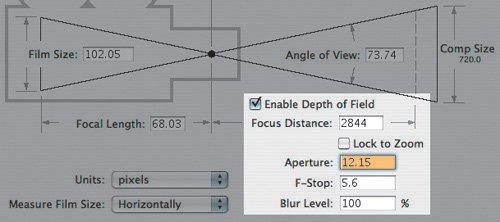
Not so with the After Effects 3D camera, which includes Aperture and F-Stop settings (Figure 9.20). These affect only focal depth, not exposure or motion blur. The two settings are tied together, so changing one in the Camera Settings dialog has a nonlinear, inverse effect on the other. F-Stop is the setting more commonly referenced by camera operators, and yet only Aperture appears as a property in the Timeline.
Figure 9.20. Checking Enable Depth of Field in Camera Settings activates Focus Distance (the distance in pixels that is sharply in focus, which can be locked to the Zoom valuenote the check box), as well as Aperture and F-Stop, which are two different ways to measure depth of field. A low F-Stop (or high Aperture) with a Blur Level of 100% will create a shallow focal effect.
After Effects depth of field settings can be matched to a camera report, provided that it includes the f-stop setting used when the footage was shot. If so, open up the Camera Settings dialog (Ctrl+Shift+Y/Cmd+Shift+Y, or click on the Camera in the Timeline panel), check the box labeled Enable Depth of Field, and enter your value for F-Stop.
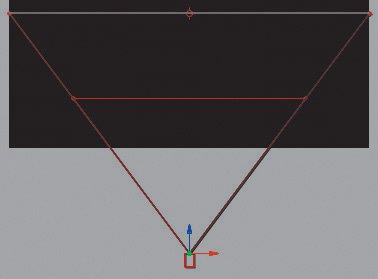
The key here is to offset at least one layer in Z space so that it falls out of focal range. Now, in the Top view, set the Focus Distance (under Options) to match the layer that will be in focus at the beginning of the shot, add a keyframe, then change the Focus Distance at another frame to match a second layer later in the shot (Figure 9.21).
Figure 9.21. With Enable Depth of Field on, the Focus Distance is denoted by a red boundary line, easily viewed and animated in isometric views.
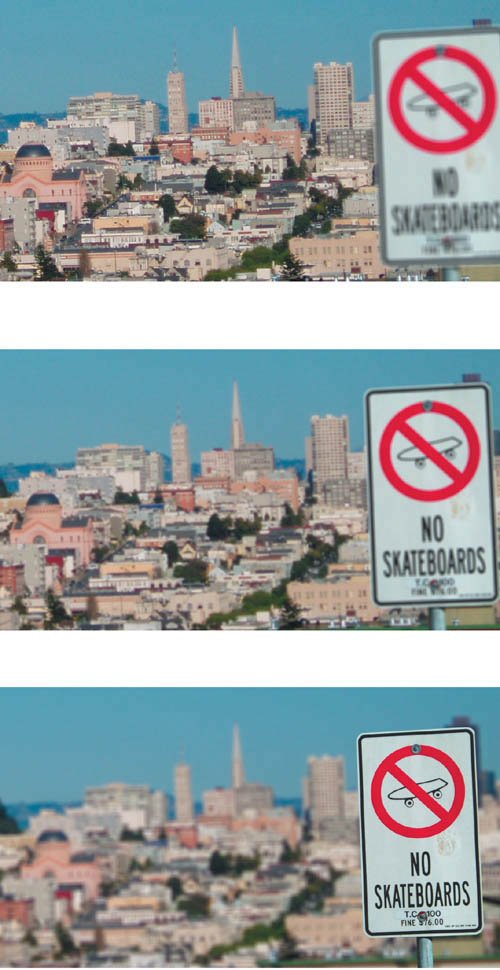
A static focus pull doesn't look quite right; changing focus on a real camera will change the framing of the shot slightly. To sell the example shot, which starts on a view of the city and racks focus to reveal a sign in the foreground, I add a slight camera pull-back, which takes advantage of the nice shift in planes of motion from the offset layers (Figure 9.22).
Figure 9.22. The final shot combines a rack focus with a gentle pull-back, using ease keyframes to animate Position and Focus Distance.
Boke Blur
Racking focus in this manner generates camera blur that is accurate relative to the plane of focus, but it does not include the look of a truly defocused lens.
Boke connotes the phenomenon whereby points of light become discs of light (also called circles of confusion) that take on the character of the lens itself as they pass through the camera lens and aperture. Like lens flares (covered in Chapter 12) these are a phenomenon of cameras, not human vision; they (subjectively) add beauty and suspense to your shot.
How so? Out of focus elements in a shot are mysterious. We may have a notion of what we are seeing, or we may not (Figure 9.23). We remain intrigued as the shot focuses in from a strange wash of color and light (Figure 9.24).
Figure 9.23. What is that mysterious object? The answer is revealed at the end of this section.

Figure 9.24. Even in the very first, most blurred frame of this pull-back shot, you may have a good idea what you're seeing, yet its appearance is strange and compelling. Note that a few blades of grass in the extreme foreground retain the quality of boke even once most of the shot is in focus.

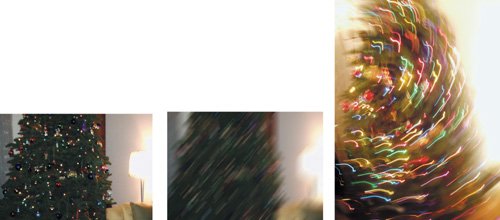
What, exactly, causes this phenomenon? A perfect lens passes a defocused point of light to the back of the camera as a soft, spherical blur. What was a bright point remains bright, but is larger and softer. Simply blurring an image in 8 or 16 bit per channel color mode dims the highlights (Figures 9.25a, b, and c).
Figures 9.25a, b, and c. Motion blur generated the standard way (a and b) literally pales in comparison to true motion blur on illuminated elements created by a moving camera (or objects) while the shutter is open (c).
Moreover, most camera lenses are not perfect, so you will not see perfect blurred spheres. The digital images in Figure 9.24 show spheres that are brighter toward the edges than in the middle; an anamorphic lens will show squashed spheres, and as with lens flares, the blades of the aperture diaphragm will sometimes be visible in the circles of confusion, making them hexagonal (or pentagonal, and so on, depending on the number of blades in the opening).
Go for Boke
Okay, suppose you have a shot that calls for boke blur. What can be done in After Effects to recreate it?
Chapters 11 and 12 explore ways in which working in 32 bits per channel can help recreate at least one aspect of realistic camera blurthat the hotspots do not dim down as they are blurred, but retain their brightness. This color space includes overhead for overbright pixels, and so you can build up and blur super-bright elements in the scene. But this is not all there is to boke.
New to After Effects 7.0 is the Lens Blur effect. This effect does not operate in 32 bpc modeit is a 16 bpc effect that is designed to fake the effects of boke. Use of the verb "fake" is not meant to imply that there is a preferable "real" method; as with Optics Compensation, this effect recreates phenomena that occur via a physical lens. In other words, on a computer, there is no choice but to fake it.
Lens Blur is a direct port from Photoshop; as such, it has a few flaws when used in After Effects (for example, that it doesn't operate at 32 bpc), and if these become too much, there are third-party options to consider. Its other limitations: You can't blur beyond 100 pixels, and it does not understand non-square pixels (it always creates perfect circles).
Notes
The most respected third-party tool for lens blurs is Frischluft's Lenscare. The default settings are not reliable, but with adjustments and depth maps (for 3D footage), you can derive some lovely results (www.frischluft.com and on the DVD).
Nevertheless, it does include what you need to create some characteristics of Boke blur in 8 and 16 bit per channel projects. Figure 9.26 shows the effect of Lens Blur on an image with some specular highlights that bloom into hexagonal disks by boosting Specular Brightness and lowering Specular Threshold slightly. If you're working with computer-generated 3D images, you can even specify a depth map, allowing you to choose which areas of the image are in or out of focus.
Figure 9.26. Lens Blur doesn't yield a perfect result when cranked up this high, but it does generate the disk shapes around specular highlights characteristic of Boke blur (here, set as hexagons). The result on the larger specular area of the lamp is odd (due to a low threshold of 90%), and there is no repeat edge pixel option, leading to a translucent fringe.

You may not be able to recreate the look of that twenty-dollar bill in Figure 9.23 so easily, but if you pay attention to what happens in these surprising reference images, your camera blur will approach that of a real, defocused camera.
The Role of Grain |
Section I. Working Foundations
The 7.0 Workflow
- The 7.0 Workflow
- Workspaces and Panels
- Making the Most of the UI
- Settings: Project, Footage, Composition
- Previews and OpenGL
- Effects & Presets
- Output: The Render Queue
- Study a Shot like an Effects Artist
The Timeline
- The Timeline
- Organization
- Animation Methods
- Keyframes and The Graph Editor
- Uber-mastery
- Transform Offsets
- Motion Blur
- Manipulating Time Itself
- In Conclusion
Selections: The Key to Compositing
- Selections: The Key to Compositing
- The Many Ways to Create Selections
- Compositing: Science and Nature
- Alpha Channels and Premultiplication
- Masks
- Combining Multiple Masks
- Putting Masks in Motion
- Blending Modes: The Real Deal
- Track Mattes
Optimizing Your Projects
- Optimizing Your Projects
- Navigating Multiple Compositions
- Precomposing and Nesting
- Adjustment and Guide Layers
- Understanding Rendering Order
- Optimizing After Effects
- Onward to Effects
Section II. Effects Compositing Essentials
Color Correction
Color Keying
- Color Keying
- Good Habits and Best Practices
- Linear Keyers and Hi-Con Mattes
- Blue-Screen and Green-Screen Keying
- Understanding and Optimizing Keylight
- Fixing Typical Problems
- Conclusion
Rotoscoping and Paint
- Rotoscoping and Paint
- Articulated Mattes
- Working Around Limitations
- Morphing
- Paint and Cloning
- Conclusion
Effective Motion Tracking
- Effective Motion Tracking
- The Essentials
- Optimizing Tracking Using 3D
- Extending a Track with Expressions
- Tracking for Rotoscoping
- Using 3D Tracking Data
- Conclusion
Virtual Cinematography
- Virtual Cinematography
- 5D: Pick Up the Camera
- Storytelling and the Camera
- Camera Blur
- The Role of Grain
- Film and Video Looks
- Conclusion
Expressions
- Expressions
- Logic and Grammar
- Muting Keyframes
- Linking Animation Data
- Looping Animations
- Smoothing and Destabilizing
- Offsetting Layers and Time
- Conditionals and Triggers
- Tell Me More
Film, HDR, and 32 Bit Compositing
- Film, HDR, and 32 Bit Compositing
- Details
- Film 101
- Dynamic Range
- Cineon Log Space
- Video Gamma Space
- Battle of the Color Spaces
- Floating Point
- 32 Bits per Channel
- Conclusion
Section III. Creative Explorations
Working with Light
- Working with Light
- Light Source and Direction
- Creating a Look with Color
- Backlighting, Flares, Light Volume
- Shadows and Reflected Light
- HDR Lighting
- Conclusion
Climate: Air, Water, Smoke, Clouds
- Climate: Air, Water, Smoke, Clouds
- Particulate Matter
- Sky Replacement
- The Fog, Smoke, or Mist Rolls In
- Billowing Smoke
- Wind
- Water
- Conclusion
Pyrotechnics: Fire, Explosions, Energy Phenomena
- Pyrotechnics: Fire, Explosions, Energy Phenomena
- Firearms
- Sci-Fi Weaponry
- Heat Distortion
- Fire
- Explosions
- In a Blaze of Glory
Learning to See
Index
EAN: 2147483647
Pages: 157
- ERP Systems Impact on Organizations
- ERP System Acquisition: A Process Model and Results From an Austrian Survey
- Data Mining for Business Process Reengineering
- Intrinsic and Contextual Data Quality: The Effect of Media and Personal Involvement
- Relevance and Micro-Relevance for the Professional as Determinants of IT-Diffusion and IT-Use in Healthcare
