User Interface
Overview
So far, the Java examples in this book have interacted with the user via command-line parameters and System.in and System.out. This is not the real world of application programming, of course. Even traditional RPG applications use display files, which offer a more compelling user interface than the console. In Java, you use a graphical user interface (GUI) to interact with the user. Indeed, there are a number of GUIs to choose from.
User Interfaces in RPG IV
Processing display files has not changed much from RPG III to RPG IV. The operations are still the same (EXFMT, READ, and WRITE), but the syntax of the F-spec for declaring workstation files is different, due to the redesigned F-spec. Here is what the F-spec for a workstation file looks like in RPG IV:
678901234567890123456789012345678901234567890123456789012
FFilename++IPEASFRlen+LKlen+AIDevice+.Keywords+++++++++++
FDISPLAY CF E WORKSTN SFILE(sflR:currRRN)
Note the use of the new keyword SFILE to tell RPG that this display file contains a subfile. The first parameter is the name of the subfile record format, and the second is the name of a field that will be updated with the subfile's current RRN after a READC or CHAIN operation. Up to 12 SFILE keywords are permitted per workstation file. There is also a SLNO keyword for record formats that support variable starting-line numbers.
Display files typically contain many record formats that can cause naming collisions. A number of other keywords can help with this: IGNORE/INCLUDE, PREFIX, and RENAME. These are for dropping or including whole record formats, renaming fields, and renaming records, respectively. Green-screen applications still use display files that are defined external to the RPG program, with "holes" left in them (named fields) for the RPG program to write and read at runtime.
There are also a number of GUI options now for RPG, such as VisualAge for RPG. This product, like others on the market, allows you to design and run your GUI on a client, together with the RPG code that processes the user interface. The business logic can and should remain on the AS/400, but it is called from the client RPG code via CALL operations. These GUIs are event-driven, like all GUIs. Interestingly enough, VisualAge RPG now allows you to compile your client GUI and RPG code into Java code. This allows you to run the client part of your application on any operating system that supports GUI and has a Java Virtual Machine, or as applets in a Web Browser.
User Interfaces In Java Options, Options, Options
In Java, you have at least three options for your user interface:
- Abstract Windowing Toolkit (AWT) is the original GUI package (java.awt) that still ships with the JDK. It has a core set of functionality and uses operating-system GUI widgets under the covers. AWT code can run as an application or as an applet in a Web page.
- Swing is the AWT replacement GUI package (javax.swing) that also ships with the JDK (as of 1.2.0). It is a superset of AWT, and significantly richer in function. It is written in 100% Java, so it is more portable and consistent from system to system (yes, and somewhat slower). Swing code can run as an application or as an applet in a Web page.
- Servlets and JavaServer Pages are not GUI classes that you write Java code to render. They aren't even part of the JDK. Their purpose is to write out an HTML Web page that is displayed in Web browser. A servlet runs the business logic or application to get the data, and then passes it to a JSP, which, in turn, merges it with the static HTML template to produce the new page. This is very much like display files and RPG.
AWT is seldom used anymore for new Java applications, so really your choice is between Swing and servlets. You decide which to use based on whether you want a rich (read "thick") GUI that results in a traditional client/server application, or a more humble (read "thin") GUI that is distributed on demand to clients as they use it. As we write this, most people are using servlets, but Swing is still popular for people who don't mind distributing their applications, such as tool writers. As Internet bandwidth explodes over the coming years, applets written in Swing will probably become popular again, but historically their download time has been a handicap.
We can't cover all these in one chapter, so we only cover Swing here. Even if you don't plan to use Swing for end-user applications, you should read this chapter, because you will find yourself using it for your own little utilities. (We did!) Also, Swing really helps bring all this OO stuff home. Its GUI classes use it all: inheritance, abstract methods, interfaces, and design patterns.
The "classic" AWT package is still used quite a bit directly by Swing, as you will see, but if you want to learn just AWT, any Java book will cover it. However, we can't even cover Swing in much detail here, because it is simply too large. Books dedicated to it typically exceed a thousand pages. This chapter simply introduces you to the basics and gives you enough information in a recipe-style fashion to get you productive. It itemizes, but does not cover, the advanced capabilities. If you need them, you can read about them in the JDK documentation or another book. Our goal then is to teach you how to write typical Swing GUIs and make you aware of all the additional capabilities, should you decide to pursue them in more detail.
This chapter teaches how to code Swing by hand, but you don't have to. Just as you usually use SDA to design your display files, you will usually use a graphical layout tool to design your Swing user interface. For example, the Visual Composition Editor in VisualAge for Java makes writing GUIs in AWT or Swing relatively easy. However, in our experience, knowing the underlying Swing functions helps you use any of the layout tools more effectively. This is no different than SDA, which is easier to use if you know DDS. Further, some of us just prefer coding this stuff by hand! Sad, isn't it?
Java GUI
Java has no externally described language for defining your user interface independent of your code. This is in contrast to what AS/400 display files allow. Rather, your user interface is built up dynamically with Java code. This programmatic approach to the user interface offers some advantages, for example, use of conditional logic versus hard-to-maintain indicator conditions. It also has some disadvantages relative to reuse and code size. However, the reuse disadvantages can easily be overcome through good object-oriented principles. For example, common window and dialog styles, and common window parts, such as a customer number prompt, can be encapsulated in classes that can be easily reused and extended as needed, leading to code savings and consistent standards. Indeed, this approach helps immensely with code-size reduction.
There are a number of fundamental differences between the display-file programming model and Java's dynamic, event-driven programming model for user interfaces. They are summarized in Table 12.1. Each of these differences is covered in the following sections.
|
Display File |
Java |
|---|---|
|
Enter- or Function-key driven input. |
Event-driven input. |
|
Modal display of records. (Processing waits on the user.) |
Modeless display of windows. (Processing does not wait on the user.) |
|
Screen sizes of 24x80 or 27x132. |
Programmer-defined screen sizes, by pixels. |
|
Row, column field addressing. |
Relative field addressing, depending on the window's "layout manager." |
|
Attributes are set using indicators. |
Attributes are set and queried by method calls. |
|
Built-in support for online help. |
No built-in help support. Most people code their own using HTML, or the optional JavaHelp package available from Sun. |
An Overview of Java Swing
Writing Java user interfaces with Swing generally involves the following steps:
- Import the necessary packages.
- Write new window classes that extend the JFrame class for primary windows or the JDialog class for secondary dialog windows.
- Write code to prepare and present the window in the constructor of your class.
- Write all the code to instantiate the GUI objects and place them in your window, again in the constructor of your class.
- Identify to Java which events you are interested in for which GUI objects (e.g., window close or button press), and supply the required methods to process those events. Java will call those methods at runtime.
- In your main method, instantiate your window class, which starts the whole thing running. Control returns immediately, but the window is displayed and responds to user input until some event logic explicitly disposes of the window and exits the application via System.exit(0). Because the Java GUI runtime starts a non-daemon event thread to process user events, the application does not end by reaching the end of main.
All the following examples import the same list of packages to ensure access to all the Java GUI classes:
import java.awt.*; // base AWT classes
import java.awt.event.*; // base AWT event classes
import javax.swing.*; // base Swing classes
import javax.swing.event.*; // base Swing event classes
Since Swing reuses much of AWT, you have to import both. The classes can be categorized as follows:
- Basic components, such as JButton and JCheckBox implement individual GUI parts as you would see in a typical GUI application. You instantiate instances of these and optionally use methods to tailor them, then finally add them to your window.
- Containers, such as a JFrame, JDialog and JPanel contain basic components. A JPanel is a sub-window square box for grouping basic components together into a composite component, which can then be added to any window as though it were a basic component.
- Layout managers define how added components to a container are to be displayed, or "laid out."
- Events are used to process input from each of the components. The Java runtime calls specific methods in your class when a user event happens and passes those methods event objects that contain information about the event, such as the GUI part it applies to.
The idea is to create or extend a container object, such as a JFrame window, and add instances of the basic components to it. This is done using the add method of the container class.
Consider the example in Listing 12.1. This class, when run, displays a main window with a text field, as shown in Figure 12.1. All the windowXXX methods are required because they are defined in the WindowListener interface being implemented. We only care about and hence code a body for the windowClosing method, which Java calls when the user presses the X key to close the window. Notice that you can't just call the add method directly, but rather have to first call getContentPane, and then call add on the result of that. This is a requirement in Swing for both JFrame windows and JDialog windows.
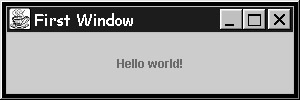
Figure 12.1: A simple window display with a text (JLabel) component
Listing 12.1: A First Java Swing Window Class
import java.awt.*; // AWT components and common classes
import java.awt.event.*; // AWT/Swing events
import javax.swing.*; // Swing components and classes
import javax.swing.event.*; // Swing specific events

public class FirstWindow extends JFrame
 implements WindowListener
{
 public FirstWindow()
 {
 super();
 setTitle("First Window");

 JLabel label = new JLabel("Hello world!");
 label.setHorizontalAlignment(SwingConstants.CENTER);
 getContentPane().add(label);

 addWindowListener(this); // we want window events!
 setSize(300, 100); // width, height
 setVisible(true); // this method inherited from parent
 }

 // methods required by WindowListener interface
 public void windowActivated(WindowEvent e) { }
 public void windowDeactivated(WindowEvent e) { }
 public void windowIconified(WindowEvent e) { }
 public void windowDeiconified(WindowEvent e) { }
 public void windowOpened(WindowEvent e) { }
 public void windowClosed(WindowEvent e) { }
 public void windowClosing(WindowEvent e)
 {
 dispose();
 System.exit(0);
 }

 // Test this thing
 public static void main(String args[])
 {
 FirstWindow window = new FirstWindow();
 }
}
Any questions? No doubt. More details are presented in the following sections. First, however, Figure 12.2 shows the class hierarchy for the major classes involved in GUI programming in Java. This diagram will come in handy when you start using Swing. What is important to note about this diagram is that many classes inherit methods from parent and grandparent classes. For example, the component classes inherit methods from JComponent, Container, and Component.
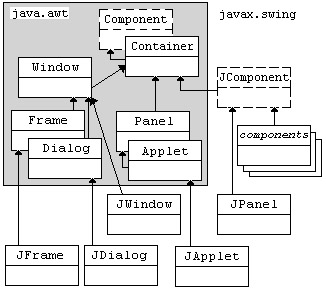
Figure 12.2: A class hierarchy of the major Java-supplied Swing classes
The boxes with dotted lines in Figure 12.2 are abstract classes. The up-arrow lines indicate the lower class extends the higher classes. (This is UML diagram syntax.) The classes shown in the gray area are from the java.awt package, while the rest are from the javax.swing package. Notice that all Swing class names start with the letter J.
Basic GUI Components in Java
Table 12.2 lists the basic components that Java supports. These are the basic building-block classes that you will use repeatedly throughout your Swing programming. These classes all extend JComponent, so they share many common methods.
|
Component |
Description |
|---|---|
|
JButton |
Push buttons |
|
JCheckbox |
Check boxes (for multiple selection) |
|
JRadioButton |
Radio buttons (for single selection) |
|
JComboBox |
A combination of an entry field and a drop-down list box |
|
JList |
A selection list (single column only) |
|
JLabel |
A text constant |
|
JTextField |
An entry field (a named field in DDS) |
|
JPasswordField |
An entry field that masks input (usually for password prompts) |
|
JTextArea |
A multiple-line entry field (a field with the CNTFLD keyword in DDS) |
|
JScrollPane |
Wraps a Jlist or JTextArea so it has scrollbars |
Table 12.3 provides a quick summary of typical ways to instantiate and initialize objects of these classes.
|
Instantiation |
Parameters |
|---|---|
|
button1 = new JButton("Cancel"); |
The text on the push button. |
|
cbFish = new JCheckbox("Italic"); |
The text on the check box. |
|
rbg = new ButtonGroup(); |
The text on the button, with an initial selection state. Only one button is selectable among all in any single ButtonGroup object. |
|
String itemArray[] = {"Item 1","Item 2"}; |
A JComboBox can be populated by passing an array or a vector to ctor, but can't be changed after. |
|
dropdown = new JComboBox(); |
A JComboBox can also be created empty and populated by calling the addItem method. |
|
String itemArray[] = {"Item 1","Item 2"}; |
A Jlist can be populated by passing an array or a vector to the constructor, but cannot be changed after. |
|
listModel = new DefaultListModel(); |
A Jlist can also be created with a DefaultListModel object, and can be changed by using methods in this class. |
|
prompt1 = new JLabel("Enter name"); |
The text to display as the constant. |
|
entryName = |
The default text to display and the maximum size in characters (used only for determining display size). |
|
passwordEntry = |
The maximum size in characters (for the display size). |
|
entryComments = |
The default text to display, and the number of rows and columns (used only for determining the display size). |
|
jsp = new JScrollPane(listbox); |
A component to be shown with scrollbars. |
Figure 12.3 shows what these components look like.
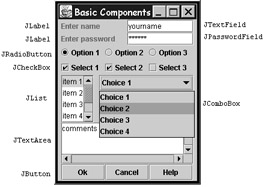
Figure 12.3: All the basic Swing components, at a glance
Note that the JList and JTextArea entries in Figure 12.3 have been placed inside JScrollPane objects to get the scrollbars, like this:
JScrollPane jspList = new JScrollPane(listbox);
When you do this, you subsequently add the JScrollPane object to the window, versus the component placed inside the JScrollPane. By default, a JScrollPane object only places scrollbars around the object if it needs it. If you prefer to always see scrollbars, use the setVerticalScrollBarPolicy and setHorizontalScrollBarPolicy methods, passing in the constant HORIZONTAL_SCROLLBAR_ALWAYS or VERTICAL_SCROLLBAR_ALWAYS from JScrollPane.
Common inherited methods
All these classes inherit from the class JComponent. They pick up important methods from this parent class, some of which are listed in Table 12.4.
|
Description |
Method |
|---|---|
|
Enabling/disabling ("graying out") |
setEnabled(true/false), isEnabled() |
|
Showing/hiding |
setVisible(true/false), isVisible() |
|
Setting focus to this component, or the next component, and querying if in focus |
requestFocus(), transferFocus(), hasFocus() |
|
Setting the background and foreground color |
setBackground/setForeground(Color), |
|
Setting the text font |
setFont(Font) |
|
Setting the border |
setBorder(Border) |
|
Setting fly-over text |
setToolTipText(String) |
|
Adjusting display characteristics |
setAlignmentX/Y, setMinimumSize, setMaximumSize, setPreferredSize |
|
Repainting after making changes (not normally needed, except that occasionally Swing doesn't repaint properly) |
repaint |
Colors
The colors you are allowed to use as predefined constants in java.awt.Color are self-explanatory. They are listed in Table 12.5.
|
Color.black |
Color.blue |
Color.cyan |
Color.darkGray |
|
Color.gray |
Color.green |
Color.lightGray |
Color.magenta |
|
Color.orange |
Color.pink |
Color.red |
Color.white |
|
Color.yellow |
For example, to change a text constant's colors, you might code this:
JLabel constant = new JLabel("**overdraft**");
constant.setBackground(Color.red);
constant.setForeground(Color.white);
By default, the user-specified system colors are used. You can explicitly specify these as well by using the predefined constants in the SystemColor class. Because this class extends Color, you can substitute these anywhere a Color is allowed. If you are artistically inclined, you can create your own unique colors by specifying the red-green-blue components on the constructor of a Color object, or by using the brighter and darker methods.
Fonts
For each font, you have to create a new Font object by specifying a font name, style, and size, like this:
constant.setFont(new Font("sansSerif",Font.BOLD,12));
Font names are like you see in your Windows control panel, such as "sansSerif," "Courier New," "Times Roman," and "Helvetica." Font styles are the constants Font.PLAIN, Font.BOLD, and Font.ITALIC. These can be OR'd together as in Font.BOLD | Font.ITALIC. New for Swing (versus AWT) are borders and tool-tip text, which are covered in the next section. (See the java.awt.Font class documentation for more details on creating fonts.)
Borders
Borders allow you to give your component a nice-looking edge. The parameter to setBorder is a Border object from the package javax.swing.border. You can create your own borders by instantiating the Border class directly, but you rarely will. Rather, you will usually use the factory methods inside the BorderFactory class, as shown in Table 12.6.
|
Component |
Description |
|---|---|
|
createEmptyBorder(int top, int left, int bottom, int right) |
Just reserves white space (sizes in pixels) around the component |
|
createEtchedBorder() |
Creates an etched ("burned in") border |
|
createLineBorder(Color color, int size) |
Creates line of a given color and size (pixels) |
|
createLoweredBevelBorder() |
Creates a beveled edge that appears to go "in" |
|
createRaisedBevelBorder() |
Creates a beveled edge that appears to go "out" |
|
createMatteBorder(int t, int l, int b, int r, Color color) |
Creates a line border of the given size per edge (pixels) and the given color |
|
createTitledBorder(String) |
Creates a thin line border with the given text in the upper left |
|
createCompoundBorder(b1, b2) |
Create a new border from two other borders |
You can nest borders to get a combined effect, using the createCompoundBorder method. Also, createTitledBorder allows another border to be titled by specifying another border as the first parameter to the createTitledBorder method call. For example, to get an etched border with a title, you would do this:
Border border1 = BorderFactory.createEtchedBorder();
Border border2 = BorderFactory.createTitledBorder(border1, "My Title");
myComponent.setBorder(border2);
To show what these borders look like, each of them is applied to a different JLabel in Figure 12.4.
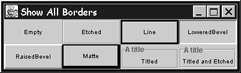
Figure 12.4: Examples of the different borders available in Swing
Borders can really improve the appearance of your application. For example, you can put a non-editable JTextField component at the bottom of your window as a message line. To make it stand out, use the lowered bevel border for it. Similarly, you might find the raised bevel border a great improvement in the look of push buttons. Also, a titled and etched border can be applied to a JPanel that contains related components, to visually group them on the screen.
Tool tips
It is very common in GUIs now to offer fly-over or bubble help, or what Java calls tool tips. A tool tip is a short description that pops up when the cursor hovers over a component. This is supported in Java by simply calling the setToolTipText method on your component and supplying the text to display in the pop-up. For example, you might code this tool-tip text for a push button:
JButton registerButton = new JButton("Register");
registerButton.setToolTipText("Select this to register a new attendee");
This would look like Figure 12.5 when the user hovers the mouse over the button.
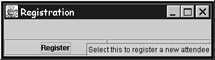
Figure 12.5: An example of tool-tip text in Swing
Common non inherited methods
You have seen some of the most popular methods that all Swing component classes inherit from their ancestor classes. In addition to these, a number of other methods are not inherited, but are reasonably consistent among a number of the classes. Because they are not applicable to every component, they were not defined in the base class JComponent, but many of them are defined in most of the individual child classes. They are important enough that you will use them very often in Swing programming. These commonly used non-inherited methods are listed in Table 12.7.
|
Method |
Description |
|---|---|
|
setText/getText |
Set label or input text, and query label or input text. For Jlabel, JRadioButton, JCheckBox, JTextField, JPasswordField, and JTextArea. |
|
setHorizontalAlignment/set VerticalAlignment |
Specify whether text is left/top justified, centered, or right/bottom justified. Specify one of the following constants from SwingConstants: LEFT, CENTER, RIGHT, TOP, or BOTTOM. |
|
setMnemonic |
Select a character from the display text to be underlined. The user can select the component by pressing Alt+character. The character should be unique per window. For Jbutton, JRadioButton, and JCheckBox. |
|
setDisplayedMnemonic and setLabelFor |
For a Jlabel used as prompt text for an entry field, this allows you to specify a unique mnemonic character, such that when it is selected by Alt+character, the entry field gets focus. The parameter to setLabelFor is any component, such as a JTextField. |
|
setIcon and setHorizontal/Vertical TextPosition |
Specify a .gif or .jpg image file to display on a Jlabel, Jbutton, JCheckBox, or JRadioButton. This also allows you to specify the position of the text relative to the image. |
In addition to the methods in Table 12.7, there are common methods that are specific to JTextField, JPasswordField, and JTextArea. All of these extend the abstract class JTextComponent, which in turn extends JComponent. These are shown in Table 12.8.
|
Method |
Description |
|---|---|
|
select/selectAll/ getSelectedText/ replaceSelection |
Set and query selected text in the JTextField, JPasswordField, and JTextArea components. |
|
serCarePosition/getCarePostion |
Set and query cursor character position (zero-based) for JTextField, JPasswordField, and JTextArea. |
|
setEditable/isEditable |
Set and query if the user is allowed to enter text into JTextField, JPasswordField, and JTextArea. |
|
cut/copy/paste |
Perform clipboard operations relative to the selected text. |
|
read/write |
Allows the contents to be populated from or written to a stream (i.e., a flat file). |
|
append/insert/ replaceRange/ getLineCount/setWrap/ setWrapStyleWord |
Specific functionality for JTextArea for working with the text, and for setting the word-wrap option (true or false). If you set word-wrap to true, you can use setWrapStyleWord(true) to force wrapping only at a word boundary versus a character boundary. |
There are also common methods that are specific to the buttons (JButton, JRadioButton, and JCheckBox.) All of these extend the abstract class AbstractButton, which in turn extends JComponent. They are shown in Table 12.9.
|
Method |
Description |
|---|---|
|
setSelected/isSelected |
Select or query the selected state of JCheckBox or JRadioButton. |
|
doClick |
Simulates the user clicking on the button. Causes any code you have registered for this event to be executed. |
Finally, there are common methods specific to JList and JComboBox. These are shown in Table 12.10.
|
Method |
Description |
|---|---|
|
setSelectedIndex/ getSelectedIndex |
Select a list item by its zero-based index number or query the current selection index number for Jlist and JComboBox. The getSelectedIndex method returns -1 if nothing is selected. |
|
setSelectedValue/ getSelectedValue |
Select a Jlist item by object reference variable, or query the selected item's object reference (or null if no selection). |
|
setSelectedItem/ getSelectedItem |
Select a JComboBox item by object reference variable, or query the selected item's object reference (or null if no selection). |
|
setSelectionMode |
Specify how many items can be selected in a Jlist: SINGLE_SELECTION, SINGLE_INTERVAL_SELECTION, or MULTIPLE_INTERVAL_SELECTION |
|
getSelectedIndices/ getSelectedValues |
Query all selected item indices or objects, for a multiple-selection JList. |
|
clearSelection |
De-select all items in a JList. |
|
ensureIndexIsVisible |
Scroll a JList to display a given item, by index number. |
|
addItem |
Append a new item to a JComboBox list. |
|
((DefaultListModel)get Model()).addElement or insertElementAt |
Append or insert a new item to a JList created with new JList(new DefaultListModel()); There is also a setElementAt method to change a list entry. |
|
removeAllItems/ removeItem/ removeItemAt |
For a JComboBox, remove all items, remove an item by a given reference, or remove an item by a given index number. |
|
((DefaultListModel)getModel()).removeAllElem ents/removeElement/ removeElementAt |
For a JList, remove all items, remove an item by reference, or remove an item by a given index number. |
|
getItemCount |
Return a count of how many items are in the JComboBox. |
|
getModel().getSize() |
Return a count of how many items are in the JList. |
|
setVisibleRowCount |
Set how many rows are displayed at a time in a JList. (The default is eight.) |
|
setMaximumRowCount |
Set how many rows are displayed at a time in a JComboBox. |
Most of these methods are for setting and querying attributes such as text, text alignment, and selected item. Keep these tables handy; you will find yourself referring back to them often as you start coding Swing. Of course, this is a very small subset of the methods you will commonly need to use for each component, so the JDK documentation will become your best friend as well.
Mnemonics
It is a very good policy to always supply mnemonics for your GUI button components (push buttons, checkboxes, and radio buttons), so that power users and those who can't use a mouse can easily select those buttons. This is easily done in Swing by calling the setMnemonic method and supplying to it a character to act as the mnemonic. If this character exists in the text for the button, it will be underlined. Users can select that button by pressing Alt plus the underlined character. Figure 12.6 shows examples of buttons that have mnemonics (the underlined characters).
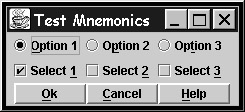
Figure 12.6: Examples of mnemonics
Note that a raised bevel border is also used for the push buttons. This is the code for Figure 12.6:
rb1.setMnemonic('O'); rb2.setMnemonic('P'); rb3.setMnemonic('T');
cb1.setMnemonic('1'); cb2.setMnemonic('2'); cb3.setMnemonic('3');
button1.setMnemonic('O');
button2.setMnemonic('C');
button3.setMnemonic('H');
button1.setBorder(BorderFactory.createRaisedBevelBorder());
button2.setBorder(BorderFactory.createRaisedBevelBorder());
button3.setBorder(BorderFactory.createRaisedBevelBorder());
It is slightly more work if you want to set a mnemonic for a JLabel so that when it is selected, a JTextField (or any component) is given focus. However, this is so handy for users, it's worth it. To do this, first call setDisplayedMnemonic to set the mnemonic character, and then call setLabelFor and identify the component to get focus when this mnemonic is selected. Here is a partial example, resulting in Figure 12.7:
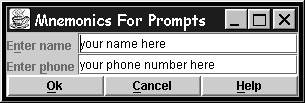
Figure 12.7: Examples of mnemonics for a JLabel prompt
prompt1 = new JLabel("Enter name ");
entryName = new JTextField("your name here", 20);
prompt1.setDisplayedMnemonic('n');
prompt1.setLabelFor(entryName);
See how the letters n and p are underlined in the prompt text? If a user selects Alt+n, the entry field with "your name here" gets input focus. Similarly, if Alt+p is selected, the entry field with "your phone number here" gets focus. Cool! By the way, if you choose a letter that is not among those in the displayed text, there is no visual clue to the user as to which letter is the mnemonic. However, it will show up in the tool-tip text (if you specify tool-tip text). Java will append alt+x to the tool-tip text for each component with a mnemonic, where x is the mnemonic character.
Clearly, the tricky part to mnemonics is to select a character that is unique for this window, since having two buttons with the same mnemonic renders the second one inaccessible. This can be quite tedious and error-prone, and is even more difficult if you translate your screens to different languages. To help you with this, we have written a class that will automate it. The Mnemonics directory on the CD-ROM includes a class named Mnemonics. It has static methods addMnemonicsForJFrame and addMnemonicsForJDialog that, if called with a JFrame or JDialog object, will walk through all the components in the window, find a unique character among their text (if possible, else a unique character not among their text), and assign that as the mnemonic. This means adding a single line of code to the end of your constructor will give you mnemonics, uniquely chosen, for every component. This is a keeper if you are going to do any Swing programming.
Images
Another function we find very nice in Swing is the ability to place images in buttons, radio buttons, checkboxes, labels, and (as will soon see) menu items. To place a .gif or .jpg image into one of these components, start by creating an ImageIcon object, passing in the name of the .gif or .jpg file:
ImageIcon burgerImage =
 new ImageIcon(getClass().getResource("burger.gif"));
This loads the image into the memory of the ImageIcon object. The use of getResource from the Class object ensures Java will find this file even if it is packaged with the code inside a .jar file.
You can now place your ImageIcon object inside a component by specifying it as the second parameter of the JLabel, JRadioButton, JCheckBox, or JButton constructor (or the only parameter, if you don't also want to show text). Alternatively, you can call the setIcon method and pass it there. If you have both text and an image, you can also specify how the two are placed relative to each other by calling the setHorizontalTextPosition and setVerticalTextPosition methods. They take a constant from the SwingConstants interface: LEFT, RIGHT, CENTER, LEADING, TRAILING, TOP, or BOTTOM. For example, Listing 12.2 shows just the constructor of a class named TestButtonImages. When you run TestButtonImages, you get Figure 12.8.
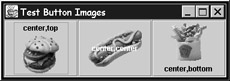
Figure 12.8: Examples of images in buttons
Listing 12.2: A Class to Display Text and Images
public TestButtonImages() // constructor
{
 super("Test Button Images");
 ImageIcon buttonImage1 =
 new ImageIcon(getClass().getResource("burger.gif"));
 ImageIcon buttonImage2 =
 new ImageIcon(getClass().getResource("hotdog.gif"));
 ImageIcon buttonImage3 =
 new ImageIcon(getClass().getResource("fries.gif"));
 JButton b1 = new JButton("center,top", buttonImage1);
 JButton b2 = new JButton("center,center",buttonImage2);
 JButton b3 = new JButton("center,bottom",buttonImage3);
 b1.setHorizontalTextPosition(SwingConstants.CENTER);
 b1.setVerticalTextPosition(SwingConstants.TOP);
 b2.setHorizontalTextPosition(SwingConstants.CENTER);
 b2.setVerticalTextPosition(SwingConstants.CENTER);
 b3.setHorizontalTextPosition(SwingConstants.CENTER);
 b3.setVerticalTextPosition(SwingConstants.BOTTOM);
 b2.setForeground(Color.white);
 getContentPane().setLayout(new GridLayout(1,3));
 getContentPane().add(b1);
 getContentPane().add(b2);
 getContentPane().add(b3);
 pack(); setVisible(true);
 addWindowListener(this);
}
By the way, if you don't like having to qualify the constants with the interface name SwingConstants, you can always just add implements SwingConstants to your class definition. As mentioned in Chapter 9, this is one way to use interfaces: place common constants in them and implement them in your classes to get unqualified access to the constants in the interface.
Specifying an ImageIcon in the constructor or setIcon method gives you one image. For JButton, JRadioButton, and JCheckBox, however, you can specify six other images if you want to show a different picture for different states of the button. The methods to specify these are given in Table 12.11.
|
Method |
Description |
|---|---|
|
setDisabledIcon |
Image to show when button is disabled |
|
setSelectedIcon |
Image to show when button is selected |
|
setDisabledSelectedIcon |
Image to show when button is disabled and selected |
|
setPressedIcon |
Image to show when button is pressed |
|
setRolloverIcon |
Image to show when mouse is over the button |
|
setRolloverSelectedIcon |
Image to show when mouse is over the button and button is selected |
Lists can have images, too. You can put any object inside a JList or JComboBox, and Java simply calls the toString method to get the text for this element. However, you can also add ImageIcon objects to get a list of images. If you want to have both image and text, however, you have to do more work. You have to create a class that extends JLabel and implements ListCellRenderer, including the all-important getListCellRendererComponent method. Then, you have to call setCellRenderer on the JList or JComboBox object, passing an instance of the new class. This is beyond this book, but an example you can copy and change is on the CD-ROM, in the files  TestImageList.java and TestListCellRenderer.java. If you run the former, you will see the output shown in Figure 12.9.
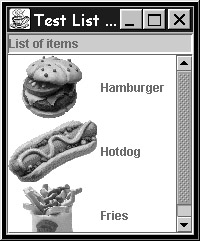
Figure 12.9: Examples of images in a JList
Model view controller
While not often used for these basic components, one aspect of Swing you will often read about is the notion of model-view separation. Strictly speaking, Swing components all follow the model-view-controller design pattern, which stipulates that you separate the data (model) from the view (user interface) and the controller that binds the two together.
In Java Swing, the component classes are a combination of the view and the controller. They all support a separate class for holding the data that is displayed in the view. There is a different model class for each component. You have the option of first creating an instance of the model class (or your own class that extends it), and passing that object to the constructor for the component. Indeed, the same model object can be specified in more than one UI component, and if the data in the model changes, all UI components will reflect that change. You can also subsequently query or re-set the model object for any UI component by calling the getModel or setModel methods. The model class for each basic component is shown in Table 12.12.
|
Component Class |
Model Class |
|---|---|
|
JLabel |
Not applicable (no user input) |
|
JTextField |
javax.swing.text.PlainDocument |
|
JPasswordField |
javax.swing.text.PlainDocument |
|
JTextArea |
javax.swing.text.PlainDocument |
|
JButton |
javax.swing.DefaultButtonModel |
|
JRadioButton |
JToggleButton.ToggleButtonModel (nested class) |
|
JCheckBox |
JToggleButton.ToggleButtonModel (nested class) |
|
JList |
javax.swing.DefaultListModel |
|
JComboBox |
javax.swing.DefaultComboBoxModel |
You don't have to use the M-V-C power of Swing very often, and indeed almost never for the basic components. When you create a component object and do not specify a model object in the constructor, Java creates an instance of the correct model class for you and uses it. All the methods for setting and querying content (getText, setText, addItem, etc.) that are supplied by the component classes are simply fast paths to the same methods in the underlying model object. The calls are simply passed through.
The only exception to this is the JList class, which does not supply a default model. You are forced to create an instance of DefaultListModel and pass it to the constructor of JList. To manipulate items in the list, you have to use the methods in the DefaultListModel class. As a result, using JList requires a bit more work than the rest of the basic components, unfortunately.
Events
When you write display-file applications on the AS/400, you are writing modal code. This means the processing involves writing the record formats and reading them (or both in one step, with EXFMT). The READ or EXFMT operation does not return control to your application until the user presses Enter or a function key.
This is different in GUI programming. When you write a GUI application, the processing involves preparing and then displaying windows. At that point, you get control back immediately, but the Java runtime also gets control, via its event thread. Because this is a non-daemon thread, the program does not end when execution reaches the end of the main method. Rather, it will run forever until you issue a call to the System.exit method. The Java event thread watches for users to perform events, such as pressing a button or selecting a list item. Anything the user does, including simply moving his or her mouse, is tracked. If you decide that you wish to do processing for any of the events Java tracks, you can.
Unlike some other GUI systems that simply try to call a particular method in your class for each event, and do nothing if you don't code that method, Java tries to be a little more robust. First, to reduce traffic, it only tries to call you for each event if you have registered an interest in that event for a particular component. It supplies a method in every component, which you can call to do this registration. Further, to allow the compiler to verify you are ready to process that event, it forces you to implement specific interfaces for specific events. Thus, the interface rules force you to code the methods dictated by that event. Let's look at the details of this framework for the basic components.
Because of the sheer number of event types, Java groups them, and supplies a single method call for registering interest in each group. Further, each group has a single interface you must implement for the events in that group. The individual event types within the group are distinguished by different methods within the interface, and you simply code empty methods for those specific events you are not interested in. Table 12.13 lists each event group, the method you call per component to register interest in these events, and the name of the interface you must implement to process these events.
|
Event Group |
Interface; Method for Registering |
Methods Inside Interface |
|---|---|---|
|
Window events |
WindowListener; addWindowListener |
windowActivated(WindowEvent) |
|
Action events |
ActionListener; addActionListener |
actionPerformed(ActionEvent) |
|
Selection events |
ItemListener; addItemListener |
itemStateChanged(ItemEvent) |
|
Focus events |
FocusListener; addFocusListener |
focusGained(FocusEvent) |
|
Text events |
TextListener; addTextListener |
textValueChanged(TextEvent) |
|
Keyboard events |
KeyListener; addKeyListener |
keyPressed(KeyEvent) |
|
Mouse events |
MouseListener; addMouseListener |
mouseClicked(MouseEvent) mouseEntered(MouseEvent) |
|
Mouse move events |
MouseMotionListener; addMouseMotionListener |
mouseDragged(MouseEvent) |
|
List selection events |
ListSelectionListener; addListSelectionListener |
valueChanged(ListSelectionEvent) |
|
Text-field data change |
DocumentListener; addDocumentListener |
changedUpdate(DocumentEvent) |
|
Model changes |
ChangeListener; addChangeListener |
stateChanged(ChangeEvent) |
This is not a complete list, but it's more than enough for most applications. All these events pertain to components, except for WindowListener, which pertains to a Jframe or JDialog window. You saw how to use this to make a window closable, back in Listing 12.1:
- Code implements WindowListener in the class definition
- Code addWindowListener(this) in the constructor (the method inherited from JFrame).
- Code the seven method definitions from the WindowListener interface, with empty bodies for all but the one you are interested in: windowClosing. In this one, add code to close the window (dispose(), also inherited) and exit: System.exit(0).
There are more event groups you will need for advanced components, covered later in this chapter. All interfaces in the middle column come from the package java.awt.event, except for the last three rows, which come from javax.swing.event.
The method to process each event must define a single parameter, which is the name of a class that always ends in "Event." These classes are the event classes, and Java sends an object of the appropriate class for each event. You can query information about the event from each object, although you will often get everything you need by calling the getXXX methods on your components. One method that all event classes support, which you also need, though: getSource. It returns an Object object, which is the component object to which the event occurred. For example, if the user presses a push button, the actionPerformed method gets called, and getSource on the ActionEvent object will return the JButton object that was pressed by the user. (By the way, the methods in the third column of Table 12.13 all return nothing, void, and must all be coded as public.)
Imagine you are interested in processing a button-press event for a JButton object named closeButton. This is an action event, so in your constructor, you would code closeButton.addActionListener(this). The method addActionListener is supplied by Java in the JButton class, and like all the addXXXListener methods, it takes as a parameter any object that implements the XXXListener interface required for that event group. Usually, this is the same class that extends JFrame, hence you pass this. However, you do have the option of putting your event-processing code in a separate class and passing an instance of the other class to the addXXXListener method call. This can be handy if you want to share processing logic across windows. In either case, the class that implements ActionListener supplies an actionPerformed method that does the appropriate thing, for example:
public void actionPerformed(ActionEvent evt)
{
 if (evt.getSource() == closeButton)
 {
 dispose();
 System.exit(0);
 }
}
This method will be called by Java whenever the user presses the closeButton button.
Some of the interfaces, such as WindowListener and MouseListener, require you to code a bunch of methods in your class. Typically, you are only interested in one or two of these, but due to the interface rules, you have to code all the rest too, even if you just make them empty. To save time, Java does supply "adapter" classes, which implement the interface and supply the empty methods already. These classes are named XXXAdapter, as in WindowAdapter and MouseAdapter. You can then simply define a new class that extends the adapter class, and override only the methods you wish to write code for. This can be handy, but since your class is usually already extending JFrame or JDialog, it is rarely usable. However, adapter classes are often used for convenience together with a nested ("inner") class (discussed in Chapter 14). This is only a keystroke-saving convenience. We prefer, instead, to code it properly, making the code easier to read, maintain, and debug.
In summary, then, to process particular events for particular components, you must call the appropriate addXXXListener method and implement the appropriate XXXListener interface. The latter requires you to code the methods in the interface, and it is these methods that Java will call when the event happens. If you register an interest in the same event for many components (such as action events for JButtons), the same method will be called for all components, so you use evt.getSource() to establish which component caused the event to be "fired" (as it is called).
Table 12.14 lists the event groups supported by the basic components. If you define your own model class, you can use ChangeListener to listen for changes to the model (although all components created with the model already do this automatically). Also, all these components support addFocusListener if you want to know when they gain or lose focus.
|
Component |
Event Interface, Registration Method and Called Method |
Description |
|---|---|---|
|
JButton |
ActionListener, addActionListener, actionPerformed |
When the user presses the button, process button logic in the actionPerformed method. |
|
JRadioButton, JCheckBox |
ItemListener, addItemListener, itemStateChanged |
When the user (de)selects the button, call getStateChange on the ItemEvent object. Returns DESELECTED or SELECTED. |
|
JList |
ListSelectionListener, addListSelectionListener, valueChanged |
When the user selects a list item, use getSelectedIndex on Jlist object to find out the new selected item index. |
|
JComboBox |
ActionListener, addActionListener, actionPerformed |
When the user selects a list item, Java automatically places the selected item in the text field part. Also supports ItemListener to get control before Java does this. |
|
JTextField, JPasswordField |
ActionListener, addActionListener, actionPerformed |
This gets fired when the user presses Enter. To monitor keystrokes, extend the model (PlainDocument) and override the insertString method. |
|
JTextArea |
The Enter key inserts a new line, so there is no event. To monitor keystrokes, extend the model (PlainDocument) and override the insertString method. |
Again, you will see examples of event-processing as you go through this chapter. Also, you'll see more about JTextField programming later, such as how to emulate some of the display-file functionality: restricting the input length, restricting the input characters, auto-advancing to the next field, and even supporting editword-like behavior. First, however, you need to see how all these components are put into your windows and how Java decides to arrange them.
Containers Jframes, Jdialogs, And Jpanels
To see the basic components created in the previous section, you need a window of some kind. This will usually be an instance of the JFrame class. (Remember, frames are considered containers, as they contain other components.) This JFrame class provides a main window with all the usual pieces: a border; a title bar; minimize, maximize, and close buttons; and a system menu in the upper left corner. You create a frame or "main" window easily enough:
JFrame myWindow = new JFrame("My First Java Window");
This creates an actual window. However, it is not too useful yet, because you cannot see it! You can display it with this:
myWindow.setVisible(true);
However, it will be a tiny little thing. Prior to calling setVisible, you need to do some typical tailoring:
- Set the window's size. This is done using the setSize method, specifying the width and height of the window in pixels (a graphical unit of measurement, very small). Finding the exact size is a matter of trial and error, but setSize(300,200) will get you going. Alternatively, you can just call the pack method to size the window to match the size of the contents.
- Set the window's position. This is done using the setLocation method, specifying the x and y pixel address relative to the upper left corner of the screen (x pixels across, y pixels down). Notice that the address is of your window's upper left corner. This, too, is trial and error, but setLocation(200,100) will get you going.
- Set the window's title. If you do not specify the title in the constructor to JFrame, you can specify it later using setTitle(String).
- Optionally, set the window's font, background color, and foreground color. Setting these once for the window should cause them to be inherited by all the components you add to the window, but so far this doesn't seem to work in Swing. (It did work in AWT.) So, if you want to change the text or color of all your components, use setFont, setBackground, and setForeground for each component, as described in the basic component section earlier in this chapter. By default, your system's current settings for these are used, and most people recommend leaving them that way.
- Add all the components you wish to display in the "client area," or middle part of the window. These include the basic components described previously, such as push buttons. We will cover this crucial step shortly.
Before looking at some sample code, let's pause for a word on programming style. We suggest that, for each window in your application, you have a new class that extends JFrame (your class is a window, after all), and initializes and populates the window in the constructor. Define all of the component and container objects as private or protected instance variables of the class, and instantiate them in the constructor. These variables will need to be available to your other methods when it comes time to process input, hence the need to make them instance variables.
You will find that you write the same code over and over again when creating new window classes. To help reduce this drudgery, we highly recommend starting with a base class that does some typical stuff (like handling the close event, implementing the common event interfaces, and supplying empty versions of the event interface methods). This way, each new window class you create can simply extend your base class and pick up all that base work for free. Then, it simply has to override the appropriate methods, such as the event methods it is interested in. Further, if you later decide all windows should have a blue background, you have only a single class to change, and all your windows will immediately inherit that change.
This kind of base class for frame windows is shown in Listing 12.3 (without all the windowXXX methods, since they haven't changed from Listing 12.1).
Listing 12.3: The Base Window Class
import java.awt.*;
import java.awt.event.*;
import javax.swing.*;
import javax.swing.event.*;

public class BaseWindow extends JFrame
 implements WindowListener, ActionListener,
 ItemListener, ListSelectionListener
{
 public BaseWindow(String title) // constructor
 {
 super(title);

 createComponents(); // another method in this class
 addComponents(); // another method in this class
 addWindowListener(this); // we want window events
 setLocation(200,100); // x, y from upper left
 //setSize(400, 200); // Only used if pack not used
 pack();
 Mnemonics.addMnemonicsForJFrame(this);
 setVisible(true); // Show the window
 } // end constructor

 // instantiate our GUI components
 protected void createComponents() { }
 // add our GUI components to the window by calling add
 protected void addComponents() { }
 // methods required by the listener interfaces we implement

 // WindowListener interface methods
 public void windowActivated(WindowEvent e) { }
 ...
 public void windowClosing(WindowEvent e)
 {
 dispose();
 System.exit(0);
 }

 // ActionListener interfaces methods
 public void actionPerformed(ActionEvent evt) { }
 // ItemListener interface methods
 public void itemStateChanged(ItemEvent evt) { }
 // ItemSelectionListener interface methods
 public void valueChanged(ListSelectionEvent evt) { }
} // end BaseWindow class
Look at the constructor. You can't avoid your child classes having constructors, as these are not inherited, but you can reduce them to a simple call to super. However, creating the component objects and then adding them to the window needs to be done in the constructor, and must be done by the child classes. These jobs are abstracted out into two empty methods named createComponents and addComponents. The idea is the child classes will override these and put the code into these methods. The base constructor calls these methods, so for child classes, the child's versions gets called polymorphically.
After these calls, our own handy Mnemonics class and its addMnemonicsForJFrame method are used to automatically add mnemonics to all the components in the window. The only other methods that child classes might want to override are the appropriate event methods actionPerformed, itemStateChanged, and valueChanged, if the child classes want to process these events. If not, then the methods do not need to be overridden. Notice also that the code calls the pack method at the end of the constructor. This method call (inherited from JFrame) saves you from having to determine a workable window size yourself. For this to work, however, Java needs to be able to determine the "preferred" size of each component, so you might end up having to explicitly call the setPreferredSize method on some components if Java runs into trouble. Also, make sure you specify the number of columns on your JTextField components, to help Java do this calculation.
An alternative to a JFrame window is a JDialog window. This is used when you want to prompt the user for information and "block" while waiting for his or her response. (This is called modal behavior.) Typically, dialogs are used to display error messages or prompt for information needed to complete an action, such as prompting for a user ID and password. Coding a JDialog class is very similar to coding a JFrame class, except that the constructor needs a JFrame object to act as the owning parent. (Location is relative to it, and it is locked while the dialog is showing.) Also, you don't call setVisible in the constructor. The caller will do that because setVisible does not return control until the dialog window is disposed. Finally, in the window-closing code, you do not code System.exit, as you never want to exit the whole application just because a dialog window was closed.
Listing 12.4 shows the BaseDialog class, but since most of the code is the same as BaseWindow in Listing 12.3, only the constructor is given.
Listing 12.4: The Constructor for the BaseDialog Class
public BaseDialog(JFrame parent, String title)
{
 super(parent, title, true); // true means modal behavior

 createComponents(); // another method in this class
 addComponents(); // another method in this class

 addWindowListener(this); // we want window events!
 setLocation(250,150); // x, y from upper left
 //setSize(400, 200);// width, height. Only used if pack not used.
 pack();
 Mnemonics.addMnemonicsForJDialog(this);
}
Of course, this class is coded to extend JDialog, not JFrame. To test this class, include in it the following main method code:
public static void main(String args[])
{
 BaseWindow parent = new BaseWindow("Base Window");
 parent.setSize(300,150);
 BaseDialog dialog = new BaseDialog(parent, "Base Dialog");
 dialog.setSize(50,75);
 dialog.setVisible(true);
 System.exit(0);
}
Because the base windows are empty, you have to set their sizes to get a meaningful result. Figure 12.10 shows that result.

Figure 12.10: The JDialog example using the BaseDialog class
You will see more of JDialog later when you create a dialog. First, let's focus on JFrame.
Adding components to containers Layout managers
Now the really fun part begins: populating windows with components like push buttons and entry fields. If you think about display files, you'll realize that frame and dialog containers are rather like record formats, and components are like the fields and constants in your record formats. The record formats contain fields.
To lay out your fields in display-file DDS, you specify row and column addresses, and the display-file compiler (CRTDSPF) determines the display length for each field. You must be careful not to overlap fields. In Java, you lay out your components by adding them to your container (frame or dialog). That is, you first instantiate instances of component objects, and then add them to your container, like this:
JButton registerButton = new JButton("Register");
getContentPane().add(registerButton);
What does this mean? Where does it go? It depends on what layout manager you specify for your object. Prior to adding objects to a container, you need to specify a layout manager for that container. Layout managers are classes that define rules about where added components will be placed. To specify a particular layout manager, code the container method setLayout:
getContentPane().setLayout(new xxxLayout());
Notice for JFrame and JDialog (but not JPanel, as you will see later), you have to call getContentPane() because it is the content pane you are adding to. This is just a special nested container that windows have to hold the components. Having done this with a desired xxxLayout class, your components are added according to the rules of that class, which ensures that the components do not overlap. The layout manager classes are listed in Table 12.15.
|
Layout Manager |
Description |
|---|---|
|
BorderLayout |
You can only add five components. The window is divided into five regions, each a constant in BorderLayout: NORTH (top), SOUTH (bottom), WEST (left), EAST (right), and CENTER (middle). When adding a component, you must specify which region to place it in. This is great for simple windows. |
|
FlowLayout |
Each component inserted after the previous one, with some padding. If it fits horizontally, it goes there; otherwise, it starts on the next line. This is okay for buttons. |
|
GridLayout |
The window is divided into evenly sized cells. You must specify in the constructor how many rows and columns to allocate. Each addition then occupies the next sequential cell. Cell size is the largest display size of all the added components. This is great for evenly sized push buttons. |
|
GridBagLayout |
This is the most complex and most flexible class. The window is divided into cells again, but each is sized to be as big as needed for the component in it. It requires the use of the GridBagConstraints helper class to define the attributes of each populated cell. This is great for everything, if you can handle the coding. |
|
BoxLayout |
New for Swing, this class is designed to get the benefits of GridBagLayout without the pain. It has one row or column of components, each in its own cell that is uniquely sized for that component. This is great for toolbars or button bars. Our experience, though, is it is tough to get the sizing to come out just right. |
|
CardLayout |
Obsolete. The JTabbedPane is the new preferred way, discussed later in this chapter. |
In addition to the classes in Table 12.15, there is yet another option: specifying a layout manager of null, like this:
getContentPane().setLayout(null);
This layout mode indicates that you will hard-code the pixel x and y address of every component you add. This is not a recommended option and is not covered further in this book, however, because it produces a screen-resolution-dependent window that does not gracefully allow for resizing by the user.
Using BorderLayout
To see what a BorderLayout layout looks like, let's create a class that extends the BaseWindow class from Listing 12.3. It will define, create, and add four components: a list heading, a list, a push button, and a message line (that is, a non-editable JTextField serving the purpose of a message line). The code is shown in Listing 12.5.
Listing 12.5: Testing the BorderLayout Layout Manager
// Not shown: usual 4 import statements

public class RegisterWindow extends BaseWindow
{
 private JLabel listHeader;
 private JList list;
 private JScrollPane listScrollPane;
 private JButton registerButton;
 private JTextField msgLine;

 public RegisterWindow()
 {
 super("Registration");
 }

 // Override from parent class: instantiate components
 protected void createComponents()
 {
 listHeader = new JLabel("Attendees");
 DefaultListModel lModel = new DefaultListModel();
 list = new JList(lModel);
 listScrollPane = new JScrollPane(list);
 registerButton = new JButton("Register");
 msgLine = new JTextField(20);
 listHeader.setBorder(BorderFactory.createLoweredBevelBorder());
 for (int idx=1; idx<11; idx++) lModel.addElement("Attendee " + idx);
 list.setVisibleRowCount(4);
 registerButton.setBorder(BorderFactory.createRaisedBevelBorder());

 msgLine.setEditable(false);
 msgLine.setBackground(Color.cyan);
 msgLine.setBorder(BorderFactory.createLoweredBevelBorder());
 }
 // Override from parent class: add components
 protected void addComponents()
 {
 getContentPane().setLayout(new BorderLayout());
 getContentPane().add(listHeader, BorderLayout.NORTH);
 getContentPane().add(listScrollPane,BorderLayout.CENTER);
 getContentPane().add(registerButton,BorderLayout.EAST);
 getContentPane().add(msgLine, BorderLayout.SOUTH);
 }
}

Figure 12.11: The layout produced by BorderLayout
The code in createComponents first instantiates the components, then does some tailoring of them by calling some of the component methods described earlier. Notice the extra work required for a JList, including creating a DefaultListModel object and then using it to add items to the list. Also notice a JList has to be inside a JScrollPane to see scrollbars, as discussed earlier. This createComponents method will remain the same for subsequent examples in this chapter, as you examine each of the other layout managers (except the obsolete CardLayout).
The important code is in addComponents, which sets the layout manager and subsequently adds the four components. Figure 12.11 shows the result of compiling and running this class. (It has a main method that we didn't bother showing you.)
This example of a border layout turned out so well because there happens to be fewer than five components, and BorderLayout allows up to five. The only unused region is on the left, but you can see that empty regions do not take up any space. If you had more components, you would use "nested containers," discussed in an upcoming section on the JPanel container.
Using FlowLayout
With a FlowLayout manager, you simply add each component to the screen, one after another. If a component fits on the current row, it goes there. If not, it wraps to the next line. If there simply is not enough space left to show a component, it is not shown. Listing 12.6 shows the updated addComponents method to support this manager.
Listing 12.6: Testing the FlowLayout Layout Manager
protected void addComponents()
{
 getContentPane().setLayout(new FlowLayout());
 getContentPane().add(listHeader);
 getContentPane().add(listScrollPane);
 getContentPane().add(registerButton);
 getContentPane().add(msgLine);
}
Notice this layout manager does not take any parameters to the add method. (Indeed, all others work the same way.) Figure 12.12 shows the new results.
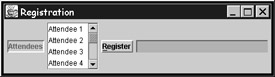
Figure 12.12: The layout produced by FlowLayout
If you resize the window, the components move around automatically to fit the new size. That is, they "flow" as required. It is not a good idea to use pack when using this layout manager, as you can see. Indeed, this layout manager is not a good choice in this case. However, it can be a good choice when all you are adding is push buttons and you want each to get its own size.
Using GridLayout
The GridLayout manager divides the screen into the specified number of rows and columns. After that, the components are added to the next cell, moving left to right. Each cell is as big as the one necessary to hold the largest-sized component.
This is a tricky layout to use in the example because there is not an even number of components per row. You have one on the first row (the list header), two on the second row (the list and the push button), and one on the third row (the message line). To handle this, specify three rows and two columns, then add a dummy JLabel object to the empty cells so they have something. (Otherwise, all of the components would be shifted inappropriately.) The code for this is shown in Listing 12.7.
Listing 12.7: Testing the GridLayout Layout Manager
protected void addComponents()
{
 getContentPane().setLayout(new GridLayout(3,2));
 getContentPane().add(listHeader);
 getContentPane().add(new JLabel(""));
 getContentPane().add(listScrollPane);
 getContentPane().add(registerButton);
 getContentPane().add(msgLine);
}
Figure 12.13 shows the result. (It's not pretty!) The problem here is that GridLayout sizes every cell to be as big as the biggest component, which in this case is the JList.
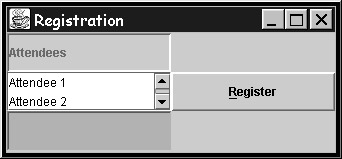
Figure 12.13: The layout produced by GridLayout
The GridLayout manager is useful only in certain situations, such as for a property-sheet window with label/entry pairs that look good when they are all the same size, as shown in Figure 12.14. It is also heavily used for holding push buttons, when you want all the buttons to be the same size, as shown in Figure 12.15.

Figure 12.14: Using GridLayout for evenly sized columns in a property sheet
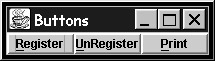
Figure 12.15: Using GridLayout for evenly sized buttons
Using GridBagLayout
The GridBagLayout manager is by far the most complex of all the layout managers to code. However, when the previously mentioned ones fail to meet your purposes, you can be sure that this one will always work. Like GridLayout, it divides the screen into cells, but not every cell is the same size. You do not specify the rows and columns for the cells when you instantiate the layout object. Rather, it is done implicitly as you add each component. For each component you add, you specify the row and column coordinates (0,0 based), and the number of rows and columns this component is to span. You can also specify information such as whether the component is allowed to grow and shrink with the sizing of the window (horizontally and/or vertically), whether it is to be stretched to fit the cell(s) it is in, and how it is to be aligned in the cell(s).
There is potentially a lot of extra information to be specified with each component as it is added, which is why there is relative complexity. How is all this extra information specified? Not via parameters to the add method, as you might expect. That would make this method too complicated and would require numerous parameters. Rather, in true object- oriented fashion, you instantiate another class, GridBagConstraints, that will contain all this information. With this approach, you can specify all your defaults once, initially. Then, you change only the defaults you need to for each component that you add. The non- object-oriented part of this class, however, is that all this information is specified by explicitly changing variables in the object versus the better approach of using setXXX methods.
Here are the steps needed to use GridBagLayout:
- Instantiate an instance of GridBagLayout, with no parameters.
- Instantiate an instance of GridBagConstraints, with no parameters.
- Specify the GridBagLayout object as the layout manager, via setLayout.
- Set all your preferred default values in the GridBagConstraints class.
- For each component to be added:
- Set the required values of the GridBagConstraints object uniquely for this component (such as the row and column addresses via the gridy and gridx variables).
- Call the GridBagLayout method setConstraints, passing your component and the GridBagConstraints object.
- Call the add method of the window to add the component, as usual.
The important variables that need to be set in GridBagConstraints are listed in Table 12.16.
|
Variable |
Description |
|---|---|
|
gridy, gridx |
The row and column position (zero-based) for this component, where 0,0 is the upper left corner. |
|
gridheight, gridwidth |
The numbers of rows and columns this component will occupy. The default is one each. |
|
weighty, weightx |
Does this component grow in either direction when the window is sized? If yes, specify 1.0, otherwise specify zero. The default is zero. Typically, specify 1.0 for weightx for JTextField, 1.0 for weightx and weighty for Jlist and JTextArea. At least one component should have a nonzero value. |
|
fill, anchor |
What should be done when the cell(s) are larger than the component?
|
The tricky part (which will eventually come very easily to you) is determining the gridy/x and gridheight/width to specify for each component. Here is a little algorithm to get you going:
- Lay out the intended screen in your mind or on paper.
- Determine how many unique rows there are. In the example, we decided to have four rows because we really want the list box to be taller than the button beside it. We assign the list box to two rows and the button to only one row. Draw a line horizontally across the top and bottom of each component.
- Determine how many unique columns there are (two, in the example). Draw a line vertically at the start and end of each component.
- Determine, for each component:
- The row and column where it should start.
- If there are no components beside it, its width is the number of remaining columns. The bottom message line in the example will span both columns. If there are components beside it, the width is the difference between this component's starting column and the one beside it.
- If there are no components beside it, its height is one. If there are components beside it, its height is the number of components, vertically, beside it. For example, a list box with three push buttons vertically beside it would have a height of three (or four, if you wanted a row of padding below the last button).
Figure 12.16 shows how the example is divided up. Notice that the list header should only span one column, not all columns as in the BorderLayout example.
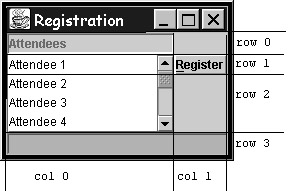
Figure 12.16: Mapping out rows and columns for GridBagLayout
The code for this layout is in Listing 12.8. Notice the helper method named addPart that handles the tedious but necessary variable assignments.
Listing 12.8: Testing the GridBagLayout Layout Manager
protected void addComponents()
{
 GridBagLayout gbl = new GridBagLayout();
 GridBagConstraints gbc = new GridBagConstraints();
 gbc.fill = GridBagConstraints.BOTH;
 gbc.anchor = GridBagConstraints.SOUTH;
 getContentPane().setLayout(gbl);
 addPart(gbl, gbc, listHeader, 0, 0, 1, 1, false, false);
 addPart(gbl, gbc, listScrollPane, 1, 0, 2, 1, true, true);
 addPart(gbl, gbc, registerButton, 1, 1, 1, 1, false, false);
 addPart(gbl, gbc, msgLine, 3, 0, 1, 2, false, false);
}

protected void addPart(GridBagLayout gbl, GridBagConstraints gbc,
 JComponent part,
 int row, int col, int rows, int cols,
 boolean stretchVert, boolean stretchHorz)
{
 gbc.gridy = row;
 gbc.gridx = col;
 gbc.gridheight = rows;
 gbc.gridwidth = cols;
 gbc.weighty = stretchVert ? 1.0 : 0; // true? = 1 else 0
 gbc.weightx = stretchHorz ? 1.0 : 0; // true? = 1 else 0
 gbl.setConstraints(part, gbc);
 getContentPane().add(part);
}
And what does this produce? The result is shown in Figure 12.17.
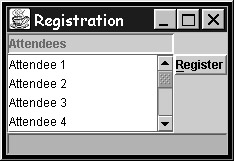
Figure 12.17: The layout produced by GridBagLayout
Remember, users can resize your windows, even if you pack them, so it is important to identify those components you would like to grow when the window is sized, by specifying nonzero values for weightx and weighty. In this example, the list box stretchable in both directions, so when the window is made bigger, the list, and only the list, will grow to absorb the space. If no component has a nonzero weight value, the components will remain clumped in the middle, and all the white space will appear around them.
Using BoxLayout
All the previous layout-manager classes came from the java.awt package and existed in the AWT days. The BoxLayout class is new for Swing and is in the javax.swing package. Swing engineers (a consortium of companies) invented BoxLayout to handle their new JToolBar class, which was needed to show evenly sized components in a row, but without the wrapping behavior of FlowLayout. Unlike GridLayout, they also needed the ability to place pads between some of the buttons, which you see commonly between groups of buttons in a tool bar. So they invented BoxLayout, and within it, something called struts for these pads. Having done this, they made it available for you to use.
Table 12.17 compares the attributes of the various layout managers, with the exception of BorderLayout because its five-region limit is really only applicable in special cases.
|
Attribute |
FlowLayout |
GridLayout |
GridBagLayout |
BoxLayout |
|---|---|---|---|---|
|
Non-evenly spaced cells |
Yes |
No |
Yes |
Yes |
|
No wrapping |
No |
Yes |
Yes |
Yes |
|
Multiple-cell spanning |
No |
No |
Yes |
No |
|
Multiple rows or columns |
No |
No |
Yes |
No |
|
Easy to use |
Yes |
Yes |
No |
Yes |
As you can see, GridBagLayout remains the winner in every category except complexity. It appears that BoxLayout comes in second, but while it is easy to code, it is a pain to finesse so the output is acceptable. Thus, we actually recommend you ignore this layout manager! For completeness, though, the example in Listing 12.9 shows how to use it.
Listing 12.9: Testing the BoxLayout Layout Manager
protected void addComponents()
{
 BoxLayout vertRow = new BoxLayout(getContentPane(),BoxLayout.Y_AXIS);
 getContentPane().setLayout(vertRow);
 Box row0 = Box.createHorizontalBox();
 row0.add(listHeader);
 row0.add(Box.createHorizontalGlue());
 getContentPane().add(row0);
 Box row1 = Box.createHorizontalBox();
 row1.add(listScrollPane);
 row1.add(registerButton);
 getContentPane().add(row1);
 getContentPane().add(msgLine);
}
Notice that we BoxLayout is constructed differently than all the other managers. Rather than simply calling setLayout on a new BoxLayout instance, you first have to create a BoxLayout instance and tell it what you intend to use it for (getContentPane in this case, or any JPanel object generically). This is the first pain. To use a BoxLayout for more than one row or column of components, you have to think of your screen as a vertical box, within which each row is another horizontal box, where your actual components are. If any row has only one component, you can just add it to the vertical box. If it has multiple components, you have to first create a horizontal layout box and populate it, and then add that box to the vertical box. Boxes like this can be created either by creating a JPanel and setting its layout manager to a BoxLayout instance, or calling the factory method createHorizontalBox (or createVerticalBox), which returns a container with the appropriate layout manager already set.
The example uses the first way for the vertical box and the second way for the horizontal boxes in the first and third rows. There's only a single component in the first row, but because it should not span the full width, a box is created to hold it and the method createHorizontalGlue is used to create padding beside it. There is also a create HorizontalStrut to create rigid, fixed-sized spaces, but that's not what we want here.
Finally, running this gives Figure 12.18. It's not too bad, but there are a couple of small problems. First, the list header ("Attendees") is not as wide as the list box. Second, the push button ("Register") is centered beside the list, and we prefer it at the top. This should be fixable by setting the minimum size (setMinimumSize) of the list header component and setting the Y alignment of the push button (setAlignmentY) to one. However, everything we tried did not work. It's the little details like this that will get you with BoxLayout. For simple, single-row or single-column groupings, though, you might find it works just fine.
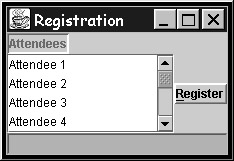
Figure 12.18: The layout produced by BoxLayout
Specifying padding between components
When you start to fine-tune your user interfaces, you might be interested in changing the Java-supplied default padding between the components that you add. This can be done with each of the layout managers by specifying horizontal and vertical "gap" values on the constructors, with the exception of GridBagLayout and BoxLayout. Alternatively, you can use the setHgap and setVgap methods supplied by each layout manager class, except for the GridBagLayout class (for which you specify the insets variable in GridBagConstraints object) and the BoxLayout class (where you use struts). The values you specify are in pixels, and you might find that five is a good number if you do not like a "tight" look. In the BorderLayout example, if you change the setLayout line to look like the following, you get Figure 12.19:
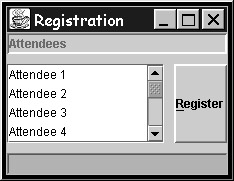
Figure 12.19: BoxLayout with a padding of 10 pixels
getContentPane().setLayout(new BorderLayout(10,10));
Padding between the frame of the window and the components requires a different operation. To do that, you simply create an empty border around the content pane, like this:
((JPanel)getContentPane()).setBorder(
 BorderFactory.createEmptyBorder(10,10,10,10));
You see, the content pane of a JFrame is in fact a JPanel object, which is a special type of component just for holding other components. Like all components, it can have a border. The next section discusses what these JPanels are and how they can dramatically help with your layout decisions.
Nesting layout managers The JPanel class
You have seen, so far, how you can add components to your JFrame or JDialog window object directly, using one of the layout manager classes to define how the added components will be placed. This is okay, but it does cause some grief choosing the appropriate layout manager, unless you use the complex GridBagLayout. Further, it does not allow for reuse of common GUI constructs. For example, in display files, you typically have one common record format with the Function-key descriptions, which you subsequently write to the bottom of many of your screens. That is reuse. You have this with display files because you can group fields into record formats, which are combined to form a screen. (Indeed, unlike Java, with display files, all fields must go into record formats.) The good news is that Java, too, has an easy way to group multiple components into a single entity. That entity is a JPanel object.
A JPanel is a container, like JFrame and JDialog, meaning it allows components to be added to it, and requires a layout manager class to define how the components will be arranged. However, JPanel has no visible borders or other frame pieces because it is meant to be used as part of a window. If you look back at Figure 12.2, you will see that JPanel extends JComponent, which means that anywhere you can add a basic component, you can also add a JPanel object. Thus, by using panels, you can greatly increase your flexibility in choosing a layout manager, because you can add panels to a JFrame window instead of adding components directly. This way, one area of your screen can use a panel with the layout manager appropriate for it and another can use another panel with a different layout manager appropriate for it.
Think about the BorderLayout layout manager. It allows only five components to be added, one each in the north, south, west, east, and center regions. This seems very restrictive, except that each of those components can in fact be a panel that contains many nested components.
Let's go back to the BorderLayout version of the example, from Listing 12.5, and update it to contain not just a single button labeled "Register," but five buttons labeled "Register," "Unregister," "Print," "Save," and "Open." How might you accomplish this? By adding a JPanel object containing these to the JFrame content pane, where you previously added a single JButton object. What should the layout manager of the JPanel object be? Well, you want a column of buttons that are the same size, so you have two easy choices: GridLayout or BoxLayout. Both will work fine, and in fact BoxLayout is best because it allows you to put struts between buttons if you want, adding a visual spacer between groups of buttons. However, to keep things simple here, let's go with GridLayout.
We have decided, by the way, to create a separate class for buttons, named BorderedButton, to make it easier to create buttons that have the border we like. First, then, here is that simple class:
import javax.swing.*;
/** Our own button class that simply adds a border to JButton */
public class BorderedButton extends JButton
{
 public BorderedButton(String label)
 {
 super(label);
 setBorder(BorderFactory.createRaisedBevelBorder());
 }
}
Listing 12.10 shows the revised addComponents method of the RegisterWindow class. (We don't show you declaring and instantiating the buttons.)
Listing 12.10: The Revised addComponents Method
protected void addComponents()
{
 getContentPane().setLayout(new BorderLayout());
 getContentPane().add(listHeader, BorderLayout.NORTH);
 getContentPane().add(listScrollPane, BorderLayout.CENTER);
 JPanel buttonPanel = new JPanel(new GridLayout(5,1));
 buttonPanel.add(registerButton);
 buttonPanel.add(unRegisterButton);
 buttonPanel.add(printButton);
 buttonPanel.add(openButton);
 buttonPanel.add(saveButton);
 getContentPane().add(buttonPanel, BorderLayout.EAST);
 getContentPane().add(msgLine, BorderLayout.SOUTH);
}
You can specify the layout manager object right in the constructor of the JPanel, although calling setLayout separately is also allowed. This method just creates a JPanel object, populates it with buttons, and then adds it to JFrame instead of a single JButton object. Let's see what this looks like, in Figure 12.20.
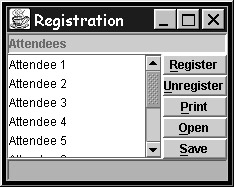
Figure 12.20: BorderLayout with a nested GridLayout JPanel
Not bad! In fact, here's what we usually do with a JFrame or JDialog: We set the layout to BorderLayout, and then we reserve the south region for a message line and the north region for a toolbar (or we leave it empty if there is no toolbar). We then always put the "meat" of the window in the center region. The east and west regions usually stay empty, but occasionally we find a good use for them, as in the east region of this example.
If we follow that design pattern here, the list box and its header would go together into their own JPanel, added to the center region. For that JPanel, a good choice is another BorderLayout, as shown in Listing 12.11.
Listing 12.11: The addComponents Method with a Nested Design
protected void addComponents()
{
 getContentPane().setLayout(new BorderLayout());
   JPanel listPanel = new JPanel(new BorderLayout());
   listPanel.add(listHeader,BorderLayout.NORTH);
   listPanel.add(listScrollPane, BorderLayout.CENTER);
 getContentPane().add(listPanel, BorderLayout.CENTER);
 JPanel buttonPanel = new JPanel(new GridLayout(6,1));
   buttonPanel.add(new JLabel(""));
 buttonPanel.add(registerButton);
 buttonPanel.add(unRegisterButton);
 buttonPanel.add(printButton);
 buttonPanel.add(openButton);
 buttonPanel.add(saveButton);
 getContentPane().add(buttonPanel, BorderLayout.EAST);
 getContentPane().add(msgLine, BorderLayout.SOUTH);
}
A filler JLabel is added to the button panel to push the buttons down to the list area. This gives the result shown in Figure 12.21. As you can see, the layout is as good as you would get with GridBagLayout, but without that layout manager's complexity. The trick is to divide your screen into components that map nicely to one of the layout managers.
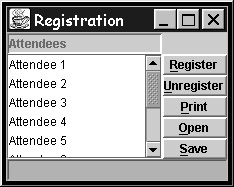
Figure 12.21: Using a nested BorderLayout JPanel inside a BorderLayout JPanel
Another benefit of JPanels, beyond the flexibility they give in getting the layout you want, is the ability to encapsulate common UI constructs intoreusable objects. When you create a new class that extends JPanel and populate it with components, you can then reuse that object in many windows, as the whole window or as part of a window. You might, for example, need to prompt for a customer number, order number, or part number in many windows. You could put the label, entry field, and "List" push button together in their own class that extends JPanel, and then insert that anywhere in any window you want. Really, you have created a new component!
A simple example is given in Listing 12.12. It is a push-button panel for the bottom of dialogs.
Listing 12.12: A Reusable ButtonPanel Class
import java.awt.*; // AWT components and common classes
import javax.swing.*; // Swing components and classes

public class ButtonPanel extends JPanel
{
 protected BorderedButton okButton, cancelButton, helpButton;

 public ButtonPanel(boolean evenSized)
 {
 super();
 if (evenSized)
 setLayout(new GridLayout(1,3));
 else
 setLayout(new FlowLayout());
 okButton = new BorderedButton("Ok");
 cancelButton = new BorderedButton("Cancel");
 helpButton = new BorderedButton("Help");
 add(okButton);
 add(cancelButton);
 add(helpButton);
 }
}
Again, BorderedButton is just your own class that extends JButton and adds a border. What is nice about this ButtonPanel class is that it allows you to choose between fixed-sized buttons and sized-to-fit buttons. Another example, a message-line class, is given in Listing 12.13.
Listing 12.13: A Reusable MessageLine Class
import java.awt.*;
import javax.swing.*;

public class MessageLine extends JPanel
{
 private JTextField msgField;

 public MessageLine()
 {
 super(new GridLayout(1,1));
 msgField = new JTextField();
 msgField.setEditable(false);
 msgField.setBorder(BorderFactory.createLoweredBevelBorder());
 msgField.setBackground(Color.cyan);
 add(msgField);
 }
 public void setText(String text)
 {
 msgField.setText(text);
 }
 public void clearText()
 {
 msgField.setText("");
 }
}
Rather than using a JTextField directly as we have been doing (which is preferable to JLabel because the user can manually cursor over to see long messages), we decided to make our own class. We could have extended JTextField, but extending JPanel and putting the JTextField object in it is better, because we can later change the implementation. For example, you might prefer to use a JComboBox, so that, like an AS/400 message subfile, you can write and display multiple error messages. You might also decide to support multiple areas in the message line, as is commonly seen in Windows applications. This is quite easily done by encapsulating the message-line component within a JPanel.
A simple form class
Another example of JPanels for reuse is with form panels. Very often, detail screens prompt for a series of inputs from the user. Typically, you want these to be laid out such the each prompt label is aligned in a column, and each text field or other input component is aligned in another column, and if there are other components beyond that, they are aligned in yet another column. You saw one way to do this earlier, using a GridLayout for a properties-sheet style of window. However, this is not very appealing, as every column ends up the same size.
The very best solution for these types of panels is to use GridBagLayout managers, but they are tedious to code. Instead, let's create a class that extends JPanel to make this easier. The class will have overloaded methods for adding rows of components (each taking different numbers of components to place in the row). The code will then put each given component into the GridBagLayout such that every column is nicely aligned. The class is shown in Listing 12.14.
Listing 12.14: A FormPanel Class that Makes GridBagLayout Easy to Use
import java.awt.*;
import javax.swing.*;
public class FormPanel extends JPanel
{
 protected GridBagLayout gbl = new GridBagLayout();
 protected GridBagConstraints gbc = new GridBagConstraints();
 protected int currRow = 1; protected int finalColspan = 1;
 public FormPanel() // constructor
 {
 super();
 gbc.weightx = 0;
 gbc.weighty = 0;
 gbc.gridheight = 1;
 gbc.gridwidth = 1;
 gbc.anchor = GridBagConstraints.SOUTHWEST;
 gbc.insets = new Insets(1,1,1,1);
 setLayout(gbl);
 }
 protected void addPart(JComponent part, int row,
 int col, int rows, int cols)
 {
 gbc.gridy = row; gbc.gridx = col;
 gbc.gridheight = rows; gbc.gridwidth = cols;
 if (cols > 1)
 gbc.fill = GridBagConstraints.HORIZONTAL; // stretch
 gbl.setConstraints(part, gbc);
 add(part);
 gbc.gridwidth=1; // reset
 gbc.fill = GridBagConstraints.NONE; // reset
 }
 // One part, one cell wide
 public void addRow(JComponent part)
 {
 addPart(part, currRow++, 0, 1, finalColspan);
 }
 // Two parts, each one cell wide
 public void addRow(JComponent part1, JComponent part2)
 {
 addPart(part1, currRow, 0, 1, 1);
 addPart(part2, currRow++, 1, 1, finalColspan);
 }
 // One part, spanning given number of cells
 public void addRow(JComponent part1, int cols)
 {
 finalColspan = cols;
 addRow(part1);
 finalColspan = 1; // reset default
 }
} // end of class FormPanel
Testing this requires a dialog window class that extends BaseDialog from Listing 12.4 (instead of the BaseWindow class we've been extending up until now). This dialog, shown in Listing 12.15, uses the FormPanel class to prompt for a phone number and a name.
Listing 12.15: A Dialog Window that Uses the FormPanel Class
public class AttendeePrompt extends BaseDialog
{
 private JLabel nbrPrompt, namePrompt;
 private JTextField nbrEntry, nameEntry;
 private ButtonPanel buttons;
 private MessageLine msgLine;
 private boolean okPressed = false;

 public AttendeePrompt(JFrame parent)
 {
 super(parent, "Attendee Prompt");
 }
 protected void createComponents()
 {
 nbrPrompt = new JLabel("Phone number");
 nbrEntry = new JTextField(15);
 namePrompt = new JLabel("Name");
 nameEntry = new JTextField(20);
 buttons = new ButtonPanel(true);
 msgLine = new MessageLine();
 buttons.okButton.addActionListener(this);
 buttons.cancelButton.addActionListener(this);
 }
 protected void addComponents()
 {
 getContentPane().setLayout(new BorderLayout(5,5));
 FormPanel form = new FormPanel();
 form.addRow(nbrPrompt, nbrEntry);
 form.addRow(namePrompt, nameEntry);
 form.addRow(buttons,2);
 getContentPane().add(form, BorderLayout.CENTER);
 getContentPane().add(msgLine, BorderLayout.SOUTH);
 }
 public void actionPerformed(ActionEvent evt)
 {
 if (evt.getSource() == buttons.cancelButton)
 dispose();
 else if (evt.getSource() == buttons.okButton)
 {
 okPressed = true;
 dispose();
 }
 }
 public boolean okPressed()
 {
 return okPressed;
 }
}
The interesting part is in addComponents, where a FormPanel object is created and populated with three rows. The third row is just the ButtonPanel object, and since we want it to span as many columns as the other rows, we use the version of addRow that lets us specify a column-span number. To see this, we need a parent window that will bring up this dialog when some user event happens. So, we change the evolving RegisterWindow class to do just that when the user presses the Register button.
The code for this is shown in Listing 12.16. Note that the line of code in createComponent to call addActionListener is not shown, and remember that the parent class BaseWindow implements the ActionListener interface required to process button events. This actionPerformed method is required by that interface, and the empty version of it is overridden from the BaseWindow parent class. Note also that the new MessageLine class is used here, too.
Listing 12.16: Updating RegisterWindow to Show a Dialog When the Register Button Is Pressed
public void actionPerformed(ActionEvent evt)
{
 msgLine.clearText(); // from MessageLine class
 if (evt.getSource() == registerButton)
 {
 AttendeePrompt dlg = new AttendeePrompt(this);
 dlg.setVisible(true);
 if (dlg.okPressed())
 msgLine.setText("Ok Pressed");
 }
}
Let's have a look at this thing! Figure 12.22 shows how nicely the components in the dialog have been formatted. That is the beauty of GridBagLayout. The beauty of FormPanel is how very simple the code in Listing 12.15 was to get this. If you do any Swing programming, you will want to use this handy class.

Figure 12.22: A dialog that uses the FormPanel class
You can probably see where we are going with all this: putting a GUI face onto the AttendeeList class from the registration example in Chapter 6. To cut to the chase, you will find all the classes for the fully fleshed-out application on the CD-ROM, in the Listing12-17 subdirectory for Chapter 12. To run it, type java RegisterWindow. This uses the GUI shown in Figure 12.22 to drive the AttendeeList class and its dependent classes Attendee, AttendeeKey, PhoneNumber, PhoneNumberException, and Helpers.
These classes have evolved from when you last saw them in Chapter 9 to include functionality discussed in Chapter 10 (exceptions) and Chapter 11 (threads). The methods the AttendeeList class now supports are register, deRegister, print (to file), write (to disk), and read (from disk). It also still supports display, but since the list is displayed right in the main window, you don't need this one. Note that the file the example reads to and writes from to persist the list is hard-coded for now to event1.dat, and the local stream file printed to is hard-coded to event1.lst. If you are interested in the details of how AttendeeList was enhanced to support these functions, have a look at the code on the CD-ROM.
Listing 12.17 is what the button event-handling method looks like now, to process all the push buttons. Note that attendees is an instance of AttendeeList created in the constructor, while populateList and enableButtons are helper methods created but not shown here. The former populates the list box from the AttendeeList object; the latter enables or disables all the buttons depending on the success of the open operation. Also not shown are the call to addActionListener(this) for all the buttons and the call to addListSelectionListener for the JList object. A new dialog window is created for confirming "unregister" requests. The code for registering is right in the AttendeePrompt class, and the code for unregistering is in the AttendeeDePrompt class. This is necessary to shows errors right in the dialog.
Listing 12.17: The Updated RegisterWindow Event Methods to Fully Support AttendeeList
public void actionPerformed(ActionEvent evt)
{
 msgLine.clearText(); // from MessageLine class
 if (evt.getSource() == openButton)
 {
 try {
 String filename = attendees.read();
 populateList(); msgLine.setText("Read in from file " + filename);
 enableButtons(true);
 } catch (java.io.IOException exc) {
 msgLine.setText("Error reading file " +
 attendees.getSaveFileName()+": "+exc.getMessage());
 }
 }
 else if (evt.getSource() == registerButton)
 {
 AttendeePrompt dlg = new AttendeePrompt(this,attendees);
 dlg.setVisible(true);
 if (dlg.okPressed())
 populateList();
 }
else if (evt.getSource() == unRegisterButton)
 {
 AttendeeDePrompt dlg = new AttendeeDePrompt(this,
 attendees,(Attendee)list.getSelectedValue());
 dlg.setVisible(true);
 if (dlg.okPressed())
 populateList();
 }
else if (evt.getSource() == printButton)
 {
 try {
 String filename = attendees.print();
 msgLine.setText("Printed to file " + filename);
 } catch (java.io.IOException exc) {
 msgLine.setText(exc.getMessage()); }
 }
else if (evt.getSource() == saveButton)
 {
 try {
 String filename = attendees.write();
 msgLine.setText("Saved to file " + filename);
 } catch (java.io.IOException exc) {
 msgLine.setText(exc.getMessage()); }
 }
} // end actionPerformed
The rest of the code, including the valueChanged method for processing list-selection events, is on the CD-ROM. Figure 12.23 shows the running application.
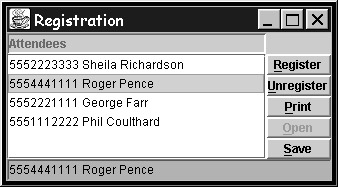
Figure 12.23: A fully functional AttendeeList GUI application
The key to error-checking is that all of the AttendeeList methods throw exceptions, instead of just writing error messages to the console, which is of no value in GUIs. The window code then simply has to catch an exception and query the text of it with getMessage, then write that text to the message line.
Effective Use of JTextFields
The most important aspect of any UI code is getting input from the user. Most of the components in Java for doing this are very straightforward, such as the radio button. However, a text field is actually not that straightforward to use effectively in Java. Because of this, and because you will use them so heavily, and because your expectations are so high from your display-file background, we have to spend a little time here helping you over some hurdles we guarantee you will hit using JTextField.
Component sizing and layout managers
You won't go very far in Swing programming before hitting situations where your components are not sized correctly by Swing. To help you fix that, you have to understand how Java determines the sizes of components. The worst component to get sized correctly is JTextField, so we'll describe the algorithm for it here. With the exception of GridLayout, each layout manager uses the following algorithm to determine the display size of a JLabel, JTextField, or JPasswordField:
- Were columns specified in constructor or via setColumns?
- If yes, use this size.
- If no, was a preferred size set via setPreferredSize?
- If yes, use the size of the letter m in the current font, multiplied by the columns.
- If no, use the size of the current contents, computed dynamically on each repaint.
The best answer, then, is to set the size you want by specifying the number of columns on the constructor. You'll find this is actually a tiny bit too small to actually display that many characters, so you should probably add one to it. Remember, this number does not restrict how many characters the user can type; it merely tells Java how big you'd like this field to be. So, if you only want to display 20 characters but allow 100, only specify 20 for the columns. The user can still type 100 characters by cursoring over. Indeed, the user can type a thousand characters if he or she wants! Your error-checking code will check for too-long text when the OK button is pressed.
All components have a preferred, minimum, and maximum size that is either hard-coded by Java or computed depending on contents. You can also query and set all of these, as well as the actual size, via get/setSize. In all cases, the size is specified via a Dimension object, which has height and width public integer fields.
Restricting input in a JTextField
Since JTextField components are the equivalent to named fields in DDS, it will come as a disappointment to you that there is no way to specify "validity checking" information that the runtime can use to restrict what or how much is typed in. There is no data type, no length or decimal positions, no VALUES, RANGE, COMP, CHECK, CHGINPDFT, DSPATR, EDTCDE, EDTWRD, or EDTMSK keyword equivalents. JTextField simply displays String text and returns to you String text. All error-checking is up to you. All formatting is up to you. However, if you want this type of function (and we know you do), you can get it by creating your own class that extends JTextField, and code it yourself.
The first thing you will want to crack is restricting what can be typed in (e.g., only numbers) and how much can be typed (e.g., a maximum of 20 characters). This is easily done by extending the PlainDocument model class, overriding the insertString method to do this error-checking on the given string, beeping (Toolkit.getDefaultToolkit().beep()) if the criteria is not met, or calling the parent's version of this method if it is okay. Java calls this method to update the model with each keystroke the user types. If you reject it, the typed character is rejected:
public void insertString(int offset, String newText, AttributeSet as)
 throws BadLocationException
{
 if (getLength() + newText.length() > 20)
 Toolkit.getDefaultToolkit().beep();
 else
 super.insertString(offset, newText, as);
}
The getLength method is inherited and is the length of the current text, while newText is the newly typed (or pasted) text. This only shows checking for the length, but by using the RPGStrings class, you could also easily check whether each character in newText is numeric. Of course, you would not hard-code 20 as the maximum length, but rather use an instance variable passed to the constructor.
Next, specify an instance of this model as the first parameter in the constructor to JTextField. This is best encapsulated in your own text-field class:
public class SmartField extends JTextField
{
 public SmartField(int columns)
 {
 super (new FieldModel(columns), columns);
 }
}
Supporting editword and auto-advance requires rather more work, and is beyond this book. However, the CD-ROM includes a working class that does all this, named SmartTextField. Its model class is SmartTextFieldModel. If you run the TestSmartTextField class, you will see how it works. It restricts users from typing more than the specified number of characters, ensures only digits are typed, and auto-advances to the next field after the maximum number of digits are typed. Further, when the field is not in focus, it formats the text (editword). By default, it does this using a dollar sign and a decimal point at the two-digit location, but you can change that via set method calls.
You will like this class, but for a significantly more robust version with additional capabilities such as range and comparison checking, full editcode and editword support, and even edit masking support, see the JFormattedTextField class that IBM supplies in the "Enterprise Toolkit for AS/400" feature of VisualAge for Java. There is even a JFormattedLabel class for editcode/editword support in labels, and a JFormattedComboBox class the uses the JFormattedTextField for the entry part and a list of JFormattedLabel objects for the list part. These are all way cool! You can even use the model class by itself if you want to format a string with an editcode for printing purposes, say. If you do get into Swing programming, you really cannot live without these classes. They were designed by AS/400 programmers for AS/400 programmers, but they are of value to any Swing programmer.
We also highly recommend looking at all the Java classes at www.ibm.com/alphaworks, in the "alphabeans" section. Among other things, you will find text field classes specifically tailored for prompting for phone numbers, dates, zip codes, and so on.
Menu Bars and POP UPS
You will be hard-pressed to find a 5250-style traditional menu in a GUI application! Rather, GUIs have menu bars such as the one shown in Figure 12.24.
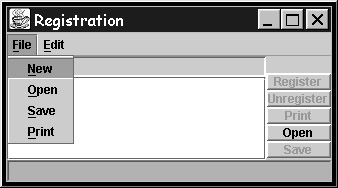
Figure 12.24: A menu bar with menus of items
This example is comprised of the following:
- A menu bar object of class JMenuBar
- Two menu objects of class JMenu, for the "File" and "Edit" menus
- A number of objects of class JMenuItem for items like "New" and "Open"
Here are the steps to define these menus inside a Java JFrame class:
- Create the JMenuBar object.
- Create the JMenu objects for the pull-down menus and nested menus.
- Add the JMenu objects to the JMenuBar object.
- Create the JMenuItem objects.
- Add the JMenuItem objects to the JMenu objects.
- Add the JMenuBar object to the JFrame window, using setJMenuBar.
The code to produce the menu bar in Figure 12.24 is shown in Listing 12.18.
Listing 12.18: Creating and Populating JMenuBar
private JMenuBar menubar;
private JMenu fileMenu, editMenu;
private JMenuItem fileNewMI, fileOpenMI, fileSaveMI, filePrintMI;
private JMenuItem editRegisterMI, editDeRegisterMI;

 menubar = new JMenuBar();
 fileMenu = new JMenu("File");
 editMenu = new JMenu("Edit");
 menubar.add(fileMenu);
 menubar.add(editMenu);
 fileNewMI = new JMenuItem("New");
 fileOpenMI = new JMenuItem("Open");
 fileSaveMI = new JMenuItem("Save");
 filePrintMI = new JMenuItem("Print");
 fileMenu.add(fileNewMI);
 fileMenu.add(fileOpenMI);
 fileMenu.add(fileSaveMI);
 fileMenu.add(filePrintMI);
 editRegisterMI = new JMenuItem("Register");
 editDeRegisterMI = new JMenuItem("UnRegister");
 editMenu.add(editRegisterMI);
 editMenu.add(editDeRegisterMI);

 setJMenuBar(menubar);
Once you have a menu, processing it is easy. Menus are just like buttons, in that you have to implement the ActionListener interface, call addActionListener on each JMenuItem object, and code the actionPerformed method to process the menu-item selection event. You compare the result of getSource to each of your JMenuItem objects to establish which menu item was selected by the user to cause this event. For example, the actionPerformed method is updated as follows:
Object part = evt.getSource();
if ((part == openButton) || (part == fileOpenMI))
 ...
else if ((part == registerButton) || (part == editRegisterMI))
 ...
else if ((part == unRegisterButton) || (part == editDeRegisterMI))
 ...
else if ((part == printButton) || (part == filePrintMI))
 ...
else if ((part == saveButton) || (part == fileSaveMI))
 ...
else if (part == fileNewMI)
 ...
To have a cascading menu (a menu item that, when selected, expands to show yet more menu items), simply add a second populated JMenu object to your first JMenu object. To show separator lines, simply call addSeparator on your JMenu object.
Easy stuff, menus. You can enable or disable them just like buttons, and also like buttons, you can put images in them, if you like. Just pass the ImageIcon object as the only or second parameter into the constructor. You can even have menu items that visually toggle between selected and unselected, by using the JCheckBoxMenuItem class. Further, the JRadioButtonMenuItem class, together with ButtonGroup, allows you to have a number of menu items, of which only one can be selected. Use setSelected and isSelected to set and query the selection states of these menu item types.
Pop up menus
In addition to placing JMenuItem, JCheckBoxMenuItem, and JRadioButtonMenuItem objects inside the JMenu objects of a menu bar, you can also add them to a JPopupMenu object to populate a pop-up menu, also called a context menu. You can then write code to show this pop-up menu when a user right-clicks on a particular component in your window.
This code is actually a little bit tricky. It involves implementing the mouse listener interface, calling addMouseListener(this) on the target component, and coding the five methods(!) from the interface. Three of these methods need to code a call to isPopupTrigger on the given MouseEvent object to determine if the right mouse button was clicked, and if so, call the show method on the JPopupMenu object. The show method requires you to pass the current object (this) and the x,y coordinates of the mouse click, which you can get by calling getX and getY on the event object.
Let's see an example. First, the RegisterWindow class definition is changed to implement MouseListener:
public class RegisterWindow extends BaseWindow
 implements MouseListener
Next, you declare and instance a JPopupMenu instance variable object:
private JPopupMenu popupMenu = new JPopupMenu();
Then, you add this object to the JMenuItem objects already in the "Edit" menu, and register your interest in mouse events with the JList component object:
popupMenu.add(editRegisterMI);
popupMenu.add(editDeRegisterMI);
list.addMouseListener(this);
Finally, you need to code the five methods required by this event interface, and then abstract-out, in method checkForPopup, the common code that three of the methods need to call to ensure the menu is shown. The code for this is given in Listing 12.19.
Listing 12.19: Processing Mouse Events for Showing a Pop-up Menu
public void mouseEntered(MouseEvent evt) {}
public void mouseExited(MouseEvent evt) {}
public void mouseClicked(MouseEvent evt)
{
 checkForPopup(evt);
}
public void mousePressed(MouseEvent evt)
{
 checkForPopup(evt);
}
public void mouseReleased(MouseEvent evt)
{
 checkForPopup(evt);
}
private void checkForPopup(MouseEvent evt)
{
 Component part = evt.getComponent();
 if (evt.isPopupTrigger() && (part == list))
 popupMenu.show(part, evt.getX(), evt.getY());
}
When you run the application and right-click in the list area, you get the pop-up shown in Figure 12.25.
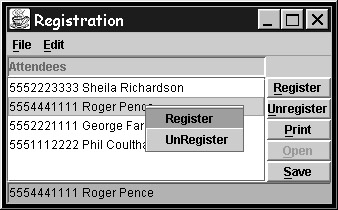
Figure 12.25: A pop-up menu
Menu item shortcuts
You can assign shortcut keys to your menu items, such as F3 for "Exit" or Ctrl+O for "Open." This is done by calling the setAccelerator method on your JMenuItem object. The only tricky part of this call is the parameters. You have to pass an instance of the KeyStroke class to identify the key-combination to assign. The KeyStroke object is created by calling the factory method getKeyStroke, which requires three parameters: the character or key (F3 or O), any modifier keys (Ctrl), and false. The character is identified by constants in java.awt.KeyEvent, and the modifier keys are identified by constants in java.awt.Event. Here is an example:
KeyStroke openKS = KeyStroke.getKeyStroke(KeyEvent.VK_O,
 Event.CTRL_MASK, false);
KeyStroke exitKS = KeyStroke.getKeyStroke(KeyEvent.VK_F3, 0, false);
fileOpenMI.setAccelerator(openKS);
fileExitMI.setAccelerator(exitKS);
These will show up in the text of your menu item, so users know there are shortcuts. Of course, when a user presses the shortcut key, it will be the same as if he or she had selected the menu item, as far as your event-handling code is concerned.
Advances Swing Functionality
So far in this chapter, you have seen all the basics you need to write user interface applications in Swing. However, Swing offers much more than just these basics. The details of these advanced functions are beyond the scope of this book (you've read enough, right?), but you should be able to read the JavaDoc documentation now to continue on your own. The following sections simply itemize all the additional functionality Swing has, so you know what is available to you.
Default push button
For JFrame and JDialog classes, you can identify a push button as the default push button, so that it is pressed when the user simply presses the Enter key. This is done by calling getRootPane().setDefaultButton and passing a JButton object to it.
Toolbars
There is a JToolBar class for creating a bar of buttons to display across the top of your window. (Actually, you can put it anywhere.) You populate it with JButton objects, so it can show images and/or text. It is typically placed in the north part of a BorderLayout layout manager. The toolbar can be "ripped off" by the user and placed elsewhere in the window or floated on the desktop. This is free; no coding is required.
Actions
GUIs often support the same action redundantly in menus, pop-up menus, buttons, and toolbars. This can lead to redundant code and make it a nightmare trying to enable/disable them appropriately. To save you from this nightmare, Swing allows you to define an action, which is a class that extends AbstractAction, and implements the required run method. You pass text and an optional ImageIcon object to the parent's constructor.
You can place an action object directly into a menu, pop-up menu, button, or toolbar. The text and optional image from the action will be displayed, and when the user selects the item, the run method in your action object will be called. You can also call setEnabled(true/false) on the action, and all the GUI places where the action is used will be enabled/disabled by that one call.
Multiple document interface
You can design an application that has a master window with other windows inside it (as in many Windows applications). The classes you need are JDesktopPane and JInternalFrame. You will use these instead of JFrame and JDialog.
More components
Here are some other components you can use in Java:
- JProgressBar. Moves a bar across to indicate progress.
- JSlider. Users can drag a thumbnail to the left or right, much like a horizontal scrollbar.
- JTree. A tree with nodes, much like you see in Windows Explorer, on the left side.
- JTable. A multiple column list box (a subfile!), much like you see in Windows Explorer, on the right side.
- JTextPane. An advanced editor widget that goes beyond JTextPane, supporting different colors and fonts for characters.
More containers
The following specialty containers allow for some special effects:
- JSplitPane allows you to put a different component or panel in the left and right panes (or top and bottom panes). User can move the split bar in the middle by dragging it.
- JTabbedPane allows you to create wizards. Put multiple panels in, and cycle through them. Optionally, display a tab at the top of each panel.
Figure 12.26 shows see some of these advanced components and containers. While you can't see it in the figure, the JTextPane shows the prompt, command, and messages in different colors. In fact, two JSplitPanes are used here, one with components on the left (JTree) and right (JTable), and one with components in the top (nested JScrollPane) and bottom (JTabbedPane).
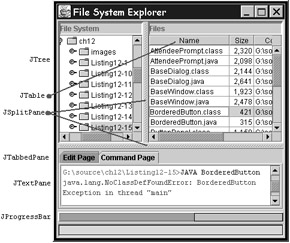
Figure 12.26: Advanced Swing components and containers
Look and feel
The Swing examples you have seen in this chapter so far show the default Swing look, called "Metal." You can change the look and the feel (behavior) to either Windows or UNIX ("CDE/Motif"). With just a few lines of code, your whole application's look changes. Quite cool. You can even write your own look and feel. To set the look and feel, call the static method setLookAndFeel in the UIManager class.
The JavaDoc documentation for this class explains how to use it, but to get you in the "Swing," we have supplied a cool helper class, LookAndFeelMenu. It extends the JMenu class, querying the installed look-and-feel options on your system to create a menu of their names. Further, all the event-processing logic is there to switch the look and feel when the user selects one of these menu items. All you have to do is instantiate the LookAndFeelMenu class, add it to a JMenuBar or a JMenu, and you are done. Figure 12.27 updates the example from Figure 12.26 to show this menu, with the CDE/Motif look and feel selected.
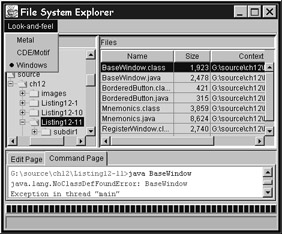
Figure 12.27: Advanced Swing components and containers, with a Motif look and feel
Predefined dialogs
Swing comes with some predefined dialogs that save you creating them yourself. This is such a great idea, it is a disappointment to learn that there are currently only two provided: an open dialog (JFileChooser) and a color dialog (JColorChooser). The first is very handy, while the second is rarely needed in a business application, unless you sell paint.
Because the open dialog is so important, we'll show you how to use it by changing the Open button in the RegisterWindow class to pop up an open dialog, instead of using a hard-coded file. By default, JFileChooser lists all files in the current directory, but we only want to show files that end with .dat. First, we need a class to do this filtering, as shown in Listing 12.20.
Listing 12.20: A Class to Filter File Names
import javax.swing.*;
import java.io.*;
public class EventFileFilter
 extends javax.swing.filechooser.FileFilter
{
 public boolean accept(File f)
 {
 return (f.isDirectory() || f.getName().endsWith(".dat"));
 }
 public String getDescription()
 {
 return "Event files (*.dat)";
 }
}
We have to extend FileFilter in the javax.swing.filechooser package, and we have to fully qualify that class name because it collides with a class of the same name in package java.io. The package java.io must be imported because of the File class (discussed in Chapter 14). The class just has to code an accept method that returns true if the given File object should be included in the open dialog list. Java calls accept for every file in the current directory. The File object has a method to determine if the file is a directory or not, and a getName method to return the file's name. It returns true if the file is a directory (to enable drill-down) or ends with .dat. The next method to be coded is getDescription, which returns a string to display in the open dialog for this filter.
Now, let's change the actionPerformed event logic in RegisterWindow to show an open dialog and retrieve from it the name of the file chosen by the user, as in Listing 12.21.
Listing 12.21: A Class to Manage the Open Dialog
if ((part == openButton) || (part == fileOpenMI))
{
 java.io.File currDir = new
 java.io.File(System.getProperty("user.dir"));
 JFileChooser openDlg = new JFileChooser(currDir);
 openDlg.setFileFilter(new EventFileFilter());
 int buttonPressed = openDlg.showOpenDialog(this);
 if (buttonPressed != JFileChooser.APPROVE_OPTION)
 msgLine.setText("Cancelled");
 else
 {
 String pathname = openDlg.getSelectedFile().getParent();
 String filename = openDlg.getSelectedFile().getName();
 String eventname = filename.substring(0,filename.indexOf(".dat"));
 attendees = new AttendeeList(eventname);
 try {
 filename = attendees.read();
 populateList();
 msgLine.setText("Read in from file " + filename);
 enableButtons(true);
 } catch (java.io.IOException exc) {
 msgLine.setText("Error reading file " +
 attendees.getSaveFileName() + ": " + exc.getMessage());
 } // end catch
 } // end if user didn't cancel open dialog
}
This tells the open dialog what directory to show files in, using the constructor. This is via a File object, and you see the code needed to get a file object representing the current directory. Once there is a JFileChooser dialog, methods are called to tailor it, such as setFileFilter, which takes an object of the previous class to do the filtering by name. Once tailored, it is displayed by a call to showOpenDialog (or showSaveDialog, if this is for the purpose of saving a file). This is a modal call, and the returned value is an integer indicating how the user exited the dialog. The constant APPROVE_OPTION indicates that the Open or OK button was pressed.
The open dialog looks like Figure 12.28. Note that it is in the default Metal look and feel. In the Windows look and feel, it is quite similar to the Windows standard open dialog.

Figure 12.28: The JFileChooser dialog
Message and simple input dialogs
The other help Swing gives you for commonly needed actions is for modal dialogs that display a message or prompt for simple input. The following static methods are supplied in the JOptionPane class:
- The showConfirmDialog method shows a confirmation dialog with a message and Yes and No buttons.
- The showMessageDialog method shows a message dialog with OK and Cancel buttons.
- The showInputDialog method shows an input dialog prompting for text or a simple list selection.
- The showOptionDialog method creates a generic dialog where you can supply the content.
These methods all take different parameters, which you can read about in the JavaDoc documentation. For now, you will see how to use showInputDialog.
The registration example used throughout this chapter has a menu item labeled "New" that prompts the user for the name of the event. This input has .dat appended to it to make its file name. Here is the code to prompt the user:
String name = JOptionPane.showInputDialog(this,"Enter name of event");
Pretty easy stuff! It creates the dialog shown in Figure 12.29.
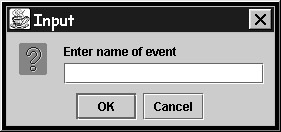
Figure 12.29: The JOptionPane. showInputDialog dialog
If the user cancels the dialog, the showInputDialog call will return null. Otherwise, you need to verify that no file with this name already exists. If it does, you should ask the user if it is okay to continue (meaning the file will be replaced). This is the code to do this:
java.io.File file = new java.io.File(name+".dat");
if (file.exists())
 {
 int ans = JOptionPane.showConfirmDialog(this,
 "File exists, override it?");
 if (ans != JOptionPane.YES_OPTION)
 return;
 }
Again, the File class is used, this time to test the existence of the file. If it does exist, the showConfirmDialog method is used to pop a message to the user, with Yes and No buttons. If the user does not press the Yes button, the code exits the actionPerformed method. The code above results in the dialog in Figure 12.30.

Figure 12.30: The JOptionPane.show ConfirmDialog dialog
Applets Versus Applications
Recall from Chapter 2 the discussion of Java applets versus Java applications:
- Applications can be invoked from a command line, using java MyClass. This first class requires the existence of a public static void main(String args[]) {...} method, which the Java runtime looks for.
- Applets cannot be invoked from the command line. They must be embedded in an HTML Web page, using an APPLET tag. The Web browser, on encountering the APPLET tag, will retrieve the applet from the host server where the Web page came from and run it.
All of the examples to this point have used an application-style main method and have been invoked from the command line. All of the non-main code is still valid for applets because they use the same language and Java-supplied packages as Java applications do. However, there are some restrictions related to security. Java applets are, by default, restricted to a sandbox that prevents them from accessing in any way the workstation or computer the Web browser is running on, or any server other than the one they came from. Applets cannot do the following:
- Access local files in any way, including running local programs
- Access or change local properties, like the current working directory
- Access any server except the one they came from, via any form of communications, including JDBC or the AS/400 Toolbox for Java classes
These restrictions are enforced by the Web browsers, although most allow these to be configured. Java includes the capability of digitally signing your applets using the JDK-supplied javakey tool. Briefly, this tool allows for mutually consented use of a Java applet that has full access rights. It ensures the following:
- The user knows that the applet came from you and has not been tampered with.
- The programmer knows that only those people identified are allowed to run the applet.
Applets and Swing
Applets are classes that extend the javax.swing.JApplet class. This class is a container, much like a JPanel, and you write applets exactly as you would write a panel. The only difference is that you must use getContentPane() to set the layout and add the components, just as with JFrame and JDialog. Applets have no frames because they run in the rectangular space of the Web browser frame. Listing 12.22 shows the first example applet.
Listing 12.22: A Simple Applet for Calculating Tips
 import java.awt.*;
 import java.awt.event.*;
 import javax.swing.*;
import javax.swing.event.*;
import java.math.*;

public class TipApplet extends JApplet implements ActionListener
{
 private JTextField input = new JTextField("100.00",9);
 private JTextField rate = new JTextField(".15",2);
 private JRadioButton badRB = new JRadioButton("Bad");
 private JRadioButton fairRB = new JRadioButton("Fair",true);
 private JRadioButton goodRB = new JRadioButton("Good");
 private ButtonGroup rbGroup = new ButtonGroup();
 private JTextField output = new JTextField(9);
 private JButton calcButton = new JButton("Calculate tip");
 private BigDecimal badRate = new BigDecimal("0.10");
 private BigDecimal fairRate = new BigDecimal("0.15");
 private BigDecimal goodRate = new BigDecimal("0.20");

 public TipApplet()
 {
 output.setEditable(false);
 setOutputFieldColors(false);
 calcButton.addActionListener(this);
 JPanel rbPanel = new JPanel(new GridLayout(1,3));
 rbGroup.add(badRB); rbGroup.add(fairRB);
 rbGroup.add(goodRB); rbPanel.add(badRB);
 rbPanel.add(fairRB); rbPanel.add(goodRB);
 JPanel clientPanel = new JPanel(new GridLayout(4,2,0,5));
 clientPanel.add(new JLabel("Enter dollar amount:"));
 clientPanel.add(input);
 clientPanel.add(new JLabel("Select service level:"));
 clientPanel.add(rbPanel);
 clientPanel.add(new JLabel("Press button:"));
 clientPanel.add(calcButton);
 clientPanel.add(new JLabel("You should tip:"));
 clientPanel.add(output);
 getContentPane().setLayout(new BorderLayout(5,5));
 getContentPane().add(clientPanel,BorderLayout.CENTER);
 }

 private void setOutputFieldColors(boolean error)
 {
 output.setBackground(error?Color.red : Color.green);
 output.setForeground(error?Color.white : Color.black);
 }

 public void actionPerformed(ActionEvent evt)
 {
 boolean error = true;
 try
 {
 BigDecimal base =
 new BigDecimal(input.getText().trim())
 .setScale(2,BigDecimal.ROUND_HALF_UP);
 input.setText(base.toString());
 BigDecimal tipRate = fairRate;
 if (badRB.isSelected())
 tipRate = badRate;
 else if (goodRB.isSelected())
 tipRate = goodRate;
 BigDecimal result = base.multiply(tipRate);
 result = result.setScale(2,BigDecimal.ROUND_HALF_UP);
 output.setText(result.toString());
 error = false;
 }
 catch (Exception exc)
 {
 output.setText("** INPUT ERROR **");
 input.requestFocus();
 input.selectAll();
 }
 setOutputFieldColors(error);
 }
}
You can see that the applet is a simple tip-calculating tool. You can also see that coding an applet is identical to coding a JPanel, except for the need to use getContentPane(). To run the applet, you use a little HTML, as shown in Listing 12.23.
Listing 12.23: The HTML that Embeds the Sample Applet
Tom's Tip Tool
Need help calculating your tip?
Try this:
At least, this is all you should need to do. However, as of this writing, it will not work as-is because Web browsers still do not support JDK 1.2 or Swing. To overcome this, you have to use the Java plug-in for the browsers. This comes from Sun for Windows and Solaris, and is shipped as part of the JDK and Java Runtime Environment, so you've already got it. However, to use it, you have to change your HTML APPLET tag to tell it to use the plug-in's JVM instead of the browser's. To do this, you need to download the HTML conversion tool from Sun (http://java.sun.com/products/plugin/), which comes as a zip file. Unzip it, and place the zip file and the unzipped directory on your CLASSPATH, then type java HTMLConverter. This will convert your HTML files in place and back them up. After that, you're ready to roll! Just open your HTML file by double-clicking it, and you'll get Figure 12.31.
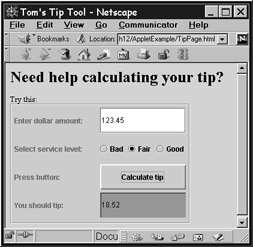
Figure 12.31: Running an applet in a browser
If you can't decide whether to write applets or applications, write everything as applets because you can embed any applet inside a JFrame just as though it really were a JPanel. This gives you the best of both worlds. You'll see how we did that in TestTipApplet.java on the CD-ROM.
For information on the APPLET tag, consult the documentation for the Sun JDK, in the file docs/guide/misc/applet.html in your JDK subdirectory. For information on some of the unique methods available to applets, see the JavaDoc documentation for JApplet and its parent, java.awt.Applet.
Translation Ready Using Resource Bundles
Do you support the translation of your products into different languages, such as German, French, or Japanese? If you do not, yet, you probably will someday, so you should plan your code to allow for this. Preparing for international support usually involves keeping string constants outside of your program so the translators can access them. That way, you can ship only one program object that can display different languages dynamically.
On the AS/400, this is done using display-file objects and message files. You usually let the translators directly edit the text constants in them. You can then simply change your library list to have your programs pick up the different versions of these translated objects. In Java, there are no message files and, as you have learned, no external user interface objects. Up to this point, all of the user-interfaces strings (such as text constants, titles, and button labels) and error-message strings have been hard-coded. The downside of this, of course, is that you'll need to produce redundant copies of your Java programs for each language you want to support. That will create a maintenance nightmare.
Java 1.1 tackled the whole area of internationalization support, including not only translated strings but also the wider topics of currency, collating sequences, and the formatting of numbers, dates, and times. This "internationalization framework" was actually based on code supplied by IBM's Taligent subsidiary. There is a good tutorial on the whole subject in Sun's tutorial on Java. See http://java.sun.com/docs/books/tutorial/intl/index.html.
Locales
The main idea behind international support is to allow your program to work in different languages automatically. The trick is to define all your language-sensitive and country-sensitive information (for example, currency is different per country, while language might not be) in a class that is somehow tagged as being for a particular language and/or country. Then, for each language and/or country in which you wish your program to operate, you simply supply a unique version of this class. For Internet applets this is especially important, given the international access they have.
At runtime, then, you need some way to identify the language and/or country in which your user wishes to work. This can be done by asking directly via the user interface (for example, through language and country JComboBox drop-downs), or by simply using the Java system default, which is set up to be the same as the computer, Web browser, or other host in which the Java application or applet is running. Having determined the language and country pair (or optionally, either a language or country, using defaults for the other), your program will choose the appropriate class described earlier, containing language/country-specific information such as translatable strings. How does it do this? Let's look a little deeper….
In Java, the current operating language/country "mode" is captured by a class named Locale in the java.util package. You create a new Locale object by specifying in the constructor the language and the country, as strings. One of these strings can be null, if you are not interested in country-specific languages or language-specific countries. The string values are two-character codes that are predefined by an ISO (International Standards Organization) standard. However, you need not worry about them; rather than instantiating locales, you will probably just use the predefined "constant" locales supplied as helpers in the Locale class, such as Locale.US, Locale.GERMANY, and Local.GERMAN.
What are these mysterious locales, and why do you need them? A number of classes in the java.text package for such things as message/date/number formatting allow you to pass in one of these locale objects so the formatting is done correctly for that place. For example, the appropriate date format and decimal point symbol are used. If no locale is specified, the system-default locale is used, which you can always query by calling Locale.getDefault(). These methods are called locale sensitive. They are intended to work correctly for any given locale, or at least the locales they claim to officially support.
To warm up your fingers for more coding to come, here is a simple locale program:
import java.util.*;
public class TestLocale
{
 public static void main(String args[])
 {
 Locale defloc = Locale.getDefault();
 System.out.println("name is : " + defloc.getDisplayName());
 System.out.println("language is: " + defloc.getLanguage());
 System.out.println("country is: " + defloc.getCountry());
 }
}
On our system, this gives the following result:
name is : English (United States)
language is: en
country is: US
Translated strings Resource bundles
Suppose you want to design your own locale-sensitive classes. The tricky thing is that Locale objects are quite useless on their own-they hold no real information. They are simply objects that your code (and the Java-supplied code in java.text) can use to determine which language to display, or which language/country to support.
Let's write a locale-sensitive version of the little tip-calculator applet. (Note that the following technique is used for Swing or even non-graphical coding, whenever you need to translate strings.)
The class constructor is changed to take an optional Locale object, displaying the window in the language for that locale. If it is a locale into which our strings have not translated, they're simply shown in English. Because this example will only translate into one other language (German), this will often be the case.
The first thing to do is extract all the strings from the program and put them in their own class. You need to put them in a two-dimensional array, where the first string is merely a key for finding the second, translated string. This way, the program will extract the strings by reading them from the array using that key. Java has built-in support for this, in the form of a ListResourceBundle class that is extended in Listing 12.24 to create a new class.
Listing 12.24: A ListResourseBundle Class
import java.util.*;
public class TipStrings extends ListResourceBundle
{
 protected static final Object[][] contents =
 {
 {"LABEL_BAD", "Bad"},
 {"LABEL_FAIR", "Fair"},
 {"LABEL_GOOD", "Good"},
 {"LABEL_CALC", "Calculate tip"},
 {"PROMPT_AMOUNT", "Enter dollar amount:"},
 {"PROMPT_SERVICE", "Select service level:"},
 {"PROMPT_PRESS", "Press button:"},
 {"PROMPT_TIP", "You should tip"},
 };

 public Object[][] getContents()
 {
 return contents;
 }
}
The getContents method is required to be overridden from the base ListResourceBundle class, since it is defined as abstract. It returns the array of translatable strings, an array called contents in this example.
Now, let's create a German version of this class. Listing 12.25 shows the strings translated into German. The name of the class is also changed slightly to indicate that it is for German locales (with the _de suffix for Deutsche, the German word for German). We don't actually know German well enough to translate these strings, so we cheated and simply prefixed each one with De_ to test for the right output. This is a good way for you to test you caught every string, prior to the actual translation phase, Ja?
Listing 12.25: The Translated ListResourceBundle Class
import java.util.*;
public class TipStrings_de extends ListResourceBundle
{
 public Object[][] getContents()
 {
 {"LABEL_BAD", "De_Bad"},
 {"LABEL_FAIR", "De_Fair"},
 {"LABEL_GOOD", "De_Good"},
 {"LABEL_CALC", "De_Calculate tip"},
 {"PROMPT_AMOUNT", "De_Enter dollar amount:"},
 {"PROMPT_SERVICE", "De_Select service level:"},
 {"PROMPT_PRESS", "De_Press button:"},
 {"PROMPT_TIP", "De_You should tip"},
 };

 protected static final Object[][] contents =
 {
 return contents;
 }
}
The code needs to be changed to use these strings and the appropriate version of the class, as opposed to hard-coding the strings:
ResourceBundle strings =
 ResourceBundle.getBundle("TipStrings",locale);
This returns an instance of TipStrings_de if the locale is Locale.GERMAN, or TipStrings otherwise. You typically get the Locale object locale by some user prompt, or by calling Locale.getDefault().
Now, all the hard-coded strings are changed to use the getString method from the ResourceBundle object reference variable, as follows:
badRB = new JRadioButton(strings.getString("LABEL_BAD"));
This takes the key as input and returns the translated value. Simple enough. You can see the complete converted class on the CD-ROM, if you want.
There is more to supporting internationalization than simply factoring out your translatable strings, as you probably know-there are other details like date formats and currency. You can learn about all of this in your JDK documentation, especially in the file D:jdk1.2.2docsguideinternatindex.html.
Summary
In this chapter, you learned the following:
- The basics of Java Swing, and what its advanced capabilities are.
- How to write a Java applet and deploy it in an HTML page.
- How to translate your strings.
- How much you need a break from reading!
Chapter 13 Database Access
Foreword
- The World Of Java
- The Java Onion
- Javas Language And Syntax
- Structured Operations And Statements
- Data Types And Variables
- Arrays And Vectors
- String Manipulation
- Date And Time Manipulation
- An Object Orientation
- Exceptions
- Threads
- User Interface
- Database Access
- More Java
- Appendix A Using Java on the AS/400
- Appendix B Mixing RPG And Java
- Appendix C Obtaining The Code Samples
EAN: 2147483647
Pages: 191
