Using Graphic Objects on Forms
In addition to adding graphics to tables on a form or to creating a graphic background for the form, graphic objects can be added to forms in three ways. You can copy the object to the Clipboard and paste it into a form, you can import the image file, or you can create and use a shared image resource. In general, it is best to import the file or use a shared image resource. When the graphic object is stored on the form, you can manipulate it using the Picture menu. You can also resize these embedded graphic objects.
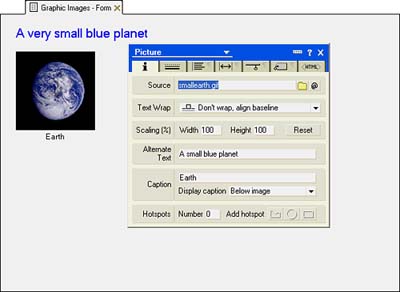
To import an image, position the cursor at the desired location and choose File, Import from the menu. Select the image type and the image, and click Import. To use a shared image, choose Create, Image Resource from the menu. When you have added the image to a form, you can work with it in either the Picture menu or the Picture properties box (see Figure 5.18).
Figure 5.18. You can enter alternative text for deferred and Web loading in the Picture properties box. Note the caption Earth.
When you add an image to your form and subsequently select the image, a menu called Picture is added. This menu has several prompts, as shown in Table 5.4.
Table 5.4. Picture Menu Prompts
| Prompt | Effect |
|---|---|
| Picture Properties | Displays the Picture properties box |
| Replace Picture | Displays the Import Picture dialog box, allowing you to replace the image |
| Add Hotspot Rectangle | Adds a rectangular hotspot area |
| Add Hotspot Circle | Adds a circular hotspot area |
| Add Hotspot Polygon | Adds an irregularly shaped hotspot area |
| Add Default Hotspot | Adds a default hotspot that contains the entire image area |
| Hotspot Properties | Presents the Hotspot properties box |
| Delete Selected Hotspot | Removes the selected hotspot |
The extensive support for hotspots enables you to build forms and pages that can be used as image maps in Web applications. (For more information on creating hotspots and image maps, see Chapter 8, "Using the Page Designer.")
The Picture properties box has tabs for Picture Info and Picture Border in addition to the standard Paragraph Alignment, Paragraph Margins, Paragraph Hide-When, and Paragraph Styles tabs. The last tab is labeled Picture Extra HTML, but it is the standard HTML tab dialog box.
The Picture Info tab has settings for Source (click the Browse or Formula buttons to use shared resources), Text Wrap, Alternate Text, Caption, and Hotspots. For Text Wrap, you can choose from the following settings:
- Wrap, Float Image Left
- Wrap, Float Image Right
- Wrap Around Image
- Don't Wrap, Align Top
- Don't Wrap, Align Middle
- Don't Wrap, Align Bottom
- Don't Wrap, Align Baseline (the default)
To resize the picture, you can click the image and use the drag handle in the lower-right corner of the image, or you can type values directly into the Width and Height fields in the Scaling (%) section. (Note that these values are in percentages, not in pixels.) The percentage is in relationship to the original image size as stored in either a shared image resource or the file system. If you decide that you don't like the new size, you can revert to the original size by clicking the Reset button.
You can add alternative text and captions to images. Any text entered in the Alternate Text field is shown when the browser can't load the image. When text is entered in the Caption field, an additional field appears specifying where the caption is to appear. Captions can be placed below an image or centered on an image.
Hotspots can be added to the image and programmed. A hotspot can be a part of the image or the entire image. (You can read more about adding hotspots in Chapter 8.)
The Picture Border tab lets you choose a border style, add a drop shadow, and change the inside, thickness , and outside border widths. The Picture Border tab operates just like the Table Border tab described earlier in the section "Working with Table Borders."
Part I. Introduction to Release 6
Whats New in Release 6?
- Whats New in Release 6?
- A Brief History of Lotus Notes
- Major Features of Lotus Notes
- Types of Applications
- Whats New in Domino Designer?
- New Design Element Features
- New Language Features
The Release 6 Object Store
- The Release 6 Object Store
- Defining a Domino Database
- Understanding the Database Structure
- Creating a Database
- Working with Database Properties
- Understanding Design Templates
- Creating Your Own Templates
- Inheriting Designs from Templates
- Using Templates to Replicate Design Changes
- Using Templates as Design Libraries
- Archiving Versions with Templates
The Integrated Development Environment
- The Integrated Development Environment
- Working in the Application Design Environment
- Working with the Properties Box
- Understanding the Work Pane
- Using the Programmers Pane
- Understanding the Info List
- Understanding the Action Pane
- Customizing the Tools Menu
- Printing Source Code
- Using the HTML Editor
- Locking Design Elements
Part II. Foundations of Application Design
Forms Design
- Forms Design
- Designing Forms
- Setting Form Properties
- Working with Text Properties
- Working with Fields
- Writing Formulas in Fields
Advanced Form Design
- Advanced Form Design
- Working with Tables
- Using Graphic Objects on Forms
- Working with Form-Level Events
- Using Form Actions
- Working with Hotspots
- Understanding Sections and Section Properties
- Using Layout Regions
- Working with Special Forms
- Creating Reusable Design Objects
- Using Embedded Elements
- Using the Form Design Document
Designing Views
- Designing Views
- Defining the Elements of a View
- Creating a View
- Setting View Properties
- Creating Advanced View Selections
- Adding and Editing View Columns
- Using View Column Properties
- Adding Actions to a View
- Creating Calendar Views
- Understanding Folders
Using Shared Resources in Domino Applications
- Shared Resources
- Sharing Images Within a Database
- Creating Shared Files
- Creating Shared Applets
- Shared Code
- Creating Subforms
- Creating Shared Fields
- Creating Shared Actions
- Script Libraries
- Database Resources
Using the Page Designer
- Using the Page Designer
- Understanding Pages
- Working with the Page Properties Box
- Using the Page Designer
- Adding Layers to Your Pages
Creating Outlines
- Creating Outlines
- Creating an Outline
- Working with Outline Entries
- Embedding Outlines
- Adding an Outline to a Frameset
Adding Framesets to Domino Applications
- Adding Framesets to Domino Applications
- Creating a Frameset
- Using the Frameset Designer
- Working with Frames
- Viewing the HTML Source of Your Frameset
- Launching the Frameset
Automating Your Application with Agents
- Automating Your Application with Agents
- Working with Agents
- Creating an Agent
- Working in the Agent Builder Design Window
- Using @Commands in Agents
- Putting Your Agent to Work
- Creating a Complex Agent
- Using LotusScript in Agents
- Creating Web Agents Using Formulas and LotusScript
- Using Java in Agents
- Testing and Debugging Agents, the Agent Log, and Agent Properties
- Agent Properties via the Agent InfoBox
Part III. Programming Domino Applications
Using the Formula Language
- Using the Formula Language
- Overview of the Formula Language
- Knowing Where to Use @Functions and @Commands
- Formula Syntax
- Limitations of the Formula Language
- Working with Statements
- Using Logical @Functions
- Working with Date and Time @Functions
- Working with Strings
- Getting Session and User Information
- Working with Documents
- Retrieving Data with @DbColumn and @DbLookup
- Working with Lists
- Getting User Input
- Controlling the Flow of a Formula
- Error Handling
Real-World Examples Using the Formula Language
- Real-World Examples Using the Formula Language
- Programming Practices
- Using Formulas in Forms and Subforms
- Writing Field Formulas
- Writing View Formulas
- Using Hide When Formulas
- Working with Forms, Views, and Shared Actions
Writing LotusScript for Domino Applications
- Writing LotusScript for Domino Applications
- Software Construction
- Fundamental Elements of LotusScript
- New Technologies and LotusScript
Real-World LotusScript Examples
- Real-World LotusScript Examples
- Real-World Example 1: Importing a Delimited Text File
- Real-World Example 2: Delete a Parent Document and All Its Children: DeleteParentAndChildren
- Real-World Example 3: Schedule an Agent Robot to Refresh All the Documents in a View: Robot-DailyRefreshAllDocs
- Real-World Example 4: Return a Web User to the Place Where He Started After a Document Is Submitted: WebQuerySave-DocSubmit
Writing JavaScript for Domino Applications
- Writing JavaScript for Domino Applications
- What Is JavaScript?
- JavaScript Is Not Java
- JavaScript and the Domino IDE
- The Document Object Model
- JavaScript Support in Domino 6
- When to Use JavaScript
- A Look at JavaScript in Domino
- JavaScript Libraries in Domino
- JavaScript Principles 101
- Syntax and Command Blocks
- Statements
- Output
- Functions
- Objects
- Input Validation
- Validating Check Boxes
- Validating Radio Buttons
- Validating Selection Lists
- Calculations
- JavaScript Application
Real-World JavaScript Examples
- Real-World JavaScript Examples
- Real-World Example 1: Dynamic Drop-Down Lists on the Web
- Real-World Example 2: Dialog Boxes and window. opener on the Web
- Real-World Example 3: Dynamic Tables
- Real-World Example 4: Useful JavaScript Utilities
Writing Java for Domino Applications
- Writing Java for Domino Applications
- Introduction to Java
- Choosing a Java Solution in Domino
- Understanding the Notes Object Interface
- Writing Java Agents
- Using Other Java IDEs
- Other Uses for Java
Real-World Java Examples
Enhancing Domino Applications for the Web
- Enhancing Domino Applications for the Web
- Whats New in Designer 6
- Understanding the Domino Web Application Server
- Understanding the Basics of HTML
- Using HTML in Domino Designer
- Adding Power with Domino URLs
- Views and Forms Working Together on the Web
- Incorporating Flash into Your Web Pages
- What Its All About: XML Exposed
- How Does Domino Use XML?
Part IV. Advanced Design Topics
Accessing Data with XML
Accessing Data with DECS and DCRs
- Accessing Data with DECS and DCRs
- What Is DECS?
- The External Data Source
- DECS Administrator
- Creating the Activity
- Accessing the Application
- DECS Summary
- Data Connection Resources
- DCR Example
- Tips on External Data Access
Security and Domino Applications
- Security and Domino Applications
- How Does Domino Security Work?
- Enabling Physical Security
- Setting Server Access
- Database Access Control Lists
- The Role of the Domino Directory in Application Security
- ACL Privileges
- Enabling Database Encryption
- Using Roles
- Implementing View-Level Security
- Implementing Form-Level Security
- Implementing Document-Level Security
- Applying Field-Level Security
- Hiding the Design of Your Application
Creating Workflow Applications
- Creating Workflow Applications
- The Evolution of Groupware
- Introducing Workflow
- Creating Mail-Enabled Applications
- Using Triggers to Send Email
- Sending Mail with LotusScript
Analyzing Domino Applications
Part V. Appendices
Appendix A. HTML Reference
Appendix B. Domino URL Reference
EAN: 2147483647
Pages: 288
- Chapter III Two Models of Online Patronage: Why Do Consumers Shop on the Internet?
- Chapter IV How Consumers Think About Interactive Aspects of Web Advertising
- Chapter VI Web Site Quality and Usability in E-Commerce
- Chapter XVI Turning Web Surfers into Loyal Customers: Cognitive Lock-In Through Interface Design and Web Site Usability
- Chapter XVIII Web Systems Design, Litigation, and Online Consumer Behavior
