Easy VPN Remote
Besides supporting the Easy VPN Server function, certain routers also can be Easy VPN Remotes. These routers include the 800, ubr900, and 1700 series routers. This was introduced in IOS 12.2(4)YA and 12.2(13)T. As you saw in the last section, setting up an Easy VPN Server on a router from the CLI is not the simplest process in the world. Because of this complication and because administrators at remote offices might not be very Cisco-savvy at configuring IPsec sessions, Cisco has simplified the configuration for Easy VPN Remote devices. In other words, there are very few commands you need to configure to set up a router as an Easy VPN Remote.
Cisco accomplishes this by using the same process used with the Cisco VPN Client software: hiding all of the IPsec details from the user. Policies are defined on an Easy VPN Server and pushed down to the Remote during IKE Mode Config. These advantages allow you to deploy a large number of Remotes quickly and easily.
Note
Even though Cisco officially supports Remote functionality on the 800, ubr900, and 1700 series routers, the Remote commands work on other routers. I've successfully set up 3620 and 3640 routers as Remotes. However, don't expect any help from the Cisco TAC if you have a problem with an unsupported Remote router client.
Easy VPN Remote Connection Modes
Cisco Easy VPN Remote routers are more similar to Cisco 3002 hardware clients. Both support client and network extension modes, as shown in Figure 18-2. If you recall from Chapter 3, in client mode, the Easy VPN Remote is assigned a single internal IP address; all devices behind the Remote have PAT performed on them by the Remote to send their traffic across the IPsec tunnel.
Figure 18-2. Easy VPN Remote with Client and Network Extension Modes
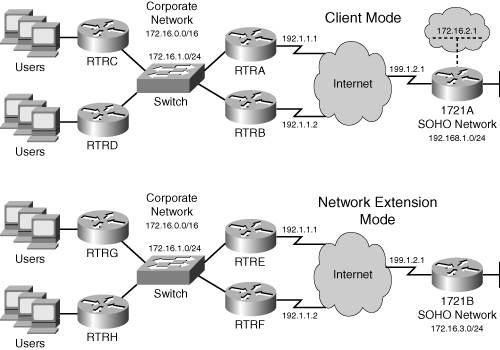
The main limitation of client mode is that devices behind the Easy VPN Server can't initiate connections to devices behind the client-mode Remote; in this case, you would use network extension mode. Because of the word "easy" in Easy VPN, you don't have to set up NAT or PAT on the Remote device. Cisco Easy VPN software will do this automatically. The only requirement is that the Remote act as a DHCP server for its internal devices. Cisco does make some assumptions about the NAT/PAT configuration, though, as follows:
- The NAT inside interface is Ethernet0 on the 800 and UBR900 and FastEthernet0 on the 1700 series routers.
- The NAT outside interface is the interface where the Easy VPN Remote configuration is applied.
- You must let the router create the NAT/PAT commands: if you already have NAT/PAT commands on the router, you'll need to remove them before beginning your Easy VPN Remote configuration.
TIP
Because the Remote, in client mode, is using PAT, all remotes theoretically could use the same IP network number for their inside interfaces, thereby conserving IP addressing space.
Network extension simulates an L2L session, allowing devices behind the Server to establish connections to devices behind the Remote; no internal IP address is assigned to the Remote device. Each Remote device's inside interface will need a unique network number (different from other Remotes' networks in network extension mode).
Note
As mentioned in the last chapter, NAT-T is enabled automatically on all Cisco IPsec-capable routers running IOS 12.2(13)T or later. This shouldn't be an issue for Easy VPN Remote routers with an earlier version of software, because Remote routers typically are connected to the Internet directly, and have either a statically or dynamically acquired public IP Address.
Given the advantages I've discussed so far with Easy VPN Remotes, it's important that I also mention their disadvantages:
- You cannot create an NAT/PAT configuration manually on the Remote.
- If you change the IP address of the inside interface of the Remote, any existing tunnel is terminated and rebuilt automatically.
- The Remote is a client and therefore cannot have more than one IPsec tunnel up at a time; if you need more than one tunnel up, you'll have to configure the router using L2L IPsec sessions.
- The initial release of Easy VPN Remote on Cisco routers doesn't support digital certificates (even through Servers do), DH group 5 keys, PFS, and AES; with the exception of certificates, the current IOS versions support the rest.
Easy VPN Remote Configuration
Configuring an Easy VPN Remote involves these steps:
|
Step 1. |
Configure a DHCP server pool (this is required if the Remote is operating in client mode, where the Remote will assign addressing information to inside users). |
|
Step 2. |
Set up the Easy VPN Remote configuration. |
|
Step 3. |
Connect to the Easy VPN Server. |
|
Step 4. |
Configure User Authentication. |
|
Step 5. |
Verify the Easy VPN Remote configuration. |
The following sections will discuss each of these steps.
Step 1: Configure a DHCP Server Pool
If you'll be using client mode on your Easy VPN Remote router, you must set it up as a DHCP server and assign IP addressing information to internal devices. I won't discuss all the DHCP commands you can set up on your Remote, but just the main ones:
Router(config)# ip dhcp pool pool_name
Router(dhcp-config)# network IP_network [subnet_mask | /prefix_length ]
Router(dhcp-config)# default-router this_router's_address
Router(dhcp-config)# domain-name domain_name
Router(dhcp-config)# dns-server 1st_DNS_server 2nd_DNS_server
Router(dhcp-config)# netbios-name-server 1st_WINS_server
 2nd_WINS_server
Router(dhcp-config)# lease {days [hours [minutes]] | infinite}
Router(dhcp-config)# exit
Router(config)# ip dhcp excluded-address IP_address
On the client mode Remote, use the ip dhcp pool command to create your DHCP server configuration; this takes you into a subcommand mode. The network command specifies the IP network number (with the exception of the network number and directed broadcast address) to use for assigning addresses to requesting clients. If you omit the subnet mask or prefix, it defaults to the class mask of the network number. The default-router command defines the default gateway address and should specify the IP address of the router's private/ internal interface. The domain-name command defines the domain name, the dns-server command can specify up to two DNS servers, the netbios-name-server command can specify up to two WINS servers, and the lease command specifies the length of the lease of any assigned addressing information to internal devices.
The ip dhcp excluded-address command specifies an address that should not be included in the address pool. At a minimum, this should include the IP address of the router's internal interface. Enter this command separately for each address you want to exclude.
You can use the following commands to verify your Remote's configuration:
- show ip dhcp pool Displays the addresses in the address pool.
- show ip dhcp binding Displays the addresses assigned to requesting clients.
For Windows-based PCs connected to the internal interface of the router, set them up for DHCP and then use the ipconfig /all command to verify that they are obtaining IP addressing information from the Remote.
Step 2: Set up the Easy VPN Remote Configuration
Setting up the Easy VPN Remote configuration on the Remote is an easy process and can involve the following commands:
Router(config)# crypto ipsec client ezvpn profile_name
Router(config-crypto-ezvpn)# group group_name key group_password_key
Router(config-crypto-ezvpn)# peer IP_address_of_the_Server
Router(config-crypto-ezvpn)# mode {client | network-extension}
Router(config-crypto-ezvpn)# exit
Router(config)# interface type port_#
Router(config-if)# crypto ipsec client ezvpn profile_name
 [outside | inside]
The crypto ipsec client ezvpn global command creates a connection profile that is used to connect to an Easy VPN Server; the profile name is locally significant. This command takes you into a subcommand mode. The group command specifies the group the Remote belongs to on the Server, and the pre-shared key for the group. The peer command specifies the Easy VPN Server to which the remote will be connecting. Until IOS 12.3(4)T, you could configure only one Server; from this release onward, you can enter this command multiple times for multiple Servers. The mode command specifies the connection mode the Remote will use: client or network extension mode.
Note
If the Remote will be connecting to a VPN 3000 concentrator in network extension mode, you need to enable this in the group under the HW Client tab.
Once you have configured the connection profile for the Remote, you need to activate it on the router's interface facing the Server (the interface connected to the public network). This is done with the crypto ipsec client ezvpn interface command. For client mode connections, this interface becomes the "outside," and will be the default, when the Remote automatically sets up its NAT/PAT configuration. You can override the location of the interface with the outside and inside parameters. You can have up to four outside interfaces (one tunnel per interface). These parameters are necessary only when you have more than two interfaces on your router, as might be the case with a 1700 series router.
Step 3: Connect to the Easy VPN Server
On the Easy VPN Remote routers, there are two methods of bringing up a connection: manually or automatically. The default connection mode is automatic, where any outbound traffic will trigger the router to bring up the IPsec tunnel to the configured Easy VPN Server. To change it to manual, enter your connection profile and configure the connect manual command:
Router(config)# crypto ipsec client ezvpn profile_name
Router(config-crypto-ezvpn)# connect [auto | manual]
Then from either User or Privilege EXEC mode, use the following command to bring up the IPsec tunnel to the Easy VPN Server:
Router> crypto ipsec client ezvpn profile_name
On the ubr900 cable access routers, instead of using the CLI to bring up the connection, users behind the ubr900 can use a web browser. However, this process is not enabled by default. To allow users connected to a ubr900 router to use a web browser to bring up a connection, configure the following:
Router(config)# ip http server
Router(config)# ip http ezvpn
The first command enables the HTTP web server on the router and the second allows a user to access the ubr900 using a web browser to bring up the IPsec session.
Note
The web browser method of bringing up IPsec sessions is currently available only on the ubr900 cable modems.
Step 4: Configure User Authentication
If the Easy VPN Server has not been configured with the "save the password" function for the group that the Remote router belongs to, you must supply this to the router before the IPsec session can be established. To do this, use the following command at User or Privilege EXEC mode:
Router> crypto ipsec client ezvpn xauth [profile_name]
You'll be prompted to enter the XAUTH username and password for the router's authentication credentials. If you don't specify the profile name, the router assumes that the username and password will be used with the tunnel you're bringing up. Example 18-7 illustrates this process. In this example the router attempted to bring up a connection, but the Server is asking the Remote for XAUTH credentials. The XAUTH credentials for this router are a username of "1751A" and a password of "cisco123." If someone doesn't supply the username and password through the use of the crypto ipsec client ezvpn xauth command, the Remote will repeat the request (the first two messages in Example 18-7) every 10 seconds.
Example 18-7. Manually Supplying the XAUTH Credentials
1751A>
20:27:39: EZVPN: Pending XAuth Request, Please enter the following command:
20:27:39: EZVPN: crypto ipsec client ezvpn xauth
1751A> crypto ipsec client ezvpn xauth
Enter Username and Password: 1751A
Password: cisco123
The problem with the above approach is that every time the Remote needs to bring up an IPsec tunnel to the Server, someone has to log in to the router and provide the user credentials. This would be true if you hadn't enabled the save-password command for the Remote's group on the Server, assuming that a router is a Server. Instead of having to supply the XAUTH credentials manually every time the Remote needs to bring up an IPsec tunnel to the Server, you can configure and store this on the Remote. This feature is new in IOS 12.3(4)T.
First, you must configure this option for the group that the Remote belongs to. Because of security concerns, I recommend that you place hardware clients such as the 3002, PIXs, and routers in their own group that is separate from software clients. Then for the hardware client group(s), enable the "save the XAUTH credentials locally" feature on the Easy VPN Server.
Caution
Because both the device and user authentication credentials are stored locally on the Remote, it is imperative that you secure the router locallyif someone steals the router, they can bring up a VPN session to a Server without having to enter any authentication credentials.
Second, on the Easy VPN Remote router, you'll need to configure and save the XAUTH credentials. Use the username command within the Remote's connection profile:
Router(config)# crypto ipsec client ezvpn config_name
Router(config-crypto-ezvpn)# username username password password
Note
If the Easy VPN Server doesn't have the save-the-password parameter enabled, or disables it at a later time, when the Easy VPN Remote router makes a connection, it will learn this new policy and erase the username and password configured for the Easy VPN connection profile.
Tip
Also, I've only been able to use the username in the crypto-ezvpn subcommand mode on an 800 series router: I've not been able to get this to work on 1700 series routers. To get around this problem on a 1700 router, configure the Server to allow the 1700 to save its password locally and then use the crypto ipsec client ezvpn xauth command shown in Example 18-7, where you'll enter the username and password manually. Because the Server allows this to be stored locally, what you enter in the crypto command will be saved on the router automatically; just be sure to save the router's configuration with the copy running-config startup-config command.
Step 5: Verify the Easy VPN Remote Configuration
The following commands will help you manage and troubleshoot IPsec tunnels on your Easy VPN Remote router:
- show crypto ipsec client ezvpn Displays the current state of the Remote's tunnel, if any, including policy information pushed down from the Server during IKE Mode Config.
- show ip nat statistics Displays the address translation configuration and table used by a Remote router running in client mode.
- debug crypto ipsec client ezvpn Helps troubleshoot the setup and operation of Easy VPN Remote connections; Example 18-8 illustrates the use of this command, where a connection is established successfully to a Server.
- clear crypto ipsec client ezvpn Tears down any IPsec tunnel currently established to an Easy VPN Server.
Example 18-8. Debugging an Easy VPN Remote Connection
1751A# debug crypto ipsec client ezvpn
EzVPN debugging is on
1751A#
1d17h: EZVPN: New State: READY
1d17h: EZVPN: Current State: READY
1d17h: EZVPN: Event: MODE_CONFIG_REPLY
1d17h: ezvpn_mode_config
1d17h: ezvpn_parse_mode_config_msg
1d17h: EZVPN: Attributes sent in message:
1d17h: DNS Primary: 172.16.1.25
1d17h: DNS Secondary: 172.16.1.26
1d17h: NBMS/WINS Primary: 172.16.1.27
1d17h: NBMS/WINS Secondary: 172.16.1.28
1d17h: Default Domain: cisco.com
1d17h: EZVPN: New State: SS_OPEN
1d17h: EZVPN: Current State: SS_OPEN
3d17h: EZVPN: Event: SOCKET_READY
Easy VPN Remote Configuration Example
I'll now show you how to set up an Easy VPN Remote by illustrating its configuration in an example. I'll build upon the Server example in Example 18-6. The new updated configuration includes the commands in Example 18-9; I'll show only the new commands added to this configuration. There is a new group called "hwclients" for the Remote hardware clients, including Cisco routers. Assume the Easy VPN Remote router is an 831. A username of "r831" has been added for the Server router for XAUTH. In this instance, client mode will be used, so an address pool has been created and referenced in the new group. Notice that split DNS has been set up, and split tunneling. Below this, I'm allowing the hardware clients to store the XAUTH username and password locally.
Example 18-9. Easy VPN Server Example Configuration for an Easy VPN Remote Router
RTRA(config)# aaa authorization network localgroups local
RTRA(config)# username r831 secret cisco123
RTRA(config)# ip local pool hwclientspool 192.168.0.240 192.1.1.249
RTRA(config)# crypto isakmp client configuration group hwclients
RTRA(config-isakmp-group)# key cisco123
RTRA(config-isakmp-group)# pool hwclientspool
RTRA(config-isakmp-group)# domain cisco.com
RTRA(config-isakmp-group)# dns 192.168.0.10 192.168.0.11
RTRA(config-isakmp-group)# wins 192.168.0.12 192.168.0.13
RTRA(config-isakmp-group)# max-logins 1
RTRA(config-isakmp-group)# split-dns cisco.com
RTRA(config-isakmp-group)# acl splitremote
RTRA(config-isakmp-group)# save-password
RTRA(config-isakmp-group)# exit
RTRA(config)# crypto map mymap isakmp authorization list localgroups
The Easy VPN Remote configuration of the 831 router is shown in Example 18-10. The top part of the configuration has the 831 Remote acting as a DHCP serverthis is necessary because client mode is being used for the remote access session. Notice that the router's local LAN interface is excluded from the DHCP server pool. Below this, an Easy VPN connection profile called "hwclients" is created. The 831 belongs to the group called "hwclients" and connects using client mode. The Server is 192.1.1.1 and an IPsec tunnel will be brought up automatically as needed, where the username and password for 831 is stored locally (the group policy on the Server allows this). Last, the connection profile is activated on the interface connected to the Internet.
Example 18-10. Easy VPN Remote Example Configuration
r831(config)# ip dhcp pool REMOTE
r831(dhcp-config)# network 192.168.1.0 255.255.255.0
r831(dhcp-config)# default-router 192.168.1.1
r831(dhcp-config)# domain-name cisco.com
r831(dhcp-config)# dns-server 199.1.1.1
r831(dhcp-config)# lease 1 0 0
r831(dhcp-config)# exit
r831(config)# ip dhcp excluded-address 192.168.1.1
r831(config)# crypto ipsec client ezvpn hwclients
r831(config-crypto-ezvpn)# group hwclients key cisco123
r831(config-crypto-ezvpn)# mode client
r831(config-crypto-ezvpn)# peer 192.1.1.1
r831(config-crypto-ezvpn)# connect auto
r831(config-crypto-ezvpn)# username r831 password cisco123
r831(config-crypto-ezvpn)# exit
r831(config)# interface Ethernet0
r831(config-if)# description Internet Connection
r831(config-if)# ip address 199.1.2.1 255.255.255.0
r831(config-if)# crypto ipsec client ezvpn hwclients
r831(config-if)# exit
r831(config)# interface FastEthernet0
r831(config-if)# description Local LAN Connection
r831(config-if)# ip address 192.168.1.1 255.255.255.0
Part I: VPNs
Overview of VPNs
- Overview of VPNs
- Traffic Issues
- VPN Definition
- VPN Components
- VPN Designs
- VPN Implementations
- VPNs: Choosing a Solution
- Summary
VPN Technologies
IPsec
PPTP and L2TP
SSL VPNs
Part II: Concentrators
Concentrator Product Information
- Concentrator Product Information
- Concentrator Models
- Concentrator Modules
- Concentrator Features
- Introduction to Accessing a Concentrator
- Summary
Concentrator Remote Access Connections with IPsec
- Concentrator Remote Access Connections with IPsec
- Controlling Remote Access Sessions to the Concentrator
- IPsec Remote Access
- Network Access Control (NAC) for IPsec and L2TP/IPsec Users
- Summary
Concentrator Remote Access Connections with PPTP, L2TP, and WebVPN
- Concentrator Remote Access Connections with PPTP, L2TP, and WebVPN
- PPTP and L2TP Remote Access
- WebVPN Remote Access
- Summary
Concentrator Site-to-Site Connections
- Concentrator Site-to-Site Connections
- L2L Connectivity Example
- ISAKMP/IKE Phase 1 Preparation
- Adding Site-to-Site Connections
- Address Translation and L2L Sessions
- Summary
Concentrator Management
- Concentrator Management
- Bandwidth Management
- Routing on the Concentrator
- Chassis Redundancy
- Administration Screens
- Summary
Verifying and Troubleshooting Concentrator Connections
- Verifying and Troubleshooting Concentrator Connections
- Concentrator Tools
- Troubleshooting Problems
- Summary
Part III: Clients
Cisco VPN Software Client
- Cisco VPN Software Client
- Cisco VPN Client Overview
- Cisco VPN Client Interface
- IPsec Connections
- VPN Client GUI Options
- VPN Client Software Updates
- VPN Client Troubleshooting
- Summary
Windows Software Client
- Windows Software Client
- Windows Client
- Configuring the Windows VPN Client
- Configuring the VPN 3000 Concentrator
- Microsoft Client Connections
- Troubleshooting VPN Connections
- Summary
3002 Hardware Client
- 3002 Hardware Client
- Overview of the 3002 Hardware Client
- Initial Access to the 3002
- Authentication and Connection Options
- Connection Modes
- Administrative Tasks
- Summary
Part IV: IOS Routers
Router Product Information
Router ISAKMP/IKE Phase 1 Connectivity
- Router ISAKMP/IKE Phase 1 Connectivity
- IPsec Preparation
- ISAKMP/IKE Phase 1 Policies
- ISAKMP/IKE Phase 1 Device Authentication
- Monitoring and Managing Management Connections
- Routers as Certificate Authorities
- Summary
Router Site-to-Site Connections
- Router Site-to-Site Connections
- ISAKMP/IKE Phase 2 Configuration
- Viewing and Managing Connections
- Issues with Site-to-Site Connections
- Summary
Router Remote Access Connections
- Router Remote Access Connections
- Easy VPN Server
- Easy VPN Remote
- IPsec Remote Access and L2L Sessions on the Same Router
- WebVPN
- Summary
Troubleshooting Router Connections
- Troubleshooting Router Connections
- ISAKMP/IKE Phase 1 Connections
- ISAKMP/IKE Phase 2 Connections
- New IPsec Troubleshooting Features
- Fragmentation Problems
- Summary
Part V: PIX Firewalls
PIX and ASA Product Information
- PIX and ASA Product Information
- PIX Deployment Scenarios
- PIX and ASA Feature and Product Overview
- Summary
PIX and ASA Site-to-Site Connections
- PIX and ASA Site-to-Site Connections
- ISAKMP/IKE Phase 1 Management Connection
- ISAKMP/IKE Phase 2 Data Connections
- L2L Connection Examples
- Summary
PIX and ASA Remote Access Connections
- PIX and ASA Remote Access Connections
- Easy VPN Server Support for 6.x
- Easy VPN Remote Support for 6.x
- Easy VPN Server Support for 7.0
- Summary
Troubleshooting PIX and ASA Connections
- Troubleshooting PIX and ASA Connections
- ISAKMP/IKE Phase 1 Connections
- ISAKMP/IKE Phase 2 Connections
- Summary
Part VI: Case Study
Case Study
Index
EAN: 2147483647
Pages: 178
