Controlling Remote Access Sessions to the Concentrator
Before I begin discussing how to terminate remote access sessions on a concentrator, I first need to discuss two basic means for controlling remote access to the concentrator:
- Groups
- Users
The following two sections will discuss these two concepts.
Group Configuration
Groups are used to simplify the application of remote access policies to your remote access users. If users have similar policies, you can create a single group with the associated policies and then place the right users into that group. With this process, you only have to create the policies once, but you can apply the policies to many users.
Cisco supports two types of groups:
- Base or Global
- Specific
The following two sections will discuss these two group types.
Base Group
The base group, commonly called the global group, is used for one primary purpose: to define remote access policies that are common to all specific groups and users. In other words, users typically are not associated with the global group. As an example, perhaps you have a policy that says all remote access users can use IPsec only to establish a tunnel to your concentrator. You have 20 specific groups this policy needs to be applied to. This policy is defined at the group level. However, it makes no sense to have to apply this policy to each of the groups individually. This is the main purpose of the base group: to apply a single policy that will affect all groups on the concentrator.
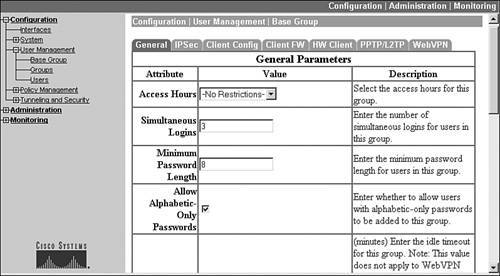
To access the base group's configuration, go to Configuration > User Management > Base Group. From here, you'll see the screen shown in Figure 7-1. At the top of the screen are tabs that take you into different configuration areas for the group policies. In Figure 7-1, the default tab, General, is in the foreground. You can click a tab to take you to different areas. I'll discuss each of these tabs, and their configuration parameters, throughout the rest of this chapter and the next. The one exception to this is the HW Client tab, which I'll discuss in Chapter 14, "3002 Hardware Client."
Figure 7-1. Global Group Screen
Tip
If you have many groups with similar policies, configure the base group with these policies first, and then create your specific groups. Your specific groups will inherit the properties of the base group, and then you can override any necessary policy configurations on a group-by-group basis.
Specific Groups
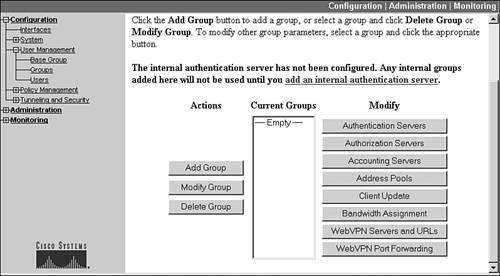
Of course, the base group's policy definitions might not be suited to each user or group of users. Therefore, Cisco concentrators let you create specific groups where you can override the policies defined in the base group on a policy-by-policy basis. To create, delete, or modify a group, go to Configuration > User Management > Groups. The bottom part of this screen is shown in Figure 7-2. In the middle of the screen is the listing of groups (in this example, no groups exist on the concentrator). To the left and right of the list of groups are buttons you can click to affect an action. For example, if you click the Add Group button, you can add a group and configure its remote access policies. For any other button, you first must select a group by clicking its name and then clicking the correct button. Many of these buttons are discussed later in this chapter, and some of the others, such as Client Update and Bandwidth Assignment, are discussed in Chapter 10, "Concentrator Management."
Figure 7-2. Specific Group Screen
Identity Tab
When you either are adding a new group (clicking the Add Group button) or modifying an existing group (clicking the Modify Group button), you are taken to the screen shown in Figure 7-3. In this example, I'm adding a new group. You'll notice that the tab in the foreground is the Identity tab. Here you can define:
- The name of the groupI called this group "MyUsers."
- The password for the group (used for device pre-shared key authentication)The password is hidden with asterisks automatically as you type it in (you must type it in twice for verification purposes).
- How authentication for the group is to be doneThis can be selected using either "Internal," where the users are defined on the concentrator, or "External," where the users are defined on an external server (like a RADIUS or NT Domain server). I'll discuss how to set up external authentication later in the chapter in the "External Authentication" section.
Figure 7-3. Group Configuration: Identity Tab
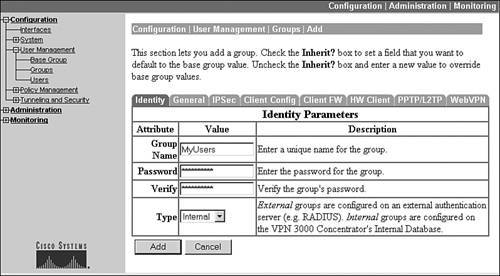
As you can see, there's not much to change under this tab.
Note
At the bottom of the screen, if you click the Apply or Add button, it activates your changes and takes you back to the group listing screen; however, if you need to make changes where the parameters are located under different tabs for the group, clicking a different tab button will preserve your changes on your current screen. Before leaving the group configuration section, though, click the Apply button at the bottom to activate changes made under all of the group tabs. If you don't want to activate any of your changes within the group, click the Cancel tab to abort your changes.
General Tab
If you click the General tab, you are taken to the screen shown in Figure 7-4. Only the top part of the screen is shown here. The screen is divided into four columns:
- Attribute This is the name of the parameter.
- Value This is the value assigned to the parameter.
- Inherit? This defines whether the parameter is inherited from the base group or not.
- Description This gives a brief description as to what the attribute (parameter) is used for.
Figure 7-4. Group Configuration: General Tab
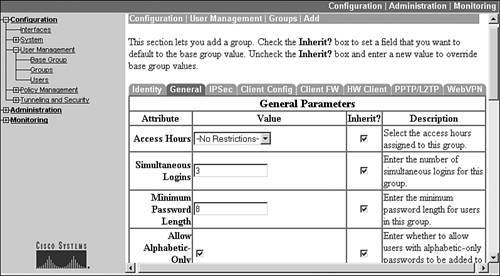
These columns, with the exception of the "Inherit?" column, are self-explanatory; so I'll discuss the "Inherit?" column in more depth. All the parameters that you see on the General tab and the other tabs to the right of this tab, like Client FW and WebVPN, have an "Inherit?" check box to the right of each parameter. When this is selected (checked), the concentrator obtains the setting of the parameter from the base group. Anytime you change a parameter, the check mark is removed from the "Inherit?" check box automatically and the concentrator uses whatever value you specify for the parameter.
Tip
If you've changed a specific parameter for a group and want to change it back to what the base group has defined, click the check box to the right of the parameter labeled "Inherit?" and then click the Apply button at the bottom of the screen. This changes the parameter's value back to the base group's defined value. You can verify this change easily by going back into the group and selecting the proper tab to see the base group value for the parameter.
Also, make sure that the "Inherit?" check box is unchecked anytime you change a parameter from the base group's configurationthis should happen automatically, but I've seen a couple of instances in various software versions where this doesn't occur for certain parameters.
The General tab allows you to define general properties of the group. These properties are defined in Table 7-1. Most of the parameters and their configurations are self-explanatory.
|
Attribute |
Explanation |
|---|---|
|
Access Hours |
You can restrict when a remote access user can connect. Your options include: No-Restrictions, Never (no access is allowed by any member of the group), and Business Hours (9AM5PM, MondayFriday). |
|
Simultaneous Logins |
You can restrict the number of remote access sessions a single internally authenticated user can establish: the default is 3. |
|
Minimum Password Length |
You can set the minimum number of characters that a user's password needs to have. This can range from 1-32, where 8 is the default. This parameter is for internally defined users only. |
|
Allow Alphabetic-Only Passwords |
You can allow users to use alphabetic-only passwords (contain only letters); I highly recommend that you uncheck this option. This parameter is for internally defined users only. |
|
Idle Timeout |
You can define the timeout period for an idle remote access user session; this can range from 0 (no limit) to 10,800 minutes, with 30 minutes being the default. For WebVPN users, if the Idle Timeout is set to 0, the Default Idle Timeout value defined on the Configuration > Tunneling and Security > WebVPN > HTTP/HTTPS Proxy screen is used. For WebVPN users, I highly recommend that you set a short idle timeout because when a user's browser is set to disable or prevent the use of cookies, the users don't actually connect, but they still are listed on the Administration > Administer Sessions or Monitoring > Sessions screens, which can be misleading to an administrator. Also, if you set the Simultaneous Logins parameter to 1, and this condition occurs, the user won't be able to connect again until the ghost session idles out. By setting a low idle timeout value, a WebVPN user's cookies are deleted quickly, allowing that user to reconnect in a shorter period. Also, this parameter does not apply to users behind hardware clients, like the VPN 3002; but it does apply to the hardware clients themselves. |
|
Maximum Connect Time |
You can define the maximum number of minutes the user is allowed for a remote access session. Once this limit is reached, the user's session is dropped by the concentrator. This value can range from 0 (no limit, which is the default) to 2,147,483,647 minutes (which is more than 4,000 years!) |
|
Filter |
You can define a filter that is applied to the user's VPN session. This filter can be used to restrict a user's access to resources. I discuss how to create a filter in the "Client FW Tab" section later in the chapter. |
|
Primary and Secondary DNS |
You can define a primary and secondary DNS server to assign to the client. This overrides the client's assigned DNS server settings unless you have set up split DNS. |
|
Primary and Secondary WINS |
You can define a primary and secondary WINS server to assign to the client. This overrides the client's assigned WINS server settings. |
|
SEP Card Assignment |
You can specify which SEP module, in a dual-SEP module concentrator, a group should be assigned to. Cisco highly recommends that you don't use this process for load balancing, but that you use Virtual Cluster Agent (VCA) instead; VCA is discussed in Chapter 10, "Concentrator Management." If you recall from the last chapter, SEP modules perform encryption processes in hardware. |
|
Tunneling Protocols |
You can specify which remote access VPN implementations members of the group can use. The Quick Configuration properties you defined show here, by default (these are applied to the base group). You can specify none, one, or all of the following: IPsec, PPTP, L2TP, L2TP over IPsec, and WebVPN. Please note that if you don't select one or more protocols, no user is allowed remote access connectivity for the group. For example, if you want users to use only IPsec, make sure the check box to the left of IPsec is checked and the rest are unchecked. Please note that for a specific group, you can only select IPsec or L2TP over IPsecthe same group cannot have both of these activated. |
|
Strip Realm |
You can define whether or not realm information is stripped from the sent username. For example, some users send something like richard@ntdomain as their username when authenticating to a domain controller. Some external authentication servers don't understand the realm part (the "@" sign and the information following it), so the concentrator can strip the realm information off before sending just the user information to the external authentication server. |
|
DHCP Network Scope |
You can define the network scope that the DHCP server should use when assigning an address to the remote access client. Specify a network number here. If you enter 0.0.0.0 as the address, the network number of the concentrator's private interface is used. I discuss the use of DHCP to assign addresses to clients in the "Address Assignment" section later in the chapter. |
The Identity and General tabs apply to any type of remote access VPN implementation that the concentrator supports. The other tabs typically are specific to a particular VPN implementation. I'll discuss the other tabs later in this chapter.
Tip
Remember that the concentrator doesn't save its changes automatically. Click the Save Needed icon at the top right of a Configuration or Administration screen to save your changes.
External Authentication
One limitation of all Cisco's concentrators is that they support up to a combination of only 1,000 local groups or users. So if you purchase a 3080 concentrator that supports 10,000 remote access sessions, the only way the 3080 will support this number of users is to use an external authentication server. In Chapter 6, "Concentrator Product Information," I discussed the external authentication methods that the concentrators support for remote access users:
- RADIUS
- NT Domain
- SDI
- Kerberos/Active Directory
The following sections will discuss how to specify the use of an external server for authenticating remote access users.
Authentication Server Creation
To specify the use of an external authentication server(s), first go to the Group configuration screen: Configuration > User Management > Groups. This screen was shown previously in Figure 7-2. From here, select the group that will be using external user authentication and click the Authentication Servers button. This screen is shown in Figure 7-5.
Figure 7-5. Group External Authentication Screen
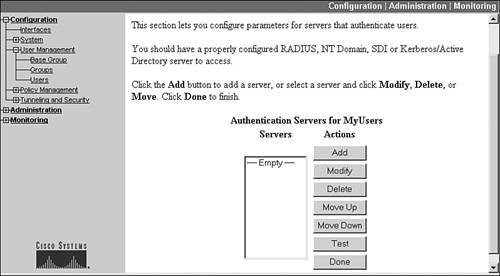
Click the Add button to add an external authentication server. When you click the Add button, the screen in Figure 7-6 is shown. The default authentication server type is RADIUS. But you also can choose NT Domain, SDI, and Kerberos/Active Directory.
Figure 7-6. Adding a RADIUS External Authentication Server

For RADIUS external authentication, enter the IP address of the server in the "Authentication Server" text box and the encryption key used to encrypt password payload information in the "Server Secret" text boxes. The other information is optional. If you choose NT Domain for the "Server Type," the screen parameters and information change. From the updated screen, enter the IP address and name of the domain controller. If you choose SDI external authentication, you must specify the IP address of the server and the version of software on the server. If you choose Kerberos/Active Directory, you must specify the IP address of the server and the name of the realm it belongs to.
When you are done adding your server, click the Done button at the bottom of the screen; this takes you back to the screen in Figure 7-5. You can add multiple servers, of the same external authentication type, for the group so as to add authentication redundancy. One additional button on the screen in Figure 7-5 is the Test button. Once you add a server, select it by clicking it and then click the Test button; this causes the concentrator to send a test message to the server. You'll be prompted for a remote access username and password to verify that the external authentication functions. Click the OK button to send the authentication information to the server. If you see this message, "Authentication Error: No response from server," then either you've misconfigured the server, or there is a connectivity problem between the concentrator and the server.
When you add multiple servers, the first server you add becomes the primary external authentication server for the group (you can have up to 10 authentication servers). You can click a server and click the Move Up and Move Down buttons to re-prioritize the list of external authentication servers, affecting which server becomes the primary one for the group. The server at the top of the list is the primary server. Click the Done button when you are done with the Authentication Servers screen, taking you back to the Groups screen.
Note
If you define only one external authentication server, and it is not reachable by the concentrator, the user's authentication will fail; therefore, you should have redundant external authentication servers defined, at different locations within your network.
Authorization Servers
From the Groups screen, there are two additional buttons below the Authentication button that deal with external authentication servers:
- Authorization Servers
- Accounting Servers
Note
The use of authorization and accounting servers is optional, but if you want to use them, you also must specify an authentication server; in other words, external authorization and accounting rely on the use of external authentication. Also, the authentication, authorization, and accounting functions can all be located on one external server or they can be spread across multiple external servers.
One limitation of defining only authentication servers is that the external authentication server is used only to authenticate the remote access userscheck the users' usernames and passwords. You already might have defined many of the group's policies, such as access hours, primary DNS server, login banner, or filter, on an external server; and you want to use this information instead of re-configuring it on the concentrator. This information can be used by a group if you add an external authorization server(s).
To add an authorization server, go to the Group configuration screen: Configuration > User Management > Groups. This screen was shown previously in Figure 7-2. From here, select the group that will be using external user authentication and click the Authorization Servers button. The screen presented to you is almost the same as that shown previously in Figure 7-5; however, this screen allows you to add/delete/modify authorization servers only. Click the Add button to add an external authentication server. When you do this, you'll see the screen shown in Figure 7-7.
Figure 7-7. Adding a RADIUS External Authorization Server
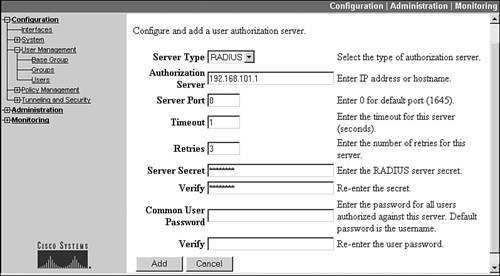
Only two external authorization server types are supported: RADIUS and LDAP. The default is RADIUS, and the RADIUS parameters are shown in Figure 7-7. You must specify the IP address of the RADIUS server in the "Authorization Server" field. The RADIUS server port defaults to 1,645; if you are using an implementation of RADIUS where the server port is 1,812, you'll need to specify this for the "Server Port" parameter. You'll also need to specify the secret key to encrypt payload password information. The "Common User Password" field is a password the RADIUS server needs, but doesn't use; for this reason, Cisco defaults the password to that of the username (this has nothing to do with authentication functions). When you're done, click the Add button at the bottom. You can create up to 10 authorization servers per group (of the same external server type). Like authentication servers, you can sort the order of the authorization servers and test connectivity to them.
For a RADIUS authorization server to interoperate correctly with your concentrator, one of the following must be true:
- If the RADIUS server is Cisco Secure ACS, the authorization attributes already are integrated into the concentrator and you need to do nothing further.
- If the RADIUS server is FUNK RADIUS, you must obtain the authorization attribute file from Cisco called cisco3k.dct, which contains the authorization attributes; authorization attributes define message codes used for the server and concentrator to interact with each other. Place this file in Flash memory in the concentrator (I discuss how to do this in Chapter 10, "Concentrator Management").
- For any other RADIUS server product, you must define the attributes manually and place the definitions in the concentrator's Flash memory. This process is beyond the scope of this book.
There are over 50 RADIUS authorization attributes the concentrator understands.
If you choose "LDAP" as the Server Type, the screen changes to something different than what you saw in Figure 7-7. With LDAP, you must enter the following information:
- Server Type LDAP.
- Authorization Server Server's IP address.
- Login DN The name of the directory object, containing the authorization information that the concentrator will access.
- Password and Verify The password for the login DN.
- Base DN The location of the LDAP hierarchy where the concentrator should begin searching for the authorization information; it's entered in a format like OU=MyUsers, O=cisco.
- Search Scope One-level search searches one level below the base DN, whereas a subtree search searches all levels below the base DN.
- Naming Attributes The list of relative distinguished name attributes that uniquely identify an entry on the LDAP server, like Common name (cn), Organizational Unit (OU), and User ID (uid), to name a few.
When you're done, click the Add button at the bottom of the screen.
Accounting Servers
Accounting servers are used to keep a record of a user's authentication and authorization interactions with the VPN 3000 concentrator; by default, this kind of information is not stored on an external server unless you define one or more accounting servers.
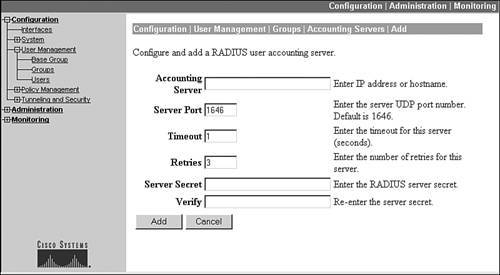
To add an accounting server, go to the Group configuration screen: Configuration > User Management > Groups. This screen was shown previously in Figure 7-2. From here, select the group that you want to record accounting for (external authentication or authorization) and click the Accounting Servers button. The screen presented to you is almost the same as that shown previously in Figure 7-5; however, this screen allows you to add/delete/modify accounting servers only. Click the Add button to add an external authentication server. When you do this, you'll see the screen shown in Figure 7-8.
Figure 7-8. Adding a RADIUS External Accounting Server
Note
Before you define an external accounting server, first you must define an external authentication server. Also, only RADIUS is supported for accounting functions.
For RADIUS accounting, you must specify the IP address of the RADIUS server in the Accounting Server field and the Server Secret password used to encrypt password information sent between the concentrator and RADIUS server. The other information is optional. The only other parameter you might change is the Server Port field, where the RADIUS server's UDP port defaults to 1,646; some RADIUS implementations use 1,813 for the port. When you're done, click the Add button at the bottom of the screen. You can add up to 10 accounting servers, sort them in the proper processing order, and even test connectivity to them (just as you could with the authentication and authorization servers).
Group Configuration
Once you have defined your authentication, authorization, and/or accounting server(s), you need to specify that the group will use the external authentication servers. You do this by choosing Configuration > User Management > Groups, selecting the group by clicking it, and then clicking the Modify Group button. From the Identity tab, use the pull-down selector to change the authentication Type from "Internal" to "External" (see Figure 7-3) and click the Apply button. Once you have done this, any user associated with this group will use the defined external authentication, authorization, or accounting servers you have defined.
Address Assignment
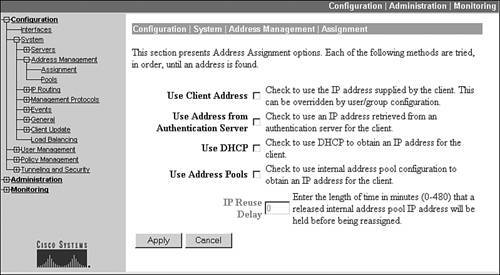
In Chapter 6, "Concentrator Product Information," I discussed the use of Quick Configuration; during Quick Configuration, one of the items asked is how addresses will be assigned to remote access clients. To change how addresses are assigned to remote access clients globally, go to Configuration > System > Address Management > Address Assignment. On this screen, there are four possible methods that can be used, as shown in Figure 7-9:
- Use Client Address Use the address the client has manually assigned to itself; this doesn't apply to Cisco Easy VPN Remotes (clients), but to other types of clients, like Microsoft's Windows Client.
- Use Address from Authentication Server Use the address the authentication server, like RADIUS, assigns to the client.
- Use DHCP Use the address from a DHCP server to assign to the client.
- Use Address Pools Have the concentrator use a global or group address pool to assign an address to the client.
Figure 7-9. Global Address Assignment Configuration
The first two don't require any additional configuration on the concentrator, whereas the latter two do. Also, different groups can use different addressing methods. The next two sections will discuss the last two options in the above bullet points.
DHCP Address Assignment
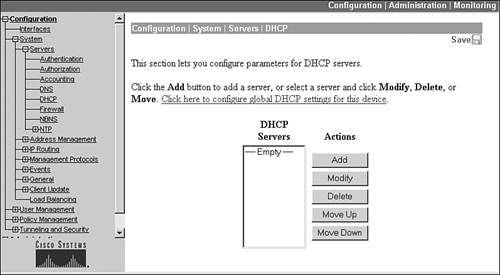
If you choose the Use DHCP option, a DHCP server will assign an address to the remote access client. For this to function correctly, you must go to the Configuration > System > Servers > DHCP screen first. Click the Add button to add a DHCP server. From the new screen, you need to enter only the IP address of the DHCP server and then click the Add button at the bottom. If you add multiple servers, the first server listed in Figure 7-10 becomes the primary DHCP serveryou can use the Move Up and Move Down buttons to re-prioritize the list.
Figure 7-10. DHCP Server Listing
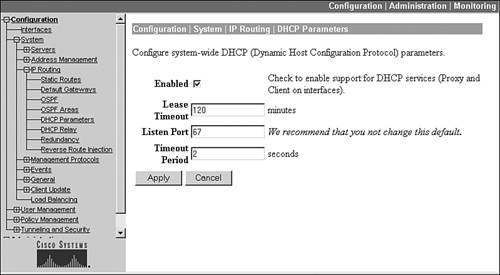
Once you have added your DHCP servers, go to Configuration > System > IP Routing > DHCP Parameters. This screen is shown in Figure 7-11. This screen allows you to define your global DHCP configuration parameters. At a minimum, you must select the Enabled check box. The Lease Timeout parameter has the concentrator, on behalf of the remote access client, renew the address registration when this time period is reached. The Timeout Period is used when you've configured multiple DHCP servers. When the first DHCP server doesn't respond within this time period, the concentrator will contact the second DHCP server for a remote client's address.
Figure 7-11. DHCP Parameters
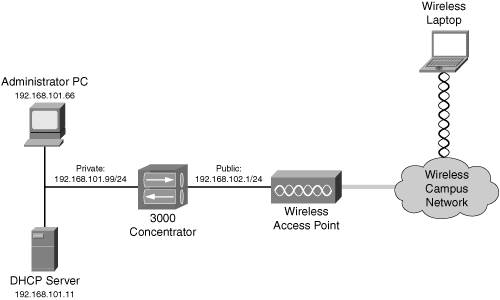
One optional DHCP setting is DHCP relay. DHCP relay is used in an environment where the concentrator is used for internal access of wireless clients, where the wireless clients are using a VPN to connect to the corporate network, as shown in Figure 7-12. However, the wireless clients typically use DHCP to acquire an IP address for their wireless NIC. When the wireless client sends a DHCP request to the public or external interface of the concentrator, the concentrator forwards the request to one or more DHCP servers in the private network. Basically, the concentrator is relaying DHCP messages between the client and server. The advantage of DHCP relay is that you don't have to set up the concentrator as a DHCP server; you have an internal DHCP server perform this process.
Figure 7-12. DHCP Relay Example
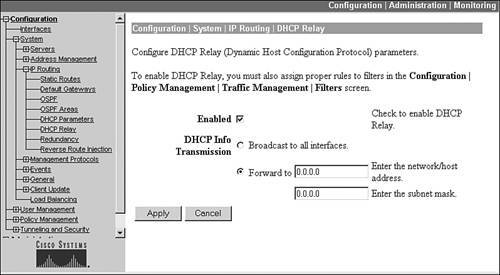
To set up DHCP relay, go to Configuration > System > IP Routing > DHCP Relay. This screen is shown in Figure 7-13. There are two relay options:
- Enabled This check box enables DHCP relay.
- Broadcast to all interfaces The client's DHCP request, when received on the public interface, is broadcasted out the private and external interface; if it is received on the external interface, the DHCP request is broadcasted out only the private interface. The assumption with this choice is that the DHCP server is on the segment to which the concentrator's private interface is directly attached.
- Forward to Here you can list a specific host address or network to relay the DHCP request to. You must specify a subnet maskfor a specific host, use 255.255.255.255.
Figure 7-13. DHCP Relay Screen
Click the Apply button to activate your changes.
Note
By default, the concentrator does not permit (blocks) all DHCP messages on its public and external interfaces. To allow DHCP traffic to enter and leave the external or public interface of the concentrator, you must change the filter on its interface by adding two rules to allow inbound and outbound DHCP traffic: DHCP In and DHCP Out. This process is described in Chapter 10, "Concentrator Management."
Concentrator Address Pools
Another option you can use for assigning addresses to clients is to define one or more address pools on the concentrator and let the concentrator be responsible for assigning the addresses: Choose Use Address Pools on the screen in Figure 7-9 to enable this process. One additional option on this screen is the IP Reuse Delay parameter: this parameter, when configured, has the concentrator wait the specified minutes before reusing an address in the address pool.
You can create two types of address pools on your concentrator:
- Global pool This pool(s) is used by all remote access clients if a group pool doesn't exist for a user.
- Group pools This address pool(s) is used by all remote access users associated with the respective group.
When going through Quick Configuration on the concentrator, if you choose the option to have the concentrator assign the addresses, and you specify the addresses in the pool, you have just created a global pool. You can add, change, or delete the global pool configuration by going to Configuration > System > Address Management > Pools. This screen lists the global pool or pools you have created on the concentrator. From this screen, click the correct button to make a change. For example, if you want to add a global pool, click the Add button. You must enter a starting address, ending address, and a subnet mask for the pool of addresses. Click the Add button to add a pool.
The most common way to have the concentrator itself assign internal addresses to clients is on a group-by-group basis. First, create a group from the Configuration > User Management > Groups screen, shown previously in Figure 7-2. Once you have done this, click the name of the group and then click the Address Pools button. The screen in Figure 7-14 is displayed.
Figure 7-14. Group Address Pool Listing
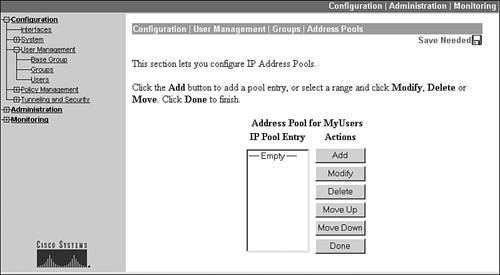
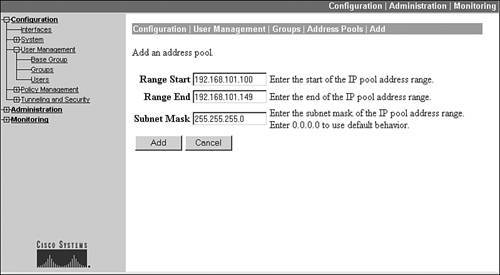
Then click the Add button to add an address pool for the group. This screen is shown in Figure 7-15. As in adding a global address pool, the group address pool needs a starting and ending address for the pool and the subnet mask value used for the address pool. Click the Add button to add the address pool, which takes you back to the screen in Figure 7-14. If you define multiple pools for a group, you can prioritize their usage by the concentrator by using the Move Up and Move Down buttons. When you are done adding your pool(s), click the Done button at the bottom of Figure 7-14.
Figure 7-15. Add a Group Address Pool
Caution
Make sure that when you set up your address pools, these addresses don't overlap those that your internal DHCP servers are using; otherwise you'll experience connectivity problems if an inside device is assigned the same address (from a DHCP server) as a VPN client (from the concentrator).
User Configuration
The second method of controlling remote access to the concentrator is through the use of user accounts. Authentication of users can be done externally, as mentioned earlier in the "External Authentication" section, or the users can be defined locally on the concentrator and the concentrator is responsible for the authentication of users. Having the concentrator be responsible for local authentication of users requires you to complete two configuration steps, in any order:
- Specify that the group the users will belong to will use Internal authentication.
- Create your users.
Group Setup for Internal Authentication
To specify the use of internal authentication of users, go to the Configuration > User Management > Groups screen, shown previously in Figure 7-2. Click the name of a group and click the Modify button. This displays the screen shown previously in Figure 7-3. In Figure 7-3, the Type of authentication is set to "Internal."
User Setup of Internal Authentication
To add local user accounts to your concentrator, go to Configuration > User Management > Users. This screen, shown in Figure 7-16, lists the users that have been added locally to the concentrator.
Figure 7-16. Local User Account Listing
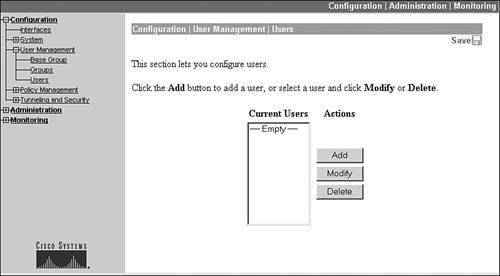
To add a user, click the Add button, which brings you to the screen in Figure 7-17. Like the Group configuration screen, this screen has tabs at the top:
- Identity Defines the name and password for the user, and which group the user belongs to.
- General Defines access restrictions for the user.
- IPsec Defines IPsec properties for the user.
- PPTP/L2TP Defines PPTP and/or L2TP properties for the user.
Figure 7-17. Local User Account Creation
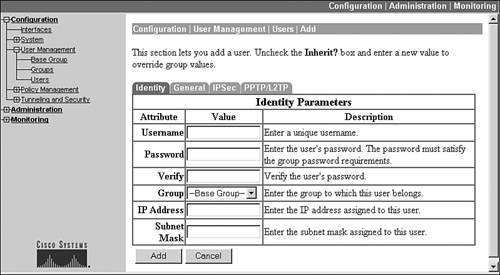
Properties you configure on a user-by-user basis override the group policies the user belongs to. The default tab that is in the foreground when you add or modify a user is the Identity tab, which is shown in Figure 7-17. The first field you must enter is the name of the user. The user's name is case-sensitive and can be up to 64 characters in length. Following this, you must enter the user's password twice. The password can be up to 32 characters in length and also is case-sensitive. Below this is the group that the user belongs touse this drop-down selector to place the user into the correct group. Last, you can assign an IP address and subnet mask to the user instead of using a dynamic approach as with local address pools, DHCP, or an AAA server. This might be necessary if a particular user always needs to be assigned the same IP address.
The General tab is similar to the same tab found in the Group configuration screen. This tab allows you to define access restrictions, including access hours, simultaneous logins, idle timeout, maximum connect time, a filter, and the allowed VPN tunneling protocols. These configurations override the group configuration that the user belongs to. I'll discuss the other two tabs later in this chapter and the next chapter.
Note
Remember that a concentrator has a limit to the maximum number of groups, users, and L2L sessions it can locally support (L2L sessions are treated as groups). The combination of these cannot exceed the concentrator's L2L session maximum value. For example, on a 3060 or 3080, they support a combination of only 1,000 local groups, users, and L2L sessions. Also, one limitation of local user accounts is that if you have two concentrators, you must manually replicate the user accounts across the two concentratorsthere is no automatic synchronization of the configuration between concentrators. Therefore, most administrators will use an external authentication method when more than one concentrator is being used to terminate remote access sessions.
Part I: VPNs
Overview of VPNs
- Overview of VPNs
- Traffic Issues
- VPN Definition
- VPN Components
- VPN Designs
- VPN Implementations
- VPNs: Choosing a Solution
- Summary
VPN Technologies
IPsec
PPTP and L2TP
SSL VPNs
Part II: Concentrators
Concentrator Product Information
- Concentrator Product Information
- Concentrator Models
- Concentrator Modules
- Concentrator Features
- Introduction to Accessing a Concentrator
- Summary
Concentrator Remote Access Connections with IPsec
- Concentrator Remote Access Connections with IPsec
- Controlling Remote Access Sessions to the Concentrator
- IPsec Remote Access
- Network Access Control (NAC) for IPsec and L2TP/IPsec Users
- Summary
Concentrator Remote Access Connections with PPTP, L2TP, and WebVPN
- Concentrator Remote Access Connections with PPTP, L2TP, and WebVPN
- PPTP and L2TP Remote Access
- WebVPN Remote Access
- Summary
Concentrator Site-to-Site Connections
- Concentrator Site-to-Site Connections
- L2L Connectivity Example
- ISAKMP/IKE Phase 1 Preparation
- Adding Site-to-Site Connections
- Address Translation and L2L Sessions
- Summary
Concentrator Management
- Concentrator Management
- Bandwidth Management
- Routing on the Concentrator
- Chassis Redundancy
- Administration Screens
- Summary
Verifying and Troubleshooting Concentrator Connections
- Verifying and Troubleshooting Concentrator Connections
- Concentrator Tools
- Troubleshooting Problems
- Summary
Part III: Clients
Cisco VPN Software Client
- Cisco VPN Software Client
- Cisco VPN Client Overview
- Cisco VPN Client Interface
- IPsec Connections
- VPN Client GUI Options
- VPN Client Software Updates
- VPN Client Troubleshooting
- Summary
Windows Software Client
- Windows Software Client
- Windows Client
- Configuring the Windows VPN Client
- Configuring the VPN 3000 Concentrator
- Microsoft Client Connections
- Troubleshooting VPN Connections
- Summary
3002 Hardware Client
- 3002 Hardware Client
- Overview of the 3002 Hardware Client
- Initial Access to the 3002
- Authentication and Connection Options
- Connection Modes
- Administrative Tasks
- Summary
Part IV: IOS Routers
Router Product Information
Router ISAKMP/IKE Phase 1 Connectivity
- Router ISAKMP/IKE Phase 1 Connectivity
- IPsec Preparation
- ISAKMP/IKE Phase 1 Policies
- ISAKMP/IKE Phase 1 Device Authentication
- Monitoring and Managing Management Connections
- Routers as Certificate Authorities
- Summary
Router Site-to-Site Connections
- Router Site-to-Site Connections
- ISAKMP/IKE Phase 2 Configuration
- Viewing and Managing Connections
- Issues with Site-to-Site Connections
- Summary
Router Remote Access Connections
- Router Remote Access Connections
- Easy VPN Server
- Easy VPN Remote
- IPsec Remote Access and L2L Sessions on the Same Router
- WebVPN
- Summary
Troubleshooting Router Connections
- Troubleshooting Router Connections
- ISAKMP/IKE Phase 1 Connections
- ISAKMP/IKE Phase 2 Connections
- New IPsec Troubleshooting Features
- Fragmentation Problems
- Summary
Part V: PIX Firewalls
PIX and ASA Product Information
- PIX and ASA Product Information
- PIX Deployment Scenarios
- PIX and ASA Feature and Product Overview
- Summary
PIX and ASA Site-to-Site Connections
- PIX and ASA Site-to-Site Connections
- ISAKMP/IKE Phase 1 Management Connection
- ISAKMP/IKE Phase 2 Data Connections
- L2L Connection Examples
- Summary
PIX and ASA Remote Access Connections
- PIX and ASA Remote Access Connections
- Easy VPN Server Support for 6.x
- Easy VPN Remote Support for 6.x
- Easy VPN Server Support for 7.0
- Summary
Troubleshooting PIX and ASA Connections
- Troubleshooting PIX and ASA Connections
- ISAKMP/IKE Phase 1 Connections
- ISAKMP/IKE Phase 2 Connections
- Summary
Part VI: Case Study
Case Study
Index
EAN: 2147483647
Pages: 178
