VPN Client Software Updates
In this section I'll discuss how to upgrade the VPN Client software. Cisco VPN 3000 concentrators support two types of automatic client upgrades: the 3002 hardware client and the Windows VPN Client. I'll cover what you have to do on both the concentrator and VPN Client side of the connection.
Concentrator: Client Updates
There are two types of client updates or upgrades the concentrator supports: the Cisco VPN client software and the 3002 hardware client. Upgrades of both can be controlled on the concentrator. If you go to the Configuration > System > Client Update > Entries screen on the concentrator and click the Add button, you can add an update entry. This screen is shown in Figure 12-19.
Figure 12-19. Adding Client Updates on a Concentrator

There are three parameters on the screen in Figure 12-19. The Client Type parameter specifies the type of client you want to upgrade. All versions of the concentrator allow you to upgrade Windows and 3002 clients. If you enter "Windows" as the parameter, this update entry applies to all Windows clients: "Win9x" applies to only Windows 95, 98, and ME; and "WinNT" applies to only Windows NT 4.0, 2000, and Windows XP. For Windows clients, your update entries should not overlap. In other words, don't specify both "Windows" and "Win9x" because this would cause the concentrator to send two update notices to the client. To specify an update for a VPN 3002 hardware client, use "vpn3002." Newer concentrator images support the upgrade of MacOS, Solaris, and Linux clients using these client types, respectively: "Mac OS X," "Solaris," and "Linux." Please note that upgrading of the non-Windows clients is a fairly new feature with the concentrators and clients.
Note
You must enter the Client Type in the exact case and spacing, or the client will ignore the update message.
The URL parameter specifies the location of the client update file (typically on a web server behind the VPN 3000 concentrator). For a 3002 client, the update must be a TFTP server, so you would enter something like this: tftp://192.168.1.1/vpn3002-4.1.7.Rel-k9.bin. Make sure you use the same case that Cisco specified on their web site. For all other clients (software-based), the update location must be a web server URL ("http" or "https"), like this: http://IP_address/client_image. With both types of URLs, you can include directories; and for HTTP URLs, you can include port numbers if the web server is running on a different port. You can also use a name for the server, but you must configure a DNS server on the concentrator to resolve the name to an address.
The Revisions parameter specifies what version or versions of software the clients should be running; if they are not running these versions, they should install the software in the URL parameter. You can specify multiple revision numbers; just separate them by a command and a space.
Note
It is important that the revision be entered in the exact case that appears in the image name from Cisco. In other words, the clients will see a difference between "4.1.7.Rel" and "4.1.7.rel." If the client is running 4.1.7.Rel and you enter the "r" in lower case, the client will think that this is a different version and download thisagain and again!
If you have more than one client type, you'll add more than one update entry. Also, the above configuration applies to all clients of that type: you can control this on a group-by-group basis by adding an auto-update for a specific group instead of using the above process. This is done by going to Configuration > User Management > Groups, clicking a group name, and then clicking the Client Update button. The process from this point onward is the same as described above.
The last step you must perform on the concentrator is to enable the auto-update process. To do this, go to Configuration > System > Client Update > Enable and click the Enable check box to enable it.
VPN Client Preparation for Auto-Update of Windows 2000 and XP
There are a few things you have to do to prepare to use the auto-update feature for Windows 2000 and XP VPN Clients running 4.6 or later. There are two types of updates: minor (minor updates to the existing software) and major (a full updatereplacing the existing software with a new version).
Web Server Configuration for Auto-Update
First, you need to download a special update file from Cisco called update-4.x.yy.zzzz-minor-K9.zip or update-4.x.yy.zzzz-major-K9.zip, where "4" is the major release and x.yy.zzzz is the version and revision information. Place this file in its own directory (like "windows46updates") on a web server and unzip its contents. When unzipped, you'll see the following additional files:
- vpnclient-win-is-4.x.yy.zzzz-k9.exe InstallShield installation file.
- vpnclient-win-msi-4.x.yy.zzzz-k9.exe MSI installation File.
- Binary-{Major|Minor}-4.X.Yy.Zzzz.zip Contains the VPN Client update components (don't unzip this); this file is deleted upon installation on the client device.
- sig.dat Contains a signature of the binary.zip file used by InstallShield or MSI to determine the integrity of the binary.zip file. If it's been tampered with, no installation occurs; this file is deleted upon installation on the client device.
- binary_config.ini A configuration file that has the VPN Client version available on the web server; the autoupdate.exe program on the VPN Client uses this to determine if the update needs to be downloaded or not (the program looks at the Version parameter in this file to determine if an update is necessary. The file is deleted upon installation on the client device).
- new_update_config.ini This file is used to determine what additional components need to be downloaded, like connection profiles and OEM packages (that have the oem.ini and verifying configurations); this file's name is changed to "update_config.ini" once the update is completed on the client. Please note that this file is not necessary if you're not updating or adding any .pcf, oem.ini, or verifying configurations.
Of the files in the preceding list, the only one you can create, if necessary, is the new_update_config.ini file; all of the other files are supplied by Cisco and should not be tampered with. The new_update_config.ini file can contain the contents in Table 12-6. Any files specified in this configuration file also must be copied to the installation directory on the web server; the VPN Client will download these if you specify them.
|
Parameter |
Description |
|---|---|
|
[Update] |
First section name in the file (required). |
|
Version= |
Enter a version number of the update packagethis can be any number and is used by you, the administrator, to keep track of updates. Version numbers typically start at "1" and work their way up every time there's a new update. |
|
FileName= |
This is the name of a .zip file that contains the new or updated .pcf files. This is required only if you have new connection profiles. An example would be newprofiles.zip. This needs to be placed in the web directory containing the installation files. |
|
MaxSize= |
This is the size of the above .zip file in bytes, plus 5,000. |
|
[Oem] |
This is the name of a section pertaining to a .zip file that contains a new vpnclient.ini and oem.ini files and is used only by the InstallShield update process. This section isn't necessary if you don't have these new files. |
|
FileName= |
This is the name of the .zip file containing the updated vpnclient.ini and oem.ini files for the InstallShield update process. |
|
MaxSize= |
This is the size of the above .zip file in bytes, plus 5000 bytes. |
|
[Transform] |
This section is needed only if you'll be doing an MSI installation; the transform in the ZIP file must be named oem.mst. |
|
FileName= |
This is the name of the .zip file containing the updated transform files for the MSI update process. |
|
MaxSize= |
This is the size of the above .zip file in bytes, plus 5000 bytes. |
|
[Autoupdate] |
This is the name of the section head for auto-update. |
|
Required= |
If set to 0, the update is not required; if 1, the update is required. |
Concentrator Configuration for Auto-Update
Also, when you create the update entry on the concentrator, do not specify any filenames for the URL when using the VPN Client auto-update feature in 4.6 client versions; instead, specify the directory where all of the installation files for auto-update are located, like: http://IP_address/windowsauto46, where "windowsauto46" is the web server directory containing the installation files.
Client Update Process
There are two client update types: manual and automatic. The following sections will describe the two processes for the VPN Client when using the upgrade feature on the concentrator.
Manual Upgrades
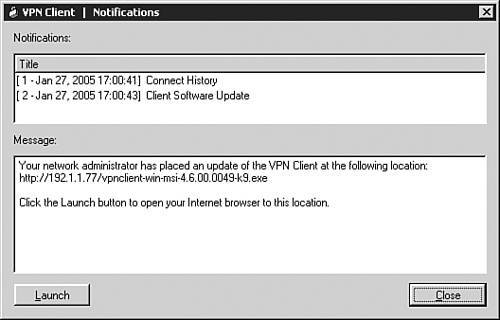
With the manual process, when the client connects to the concentrator, the concentrator, during IKE Mode Config, sends an update notification to the client. If the update information is different from what the client is running, the client receives a pop-up notification window as shown in Figure 12-20. This window has a Launch button that, when the user clicks it, will download the image file specified in the URL parameter discussed previously in the "Concentrator: Client Updates" section. Once downloaded, the user will need to:
|
1. |
Manually uninstall the old client and reboot. |
|
2. |
Install the new client and reboot. |
Figure 12-20. Manual Upgrade Process
This process applies to Windows 2000/XP clients running software older than 4.6 and the other non-Windows clients.
Tip
If you don't want your users to be able to download the software via the Launch button, don't include "http" or "https" in the URL prefix defined on the VPN 3000 concentrator.
Automatic Upgrades
With a 3002 hardware client, when it receives the update notification from the Easy VPN Server, the 3002 will download the update automatically, install it, and reboot itself; upon rebooting, the 3002 will re-establish its IPsec remote access session to the concentrator.
In 4.6, the Windows 2000 and XP clients support optional automatic updates like the 3002. Unlike the manual update approach, auto-update doesn't require the remote access user to uninstall the old software first, reboot, install the new version, and then reboot. Instead, when the VPN Client makes a connection to the concentrator, the update is downloaded automatically either via the VPN tunnel or split tunneling from a web server. If the update is a major upgrade, the user will have to reboot twice, as in the manual process (the user is notified of this through pop-up windows); however, if it is a minor upgrade, the user will be notified that a reboot is not necessary. Another nice feature of Windows auto-update is that if the download is interrupted when the client disconnects, upon reconnecting to the Easy VPN Server, the download will resume where it left off.
The autoupdate.exe program (part of the VPN Client installation in 4.6) is responsible for the auto-update process. When a notification message is sent from the Easy VPN Server to the VPN Client, this program determines if any additional steps need to be taken or not. If an update is necessary, this program downloads the update files (remember that it will take some time to download these because there is probably 20+MB of file data). Once the update files from the web server have been downloaded successfully, the user is then prompted for what action should be taken through a pop-up window, as shown in Figure 12-21. The user can install the package now, install it later, or reject the downloaded update. At the top of the window is the type of update: full (major), update (minor), and profile (connection entries). Only the first type of update requires a reboot. In Figure 12-21, this is a minor upgrade.
Figure 12-21. Auto-update Upgrade Process

If the user accepts the update and clicks the Install Now button, the autoinstall.exe program installs the update files. While the upgrade is occurring, the pop-up window will display the installation status. During this whole process of downloading the installation files, log messages are recorded in the autoupdate.log file in the "updates" subdirectory of the VPN Client (this is where the client upgrade files are also downloaded to). During the installation, log messages are stored in the autoinstall.log file in the same directory.
Note
With a minor upgrade, if you had an IPsec session open to the concentrator, this is disconnected automatically upon finishing the upgrade. If you're using auto-initiation, the session will be re-established shortly; otherwise, you'll have to re-establish the IPsec session manually.
Part I: VPNs
Overview of VPNs
- Overview of VPNs
- Traffic Issues
- VPN Definition
- VPN Components
- VPN Designs
- VPN Implementations
- VPNs: Choosing a Solution
- Summary
VPN Technologies
IPsec
PPTP and L2TP
SSL VPNs
Part II: Concentrators
Concentrator Product Information
- Concentrator Product Information
- Concentrator Models
- Concentrator Modules
- Concentrator Features
- Introduction to Accessing a Concentrator
- Summary
Concentrator Remote Access Connections with IPsec
- Concentrator Remote Access Connections with IPsec
- Controlling Remote Access Sessions to the Concentrator
- IPsec Remote Access
- Network Access Control (NAC) for IPsec and L2TP/IPsec Users
- Summary
Concentrator Remote Access Connections with PPTP, L2TP, and WebVPN
- Concentrator Remote Access Connections with PPTP, L2TP, and WebVPN
- PPTP and L2TP Remote Access
- WebVPN Remote Access
- Summary
Concentrator Site-to-Site Connections
- Concentrator Site-to-Site Connections
- L2L Connectivity Example
- ISAKMP/IKE Phase 1 Preparation
- Adding Site-to-Site Connections
- Address Translation and L2L Sessions
- Summary
Concentrator Management
- Concentrator Management
- Bandwidth Management
- Routing on the Concentrator
- Chassis Redundancy
- Administration Screens
- Summary
Verifying and Troubleshooting Concentrator Connections
- Verifying and Troubleshooting Concentrator Connections
- Concentrator Tools
- Troubleshooting Problems
- Summary
Part III: Clients
Cisco VPN Software Client
- Cisco VPN Software Client
- Cisco VPN Client Overview
- Cisco VPN Client Interface
- IPsec Connections
- VPN Client GUI Options
- VPN Client Software Updates
- VPN Client Troubleshooting
- Summary
Windows Software Client
- Windows Software Client
- Windows Client
- Configuring the Windows VPN Client
- Configuring the VPN 3000 Concentrator
- Microsoft Client Connections
- Troubleshooting VPN Connections
- Summary
3002 Hardware Client
- 3002 Hardware Client
- Overview of the 3002 Hardware Client
- Initial Access to the 3002
- Authentication and Connection Options
- Connection Modes
- Administrative Tasks
- Summary
Part IV: IOS Routers
Router Product Information
Router ISAKMP/IKE Phase 1 Connectivity
- Router ISAKMP/IKE Phase 1 Connectivity
- IPsec Preparation
- ISAKMP/IKE Phase 1 Policies
- ISAKMP/IKE Phase 1 Device Authentication
- Monitoring and Managing Management Connections
- Routers as Certificate Authorities
- Summary
Router Site-to-Site Connections
- Router Site-to-Site Connections
- ISAKMP/IKE Phase 2 Configuration
- Viewing and Managing Connections
- Issues with Site-to-Site Connections
- Summary
Router Remote Access Connections
- Router Remote Access Connections
- Easy VPN Server
- Easy VPN Remote
- IPsec Remote Access and L2L Sessions on the Same Router
- WebVPN
- Summary
Troubleshooting Router Connections
- Troubleshooting Router Connections
- ISAKMP/IKE Phase 1 Connections
- ISAKMP/IKE Phase 2 Connections
- New IPsec Troubleshooting Features
- Fragmentation Problems
- Summary
Part V: PIX Firewalls
PIX and ASA Product Information
- PIX and ASA Product Information
- PIX Deployment Scenarios
- PIX and ASA Feature and Product Overview
- Summary
PIX and ASA Site-to-Site Connections
- PIX and ASA Site-to-Site Connections
- ISAKMP/IKE Phase 1 Management Connection
- ISAKMP/IKE Phase 2 Data Connections
- L2L Connection Examples
- Summary
PIX and ASA Remote Access Connections
- PIX and ASA Remote Access Connections
- Easy VPN Server Support for 6.x
- Easy VPN Remote Support for 6.x
- Easy VPN Server Support for 7.0
- Summary
Troubleshooting PIX and ASA Connections
- Troubleshooting PIX and ASA Connections
- ISAKMP/IKE Phase 1 Connections
- ISAKMP/IKE Phase 2 Connections
- Summary
Part VI: Case Study
Case Study
Index
EAN: 2147483647
Pages: 178
