ISAKMP/IKE Phase 2 Configuration
ISAKMP IKE Phase 2 Configuration
Once ISAKMP/IKE Phase 1 completes (negotiates the Phase 1 policies, performs DH, and authenticates the peer), the management connection is established. The management connection is then used to build the two unidirectional data connections during ISAKMP/ IKE Phase 2. In its simplest form, there are three components that need to be configured for L2L sessions for ISAKMP/IKE Phase 2:
- Define the traffic that needs to be protected (crypto ACL).
- Define how that traffic is to be protected (transform set).
- Define to whom the traffic should be forwarded (crypto map).
If the remote L2L peer acquires its address dynamically, and you want to allow the remote peer to build an L2L session to your router, you'll have to build a dynamic crypto map with an entry for this peer. If you're using certificates for device authentication, you can use a new feature in the IOS called distinguished named-based crypto maps. This feature allows you to have more control over what certificate you'll accept from a particular peer. The following section will discuss the three bullets above and these two additional, yet optional, configuration tasks.
Defining Protected Traffic: Crypto ACLs
One method of defining what traffic needs to be protected is to create a crypto ACL. A crypto ACL is basically an ACL with permit or deny statements in it, where a permit statement specifies the traffic is to be protected and a deny statement specifies the traffic doesn't need to be protected. Named or numbered ACLs can be used. The crypto ACL created on one peer should be mirrored on the other peer; this ensures that traffic that is to be protected locally by your router is processed correctly by the remote peer.
Tip
In most instances, if you don't mirror crypto ACLs on the two peers, the ISAKMP/IKE Phase 2 connection will fail.
For example, if I want to protect traffic between two networks192.168.1.0/24 connected to RouterA and 192.168.2.0/24 connected to RouterBI would use the configuration shown in Example 17-1 (I assume you are familiar with ACLs on IOS routers). The names or numbers of the ACLs on the two peers don't need to match; however, I've found that when a router is connected to many different peers, possibly in a partially or fully meshed environment, using the same ACL name for each peer-to-peer session makes it easier to manage. Notice that in the two ACL permit statements, the addressing information is mirrored (reversed).
Example 17-1. Mirroring Crypto ACLs
! RouterA's configuration
RouterA(config)# ip access-list extended mirrored
RouterA(config-ext-nacl)# permit 192.168.1.0 0.0.0.255
 192.168.2.0 0.0.0.255
! RouterB's configuration
RouterB(config)# ip access-list extended mirrored
RouterB(config-ext-nacl)# permit 192.168.2.0 0.0.0.255
 192.168.1.0 0.0.0.255
Cisco highly discourages the use of the keyword any in a crypto ACL, because this can create connectivity problems. For example, if you want multicast traffic to enter the router's external interface where IPsec is applied, this will cause the router to drop the traffic unless it is protected by IPsec. This is also true of other kinds of traffic, like ICMP messages. If you do use the keyword any in a permit statement, be sure to precede the statement with specific deny statements for traffic that shouldn't be protected.
Tip
I recommend using named IP ACLs, using the name of the remote site or peer. This makes it easy to determine which ACL is to be used with which site (peer).
As you will see in the "Building a Static Crypto Map Entry" section later, the crypto ACL is activated in a crypto map entry, which is associated with an interface. If you have multiple sites, you'll need multiple entries in your crypto map where each entry has a unique crypto ACL. If there is an overlap between crypto ACLs in different entries, the crypto ACL in the highest priority crypto map entry will be used to protect traffic to a destination; based on this process, there is a chance, given the order (priority) of the crypto map entries, that an overlapping entry could be used to verify returning traffic, which could cause the router to drop it. The IOS is not smart enough to generate a message indicating that you have overlapping ACLs; you'll have to ensure this.
When the router processes the crypto ACL, it looks for a match in the first permit statement. If the packet matches this, the packet will be protected as it leaves the router; if no match is found, the traffic leaves the router as is. For packets coming from an external network in the router, if it matches a permit statement in a crypto ACL, the router validates the traffic based on the IPsec SA that's established for the unidirectional data connection from the remote peer to the local router. If the packet is unprotected (but matches a permit statement in the crypto ACL), it is automatically dropped. If there is no match with a permit statement, the router processes the packet normally. Like normal ACLs, you can view your crypto ACLs with the show [ip] access-lists command.
Note
Assuming that your router is a perimeter router, is filtering inbound traffic from the outside world, and is also terminating VPN sessions, you'll probably experience problems with data getting through the ACL check if you're new to Cisco IPsec router configurations. When a VPN connection is terminated on a Cisco router with an inbound ACL, the ACL is checked firstI assume you are permitting the ISAKMP/IKE Phase 1 connection (UDP 500) and the ESP, AH, and/or NAT-T (UDP 4,500) connections. If the packet passes this check, the router then verifies the protection and decrypts it. Most people are unaware that the IOS then runs the unprotected packet through the ACL check again! Therefore, whatever statements you include in your crypto ACL(s), you also need to include in the perimeter ACL allowing the inbound, unprotected traffic. Otherwise, the IPsec-protected packets will be allowed in, but once they're processed, they'll be dropped.
As you will see later in the chapter, there are other options besides the use of crypto ACLs to define what traffic needs to be protected; however, this was the first implementation of Cisco L2L sessions, so I've discussed it first.
Defining Protection Methods: Transform Sets
Where the crypto ACL defines what data traffic should be protected, a transform set defines how the data traffic is going to be protectedthe security protocols and algorithms/functions. For the ISAKMP/IKE Phase 2 negotiation to be successful for the data SAs, there has to be at least one matching transform between the two IPsec peers. If all peers have the same capabilities, then you typically define a single transform; however, if you have multiple peers with different capabilities, you typically define multiple transform sets.
To create a transform set, use the following command(s):
Router(config)# crypto ipsec transform-set transform_set_name
 transform1 [transform2 [transform3 [transform4]]]
Router(cfg-crypto-tran)# mode [tunnel | transport]
Each transform set needs a unique name and can contain up to four transforms. A transform defines how traffic will be protected. Table 17-1 defines the transforms that can be defined. You can have only one transform from each type. For example, you can't define both esp-des and esp-3des in the same set.
|
Transform Type |
Transform Parameter |
|---|---|
|
AH |
ah-md5-hmac |
|
ah-sha-hmac |
|
|
ESP authentication |
esp-md5-hmac |
|
esp-sha-hmac |
|
|
ESP encryption |
esp-null |
|
esp-des |
|
|
esp-3des |
|
|
esp-seal |
|
|
esp-aes 128 |
|
|
esp-aes 192 |
|
|
esp-aes-256 |
|
|
Compression |
comp-lzs |
SEAL is a new encryption type introduced in IOS 12.3(7)T. It uses a 160-bit encryption key and has less of an impact on the router's CPU cycles compared to the other algorithms. However, SEAL does have three limitations:
- It is not supported by hardware encryption modules and thus is better suited to smaller-end routers like the 830 series.
- It must be used with an authentication transform because SEAL encryption has a difficult time detecting tampered packets.
- It must be used with dynamic ISAKMP/IKE for the Phase 2 SAs; manual SAs are not supported.
Tip
Only enable compression in a transform set if the connection uses dialup to the remote peer; for any connection faster than this, you'll lose significant throughput by having the router perform both encryption and compression. Therefore, the most likely place you would use this transform in a transform set is for remote access users that dial into an ISPnot L2L sessions.
Once you have entered the crypto ipsec transform-set command, you are taken into a subcommand mode where you can enter the connection type. The default mode is tunnel, which is used for L2L and remote access sessions; transport mode is used for point-to-point sessionsfor example, between a router and a syslog or TFTP server. One exception to this is the use of dynamic multipoint VPNs, which I discuss in the "Scalability" section at the end of the chapter.
To view the transform sets on your router, use the show crypto ipsec transform-set command.
Note
If you change a transform set's configuration, it will affect only newly established SAs. Existing SAs will not use this until the lifetime of the connection expires and the SAs are re-negotiated or the SAs are torn down manually (cleared) and forced to be rebuilt (the clear crypto sa or clear crypto ipsec sa commands).
Building a Static Crypto Map Entry
The function of a crypto map is to bring all the necessary information together to build an IPsec sessionmanagement and data connectionsto remote peers. Each crypto map on a router has a unique crypto map name. Normally, one crypto map is necessary on a router because only one map can be activated on an interface. Therefore, if you have to protect traffic on two or more interfaces on your router and you need different policies for this traffic, you would need more than one crypto map; otherwise, if the policies are the same, you can apply the same crypto map to multiple interfaces.
There are two types of crypto maps:
- Static crypto map
- Dynamic crypto map
Static crypto maps normally are used for L2L sessions and dynamic crypto maps for remote access; however, as you'll see later, dynamic crypto maps also can be used for L2L sessions where some information about the remote peer cannot be determined until the negotiation process begins. The following sections will discuss more about crypto maps, entries in crypto maps, using ISAKMP/IKE to build IPsec data connections or manually specifying information, activating a crypto map, viewing a crypto map, and examining a simple example of creating a static crypto map.
Crypto Map Entries
A crypto map is made up of one or more entries. The function of an entry in a crypto map is to specify what traffic (crypto ACL) should be protected, how the traffic should be protected (transform set), where the protected traffic should be sent (remote peer), what address to use on the router to send protected traffic, how the ISAKMP/IKE Phase 1 and 2 connections are built (dynamically or manually), the lifetime of the data connections, and other information.
The entries in a crypto map help the router determine which policies should be used when negotiating security associations with a remote peer. Each crypto map entry is assigned a unique sequence number which determines how the router will process the entries when looking for a compatible entry. The lower the sequence number, the higher the priority. If your router will be initiating an L2L session, it must use a static crypto map entry; however, if your router is accepting a session request from a remote peer, it can use either a static or dynamic entry to determine how the connection will be built and protected. When routers are performing the negotiation process, a compatible crypto map entry must be found on both peers, where the entry contains, at a minimum, a mirrored crypto ACL, a matching identity of the peer, and a common transform set.
If any of the following conditions exist, you'll need more than one entry in your crypto map:
- Different traffic flows are to be handled by different peers (like having multiple sites you're connected to).
- You want to have a different policy applied to different types of traffic being sent to the same or different peers.
- When you are not using ISAKMP/IKE to build a session to a remote peer, you cannot have more than one permit statement in a crypto ACL; for multiple traffic flows, you would have to create a separate crypto ACL for each flow and thus would need a separate crypto map entry for each crypto ACL.
Using ISAKMP/IKE
When building a static crypto map entry for an L2L session, 99 percent of the time you'll use ISAKMP/IKE to build the session. To create a static crypto map entry using ISAKMP/ IKE, use the following configuration:
Router(config)# crypto map map_name seq_# ipsec-isakmp
Router(config-crypto-m)# match address ACL_name_or_#
Router(config-crypto-m)# set peer {hostname | IP_address}
Router(config-crypto-m)# set transform-set transform_set_name1
 [transform-set-name2...transform-set-name6]
Router(config-crypto-m)# set pfs [group1 | group2 | group5]
Router(config-crypto-m)# set security-association level per-host
Router(config-crypto-m)# set security-association lifetime
 {seconds seconds | kilobytes kilobytes}
Router(config-crypto-m)# set security-association idle-time seconds
Router(config-crypto-m)# exit
The crypto map command creates a static map entry. You must give the static crypto map a unique name, followed by the sequence number for the entry, which can range from 165,535. Remember that the lower the number, the higher the priority of the statement. Upon executing this command, you are taken into a subcommand mode where you can configure the commands pertinent to this entry.
The match address command specifies the number or name of the crypto ACL that has the traffic to be protected. For a static crypto map entry, this is a required command.
Note
If the match address command references a nonexistent crypto ACL, the router will drop all unprotected traffic sent to it, because a nonexistent ACL permits all traffic by default.
The set peer command specifies who the router will connect to for the traffic specified in the crypto ACL. You can specify either the FQDN, the name, or the IP address of the peer. If specifying the name or FQDN, the router can resolve it by using a static host table (ip host) or DNS. For redundancy, you can add multiple set peer commands to a crypto map entry; however, only one peer connection is built. Based on how you enter the set peer commands, the first instance becomes the primary, the second the secondary, and so on. If the primary cannot be reached, the second set peer command is used to establish the session. For a static crypto map entry, this is a required command.
The set transform-set command specifies the name of the transform set or sets (crypto ipsec transform-set) that can be used to protect traffic to the peer in the set peer command. You can list up to six transform set names. Normally, you'll know how the traffic to the peer is to be protected and therefore you will configure a single transform set name; but if you don't know, you can list multiple transform set names. The order in which you enter them is important, because this is the order the remote peer will use; therefore, list the most secure transform set name first and the least secure last. For a static crypto map entry, this is a required command.
The set pfs command is optional. It specifies that Perfect Forward Secrecy (PFS) should be used to share keying information for the data connections, via DH, instead of using the existing management connection. If this command is not configured, PFS is not used. Using PFS, you can specify either group 1, 2, or 5 keys, with group 5 being the most secure. If you specify this option, the (re-)negotiation of the data connection will take a little bit longer, but the sharing of the encryption and HMAC keys will be more secure.
By default, all traffic specified in the crypto ACL is protected by one SA pair between the local and remote peer. You can override this behavior with the set security-association level per-host command, which specifies that each host pairing between the local and remote side will be represented by a different SA pair. For example, if you had ten hosts at one site and ten at another, theoretically you could have 100 SA pairs between the two L2L routers. The one advantage of using this command is that you'll have different tunnels for the different peering relationships, where you can control both the priority of the packets (after encryption) and enable encryption. However, if you have many devices at each site, this can easily exhaust the resources on your router and, as such, should be used with care. This command is applicable only to static crypto map entries and is optional.
There are two sets of commands to change the lifetime of a data SA. The set security-association lifetime command is used within a crypto map entry and changes the lifetime of only the SA associated with that entry. You also can change this value globally with this command:
Router(config)# crypto ipsec security-association lifetime
 {seconds seconds | kilobytes kilobytes}
The above command affects all IPsec data SAs; however, the set security-association lifetime command allows you to override the global values for a specific crypto map entry. The default global lifetime of an SA is 3,600 seconds or 4,608,000 KB of transmitted user data (this equates to about 10 Mbps of traffic in an hour). Whenever the SA's lifetime reaches within 30 seconds of the seconds parameter or 256 KB of the kilobytes parameter, a new SA is negotiated; this process is used to ensure that there is no time lag between tearing down and rebuilding an SA between peers. To view your globally configured lifetime values, use the show crypto ipsec security-association lifetime command.
With the above commands, even if no traffic is transmitted between the peers, the SA is considered active and will not be removed until the lifetime expires. Inactive SAs waste memory and CPU resources on the router. With hundreds of peers, this can create a serious resource problem on a router. In IOS 12.2(15)T, Cisco introduced idle timers for data SAs. Like the absolute timer in the previous paragraph, idle timers can be configured globally and per crypto map entry. When the idle timer is reached (no traffic is transmitted across the SA for the duration of the idle timer), the SA is deleted automatically by the router.
Router(config)# crypto ipsec security-association idle-time seconds
You can override the global idle timeout with the set security-association idle-time command. The idle time can range from 6086,400 seconds. By default, the idle timeout mechanism is disabled on the router.
Tip
For routers that have to handle a large number of L2L and remote access connections, I highly recommend that you configure the SA idle timeout feature to remove idle SA connections so that your router can deal more effectively with active SAs. However, this should be used only between Cisco routers. When connecting to a non-Cisco router, remember that you might have to match the absolute data SA lifetime values for Phase 2 negotiations to succeed.
Not Using ISAKMP/IKE
While using ISAKMP/IKE, when the router receives traffic that needs to be protected for the first time, it needs to build a management connection and two data connections. This negotiation might take a few seconds, and this delay might cause problems for certain kinds of delay-sensitive applications. To overcome this problem, you can create manual SA entries in a crypto map. With a manual SA, ISAKMP/IKE is not used and therefore no connections are built dynamically. Instead, you specify all the criteria for the data SAs on both peers (no management connection is needed and thus is not built). Once you've done this, as soon as your router receives traffic that needs to be protected, it uses the information about the manual SA configuration to protect and forward the traffic, introducing no extra delay. Please note that because you are defining all criteria for the data SAs on both peers, including encryption and HMAC keys and the SA identifiers, you no longer need an ISAKMP/IKE Phase 1 management connection.
There are a few downsides, though, to using manual SAs:
- You must specify all SA information manually on both peers.
- You cannot use certificates for device authentication, because this requires the use of ISAKMP/IKE.
- The encryption and HMAC keys are not negotiated dynamically, increasing the likelihood that someone eventually will be able to crack the keys.
- The SAs never time out and are always up.
- Anti-replay services are not available.
- Crypto ACLs can have only a single permit statement in them; if you need multiple permit statements, you'll need to create a separate crypto ACL for each one and then create a separate crypto map entry for each crypto ACL, in effect creating a separate SA for each crypto ACL permit statement.
To create a manual SA entry in a crypto map entry, use the following configuration:
Router(config)# crypto map map_name seq_# ipsec-manual
Router(config-crypto-m)# match address ACL_name_or_#
Router(config-crypto-m)# set peer {hostname | IP_address}
Router(config-crypto-m)# set transform-set transform_set_name
Router(config-crypto-m)# set session-key inbound ah SPI_# HMAC_key
Router(config-crypto-m)# set session-key outbound ah SPI_# HMAC_key
Router(config-crypto-m)# set session-key inbound esp SPI _#
 cipher encryption_key [authenticator HMAC_key]
Router(config-crypto-m)# set session-key outbound esp SPI _#
 cipher encryption_key [authenticator HMAC_key]
The ipsec-manual parameter in the crypto map command specifies that the entry will contain a manually created SA. The match address command specifies what traffic is to be protected. Remember that this ACL can have only one permit statement. The set peer command specifies which peer this traffic will be forwarded to; with a manual entry, you can list only a single peer. If you want to change the peer, you must delete the old peer first before adding the new one. The set transform-set command specifies the transform set to use; unlike with a dynamic entry, you can specify only a single transform set.
Up until this point, the commands mostly are the same as those for an ISAKMP/IKE entry; however, the set session-key commands are new. These commands specify the SPI values to use for the SAs and the keys for the encryption and HMAC functions. Remember that there are two data SAs to define (hence, the inbound and outbound parameters). If you'll be using AH, use the first two set session-key commands. You'll need a unique SPI value for each connection (the connection identifier).
An SPI value can range from 2564,294,967,295. One restriction for SAs is that you can use the same SA only for each security protocol/destination/direction pair. If you used AH and ESP to a particular destination, you would need four SPI values: two for inbound and outbound AH and two for inbound and outbound ESP. As an example, if you were only using ESP, you could use 256 for an inbound SA and 257 for an outbound SA. In this situation, you'd need to configure the reverse on the remote peer: 256 for the outbound SA and 257 for the inbound SA. The encryption and HMAC keys are a string of 8-, 16-, or 20-byte hexadecimal characters. If you enter a key length longer than the above three, it is truncated to the lower number. Also, encryption keys must be at least 8 bytes, MD5 keys 16 bytes, and SHA keys 20 bytes. Remember that when you configure a key for an SA, it must match the key used for the SA by the other peer; also, these keys never expire and must be changed manually on both peers to meet any policy requirements regarding keys.
Activating a Crypto Map
Once you've built your static crypto map, it does not protect traffic until you activate it. Activating it is done on a physical interface where traffic will exit to the remote peer:
Router(config)# interface type [slot_#/]port_#
Router(config-if)# crypto map map_name
The crypto map command applies the crypto map to the router's interface. In newer versions of the IOS, if ISAKMP/IKE isn't enabled, it is enabled with the execution of this command.
By default, the IP address of the interface that the crypto map is applied to is used for the tunnel or transport connections. You can override this with the following command:
Router(config)# crypto map map_name local-address
 interface_name_and_number
Normally this is done when you have two interfaces you can use to reach a remote peer and have the same crypto map applied to both interfaces. In this situation, you want to the remote peer to see your router as having a single IP address, no matter which interface the local router uses to send IPsec packets to the remote peer. Normally, a loopback interface is created, placing a publicly reachable address on it; of course you could put a private address on it, but then you might have to use NAT-T to get through an address translation device.
Viewing a Crypto Map
Once you've created your crypto map and, possibly, activated it, you can view its configuration with the following command:
Router# show crypto map [interface interface | tag map_name]
Example 17-2 illustrates the use of this command. The crypto map is called "mymap" and has one entry in it (sequence number 10). This entry defines one peer (192.1.1.20), one crypto ACL (called "r3620," which permits traffic between two C-class networks), the default lifetimes, no PFS, and one transform set (called "RTRBtrans"). The crypto map is activated on Ethernet0/0.
Example 17-2. The show crypto map Command
RTRA# show crypto map
Crypto Map "mymap" 10 ipsec-isakmp
 Peer = 193.1.1.20
 Extended IP access list RTRB
 access-list RTRB permit ip 192.168.1.0 0.0.0.255
 192.168.2.0 0.0.0.255
 Current peer: 193.1.1.20
 Security association lifetime: 4608000 kilobytes/3600 seconds
 PFS (Y/N): N
 Transform sets={
 RTRBtrans,
 }
 Interfaces using crypto map mymap:
 Ethernet0/0
Configuring an Example Using Static Map Entries
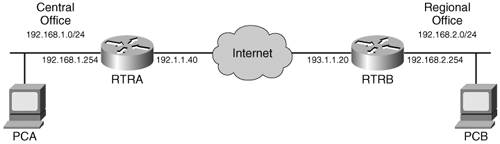
Now that you have an understanding of configuring static crypto maps, I'll illustrate their use through an example configuration. The network I'll use to illustrate this configuration is shown in Figure 17-1 and the code in Examples 17-3 for RTRA and 17-4 for RTRB, with comments explaining RTRA's configurationRTRB's is similar. Traffic between 192.168.1.0/24 and 192.168.2.0/24 is being protected by this configuration.
Figure 17-1. Simple Configuration Example Using Static Crypto Map Entries
Example 17-3. Static Crypto Map Example: RTRA
! Enabling ISAKMP and defining the management connection policy
RTRA(config)# crypto isakmp enable
RTRA(config)# crypto isakmp identity address
RTRA(config)# crypto isakmp policy 10
RTRA(config-isakmp)# encryption aes 128
RTRA(config-isakmp)# hash md5
RTRA(config-isakmp)# authentication pre-share
RTRA(config-isakmp)# group 2
RTRA(config-isakmp)# exit
! Using pre-shared keys for authentication
RTRA(config)# crypto isakmp key cisco123 address
 193.1.1.20 255.255.255.255 no-xauth
! This is the crypto ACL
RTRA(config)# ip access-list extended RTRB
RTRA(config-ext-nacl)# permit ip 192.168.1.0 0.0.0.255
 192.168.2.0 0.0.0.255
RTRA(config-ext-nacl)# exit
! The static route specifies how to reach the remote networks
RTRA(config)# ip route 192.168.2.0 255.255.255.0 192.1.1.20
! Defining the transform set
RTRA(config)# crypto ipsec transform-set RTRB esp-aes esp-md5-hmac
RTRA(cfg-crypto-tran)# exit
! Creating the crypto map entry for RTRB using ISAKMP/IKE
RTRA(config)# crypto map mymap 10 ipsec-isakmp
RTRA(config-crypto-m)# set peer 193.1.1.20
RTRA(config-crypto-m)# set transform-set RTRB
RTRA(config-crypto-m)# match address RTRB
RTRA(config-crypto-m)# exit
! Creating the perimeter ACL, allowing only IPSec traffic
! Note that you need to add an entry for the unprotected traffic too
RTRA(config)# ip access-list extended perimeter
RTRA(config-ext-nacl)# permit udp host 193.1.1.20
 host 192.1.1.40 eq 500
RTRA(config-ext-nacl)# permit esp host 193.1.1.20 host 192.1.1.40
RTRA(config-ext-nacl)# permit ip 192.168.2.0 0.0.0.255
 192.168.1.0 0.0.0.255
RTRA(config-ext-nacl)# deny ip any any
RTRA(config-ext-nacl)# exit
! Activating the inbound ACL and crypto map on the external interface
RTRA(config)# interface Ethernet0/0
RTRA(config-if)# ip address 192.1.1.40 255.255.255.0
RTRA(config-if)# crypto map mymap
Example 17-4. Static Crypto Map Example: RTRB
RTRB(config)# crypto isakmp enable
RTRB(config)# crypto isakmp identity address
RTRB(config)# crypto isakmp policy 10
RTRB(config-isakmp)# encryption aes 128
RTRB(config-isakmp)# hash md5
RTRB(config-isakmp)# authentication pre-share
RTRB(config-isakmp)# group 2
RTRB(config-isakmp)# exit
RTRB(config)# crypto isakmp key cisco123 address
 192.1.1.40 255.255.255.255 no-xauth
RTRB(config)# ip access-list extended RTRA
RTRB(config-ext-nacl)# permit ip 192.168.2.0 0.0.0.255
 192.168.1.0 0.0.0.255
RTRB(config-ext-nacl)# exit
RTRB(config)# ip route 192.168.1.0 255.255.255.0 193.1.1.1
RTRB(config)# crypto ipsec transform-set RTRA esp-aes esp-md5-hmac
RTRB(cfg-crypto-tran)# exit
RTRB(config)# crypto map mymap 10 ipsec-isakmp
RTRB(config-crypto-m)# set peer 192.1.1.40
RTRB(config-crypto-m)# set transform-set RTRA
RTRB(config-crypto-m)# match address RTRA
RTRB(config-crypto-m)# exit
RTRB(config)# ip access-list extended perimeter
RTRB(config-ext-nacl)# permit udp host 192.1.1.40
 host 193.1.1.20 eq 500
RTRB(config-ext-nacl)# permit esp host 192.1.1.40 host 193.1.1.20
RTRB(config-ext-nacl)# permit ip 192.168.1.0 0.0.0.255
 192.168.2.0 0.0.0.255
RTRB(config-ext-nacl)# deny ip any any
RTRB(config-ext-nacl)# exit
RTRB(config)# interface Ethernet0/0
RTRB(config-if)# ip address 193.1.1.20 255.255.255.0
RTRB(config-if)# ip access-group perimeter in
RTRB(config-if)# crypto map mymap
Note
When examining Examples 17-3 and 17-4, notice that the interface ACL allows the traffic between the two sites. This is necessary since the external ACL is processed twice: on the protected IPsec traffic and then again once the traffic is verified and decrypted. Of course, you could also use certificates, which would be the most secure authentication solution.
Building Dynamic Crypto Maps
One problem with static crypto map entries is that you must specify the IP address of the remote peer. This can be difficult if the local or remote router is acquiring its addressing information dynamically. In this instance, you can use dynamic crypto maps to solve your connectivity problem. Normally dynamic crypto maps are used for remote access IPsec sessions; however, you can use them for L2L sessions also. In this chapter I'll focus on the latter. The next chapter will focus on the former.
Note
One problem with peers obtaining their addresses dynamically is that if you're using pre-shared symmetric or asymmetric keys, you cannot use the IP address of the peer as its identity; instead, you'll need to use its name, typically a FQDN, or, less preferably, a wild-carded pre-shared key, which is less secure.
A dynamic crypto map is, by and large, a static map entry without all the required configuration parameters. With a static crypto map entry, you must at a minimum enter the peer's name or address (set peer), the traffic to be protected (match address), and how the traffic is to be protected (set transform-set). However, in many instances, you won't know this information until the remote peer actually connects to you. With dynamic crypto maps, the missing configuration parameters are filled in dynamically when negotiating the IPsec parameters. This allows your router to accept connections from a remote peer without having to configure everything statically.
Some limitations of using dynamic crypto maps include:
- You must use ISAKMP/IKE to perform the negotiation.
- One peer must have a static configuration (typically the spoke or remote access device) and one must have a dynamic configuration (typically the hub or VPN gateway device).
- Only one peer (the one with the static configuration) can initiate the IPsec tunnel.
Because of the last bullet point, dynamic crypto maps typically are not used for L2L sessions because either side might initiate traffic.
To help you with the configuration of dynamic crypto maps, the following sections cover these topics:
- Creating a Dynamic Crypto Map
- Using a Dynamic Crypto Map
- Configuring an Example Using a Dynamic Crypto Map
- Configuring Tunnel Endpoint Discovery with Dynamic Crypto Maps
Creating a Dynamic Crypto Map
Creating a dynamic crypto map is similar to creating a static one. Here are the basic commands associated with this process:
Router(config)# crypto dynamic-map dynamic_map_name sequence_#
Router(config-crypto-m)# match address ACL_name_or_#
Router(config-crypto-m)# set peer {hostname | IP_address}
Router(config-crypto-m)# set transform-set transform_set_name1
 [transform-set-name2...transform-set-name6]
Router(config-crypto-m)# set pfs [group1 | group2 | group5]
Router(config-crypto-m)# set security-association level per-host
Router(config-crypto-m)# set security-association lifetime
 {seconds seconds | kilobytes kilobytes}
Router(config-crypto-m)# set security-association idle-time seconds
Router(config-crypto-m)# exit
To create a dynamic crypto map, use the crypto dynamic-map command. You must give the dynamic map a unique name. Within the dynamic crypto map you can have multiple entries, where each entry is given a unique sequence number. The sequence number can range from 165,535, where 1 has the highest priority and is processed first during the IPsec negotiation. The rest of the commands were discussed previously in the "Using ISAKMP/IKE" section.
With dynamic crypto map entries, there is only one required command: set transform-set. The rest of the commands are optional. If you don't configure the match address command, the router will accept any crypto ACL the remote peer proposes during the Phase 2 negotiation. The peer's identity typically is not known, so configuring the set peer command is uncommon in a dynamic crypto map entry.
Tip
If you have multiple L2L peers that acquire their addressing information dynamically, I recommend configuring a separate crypto ACL for each and then a separate entry in the dynamic crypto map for each peer, specifying minimally the transform set and the crypto ACL. Therefore, if there is a mismatch in the crypto ACL between the remote and local router, the IPsec connection won't come upthis tells you that there is a possible problem with the mirrored crypto ACLs, and allows you to control what traffic should be protected.
To view the entries in your dynamic crypto map, use this command:
Router# show crypto dynamic-map [tag dynamic_map_name]
The output of this command is similar to that of the show crypto map command. Example 17-5 illustrates the use of this command. In this example, a crypto ACL and transform set are defined; everything else is left to its default value.
Example 17-5. The show crypto dynamic-map command
RTRA# show crypto dynamic-map
Crypto Map Template"dynmap" 10
 Extended IP access list RTRB
 access-list RTRB permit ip 192.168.1.0 0.0.0.255
 192.168.2.0 0.0.0.255
 Security association lifetime: 4608000 kilobytes/3600 seconds
 PFS (Y/N): N
 Transform sets={
 RTRB,
 }
Using a Dynamic Crypto Map
Once you've created your dynamic crypto map, you must activate it. Unlike a static crypto map configuration, you don't apply it to the router's interface. Because only a single crypto map (which must be a static map) can be applied to a router's interface, Cisco has you embed a dynamic crypto map as an entry within a static map configuration; this allows you to configure static L2L, dynamic L2L, and remote access IPsec VPNs on the same router.
Tip
Because you need to embed the dynamic crypto map as an entry in a static crypto map, and because the dynamic crypto map typically lacks a lot of configuration information that is filled in during the IPsec negotiation process, you typically give the dynamic crypto map entry reference a high sequence number within the static map; this ensures that the static entries are used before any dynamic ones.
When a router uses a dynamic crypto map to establish an IPsec session with a remote peer, a temporary static crypto map entry is created in the static map with the IPsec-negotiated information. When the session expires, the temporary crypto map entry is removed.
To embed a dynamic crypto map and its entries within a static map, use the following command:
Router(config)# crypto map static_map_name seq_# ipsec-isakmp
 dynamic dynamic_map_name
Notice that you add the dynamic parameter along with the dynamic map name to the static crypto map entry. Also, be sure to give the dynamic crypto map a sequence number higher than all of the static entries, ensuring that it won't be used by an L2L session where you know all the parameters involved.
Configuring an Example Using a Dynamic Crypto Map
I'll now illustrate an example using dynamic crypto maps. I'll use Figure 17-1 and the previous example from the "Configuring an Example Using Static Map Entries" section. In this example, assume RTRB is acquiring its address dynamically via DHCP. The dynamic crypto map configuration is done on RTRA. Example 17-6 shows RTRA's configuration, including appropriate comments. One important item to point out is that because RTRB's IP address is unknown, a wildcard must be used for the pre-shared key, which might be of concern. If so, then either use a hostname as the identity type with pre-shared keys or, more preferably, use certificates. Also, notice that I only configured a transform set and a crypto ACL for the dynamic map ("dynmap"). The static map ("statmap") only has one entry in it; but that entry has a very high sequence number. This makes it easy to add static entries with lower numbers (higher preference).
Example 17-6. Dynamic Crypto Map Example: RTRA
! Enabling ISAKMP and defining the management connection policy
RTRA(config)# crypto isakmp enable
RTRA(config)# crypto isakmp identity address
RTRA(config)# crypto isakmp policy 10
RTRA(config-isakmp)# encryption aes 128
RTRA(config-isakmp)# hash md5
RTRA(config-isakmp)# authentication pre-share
RTRA(config-isakmp)# group 2
RTRA(config-isakmp)# exit
! Using pre-shared keys for authentication
! Because the IP address of RTRB is unknown, you must
! wildcard the key
RTRA(config)# crypto isakmp key cisco123 address
 0.0.0.0 0.0.0.0 no-xauth
! This is the crypto ACL
RTRA(config)# ip access-list extended RTRB
RTRA(config-ext-nacl)# permit ip 192.168.1.0 0.0.0.255
 192.168.2.0 0.0.0.255
RTRA(config-ext-nacl)# exit
! The static route specifies how to reach the remote networks
RTRA(config)# ip route 192.168.2.0 255.255.255.0 192.1.1.20
! Defining the transform set
RTRA(config)# crypto ipsec transform-set RTRBtrans
 esp-aes esp-md5-hmac
RTRA(cfg-crypto-tran)# exit
! Creating a dynamic crypto map for RTRB
RTRA(config)# crypto dynamic-map dynmap 10
RTRA(config-crypto-map)# set transform-set RTRBtrans
RTRA(config-crypto-map)# match address RTRB
RTRA(config-crypto-map)# exit
! Creating the crypto map entry for the dynamic crypto map
RTRA(config)# crypto map statmap 65000 ipsec-isakmp dynamic dynmap
! Creating the perimeter ACL, allowing only IPSec traffic
! Note that you need to add an entry for the unprotected traffic too
RTRA(config)# ip access-list extended perimeter
RTRA(config-ext-nacl)# permit udp host 193.1.1.20
 host 192.1.1.40 eq 500
RTRA(config-ext-nacl)# permit esp host 193.1.1.20 host 192.1.1.40
RTRA(config-ext-nacl)# permit ip 192.168.2.0 0.0.0.255
 192.168.1.0 0.0.0.255
RTRA(config-ext-nacl)# deny ip any any
RTRA(config-ext-nacl)# exit
! Activating the inbound ACL and crypto map on the external interface
RTRA(config)# interface Ethernet0/0
RTRA(config-if)# ip address 192.1.1.40 255.255.255.0
RTRA(config-if)# crypto map statmap
RTRB's configuration (Example 17-7) is very similar to that previously done in Example 17-3 with a static crypto map. Since RTRB knows RTRA's address, a specific pre-shared key with a corresponding address is used and a static crypto map is used.
Example 17-7. Dynamic Crypto Map Example: RTRB
RTRB(config)# crypto isakmp enable
RTRB(config)# crypto isakmp identity address
RTRB(config)# crypto isakmp policy 10
RTRB(config-isakmp)# encryption aes 128
RTRB(config-isakmp)# hash md5
RTRB(config-isakmp)# authentication pre-share
RTRB(config-isakmp)# group 2
RTRB(config-isakmp)# exit
! Since the peer's address is known, a specific address
! is given for the key
RTRB(config)# crypto isakmp key cisco123 address
 192.1.1.40 255.255.255.255 no-xauth
RTRB(config)# ip access-list extended RTRA
RTRB(config-ext-nacl)# permit ip 192.168.2.0 0.0.0.255
 192.168.1.0 0.0.0.255
RTRB(config-ext-nacl)# exit
RTRB(config)# ip route 192.168.1.0 255.255.255.0 193.1.1.1
RTRB(config)# crypto ipsec transform-set RTRAtrans
 esp-aes esp-md5-hmac
RTRB(cfg-crypto-tran)# exit
RTRB(config)# crypto map mymap 10 ipsec-isakmp
RTRB(config-crypto-m)# set peer 192.1.1.40
RTRB(config-crypto-m)# set transform-set RTRAtrans
RTRB(config-crypto-m)# match address RTRA
RTRB(config-crypto-m)# exit
RTRB(config)# ip access-list extended perimeter
RTRB(config-ext-nacl)# permit udp host 192.1.1.40
 host 193.1.1.20 eq 500
RTRB(config-ext-nacl)# permit esp host 192.1.1.40 host 193.1.1.20
RTRB(config-ext-nacl)# permit ip 192.168.1.0 0.0.0.255
 192.168.2.0 0.0.0.255
RTRB(config-ext-nacl)# deny ip any any
RTRB(config-ext-nacl)# exit
! Getting an address via DHCP
RTRB(config)# interface Ethernet0/0
RTRB(config-if)# ip address dhcp
RTRB(config-if)# ip access-group perimeter in
RTRB(config-if)# crypto map mymap
Configuring Tunnel Endpoint Discovery with Dynamic Crypto Maps
Using static crypto maps presents one problem: as you add more and more peers to your configuration, management becomes a real burden. Dynamic crypto maps, as I described in the last section, are restricted in that only one of the two peers can initiate the connection (the one with the strictly static map configuration).
Tunnel Endpoint Discovery (TED) is a Cisco-proprietary feature developed to deal with these problems. TED allows routers to discover IPsec endpoints and their configurations automatically, reducing the amount of configuration you have to perform on your routers.
TED Process
I'll use Figure 17-1, shown previously, to illustrate how TED works.
- Assume that PCB sends a packet to PCA. RTRB receives the packet and doesn't currently have an IPsec SA established, but the packet does match a permit statement in a crypto ACL. RTRB drops the packet, but sends a TED probe to determine who the remote peer is to RTRA. The TED probe contains the IP address of RTRB and is sent across the network in clear text.
- When RTRA receives the TED probe, it drops it because it isn't protected, but sends back a TED reply with the IP address of itself in the reply packet.
- After RTRB receives the reply, it now knows the IP address of RTRA and can initiate an ISAKMP/IKE Phase 1 connection.
If you had 100 peers and used a static crypto map configuration and wanted to fully mesh the network, each router would need 99 entries in a static crypto map. And as you added more and more peers, this quickly would become unmanageable. Likewise, dynamic crypto maps work only in a hub-and-spoke design; fully meshing them is impossible because either peer might need to initiate a connection, which presents a dilemma as to which peer should have the static configuration and which peer the dynamic configuration.
With TED, only a single dynamic crypto map with the TED feature needs to be created because the peers will be discovered dynamically. Therefore, static crypto maps are not needed. TED has the following restrictions, however:
- It is Cisco-proprietary and will work only with IOS routers.
- It works only with dynamic crypto maps.
- Because the peer IP addresses are embedded in the payloads of TED discovery probes, this causes TED to fail when performing address translation.
- TED simplifies the configuration of the routers by providing a discovery process; it does not provide any scalability advantages as to managing many connections with many L2L peers.
- It increases the amount of time to set up an IPsec session because a discovery phase must take place first.
- The routers' IP addresses must be in the same subnet (one hop away), limiting TED's usefulness to private WAN networks; plus the destinations that you want to reach must be in your router's routing table.
- The crypto ACL used for TED in the crypto map can specify only the IP protocol (ip parameter) in TEDv1 and v2; other protocols, such as TCP, UDP, ICMP, and others, cannot be specified; TEDv3 removes this restriction.
TED Configuration
To configure TED, first you must create a dynamic crypto map. These commands were discussed in the "Creating a Dynamic Crypto Map" section. There are two required commands you must configure for the dynamic crypto map entry: set transform-set (defines how to protect the traffic) and match address (defines what traffic is to be protected).
Once you've built your dynamic crypto map, you need to reference it in a static crypto map using the following command:
Router(config)# crypto map static_map_name seq_# ipsec-isakmp
 dynamic dynamic_map_name discover
Notice that this command is almost like the one in the "Using a Dynamic Crypto Map" section, which specifies a dynamic crypto map. The only difference with this command is the discover parameter, which enables TED.
TED Example
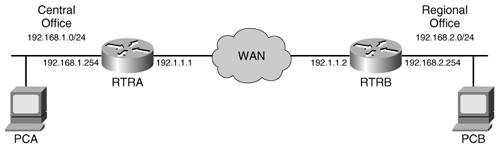
Setting up TED is fairly straightforward. The network shown in Figure 17-2 illustrates the configuration of TED. Because TED doesn't work across networks with multiple hops, like the Internet, assume that RTRA and RTRB are connected via a dedicated serial connection, but this could easily be Frame Relay or ATM.
Figure 17-2. Simple WAN Network Using TED
Example 17-8 shows RTRA's configuration and 17-9 shows RTRB's configuration. The configuration of the two routers is very similar. I'll point out a few interesting things about this configuration. First, because pre-shared keys are used and the IP addresses of the peers are unknown, I've wildcarded the key. Of course, in this instance, you could easily hard-code the addresses; but if you had 200 or 300 peers, this would not be practical. Instead, in this situation, I'd recommend the use of certificates. I used static routes so that the two routers can learn the remote destinations; however, in a large WAN deployment, you'd probably use a dynamic routing protocol. If this is the case, you'd have to change the perimeter ACL to allow routing traffic to enter your router.
Example 17-8. TED Configuration on RTRA
! Enabling ISAKMP and defining the management connection policy
RTRA(config)# crypto isakmp enable
RTRA(config)# crypto isakmp identity address
RTRA(config)# crypto isakmp policy 10
RTRA(config-isakmp)# encryption aes 128
RTRA(config-isakmp)# hash md5
RTRA(config-isakmp)# authentication pre-share
RTRA(config-isakmp)# group 2
RTRA(config-isakmp)# exit
! Using pre-shared keys for authentication
! Because the IP address of TED peer is unknown, you must
! wildcard the key
RTRA(config)# crypto isakmp key cisco123 address
 0.0.0.0 0.0.0.0 no-xauth
! This is the crypto ACL
RTRA(config)# ip access-list extended RTRB
RTRA(config-ext-nacl)# permit ip 192.168.1.0 0.0.0.255
 192.168.2.0 0.0.0.255
RTRA(config-ext-nacl)# exit
! The static route specifies how to reach the remote networks
RTRA(config)# ip route 0.0.0.0 0.0.0.0 192.1.1.2
! Defining the transform set
RTRA(config)# crypto ipsec transform-set RTRB esp-aes esp-md5-hmac
RTRA(cfg-crypto-tran)# exit
! Creating a dynamic crypto map for TED usage
RTRA(config)# crypto dynamic-map dynmap 10
RTRA(config-crypto-map)# set transform-set RTRB
RTRA(config-crypto-map)# match address RTRB
RTRA(config-crypto-map)# exit
! Creating the TED crypto map entry for the dynamic crypto map
RTRA(config)# crypto map statmap 65000 ipsec-isakmp
 dynamic dynmap discover
! Creating the perimeter ACL, allowing only IPSec traffic
! Note that you need to add an entry for the unprotected traffic too
! Also, I removed the ACL entry for NAT-T, since address translation
! doesn't work with the TED discovery process
RTRA(config)# ip access-list extended perimeter
! I removed the NAT-T ACL entry since the routers are directly
! connected to each other
RTRA(config-ext-nacl)# permit udp host 192.1.1.2
 host 192.1.1.1 eq 500
RTRA(config-ext-nacl)# permit esp host 192.1.1.2 host 192.1.1.1
RTRA(config-ext-nacl)# permit ip 192.168.2.0 0.0.0.255
 192.168.1.0 0.0.0.255
RTRA(config-ext-nacl)# deny ip any any
RTRA(config-ext-nacl)# exit
! Activating the inbound ACL and crypto map on the external interface
RTRA(config)# interface Serial0/0
RTRA(config-if)# ip address 192.1.1.1 255.255.255.0
RTRA(config-if)# crypto map statmap
Example 17-9. TED Configuration on RTRB
RTRB(config)# crypto isakmp enable
RTRB(config)# crypto isakmp identity address
RTRB(config)# crypto isakmp policy 10
RTRB(config-isakmp)# encryption aes 128
RTRB(config-isakmp)# hash md5
RTRB(config-isakmp)# authentication pre-share
RTRB(config-isakmp)# group 2
RTRB(config-isakmp)# exit
RTRB(config)# crypto isakmp key cisco123 address
 0.0.0.0 0.0.0.0 no-xauth
RTRB(config)# ip access-list extended RTRA
RTRB(config-ext-nacl)# permit ip 192.168.2.0 0.0.0.255
 192.168.1.0 0.0.0.255
RTRB(config-ext-nacl)# exit
RTRB(config)# ip route 0.0.0.0 0.0.0.0 192.1.1.1
RTRB(config)# crypto ipsec transform-set RTRA esp-aes esp-md5-hmac
RTRB(cfg-crypto-tran)# exit
RTRB(config)# crypto dynamic-map dynmap 10
RTRB(config-crypto-map)# set transform-set RTRB
RTRB(config-crypto-map)# match address RTRB
RTRB(config-crypto-map)# exit
RTRB(config)# crypto map statmap 65000 ipsec-isakmp
 dynamic dynmap discover
RTRB(config)# ip access-list extended perimeter
RTRB(config-ext-nacl)# permit udp host 192.1.1.1
 host 192.1.1.2 eq 500
RTRB(config-ext-nacl)# permit esp host 192.1.1.1 host 192.1.1.2
RTRB(config-ext-nacl)# permit ip 192.168.1.0 0.0.0.255
 192.168.2.0 0.0.0.255
RTRB(config-ext-nacl)# deny ip any any
RTRB(config-ext-nacl)# exit
RTRB(config)# interface Serial0/0
RTRB(config-if)# ip address 192.1.1.2 255.255.255.0
RTRB(config-if)# ip access-group perimeter in
RTRB(config-if)# crypto map statmap
Distinguished Name-Based Crypto Maps
The Distinguished Name-Based crypto map feature, introduced in IOS 12.2(4)T, allows you to restrict access on IPsec interfaces based on information in a user's certificate, especially those certificates that have Distinguished Names (DNs). Without this feature, a router will accept any certificate from an authenticated source; with this feature, you can control which peers you'll allow by examining additional information in the peer's certificate. As an example, you might have an Internet and Extranet connection on your router and you're using certificates for IPsec device authentication. Your SOHO and mobile users use the Internet for making connections to the corporate office while your third-party company uses the Extranet. Your concern is that you want only the third-party company to use the Extranet connection, and not the Internet connection, when establishing IPsec sessions to you. DN-Based crypto maps allow you to implement this type of policy.
Setting Up DN-Based Crypto Maps
Setting up DN-based crypto maps is fairly simple. First, you need to define the criteria to match on in a certificate. Your choices are matching on certificate field information, like the CN, OU, O, and other certificate fields or the hostname of a peer. To configure DN matching, use these commands:
Router(config)# crypto identity DN_policy_name
Router(config-identity)# description descriptive_text
Router(crypto-identity)# dn name=string [,name=string...]
The crypto identity command creates the policy matching rules. The description command allows you to assign a brief description that describes the policy-matching criteria. The dn subcommand specifies which fields and values on a certificate to examine for a match. For example, if you want to match on "ou=Developers, o=Cisco" to match a certificate containing these two fields, you can enter multiple dn commands within a policy configuration.
To configure hostname matching, use these commands:
Router(config)# crypto identity DN_policy_name
Router(config-identity)# description descriptive_text
Router(crypto-identity)# fqdn hostname_or_FQDN
The fqdn command allows you to enter a FQDN or the domain name that will appear on a certificate, such as "fatcat.cisco.com" or "cisco.com." To view your configured policies, use the show crypto identity command.
One you've defined your matching criteria, you have to activate your rules. This is done by applying the matching criteria to a crypto map entry, like this for a static crypto map entry:
Router(config)# crypto map map_name seq_# ipsec-isakmp
Router(config-crypto-map)# set identity DN_policy_name
or like this for a dynamic crypto map entry:
Router(config)# crypto dynamic-map map_name seq_#
Router(config-crypto-map)# set identity DN_policy_name
You need to do this process for each crypto map entry for a crypto map activated on a particular interface. Once you've configured this feature, if you see the following message for peers with nonmatching criteria, you know that your policy configuration is working:
<time>: %CRYPTO-4-IKE_QUICKMODE_BAD_CERT: encrypted connection
 attempted with a peer without the configured certificate
 attributes.
Illustrating the Use of DN-Based Crypto Maps
Now that you have a basic understanding for configuring DN-based crypto maps, I'll illustrate the process in Example 17-10. In this example, a router has two external interfaces: one to the Internet and one to an Extranet partner. The router is accepting remote access sessions, using certificates for device authentication. The problem you've been experiencing is that in many instances, the Extranet people are coming through the Internet to reach your company instead of using the directly connected Extranet connection; this is causing bandwidth issues for your Internet connection and you want to halt this practice. Example 17-10 omits some of the basic configuration, such as the ISAKMP/IKE Phase 1 policy, the certificate configuration, perimeter ACL, and so on. Instead, I'll focus on the DN-based crypto map configuration. In this example, I created two policies: "myidentpolicy" and "extidentpolicy." I've also created two dynamic crypto maps with a single entry each, one for each policy. I then created two separate static crypto maps and referenced a dynamic crypto map in them.
Example 17-10. DN-Based Crypto Map Example
! Transform set for all remote peers
RTRA(config)# crypto ipsec transform-set remote esp-aes esp-sha-hmac
RTRA(cfg-crypto-tran)# exit
! Creating a certificate matching policy for my company
RTRA(config)# crypto identity myidentpolicy
RTRA(config-identity)# description Certificate policy for My Company
RTRA(crypto-identity)# dn o=mycompany
RTRA(crypto-identity)# exit
! Creating a certificate matching policy for the Extranet
RTRA(config)# crypto identity extidentpolicy
RTRA(config-identity)# description Certificate policy for Extranet
RTRA(crypto-identity)# dn o=theircompany
RTRA(crypto-identity)# exit
! Creating a dynamic crypto map for my company's peers
RTRA(config)# crypto dynamic-map mydynmap 10
RTRA(config-crypto-map)# set transform-set remote
RTRA(config-crypto-map)# set identity myidentpolicy
RTRA(config-crypto-map)# exit
!Creating a dynamic crypto map for Extranet peers
RTRA(config)# crypto dynamic-map extdynmap 10
RTRA(config-crypto-map)# set transform-set remote
RTRA(config-crypto-map)# set identity extidentpolicy
RTRA(config-crypto-map)# exit
! Creating the crypto map entry for my company's dynamic crypto map
RTRA(config)# crypto map mystatmap 65000 ipsec-isakmp
 dynamic mydynmap
! Creating a different crypto map and crypto map entry for Extranet's
 dynamic crypto map
RTRA(config)# crypto map extstatmap 65000 ipsec-isakmp
 dynamic extdynmap
! Applying my company's static map to the Internet interface
RTRA(config)# interface Ethernet0/0
RTRA(config-if)# description Internet Connection
RTRA(config-if)# ip address 192.1.1.40 255.255.255.0
RTRA(config-if)# crypto map mystatmap
RTRA(config-if)# exit
! Applying the Extranet's static map to the Extranet interface
RTRA(config)# interface Ethernet0/1
RTRA(config-if)# description Extranet Connection
RTRA(config-if)# ip address 192.1.1.40 255.255.255.0
RTRA(config-if)# crypto map extstatmap
Part I: VPNs
Overview of VPNs
- Overview of VPNs
- Traffic Issues
- VPN Definition
- VPN Components
- VPN Designs
- VPN Implementations
- VPNs: Choosing a Solution
- Summary
VPN Technologies
IPsec
PPTP and L2TP
SSL VPNs
Part II: Concentrators
Concentrator Product Information
- Concentrator Product Information
- Concentrator Models
- Concentrator Modules
- Concentrator Features
- Introduction to Accessing a Concentrator
- Summary
Concentrator Remote Access Connections with IPsec
- Concentrator Remote Access Connections with IPsec
- Controlling Remote Access Sessions to the Concentrator
- IPsec Remote Access
- Network Access Control (NAC) for IPsec and L2TP/IPsec Users
- Summary
Concentrator Remote Access Connections with PPTP, L2TP, and WebVPN
- Concentrator Remote Access Connections with PPTP, L2TP, and WebVPN
- PPTP and L2TP Remote Access
- WebVPN Remote Access
- Summary
Concentrator Site-to-Site Connections
- Concentrator Site-to-Site Connections
- L2L Connectivity Example
- ISAKMP/IKE Phase 1 Preparation
- Adding Site-to-Site Connections
- Address Translation and L2L Sessions
- Summary
Concentrator Management
- Concentrator Management
- Bandwidth Management
- Routing on the Concentrator
- Chassis Redundancy
- Administration Screens
- Summary
Verifying and Troubleshooting Concentrator Connections
- Verifying and Troubleshooting Concentrator Connections
- Concentrator Tools
- Troubleshooting Problems
- Summary
Part III: Clients
Cisco VPN Software Client
- Cisco VPN Software Client
- Cisco VPN Client Overview
- Cisco VPN Client Interface
- IPsec Connections
- VPN Client GUI Options
- VPN Client Software Updates
- VPN Client Troubleshooting
- Summary
Windows Software Client
- Windows Software Client
- Windows Client
- Configuring the Windows VPN Client
- Configuring the VPN 3000 Concentrator
- Microsoft Client Connections
- Troubleshooting VPN Connections
- Summary
3002 Hardware Client
- 3002 Hardware Client
- Overview of the 3002 Hardware Client
- Initial Access to the 3002
- Authentication and Connection Options
- Connection Modes
- Administrative Tasks
- Summary
Part IV: IOS Routers
Router Product Information
Router ISAKMP/IKE Phase 1 Connectivity
- Router ISAKMP/IKE Phase 1 Connectivity
- IPsec Preparation
- ISAKMP/IKE Phase 1 Policies
- ISAKMP/IKE Phase 1 Device Authentication
- Monitoring and Managing Management Connections
- Routers as Certificate Authorities
- Summary
Router Site-to-Site Connections
- Router Site-to-Site Connections
- ISAKMP/IKE Phase 2 Configuration
- Viewing and Managing Connections
- Issues with Site-to-Site Connections
- Summary
Router Remote Access Connections
- Router Remote Access Connections
- Easy VPN Server
- Easy VPN Remote
- IPsec Remote Access and L2L Sessions on the Same Router
- WebVPN
- Summary
Troubleshooting Router Connections
- Troubleshooting Router Connections
- ISAKMP/IKE Phase 1 Connections
- ISAKMP/IKE Phase 2 Connections
- New IPsec Troubleshooting Features
- Fragmentation Problems
- Summary
Part V: PIX Firewalls
PIX and ASA Product Information
- PIX and ASA Product Information
- PIX Deployment Scenarios
- PIX and ASA Feature and Product Overview
- Summary
PIX and ASA Site-to-Site Connections
- PIX and ASA Site-to-Site Connections
- ISAKMP/IKE Phase 1 Management Connection
- ISAKMP/IKE Phase 2 Data Connections
- L2L Connection Examples
- Summary
PIX and ASA Remote Access Connections
- PIX and ASA Remote Access Connections
- Easy VPN Server Support for 6.x
- Easy VPN Remote Support for 6.x
- Easy VPN Server Support for 7.0
- Summary
Troubleshooting PIX and ASA Connections
- Troubleshooting PIX and ASA Connections
- ISAKMP/IKE Phase 1 Connections
- ISAKMP/IKE Phase 2 Connections
- Summary
Part VI: Case Study
Case Study
Index
EAN: 2147483647
Pages: 178
