VPN Client GUI Options
I've already discussed two of the options available from the VPN Client's Options in the main menu: Preferences and the Mode selection (Simple and Advanced). This part of the chapter will discuss the other three options: Application Launcher, Windows Login Properties, and Stateful Firewall (Always On).
Application Launcher
The Application Launcher option from the Options selection in the main menu of the VPN Client allows you to run an application before establishing a session to an Easy VPN Server. You might want to do this if you've configured Start Before Logon in the Windows Login Properties of the VPN Client and you need to authenticate to some other application before bringing the tunnel up, or you need to start another application for monitoring functions before each session is established.
By default, this option is disabled. When you go to Options > Application Launcher from the main menu, click the Enable check box to enable it and then click the Browse button to find the application to launch. Click the OK button to save your changes.
Note
To use the Application Launcher feature, you also must select the Allow launching of third party applications before logon option in the Windows Login Properties, discussed in the next section.
Windows Login Properties
The Windows Login Properties, which you can access by going to Options > Windows Login Properties from the main menu, allow you to specify special login functions for Windows NT 4.0, 2000, and XP platforms (for other platforms, this will not appear as a selection in the menu tree). There are three check boxes in this window that allow you to:
- Enable start before logon Allows you to connect to the network via IPsec before you log on to your Windows domain. This might be necessary if the domain controller is located behind the Easy VPN Server. When this option is used, you log in to your domain after the IPsec tunnel is established.
- Allow launching of third party applications before logon (Application Launcher, Third party dial-up application) Allows you to launch an application before you log in to your Windows domain.
- Disconnect VPN connection when logging off Has the VPN Client automatically disconnect itself whenever you log out of the Windows domain. Of the three parameters, only this one is enabled by default. About the only time you would want to disable this feature is if your network is using Windows roaming profiles.
Automatic Initiation
Automatic initiation, commonly called auto-initiation (AI), allows computers to establish IPsec sessions automatically using the Cisco VPN Client. AI, new in Version 3.6, was developed primarily for wireless environments, but can be used in other situations. AI is disabled by default. When enabled, the VPN Client becomes active immediately whenever the following are true:
- The computer boots up or the computer comes out of a standby or hibernating state.
- The computer has an IP address assigned to a NIC that is associated with AI.
When both of these items are true, AI will use the appropriate connection profile to automatically set up a secure session to the Easy VPN Server in the associated connection profile. This is very useful in wireless LANs (WLANs) where you want to make the VPN process as transparent as possible to the user. In most WLANs conscious of security, a VPN is used to protect the wireless traffic when it is sent to the wired LAN. For example, depending on which wireless access point your computer is connected to and which DHCP server it has acquired its addressing information from, you might need to connect to a specific Easy VPN Server before you can access corporate resources. Of course, this can be problematic for users, because it will be difficult for them, in most cases, to figure out which Server they should be connected to. AI takes this guesswork out of this situation by predefining which profile the VPN Client should use based on the addressing information assigned to the local NIC.
vpnclient.ini File
Unlike the other features discussed so far with the VPN Client, AI first must be enabled by configuring parameters in the vpnclient.ini file with a text editor. Once you've done this, you can then use the VPN Client GUI to enable and disable AI, or change the retry interval for a failed session attempt. Table 12-4 lists the parameters you configure in the vpnclient.ini file.
|
Parameter |
Values |
Description |
|---|---|---|
|
AutoInitiationEnable |
0: disable (default) 1: enable |
Enables AI |
|
AutoInitiationRetryInterval |
110 minutes (1 is the default) or 560 seconds, depending on the interval type |
Specifies the time to wait when a session attempt fails before trying again |
|
AutoInitiationRetryIntervalType |
0: minutes (default) 1: seconds |
Specifies the retry interval measurement in either minutes or seconds: for LAN session, I would use seconds: for dialup session, I would use minutes |
|
AutoRetryLimit |
A number |
Specifies the number of times to try to session before failing |
|
AutoInitiationList |
A name or names separated by commas |
Specifies the names of sections in the vpnclient.ini file that specify the connection profiles to use for AI |
|
[Section_name] |
This is one of the names specified in the AutoIntiationList parameter |
Specifies the parameters to use for AI when connecting with a specified connection profile |
|
Network and Mask |
IP network number and subnet mask |
These appear under the section name and specify the network number that needs to be associated with the PC's NIC to use this entry for AI |
|
ConnectionEntry |
Name of a connection profile |
This is the name of the .pcf file to use for the AI connection and appears under the section name |
|
Connect |
0: do not use AI 1: use AI (default) |
This enables or disables AI for the section name entry |
I'll use Example 12-4 to illustrate how to set up the vpnclient.ini file for AI.
Example 12-4. Sample vpnclient.ini File with AI
[Main]output omitted
images/U2192.jpg border=0> AutoInitiationEnable=1 AutoInitiationRetryIntervalType=1 AutoInitationRetryInterval=30 AutoInitiationRetryLimit=20 AutoInitiationList=WLAN [WLAN] Network=192.168.0.0 Mask=255.255.0.0 ConnectionEntry=wirelesslan Connect=1
In this example, AI has been enabled in the first line under the [Main] section. The second and third lines set the interval type to seconds and the timeout to 30 seconds. The fourth line specifies the number of retries to connect when AI fails to connect initially to the Easy VPN Server or loses its current connection to the Server. The last line under the [Main] section specifies the section name that contains the parameters that determine when AI is to be used and what connection profile to use to establish a secure session. The section name is [WLAN] and if the PC's NIC has an address that begins with "192.168." (based on the IP address and subnet mask), AI will take effect. The wirelesslan.pcf file will be used by AI to establish a secure connection and the last line of [WLAN] enables this profile for AI (this is the default).
Tip
If you need to enter multiple section names, you should order them in the AutoInitiationList parameter based on uniqueness of the network numbers: the more specific network number sections should appear first and the least specific last. For example, if you have two sections, one with a network of 10.10.0.0 255.255.0.0 and another with 10.0.0.0 255.0.0.0, the section with 10.10.0.0 should appear first because it is more specific. The VPN Client processes sections in the AutoInitiationList parameter from first to last; the first match that is found for a section is used and the rest are ignored.
AI Configuration Verification
Once you have configured AI, you can verify your configuration by performing either of the following:
- From the Windows command prompt (cmd.exe), use the vpnclient verify autoinitconfig command.
- From the VPN Client GUI, in the main menu select Options: you should now see an entry for Automatic VPN Initiation under the Options menu selections.
Example 12-5 shows the use of the Windows command line to verify your AI configuration. In this example, you can see that the AI has been enabled; if there were any configuration errors, you would see them in the display output.
Example 12-5. AI Verification: Windows Command Line
C:Program FilesCisco SystemsVPN Client> vpnclient verify autoinitconfig
Cisco Systems VPN Client Version 4.6.00.0049
Copyright (C) 1998-2004 Cisco Systems, Inc. All Rights Reserved.
Client Type(s): Windows, WinNT
Running on: 5.0.2195 Service Pack 4
Config file directory: C:Program FilesCisco SystemsVPN Client

Auto-initiation Configuration Information.
Enable: 1
Retry Interval: 60 seconds
List Entry 0: Network: 192.168.0.0
 Mask: 255.255.0.0
 Connect Flag: 1
 Connection Entry: 'wirelesslan'
VPN Client GUI and AI
Once you have successfully configured AI, start up the VPN Client. In the VPN Client, if you go to Options > Automatic VPN Initiation, you can enable or disable AI and change the retry interval. You cannot change any other parameter related to AI from the GUI; instead, you must use a text editor to manipulate the vpnclient.ini AI parameters.
AI Usage
Once your PC NIC comes up and is assigned an IP address and subnet mask, AI will compare the NIC's associated network number to the networks in its AI sections. If there is a match, AI will use the associated connection profile and bring up a secure connection to the associated Easy VPN Server automatically. You'll be prompted for your XAUTH username and password during the authentication phase.
Once you have a VPN session established, if you terminate it, AI will bring the session back up automatically. If you want to suspend the use of AI, right-click the yellow padlock icon in the Windows taskbar and choose Suspend Auto-initiation. This will prevent AI from re-establishing a session automatically. This only suspends the AI process for your current computer session; if you reboot your PC, AI is re-enabled automatically. To resume the use of AI, right-click the yellow padlock icon in the Windows taskbar and choose Resume Auto-initiation.
To disable AI, either:
- Right-click the yellow padlock icon in the Windows taskbar and choose Disable Auto-initiation.
- In the VPN Client main menu, go to Options > Automatic VPN Initiation and uncheck the Enable automatic VPN initiation check box.
Stateful Firewall
The Cisco VPN Client includes an integrated stateful firewall that is a .dll file provided by Zone Labs; it is commonly referred to as the Cisco Integrated Client (CIC) firewall. The feature itself is referred to as "Stateful Firewall (Always On)" and is only available on Windows clients. CIC is stateful for TCP, UDP, and ICMP packets. CIC, or some type of software firewall, should be used to provide protection for a computer when split tunneling is allowed and devices can access the PC directly without going through the tunnel. When you define split tunneling on your Easy VPN Server, you also should specify a firewall policy that the client should use.
The default behavior of the CIC stateful firewall, when enabled, is to allow all outbound traffic and deny all inbound traffic, except for the following traffic:
- For inbound traffic, if it is returning traffic for a connection originated by the computer, allow it into the computer.
- Allow inbound DHCP replies from a different port into the computer.
- Allow inbound ESP traffic into the computer. This is necessary because stateful firewalls need to examine Layers 4 and higher to determine the state of the connection and ESP is a Layer-3 protocol.
Firewall policies are defined on the Easy VPN Server and pushed to the client during IKE Mode Config (Network Admission Control, or NAC, enforcement is available in 4.7 of the VPN 3000 concentrator and allows you to define similar policies). You can define what firewall the client should be using and what policy should be used:
- Are You There (AYT) The firewall must be operational on the client.
- Central Policy Push or Central Protection Policy (CPP) A firewall filter is defined on the Easy VPN Server or external authorization server and pushed down to the client during IKE Mode Config, which the client's firewall will use. The filter affects only nontunneled traffic: traffic not traversing the tunnel (therefore split tunneling is necessary). If you want to filter traffic on the tunnel, you must define a filter on the Easy VPN Server to perform this process.
These policies and their configuration on the VPN 3000 concentrator were discussed in Chapter 7, "Concentrator Remote Access Connections with IPsec." Table 12-5 has a brief overview of the software firewalls supported by AYT and CPP. The following two sections will discuss how to enable the CIC firewall and how to view the operation of the firewall on the PC.
|
Firewall Product |
Supported Policies |
|---|---|
|
CIC |
CPP (policies on Easy VPN Server) |
|
Network Ice BlackICE Defender |
AYT |
|
Zone Labs ZoneAlarm and ZoneAlarm Pro |
AYT and CPP (policies on the Easy VPN Server) |
|
Zone Labs Integrity |
Policy from server (policies defined on a Zone Labs Integrity server) |
|
Sygate Personal Firewall, Personal Firewall Pro, and Security Agent |
AYT |
|
Cisco Security Agent (CSA) |
AYT |
Enabling the Stateful Firewall Feature
By default, the CIC firewall is disabled. To enable it, perform either of the following:
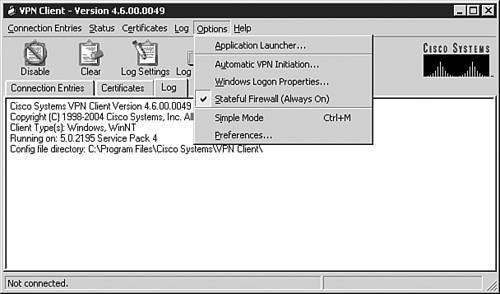
- From the main menu, choose Options > Stateful Firewall (Always On).
- In the Windows taskbar, right-click the yellow padlock icon and choose Stateful Firewall (Always On).
Once you do this, you can verify that the firewall is operational by pulling up the menu structure in either of the above two approaches and see a check mark to the left of the "Stateful Firewall (Always On)" option. This can be seen in Figure 12-17. If you don't see the check mark, the CIC firewall is disabled.
Figure 12-17. Enabling the CIC Firewall
Note
Once the CIC firewall is enabled, even if you exit the VPN Client software, the CIC firewall is still operating, providing your computer protection. To disable the CIC firewall, start up the VPN Client and follow one of the two bullet points above.
Verifying the Stateful Firewall Operation
Once you have activated the stateful firewall and established an IPsec session to the Easy VPN Server, you can view the status information about the firewall policy by going to either of the following:
- In the VPN Client GUI's main menu, go to Status > Statistics.
- In the Windows taskbar, right-click the yellow closed padlock icon and choose Statistics.
From here, click the Firewall tab and you'll see the screen shown in Figure 12-18.
Figure 12-18. Examining the Firewall Policies
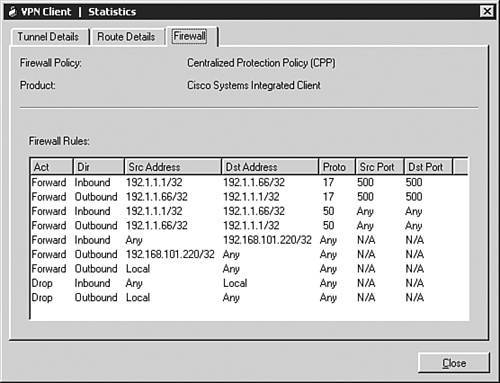
At the top of the screen you'll see the firewall policy and the firewall type defined on the Easy VPN Server for the user's group; you'll either see AYT, CPP, or Client/Server (Zone Labs Integrity only) for the type and the actual firewall product.
For an AYT policy, this is the only information you'll see. For CPP, however, you'll see the filtering rules pushed down to the client during IKE Mode Config, like that in Figure 12-18. Rules are processed top-down until a match is found. If no match is found, the default rule is used. If you are using the default Cisco VPN Client filter, "Firewall Filter for VPN Client (Default)," on the VPN 3000 concentrators, these rules drop any traffic that doesn't match the preceding rules (with the exception of the three bullet points at the beginning of the firewall section).
Tip
So that you don't accidentally misconfigure a filtering rule on the VPN 3000 concentrator for the firewall policy, I recommend that you copy the "Firewall Filter for VPN Client (Default)" on the concentrator and start with this as a building block for your CPP filter.
The Action column indicates what the firewall should do if there is a match on the filtering rule: "Forward" or "Drop." The Dir column indicates the direction of traffic flow: "Inbound" is into the PC and "Outbound" is leaving the PC. The Src Address and Dst Address columns indicate host addresses or networks. If you see "Local" for an address, this refers to the computer itself. The Proto column indicates the IP protocol; for example, 6 is TCP, 17 is UDP, and 50 is ESP. The Src Port and Dst Port columns indicate the port numbers for TCP and UDP connections.
You can expand the column headings to view all the information in a text box and you can move the column headings. However, these changes are not persistent. When you close and reopen this window, the viewing format will revert back to the default view.
Troubleshooting Firewall Connections
When you start up an IPsec session to the Easy VPN Server, the firewall policy on the Server is enforced. If your computer is not configured to follow the policy, a few things can happen. In the following scenarios, assume that a VPN 3000 concentrator is used as the Easy VPN Server.
In this first example, if the Firewall Setting parameter is set to "Firewall Optional" on the concentrator, and you either don't have a firewall operational, or have a different one operational than what the concentrator specifies, you'll see a notification message pop up during the IPsec session-building process. This notification message will state: "The client did not match the firewall policy configured on the central site VPN device. NetworkICE BlackICE Defender should be enabled or installed on your computer." In this example, the configured firewall on the concentrator was BlackICE. Even though the firewall policy didn't match between the two, the IPsec session still will proceed.
In this second example, if the Firewall Setting parameter is set to "Firewall Required" on the concentrator and you either don't have a firewall operational or have a different one operational than what the concentrator specifies, you'll see a window pop up during the connection process, stating: "Secure VPN connection terminated by Peer. Reason 435: Firewall Policy Mismatch." The VPN session is then terminated. In this instance, the concentrator refuses your session attempt unless you meet the configured firewall policy. Following this, the notification window will pop up, explaining the firewall policy requirements (an example of this is in the last paragraph).
Tip
If you're a network administrator and making changes to a group, where you want to have them use a firewall, I recommend that you use the "Firewall Optional" policy first and then send an e-mail out to everyone in the group explaining the new policy and where to download the firewall product (if it's not the CIC firewall). Unfortunately, you can't change the firewall notification message sent to the client; however, you could create a login banner explaining the access change and where to download and install the software firewall product.
Part I: VPNs
Overview of VPNs
- Overview of VPNs
- Traffic Issues
- VPN Definition
- VPN Components
- VPN Designs
- VPN Implementations
- VPNs: Choosing a Solution
- Summary
VPN Technologies
IPsec
PPTP and L2TP
SSL VPNs
Part II: Concentrators
Concentrator Product Information
- Concentrator Product Information
- Concentrator Models
- Concentrator Modules
- Concentrator Features
- Introduction to Accessing a Concentrator
- Summary
Concentrator Remote Access Connections with IPsec
- Concentrator Remote Access Connections with IPsec
- Controlling Remote Access Sessions to the Concentrator
- IPsec Remote Access
- Network Access Control (NAC) for IPsec and L2TP/IPsec Users
- Summary
Concentrator Remote Access Connections with PPTP, L2TP, and WebVPN
- Concentrator Remote Access Connections with PPTP, L2TP, and WebVPN
- PPTP and L2TP Remote Access
- WebVPN Remote Access
- Summary
Concentrator Site-to-Site Connections
- Concentrator Site-to-Site Connections
- L2L Connectivity Example
- ISAKMP/IKE Phase 1 Preparation
- Adding Site-to-Site Connections
- Address Translation and L2L Sessions
- Summary
Concentrator Management
- Concentrator Management
- Bandwidth Management
- Routing on the Concentrator
- Chassis Redundancy
- Administration Screens
- Summary
Verifying and Troubleshooting Concentrator Connections
- Verifying and Troubleshooting Concentrator Connections
- Concentrator Tools
- Troubleshooting Problems
- Summary
Part III: Clients
Cisco VPN Software Client
- Cisco VPN Software Client
- Cisco VPN Client Overview
- Cisco VPN Client Interface
- IPsec Connections
- VPN Client GUI Options
- VPN Client Software Updates
- VPN Client Troubleshooting
- Summary
Windows Software Client
- Windows Software Client
- Windows Client
- Configuring the Windows VPN Client
- Configuring the VPN 3000 Concentrator
- Microsoft Client Connections
- Troubleshooting VPN Connections
- Summary
3002 Hardware Client
- 3002 Hardware Client
- Overview of the 3002 Hardware Client
- Initial Access to the 3002
- Authentication and Connection Options
- Connection Modes
- Administrative Tasks
- Summary
Part IV: IOS Routers
Router Product Information
Router ISAKMP/IKE Phase 1 Connectivity
- Router ISAKMP/IKE Phase 1 Connectivity
- IPsec Preparation
- ISAKMP/IKE Phase 1 Policies
- ISAKMP/IKE Phase 1 Device Authentication
- Monitoring and Managing Management Connections
- Routers as Certificate Authorities
- Summary
Router Site-to-Site Connections
- Router Site-to-Site Connections
- ISAKMP/IKE Phase 2 Configuration
- Viewing and Managing Connections
- Issues with Site-to-Site Connections
- Summary
Router Remote Access Connections
- Router Remote Access Connections
- Easy VPN Server
- Easy VPN Remote
- IPsec Remote Access and L2L Sessions on the Same Router
- WebVPN
- Summary
Troubleshooting Router Connections
- Troubleshooting Router Connections
- ISAKMP/IKE Phase 1 Connections
- ISAKMP/IKE Phase 2 Connections
- New IPsec Troubleshooting Features
- Fragmentation Problems
- Summary
Part V: PIX Firewalls
PIX and ASA Product Information
- PIX and ASA Product Information
- PIX Deployment Scenarios
- PIX and ASA Feature and Product Overview
- Summary
PIX and ASA Site-to-Site Connections
- PIX and ASA Site-to-Site Connections
- ISAKMP/IKE Phase 1 Management Connection
- ISAKMP/IKE Phase 2 Data Connections
- L2L Connection Examples
- Summary
PIX and ASA Remote Access Connections
- PIX and ASA Remote Access Connections
- Easy VPN Server Support for 6.x
- Easy VPN Remote Support for 6.x
- Easy VPN Server Support for 7.0
- Summary
Troubleshooting PIX and ASA Connections
- Troubleshooting PIX and ASA Connections
- ISAKMP/IKE Phase 1 Connections
- ISAKMP/IKE Phase 2 Connections
- Summary
Part VI: Case Study
Case Study
Index
EAN: 2147483647
Pages: 178
- Chapter IV How Consumers Think About Interactive Aspects of Web Advertising
- Chapter V Consumer Complaint Behavior in the Online Environment
- Chapter VI Web Site Quality and Usability in E-Commerce
- Chapter VII Objective and Perceived Complexity and Their Impacts on Internet Communication
- Chapter IX Extrinsic Plus Intrinsic Human Factors Influencing the Web Usage
