Initial Access to the 3002
The 3002 hardware client supports both a command-line interface (CLI), which is menu-driven, and a graphical user interface (GUI). Both are discussed in this part of the chapter. The 3002 has the following default configuration:
- DHCP client on its public interface
- Static IP address of 192.168.10.1 on its private interface
- DHCP server on its private interface
So, unlike with the VPN 3000 concentrators, you don't need to use the CLI to initially configure the 3002. Because the 3002 has an IP address on its private interface, you just need to set up your PC to acquire its addressing information via DHCP and then use a web browser and point it to 192.168.10.1.
Command-Line Interface
The menu-drive CLI is used primarily for troubleshooting of the 3002 when you cannot access the 3002 via a web browser; otherwise, the web-based GUI is used to manage and troubleshoot the 3002. Accessing the CLI of the 3002 typically is done via the console port with a Cisco rollover cable. When you access the CLI, you'll be prompted to log in to the 3002. The default username and password are just like those for the 3000 concentrators: "admin" for both.
Example 14-1 shows a simple login process. As you can see from the CLI output, the interface looks the same as the CLI on the 3000 concentrators; how you move around the CLI is the same as on the concentrators (See Chapter 6, "Concentrator Product Information" for more information about using the concentrator's CLI). However, because the 3002 is a client, you will not see all the options you see on the concentrator's CLIand vice versa.
Example 14-1. 3002 CLI Login and Main Menu
Login: admin
Password: admin


 Welcome to
 Cisco Systems
 VPN 3002 Hardware Client
 Command Line Interface
Copyright (C) 19982004 Cisco Systems, Inc.


1) Configuration
2) Administration
3) Monitoring
4) Save changes to Config file
5) Help Information
6) Exit


Main ->
Graphical User Interface
With few exceptions, you'll be using a web browser to manage the 3002. Because the 3002 already is set up with an IP address on its private interface (192.168.10.1) and is acting as a DHCP server on this interface, you only need to connect a PC to this interface and set it to acquire its addressing via DHCP. Then point your web browser to the 3002 like this: http://192.168.10.1. You'll be presented with the login screen shown in Figure 14-2.
Figure 14-2. 3002 Web Access
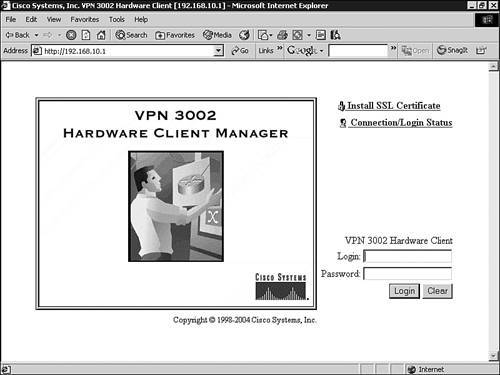
The only difference between this login screen and the concentrators' is that there is an extra hyperlink: Connection/Login Status, which I'll be talking about in the "Connection and Authentication Options" section later in the chapter. Enter the account and password and click the Login button to log in to the 3002.
Quick Configuration of the 3002
The first time you log in to the 3002, you have access to the Quick Configuration mode, which, like the corresponding process on the concentrator, allows you to put a base configuration on the 3002. This configuration allows the 3002 to set up an IPsec session to an Easy VPN Server. The first screen you see is shown in Figure 14-3. Here you have an option to start the Quick Configuration process by clicking the Click here to start Quick Configuration hyperlink or to skip this process and proceed to the main menu by clicking the Click here to go to the Main Menu hyperlink.
Figure 14-3. 3002 Initial Web-Based Login

Time Screen
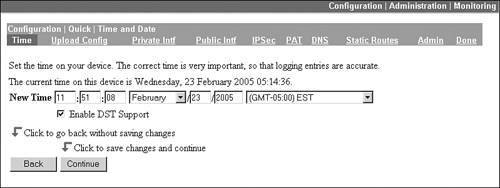
When you start Quick Configuration, first you are taken to the Time and Date screen where you can enter the date, time, time zone, and Daylight Saving Time information, shown in Figure 14-4. When you are done entering the information on this screen, click the Continue button.
Figure 14-4. Quick Configuration: Time Screen
Note
During Quick Configuration, you can exit it immediately by clicking the Main hyperlink in the top right corner or the three operational area hyperlinks below this: Configuration, Administration, or Monitoring. One different twist, compared to the concentrators, is that you don't have to proceed, screen by screen, to access a particular Quick Configuration screen; instead, you can click the name of the Quick Configuration screen (these are hyperlinks) below the "Configuration | Administration | Monitoring" bar: Time, Upload Config, Private Intf, Public Intf, IPsec, PAT, DNS, Static Routes, Admin, and Done. If you want to save your current parameter changes on the screens you have updated and exit Quick Configuration mode, click the Done hyperlink on this screen bar. When you do this, you'll be taken to the 3002's Main screen.
Upload Config Screen
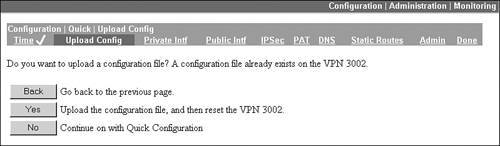
The Upload Config screen is the next screen in sequence during the Quick Configuration process, shown in Figure 14-5. This screen allows you to import an already created configuration file for the 3002 and have the 3002 activate this configuration. This commonly is used when the 3002 is sent directly from Cisco or the reseller to the SOHO, where the employees at the SOHO have little understanding of configuring networking products. You can create a 3002 configuration file at the corporate office and e-mail this attachment to someone who will perform this task at the SOHO. You'll lead them through the first few screens and then have them click the Yes button on this screen and then the Browse button (on the next screen). Have them find the 3002 configuration file on their PC and click the Upload button to load the 3002's configuration file. Once this is done, have them click the Done hyperlink in the above taskbar to save and activate the changes. Once this is done, the 3002 will be using the configuration file you e-mailed the SOHO user. If you're not using this process, then just click the No button to continue the Quick Configuration process.
Figure 14-5. Quick Configuration: Upload Config Screen
Tip
Notice that as you complete a screen, such as Time, that there is a check mark next to it in the above taskbar: this allows you to keep track of the screens you have completed in Quick Configuration mode.
Private Intf Screen
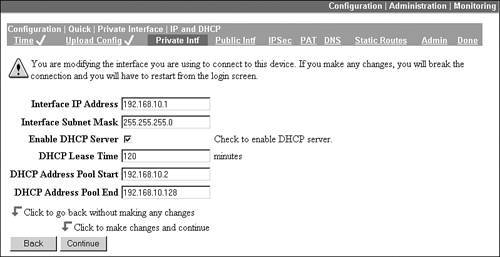
On the Private Intf screen, shown in Figure 14-6, you can change the IP addressing for the private interface, and its DHCP server configuration. The default is to use the existing IP address (192.168.10.1) and the existing DHCP server configuration. To change the private interface address or the DHCP server settings, click Yes for changing the private interface's IP address and the appropriate radio button for the DHCP server settings. After you have clicked the Continue button and you have chosen Yes for either the interface or DHCP server settings, you'll see the screen in Figure 14-7if you don't change the options on the screen in Figure 14-6, you're taken to the next screen, Public Intf.
Figure 14-6. Quick Configuration: Private Intf Screen, Part 1
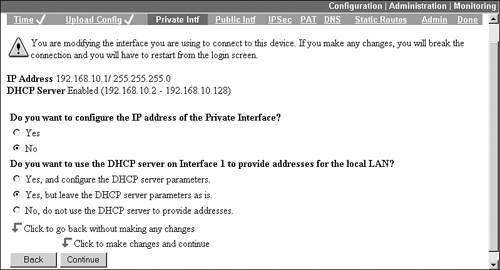
Figure 14-7. Quick Configuration: Private Intf Screen, Part 2
Public Intf Screen
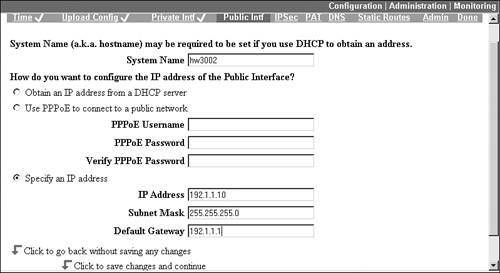
After configuring the private interface, you are taken to the Public Intf s creen, shown in Figure 14-8. At the top of the screen you can give the hardware client a name. In Figure 14-8, I used "hw3002" (the name is required if you'll be using certificates). The default addressing configuration is to acquire the IP addressing information for the public interface via DHCP, but you can acquire it using PPPoE or by defining it statically (as I did in Figure 14-8). Click the Continue button to proceed to the next screen.
Figure 14-8. Quick Configuration: Public Intf Screen
IPsec Screen
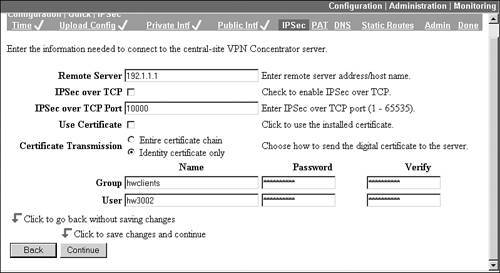
The IPsec screen, shown in Figure 14-9, allows you to specify the properties to use to connect to the Easy VPN Server. Because this is an Easy VPN Remote, most of the parameters are hidden from you, for example, ISAKMP/IKE policies and IPsec SA transform sets. At the top of the screen you need to enter the IP address of the Easy VPN Server. Optionally, you can select IPsec over TCP, but this must be enabled on the Server (NAT-T is enabled by default on the 3002 and is a nonconfigurable option). If you want to use certificates, you must have set this up before using Quick Configuration; otherwise, in the Group text box enter the name of the group the 3002 belongs to and the corresponding pre-shared group key. Because the 3002 is a client, you also must supply a username and password. Click the Continue button to proceed to the next screen.
Figure 14-9. Quick Configuration: IPsec Screen
Tip
I recommend that you place hardware and software clients in different groups on your Easy VPN Server, giving you more flexibility in assigning your VPN policies.
Note
Please note that the 3002 is a remote access IPsec client, and as such, it can have only a single IPsec tunnel established at a time. If a SOHO network needs more than one tunnel established, the 3002 is not the best possible product. In this situation, I would look at a low-end PIX or IOS router products instead and set up L2L sessions.
PAT Screen
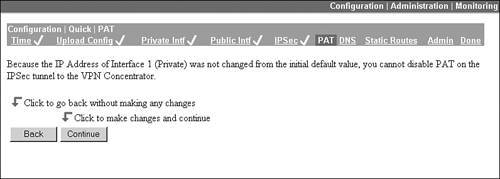
The name "PAT" for this screen is somewhat misleading: it should read "Client and Network Extension Modes," because the connection mode is what you can enable on this screen. By default, if you leave the IP address of 192.168.10.1 on the private interface, your 3002 will operate only in client mode. By changing the address on the private interface, you can enable network extension mode (this is discussed later in the "Connection Modes" section). With PAT (Port Address Translation) enabled, the 3002 operates in client mode. When disabled, it operates in network extension mode. In the screen in Figure 14-10, you can see there is no option for disabling PAT, indicating that the IP address on the private interface hasn't been changed from 192.168.10.1. At this point, if you wanted to use network extension mode, you would click the Private Intf hyperlink at the top of the screen and change the IP address from 192.168.10.1 to something else; then return to this screen by clicking the PAT hyperlink at the top of the screen. Click the Continue button from this screen to proceed with Quick Configuration.
Figure 14-10. Quick Configuration: PAT Screen
DNS Screen
The DNS screen allows you to specify the IP address of a DNS server to use for DNS resolutions and the domain name the 3002 belongs to (the domain name is required if the 3002 will be using certificates). This screen is shown in Figure 14-11. Click the Continue button to proceed with Quick Configuration.
Figure 14-11. Quick Configuration: DNS Screen

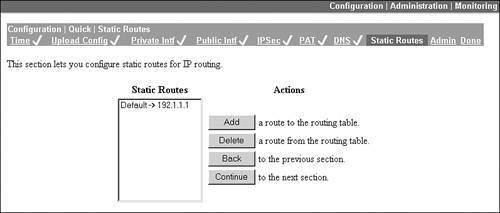
Static Routes Screen
The Static Routes screen allows you to add default and static routes, shown in Figure 14-12. If you statically define an address and default route for the public interface from Figure 14-8, you'll see a default route here. In most cases, because this is a SOHO device, you won't have additional LAN segments behind the 3002, so adding additional static routes won't be necessary. And unlike the VPN 3000 concentrators, the 3002 doesn't support any dynamic routing protocol. Click the correct button to add or delete a static route. When done, click the Continue button to proceed with Quick Configuration.
Figure 14-12. Quick Configuration: Static Routes Screen
Note
If you'll be using network extension mode, only the directly connected LAN subnet of the 3002's private interface is advertised, via RRI, to the corporate office; therefore, other LAN subnets behind the 3002 won't be able to receive traffic from the corporate office.
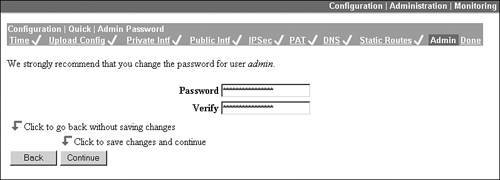
Admin Screen
The Admin screen allows you to change the password for the administrator account (admin). Cisco and I highly recommend this because the password defaults to "admin," the same as the administrator account name. This screen is the last one in the Quick Configuration process. By clicking either the Continue button at the bottom or the Done hyperlink above, the configuration is activated on the 3002 and automatically saved to Flash memory.
Figure 14-13. Quick Configuration: Admin Screen
Tip
After you've completed Quick Configuration, unlike a VPN 3000 concentrator, you can still use it to make changes on the 3002. To access Quick Configuration, go to Configuration > Quick Configuration.
Overview of the Main GUI
Upon finishing Quick Configuration or logging in to a 3002 with a base configuration, you'll see the main GUI screen shown in Figure 14-14.
Figure 14-14. Main Menu Screen
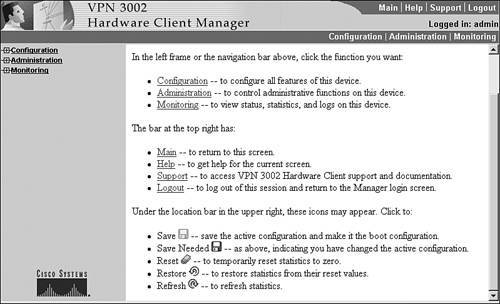
As you can see from this screen, the look and feel is the same as in the VPN 3000 concentrator's web-based GUI. However, once you burrow down through the various Configuration, Administration, and Monitoring hyperlinks, you'll see that the 3002 is a remote access client (your menu options will reflect this). However, for those administrators familiar with the concentrator's web-based interface, interacting with the 3002 is a simple task. Please refer to Chapter 6, "Concentrator Product Information," for an overview of the main menu of the 3000 concentrator, which is the same as the menu for the 3002.
In this book, I'll focus on the Configuration and Administration sections of the 3002. The 3002's Monitoring section is similar to the 3000 concentrator's Monitoring section. Under the Monitoring section, you can perform such tasks as:
- View the Filterable Event Log and the Live Event Log (you can even affect the level of logging, just as on a concentrator, by going to Configuration > System > Events > Classes and adding or changing a class's logging level for a logging destination).
- Examine the current routing table.
- Examine the current system status, and any connected IPsec tunnel to an Easy VPN Server.
- See the users that currently have authenticated when Individual User Authentication (UA) is employed (please see the "Connection and Authentication Options" section later for more information).
- View various statistics, including those related to IPsec, HTTP, Telnet, DNS, SSL, DHCP, SSH, PPPoE, NAT, and MIB-II information.
Because the layout and use of the Monitoring section information is very similar to that on the concentrators, and because I've covered the screens that are the same or similar to those in Part II of this book, I'll not go into any more depth concerning these screens except when called for throughout this chapter.
Note
Most items you need to configure on the 3002 can be done using Quick Configurationthe same things can be done from the main menu's Configuration section, in addition to some things that are beyond the scope of this book (with a few exceptions I'll bring up later in the "Connection Modes" section).
Part I: VPNs
Overview of VPNs
- Overview of VPNs
- Traffic Issues
- VPN Definition
- VPN Components
- VPN Designs
- VPN Implementations
- VPNs: Choosing a Solution
- Summary
VPN Technologies
IPsec
PPTP and L2TP
SSL VPNs
Part II: Concentrators
Concentrator Product Information
- Concentrator Product Information
- Concentrator Models
- Concentrator Modules
- Concentrator Features
- Introduction to Accessing a Concentrator
- Summary
Concentrator Remote Access Connections with IPsec
- Concentrator Remote Access Connections with IPsec
- Controlling Remote Access Sessions to the Concentrator
- IPsec Remote Access
- Network Access Control (NAC) for IPsec and L2TP/IPsec Users
- Summary
Concentrator Remote Access Connections with PPTP, L2TP, and WebVPN
- Concentrator Remote Access Connections with PPTP, L2TP, and WebVPN
- PPTP and L2TP Remote Access
- WebVPN Remote Access
- Summary
Concentrator Site-to-Site Connections
- Concentrator Site-to-Site Connections
- L2L Connectivity Example
- ISAKMP/IKE Phase 1 Preparation
- Adding Site-to-Site Connections
- Address Translation and L2L Sessions
- Summary
Concentrator Management
- Concentrator Management
- Bandwidth Management
- Routing on the Concentrator
- Chassis Redundancy
- Administration Screens
- Summary
Verifying and Troubleshooting Concentrator Connections
- Verifying and Troubleshooting Concentrator Connections
- Concentrator Tools
- Troubleshooting Problems
- Summary
Part III: Clients
Cisco VPN Software Client
- Cisco VPN Software Client
- Cisco VPN Client Overview
- Cisco VPN Client Interface
- IPsec Connections
- VPN Client GUI Options
- VPN Client Software Updates
- VPN Client Troubleshooting
- Summary
Windows Software Client
- Windows Software Client
- Windows Client
- Configuring the Windows VPN Client
- Configuring the VPN 3000 Concentrator
- Microsoft Client Connections
- Troubleshooting VPN Connections
- Summary
3002 Hardware Client
- 3002 Hardware Client
- Overview of the 3002 Hardware Client
- Initial Access to the 3002
- Authentication and Connection Options
- Connection Modes
- Administrative Tasks
- Summary
Part IV: IOS Routers
Router Product Information
Router ISAKMP/IKE Phase 1 Connectivity
- Router ISAKMP/IKE Phase 1 Connectivity
- IPsec Preparation
- ISAKMP/IKE Phase 1 Policies
- ISAKMP/IKE Phase 1 Device Authentication
- Monitoring and Managing Management Connections
- Routers as Certificate Authorities
- Summary
Router Site-to-Site Connections
- Router Site-to-Site Connections
- ISAKMP/IKE Phase 2 Configuration
- Viewing and Managing Connections
- Issues with Site-to-Site Connections
- Summary
Router Remote Access Connections
- Router Remote Access Connections
- Easy VPN Server
- Easy VPN Remote
- IPsec Remote Access and L2L Sessions on the Same Router
- WebVPN
- Summary
Troubleshooting Router Connections
- Troubleshooting Router Connections
- ISAKMP/IKE Phase 1 Connections
- ISAKMP/IKE Phase 2 Connections
- New IPsec Troubleshooting Features
- Fragmentation Problems
- Summary
Part V: PIX Firewalls
PIX and ASA Product Information
- PIX and ASA Product Information
- PIX Deployment Scenarios
- PIX and ASA Feature and Product Overview
- Summary
PIX and ASA Site-to-Site Connections
- PIX and ASA Site-to-Site Connections
- ISAKMP/IKE Phase 1 Management Connection
- ISAKMP/IKE Phase 2 Data Connections
- L2L Connection Examples
- Summary
PIX and ASA Remote Access Connections
- PIX and ASA Remote Access Connections
- Easy VPN Server Support for 6.x
- Easy VPN Remote Support for 6.x
- Easy VPN Server Support for 7.0
- Summary
Troubleshooting PIX and ASA Connections
- Troubleshooting PIX and ASA Connections
- ISAKMP/IKE Phase 1 Connections
- ISAKMP/IKE Phase 2 Connections
- Summary
Part VI: Case Study
Case Study
Index
EAN: 2147483647
Pages: 178
