IPsec Connections
This section will discuss how to connect to an Easy VPN Server using pre-shared keys and certificates for device authentication via Advanced Mode. As you go through this part of the chapter, note that you can connect your Cisco client to a VPN 3000 concentrator running at least Version 3.0, a PIX running 6.2.2(122) or 6.3(1), an ASA running 7.0, or an IOS router running 12.2(8)T with IPsec. For a 4.6 client, the corresponding concentrator code is 4.1.6, but 3.0 is the minimal version required on a concentratorjust realize that you'll be missing out on a lot of features using a concentrator with an older version of code than a client and vice versathe same is true of a PIX, ASA, or router as an Easy VPN Server.
Creating Connections using Pre-Shared Keys
To create a new connection on your VPN Client, you can either:
- Click the Connection Entries tab and then click the New button in the toolbar.
- From the main menu, choose Connection Entries > New.
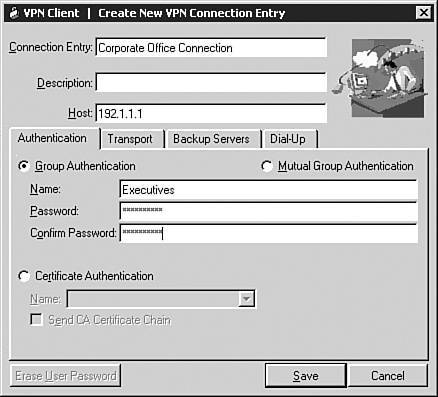
When you perform one of the two above processes, you are shown the screen in Figure 12-3. At the top of the screen you need to name the connection profile in the Connection Entry text box; this name must be compatible with the file-naming conventions used on your PC. In Figure 12-3, I called the profile "Corporate Office Connection." In the Description text box, you can enter an optional description. Below this is the Host text box, where you must enter the IP address of the Easy VPN Server the client will be connecting to. The next sections will discuss the four configuration tabs when adding a connection: Authentication, Transport, Backup Servers, and Dial-Up.
Figure 12-3. Adding a Connection: Pre-shared Keys in the Authentication Tab
Authentication Tab
If you'll be using pre-shared keys to perform device authentication during ISAKMP/IKE Phase 1, then in the Authentication tab, you'll need to click the Group Authentication radio button and then enter the name of the group the user belongs to, and the pre-shared key (password) twice for verification. This information needs to match what is configured on the Easy VPN Server. In Figure 12-3, the group name I configured was "Executives." If you don't need to configure anything else in the other tabs, you can click the Save button to save the profile and take you back to the main GUI.
Transport Tab
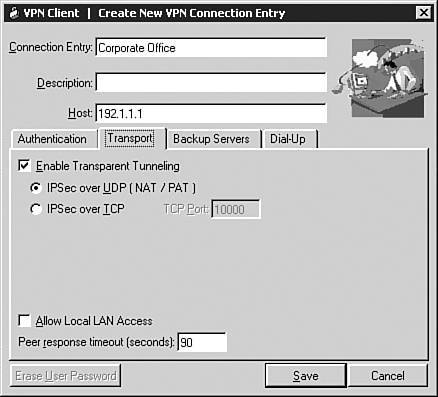
If you click the Transport tab, you are shown the window in Figure 12-4. The top part remains the same as that in Figure 12-3; only the bottom part is different. Within the Transport tab, the top part allows you to enable transparent tunneling (this is necessary if your IPsec session will be going through an address translation device performing PAT), the middle part allows you to set up local LAN access and Dead Peer Detection (DPD), and the bottom part is for login access for Windows 98 and ME clients.
Figure 12-4. Adding a Connection: Transport tab
Transparent Tunneling
Transparent tunneling is enabled by default (the Enable Transparent Tunneling radio box is checked) and UDP is the default encapsulation method. This must be enabled on the Easy VPN Server end also. For a VPN 3000 concentrator, I discussed this in Chapter 7, "Concentrator Remote Access Connections with IPsec." If the IPsec over UDP radio button is selected here, either you must enable NAT-T or IPsec over UDP on the Easy VPN Server. On the VPN 3000 concentrator, you would do this as follows:
- NAT-T Go to Configuration > Tunneling and Security > IPsec > NAT Transparency and select the IPsec over NAT-T check box.
- IPsec over UDP Go to Configuration > User Management > Groups, select a group, click the Modify button, click the Client Config tab, and click the IPsec over UDP check box.
NAT-T and IPsec over UDP might not work with certain stateful firewalls; in that instance select the IPsec over TCP radio button in the client's Transport tab. You'll also need to enable this on an Easy VPN Server. On the VPN 3000 concentrator, you'll need to go to Configuration > Tunneling and Security > IPsec > NAT Transparency and select the IPsec over TCP check box; you can change the default port number from 10,000 to something else. If this has been changed on the concentrator, you'll need to match this on the client in the TCP Port text box.
Note
The client periodically sends keepalives across the data connection to ensure that it remains in the address translation table of the PAT device. On the concentrator, if both NAT-T and IPsec over UDP are enabled, NAT-T has precedence and will be used for the session. I've personally never liked how this has been designed on the VPN Client because it leads to confusion about which of the two connection methods the client is using.
Local LAN Access
The local LAN access feature allows you to gain access to the local LAN segment, in clear-text, when you are connected to the Easy VPN Server; however, this feature will work only if your PC has a single NIC and the Easy VPN Server has enabled this function: the split tunneling in the group configuration under the Client Config tab. You select "Allow the networks in list to bypass the tunnel" for the Split Tunneling Policy parameter and then for the Split Tunneling Network List pull-down parameter, you select "VPN Client Local LAN (Default)."
If the Allow Local LAN Access check box is unchecked, you will not be able to gain access to the local LAN. This might be important in situations where the local LAN devices are not in your controlfor example, in an airport or hotel network. If this feature is enabled on the client and permitted on the Easy VPN Server, you'll be able to see the local LAN route or routes (up to 10 local routes) in the client's Routes table. These either are statically defined by the administrator or automatically detected by the client. This is discussed later in the "Client Connection Status" section.
Dead Peer Detection
DPD, sometimes referred to as "IKE keepalives," allows the two endpoints of an IPsec session to determine if their connected peers still are functioning. On the client side, it sends keepalives once every 90 seconds, by default. If a single response is not received within the value specified by the Peer response timeout (seconds) parameter, the client sends keepalives every five seconds. If it doesn't receive a reply, the client tears down the session; if the client has a list of backup Easy VPN Servers (backup servers), the client will try using this list to re-establish a session to the remote site. You can set the DPD timeout parameter from 30480 seconds. You cannot disable this function. Therefore, it is important that this be enabled on your Easy VPN Servers.
Microsoft Network Access
For Windows 98 and Windows ME clients, you'll see an additional option at the bottom of the screen related to logging in to the Microsoft Network. The Logon to Microsoft parameter allows your PC to register to a private Microsoft network to browse and use network resources once the VPN Client has established an IPsec session. It is enabled by default, but you can disable it. When enabled, you can select one of two radio buttons:
- Use default system logon credentials The default Windows username and password are used from the user's PC.
- Prompt for network logon credentials The user will be prompted for a username and password.
Backup Servers Tab
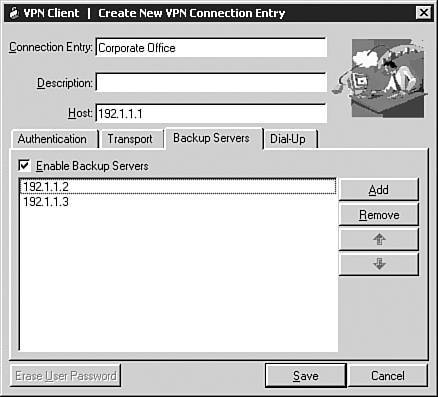
The backup server feature allows you to define redundant Easy VPN Servers for a session, commonly called "backup servers." Click the Backup Servers tab when adding (or modifying) a session to specify your backup servers. This screen is shown in Figure 12-5. Click the Enable Backup Server(s) check box to enable this feature. Then click the Add button and enter an IP address or fully qualified domain name (FQDN) of a backup server. You can define up to 10 backup servers. The entry at the top of the list becomes the primary backup. To reorder your list, click the IP address/FQDN of the backup server in the window and then click the Up or Down arrow buttons on the right.
Figure 12-5. Adding a Connection: Backup Servers Tab
Note
If you've defined a backup server list on the Easy VPN Server, during IKE Mode Config in ISAKMP/IKE Phase 1, this list is pushed down to the client; the client will erase any existing list and replace it with the one received from the Easy VPN Server. I recommend using this approach because you can control and update the server list easily from a central location, as opposed to having the users update this list manually from the VPN Client GUI.
Dialup Tab
If you'll be using a dialup connection to access the Internet, you can have the VPN Client bring up the dialup connection automatically before initiating the IPsec session, as opposed to having the user manually bringing the dialup connection first. To define this process, click the Dial-Up tab when adding or modifying a connection entry. This window is shown in Figure 12-6. To enable the feature, click the Connect to Internet via dial-up check box. You have two dialup choices. In most instances you'll probably be using Microsoft's dialup software. If this is the case, click the Microsoft Dial-Up Networking radio button and use the drop-down selector to choose the Phonebook Entry (dialup profile) to use to connect to the ISP. This entry must have been defined previously on the PC.
Figure 12-6. Adding a Connection: Dial-Up tab
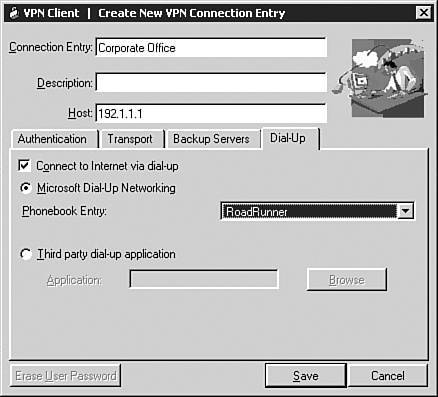
If you're not using Microsoft's dialup software, but a third-party dialup program, you'll need to click the Third party dial-up application radio button, click the Browse button and find the dialup software, and in the Application parameter text box after the application, enter the name of the dialup profile to use. For example, it might look something like this:
C:Program FilesDialup Softwaredialup.exe dialtheisp.profile
Completing the Connection
Once you've entered everything for your new connection, click the Save button at the bottom; this saves the connection profile as a ".pcf" file in the Profiles subdirectory of the client, using a prefix of the name given to the connection in the Connection Entry parameter. For example, the connection created in Figure 12-6 would have a name of "Corporate Office.pcf."
Creating Connections Using Certificates
Your second option for device authentication is to use certificates. The VPN Client supports the following CA products:
- Baltimore Technologies' UniCERT product
- Entrust Technologies' Entrust PKI product
- Netscape
- Verisign
- Microsoft Certificate Services for Windows 2000 and 2003
- Cisco IOS Router
You'll need to obtain a certificate for the VPN Client software using one of the above CAs. You have two options for obtaining certificates (assuming you're using the Cisco Certificate Store on the user's PC):
- File-based obtaining a certificate manually using an out-of-band method
- Network-based obtaining a certificate dynamically using an in-band method; the Simple Certificate Enrollment Protocol (SCEP) is used with this method
The following two sections will discuss obtaining a certificate and then I'll discuss management of certificates. Following this, I'll show you how to use certificates for authentication of your IPsec connection profiles.
Tip
If you only need to authenticate internal devices and there are no third-party trust issues, I recommend the use of Microsoft's Certificate Services because it comes with Windows 2000 and 2003 Server and Advanced Server products. If you'll be using SCEP, you'll need to obtain the resource kit for your version of Windows and install it from there.
Manually Obtaining a Certificate
Using the manual approach, you'll need to generate a file containing the client's PKCS #10 information and send this, out-of-band, to the CA administrator. The CA administrator will generate an X.509v3 identity certificate and send this and the CA (root) certificate back. If an RA is used, the administrator also will send a separate certificate for each RA.
Generating the PKCS #10 Information
To generate the PKCS #10 information, you need to perform one of the two following processes within the VPN Client:
- Click the Certificates tab in the client GUI and then click the Enroll button.
- Click Certificates in the main menu and choose the Enroll option.
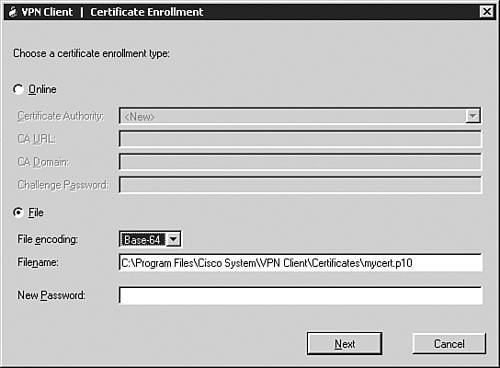
Either of the above two options performs the same function and you'll be taken to the screen shown in Figure 12-7. Click the File radio button and choose the file type by using the File encoding drop-down selector. Your two types can be either "Binary" or "Base-64." The CA administrator will tell you which type to use, but in most instances it will be Base-64, which stores information in an ASCII-encoding file format (binary encoding uses a base-2 binary encoding scheme, which cannot be displayed). Below this, enter the location and name of the file where the PKCS #10 information should be stored. In Figure 12-7, I stored this in the Certificates subdirectory of the client's installation, but you can put it wherever you like. You can configure a certificate password that is case-sensitive. This is used to verify someone's access to the certificate on the computer via the VPN Client software. Whenever you start up a VPN session to an Easy VPN Server that uses certificates for authentication, and a certificate password has been configured, the user must enter the password to use the certificate. Once you're done entering the information on this screen, click the Next button.
Figure 12-7. Manual Enrollment: Specifying the File
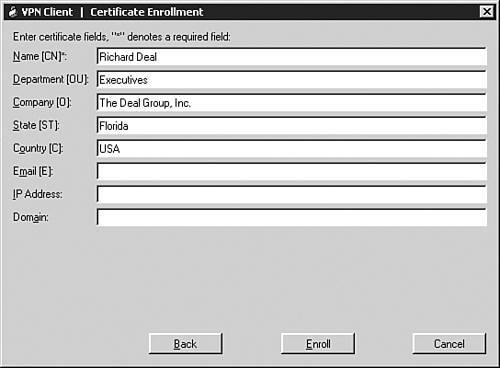
This is the PKCS #10 enrollment screen where you need to enter the identity information for the user's computer, which is shown in Figure 12-8. You can enter the same kind of information that I discussed in Chapter 7, "Concentrator Remote Access Connections with IPsec." You are required to enter the CN (Common Name). I highly recommend that you enter the user's group name in the Department or OU (Organizational Unit) field. In Figure 12-8, I put Richard's group, "Executives," in this field. By default, the Easy VPN Server uses this field to match the user to the corresponding group on the Server. If you don't specify the group name, you can use group matching on Cisco Easy VPN Servers to match the user's certificate to a particular group (again, I discussed this in Chapter 7 for the VPN 3000 concentrators). The other fields are optional.
Figure 12-8. Manual Enrollment: Specifying Identity Information
Once you've entered your information, click the Enroll button. A window will pop up displaying the status of the creation of the PKCS #10 file. You'll need to send the PKCS #10 file to the CA administrator, preferably using an out-of-band method.
Importing the CA Certificate
The CA administrator will send you back two or more certificates. The first certificate you must install is the root, or CA's identity, certificate. To import the root certificate, use one of the following two processes:
- Click the Certificates tab in the client GUI and then click the Import button.
- Click Certificates in the main menu and choose Import.
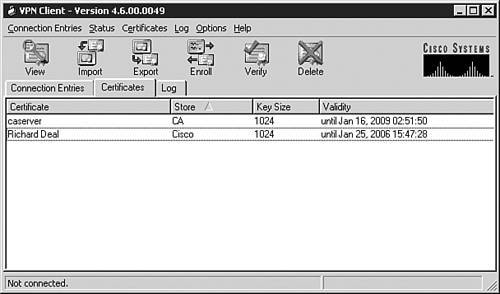
The window in Figure 12-9 will pop up. You'll need to enter the directory path and file name where you've placed the CA's (root) certificate. Or, you can assign a password to protect your identity certificates from access via the VPN Client GUI. When done, click the Import button. A window should pop up saying that the certificate was installed successfullyclick the OK button to return to the VPN Client GUI, where the Certificates tab is in the front. If you don't see the root certificate, from the main menu, choose Certificates > Show CA/RA Certificates, and you should now see the CA's certificate. In Figure 12-10, the "caserver" certificate is the root certificate.
Figure 12-9. Manual Enrollment: Importing the Root Certificate
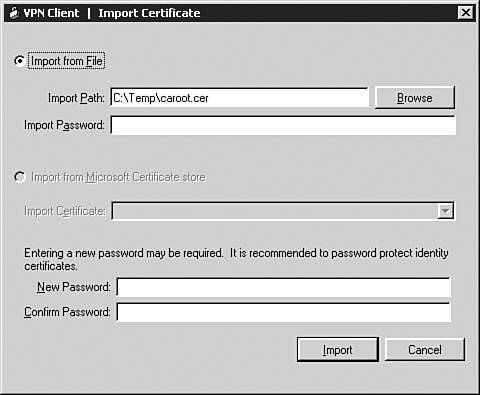
Figure 12-10. Manual Enrollment: Seeing the Installed Certificates
Importing the Identity Certificate
After installing the root certificate, you'll perform the same process to install the client's personal identity certificate. Use one of the two options in the bullet points in the previous section to bring up the Import Certificate screen and then use the Browse button to find the identity certificate the CA administrator sent you, then click the Import button. You should then see both the CA and identity certificates in the Certificates tab on the VPN Client GUI, as shown in Figure 12-10: the "Richard Deal" certificate is the identity certificate.
Using SCEP to Obtain a Certificate
Your other, and probably most common, option for obtaining a certificate for the VPN Client is to use SCEP. To begin, perform one of the two following processes:
- Click the Certificates tab in the client GUI and then click the Enroll button.
- Click Certificates in the main menu and choose Enroll.
Either of the above two options performs the same function and you'll be taken to the screen shown previously in Figure 12-7. Click the Online radio button. Make sure the Cisco Authority parameter says "" if this is the first time you're registering with or connecting to the actual CA; or choose the name of an installed root certificate if you're obtaining another certificate from an already installed CA. For the CA URL, enter the full URL to access the CA. Each CA product has a different URL syntax, so you'll need to contact the CA administrator for this information. For example, if I was using Microsoft's CA product, the URL would look something like this:
http://IP_address_or_FQDN/certsrv/mscep/mscep.dll
Following this, you'll need to ask the CA administrator for the CA Domain parameter. If the CA has a challenge password configured to restrict the request of certificates via network enrollment (SCEP), you'll need to ask the CA administrator for this password and enter it in the Challenge Password text box. Once done, click the Next button, where you're taken to the screen shown previously in Figure 12-8. Here you'll need to enter your PKCS #10 information; make sure you enter the correct group name in the Department/OU field. Once done, click the Enroll button. If the enrollment is successful, you should see a window pop up with this message: "Certificate enrollment completed successfully." Clicking the OK button will take you to the screen shown previously in Figure 12-10. When using the network enrollment process, the VPN Client will automatically request both the root and identity certificates and install them, unlike the file-based approach where you have to do this in two separate steps.
Note
For additional security, some CAs are configured not to automatically grant certificates; instead, when you submit an identity certificate request to the CA, the CA administrator must log in to the CA and approve the certificate request manuallythis is a common process when challenge passwords are not being used. You can determine if you have an outstanding certificate request by going to the Certificates tab in the VPN Client and looking for the CN of your certificate in the Certificate column and "Request" in the Store column. If this is the case, wait until the administrator generates you an identity certificate and then either choose Certificates > Retry Certificate Enrollment from the main menu options, or right-click the certificate and choose Retry Certificate Enrollment. The VPN Client will then attempt to download the root and identity certificates again.
Managing Certificates
You can perform many functions to manage your certificates on your VPN Client, such as view them, delete them, export them, change the password for a certificate, and so on. The following sections will briefly explore these options.
Viewing a Certificate
To view the details of a certificate, click the Certificates tab and then perform one of the four following processes:
- Click a certificate, go to the main menu, and choose Certificates > View.
- Right-click a certificate and choose View.
- Click a certificate and click the View button in the toolbar.
- Double-click a certificate.
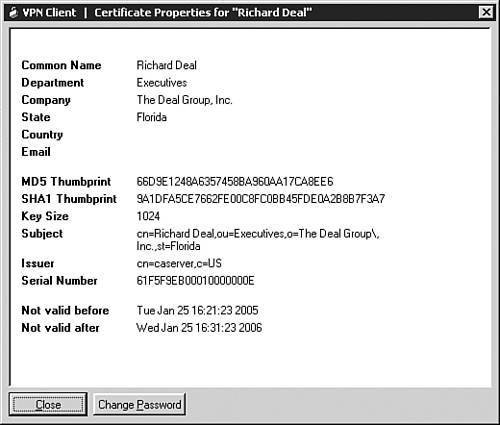
An example identity certificate with a CN of "Richard Deal" can be seen in Figure 12-11, where the department name (used as the user's group) is "Executives." Notice that Richard's certificate is valid for one year starting on January 25, 2005.
Figure 12-11. View a Certificate
To verify if a certificate is still valid, use one of these options:
- Click the certificate name and from the main menu, go to Certificates > Verify.
- Click the certificate name and then click the Verify button in the toolbar.
- Right-click the certificate name and choose Verify.
A pop-up window will appear displaying the validity of the certificate. Possible messages are shown in Table 12-3.
|
Pop-Up Message |
Explanation |
|---|---|
|
Certificate is not valid yet |
The beginning (start) time on the certificate has not yet been reached and the certificate is not valid yet (check the time on your computer; if it's incorrect, then fix it and re-verify the certificate). |
|
Certificate has expired |
The ending time of the certificate has been reached and the certificate is no longer valid. |
|
Certificate signature is not valid |
Either you don't have a root certificate installed or the root certificate has expiredin either case, download the current root certificate for the CA. |
|
Certificate "CN on the certificate" is valid |
The certificate is valid. |
Note
Because time is important for verifying the validity of a certificate, I recommend the use of NTP to synchronize the time on your user's devices and the CA, preferably using your own time server.
Deleting a Certificate
If your certificate has expired (and you won't be renewing it), has been compromised, or you no longer need the certificate, you can delete it (and its keys) from your computer by performing one of the following:
- Click the certificate name and in the main menu go to Certificates > Delete.
- Right-click the certificate name and choose Delete.
- Click the certificate name and click the Delete button in the toolbar.
If the certificate has been password-protected, you'll need to supply the correct password before deleting it. Also, you'll be prompted to either click the Delete or Do Not Delete button (the latter is the default).
Tip
If you don't want your users to be playing around with any of the certificate options in the VPN Client GUI, I recommend setting the AdvancedView parameter in the vpnclient.ini file to "1" and then placing an exclamation point in front of this variablethis will limit the user to Simple Mode where the user doesn't have access to certificate functions.
Exporting a Certificate
If you need to move a certificate and public/private key combination to a different machine, or want to back these up, you can use the certificate export feature to copy these components. This can be accomplished by using one of the following processes:
- Clicking the certificate name and from the main menu choosing Certificates > Export.
- Clicking the certificate name and clicking the Export button in the toolbar.
- Right-clicking the certificate name and choosing Export.
You also can choose the option to export the entire certificate chain, which exports the identity, CA, and any RA certificates. Also, if the certificate is password-protected, you must supply the correct password. You'll be prompted for the location and name of the exported certificate, and for an optional password to protect the exported certificate.
Caution
If someone gains unauthorized access to a user's computer with certificates, they can use the export function to copy valid certificate information and keys to another system, and then use these to gain unauthorized access to your network. Therefore, I highly recommend you password-protect certificates. The next section discusses this.
Changing or Setting an Identity Certificate's Password
You can choose to assign a password to a certificate. If you perform this function, any type of access to the certificate requires the correctly configured password: for example, trying to export or delete a certificate, or bringing up an IPsec connection that uses a certificate. To assign a password to an identity certificate (or change it), perform one of the following processes:
- Click the certificate name and from the main menu, go to Certificates > Change Certificate Password.
- Right-click the certificate name and choose Change Certificate Password.
If the identity certificate already has a password, you must first enter the password assigned to the certificate. Once you've done this, enter the new password; you'll be prompted to confirm the new password. After this, you must always supply the new password when accessing the associated identity certificate.
Specifying Certificates in a Connection Profile
To add a new connection that will use certificates, you can either:
- Click the Connection Entries tab and then click the New icon in the toolbar.
- From the main menu, choose Connection Entries > New.
When you perform one of the two above processes, you'll see the screen shown previously in Figure 12-3. At the top of the screen you need to name the connection profile in the Connection Entry text box; this name must be compatible with the file-naming conventions used on your PC. In Figure 12-3, I called the profile "Corporate Office Connection." In the Description text box, you can enter an optional description. Below this is the Host text box, where you must enter the IP address of the Easy VPN Server the client will be connecting to.
There are two types of authentication that use certificates:
- Certificate Authentication Uses certificates only for device authentication; this requires an ISAKMP/IKE Phase 1 policy that specifies RSA Digital Certificate (XAUTH) on the VPN 3000 concentrators, PIX, ASAs and routers (both the Easy VPN Server and the client need identity certificates).
- Mutual Group Authentication uses both certificates and pre-shared keys for device authentication; this requires an ISAKMP/IKE policy that specifies an RSA Digital Certificate (HYBRID) on the VPN3000 concentrators (only the Easy VPN Server needs an identity certificate, but pre-shared keys are used for additional security to authenticate the user's computer).
Click one of the two options in the screen for Figure 12-3 and then select the user's identity certificate name using the pull-down Name selector parameter. Click the Save button when done.
One optional parameter you can enable is Send CA Certificate Chain. By default, this is disabled; by enabling it, the VPN Client will send all CA certificates in the hierarchy of the domain, including the root certificate (these must initially be installed on the client), and the identity certificate to the authenticating Easy VPN Server. This allows the Server to trust the computers's identity certificate that has the same root certificate without the Server having to have the same subordinate CA certificate(s) installed. This option is necessary only if you have a hierarchical CA implementation and you won't be sure if the Server and the user's computer will be obtaining a certificate from the same CA in the hierarchy.
You also can modify an existing connection profile from using pre-shared keys to using certificates by doing one of the following:
- Clicking the connection name and from the main menu going to Connection Entries > Modify.
- Clicking the connection name and clicking the Modify button in the toolbar.
- Right-clicking the connection name and choosing Modify.
Any of these options will pull up the screen shown previously in Figure 12-3, with the Authentication tab in the forefront.
Other Connection Configuration Options
There are other connection configuration options you can configure for your VPN Client, such as setting the default connection profile; creating a shortcut startup icon on your desktop for a connection profile; modifying, deleting, and importing a connection entry; and erasing a saved password. I'll discuss some of these options in the next set of sections; the rest are easy to perform, either using the main menu options or the buttons in the Connection Entries tab.
Setting a Connection Profile as the Default
The first connection entry you add to your VPN Client becomes the default connection profile. It is highlighted using bold under the Connection Entries tab. Any connection you add after the first is displayed in a normal font (nonbold). If you select the Enable connect on open check box from the main menu's Options > Preferences, whenever you start up the VPN Client, the default connection profile is used to initiate a connection to the related Easy VPN Server.
To make a connection entry the default, either:
- Click the connection name in the Connection Entries tab and from the main menu, select Connection Entries > Set as Default Connection Entry.
- Right-click the connection name and select Set as Default Connection Entry.
Creating a Shortcut for a Connection Profile
You have the ability to create a shortcut icon on your desktop for a connection profile. By doing this, you can double-click the desktop shortcut icon, causing the VPN Client to initiate an IPsec session to the Easy VPN Server defined in the associated profile. To create a shortcut icon on your desktop for a connection profile, either:
- Click the connection name in the Connection Entries tab and from the main menu, select Connection Entries > Create Shortcut.
- Right-click the connection name in the Connection Entries tab and select Create Shortcut.
Connecting to the Easy VPN Server
Once you have created a connection profile and have configured your Easy VPN Server correctly, you're ready to establish an IPsec session from your desktop to the Server. This can be accomplished in several ways. It is different if the client is in Simple versus Advanced Mode:
- If you've created a shortcut of a connection profile on your desktop, just double-click the shortcut.
- If you've set the VPN Client preferences to enable the Enable connect on open parameter, the client will connect automatically using the default profile when the client starts up.
- If the client has been configured for Simple Mode, when you start the client, use the drop-down selector to choose the connection profile and click the Connect button (see Figure 12-1). By default, the default connection profile will be displayed for the connection entry.
- If the client has been configured for Advanced Mode, perform one of the following:
- From the Connection Entries tab (see Figure 12-2), double-click the name of the connection profile.
- From the Connection Entries tab, click a connection name and from the main menu, select Connection Entries > Connect.
- From the Connection Entries tab, click a connection name and then click the Connect button in the toolbar.
- From the Connection Entries tab, right-click a connection name and choose Connect.
When using any method to establish an IPsec session to a Server, you'll see two windows pop up, as shown in Figure 12-12. The first is labeled "VPN Client | Connecting to 'Corporate Office'", and displays brief logging information of the events that are occurring. Assuming that there are no problems with the first three steps of ISAKMP/IKE Phase 1, the following will happen:
|
1. |
If you're using dialup to access the ISP, you'll be prompted for the username and password used for PPP authentication (this would occur before any ISAKMP/IKE Phase 1 tunnel attempt). |
|
2. |
If you are using certificates, you'll be prompted for the password to access the certificate; even if no password has been configured, you'll still be prompted. |
|
3. |
You'll need to enter the username and password to perform XAUTH authentication (this is the "VPN Client | User Authentication for 'Corporate Office'" window in Figure 12-12. |
|
4. |
If the user authentication on the Easy VPN Server uses RADIUS, and the expiry authentication is enabled and your password has expired, you'll be prompted to enter and confirm a new password. |
|
5. |
If the network administrator of the Easy VPN Server has configured a login banner for the group, a window will pop up on the client's desktop displaying the banner. Click the Continue button to proceed with the login process. |
Figure 12-12. Connecting to a VPN Gateway
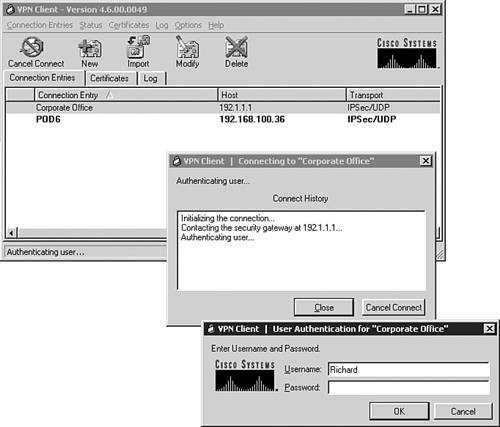
Enter the correct XAUTH username and password and click the OK button. The authentication information is passed to the Easy VPN Server and you'll see some more logging information appear in the "VPN Client | Connecting to 'Corporate Office'" window concerning the next steps in completing the connection. If you put in the wrong username and password, you'll be reprompted for these and a message will appear in the "VPN Client | Connecting to 'Corporate Office'" window concerning the problem, as follows:
- Authentication failure You entered the wrong username and password combination.
- Account disabled Your account has been disabled.
- Error changing password You were prompted to change your password and did this incorrectly.
- No dial-in permission You do not have the required privileges to establish a remote access session to the network.
- Restricted login hours Your login hours are restricted (perhaps you cannot VPN into the network during certain times of the day) and you are denied access to the network.
If the connection is successful, the "VPN Client | Connecting to 'Corporate Office'" window will disappear.
Depending on how you have the VPN Client set up, it might minimize automatically and appear as a yellow closed padlock icon in the Windows taskbar in the bottom right-hand corner of your screen. Otherwise, if you had the VPN Client open when making the connection and it was in Advanced Mode, it will remain open and you'll see the screen shown in Figure 12-13. As you can see in Figure 12-13, the connection profile "Corporate Office" has a yellow closed padlock to the left of it, indicating that there is an IPsec session to the associated Easy VPN Server.
Figure 12-13. Connected to a VPN Gateway

In Figure 12-13, at the very bottom right-hand corner of the screen is a down-arrow button. Clicking this button will toggle the display of the statistics shown in the bottom taskbar of the VPN client. The statistics you can see are:
- Internal IP address assigned to the client
- The amount of time the client has been connected to the VPN gateway
- The number of bytes sent and received across the IPsec tunnel
If the network administrator of the Easy VPN Server created a login banner for the remote access group, you'll see a window pop up with the banner.
Client Connection Status
As mentioned in the last section, a yellow closed padlock icon will appear in the Windows taskbar (bottom right-hand corner of the screen) and in the Connection Entries table in the VPN Client GUI. Once a session is up, you can examine statistics for the session and view any notifications. The following two sections will discuss these processes.
Statistics
Once an IPsec session has been established to an Easy VPN Server, from your desktop you can pull up statistics about the session by performing either of the following:
- In the VPN Client GUI's main menu, go to Status > Statistics.
- In the Windows taskbar, right-click the yellow closed padlock icon and choose Statistics.
Using either method, the window shown in Figure 12-14 will pop up. There are three tabs at the top: Tunnel Details, Routing Information, and Firewall Information. The following two sections will discuss the first two tabs and the "Stateful Firewall" section later in the chapter will discuss the latter tab.
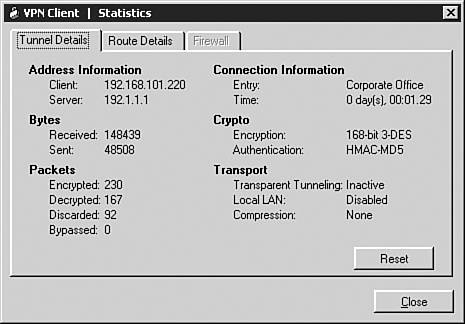
Figure 12-14. Statistics Window: Tunnel Details
Tunnel Details Tab
When you open up the Statistics window, the Tunnel Details tab is in the foreground. You can view the following information here:
- Address Information The IP address assigned to the client (192.168.101.220 in Figure 12-14) and the IP address of the Easy VPN Server (192.1.1.1).
- Connection Information The connection profile used for the session ("Corporate Office") and the length of time the session has been up (1 minute and 29 seconds).
- Bytes The number of bytes received (148,439) and sent (48,508) across the IPsec data connections.
- Crypto The packet encryption algorithm (3DES) and hashing function (MD5) for the data connections.
- Packets The number of packets encrypted (230), decrypted (167), discarded (92, because they didn't match the tunnel policy requirements), and bypassed (0, packets that were split-tunneled).
- Transport The type of tunneling (transparent tunneling was enabled in this example, but NAT-T, which was enabled on the Easy VPN Server, determined that no address translation device was detected), if Local LAN access is allowed (no), and if compression has been enabled for the tunnel (no).
To reset the statistics for this screen, click the Reset button at the bottomthis only resets the statistics for this tab.
Tip
If you're seeing packets being encrypted, but none decrypted, there is probably a routing problem at the Easy VPN Server end of the connection. It is easy to verify that you have this problem. Have the remote device at the central office ping the internal address of the VPN Client when it is connected. If this fails, you have a routing problem. Make sure that your central office devices have either static or dynamic routes to reach the Easy VPN Server and the internal addresses of the clients, and make sure that the Server is using RRI to advertise the routing information if you're using a corporate dynamic routing protocol.
Routing Information Tab
To view the routing information for the client, in the Statistics window, click the Route Details tab, which is shown in Figure 12-15. The window is broken into two sections:
- Local LAN Routes Displays the routes connected to the PC that it can access without going through the tunnel. You must have enabled split tunneling on the Easy VPN Server and allowed local LAN access in the VPN Client's connection profile. (In Figure 12-15, the PC has two NICs, which is why two local networks, 192.168.1.0 and 192.1.1.0, appear.)
- Secured Routes Displays the routes that will be secured by the tunnel. If you see "0.0.0.0 0.0.0.0" here, then all traffic except the Local LAN Routes traffic will be encrypted.
Figure 12-15. Statistics Window: Route Details
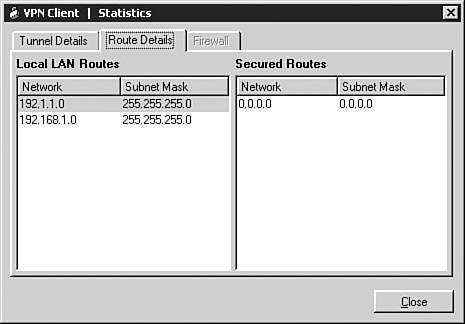
Using this screen can determine if you've been allowed to use split tunneling from your desktop. In Figure 12-15, split tunneling is allowed for local LAN access onlyall other traffic must traverse the IPsec tunnel.
Notifications
During the initial IPsec connection process, your VPN Client software might receive notification messages from the Easy VPN Server. These appear as pop-up windows on your screen. A notification message might be something as simple as a login banner, an upgrade message from the network administrator, or configuration issues with your VPN Client. Once you have established an IPsec session, you can reexamine your notification messages by either:
- Right-clicking the yellow closed padlock icon in the Windows taskbar and choosing Notifications.
- From the main menu in the VPN Client GUI, choosing Status > Notifications.
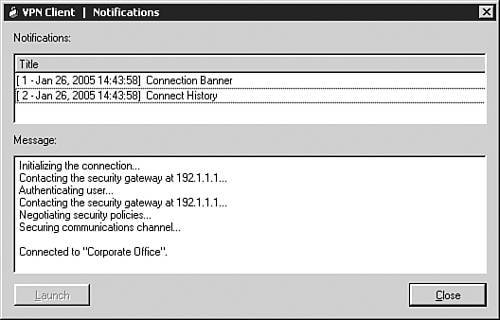
In either case, the window in Figure 12-16 will appear. In this example, there are two notifications. The first message is the login banner message from the Easy VPN Server and the second message is the connection history message, which allows you to view the messages displayed during the connection process to the Easy VPN Server (this is the one selected in Figure 12-16).
Figure 12-16. Notifications Window
Some other types of notifications you might see (in pop-up windows or in the Notifications window) are:
- A new version of VPN Client software is available for download
- The firewall policy configured on the Easy VPN Server and the firewall configuration on your computer don't match
- The administrator of the Easy VPN Server disconnected your session
- The Easy VPN Server was shut down or rebooted
- The client's idle time was exceeded for the tunnel
- The client's maximum connect time was exceeded for the tunnel
Disconnecting the Connection
If you reboot your computer, obviously your VPN session is terminated. However, you can terminate your IPsec session manually by performing one of the following processes:
- Right-clicking the yellow closed padlock icon in the Windows taskbar and choosing Disconnect.
- In the toolbar of the VPN Client, clicking the Disconnect button.
- In the main menu of the VP Client, choosing Connection Entries > Disconnect.
Part I: VPNs
Overview of VPNs
- Overview of VPNs
- Traffic Issues
- VPN Definition
- VPN Components
- VPN Designs
- VPN Implementations
- VPNs: Choosing a Solution
- Summary
VPN Technologies
IPsec
PPTP and L2TP
SSL VPNs
Part II: Concentrators
Concentrator Product Information
- Concentrator Product Information
- Concentrator Models
- Concentrator Modules
- Concentrator Features
- Introduction to Accessing a Concentrator
- Summary
Concentrator Remote Access Connections with IPsec
- Concentrator Remote Access Connections with IPsec
- Controlling Remote Access Sessions to the Concentrator
- IPsec Remote Access
- Network Access Control (NAC) for IPsec and L2TP/IPsec Users
- Summary
Concentrator Remote Access Connections with PPTP, L2TP, and WebVPN
- Concentrator Remote Access Connections with PPTP, L2TP, and WebVPN
- PPTP and L2TP Remote Access
- WebVPN Remote Access
- Summary
Concentrator Site-to-Site Connections
- Concentrator Site-to-Site Connections
- L2L Connectivity Example
- ISAKMP/IKE Phase 1 Preparation
- Adding Site-to-Site Connections
- Address Translation and L2L Sessions
- Summary
Concentrator Management
- Concentrator Management
- Bandwidth Management
- Routing on the Concentrator
- Chassis Redundancy
- Administration Screens
- Summary
Verifying and Troubleshooting Concentrator Connections
- Verifying and Troubleshooting Concentrator Connections
- Concentrator Tools
- Troubleshooting Problems
- Summary
Part III: Clients
Cisco VPN Software Client
- Cisco VPN Software Client
- Cisco VPN Client Overview
- Cisco VPN Client Interface
- IPsec Connections
- VPN Client GUI Options
- VPN Client Software Updates
- VPN Client Troubleshooting
- Summary
Windows Software Client
- Windows Software Client
- Windows Client
- Configuring the Windows VPN Client
- Configuring the VPN 3000 Concentrator
- Microsoft Client Connections
- Troubleshooting VPN Connections
- Summary
3002 Hardware Client
- 3002 Hardware Client
- Overview of the 3002 Hardware Client
- Initial Access to the 3002
- Authentication and Connection Options
- Connection Modes
- Administrative Tasks
- Summary
Part IV: IOS Routers
Router Product Information
Router ISAKMP/IKE Phase 1 Connectivity
- Router ISAKMP/IKE Phase 1 Connectivity
- IPsec Preparation
- ISAKMP/IKE Phase 1 Policies
- ISAKMP/IKE Phase 1 Device Authentication
- Monitoring and Managing Management Connections
- Routers as Certificate Authorities
- Summary
Router Site-to-Site Connections
- Router Site-to-Site Connections
- ISAKMP/IKE Phase 2 Configuration
- Viewing and Managing Connections
- Issues with Site-to-Site Connections
- Summary
Router Remote Access Connections
- Router Remote Access Connections
- Easy VPN Server
- Easy VPN Remote
- IPsec Remote Access and L2L Sessions on the Same Router
- WebVPN
- Summary
Troubleshooting Router Connections
- Troubleshooting Router Connections
- ISAKMP/IKE Phase 1 Connections
- ISAKMP/IKE Phase 2 Connections
- New IPsec Troubleshooting Features
- Fragmentation Problems
- Summary
Part V: PIX Firewalls
PIX and ASA Product Information
- PIX and ASA Product Information
- PIX Deployment Scenarios
- PIX and ASA Feature and Product Overview
- Summary
PIX and ASA Site-to-Site Connections
- PIX and ASA Site-to-Site Connections
- ISAKMP/IKE Phase 1 Management Connection
- ISAKMP/IKE Phase 2 Data Connections
- L2L Connection Examples
- Summary
PIX and ASA Remote Access Connections
- PIX and ASA Remote Access Connections
- Easy VPN Server Support for 6.x
- Easy VPN Remote Support for 6.x
- Easy VPN Server Support for 7.0
- Summary
Troubleshooting PIX and ASA Connections
- Troubleshooting PIX and ASA Connections
- ISAKMP/IKE Phase 1 Connections
- ISAKMP/IKE Phase 2 Connections
- Summary
Part VI: Case Study
Case Study
Index
EAN: 2147483647
Pages: 178
