Easy VPN Server
Easy VPN is a Cisco feature that allows you to deploy IPsec remote access devices easily using Cisco VPN Client software; their 800, 900, and 1700 series routers; the VPN 3002 hardware client; and the 501 and 506E PIX security appliances. Policies are defined on the Easy VPN Server and pushed down to the Easy VPN Remotes during IKE Mode Config.
However, as you'll see in this section, the configuration of the Easy VPN Server function from the router's CLI is not a simple endeavor, which is why I prefer using the VPN 3000 concentrators over Cisco routers or PIXs for Easy VPN Servers. Given that the configuration of an Easy VPN Server is more difficult than a concentrator, you might wonder why you should even bother with a router. Well, if you already have a perimeter router with extra capacity and need to support only a small number of remote access users, it doesn't make any sense to spend money to buy a VPN 3000 concentrator: instead, just use the existing router to perform this function.
Note
Please note that the Cisco Security Device Manager (SDM) software makes it easy to set up a router as an Easy VPN Server or Remote, hiding the commands and their syntax behind a user-friendly GUI interface. The discussion of SDM is beyond the scope of this book.
The Easy VPN Server function was introduced in IOS 12.2(8)T, and Cisco has added features to it constantly to match support with other Cisco Easy VPN Server products. Routers, when functioning as Easy VPN Servers, do not support the following options:
- RSA encrypted nonces or DSS certificates for device authentication
- DH group 1 keys
- AH for data encapsulation
- Transport mode for data connections
- Manual keying for data connections (ISAKMP/IKE is required)
- PFS for data connections: as of IOS 12.3(4)T, PFS support has been added
- IPsec over TCP and IPsec over UDP: standards-based NAT-T, however, is supported
To help you set up a router as an Easy VPN Server, the following sections cover these topics:
- Easy VPN Server Configuration
- VPN Group Monitoring
- Easy VPN Server Configuration Example
Easy VPN Server Configuration
Many of the tasks that are configured for L2L sessions, as discussed in Chapter 17, "Router Site-to-Site Connections," also are configured for IPsec remote access sessions, including ISAKMP/IKE Phase 1 policies, transform sets, dynamic crypto maps, and static crypto maps. Because I've already discussed these commands in Chapters 16 and 17, I'll only focus on the Easy VPN Server commands in the following sections. After this, I'll put all of these components together (from this and the previous two chapters) in an Easy VPN Server example.
Defining AAA
AAA (authentication, authorization, and accounting) is used to restrict traffic to or through a router. Easy VPN uses AAA to implement group policies and authorization and also for XAUTH (user) authentication. This section will focus on only the basics of AAA in regard to its use with an Easy VPN Server: for more detailed information on using AAA on a Cisco router, read my book entitled Cisco Router Firewall Security published by Cisco Press (ISBN 1587051753).
The group and user information used by an Easy VPN Server to restrict IPsec access and authenticate users can be defined locally on the router or on an AAA server using RADIUS as a communication protocol. For a small number of users and a single router terminating the IPsec remote access sessions, I would define the group and user information locally on the router; if you have more than one router at a location where users will terminate their remote access sessions, I would centralize the configuration and management of group and user information by using an AAA RADIUS server such as Cisco Secure Access Control Server (CSACS).
The commands used to set up AAA for an Easy VPN Server include the following:
Router(config)# aaa new-model
Router(config)# aaa authentication login authentication_list_name
 method1 [method2...]
Router(config)# username user's_name {password| secret} password
Router(config)# radius-server host AAA_IP_address [auth-port port_#]
 [acct-port port_#] key AAA_key_string
Router(config)# aaa authorization network authorization_list_name
 method1 [method2...]
The aaa new-model command enables AAA on a router. The aaa authentication login command sets up authentication of usernames and passwords for XAUTH. The list_name parameter needs to match the same parameter in the crypto map map_name client authentication list list_name command, discussed later in the "Creating a Static Crypto Map and XAUTH" section.
The two methods you can list in aaa authentication login command are local or group radius. Methods define how authentication will be done. If you specify local, you must define the usernames and passwords on the router manually, using the username command. Using the secret parameter with this latter command will encrypt the user's password on the router automatically. If you specify group radius, an AAA RADIUS server is used to authenticate the user's username and password. You'll need to define the AAA RADIUS server with the radius-server command. If you don't specify the authentication/authorization (auth-port) or accounting (acct-port) ports, they default to 1,645 and 1,646, respectively, which is what CSACS uses; other implementations sometimes use 1,812 and 1,813, respectively. The key parameter specifies the encryption key used to encrypt any passwords sent between the router and AAA RADIUS serverthis must match the key used on the AAA RADIUS server. You also can specify two methods for redundancy, such as local group radius or group radius local. The router will process the methods in the order listed.
The aaa authorization network command specifies that AAA will be used to handle the IPsec remote access group functions. In this command, the authorization_list_name parameter needs to match the list name configured in with the crypto map static_map_name isakmp authorization list command (discussed in the "Creating a Static Crypto Map and XAUTH" section later in the chapter). Like the aaa authentication login command, you can specify up to two methods to determine how group authorization will be done: local or group radius. If you choose local, you must define the group locally on the router, including its properties; if you choose group radius, the group must be defined on the AAA RADIUS server.
Note
Currently only an AAA server supporting the RADIUS communication protocol is supported for user and group functions on an Easy VPN Server: TACACS+ is not.
Creating Groups
If you have chosen the local authorization method in the aaa authorization network command, you must define your groups locally on the router. You can use the following commands to create a group on the Easy VPN Server for your users:
Router(config)# ip local pool pool_name first_IP_address
 last_IP_address
Router(config)# crypto isakmp client configuration address-pool
 local pool_name
Router(config)# crypto isamkp client configuration group
 {group_name | default}
Router(config-isakmp-group)# key pre_shared_key
Router(config-isakmp-group)# pool pool_name
Router(config-isakmp-group)# domain domain_name
Router(config-isakmp-group)# dns 1st_DNS_server [2nd_DNS_server]
Router(config-isakmp-group)# split-dns domain_name
Router(config-isakmp-group)# wins 1st_WINS_server [2nd_WINS_server]
Router(config-isakmp-group)# include-local-lan
Router(config-isakmp-group)# acl ACL_name_or_#
Router(config-isakmp-group)# firewall are-u-there
Router(config-isakmp-group)# backup-gateway {IP_address | hostname}
Router(config-isakmp-group)# save-password
Router(config-isakmp-group)# pfs
Router(config-isakmp-group)# max-logins #_of_simultaneous_logins
Router(config-isakmp-group)# max-users #_of_users
Router(config-isakmp-group)# access-restrict interface_name
Router(config-isakmp-group)# group-lock
Router(config-isakmp-group)# exit
The ip local pool command specifies an address pool to use to assign internal addresses to remote access users. You must assign a name to the pool, and a beginning and ending address for the pool.
The crypto isakmp client configuration address-pool command allows you to associate an address pool created by the ip local pool command with remote access usage. If a particular remote access group doesn't specify an address pool, this pool is used. Using this command allows multiple groups to share the same address pool; however, you can create different pools for different groups with the pool subcommand for a group (discussed later in this section).
The crypto isakmp client configuration group command creates your users' groups locally on a router. This is necessary if you specified the local method for the aaa authorization network command. To create a specific group, just use the name of the group with the crypto isakmp client configuration group command. You can create a default group by using the default parameter instead of a group name: if users don't specify what group they belong to, the default group will then be used. After you execute the crypto isakmp client configuration group command, you are taken into a subcommand mode where you can enter the group's properties.
The key command creates a pre-shared key to be used for the group's authentication. The user must specify the group name and this key to authenticate with the group. If you don't configure the key command, digital certificates are used for device authentication.
Tip
If you'll be using digital certificates for remote access device authentication, the name of the group must be in the Organizational Unit (OU)/Department field.
The pool command specifies the pool of addresses that will be used to assign internal addresses to clients for this specific group. The name specified with this command must match the name configured in the ip local pool command. You can assign only one address pool to a group.
Note
If you forget to assign an address pool to the group or create a global address pool, clients attempting to build a remote access session to the router will fail.
The domain command specifies the domain name to assign to the client, like "cisco.com" or "ciscopress.com." This overrides the domain name already manually or dynamically assigned on the remote access client. The dns command allows you to assign up to two DNS servers to the client; just specify the IP addresses, separated by a space, after the dns command. The assignment of these to the client overrides any DNS servers currently configured on the client.
The split DNS feature was added in IOS 12.3(4)T. This allows some DNS queries to be forwarded to the DNS servers specified in the dns command and other DNS queries to be handled by the DNS servers either manually defined or dynamically acquired on the client (like from the ISP's DHCP assignment). Split DNS is enabled with the split-dns command. For domains that you want users to resolve using the DNS servers listed in the dns command, list those domains with the split-dns command. If you have multiple domains you want these servers to resolve, list them in separate split-dns commands. For domains not listed in the split-dns commands, the user's locally defined DNS servers will be used to perform the resolution.
If you use WINS in a Microsoft-centric environment, you can use the wins command to assign up to two WINS server addresses to the remote access client: these addresses will override any locally configured WINS server addresses on the client.
The include-local-lan command allows clients of the group to access the local LAN segment in clear text, while all other traffic must be sent protected to the Easy VPN Server. This feature is new in IOS 12.3(2)T. With Cisco VPN Client software, you also must enable this feature on the client to allow clear-text local LAN access.
The acl command allows you to set up more complex split-tunnel configurations. With this command, you reference the name or number of an extended IP ACL that specifies what is to be protected. permit commands specify traffic to be protected by the tunnel; deny commands or the implicit deny specifies traffic to be sent in clear text by the client.
Example 18-1 illustrates an ACL that will be used for split tunneling. The configuration of the ACL can be somewhat confusing, since you would think that the source address would be the client and the destination is the place the client is trying to reach; however, this is not true. The ACL is configured from the router's perspective. In Example 18-1, any client traffic (listed as the destination address in the ACL), when sent to 192.168.0.0/24 (the source address in the ACL), will be protected. All other traffic is sent in clear text.
Example 18-1. Split Tunneling ACL Example
Router(config)# ip access-list extended splitengineering
Router(config-ext-nacl)# remark Protect this traffic
Router(config-ext-nacl)# permit ip 192.168.0.0 0.0.0.255 any
Router(config-ext-nacl)# remark Send all other traffic in clear-text
Router(config-ext-nacl)# deny ip any any
Tip
Remember that when setting up your split tunneling ACL on your router, the source address in the ACL is what the client is trying to reach and the destination address represents the client itself. In Example 18-1, you could easily have replaced the keyword any for the destination address with the range of addresses in the client address pool for the group using this split tunneling ACL.
As of IOS 12.3(2)T, Cisco routers, as Easy VPN Servers, support the Are You There (AYT) firewall feature, which allows you to have the Cisco VPN Client software (Windows-only) poll periodically for the operation of a supported firewall. I discussed the AYT feature in Chapter 7, "Concentrator Remote Access Connections with IPsec." This feature is enabled with the firewall are-u-there command. Unlike the concentrators, you cannot specify which firewall the group should be running; nor does the router, acting as a server, support Central Policy Push (CPP). The AYT feature on Cisco routers currently supports Black ICE or Zone Alarm personal firewalls.
Note
You should enable the AYT feature for an Easy VPN Server group only if that group contains the Cisco VPN Client for Windows clients; otherwise, other IPsec software clients will have their remote access sessions dropped.
As of 12.3(4)T, the router can push down a list of up to 10 backup Easy VPN Servers to a connecting Easy VPN Remote. The backup servers are configured with the backup-gateway command. Each backup server must be listed with a separate backup-gateway command, where in each command you can list either the IP address of the Easy VPN Server or its FQDN.
By default, Easy VPN Remote devices cannot save their username's XAUTH password locally. In IOS 12.3(2)T, you can enable this function with the save-password command. When enabled, after the client connects and receives this policy during IKE Mode Config, on a subsequent connection to the Server, the client is allowed to store the password locally when prompted for its XAUTH credentials. Please note that this feature will not work with one-time passwords, such as those derived from token cards.
Caution
Using the save password feature could present a security risk if the client's device becomes compromised. Therefore its use should be evaluated carefully before enabling it; however, it is commonly used on hardware clients like the VPN 3002 and low-end PIXs and routers when configured for unit, or the default, authentication method.
The pfs command, new in IOS 12.3(4)T, allows the use of Perfect Forward Secrecy (PFS) by clients. If you recall from Chapter 3, "IPsec," PFS is an alternative to sharing keying information for the two unidirectional data connections instead of the existing management connection. PFS is more secure because it uses DH, which supports larger key sizes than DES, 3DES, or AES. The DH key group used will be the same one negotiated by the Server and Remote during ISAKMP/IKE Phase 1.
The max-logins and max-users commands allow you to implement a simple form of call admission control (CAC). Both of these commands were introduced in IOS 12.3(4)T. They allow you to place limits on the maximum number of simultaneous logins and user sessions for a particular group. This might be necessary on lower-end routers where you don't want users from one group using up all of the IPsec sessions that the router supports.
With IPsec remote access CAC, you place connection limits on a group-by-group basis. The max-logins command specifies the maximum number of simultaneous logins allowed for the group (logins occurring at the same time); this ensures that if too many incoming session requests occur at the same time for a group, the router will handle only the ones up to the maximum value specified by this command. You can specify from 110 simultaneous logins. The max-users command places a limit on the maximum number of connected user sessions for a group, thereby ensuring that one group doesn't use up all of the router's IPsec sessions and starves other groups on the router. This is important for smaller-end routers functioning as Easy VPN Servers. You can specify limits from 15,000 users for a group.
You can use the access-restrict command to restrict the interface(s) that users from the group can terminate VPN sessions on. This command has meaning only when you have applied a crypto map for the remote access users to more than one interface on the router, or have more than one crypto map applied to interfaces on the router, but only want the users to use one of the interfaces for their remote access connections. The name of the interface you specify with this command restricts the Easy VPN Remotes of the associated group to terminating their connections on only that interface. When enabled, if a user from the group attempts to set up an IPsec session to another interface, the router drops the connection attempt. You can define multiple interfaces for a group, but each interface must be defined with a separate access-restrict command.
The group lock feature, new in IOS 12.2(13)T, allows you to perform an extra authentication check during XAUTH. With this feature enabled, the user must enter user name, group name, and user password during XAUTH to authenticate. The user and group names can be entered in any of the following formats: "user's name/group name," "user's namegroup name," "user's name%group name," or "user's name©group name." The group name entered during XAUTH is compared by the Server with the group name sent for pre-shared key device authentication. If they don't match, the Server denies the connection. To enable this feature, use the group-lock command for the group.
Note
Group locking only works with pre-shared key authentication. If you enable this command for users who use digital certificates, XAUTH authentication will fail.
Implementing Call Admission Control for IKE
I discussed two generic forms of CAC for groups in the last section: the max-logins and max-users subcommands. However, both of these require an initial management connection dialog to be established between the Remote and Server, which can tie up resources on the router. In 12.3(8)T, Cisco introduced CAC for IKE to help deal with this problem. Actually, CAC for IKE can be used for both L2L and remote access sessions; however, it is best suited with remote access scenarios where you have many users who connect at random times.
CAC for IKE supports two methods of limiting the number of ISAKMP/IKE Phase 1 SAs being established to or from a router:
- Setting an absolute limit to the number of IKE SAs with the crypto call admission limit commandonce the configured limit is reached, all new IKE Phase 1 SA requests are dropped.
- Setting a resource limit with the call admission limit commandnew IKE SA requests are dropped once the specified percentage of system resources is reached. A global resource monitor keeps track of the CPU cycles and memory buffers on the router, which CAC polls when a new IKE Phase 1 connection is requested.
To define an absolute limit for the number of ISAKMP/IKE Phase 1 SAs the router will accept or build, use the following command:
Router(config)# crypto call admission limit ike sa #_of_IKE_SAs
The number of ISAKMP/IKE Phase 1 SAs you specify must be greater than one and should be less than what the router physically supports for VPN sessions. If you specify a number that is lower than the current number of existing management SAs on the router, the router will display a warning message, but won't remove any of the existing SAs: only new ISAKMP/IKE Phase 1 SAs will be rejected.
To define a resource limit for new ISAKMP/IKE Phase 1 SAs, use the following command:
Router(config)# call admission limit percentage
The percentage can range from 1100. Once the limit is reached, no new ISAKMP/IKE Phase 1 SAs are allowed. If you're not sure what you should set this value to, Cisco recommends you set it to 90 percent to start with and examine the effect this has on the router and ISAKMP/IKE Phase 1 connection attempts.
Note
The configurations of the crypto call admission limit ike sa and call admission limit commands are independent of each other; you can configure one or both.
You can use two show commands to verify the configuration and operation of CAC for IKE:
- show call admission statistics
- show crypto call admission statistics
Example 18-2 illustrates the use of the show call admission statistics command. Table 18-1 explains the fields in the output of this command.
Example 18-2. The show call admission statistics Command
Router# show call admission statistics
Total call admission charges: 0, limit 90
Total calls rejected 0, accepted 11
Load metric: charge 0, unscaled 0%
|
Field |
Description |
|---|---|
|
Total call admission charges |
This is the percentage of system resources used on the router; once this reaches the system resource limit configured in the call admission limit command, new ISAKMP/IKE Phase 1 SAs are rejected. |
|
Limit |
This is the maximum percentage of system resources specified by the call admission limit command. |
|
Total calls rejected |
This is the number of ISAKMP/IKE Phase 1 SAs that were rejected because the resource limit was reached. |
|
Accepted |
This is the number of ISAKMP/IKE Phase 1 SAs that were accepted because the resource limit wasn't reached. |
|
Unscaled |
This is unrelated to ISAKMP/IKE Phase 1 connections. |
Example 18-3 illustrates the use of the show crypto call admission statistics command. This command provides more details than the show call admission statistics command; here you can see the resource limit (95 percent), the maximum number of allowed SAs (500), and a breakdown of SAs for total, incoming, outgoing, and rejected. In Example 18-3, there were 11 incoming ISAKMP/IKE Phase 1 requests, and all were accepted.
Example 18-3. The show crypto call admission statistics Command
Router# show crypto call admission statistics
 Crypto Call Admission Control Statistics
System Resource Limit: 95 Max IKE SAs: 500
Total IKE SA Count: 0 active: 0 negotiating: 0
Incoming IKE Requests: 11 accepted: 11 rejected: 0
Outgoing IKE Requests: 0 accepted: 0 rejected: 0
Rejected IKE Requests: 0 rsrc low: 0 SA limit: 0
Use the clear crypto call admission statistics command to clear the counters that track the number of rejected and accepted ISAKMP/IKE Phase 1 SAs.
Creating a Dynamic Crypto Map Entry
Because an Easy VPN Server doesn't know the IP address of an Easy VPN Remote until the Remote connects, a dynamic crypto map is needed to handle the building of the remote access session. I discussed dynamic crypto maps in Chapter 17, "Router Site-to-Site Connections," so I won't go into a lot of details about their configuration; instead, I'll only focus on those commands that are important for Easy VPN Remote sessions:
Router(config)# crypto dynamic-map dynamic_map_name sequence_#
Router(config-crypto-m)# set transform-set transform_set_name1
 [transform-set-name2...transform-set-name6]
Router(config-crypto-m)# set security-association lifetime
 {seconds seconds | kilobytes kilobytes}
Router(config-crypto-m)# set security-association idle-time seconds
Router(cofnig-crypto-m)# reverse-route
Router(config-crypto-m)# exit
I've already talked about all of these commands in Chapter 17 with the exception of reverse-route. The only required command is the set transform-set command, which specifies how the data connections will be protected.
The reverse-route command enables Reverse Route Injection (RRI). When you enable this command, the client's internal IP address (client mode) or the client's private/inside interface network number (network extension mode) is entered as a static route in the router's routing table. You can then take these static routes and redistribute them via a dynamic routing protocol with the redistribute static command within the dynamic routing protocol. This process is necessary if you have multiple Easy VPN Servers and you don't know which Server a Remote will connect to. Using this process allows internal routers and other devices behind the Easy VPN Servers to learn dynamically which Easy VPN Server has which clients connected to it. The RRI process was discussed in depth in Chapter 3, "IPsec."
Creating a Static Crypto Map and XAUTH
Once you have created your dynamic crypto map entry for your Easy VPN Remote users, you need to set up XAUTH and your static crypto map. First you must create a static crypto map and reference the dynamic crypto map as an entry within the static map:
Router(config)# crypto map static_map_name seq_# ipsec-isakmp
 dynamic dynamic_map_name
I discussed this process in depth in Chapter 17, "Router Site-to-Site Connections."
Note
If you have both L2L and remote access sessions being terminated on an Easy VPN Server, be sure that the dynamic crypto map entry in the static map has the highest sequence number, thus giving it the lowest priority; this ensures that static entries are used by L2L sessions.
Next, you'll configure the following commands:
Router(config)# crypto map static_map_name isakmp authorization
 list authorization_list_name
Router(config)# crypto map static_map_name client authentication
 list authentication_list_name
Router(config)# crypto map static_map_name client configuration
 address [initiate | respond]
Router(config)# crypto isakmp xauth timeout seconds
The crypto map static_map_name isakmp authorization list command specifies the aaa authorization network command to use to find the remote access group(s) configuration: the router looks for matching authorization_list_name values. If the method list is defined as local in the aaa authorization network command, the router looks for the group attributes locally; if you have specified group radius, the router looks for the group configuration on an AAA server.
The crypto map static_map_name client authentication list specifies the aaa authentication login command to use to authenticate users. The latter command tells the router to look for the user accounts on an AAA RADIUS server (a method list of group radius) or on the router itself (a method list of local specifies that the user accounts and passwords are defined locally with the username command).
The crypto map static_map_name client configuration address command specifies whether the Server initiates IKE Mode Config (initiate parameter) or the Remote initiates it (respond parameter). The Cisco VPN Client software and Easy VPN Remote hardware clients initiate IKE Mode config. The old Cisco Secure 1.1 VPN and Microsoft's L2TP/IPsec clients don't. Therefore, in most cases you'll need to configure just the respond parameter. If you have a mixture of both types of clients, enter the command twice: with one command specify the respond parameter and the other the initiate parameter.
By default, users have 60 seconds to enter their usernames and passwords during XAUTH. You can change this value with the crypto isakmp xauth timeout command. The time can range from 590 seconds. I recommend setting this value to 30 seconds or less unless you're using one-time passwords (OTP) and the passwords are quite lengthy.
VPN Group Monitoring
You can use two commands to monitor remote access groups and their sessions (new in IOS 12.3(4)T):
- show crypto session group Shows the groups on the router that are currently active and the number of active users for that group. See Example 18-4.
- show crypto session summary Shows the groups on the router that are currently active and the users that have authenticated via each group. See Example 18-5.
Example 18-4. The show crypto session group Command
Router# show crypto session group
 Group: Connections
 engineering: 0
 sales: 0
 admin: 2
Example 18-5. The show crypto session summary Command
Router# show crypto session summary
 Group admin has 2 connections
 User (Logins)
 rdeal (1)
 nillarionova (1)
Easy VPN Server Configuration Example
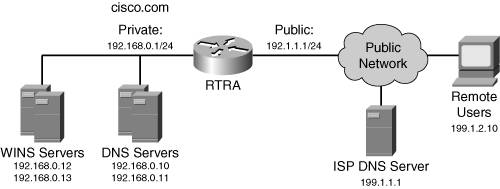
Now that you understand the configuration of the Easy VPN Server functionality on a router, I'll illustrate the complete configuration by looking at an example network shown in Figure 18-1. Assume that the Cisco VPN Client 4.x software is used by the remote access users.
Figure 18-1. Easy VPN Server Example Network
The Easy VPN Server's configuration is shown in Example 18-6. Numbered references to the right of configuration commands are discussed is the list following Example 18-6.
Example 18-6. Easy VPN Server Example Configuration
RTRA(config)# aaa new-model (1) RTRA(config)# aaa authentication login vpnclient local RTRA(config)# aaa authorization network localgroups local RTRA(config)# username rdeal secret rdeal123 RTRA(config)# username nillarionova secret nilla123 RTRA(config)# username smarcinek secret smarc123 RTRA(config)# username edeal secret edeal123 RTRA(config)# !output omitted
images/U2192.jpg border=0> RTRA(config)# crypto isakmp policy 10 (2) RTRA(config-isakmp)# encryption aes 128 RTRA(config-isakmp)# hash sha RTRA(config-isakmp)# authentication pre-share RTRA(config-isakmp)# group 2 RTRA(config-isakmp)# exit RTRA(config)# crypto isakmp keepalive 20 3 RTRA(config)# ip local pool enginepool 192.168.0.200 (3) 192.168.0.219 RTRA(config)# ip local pool adminpool 192.168.0.220 192.168.0.239 RTRA(config)# ip access-list extended splitremote (4) RTRA(config-ext-nacl)# permit ip 192.168.0.0 0.0.0.255 any RTRA(config-ext-nacl)# exit RTRA(config)# crypto isakmp client configuration group (5) engineering RTRA(config-isakmp-group)# key engine123 RTRA(config-isakmp-group)# pool enginepool RTRA(config-isakmp-group)# domain cisco.com RTRA(config-isakmp-group)# dns 192.168.0.10 192.168.0.11 RTRA(config-isakmp-group)# wins 192.168.0.12 192.168.0.13 RTRA(config-isakmp-group)# include-local-lan RTRA(config-isakmp-group)# firewall are-u-there RTRA(config-isakmp-group)# max-logins 1 RTRA(config-isakmp-group)# exit RTRA(config)# crypto isakmp client configuration group admin RTRA(config-isakmp-group)# key admin123 RTRA(config-isakmp-group)# pool adminpool RTRA(config-isakmp-group)# domain cisco.com RTRA(config-isakmp-group)# dns 192.168.0.10 192.168.0.11 RTRA(config-isakmp-group)# split-dns cisco.com RTRA(config-isakmp-group)# wins 192.168.0.12 192.168.0.13 RTRA(config-isakmp-group)# acl splitremote RTRA(config-isakmp-group)# firewall are-u-there RTRA(config-isakmp-group)# max-logins 1 RTRA(config-isakmp-group)# exit RTRA(config)# crypto ipsec transform-set clienttransform (6) esp-aes esp-sha-hmac RTRA(cfg-crypto-tran)# exit RTRA(config)# crypto dynamic-map dynmap 10 (7) RTRA(config-crypto-m)# set transform-set clienttransform RTRA(config-crypto-m)# exit RTRA(config)# crypto map mymap client authentication (8) list vpnclient RTRA(config)# crypto map mymap isakmp authorization (9) list localgroups RTRA(config)# crypto map mymap client configuration (10) address respond RTRA(config)# crypto map mymap 1000 ipsec-isakmp dynamic dynmap (11) RTRA(config)# interface Ethernet0/0 RTRA(config-if)# description Local LAN RTRA(config-if)# ip address 192.168.0.1 255.255.255.0 RTRA(config-if)# exit RTRA(config)# interface Ethernet0/1 RTRA(config-if)# description Internet Connection RTRA(config-if)# ip address 192.1.1.1 255.255.255.0 RTRA(config-if)# crypto map mymap (12)
|
1. |
The beginning part of Example 18-6 enables AAA and specifies that the Easy VPN Remotes' usernames and passwords (aaa authentication login and username commands), and the groups (aaa authorization network commands) are defined locally. |
|
2. |
A compatible ISAKMP/IKE Phase 1 policy for the VPN Client software is defined and DPD is enabled. |
|
3. |
Two local address pools are defined (ip local pool commands) and are referenced in their respective groups (pool commands). |
|
4. |
This extended ACL is used for split tunneling by the admin group. |
|
5. |
Two groups are definedengineering and adminwith the crypto isakmp client configuration group commands. Both groups use pre-shared keys for device authentication; assign a domain name, DNS server, and WINS servers; require a supported PC firewall application; and restrict access to one simultaneous login. The engineering group allows clear-text access to the local LAN, but all other traffic must be tunneled to the Easy VPN Server. The admin group sets up split DNS (split-dns command), with DNS queries for only cisco.com being sent to the central office DNS server and all other DNS queries being forwarded to the ISP DNS server. The admin group also sets up split tunneling (acl and ip access-list commands), where only traffic sent to 192.168.0.0/24 is protected and all other traffic is sent in clear text. |
|
6. |
One transform set is defined for the Remote data connections (crypto ipsec transform-set). |
|
7. |
A dynamic crypto map is created for the remote access users. RRI is not configured because there is only one Easy VPN Server and redundancy is not necessary. If there were other routers behind RTRA, because the address pools are associated with RTRA's private interface, no additional routing configuration would be required; however, if you used IP addresses that were not associated with a physical interface of RTRA, the internal routers would need static routes pointing to RTRA to reach these "internal" addresses. Make sure that proxy ARP is enabled on RTRA's internal interface. |
|
8. |
A static crypto map called "mymap" is created. XAUTH authentication is enabled (crypto map mymap client authentication list) and references the aaa authentication login command to determine where to find the user accounts. |
|
9. |
The remote access groups are associated with the crypto map (crypto map mymap isakmp authorization list), telling the router where to find the group attributes. This command references the aaa authorization network statements that tell the router that the groups are defined locally. |
|
10. |
Because the Remotes are Cisco 4.x clients and they'll initiate IKE Mode Config, I've configured the Server to respond to IKE Mode Config queries (crypto map mymap client configuration address respond). |
|
11. |
The dynamic crypto map is referenced in a static crypto map (crypto map mymap 1000 ipsec-isakmp dynamic dynmap). |
|
12. |
The static crypto map is applied to Ethernet 0/1 (crypto map mymap). |
As you can see from this example, the configuration is not that complex, even though the configuration is more complicated than an L2L router session.
Part I: VPNs
Overview of VPNs
- Overview of VPNs
- Traffic Issues
- VPN Definition
- VPN Components
- VPN Designs
- VPN Implementations
- VPNs: Choosing a Solution
- Summary
VPN Technologies
IPsec
PPTP and L2TP
SSL VPNs
Part II: Concentrators
Concentrator Product Information
- Concentrator Product Information
- Concentrator Models
- Concentrator Modules
- Concentrator Features
- Introduction to Accessing a Concentrator
- Summary
Concentrator Remote Access Connections with IPsec
- Concentrator Remote Access Connections with IPsec
- Controlling Remote Access Sessions to the Concentrator
- IPsec Remote Access
- Network Access Control (NAC) for IPsec and L2TP/IPsec Users
- Summary
Concentrator Remote Access Connections with PPTP, L2TP, and WebVPN
- Concentrator Remote Access Connections with PPTP, L2TP, and WebVPN
- PPTP and L2TP Remote Access
- WebVPN Remote Access
- Summary
Concentrator Site-to-Site Connections
- Concentrator Site-to-Site Connections
- L2L Connectivity Example
- ISAKMP/IKE Phase 1 Preparation
- Adding Site-to-Site Connections
- Address Translation and L2L Sessions
- Summary
Concentrator Management
- Concentrator Management
- Bandwidth Management
- Routing on the Concentrator
- Chassis Redundancy
- Administration Screens
- Summary
Verifying and Troubleshooting Concentrator Connections
- Verifying and Troubleshooting Concentrator Connections
- Concentrator Tools
- Troubleshooting Problems
- Summary
Part III: Clients
Cisco VPN Software Client
- Cisco VPN Software Client
- Cisco VPN Client Overview
- Cisco VPN Client Interface
- IPsec Connections
- VPN Client GUI Options
- VPN Client Software Updates
- VPN Client Troubleshooting
- Summary
Windows Software Client
- Windows Software Client
- Windows Client
- Configuring the Windows VPN Client
- Configuring the VPN 3000 Concentrator
- Microsoft Client Connections
- Troubleshooting VPN Connections
- Summary
3002 Hardware Client
- 3002 Hardware Client
- Overview of the 3002 Hardware Client
- Initial Access to the 3002
- Authentication and Connection Options
- Connection Modes
- Administrative Tasks
- Summary
Part IV: IOS Routers
Router Product Information
Router ISAKMP/IKE Phase 1 Connectivity
- Router ISAKMP/IKE Phase 1 Connectivity
- IPsec Preparation
- ISAKMP/IKE Phase 1 Policies
- ISAKMP/IKE Phase 1 Device Authentication
- Monitoring and Managing Management Connections
- Routers as Certificate Authorities
- Summary
Router Site-to-Site Connections
- Router Site-to-Site Connections
- ISAKMP/IKE Phase 2 Configuration
- Viewing and Managing Connections
- Issues with Site-to-Site Connections
- Summary
Router Remote Access Connections
- Router Remote Access Connections
- Easy VPN Server
- Easy VPN Remote
- IPsec Remote Access and L2L Sessions on the Same Router
- WebVPN
- Summary
Troubleshooting Router Connections
- Troubleshooting Router Connections
- ISAKMP/IKE Phase 1 Connections
- ISAKMP/IKE Phase 2 Connections
- New IPsec Troubleshooting Features
- Fragmentation Problems
- Summary
Part V: PIX Firewalls
PIX and ASA Product Information
- PIX and ASA Product Information
- PIX Deployment Scenarios
- PIX and ASA Feature and Product Overview
- Summary
PIX and ASA Site-to-Site Connections
- PIX and ASA Site-to-Site Connections
- ISAKMP/IKE Phase 1 Management Connection
- ISAKMP/IKE Phase 2 Data Connections
- L2L Connection Examples
- Summary
PIX and ASA Remote Access Connections
- PIX and ASA Remote Access Connections
- Easy VPN Server Support for 6.x
- Easy VPN Remote Support for 6.x
- Easy VPN Server Support for 7.0
- Summary
Troubleshooting PIX and ASA Connections
- Troubleshooting PIX and ASA Connections
- ISAKMP/IKE Phase 1 Connections
- ISAKMP/IKE Phase 2 Connections
- Summary
Part VI: Case Study
Case Study
Index
EAN: 2147483647
Pages: 178
